![- Preheat the oven to 400°F (200°C). - Season the chicken thighs with salt, black pepper, oregano, and thyme. Starting with the oven hot helps the chicken cook evenly. I like to use bone-in, skin-on thighs for extra flavor and moisture. The seasoning is key. Use a good amount of salt and pepper to bring out the taste. Oregano and thyme add depth and aroma. - Heat olive oil in a skillet over medium-high heat. - Sear chicken thighs skin-side down for 5-7 minutes until golden brown. Heat the olive oil until it shimmers. This ensures a great sear. Place the chicken skin-side down without moving it for the best browning. The skin turns crispy and golden, giving you a flavorful crust. - Flip the chicken, add garlic, then drizzle lemon juice and zest. - Add cherry tomatoes and spinach, then transfer skillet to the oven. - Roast for 25-30 minutes until internal temperature reaches 165°F (75°C). After searing, flip the chicken and add minced garlic. Garlic cooks fast, so stir it for just a minute. Next, drizzle fresh lemon juice and sprinkle lemon zest over the chicken for brightness. Scatter halved cherry tomatoes and fresh spinach around the chicken for color and nutrition. Transfer your skillet to the hot oven. Roast for 25-30 minutes until the chicken reaches 165°F (75°C). This ensures it’s safe and juicy. For the full recipe, check the [Full Recipe]. - Use freshly squeezed lemon juice for better taste. - Let chicken rest before serving for moistness. Fresh lemon juice adds a bright flavor. It brings out the zest in the chicken. When you squeeze the lemon, you get the best taste. I always recommend this simple step. Letting the chicken rest makes it juicy. It allows the juices to settle back into the meat. - Ensure the skillet is hot enough for a good sear, preventing sticking. - Control the heat to avoid burning garlic. A hot skillet is key for a nice sear. It locks in the juices and helps the skin crisp. If the skillet is not hot, the chicken may stick. Be mindful of the heat. Garlic burns quickly and can ruin the dish. I suggest adding garlic only after flipping the chicken. - Artfully arrange the chicken on a platter with tomatoes and spinach. - Drizzle pan juices over the dish for added flavor. When serving, arrange the chicken nicely. Place the tomatoes and spinach around it. This not only looks good but also tastes great. The pan juices add a lovely shine and flavor. You want your meal to be as pleasing to the eyes as it is to the taste buds. {{image_4}} You can easily switch ingredients in this dish. If you want a leaner meal, substitute chicken thighs with chicken breasts. They will cook faster, so keep an eye on them. You can also use other vegetables. Try adding zucchini or bell peppers for a fresh twist. Both add color and nutrients. To change the flavor, you can add red pepper flakes. This will give your dish a spicy kick that many enjoy. If you like fresh herbs, add basil or rosemary. These herbs change the taste and smell of the dish, making it unique. You can mix and match these changes to find your favorite version. For the full recipe, check the detailed instructions to get started on your delicious journey! Store your leftovers in an airtight container. This keeps the chicken fresh for up to 3 days. If you plan to eat it later, check for any signs of spoilage before you dig in. You can freeze the cooked chicken. Use a freezer-safe container and place it in the freezer. This method keeps your chicken good for up to 2 months. When you’re ready to eat, just take it out! To reheat your chicken, use the oven or a skillet. This helps keep the chicken's texture nice and moist. Try to avoid the microwave, as it can make the chicken rubbery. Enjoy the great taste of your One-Pan Lemon Garlic Chicken again! Approximately 25-30 minutes in the oven after searing. This timing allows the chicken to cook through and develop great flavor. The key is to make sure the internal temperature reaches 165°F (75°C). This ensures it's safe to eat and juicy, not dry. Yes, but adjust cooking time to ensure they're fully cooked. Boneless thighs cook faster than bone-in ones. Start checking for doneness after 20 minutes in the oven. This way, you’ll get perfectly cooked chicken without overcooking it. Serve with rice, quinoa, or a fresh salad for a complete meal. These sides balance the flavors and add texture. Rice or quinoa soak up the tasty juices, while a salad adds crunch and freshness. Enjoy your meal with these tasty options! This article covered all you need to know for making One-Pan Lemon Garlic Chicken. We explored key ingredients, step-by-step cooking methods, and helpful tips. Remember to season well and use fresh ingredients for the best taste. This dish is easy to adapt, so feel free to swap ingredients or add your favorite flavors. With proper storage, leftovers can last for days. Enjoy your cooking adventure!](https://tastyhatch.com/wp-content/uploads/2025/05/60f8fb41-3176-48f8-bb94-2e2dd6e1dead-768x768.webp)
Looking for a quick and tasty weeknight dinner? Try my One-Pan Lemon Garlic Chicken! This simple dish combines juicy chicken thighs with bright lemon, savory garlic, and fresh veggies, all cooked in one skillet. It’s easy to make and packs a ton of flavor. Let’s dive in and discover how to create this mouthwatering meal in no time!
“`markdown
H2 – Ingredients
H3 – Main Ingredients
– 4 bone-in, skin-on chicken thighs
– 2 tablespoons extra virgin olive oil
– 4 cloves garlic, finely minced
H3 – Seasoning and Flavoring
– Juice and zest of 1 large lemon
– 1 teaspoon dried oregano
– 1 teaspoon dried thyme
H3 – Additional Ingredients
– Salt and freshly ground black pepper to taste
– 1 cup cherry tomatoes, halved
– 1 cup fresh baby spinach
– Fresh parsley, chopped (optional garnish)
When I make One-Pan Lemon Garlic Chicken, I love using simple and fresh ingredients. The chicken thighs give a rich taste, while the lemon adds a bright zing. The garlic brings warmth and depth to the dish. I use fresh herbs like oregano and thyme to enhance the flavors.
The cherry tomatoes burst with sweetness as they cook, and the spinach wilts perfectly. It’s a colorful meal that looks great on the table. For a finishing touch, I often add fresh parsley. It gives a lovely pop of color and freshness.I recommend gathering all the ingredients ahead of time. This way, you can cook without stress and enjoy a delicious, flavorful meal in no time.
“`
Step-by-Step Instructions
Prepping the Chicken
– Preheat the oven to 400°F (200°C).
– Season the chicken thighs with salt, black pepper, oregano, and thyme.
Starting with the oven hot helps the chicken cook evenly. I like to use bone-in, skin-on thighs for extra flavor and moisture. The seasoning is key. Use a good amount of salt and pepper to bring out the taste. Oregano and thyme add depth and aroma.
Searing the Chicken
– Heat olive oil in a skillet over medium-high heat.
– Sear chicken thighs skin-side down for 5-7 minutes until golden brown.
Heat the olive oil until it shimmers. This ensures a great sear. Place the chicken skin-side down without moving it for the best browning. The skin turns crispy and golden, giving you a flavorful crust.
Combining Ingredients and Baking
– Flip the chicken, add garlic, then drizzle lemon juice and zest.
– Add cherry tomatoes and spinach, then transfer skillet to the oven.
– Roast for 25-30 minutes until internal temperature reaches 165°F (75°C).
After searing, flip the chicken and add minced garlic. Garlic cooks fast, so stir it for just a minute. Next, drizzle fresh lemon juice and sprinkle lemon zest over the chicken for brightness. Scatter halved cherry tomatoes and fresh spinach around the chicken for color and nutrition. Transfer your skillet to the hot oven. Roast for 25-30 minutes until the chicken reaches 165°F (75°C). This ensures it’s safe and juicy.
Tips & Tricks
Enhancing Flavor
– Use freshly squeezed lemon juice for better taste.
– Let chicken rest before serving for moistness.
Fresh lemon juice adds a bright flavor. It brings out the zest in the chicken. When you squeeze the lemon, you get the best taste. I always recommend this simple step. Letting the chicken rest makes it juicy. It allows the juices to settle back into the meat.
Cooking Techniques
– Ensure the skillet is hot enough for a good sear, preventing sticking.
– Control the heat to avoid burning garlic.
A hot skillet is key for a nice sear. It locks in the juices and helps the skin crisp. If the skillet is not hot, the chicken may stick. Be mindful of the heat. Garlic burns quickly and can ruin the dish. I suggest adding garlic only after flipping the chicken.
Presentation Suggestions
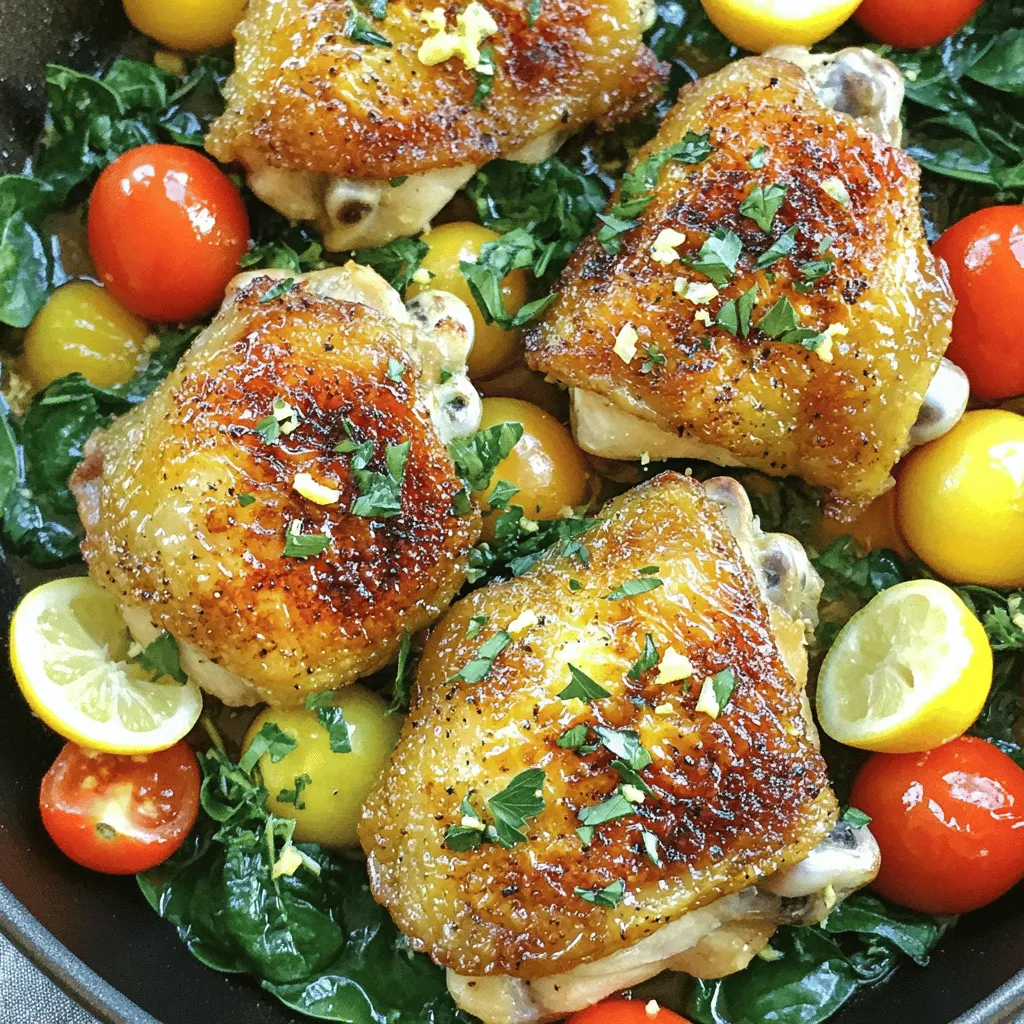
– Artfully arrange the chicken on a platter with tomatoes and spinach.
– Drizzle pan juices over the dish for added flavor.
When serving, arrange the chicken nicely. Place the tomatoes and spinach around it. This not only looks good but also tastes great. The pan juices add a lovely shine and flavor. You want your meal to be as pleasing to the eyes as it is to the taste buds.
Variations
Ingredient Swaps
You can easily switch ingredients in this dish. If you want a leaner meal, substitute chicken thighs with chicken breasts. They will cook faster, so keep an eye on them. You can also use other vegetables. Try adding zucchini or bell peppers for a fresh twist. Both add color and nutrients.
Flavor Adaptations
To change the flavor, you can add red pepper flakes. This will give your dish a spicy kick that many enjoy. If you like fresh herbs, add basil or rosemary. These herbs change the taste and smell of the dish, making it unique. You can mix and match these changes to find your favorite version.
Storage Info
Refrigeration Tips
Store your leftovers in an airtight container. This keeps the chicken fresh for up to 3 days. If you plan to eat it later, check for any signs of spoilage before you dig in.
Freezing Instructions
You can freeze the cooked chicken. Use a freezer-safe container and place it in the freezer. This method keeps your chicken good for up to 2 months. When you’re ready to eat, just take it out!
Reheating Guidelines
To reheat your chicken, use the oven or a skillet. This helps keep the chicken’s texture nice and moist. Try to avoid the microwave, as it can make the chicken rubbery. Enjoy the great taste of your One-Pan Lemon Garlic Chicken again!
FAQs
How long does it take to cook One-Pan Lemon Garlic Chicken?
Approximately 25-30 minutes in the oven after searing. This timing allows the chicken to cook through and develop great flavor. The key is to make sure the internal temperature reaches 165°F (75°C). This ensures it’s safe to eat and juicy, not dry.
Can I use boneless chicken thighs?
Yes, but adjust cooking time to ensure they’re fully cooked. Boneless thighs cook faster than bone-in ones. Start checking for doneness after 20 minutes in the oven. This way, you’ll get perfectly cooked chicken without overcooking it.
What can I serve with One-Pan Lemon Garlic Chicken?
Serve with rice, quinoa, or a fresh salad for a complete meal. These sides balance the flavors and add texture. Rice or quinoa soak up the tasty juices, while a salad adds crunch and freshness. Enjoy your meal with these tasty options!
This article covered all you need to know for making One-Pan Lemon Garlic Chicken. We explored key ingredients, step-by-step cooking methods, and helpful tips. Remember to season well and use fresh ingredients for the best taste. This dish is easy to adapt, so feel free to swap ingredients or add your favorite flavors. With proper storage, leftovers can last for days. Enjoy your cooking adventure!
![- Preheat the oven to 400°F (200°C). - Season the chicken thighs with salt, black pepper, oregano, and thyme. Starting with the oven hot helps the chicken cook evenly. I like to use bone-in, skin-on thighs for extra flavor and moisture. The seasoning is key. Use a good amount of salt and pepper to bring out the taste. Oregano and thyme add depth and aroma. - Heat olive oil in a skillet over medium-high heat. - Sear chicken thighs skin-side down for 5-7 minutes until golden brown. Heat the olive oil until it shimmers. This ensures a great sear. Place the chicken skin-side down without moving it for the best browning. The skin turns crispy and golden, giving you a flavorful crust. - Flip the chicken, add garlic, then drizzle lemon juice and zest. - Add cherry tomatoes and spinach, then transfer skillet to the oven. - Roast for 25-30 minutes until internal temperature reaches 165°F (75°C). After searing, flip the chicken and add minced garlic. Garlic cooks fast, so stir it for just a minute. Next, drizzle fresh lemon juice and sprinkle lemon zest over the chicken for brightness. Scatter halved cherry tomatoes and fresh spinach around the chicken for color and nutrition. Transfer your skillet to the hot oven. Roast for 25-30 minutes until the chicken reaches 165°F (75°C). This ensures it’s safe and juicy. For the full recipe, check the [Full Recipe]. - Use freshly squeezed lemon juice for better taste. - Let chicken rest before serving for moistness. Fresh lemon juice adds a bright flavor. It brings out the zest in the chicken. When you squeeze the lemon, you get the best taste. I always recommend this simple step. Letting the chicken rest makes it juicy. It allows the juices to settle back into the meat. - Ensure the skillet is hot enough for a good sear, preventing sticking. - Control the heat to avoid burning garlic. A hot skillet is key for a nice sear. It locks in the juices and helps the skin crisp. If the skillet is not hot, the chicken may stick. Be mindful of the heat. Garlic burns quickly and can ruin the dish. I suggest adding garlic only after flipping the chicken. - Artfully arrange the chicken on a platter with tomatoes and spinach. - Drizzle pan juices over the dish for added flavor. When serving, arrange the chicken nicely. Place the tomatoes and spinach around it. This not only looks good but also tastes great. The pan juices add a lovely shine and flavor. You want your meal to be as pleasing to the eyes as it is to the taste buds. {{image_4}} You can easily switch ingredients in this dish. If you want a leaner meal, substitute chicken thighs with chicken breasts. They will cook faster, so keep an eye on them. You can also use other vegetables. Try adding zucchini or bell peppers for a fresh twist. Both add color and nutrients. To change the flavor, you can add red pepper flakes. This will give your dish a spicy kick that many enjoy. If you like fresh herbs, add basil or rosemary. These herbs change the taste and smell of the dish, making it unique. You can mix and match these changes to find your favorite version. For the full recipe, check the detailed instructions to get started on your delicious journey! Store your leftovers in an airtight container. This keeps the chicken fresh for up to 3 days. If you plan to eat it later, check for any signs of spoilage before you dig in. You can freeze the cooked chicken. Use a freezer-safe container and place it in the freezer. This method keeps your chicken good for up to 2 months. When you’re ready to eat, just take it out! To reheat your chicken, use the oven or a skillet. This helps keep the chicken's texture nice and moist. Try to avoid the microwave, as it can make the chicken rubbery. Enjoy the great taste of your One-Pan Lemon Garlic Chicken again! Approximately 25-30 minutes in the oven after searing. This timing allows the chicken to cook through and develop great flavor. The key is to make sure the internal temperature reaches 165°F (75°C). This ensures it's safe to eat and juicy, not dry. Yes, but adjust cooking time to ensure they're fully cooked. Boneless thighs cook faster than bone-in ones. Start checking for doneness after 20 minutes in the oven. This way, you’ll get perfectly cooked chicken without overcooking it. Serve with rice, quinoa, or a fresh salad for a complete meal. These sides balance the flavors and add texture. Rice or quinoa soak up the tasty juices, while a salad adds crunch and freshness. Enjoy your meal with these tasty options! This article covered all you need to know for making One-Pan Lemon Garlic Chicken. We explored key ingredients, step-by-step cooking methods, and helpful tips. Remember to season well and use fresh ingredients for the best taste. This dish is easy to adapt, so feel free to swap ingredients or add your favorite flavors. With proper storage, leftovers can last for days. Enjoy your cooking adventure!](https://tastyhatch.com/wp-content/uploads/2025/05/60f8fb41-3176-48f8-bb94-2e2dd6e1dead-250x250.webp)
