WANT TO SAVE THIS RECIPE?
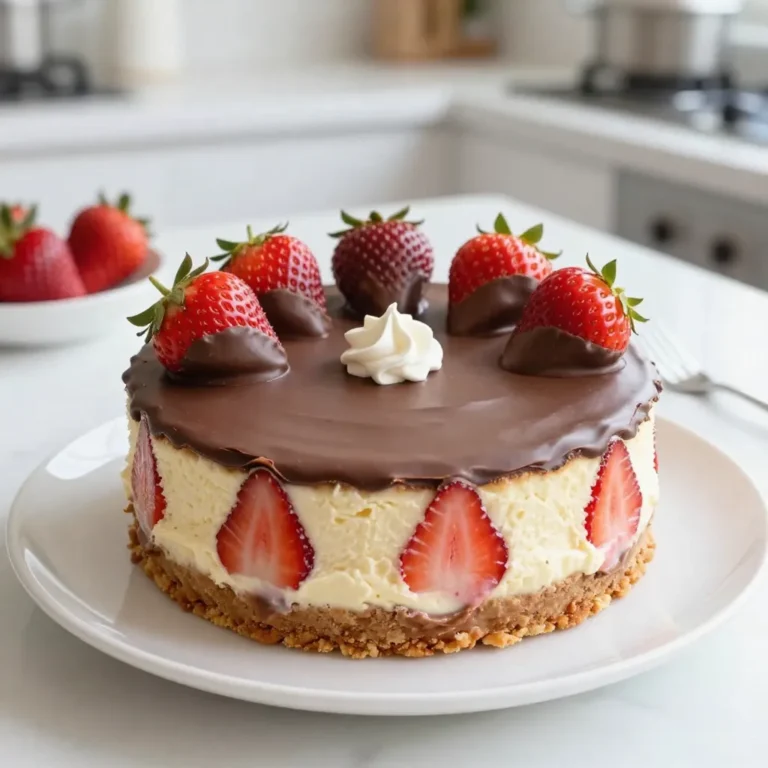
Are you ready to indulge in a dessert that combines creamy cheesecake, fresh strawberries, and rich chocolate? In Chocolate Covered Strawberry Cheesecake Delightfully Easy, I’ll guide you through a simple yet delicious recipe that will impress your friends and family. Whether you’re a baking pro or a total beginner, this step-by-step guide ensures perfection every time. Let’s dive in and create a treat that will make any occasion special!
Why I Love This Recipe
- Decadent Flavor: This cheesecake perfectly balances the rich creaminess of cheesecake with the fresh taste of strawberries, making every bite a heavenly experience.
- Visual Appeal: The chocolate-covered strawberries on top not only taste amazing but also create a stunning visual that impresses guests.
- Versatile Dessert: This cheesecake is perfect for any occasion, whether it’s a birthday, holiday, or just a special treat for yourself.
- Make Ahead: With a chill time of several hours, it’s an excellent make-ahead dessert, allowing you to prepare it in advance and enjoy stress-free entertaining.
Ingredients
List of Ingredients
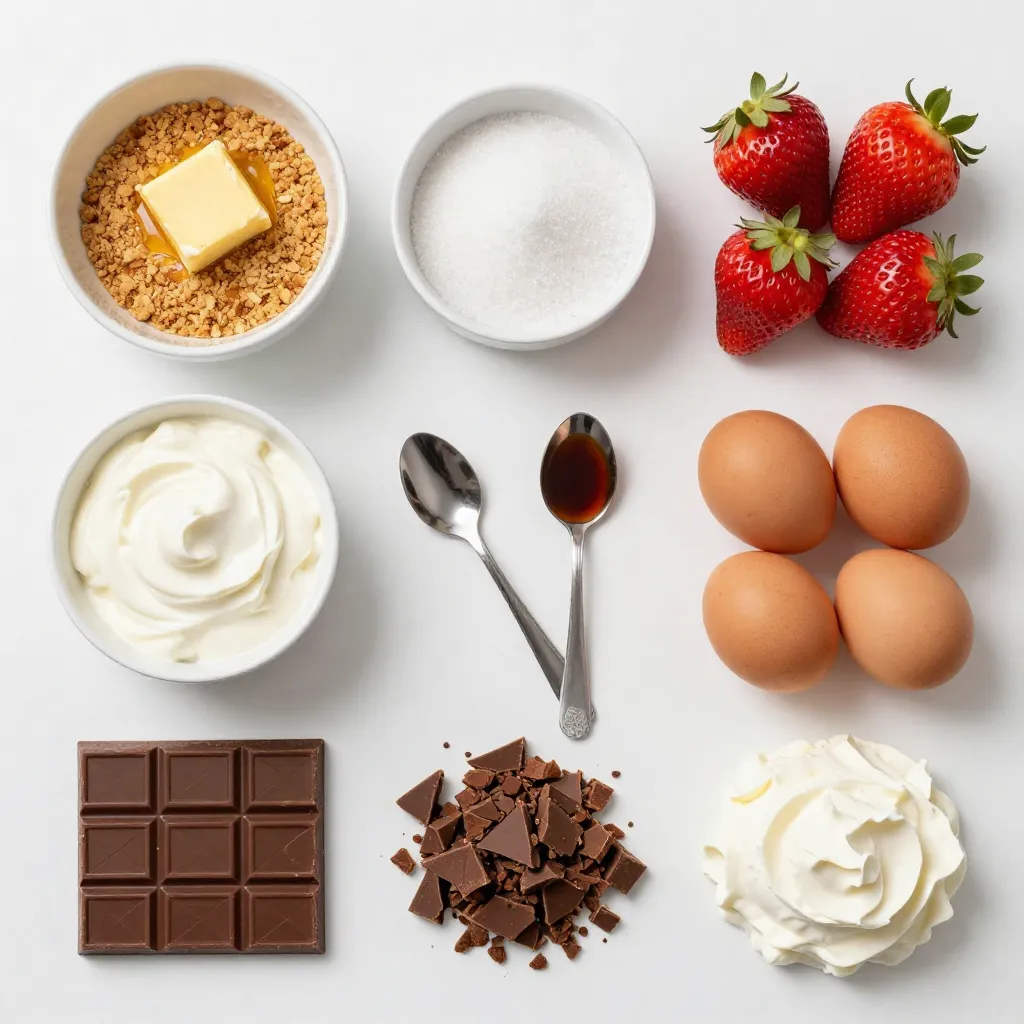
– 1 ½ cups graham cracker crumbs
– ½ cup unsalted butter, melted
– 2 tablespoons granulated sugar
– 16 oz cream cheese, softened
– 1 cup granulated sugar
– 1 teaspoon pure vanilla extract
– 3 large eggs, at room temperature
– 1 cup sour cream, at room temperature
– 1 cup fresh strawberries, pureed
– 4 oz semi-sweet chocolate, finely chopped
– 1 cup fresh strawberries, whole (for topping)
– Whipped cream (for garnish)
Helpful Ingredient Substitutions
You can swap graham cracker crumbs with crushed cookies. Try chocolate sandwich cookies for a fun twist. If you need a dairy-free option, use vegan cream cheese. This will still taste great! For a lighter version, substitute sour cream with Greek yogurt.
Special Equipment Needed
You will need a 9-inch springform pan for easy removal. A large mixing bowl helps combine the filling. An electric mixer makes it easier to achieve that creamy texture. Finally, a small saucepan is perfect for melting chocolate smoothly.

Step-by-Step Instructions
Preparing the Crust
To start, preheat your oven to 325°F (160°C). In a medium bowl, mix together these ingredients:
– 1 ½ cups graham cracker crumbs
– ½ cup unsalted butter, melted
– 2 tablespoons granulated sugar
Stir until everything blends well. Next, press this mix firmly into the bottom of a 9-inch springform pan. This makes a sturdy crust. Bake it for about 10 minutes. Look for a light golden color. Then, take it out and let it cool completely.
Making the Cheesecake Filling
Now, let’s make the filling. In a large bowl, beat 16 oz of softened cream cheese with an electric mixer. Aim for a smooth and creamy texture. Gradually add in 1 cup of granulated sugar. Keep mixing until it’s fluffy and well combined.
Next, pour in 1 teaspoon of pure vanilla extract. Then, add 3 large eggs one at a time. Make sure each egg mixes in fully before adding the next. After the eggs, stir in 1 cup of sour cream and 1 cup of pureed strawberries. Mix until everything is smooth.
Baking and Cooling the Cheesecake
Pour the cheesecake filling over the cooled crust. Use a spatula to smooth the top. For even baking, place the springform pan in a larger baking dish filled with hot water. This is called a water bath. Bake for about 50 to 60 minutes. The edges should look set, and the center should jiggle slightly.
When done, turn off the oven and crack the door open. Let the cheesecake cool in the oven for about an hour. After it cools, move it to the fridge. Chill it for at least 4 hours, or overnight for the best taste.
Tips & Tricks
Tips for Perfect Cheesecake Texture
To get a creamy cheesecake, use room temperature ingredients. This means your cream cheese, eggs, and sour cream should be warm. Mixing them at this temperature helps blend them smoothly. I suggest mixing the cream cheese first until it’s fluffy. Then add sugar slowly. This keeps the texture light and airy.
How to Avoid Cracking
Cracks can ruin your cheesecake’s look. To avoid this, make sure not to overmix your batter. Once you add the eggs, mix just until combined. Also, using a water bath helps. The steam keeps the cheesecake moist while it bakes. If you see cracks, don’t worry! You can cover them with chocolate or whipped cream.
Cooling and Chilling Recommendations
Cooling is key for the best flavor. After baking, let the cheesecake cool in the oven with the door cracked. This gentle cooling reduces the chance of cracks. Once cool, move it to the fridge. Chill it for at least four hours, but overnight is best. This time helps the flavors meld and the texture set perfectly.
Pro Tips
- Use Room Temperature Ingredients: Ensuring your cream cheese, eggs, and sour cream are at room temperature will help create a smoother cheesecake filling without lumps.
- Water Bath for Even Baking: Using a water bath will prevent the cheesecake from cracking and help it bake evenly, resulting in a creamier texture.
- Chill Overnight: For the best flavor and texture, allow the cheesecake to chill overnight. This will enhance the strawberry flavor and make slicing easier.
- Drizzle Chocolate Warm: Drizzle the melted chocolate over the cheesecake while it’s still warm for a more fluid design, allowing it to set beautifully on top.
Variations
Flavor Variations (Different Fruit Purees)
You can switch up the flavor of your cheesecake by using different fruit purees. Instead of strawberries, try:
– Raspberries for a tart kick.
– Blueberries for a sweet touch.
– Mango for a tropical vibe.
Each fruit brings a new taste and color to your cheesecake. Just blend the fruit until smooth and mix it into your cheesecake batter like you did with the strawberries.
Healthier Options (Reduced Sugar or Low-Fat Ingredients)
You can make this cheesecake a bit healthier by making simple swaps:
– Use low-fat cream cheese instead of regular cream cheese.
– Replace granulated sugar with a sugar substitute like Stevia or monk fruit.
– Swap sour cream for Greek yogurt for added protein.
These changes can help cut calories without losing the rich taste you love.
Alternative Toppings (Nuts, Caramel, etc.)
Add your own twist by using different toppings. Instead of chocolate-covered strawberries, you could try:
– Chopped nuts for crunch, like pecans or almonds.
– Caramel sauce for a sweet drizzle.
– Shredded coconut for a fun texture.
Feel free to mix and match these toppings to create your own unique dessert!
Storage Info
Best Ways to Store Leftovers
To keep your cheesecake fresh, wrap it in plastic wrap. Use an airtight container if you have one. This keeps the cheesecake from drying out or picking up other smells in the fridge. Store it in the fridge for up to five days. If you know you won’t eat it all, slice the cheesecake first. This makes it easy to grab a piece later.
Freezing Instructions
You can freeze your cheesecake for later enjoyment. First, let it cool completely. Wrap each slice in plastic wrap tightly. Then, place the wrapped slices in a freezer-safe bag or container. Label it with the date. You can freeze it for up to three months. When you’re ready to eat it, let it thaw in the fridge overnight.
Recommended Serving Timeframes
For the best taste and texture, serve the cheesecake within two days of making it. After that, the flavor may fade a bit. If you freeze it, aim to eat it within three months. This keeps the taste fresh and delightful. Always let it thaw in the fridge for a smooth texture before serving.
FAQs
What is the best way to know when cheesecake is done?
To know if your cheesecake is done, look for a few signs. Check the edges; they should be set and firm. The center should have a slight jiggle when you gently shake the pan. If the center looks wet, it needs more time. The cheesecake will firm up as it cools. Always turn off the oven and leave the door slightly open for about an hour. This helps prevent cracks.
Can I use frozen strawberries?
Yes, you can use frozen strawberries! Just be sure to thaw them first. Once thawed, drain off any extra liquid. Puree them as you would with fresh strawberries. The flavor will still be great. However, fresh strawberries give a better texture and taste for the topping. If you want the best result, stick with fresh for the garnish.
How long will the cheesecake last in the fridge?
Your cheesecake will last in the fridge for about five to seven days. Make sure to cover it well to keep it fresh. Use plastic wrap or an airtight container. If you want to keep it longer, consider freezing it. Wrapped well, it can last for up to three months in the freezer. Just thaw it overnight in the fridge when you’re ready to enjoy it again!
You learned how to make a great cheesecake from scratch. We covered ingredients, preparation, and baking tips. You can now try fun flavor twists and healthier options. Remember, perfect texture and no cracks are key. Store your leftovers well to enjoy later. Follow the steps, and you’ll have a yummy cheesecake. Now it’s time to gather your ingredients and start baking! You can impress your friends and family with your skills. Happy bakin
Chocolate Covered Strawberry Cheesecake
A delicious cheesecake topped with chocolate-covered strawberries.
Prep Time 30 minutes mins
Cook Time 1 hour hr
Total Time 6 hours hrs
Course Dessert
Cuisine American
Servings 12
Calories 350 kcal
- 1.5 cups graham cracker crumbs
- 0.5 cup unsalted butter, melted
- 2 tablespoons granulated sugar
- 16 oz cream cheese, softened to room temperature
- 1 cup granulated sugar
- 1 teaspoon pure vanilla extract
- 3 large eggs, at room temperature
- 1 cup sour cream, at room temperature
- 1 cup fresh strawberries, pureed
- 4 oz semi-sweet chocolate, finely chopped
- 1 cup fresh strawberries, whole (for topping)
- 1 serving whipped cream (for garnish)
Prepare the Crust: Preheat your oven to 325°F (160°C). In a medium mixing bowl, combine the graham cracker crumbs, melted butter, and 2 tablespoons of granulated sugar. Stir until well mixed. Press this mixture firmly and evenly into the bottom of a 9-inch springform pan, creating a solid crust. Bake for approximately 10 minutes until lightly golden, then remove from the oven and allow to cool completely.
Make the Cheesecake Filling: In a large mixing bowl, beat the softened cream cheese using an electric mixer on medium speed until it's smooth and creamy. Gradually add in 1 cup of granulated sugar, continuing to beat until well incorporated and fluffy.
Add Flavors: Mix in the pure vanilla extract. Next, add the eggs one at a time, ensuring each egg is fully incorporated before adding the next. After the eggs, blend in the sour cream and pureed strawberries until the mixture is completely smooth.
Bake the Cheesecake: Carefully pour the cheesecake filling over the cooled crust in the springform pan, using a spatula to smooth out the top. To ensure even baking, place the springform pan in a larger baking dish filled with hot water (this is called a water bath). Bake for about 50-60 minutes or until the edges are set, and the center retains a slight jiggle. Once done, turn off the oven, crack the door open, and let the cheesecake cool in the oven for about an hour.
Chill: After the cheesecake has cooled, transfer it to the refrigerator and chill for at least 4 hours or, for the best flavor and texture, overnight.
Chocolate Topping: In a small saucepan over low heat, melt the finely chopped semi-sweet chocolate, stirring constantly until it becomes smooth and glossy. Once melted, remove from heat and set aside to cool slightly.
Assemble the Cheesecake: Once the cheesecake is fully chilled, carefully remove it from the springform pan. Dip the whole fresh strawberries into the melted chocolate, allowing any excess chocolate to drip off. Arrange the chocolate-covered strawberries on top of the cheesecake in a decorative pattern.
Garnish: After placing all the strawberries, drizzle any remaining melted chocolate elegantly over the cheesecake. Let it sit for about 15 minutes to allow the chocolate to set.
Serve: Slice the cheesecake into 12 even portions and serve with a generous dollop of whipped cream on each slice for an extra touch of indulgence.
For best flavor and texture, chill overnight.
Keyword cheesecake, chocolate, dessert, strawberry
WANT TO SAVE THIS RECIPE?