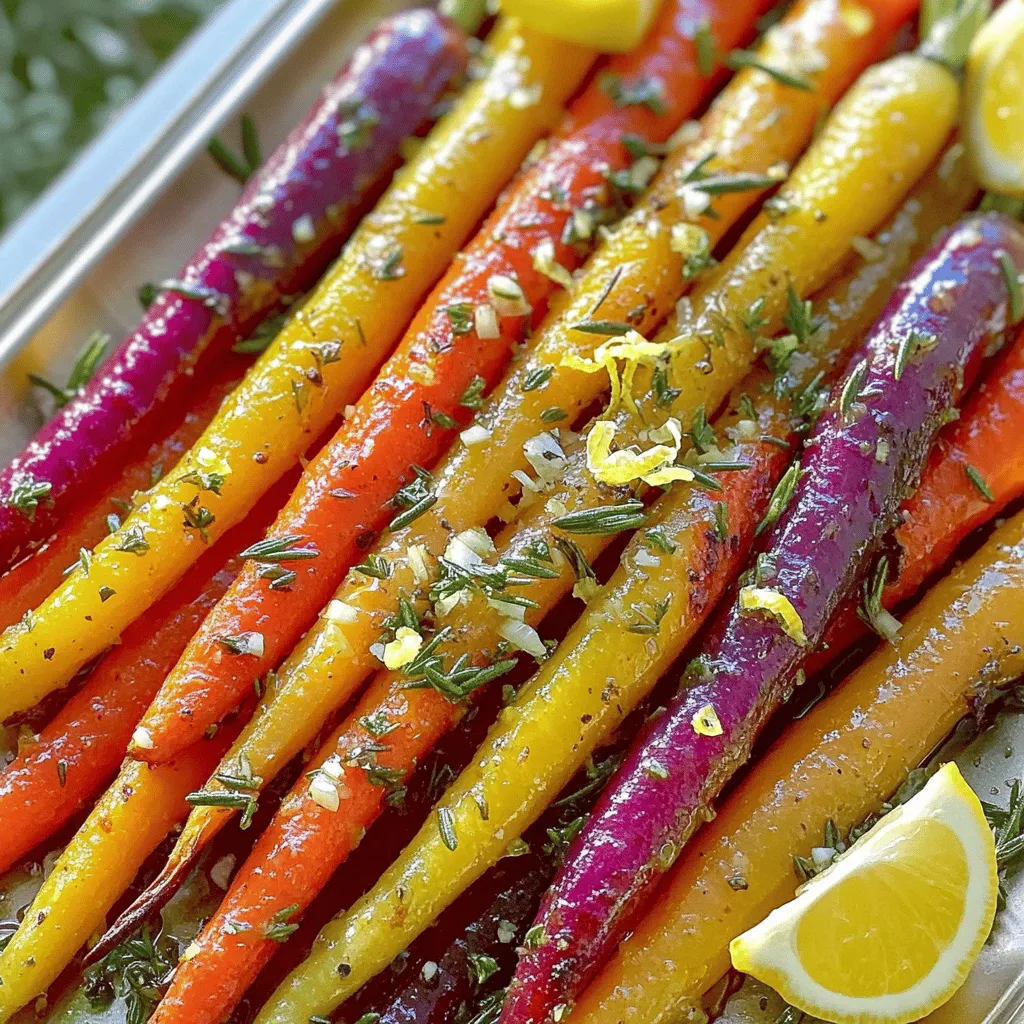
Garlic Herb Roasted Rainbow Carrots Flavorful Delight
If you want to impress your guests with a simple yet stunning dish, I have just the recipe for you!
If you want to impress your guests with a simple yet stunning dish, I have just the recipe for you!
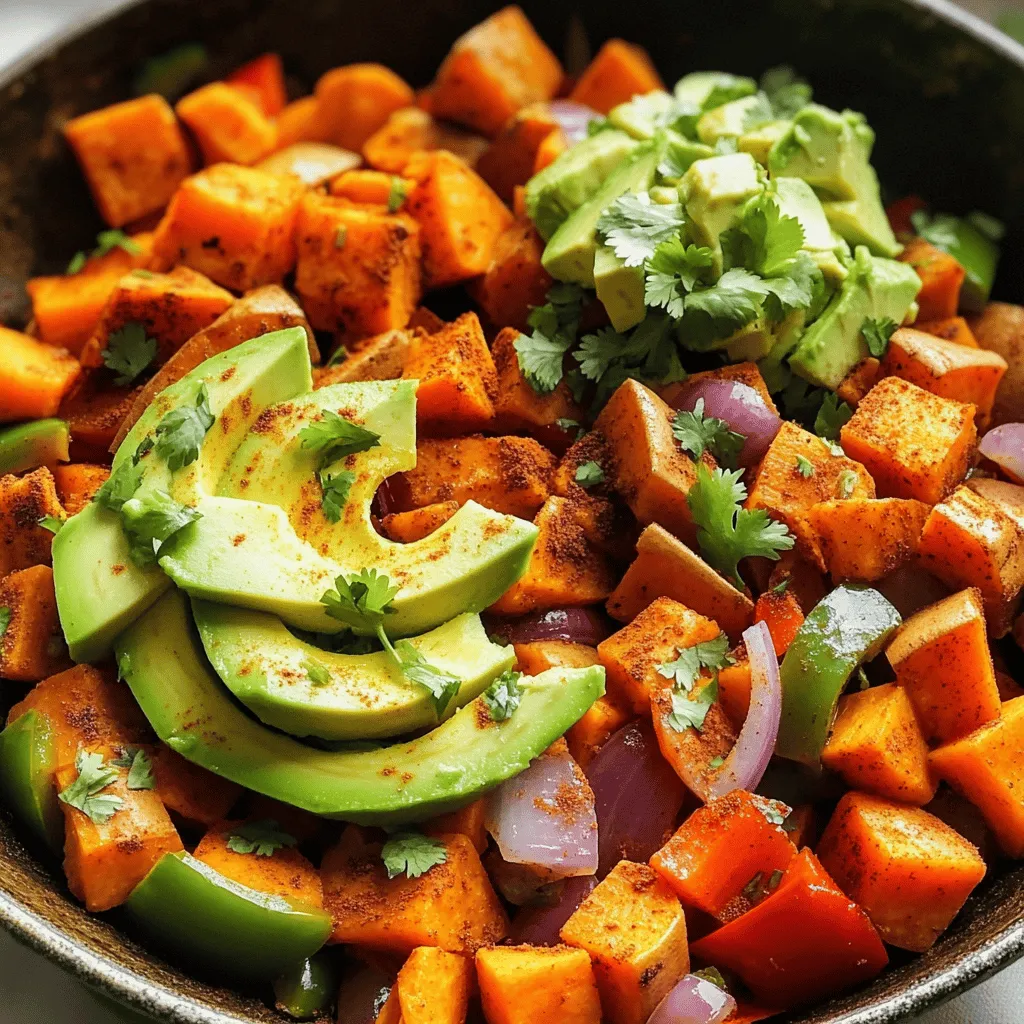
Are you ready for a meal that’s bursting with flavor and easy to make? My Southwest Sweet Potato Skillet is
. To get that perfect al dente texture, cook your pasta just right. Start by boiling a big pot of salted water. Add the spaghetti or linguine when it bubbles. Follow the instructions on the package but check it a minute or two early. You want the pasta to be firm when you bite it. Don't forget to reserve some pasta water! This water is starchy and can help your sauce stick to the pasta. Save about half a cup before draining the pasta. It’s a simple step that makes a big difference. When cooking shrimp, use medium-high heat. This keeps the shrimp juicy and tender. Too low, and they won't cook properly. Too high, and they can burn. Watch for color changes in the shrimp. They will turn pink and opaque when done. This usually takes about 2-3 minutes on each side. If they curl up tightly, they are overcooked. Adjusting seasoning is key to great flavor. Start with sea salt and freshly cracked pepper. Taste your dish as you go. If it needs more, add a bit at a time until it’s just right. For an extra zing, add more lemon. A splash of lemon juice brightens the dish. You can also try adding lemon zest for a stronger taste. It gives a fresh burst of flavor that makes this dish shine. For the full recipe, check out Lemon Garlic Shrimp Pasta Delight. Enjoy your cooking! {{image_4}} You can swap shrimp for other proteins. Chicken works great in this dish. Use boneless chicken breasts, cut into bite-sized pieces. Cook them until golden brown and fully cooked. Scallops are another tasty choice. They cook quickly and add a sweet flavor. For a vegetarian option, add seasonal vegetables. Bell peppers, zucchini, or asparagus shine in this dish. Just sauté them until tender for a colorful twist. Experiment with herbs and spices to change the taste. Fresh basil or thyme can give a new life to the dish. You might also try adding a pinch of paprika for a smoky note. Different types of pasta can change the dish too. Try penne or fettuccine if you want a different shape. Each pasta type brings its own fun texture to the plate. Need gluten-free options? Use gluten-free pasta made from rice or corn. It cooks just like regular pasta, so no worries there. If you want a low-carb meal, try zucchini noodles. Just spiralize fresh zucchini and sauté briefly. This will give you a fresh and healthy base for your dish. You can enjoy Lemon Garlic Shrimp Pasta in many ways, so feel free to get creative! To keep your Lemon Garlic Shrimp Pasta fresh, store it in an airtight container. Make sure it cools to room temperature before sealing. This helps prevent moisture build-up. It will last in the fridge for about three days. After that, the shrimp may lose its nice texture. When reheating, use a skillet over low heat. This method warms the pasta gently. Add a splash of water or olive oil to help it stay moist. Avoid the microwave; it can make the pasta mushy. Stir often to heat it evenly and keep it tasty. You can freeze Lemon Garlic Shrimp Pasta if you have extra. Place it in a freezer-safe container. It will stay good for up to two months. When ready to eat, thaw it in the fridge overnight. Reheat it on the stove, adding a little water or oil to keep it from drying out. Yes, you can prepare Lemon Garlic Shrimp Pasta ahead of time. Start by cooking the pasta and shrimp separately. - Store pasta: Keep it in an airtight container. Drizzle a little olive oil on top to prevent sticking. - Shrimp storage: Let the shrimp cool before placing it in a container. - Reheating tips: When ready to eat, reheat gently in a pan with a splash of water or broth. This keeps the shrimp tender. Lemon Garlic Shrimp Pasta pairs well with simple side dishes that enhance its flavors. - Garlic bread: A classic choice that soaks up the sauce. - Green salad: A light salad with lemon vinaigrette adds freshness. - Roasted vegetables: Seasonal veggies like asparagus or zucchini bring color and taste. To tone down the spice in Lemon Garlic Shrimp Pasta, simply adjust the red pepper flakes. - Skip the flakes: Omit them entirely for a milder dish. - Use less spice: If you want some heat, add just a pinch instead of the full amount. If you prefer not to use shrimp, there are great alternatives. - Chicken: Use diced chicken breast for a hearty swap. - Scallops: These cook quickly and offer a sweet flavor. - Vegetarian option: Try seasonal vegetables like bell peppers, mushrooms, or spinach for a fresh twist. For the full recipe and details, check the [Full Recipe]. Lemon Garlic Shrimp Pasta is a simple yet tasty dish. You need fresh shrimp, pasta, garlic, lemon, and a few key ingredients. Follow the steps to cook the best shrimp and pasta. Remember to reserve pasta water for a creamy sauce. You can switch shrimp for chicken or veggies. This dish is easy to store and reheat too. Try different flavors to make it your own. Enjoy your cooking! Simple meals like this bring happiness to the table.](https://tastyhatch.com/wp-content/uploads/2025/07/6fe21a3f-4ec9-422e-a527-0e061f86186e.webp)
Looking for a quick and tasty dish? Lemon Garlic Shrimp Pasta is your answer! This simple recipe brings bright flavors
![- 4 cups fresh broccoli florets - 1 medium onion, finely diced - 2 cloves garlic, minced - 1 medium potato, peeled and diced - 4 cups vegetable broth - 1 cup heavy cream - 2 cups sharp cheddar cheese, freshly grated - Salt and black pepper to taste - 1 teaspoon smoked paprika - Fresh chives, finely chopped (for garnish) - Additional grated cheddar cheese When making creamy broccoli cheddar soup, you need fresh, good-quality ingredients. I love using vibrant broccoli florets. They add color and nutrients. The onion and garlic create a solid base, giving the soup a great aroma. The potato helps thicken the soup and adds creaminess without too much heavy cream. For the broth, I prefer vegetable broth. It enhances the flavor without overpowering. Heavy cream is a must for richness. The sharp cheddar cheese brings a deep flavor that makes each bite special. Don't forget salt and pepper for taste. Smoked paprika adds a unique twist. For garnishes, fresh chives give a nice pop of color and flavor. You can also add more grated cheddar on top for an extra cheesy touch. If you want, check out the Full Recipe for all details. Enjoy this warm, comforting bowl of soup! - Sauté the onion and garlic in olive oil. - Add diced potato and broccoli florets. Start by heating the olive oil in a large pot over medium heat. When the oil is hot, toss in the diced onion. Sauté for about five minutes until the onion becomes soft. Then, add the minced garlic and stir for another minute. This step brings out the best flavors. Next, add the diced potato and fresh broccoli florets to the pot. Stir everything well. This mix creates a tasty base for your soup. - Pour in vegetable broth and bring to a boil. - Blend the soup for desired creaminess. Now it’s time to add the vegetable broth. Pour it in and bring the mixture to a rolling boil. Once it boils, lower the heat and let it simmer for 15 to 20 minutes. You want the broccoli and potato to be fork-tender. After the cooking time, carefully use an immersion blender to blend the soup. Blend until it reaches a smooth, creamy consistency. If you like some chunks, blend only half of the soup. This adds texture and fun to each bite. - Stir in heavy cream and cheddar cheese. - Season with salt, pepper, and smoked paprika. Raise the heat back to medium. Now, stir in the heavy cream and let the soup gently simmer again. This step makes the soup rich and velvety. Gradually sprinkle in the freshly grated cheddar cheese. Stir as you go until the cheese melts and blends smoothly. Finally, season your soup with salt, black pepper, and smoked paprika to taste. Adjust as needed for your perfect flavor. This Creamy Broccoli Cheddar Soup is ready to serve! For the full recipe, check the details above. To make your soup smooth and rich, you can use a blender. An immersion blender works great for this. Just blend until you reach your desired texture. If you want some chunks, blend only half the soup. When it comes to cream and cheese, feel free to adjust. For a richer taste, add more cheese or cream. Use sharp cheddar for a strong flavor. Fresh herbs add bright flavors to your soup. Try using fresh thyme or parsley. They work well with broccoli and cheese. If you don’t have fresh herbs, dried ones can work too. Just use less since dried herbs are stronger. You might also want to add spices. A pinch of nutmeg or a dash of cayenne can boost the taste. Serving your soup well makes it more appealing. Pour it into bowls and top with more cheese and chives. This adds color and freshness. You can also serve it with crusty bread. A slice of bread is perfect for dipping. It makes your meal feel complete and cozy. For the full recipe, check out the details above. {{image_4}} You can easily adapt this soup to meet different dietary needs. For gluten-free adjustments, use gluten-free vegetable broth and ensure any added ingredients are gluten-free. This keeps your soup safe for those with gluten sensitivities. If you're looking for vegan alternatives, swap the heavy cream for coconut milk or cashew cream. For cheese, use a vegan cheese that melts well. This way, you can enjoy a creamy texture without dairy. Want to add more flavor? Try adding proteins like cooked chicken or crispy bacon. Just chop them up and stir them in at the end. This adds a nice heartiness to the soup. You can also mix in other vegetables. Carrots, spinach, or even peas work great. Just chop them into small pieces and add them during the cooking process. This boosts nutrition and adds color. To change the taste, experiment with different cheeses. Gruyère adds a nutty flavor, while Monterey Jack gives a mild creaminess. You can mix these cheeses with cheddar for a richer taste. Don’t forget spices! Adding a pinch of nutmeg can warm up the soup, while cayenne gives it a nice kick. Start small and add more to suit your taste. You can really make this soup your own with these variations. For the full recipe, check out the details above. After making this creamy broccoli cheddar soup, store it in an airtight container. This keeps it fresh. The soup stays good in the fridge for about 3 to 4 days. Make sure to let it cool first before you seal it up. If you want to save some soup for later, freezing is a great option. Portion it into freezer-safe containers. Leave some space at the top, as soup expands when it freezes. You can keep it frozen for up to 3 months. To reheat, move it to the fridge overnight to thaw. When reheating, do it slowly on the stove. This helps keep the soup creamy. Stir it often to avoid sticking. If you find it too thick, add a splash of broth or cream. After reheating, consider adding extra toppings like more cheese or chives for a fresh touch. Enjoy your creamy, flavorful soup! Creamy Broccoli Cheddar Soup stays fresh for about 3 to 4 days in the fridge. Store it in an airtight container. Make sure it cools down before sealing it. If you want to keep it longer, consider freezing it. Yes, you can use frozen broccoli! Frozen broccoli is picked at its peak. This means it often has great flavor and nutrients. Just make sure to thaw it before adding it to the soup. This helps it cook evenly. If you want a lighter version, use half-and-half or whole milk. For a dairy-free option, try coconut milk or cashew cream. These keep the soup rich while reducing calories. To thicken your soup, you can add more potato. Just blend it until smooth. You can also mix in a cornstarch slurry. Mix equal parts cornstarch and water, then stir it in. This thickens without changing the taste. For a heartier texture, add some more cheese. For the full recipe, check out the [Full Recipe]. In this post, we covered how to make a creamy broccoli cheddar soup. We looked at key ingredients, step-by-step cooking methods, and helpful tips. You can enhance the flavor with spices and adjust for dietary needs. Don't forget to store your soup properly and try out the variations. Enjoy your kitchen fun, and remember, this soup is great for sharing. It's easy to make and packed with flavor. So give it a try, and you’ll see it become a favorite!](https://tastyhatch.com/wp-content/uploads/2025/07/73a7d25a-6f42-4b54-8564-e7ade614efe4.webp)
Welcome to my kitchen! Today, I’m sharing my favorite recipe for creamy broccoli cheddar soup. It’s rich, flavorful, and oh-so-easy
. You learned how to make spiced apple cider donuts from scratch. We covered the ingredients, step-by-step instructions, tips for perfect texture, and fun variations. Storing and freezing options help keep treats fresh. Don’t forget the FAQs to solve common problems. Now, it’s time to get baking. Enjoy the warm flavors and share your delicious donuts with friends!](https://tastyhatch.com/wp-content/uploads/2025/07/9b71a4d5-a546-4249-960e-50260c0c95a8.webp)
Fall is here, and what better way to celebrate than with Spiced Apple Cider Donuts? These warm, soft treats are

Are you looking for the perfect snack to wow your guests? Look no further! My Buffalo Chicken Dip is packed
. {{image_4}} You can mix up the flavors in your crisp. Substitute blackberries for a different taste. Blackberries add a tangy twist that pairs well with sweet berries. You can also try mixed frozen berries for convenience. Frozen berries save time and still offer great flavor. Just remember to adjust the baking time a bit. If you need a gluten-free version, it's easy to adapt. Use gluten-free oats and flour for the topping. This keeps the crunch while avoiding gluten. You can also replace regular butter with dairy-free alternatives. Coconut oil or vegan butter works well here. Want to make it healthier? Substitute granulated sugar with coconut sugar. This swap adds a hint of caramel flavor. You can also use maple syrup as a natural sweetener. It gives a rich taste and works great in desserts. With these changes, you can enjoy your Triple Berry Crisp guilt-free. For the Full Recipe, check the main section of the article! Store your leftover Triple Berry Crisp in an airtight container in the fridge. This keeps it fresh and tasty. You should consume it within 3-5 days for best quality. The berries will still taste great, and the topping will stay somewhat crisp. You can freeze the crisp after baking. It stays good for up to 3 months. Just make sure to let it cool first. When you want to enjoy it again, reheat in the oven. This helps restore a nice, crisp texture. To reheat, bake at 350°F (175°C) for 10-15 minutes. This warms it through and keeps the top crunchy. If you're in a hurry, you can microwave it for a quick reheat. Just be careful not to heat too long or it may become soggy. Yes, frozen berries can be used. Just make sure to adjust the baking time. Frozen berries may release more juice, so keep an eye on your crisp. You might need to bake it a bit longer to get that perfect, bubbly texture. You can easily double the ingredients for a larger batch. Use a bigger baking dish to fit all those delicious berries and topping. This way, you can share with friends or store leftovers for later! Serve your Triple Berry Crisp with ice cream, whipped cream, or yogurt. These toppings add creamy texture and flavor. You could also try a scoop of vanilla ice cream for a classic touch. This blog post shared a simple recipe for a delicious Triple Berry Crisp. With fresh berries, a crunchy topping, and tips for success, you can make this treat with ease. Remember to choose ripe berries and let it cool before serving for the best taste. Feel free to try different berry combinations or make dietary swaps. Enjoy your warm dessert with ice cream or whipped cream. Now, you have everything to create a delightful dish that your friends and family will love!](https://tastyhatch.com/wp-content/uploads/2025/07/e4821169-4e21-4ba5-bbbc-6b621c55628c.webp)
Craving a sweet treat that bursts with fruity flavor? Look no further! My Triple Berry Crisp combines ripe strawberries, blueberries,
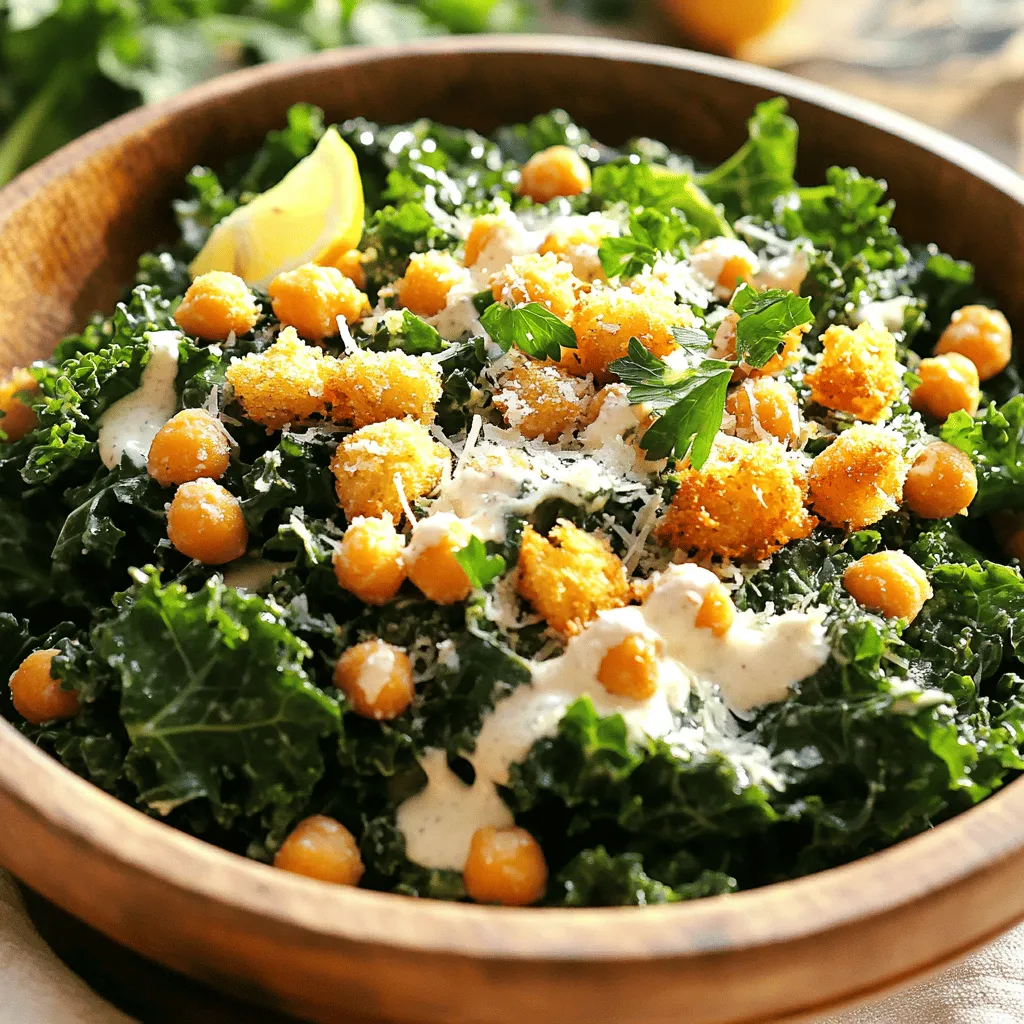
Are you ready to elevate your salad game? My Kale Caesar Salad with Crispy Chickpeas brings fresh flavors and crunch
![- 1 lb sirloin steak, cut into bite-sized pieces - 4 tablespoons unsalted butter - 4 cloves garlic, finely minced - Fresh herbs: rosemary and thyme The main ingredient in this dish is sirloin steak. It’s tender and full of flavor. Cut the steak into small pieces. This helps with even cooking and makes it easier to eat. The next key ingredient is unsalted butter. It adds richness and helps the garlic and herbs shine. Garlic gives the dish its name. Use fresh garlic for the best taste. Finely mince it to release the flavor. Fresh herbs like rosemary and thyme add a lovely aroma and taste. They can really elevate the dish. - Olive oil for cooking - Fresh parsley for garnish - Salt and black pepper to taste You can use olive oil for cooking the steak bites. It helps prevent sticking and adds a nice flavor. Fresh parsley makes a great garnish. It adds color and freshness to the dish. Don’t forget salt and black pepper. They enhance the flavors of the steak and garlic. Seasoning is key for a delicious meal. For the full recipe, check out the details above. Start by seasoning the steak bites. Use salt and black pepper for great flavor. Don’t hold back! Every piece needs to be coated well. Cut the steak into uniform chunks. This helps them cook evenly. If some pieces are bigger, they will not cook at the same time. Now, let’s heat the oil. In a large skillet, add olive oil. Heat it on medium-high until it shimmers. This means it is hot enough. Carefully add the steak bites in a single layer. Avoid overcrowding the pan; it’s okay to cook in batches. Sear them for 2-3 minutes on one side. When they have a nice brown crust, flip them. Cook for another 2 minutes for a perfect doneness. Next, we move to the garlic butter. Reduce the heat to medium. Add unsalted butter and let it melt. Then, add minced garlic, rosemary, and thyme. Stir gently for about a minute. You want the garlic to become fragrant and slightly golden. Be careful, as burnt garlic tastes bitter. Finally, return the cooked steak bites to the skillet. Toss them in the garlic butter mixture. Make sure each piece is well coated. Heat everything through, so the flavors meld together nicely. This is where the magic happens! To get your steak bites just right, you need to know the doneness levels. Here’s a quick guide: - Rare: Bright red inside, 120-125°F. - Medium Rare: Warm red center, 130-135°F. - Medium: Pink center, 140-145°F. - Medium Well: Slightly pink, 150-155°F. - Well Done: No pink, 160°F and above. For cooking times, think about thickness. A 1-inch piece takes about 2-3 minutes per side for medium rare. Thicker cuts will need more time. Always use a meat thermometer for accuracy. You can kick up the flavor of your garlic butter steak bites. Here are some ideas: - Spices: Try adding smoked paprika or cumin for a twist. - Sauces: A splash of Worcestershire sauce adds depth. - Herbs: Fresh basil or oregano can brighten the dish. Pair your steak bites with sides that balance the rich garlic butter. Good options include: - Roasted vegetables for a healthy crunch. - Creamy mashed potatoes for comfort. Serving is just as important as cooking. Here are some fun ways to present your garlic butter steak bites: - Serving Board: Use a rustic wooden board for a homey feel. - Drizzle: Show off that garlic butter by drizzling it over the top. - Garnish: Sprinkle chopped parsley for color and freshness. Remember, a well-presented dish makes eating even more enjoyable. The visual appeal can make your meal feel special. {{image_4}} You can use different cuts of steak for this dish. Tenderloin offers a buttery texture, while ribeye gives a rich flavor. Both cuts work great in garlic butter steak bites. If you want a lighter option, try chicken or shrimp. Both will soak up the garlic butter and bring a new twist to this tasty recipe. You can try different herbs to change the taste. Fresh basil or oregano can add a nice touch. If you like spice, add red pepper flakes or smoked paprika. These ingredients bring heat and depth to the dish. Feel free to mix and match until you find your perfect flavor. These steak bites pair well with many sides. Roasted vegetables add color and nutrition. Creamy mashed potatoes are a classic choice that balances the dish. You can also get creative and serve these bites as appetizers. Skewering them on toothpicks makes for easy eating at parties. For the full recipe, check out the [Full Recipe]. To keep your garlic butter steak bites fresh, let them cool first. Place them in a single layer on a plate to speed up the cooling process. Once they are cool, transfer them to an airtight container. This helps lock in flavor and keeps them safe from bacteria. Use containers made of glass or BPA-free plastic. These are great for refrigeration. To reheat your steak bites, use a skillet over low heat. This helps them warm evenly without drying out. Heat them for about 5 to 7 minutes, stirring gently. You can also use a microwave, but do this carefully. Heat in short bursts of 30 seconds, checking often. This will help keep the texture and flavor intact. If you want to freeze the garlic butter steak bites, first make sure they are completely cool. Then, place them in a freezer-safe bag or container. Remove as much air as possible to prevent freezer burn. They can last up to three months in the freezer. When ready to eat, thaw them in the fridge overnight. Reheat them gently to enjoy their full flavor. You can easily prep garlic butter steak bites in advance. Start by cutting the steak into bite-sized pieces. Season them with salt and pepper. Store the seasoned steak in an airtight container in the fridge. You can also make the garlic butter ahead. Just mix the butter, minced garlic, and herbs, then store it in the fridge. When you are ready to cook, take them out and follow the cooking steps. This makes dinner quick and easy! Garlic butter steak bites pair well with many sides. Here are some great ideas: - Roasted vegetables like broccoli, carrots, or asparagus - Mashed potatoes or creamy polenta - Crusty bread to soak up the garlic butter sauce - A fresh salad with a light vinaigrette To check if your steak bites are done, use a meat thermometer. Aim for 130°F for medium-rare or 145°F for medium. If you don’t have a thermometer, you can also use the touch test. Press the steak; it should feel firm but still have a little give. This method helps you know without cutting into the meat. Yes, the garlic butter sauce is very versatile! You can use it on: - Roasted chicken for added flavor - Sautéed shrimp or scallops for a seafood twist - Veggies like green beans or mushrooms for a tasty side - Pasta dishes to create a rich, savory sauce Reheating steak bites can be tricky. To keep them tender, use a low heat method. Place the steak bites in a skillet over medium-low heat. Add a little garlic butter to keep them moist. Heat for about 3-4 minutes, stirring gently. You can also use a microwave, but do so in short bursts to avoid toughening the meat. This method helps keep the flavor and texture just right. Garlic butter steak bites are easy and tasty. Remember the key ingredients: sirloin steak, butter, garlic, and fresh herbs. Follow the steps carefully for perfect doneness, and don’t forget to experiment with flavors and presentation. You can make variations with other meats or spices. Store leftovers smartly for future meals. Now, you can enjoy this dish anytime. Happy cooking!](https://tastyhatch.com/wp-content/uploads/2025/07/31ddbf84-74cc-4710-a86c-7a57eba1c9e3.webp)
Want a quick, tasty meal? Garlic Butter Steak Bites are your answer! This savory, simple recipe is packed with flavor

Get ready to score big with these Buffalo Chicken Sliders, a simple and tasty game-day treat! You’ll love how easy
