Skip to content
DisclaimerTerms Of UseGDPR PolicyCookie Policy

tastyhatch

  • Home
  • Drinks
  • Appetizers
  • Dinner
  • Dessert
  • About
  • Contact
  • Privacy Policy
DisclaimerTerms Of UseGDPR PolicyCookie Policy

Olivia

- 1 pound fresh broccoli florets: Choose vibrant green florets. They hold flavor well. - 3 tablespoons extra virgin olive oil: This oil adds richness and helps with roasting. - 2 cloves garlic, finely minced: Garlic gives a bold, savory taste to the dish. - 1 teaspoon fresh lemon zest: Lemon zest adds bright, zesty notes that lift the flavors. - 1/2 teaspoon crushed red pepper flakes: This is optional, but it adds a nice kick. - Salt and freshly ground black pepper: These enhance the flavors of the other ingredients. - 1/2 cup freshly grated Parmesan cheese: Use high-quality cheese for the best flavor. - 1 tablespoon freshly squeezed lemon juice: This adds a fresh pop of flavor just before serving. - 1 tablespoon fresh parsley, finely chopped: Garnish with parsley for color and freshness. This simple list makes it easy to gather everything you need for a tasty snack. Each ingredient plays a role in creating that delicious flavor. You can find the full recipe in the earlier section to guide you through the cooking process. Enjoy preparing this tasty treat! First, preheat your oven to 425°F (220°C). This ensures your broccoli cooks evenly. While the oven heats, line a large baking sheet with parchment paper. This makes for easy cleanup later. Next, take a big bowl and add the fresh broccoli florets. Pour in the extra virgin olive oil and sprinkle in the minced garlic and lemon zest. If you enjoy a bit of heat, toss in the crushed red pepper flakes. Season it all well with salt and pepper. Mix everything together until the broccoli is nicely coated. Now, spread the seasoned broccoli onto the prepared baking sheet. Make sure the florets sit in one layer. This helps them roast evenly. Place the baking sheet in the oven and roast the broccoli for about 15 minutes. You want it to become tender and a little caramelized. After 15 minutes, take the baking sheet out of the oven. Sprinkle the freshly grated Parmesan cheese over the broccoli. The heat will start to melt the cheese. Return the baking sheet to the oven for another 5-7 minutes. Look for the cheese to melt and turn golden brown. The broccoli should stay bright green and tender. Once baked, remove the sheet from the oven. Drizzle the roasted broccoli with fresh lemon juice. This adds a nice zing. Finally, sprinkle the chopped parsley on top for a pop of color. For a beautiful display, serve the Parmesan roasted broccoli on a vibrant platter. You can even add a few extra parsley leaves or lemon wedges around the edge. Enjoy this dish warm as a tasty snack or side! For the full recipe, click [here](link). - Ensuring even roasting: To get that perfect roast, spread the broccoli in a single layer on the baking sheet. This helps each piece cook evenly. If the florets overlap, they may steam instead of roast, and you want them crispy. - Achieving the perfect cheese melt: For the best melt, add the Parmesan cheese halfway through roasting. This gives it time to melt and form a lovely crust. Watch it closely, as you want it golden, not burnt. - Recommended spices & herbs: Besides the garlic and red pepper flakes, consider adding smoked paprika or a touch of cumin for a different flavor. Fresh herbs like thyme or oregano can also brighten the dish. - Ideas for additional toppings: Try adding toasted pine nuts or chopped walnuts for crunch. A drizzle of balsamic glaze can add a sweet tang that pairs well with the cheese and broccoli. {{image_4}} You can make Parmesan roasted broccoli even more exciting by switching up the cheese. Try using sharp cheddar for a bolder taste or crumbled feta for a tangy twist. Goat cheese also works well if you want a creamier texture. Each cheese brings its own flavor and aroma to the dish. You can also substitute other vegetables for the broccoli. Cauliflower florets can give a similar texture. Brussels sprouts are another great choice. Just cut them in half and follow the same steps. Carrots or asparagus can add a unique taste. The key is to roast vegetables until they are tender and slightly caramelized. If you want to make this dish vegan-friendly, simply skip the Parmesan cheese. You can add a sprinkle of nutritional yeast. This gives a cheesy flavor without dairy. You can also use vegan cheese alternatives to keep the cheesy goodness. For a gluten-free version, you don't need to make any changes! This recipe is naturally gluten-free. Just make sure to check any added ingredients like seasoning blends. Enjoy this snack without worries about gluten! To keep your roasted broccoli fresh, store it right. Place it in an airtight container. This helps prevent moisture loss. You can also use a glass container with a lid. Make sure to cool the broccoli before sealing. This keeps it crisp and tasty for longer. If you have extra, refrigerate it within two hours of cooking. Properly stored, it lasts for about 3-4 days. Reheating roasted broccoli can be tricky. You want to keep its texture and taste. The best way is to use the oven. Preheat the oven to 350°F (175°C). Spread the leftovers on a baking sheet. Heat for about 10-15 minutes. This warms the broccoli without making it soggy. If you’re in a hurry, you can use the microwave. Heat it in 30-second bursts. Stir it in between to ensure even heating. How long does Parmesan roasted broccoli last in the fridge? You can store Parmesan roasted broccoli in the fridge for about 3 to 5 days. Keep it in an airtight container to keep it fresh. Can I freeze roasted broccoli? Yes! You can freeze roasted broccoli. Just place it in a freezer-safe bag. It will last for up to 3 months. When you want to eat it, thaw it in the fridge before reheating. What can I serve with Parmesan roasted broccoli? Parmesan roasted broccoli pairs well with grilled chicken, fish, or pasta. It makes a great side for any meal. Try it with a squeeze of lemon for extra flavor! Can I prepare this dish in advance? Yes, you can prep the broccoli ahead of time. Wash and cut the broccoli, then toss it with oil and spices. Store it in the fridge for up to 24 hours. Just roast it when you’re ready. Is Parmesan roasted broccoli healthy? Yes! Parmesan roasted broccoli is a healthy snack. It’s low in calories and packed with vitamins. Broccoli is high in fiber and nutrients. Plus, the olive oil adds healthy fats! Caloric breakdown per serving A serving of Parmesan roasted broccoli has around 150 calories. This includes the oil and cheese. It’s a tasty and guilt-free way to enjoy veggies! In this article, we explored making Parmesan roasted broccoli, from ingredients to serving tips. We covered the main steps, like roasting and seasoning, ensuring you get the best flavor. We also shared storage advice and answered common questions. Enhance your meals with this healthy dish. It’s a great way to enjoy veggies. Try it and make your dinner more exciting!

Parmesan Roasted Broccoli Simple and Flavorful Snack

Looking for a quick and tasty snack? Parmesan roasted broccoli is your answer! This simple yet flavorful dish steals the

Here’s what you need to make cilantro lime rice. These fresh ingredients will bring bright flavors to your meal: - 1 cup long-grain white rice - 2 cups vegetable broth (or water) - 1 tablespoon olive oil - Juice and zest of 1 fresh lime - 1/2 cup fresh cilantro, finely chopped - 1 garlic clove, minced - 1/2 teaspoon salt (adjust to taste) - 1/4 teaspoon black pepper - Optional: 1/4 teaspoon chili powder (for a spicy kick) Each ingredient plays a key role. The rice forms the base, while the broth adds depth. Olive oil helps with cooking and flavor. Lime brightens the dish, and cilantro brings freshness. Garlic adds a nice savory note. Adjust salt and pepper to match your taste. If you like heat, add chili powder for some extra spice. For the full recipe, check out the details and enjoy making this easy and flavorful side dish! Rinsing the rice: Start by rinsing the long-grain white rice. Use a fine-mesh sieve to wash it under cold water. Keep rinsing until the water is clear. This step removes excess starch, leading to fluffier rice. Sautéing garlic: Next, heat one tablespoon of olive oil in a medium saucepan over medium heat. Add one minced garlic clove. Sauté for about 30 seconds until it smells good. Be careful not to burn the garlic, as it can taste bitter. Toasting the rice: Add the rinsed rice to the pot. Stir well to coat the grains with the garlic oil. Toast the rice for 1-2 minutes. This step enhances the rice's flavor and aroma. Adding liquid and seasonings: Pour in 2 cups of vegetable broth or water. Sprinkle in 1/2 teaspoon of salt, 1/4 teaspoon of black pepper, and if you like, 1/4 teaspoon of chili powder for some heat. Stir gently to mix everything. Bringing to a boil and simmering: Increase the heat to bring the mixture to a boil. Once it boils, lower the heat to low. Cover the pot tightly with a lid and let it simmer for about 15-18 minutes. The rice should be tender and absorb all the liquid. Resting the rice: After cooking, take the pot off the heat but keep it covered. Let it rest for 5 more minutes. This allows the rice grains to firm up and separate nicely. Fluffing the rice: Use a fork to fluff the rice gently. This breaks up any clumps and makes it light. Mixing in lime and cilantro: Now, stir in the juice and zest of one fresh lime and 1/2 cup of finely chopped cilantro. Mix until everything is well combined. Adjusting seasoning: Taste the rice. If you want, add more salt, pepper, or lime juice based on your liking. For the full recipe, check out the detailed instructions above! For a twist, you can swap olive oil for avocado oil or coconut oil. Both oils add unique taste. Fresh ingredients are key. Always use fresh lime and cilantro for the best flavor. To achieve fluffy rice, rinse it well before cooking. This removes extra starch. Cooking time is also important. Keep a close eye and adjust time if needed. If the rice is not tender, add a bit more liquid and cook longer. Garnishing adds beauty to your dish. Use extra cilantro leaves and lime wedges on top. Serve in a colorful bowl for a fun look. Pair the rice with grilled chicken or fish for a complete meal. {{image_4}} You can switch out the rice for other types. Brown rice adds a nutty flavor and more fiber. Jasmine or basmati rice can give it a fragrant touch. Just remember, cooking times may change. Instead of vegetable broth, you can use chicken stock for a richer taste. Stock adds depth and enhances the flavor of the rice. Water works too, but it lacks the extra flavor. To make your rice even more fun, add vegetables. Try mixing in peas, bell peppers, or corn. These colorful veggies not only taste great but also brighten the dish. If you want a spicy kick, sprinkle in some chili powder or cayenne pepper. Start with a little and taste as you go. This way, you can find your perfect heat level. Cilantro lime rice is easy to make vegan and gluten-free. Just use vegetable broth and check your rice brand to ensure it’s gluten-free. This way, everyone can enjoy it! For those watching sodium intake, use low-sodium broth. This simple swap helps keep the dish tasty without too much salt. Keeping an eye on health can still lead to delicious meals. To keep your cilantro lime rice fresh, use a sealed container. Glass or plastic containers work well. Make sure the rice cools to room temperature first. This step helps prevent moisture build-up. Store the rice in the fridge for up to four days. When you reheat, avoid drying out the rice. Use a microwave-safe bowl, add a splash of water, and cover it. Heat it for about one to two minutes. Stir halfway through to ensure even heating. You want the rice warm but not too hot. If you have more rice than you can eat, freezing is a great option. Pack the cooled rice in freezer bags. Try to remove as much air as possible. This keeps the rice from getting freezer burn. You can freeze it for up to three months. To thaw, place the bag in the fridge overnight or use the microwave. Reheat it as explained above. This way, you’ll enjoy great cilantro lime rice anytime! To make Cilantro Lime Rice from scratch, start with rinsing the rice. This helps remove extra starch. Next, sauté minced garlic in olive oil for flavor. Then, toast the rice for a minute or two. It adds depth to the dish. After that, add vegetable broth, salt, and pepper. Bring it to a boil, then cover and simmer until tender. Finally, fluff the rice and mix in lime juice, zest, and chopped cilantro. This process gives you that fresh, zesty flavor you crave. For a detailed guide, check the Full Recipe. Yes, you can use brown rice! It is a healthy option that adds a nutty flavor. Keep in mind that brown rice takes longer to cook. You will need to adjust the liquid and cooking time. Use about 2.5 cups of liquid for every cup of brown rice. Cook it for about 40-45 minutes instead of 15-18 minutes. The result will be just as tasty! Cilantro Lime Rice goes well with many dishes. It complements tacos, burritos, and grilled chicken. You can serve it alongside shrimp or fish for a fresh twist. It also pairs nicely with beans for a vegetarian meal. This rice adds a bright touch to any plate! Leftover Cilantro Lime Rice can last in the fridge for about 3-4 days. Store it in an airtight container to keep it fresh. If you want to keep it longer, consider freezing it. Frozen rice can last up to 2 months. Just thaw it in the fridge before reheating! Cilantro lime rice is simple yet tasty. We started by listing ingredients and then followed easy steps to cook. Enhancing flavors, adjusting texture, and creative serving can make this dish shine. You can mix in different ingredients or swap rice types based on your needs. Storing leftovers and reheating properly will keep flavors fresh. Remember, with this guide, you can make a delicious rice dish that fits your taste. Enjoy cooking and customizing this recipe to suit your meals. Trust me, it will be a hit!

Cilantro Lime Rice Easy and Flavorful Side Dish

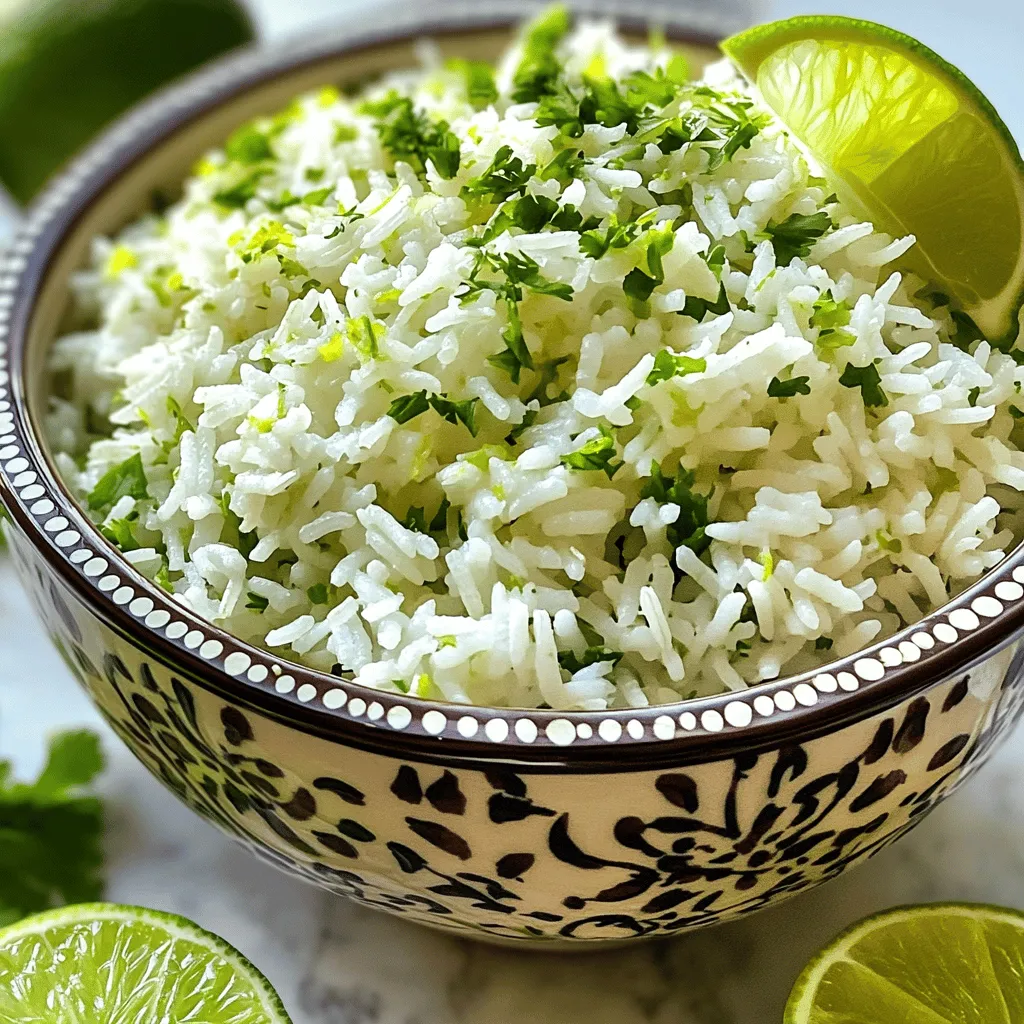
If you’re looking for a zesty and fresh side dish, let me introduce you to Cilantro Lime Rice. It’s easy

Here’s a list of what you need for Easy Pasta Primavera. These fresh ingredients create a bright and tasty dish. - 12 oz whole wheat pasta - 1 tablespoon extra virgin olive oil - 1 medium onion, thinly sliced - 3 cloves garlic, minced - 1 red bell pepper, cored and sliced - 1 yellow bell pepper, cored and sliced - 1 medium zucchini, chopped - 1 cup cherry tomatoes, halved - 1 cup fresh spinach leaves - 1 teaspoon dried oregano - Salt and pepper to taste - 1/4 cup grated Parmesan cheese (optional) - Fresh basil for garnish Using fresh, colorful veggies makes this dish pop. The whole wheat pasta gives a nutty flavor and boosts the fiber. I love the way the garlic and onions blend with the bell peppers. They create a sweet base that adds depth to the dish. The cherry tomatoes burst with flavor as they cook. The spinach wilts down nicely, adding a fresh touch. You can use any seasonal veggies you like, too! For instance, asparagus or broccoli also work well. You can find the Full Recipe at the end of this article. This will help you create a delicious dinner that is easy and quick. 1. Bring a large pot of water to a boil. 2. Add 12 oz of whole wheat pasta and a generous amount of salt. 3. Cook until al dente, according to the package instructions. 4. Drain the pasta and set it aside. Reserve a cup of the cooking water. 1. In a large skillet, heat 1 tablespoon of extra virgin olive oil over medium heat. 2. Add 1 medium onion, thinly sliced, and 3 cloves of minced garlic. 3. Sauté for about 3-4 minutes, until the onion turns translucent and fragrant. 1. Add 1 sliced red bell pepper, 1 sliced yellow bell pepper, and 1 chopped zucchini to the skillet. 2. Cook for 5-7 minutes, stirring occasionally, until the veggies soften and char a bit. 1. Add 1 cup of halved cherry tomatoes and 1 cup of fresh spinach leaves. 2. Cook for 2-3 minutes, until the spinach wilts and the tomatoes start to blister. 1. Toss the cooked pasta with the sautéed veggies in the skillet. 2. If it seems dry, add a splash of the reserved pasta cooking water to make a light sauce. 1. Season your dish with salt and freshly cracked pepper to taste. 2. If you like, sprinkle 1/4 cup of grated Parmesan cheese on top. 3. Garnish with fresh basil leaves for a pop of color and flavor. To make great pasta, you need to aim for the perfect texture. Al dente means "to the tooth" in Italian. It should feel firm when you bite into it. Here’s how to achieve that: - Boil water: Start with a large pot of water. Bring it to a rolling boil. - Salt the water: Add a good amount of salt. This step is key. It adds flavor to the pasta as it cooks. - Timing: Follow the package instructions for cooking time. Check the pasta one or two minutes before the time is up. Fresh herbs and spices can take your pasta primavera to the next level. Here are some ideas: - Use fresh herbs: Fresh basil or parsley adds a bright taste. Chop them finely and mix in at the end. - Dried spices: Dried oregano works well. It gives a warm flavor. If you use fresh herbs, cut back on dried ones. - Fresh vs. dried: Fresh ingredients often provide the best taste. However, dried herbs are handy. They last longer and are easy to store. How you serve your pasta matters. Here are some tips to make it look great: - Choose the right dish: Serve in shallow bowls. This way, you can show off the colorful veggies. - Garnishing: Finish with a sprinkle of Parmesan and some fresh basil leaves. This adds nice color and flavor. - Arranging: Place the vegetables on top of the pasta. This makes it look more appealing. For the full recipe, check out [Full Recipe]. {{image_4}} For a vegan pasta primavera, skip the cheese. This keeps the dish light and fresh. You can add plant-based proteins like chickpeas or tofu. These options boost nutrition and keep the meal filling. If you need gluten-free options, consider using pasta made from rice or corn. These alternatives work well and still taste great. You can also mix in different vegetables like carrots and broccoli. Each brings its own unique flavor to the dish. You can change this dish with the seasons. In spring or summer, use fresh peas and asparagus for a bright taste. In fall, try adding butternut squash or kale for warmth. Adapt your recipe to match what is fresh and in season. This makes your pasta primavera even more delightful. For the full recipe, check out the vibrant vegetable pasta primavera. To keep your Easy Pasta Primavera fresh, store leftovers right away. Let it cool for a few minutes. Then, place it in an airtight container. This helps avoid moisture loss and keeps flavors intact. I recommend using glass or BPA-free plastic containers. They seal well and are easy to clean. You can freeze your prepared pasta primavera for later use. First, let it cool completely. Next, transfer it to a freezer-safe container. Make sure to leave some space at the top for expansion. When you’re ready to eat, thaw it in the fridge overnight. Reheat it in a pan over low heat. Add a splash of water or olive oil to keep it moist. In the fridge, your pasta primavera can last for 3 to 4 days. In the freezer, it stays good for about 2 to 3 months. Just remember to label your containers with the date. This way, you know when it's time to enjoy your delicious dish again. Pasta primavera is a fresh pasta dish, filled with colorful vegetables. It began in Italy in the 1970s. The name means "spring pasta" in Italian. This dish celebrates seasonal vegetables, making it light and vibrant. Yes, you can prep some parts ahead. Cook the pasta and cool it. Store it in the fridge for up to three days. You can also chop the veggies a day before. Just keep them in a sealed bag. Cook the dish fresh when you’re ready to eat. You can add proteins like chicken, shrimp, or tofu. To change the veggies, try broccoli, asparagus, or carrots. This makes the dish fit your taste. Feel free to mix in new flavors or spices. Create your perfect blend. Pasta primavera pairs well with garlic bread or a green salad. You might also enjoy it with a light soup. These sides enhance the meal without overpowering it. They keep the focus on the pasta’s fresh flavors. Absolutely! You can try different shapes like spaghetti, farfalle, or shells. Each shape brings a unique texture. Whole wheat or gluten-free options work well too. Choose what you love or have on hand. Enjoy the flexibility! For the full recipe, check out the detailed cooking instructions. This easy Pasta Primavera recipe combines fresh veggies with whole wheat pasta. You learned how to cook perfect pasta and sauté vibrant vegetables. We also explored tasty variations like vegan and gluten-free options. Remember, using fresh herbs boosts flavor and makes your dish shine. With proper storage, leftovers can stay delicious for days. Try this dish for a quick and healthy meal that suits any season! Enjoy the fun of cooking and experimenting with your favorite ingredients.

Easy Pasta Primavera Flavorful and Simple Recipe

Are you ready to whip up a dish that is both colorful and tasty? My Easy Pasta Primavera recipe packs

- 1 ripe mango, peeled and diced - 1 cup fresh pineapple chunks - 1 medium banana, sliced - 1 cup coconut milk (or almond milk) - 1 tablespoon honey or agave syrup (optional) - 1 tablespoon freshly squeezed lime juice - A handful of ice cubes - Fresh mint leaves for garnishing To make a great mango pineapple smoothie, you need fresh ingredients. The mango should be ripe. A ripe mango feels slightly soft when you press it. It should also smell sweet near the stem. When picking pineapple, look for a sweet smell. The leaves should be green and fresh. If the pineapple feels heavy for its size, it is likely juicy. Bananas should have a few brown spots. This means they are sweet and soft. Avoid bananas that are too green or too brown. Using fresh and ripe fruit makes your smoothie taste amazing. For a detailed guide, check the Full Recipe. First, gather all your ingredients. You will need: - 1 ripe mango, peeled and diced into bite-sized pieces - 1 cup fresh pineapple chunks, preferably chilled - 1 medium banana, sliced into rounds - 1 cup coconut milk (or substitute with almond milk for a nut-free version) - 1 tablespoon honey or agave syrup (optional) - 1 tablespoon freshly squeezed lime juice - A handful of ice cubes (about 1 cup) - Fresh mint leaves, for garnishing Next, prep your blender jar. Make sure it is clean and dry. This helps the smoothie blend smoothly and taste fresh. Now, it’s time to blend! Start by adding the diced mango, fresh pineapple chunks, and sliced banana into the blender. Pour in the coconut milk and lime juice next. If you prefer a sweeter smoothie, add the honey or agave syrup now. Finally, toss in the ice cubes. They help chill and thicken your smoothie. Blend on high speed. Watch for that smooth and creamy texture. If the mixture sticks to the sides, stop and scrape it down. Blend again until it’s perfectly mixed. Once blended, taste your smoothie. If you want it sweeter, add more honey. If you like it tangy, squeeze in some extra lime juice. Pour the smoothie into chilled glasses. This makes each sip extra refreshing. For a fun touch, garnish with fresh mint leaves. You can even add a slice of lime on the rim of each glass. Enjoy your Mango Pineapple Smoothie! To get the best texture, consider using frozen fruit instead of ice. Frozen fruit makes your smoothie creamier. Ice can water down the flavor. However, if you want a cold drink, feel free to add ice. Adjusting the liquid is key. If your smoothie is too thick, add more coconut milk. If it is too thin, add more fruit. Aim for a thick and creamy mix. If you find your smoothie is not sweet enough, try adding more honey or agave syrup. This adjustment helps balance the flavors. You can also add a bit more lime juice to enhance the zing. For a tropical twist, mix in other fruits like kiwi or passion fruit. These flavors pair well with mango and pineapple, making your smoothie even more exciting. Mango and pineapple offer many health benefits. Mango is rich in vitamins A and C. It supports your immune system and boosts skin health. Pineapple contains bromelain, which may aid digestion. In terms of calories, this smoothie is quite light. One serving has about 200 calories, depending on the added sweeteners. With all the nutrients, this drink is a delicious way to nourish your body. For the full recipe, check out the Tropical Bliss Mango Pineapple Smoothie. {{image_4}} For a creamy texture, try using plant-based options. Instead of regular yogurt or ice cream, you can use coconut yogurt. It adds a nice, tropical flavor. If you want ice cream, use dairy-free options like coconut or almond ice cream. You can also use different plant-based milks. Almond milk is a great choice if you want a nut-free version. Oat milk can add a rich creaminess, while soy milk gives a nice protein boost. Want to make your smoothie even healthier? Add some superfoods! Spinach is a great option. It blends well and adds vitamins without changing the taste much. Chia seeds are another option. They pack a punch of omega-3 fatty acids and fiber. You can also include protein powder. It will help keep you full longer. Look for a flavor that matches your smoothie. Vanilla or berry flavors pair well with mango and pineapple. Mixing in other fruits can elevate your smoothie. Try adding berries like strawberries or blueberries. They add a sweet and slightly tart flavor. If you want something more exotic, consider passion fruit or kiwi. Herbs and spices can make your drink special. Fresh mint adds coolness and brightness. A pinch of ginger brings a spicy kick. You can even sprinkle some cinnamon for warmth. These variations keep your mango pineapple smoothie fresh and exciting! For the complete recipe, check out the Full Recipe section. To keep your mango pineapple smoothie fresh, use an airtight container. Glass jars work great. Be sure to store it in the fridge. It stays good for about two days. If you see any change in color or smell, toss it out. If you want to save your smoothie for later, freezing is a smart choice. Pour the smoothie into ice cube trays or freezer-safe bags. It can last up to three months in the freezer. When you are ready to enjoy it, thaw the smoothie overnight in the fridge. For quick thawing, place the bag in warm water. Blend again for a smooth texture. Leftover smoothie can be fun! You can turn it into popsicles. Just pour the smoothie into popsicle molds and freeze. In a few hours, you’ll have a sweet treat. Another option is to use it in smoothie bowls. Pour the leftover smoothie into a bowl and add toppings like granola, nuts, or fresh fruit. This way, you create a delicious breakfast or snack! For the full recipe, check out Tropical Bliss Mango Pineapple Smoothie. You can use many options instead of coconut milk. Here are a few great choices: - Almond milk - Soy milk - Oat milk - Cashew milk These alternatives work well and keep the smoothie tasty. Almond milk is nut-free and light. Soy milk adds protein. Oat milk has a creamy texture. Cashew milk is rich and smooth. You can store the mango pineapple smoothie for up to two days in the fridge. Use an airtight container to keep it fresh. If you want to freeze it, pour it into ice cube trays. This method keeps flavor and quality. Just blend the cubes again when you’re ready to enjoy. Yes, this smoothie is healthy! It contains fresh fruits full of vitamins. Mangoes and pineapples are high in vitamin C. They also provide fiber for digestion. The coconut milk adds healthy fats. If you use honey, keep in mind it adds some sugar. Adjust based on your health needs. Yes, you can make this smoothie ahead of time. Just prepare it and store it in the fridge. If you want to keep it fresh, drink it within two days. You can also prep the fruits in advance. Keep them in the fridge for quick blending later. To make the smoothie thicker, try these tips: - Add more frozen fruit like bananas or mango. - Use less liquid. - Include yogurt for creaminess. These changes will help you achieve that perfect texture while keeping the flavor intact. Enjoy your thick and creamy smoothie! This mango pineapple smoothie is simple and tasty. You learned about key ingredients and how to blend them. I shared tips on picking fresh fruits and achieving the best texture. Plus, we explored fun variations and storage ideas. Enjoy making this smoothie! It’s healthy and a great treat. So grab your fruits and blend away!

Mango Pineapple Smoothie Fresh and Delicious Recipe

Are you ready to embark on a tropical taste adventure? My Mango Pineapple Smoothie recipe combines ripe mango, fresh pineapple,

- 8 small corn tortillas - 1 can (15 oz) black beans, rinsed and drained - 1 cup corn kernels (fresh or frozen) - 1 red bell pepper, diced - 1 medium zucchini, diced - 1 cup fresh spinach, chopped - 1 cup of your favorite salsa - 1 teaspoon ground cumin - 1 teaspoon chili powder - 1 cup shredded cheese (cheddar or Mexican blend) - 2 tablespoons extra virgin olive oil - Salt and freshly cracked pepper to taste - Fresh cilantro leaves for garnish (optional) These ingredients make the base of your easy veggie enchiladas. Each one adds great taste and nutrition. Corn tortillas hold the filling well. Black beans give protein and fiber. The corn adds sweetness, while bell peppers and zucchini bring crunch. Fresh spinach adds color and vitamins. Using your favorite salsa makes a big difference. It adds moisture and flavor. Cumin and chili powder spice things up. The cheese on top melts beautifully, giving a nice finish. Feel free to adjust the ingredients to your taste. You can swap vegetables or change the cheese. This recipe is flexible and fun! For the full recipe, check out the details above. - Preheat the oven to 375°F (190°C). - Prepare and chop vegetables. Start with washing your red bell pepper and zucchini. Dice them into small pieces. Chop the spinach into bite-sized bits. This helps everything blend well in the enchiladas. - Heat olive oil in a skillet. - Sauté red bell pepper and zucchini for 5 minutes. Add two tablespoons of olive oil to your skillet. Heat it over medium heat. Once the oil is hot, toss in the diced bell pepper and zucchini. Cook them for about five minutes. They should become tender and smell nice. - Add spinach, black beans, and corn to the skillet. - Fill tortillas with vegetable mixture and cheese. Now, add the chopped spinach, rinsed black beans, and corn to the skillet. Sprinkle in one teaspoon of ground cumin and one teaspoon of chili powder. Season with salt and pepper to taste. Stir everything for about three to four minutes until it’s heated through. Take a tortilla and place a scoop of this mix in the center. Sprinkle some cheese on top. Roll it tightly and place it seam-side down in a baking dish. Repeat this until all tortillas are filled and arranged. - Pour salsa over rolled enchiladas. - Cover with foil and bake for 20 minutes. Pour your favorite salsa over the rolled enchiladas, making sure to cover them well. Top with any remaining cheese. Cover the dish with foil to keep them moist. Bake for 20 minutes. After that, remove the foil and bake for an extra 10 minutes, until the cheese is melted and bubbly. Enjoy your Easy Veggie Enchiladas! For more details, check the Full Recipe. - To melt cheese perfectly, bake for 30 minutes total. - Avoid soggy tortillas by heating them briefly before filling. When you heat tortillas in a dry skillet for a few seconds, they stay strong. This simple step lets you fill them with veggies without tearing. Make sure to keep an eye on them; too much heat can make them crispy. - Garnish with fresh cilantro for a bright look. - Serve with sour cream and extra salsa for a tasty meal. Plating matters! I love to arrange the enchiladas neatly. A sprinkle of cilantro adds color. A dollop of sour cream gives a creamy touch, making each bite better. - Overfilling tortillas makes them hard to roll. - Always season your veggies well for full flavor. Keep the filling modest. If you stuff too much, it can spill out while baking. Also, seasoning is key. Don’t skip salt and pepper, as they bring out the best in your veggies. For the full recipe, check out the [Full Recipe]. {{image_4}} For gluten-free options, use corn tortillas instead of wheat ones. Corn tortillas are naturally gluten-free and provide a great texture. If you want to make your enchiladas vegan, try using plant-based cheese and skip the sour cream. Look for dairy-free versions at your store. These swaps let everyone enjoy this dish! You can add different beans or veggies to change the taste. Try pinto or kidney beans for a new twist. You can also toss in mushrooms, carrots, or even sweet potatoes. If you like heat, spice it up with jalapeños or other peppers. This will give your enchiladas a nice kick! Switch up your sauces for fun! Use different salsas, like mango or green salsa, to add unique flavors. You can also try enchilada sauces with different heat levels. Feeling adventurous? Experiment with ranch dressing or barbecue sauce instead of salsa. These options can transform your meal into something new and exciting. To store your veggie enchiladas, place them in an airtight container. Cover them tightly to keep moisture in. They can last in the fridge for up to 3 days. If you want to enjoy them later, freezing is a great option. To freeze uncooked enchiladas, tightly wrap them in plastic wrap after assembling. Place them in a freezer-safe bag or container. They can stay good for up to 3 months. When you’re ready to cook, thaw them in the fridge overnight. This way, they will cook evenly. For reheating, the oven is best. Preheat it to 350°F (175°C) and bake for about 20 minutes. This method keeps the enchiladas warm and crispy. If you use the microwave, heat them in short bursts. This prevents sogginess and keeps the texture nice. For both methods, check if they are heated through before serving. Easy veggie enchiladas take about 55 minutes in total. You will spend 15 minutes prepping your ingredients. Then, cooking and baking takes an additional 40 minutes. This quick timeline makes it easy to fit into your busy week. Yes, you can make easy veggie enchiladas ahead of time. You can prepare them and store them in the fridge for up to three days. Just cover them tightly with foil or plastic wrap. For longer storage, freeze them for up to two months. Allow them to thaw before baking. You can serve veggie enchiladas with many tasty sides. Here are some ideas: - Mexican rice or cilantro lime rice - Refried beans or black beans - Fresh guacamole and tortilla chips - A light salad with avocado and lime dressing These sides will enhance your meal and add more flavor. To reheat leftover enchiladas, use your oven for the best results. Preheat it to 350°F (175°C). Place the enchiladas in a baking dish and cover them with foil. Bake for about 20 minutes until heated through. This way, they stay moist and tasty. You can also use the microwave, but be careful not to dry them out. Enjoy your meal again! In this article, I shared a simple recipe for easy veggie enchiladas. You learned about the key ingredients, step-by-step instructions, and helpful tips. Experiment with different flavors and dietary options to make this dish your own. Proper storage ensures your leftovers stay fresh. I hope you feel inspired to create a tasty meal that everyone will enjoy. Try these enchiladas soon, and make them a part of your cooking routine!

Easy Veggie Enchiladas Quick and Flavorful Recipe

Looking for a quick and tasty meal that’s loaded with veggies? My Easy Veggie Enchiladas are the perfect solution. In

To make delicious strawberry lemon blondies, you need a few key ingredients: - 1 cup unsalted butter, melted - 1 ½ cups brown sugar, tightly packed - 2 large eggs, at room temperature - 2 teaspoons pure vanilla extract - 2 cups all-purpose flour - ½ teaspoon baking powder - ½ teaspoon baking soda - ½ teaspoon fine sea salt - Zest of 1 lemon - 1 tablespoon fresh lemon juice - 1 cup fresh strawberries, hulled and diced - ½ cup white chocolate chips (optional) These ingredients create a moist and flavorful treat. The butter adds richness, while the brown sugar provides a lovely caramel note. The fresh strawberries and lemon give it a bright and refreshing taste. You can customize your blondies with some fun add-ins. Try adding: - Chopped nuts like walnuts or pecans for crunch. - A pinch of cinnamon for warmth. - Different fruits like blueberries or raspberries. If you need to make substitutions, here are some ideas: - Use coconut oil instead of butter for a dairy-free option. - Swap out all-purpose flour for almond flour for a gluten-free version. - Replace white chocolate chips with dark chocolate for a richer flavor. These options help you make the recipe your own while keeping it simple and tasty. Accurate measuring is key for great blondies. Here are some tips: - Use a kitchen scale for precise measurements. - When measuring flour, spoon it into the cup and level it off with a knife. - Tightly pack brown sugar to ensure it's not too loose in the mix. By measuring correctly, you help your blondies turn out perfectly every time. For the full recipe, check out the complete details above and get ready to bake! Start by preheating your oven to 350°F (175°C). Take a 9x9 inch baking pan and grease it lightly. You can also use parchment paper. If you use parchment, leave some hanging over the sides. This helps you lift the blondies out later. In a large mixing bowl, add the melted butter and brown sugar. Use a whisk to mix them well. Make sure the mixture is smooth. Then add the eggs, one at a time. Whisk after each one. Finally, add the vanilla extract and mix until it’s all blended. In a separate bowl, whisk together the flour, baking powder, baking soda, and salt. This is your dry mix. Gradually add this dry mix to the wet mixture. Use a spatula to fold them together gently. Be careful not to overmix. This keeps your blondies light and fluffy. Now it’s time to add some brightness! Gently fold in the lemon zest and lemon juice. Then add the diced strawberries. If you want, you can also add white chocolate chips. Make sure everything is evenly mixed. Pour the batter into the prepared pan. Smooth the top with a spatula. Place the pan in the oven and bake for 25-30 minutes. To check if they are done, insert a toothpick into the center. It should come out with a few moist crumbs, not wet batter. Once done, let them cool for about 10 minutes in the pan. Use the parchment to lift them out and cool completely on a wire rack. To get the best texture in your blondies, mix the wet and dry ingredients gently. Overmixing can make them tough. When you fold in the strawberries and lemon, do it slowly. This keeps the batter light. Be sure to bake until a toothpick shows a few moist crumbs. This means they are perfectly cooked! One big mistake is using cold eggs. Always use room temperature eggs for better mixing. Another common error is skipping the parchment paper. It helps you remove the blondies easily. Finally, don’t skip checking doneness early. Ovens can vary, and you don’t want overcooked blondies. After baking, let the blondies cool in the pan for 10 minutes. This helps them set. Use the parchment paper to lift them out gently. Place them on a wire rack to cool completely. For cutting, use a sharp knife. This gives you clean squares. If you want, dust with powdered sugar for a pretty touch. For the full recipe, check the section above. {{image_4}} You can swap strawberries for many fruits. Raspberries add a nice tartness. Blueberries work well too, giving a sweet burst. Peaches can add a juicy touch. If you want something tropical, try mango. Just remember to adjust the amount based on the fruit's moisture. To make these blondies gluten-free, use almond or coconut flour. You can also try a gluten-free blend. For a dairy-free option, replace butter with coconut oil or vegan butter. Use dairy-free chocolate chips if you want that extra sweetness. Get creative with flavors! A splash of almond extract can add depth. You could also try adding cardamom for a warm spice. Want something more citrusy? Use lime juice and zest instead of lemon. Each swap can give your blondies a new taste. Feel free to explore the full recipe for all the details! To keep your strawberry lemon blondies fresh, store them in an airtight container. Make sure they cool completely first. This prevents them from becoming soggy. You can keep them at room temperature for up to three days. If you want them to last longer, refrigerate them. They will stay good in the fridge for about a week. Just remember to let them come to room temperature before serving. Freezing is a great option if you want to save some blondies for later. To freeze them, first cut the blondies into squares. Wrap each square tightly in plastic wrap. Then, place them in a freezer-safe bag or container. They can stay in the freezer for up to three months. When you are ready to eat them, just take out the number you want. Let them thaw in the fridge overnight or at room temperature for a few hours. Reheating your blondies is easy and quick. You can use the microwave for this. Place a square on a microwave-safe plate. Heat it for about 10-15 seconds. Check to see if it is warm enough. If not, heat in additional 5-second bursts. You can also reheat them in the oven. Preheat the oven to 350°F (175°C). Place the blondies on a baking sheet and warm them for about 5-10 minutes. This helps bring back their soft texture. Enjoy your delicious treat! Strawberry Lemon Blondies last about 3 to 5 days when stored right. Keep them in an airtight container. This helps keep them fresh and moist. If you want to enjoy them longer, consider freezing them. Yes, you can make these blondies ahead of time. They taste great even after a day or two. Just let them cool completely before storing. This way, the flavors can meld beautifully. These blondies pair well with many treats. Here are some great options: - Vanilla ice cream - Fresh whipped cream - A cup of tea or coffee - Lemonade for a refreshing drink These pairings enhance the bright flavors of the blondies. Yes, you can use frozen strawberries. Just make sure to thaw and drain them first. This helps remove extra moisture. Chopped, they work well in the batter, adding that fruity goodness. In this post, we explored ingredients, baking steps, tips, and variations for Strawberry Lemon Blondies. We discussed how to measure, mix, and bake them perfectly. I shared ways to avoid common mistakes and suggested storing and reheating tips. These blondies are a delightful treat, whether for a special event or a simple snack. You can customize them to suit your taste or dietary needs. Enjoy creating your own version of this sweet treat!

Strawberry Lemon Blondies Simple and Tasty Treat

If you’re craving a sweet and tangy treat, Strawberry Lemon Blondies are the answer! With their vibrant flavors and chewy

- 1 cup rolled oats - 1/2 cup creamy peanut butter - 1/3 cup honey or pure maple syrup I love starting with the main ingredients. They are simple but crucial. The rolled oats give texture and fiber. Creamy peanut butter adds healthy fats and protein. Honey or maple syrup adds a touch of sweetness. - 1/2 cup chocolate chips (dark or milk) - 1/4 cup ground flaxseed - 1/2 teaspoon pure vanilla extract - A pinch of sea salt Next, we add some fun. Chocolate chips make these energy balls a treat. You can pick dark or milk chocolate, based on your taste. Ground flaxseed boosts nutrition and adds fiber. Vanilla extract gives a warm flavor, while sea salt balances the sweetness. - Chopped nuts or seeds - Protein powder - Dried fruits Want to mix things up? You can add nuts or seeds for crunch. Protein powder can make them even more filling. Dried fruits, like raisins or cranberries, add extra sweetness and chewiness. For the full recipe, check out the main article. You will enjoy making these tasty snacks! First, grab a large mixing bowl. Add 1 cup of rolled oats, 1/4 cup of ground flaxseed, and a pinch of sea salt. Stir these dry ingredients with a wooden spoon until they blend well. In a separate bowl, mix 1/2 cup of creamy peanut butter, 1/3 cup of honey or pure maple syrup, and 1/2 teaspoon of pure vanilla extract. Blend these wet ingredients until smooth. Next, pour the wet mixture into the bowl of dry ingredients. Use a spatula or your hands to mix everything together. Make sure all the dry ingredients get moistened. Then, fold in 1/2 cup of chocolate chips. Distribute them evenly throughout the mixture, ensuring every bite is filled with chocolatey goodness. Now, cover the bowl with plastic wrap. Place it in the fridge for about 15 minutes. This chilling step makes the mixture easier to handle. After chilling, scoop small portions of the mixture. Roll each portion into 1-inch balls. Place them on a baking sheet lined with parchment paper. For the best results, return them to the refrigerator for another 15 to 30 minutes. Enjoy making these easy Chocolate Peanut Butter Energy Balls! For the full recipe, check out the provided link. For the best texture, you can adjust the amount of oats or nut butter. If your mixture feels too dry, add more peanut butter. If it seems too sticky, mix in a little more oats. This way, you can create the perfect balance for your energy balls. Mixing can be tricky sometimes. To make it easier, I suggest using your hands. Get in there! It helps blend everything well. If you prefer a tool, use a spatula. Just ensure you mix until all ingredients are combined. Want to take your energy balls to the next level? Consider adding spices like cinnamon or cocoa powder. A bit of cinnamon gives warmth, while cocoa adds rich chocolate flavor. You can also use flavored protein powder. It adds taste and boosts protein content, making these energy balls even better for your snack time. Make your energy balls look great! You can arrange them on a pretty plate or in a clear jar. This adds a fun touch for guests. For a little extra indulgence, drizzle melted chocolate over the balls before serving. It looks fancy and tastes amazing. You can find the Full Recipe to start making these delicious snacks today! {{image_4}} You can make your energy balls even more fun by changing the flavors. Try adding coconut flakes for a tropical twist. The sweet coconut pairs well with the rich chocolate and peanut butter. Just mix in about 1/2 cup of unsweetened coconut flakes when you combine your ingredients. You can also switch up the nut butter. Instead of peanut butter, you can use almond butter or cashew butter. Each nut butter brings its unique flavor and texture. This way, you can create a new taste with every batch. If you're looking for a vegan option, use maple syrup instead of honey. Also, swap in dairy-free chocolate chips. This keeps the energy balls tasty and suited for a vegan diet. For those needing gluten-free snacks, make sure your oats are certified gluten-free. You can also use sunflower seed butter if you have nut allergies. This way, you can enjoy a safe and delicious treat. Add some fun seasonal flavors to your energy balls. For a fall twist, mix in pumpkin spice. Just 1 teaspoon of pumpkin spice can make a big difference. It gives your energy balls a warm, cozy taste perfect for autumn. During the holidays, add a few drops of peppermint extract. This will turn your energy balls into a festive treat. A little minty flavor can make your snacks feel special and fun for family gatherings. To keep your chocolate peanut butter energy balls fresh, place them in an airtight container. This helps keep them moist and tasty. I recommend storing them in the fridge. They will stay fresh for about one week. If you notice any change in smell or texture, it may be time to toss them. If you want to store them for longer, freezing is a great option. To freeze, arrange the energy balls on a baking sheet. Make sure they do not touch each other. Freeze them for about an hour until they are firm. Then, transfer them to a freezer bag or container. They can last for up to three months in the freezer. When you want to eat them, simply take them out and thaw at room temperature for about 30 minutes. You can use leftover energy balls in many fun ways. Try adding them to smoothies for a boost of energy. Just blend one or two in with your favorite fruits. You can also chop them up and mix them into yogurt bowls for a tasty snack. If you’re on the go, grab a ball for a quick bite. They are perfect for busy days when you need a pick-me-up. For the full recipe, check out the instructions above and enjoy these delicious treats! Chocolate Peanut Butter Energy Balls can last about one week in the fridge. Store them in an airtight container. If you want to keep them longer, you can freeze them. In the freezer, they stay fresh for up to three months. Just remember to thaw them before you eat! Yes, you can substitute peanut butter if you have allergies or just prefer something else. Almond butter or cashew butter works great. Sunflower seed butter is another good choice. Each option gives a unique taste while keeping the energy balls tasty. These energy balls are quite healthy! They are packed with fiber, protein, and good fats. Each ball has about 100 calories, depending on the ingredients used. Rolled oats and flaxseed add nutrients, while peanut butter gives protein to help keep you full. These chocolate peanut butter energy balls are simple and fun to make. We mixed rolled oats, peanut butter, and honey for a tasty treat. You can add chocolate chips, nuts, or even spices for flavor. The steps are easy: mix, roll, and chill. Store them in a container for lasting freshness. Feel free to try different flavors or ingredients based on your taste. Enjoy these healthy snacks whenever you need energy, whether at home or on the go. They’re perfect for everyone!

Chocolate Peanut Butter Energy Balls Simple Snack Fix

Looking for a quick snack that packs a punch? Try my Chocolate Peanut Butter Energy Balls! They’re tasty, easy to

To make Roasted Garlic Broccoli Salad, gather these simple ingredients: - 2 fresh heads of broccoli, cut into bite-sized florets - 5 cloves of garlic, unpeeled and whole - 1/4 cup extra-virgin olive oil - 1 tablespoon freshly squeezed lemon juice - 1/4 cup finely grated Parmesan cheese - 1/4 cup pine nuts, lightly toasted - 1/4 teaspoon crushed red pepper flakes (optional for a kick) - Sea salt and freshly cracked black pepper to taste - Fresh parsley, finely chopped for a vibrant garnish You can make this salad your own! Here are some easy swaps: - Broccoli: Try green beans or Brussels sprouts instead. - Parmesan cheese: Use nutritional yeast for a vegan option. - Pine nuts: Substitute with walnuts or sunflower seeds for crunch. - Lemon juice: Apple cider vinegar works well if you don’t have lemon. - Red pepper flakes: Omit or use black pepper if you prefer mild flavors. Fresh broccoli makes a big difference in taste. Here’s what to look for: - Color: Choose bright green florets. Avoid yellow or wilted ones. - Stems: The stems should feel firm and sturdy, not soft or limp. - Leaves: Look for fresh leaves; they should be vibrant and not dried out. - Smell: Fresh broccoli has a clean, earthy scent. A strong odor signals it’s past its prime. Using these tips will help you create a delicious Roasted Garlic Broccoli Salad. For the full recipe, check out the [Full Recipe]. To start, gather all your ingredients. You will need broccoli, garlic, olive oil, lemon juice, Parmesan, pine nuts, red pepper flakes, salt, pepper, and parsley. 1. Preheat your oven to 400°F (200°C). This temperature works great for roasting. 2. Cut the broccoli into bite-sized florets. It helps to cook them evenly. 3. Leave the garlic cloves unpeeled and whole. They will roast better this way. 4. Place the broccoli and garlic on a large baking sheet. Make sure they are spread out, so they roast well. Roasting transforms the broccoli and garlic, making them sweet and tasty. 1. Drizzle olive oil over the broccoli and garlic. Use enough to coat them well. 2. Sprinkle sea salt and cracked black pepper over the veggies. This adds flavor. 3. Toss everything gently on the baking sheet. Ensure all pieces are well-coated. 4. Roast in the oven for 20-25 minutes. The broccoli should be tender and crispy. The garlic will turn golden brown. Once the veggies are roasted, it’s time to mix everything for the salad. 1. Take the baking sheet out of the oven and let it cool for a few minutes. 2. In a large bowl, combine the roasted broccoli and garlic. 3. Squeeze the soft roasted garlic into the bowl. Mix it with the broccoli for great flavor. 4. Add fresh lemon juice, grated Parmesan, and pine nuts. If you want heat, add red pepper flakes. 5. Toss everything together gently. Make sure the flavors blend well. 6. Taste your salad. Adjust the seasoning if needed. 7. Just before serving, sprinkle the chopped parsley on top for a fresh look. This salad brings together simple ingredients for a delicious side. For the complete recipe, check the Full Recipe section. To get your broccoli just right, start with fresh heads. Look for bright green florets. Cut them into bite-sized pieces for even cooking. Spread them out on your baking sheet. This helps them roast without steaming. Keep the oven at 400°F (200°C). Roast for about 20-25 minutes. You want them tender with crispy edges. Roasting garlic adds a sweet and rich taste. Use whole, unpeeled cloves for the best flavor. Place them on the baking sheet with the broccoli. They will turn golden brown and soft. Once roasted, you can squeeze the garlic out of the skins. Mix it with the broccoli for a deep garlic flavor. To make this salad sing, add fresh lemon juice. It brightens the dish and balances the garlic. Don’t forget the Parmesan cheese. It adds a salty and nutty flavor. Toasted pine nuts give a nice crunch. If you like heat, sprinkle some crushed red pepper flakes. Finally, finish with fresh parsley for color and freshness. For the full recipe, check out the Garlic-Kissed Roasted Broccoli Salad. {{image_4}} You can easily add more vegetables to this salad. Try carrots, bell peppers, or cherry tomatoes. Cut these veggies into similar sizes to the broccoli. This helps them roast evenly. Mixing colors makes your salad more fun and tasty. Each added veggie brings its own flavor and crunch. For a heartier salad, consider adding protein. Cooked chicken, shrimp, or chickpeas work well. Toss in cooked bacon bits for a smoky touch. If you want plant-based protein, use black beans or tofu. These options make your salad filling and satisfying. Keeping it gluten-free? No worries! This salad is already gluten-free. Just skip the Parmesan cheese for a dairy-free version. You can use nutritional yeast instead for a cheesy flavor. This way, everyone can enjoy this delicious dish without worry. To store leftovers, place the salad in an airtight container. This keeps it fresh. Make sure to cool it to room temperature first. If you have roasted garlic left, store it separately. This helps maintain the salad's flavor and texture. When you want to enjoy the salad again, simply reheat it in the oven. Preheat your oven to 350°F (175°C) and spread the salad on a baking sheet. Heat for about 10 minutes. This warms it up without making it soggy. You can also microwave it for a quick option. Heat in short bursts, stirring in between. The roasted garlic broccoli salad lasts about three days in the fridge. After that, the broccoli can lose its crunch. If you notice any off smells or sliminess, it's best to toss it. Always check before eating! Enjoy every bite while it’s fresh for the best taste. Yes, you can make this salad ahead. Roasted garlic broccoli salad tastes great even after a day. Just store it in the fridge in an airtight container. The flavors will blend nicely. However, to keep the broccoli crisp, add the dressing just before serving. If you need a substitute for Parmesan cheese, try nutritional yeast. It has a cheesy flavor and is dairy-free. You can also use pecorino cheese or a vegan cheese alternative. These options keep the salad tasty and fun! To keep broccoli from getting soggy, roast it until it’s just tender. Spread the florets out on the baking sheet without crowding them. This allows air to circulate and helps them crisp up. Always use fresh broccoli for the best results. Serve this salad in a large bowl to show off the colors. Drizzle a little extra olive oil on top for shine. A sprinkle of extra cheese adds to the look and taste. This salad is perfect as a side dish or a light meal. To roast garlic without burning it, keep the oven at 400°F (200°C). Wrap whole garlic cloves in foil with a bit of oil. Check them after 20 minutes. If they are soft and golden, they are done. This way, you get sweet, creamy garlic to mix into your salad. This article provides a complete guide to making a tasty roasted garlic broccoli salad. It covers ingredient lists, substitutes, and tips for fresh broccoli. The step-by-step section helps you prepare perfectly roasted garlic and broccoli for maximum flavor. I shared tips to achieve that ideal roast and variations for adding protein and veggies. Finally, you learned how to store leftovers and answers to common questions. With these tips, you can enjoy a healthy dish full of flavor anytime. Your cooking confidence will grow, and your meals will shine!

Roasted Garlic Broccoli Salad Flavorful and Easy Side

If you’re looking for a side dish that packs a punch, you’ve found it! My Roasted Garlic Broccoli Salad combines

To make blueberry chia jam, you need some simple ingredients. Here’s what you’ll need: - Fresh or frozen blueberries - Honey or maple syrup - Chia seeds - Lemon juice - Salt These ingredients work together to create a tasty and healthy jam. Fresh blueberries give the best taste, but frozen ones work just as well. Honey or maple syrup adds sweetness, so you can choose based on your taste. Chia seeds are the magic ingredient; they help the jam thicken and add some nutrition. Lemon juice gives a nice zing, while a pinch of salt enhances all the flavors. Using these ingredients makes it easy to whip up a delicious jam at home. You don’t need any fancy tools or hard-to-find items. Just gather these ingredients, and you are ready to go! For the complete cooking instructions, check out the Full Recipe. 1. Mashing the blueberries Start with your blueberries. If you use fresh ones, rinse them well. Place them in a medium saucepan. For frozen blueberries, you can add them straight from the bag. Use a fork or a potato masher to mash them gently. This step helps release their sweet juices. Aim for a chunky texture, which adds character to your jam. 2. Combining ingredients in a saucepan Next, add your choice of honey or maple syrup to the mashed blueberries. This will sweeten the jam. Mix in the freshly squeezed lemon juice and a pinch of salt. Stir well. This mixture creates a balanced flavor. The lemon juice brings a nice brightness. The salt enhances the sweetness. 3. Cooking until thickened Now, place the saucepan over medium heat. Cook the mixture for about 5 minutes. Stir it often while it cooks. You will see the blueberries soften. Once they begin to bubble, lower the heat to a gentle simmer. Add the chia seeds. Stir them in well. Keep cooking for an additional 2-3 minutes. The chia seeds will absorb liquid and thicken the jam. Remove the saucepan from heat. Let it cool at room temperature, where it will thicken even more. This simple process makes a tasty blueberry chia jam. You can enjoy this jam on toast or as a topping for yogurt. For the complete recipe, check out the Full Recipe. Adjusting sweetness levels You can make your jam sweeter or less sweet. Start with 2 tablespoons of honey or maple syrup. After cooking, taste the jam. If you want it sweeter, add a little more syrup. Always mix well after adding more to blend the flavors. Ensuring optimal thickness To get the right thickness, watch how long you cook the jam. The chia seeds will absorb some liquid as you cook. If it seems too runny, let it simmer a bit longer. Stir often to avoid burning. When it cools, it will thicken more. Using the right storage container Choose a clean jar or airtight container for storing your jam. Glass jars work well because they keep the jam fresh. Once cooled, pour the jam into the jar and seal it tightly. This keeps it safe in the fridge for up to two weeks. For longer storage, consider freezing it in safe containers. For the full recipe, check out Blueberry Chia Jam Delight. {{image_4}} You can easily make this jam your own. Here are a few fun ideas to try: - Adding other berries for mixed fruit jam: Mix blueberries with raspberries, strawberries, or blackberries. This adds new flavors and colors. You can use a mix of fresh or frozen berries. Just keep the same amount, two cups total. - Infusing flavors with spices: Want to spice things up? Add a dash of cinnamon or nutmeg. You can also try ginger for a warm note. Just a little goes a long way. Start with 1/4 teaspoon and adjust to taste. - Making it sugar-free with alternative sweeteners: You can use stevia or monk fruit instead of honey or maple syrup. This way, you can enjoy jam without added sugar. Adjust the amount based on your sweetness preference. Feel free to mix and match these ideas to create a jam that suits your taste. Enjoy exploring different flavors! To keep your blueberry chia jam fresh, use clean glass jars. Glass helps preserve flavor and nutrients. Make sure the jars are airtight to prevent spoilage. Your jam will last in the fridge for about two weeks. Store it in the back of the fridge where it stays cold. Check for any signs of spoilage before using it. If you want to save it for longer, freezing is a great option. Pour the cooled jam into freezer-safe containers. Leave some space at the top, as the jam will expand when frozen. It can last for up to six months in the freezer. With these easy storage tips, you can enjoy your blueberry chia jam anytime. For the complete recipe, check out the Full Recipe section. How long does blueberry chia jam last? Blueberry chia jam lasts about two weeks in the fridge. Make sure you store it in an airtight jar. This keeps it fresh and tasty. If you want it to last longer, you can freeze it. Can I use frozen blueberries for this recipe? Yes, you can use frozen blueberries. They work just as well as fresh ones. Just thaw them slightly before cooking. This helps them break down easier. It’s a great way to enjoy blueberry chia jam all year round. What are the health benefits of chia seeds and blueberries? Chia seeds are rich in fiber and healthy fats. They help keep you full and support digestion. Blueberries are full of antioxidants, vitamins, and minerals. They boost your immune system and are good for your heart. Together, they make a tasty and nutritious jam. For the full recipe, check out the Blueberry Chia Jam Delight section above. You can make delicious blueberry chia jam using just a few simple ingredients. We covered everything from mashing blueberries to cooking the mix until thick. Adjusting sweetness and perfect storage options can enhance the taste. Feel free to explore variations, whether you add other fruits or herbs for new flavors. Remember, this jam can last in the fridge or even be frozen for later use. Enjoy your tasty creation and share your love for this healthy treat!

Blueberry Chia Jam Simple and Flavorful Recipe

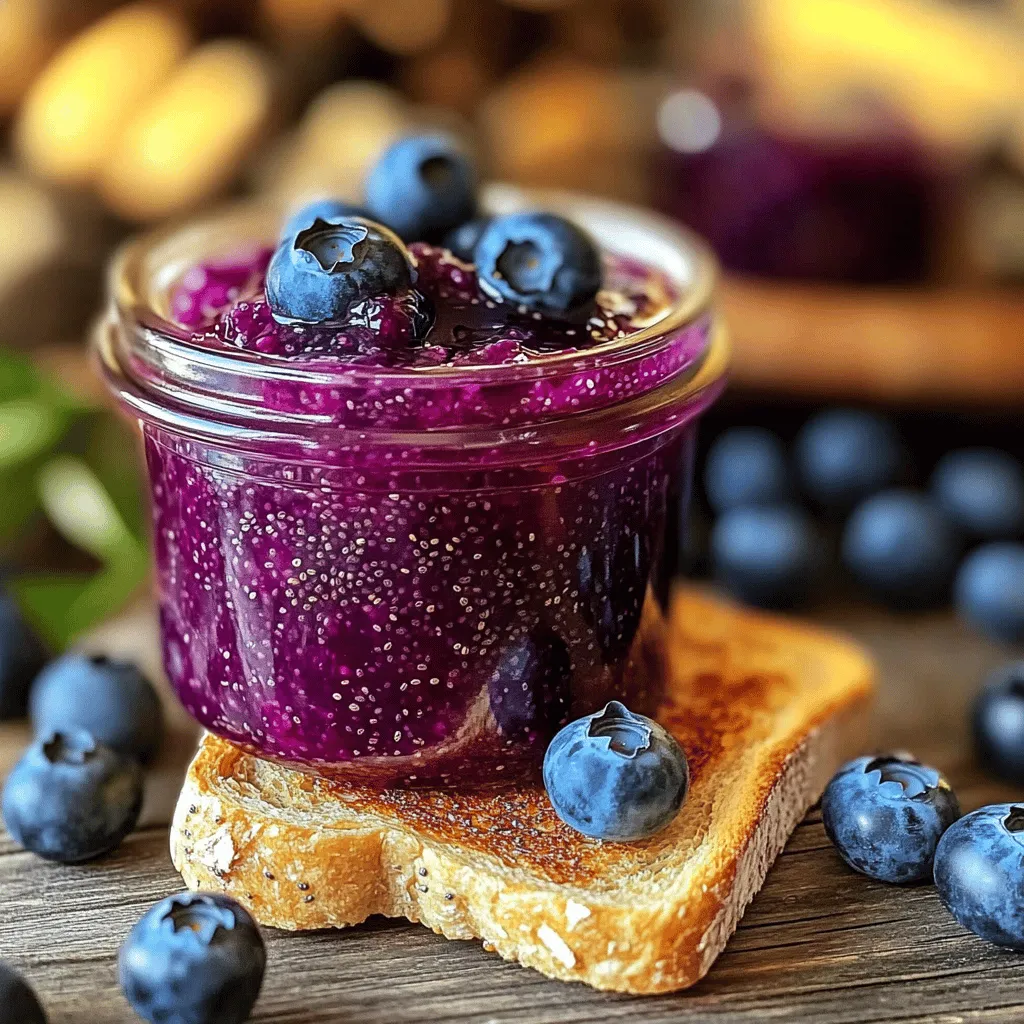
Are you looking for a simple and tasty way to enjoy blueberries? This Blueberry Chia Jam recipe is easy to

To make these delightful no-bake cheesecake cups, you need to gather a few key ingredients. Each adds its own charm to the dish. Here’s what you will need: - 1 cup cream cheese, softened to room temperature - 1 cup creamy Greek yogurt - 1/2 cup powdered sugar - 1 teaspoon pure vanilla extract - 1/4 cup heavy cream - 1 cup mixed fresh berries (strawberries, blueberries, and raspberries work well) - 1/2 cup crushed graham crackers - 2 tablespoons melted unsalted butter - Fresh mint leaves for an eye-catching garnish The cream cheese and Greek yogurt create a rich and creamy texture. The berries provide a burst of flavor and color. The graham crackers and butter form a crumbly crust that holds everything together. Feel free to explore the Full Recipe for detailed instructions on how to combine these ingredients into a delicious treat! 1. Mixing the cheesecake base Start by taking a large bowl. Add softened cream cheese, Greek yogurt, powdered sugar, and vanilla extract. Beat these items together with an electric mixer on medium speed. Mix until the blend is smooth and creamy. Make sure there are no lumps. This step is key for a creamy texture. 2. Whipping the cream In another bowl, pour in your heavy cream. Use a hand mixer or whisk to whip it. Keep whisking until you see stiff peaks form. This tells you the cream is fluffy enough. It adds air to your cheesecake, making it light. 3. Assembling the cups with crust and filling In a separate bowl, combine crushed graham crackers and melted butter. Stir until the crumbs feel like wet sand. Next, prepare your serving cups. Divide the graham cracker mixture equally among them. Press it down lightly with the back of a spoon. This forms a nice crust. Now, spoon in your cheesecake mixture on top of the crust. Fill each cup generously to the rim. 4. Chilling for optimal texture Top each cheesecake cup with a handful of mixed berries. This adds color and flavor. Place the cups in the refrigerator. Chill them for at least 2 hours. This step helps the cheesecake to set and flavors to develop. If you want to get fancy, add a mint leaf on top just before serving. You can find the Full Recipe for these delicious No-Bake Cheesecake Cups in the recipe section above. - Overmixing the cream cheese mixture: When you mix the cream cheese too much, it can become too soft. This makes your cheesecake cups less fluffy. Aim for a smooth blend, but stop once it’s creamy. - Not chilling the cups long enough: Chilling is key! If you don’t chill the cups for at least two hours, they won’t set properly. This can lead to a messy serve. Patience is a virtue here! - Using stale graham crackers: Freshness matters! Old graham crackers can ruin the crust's taste and texture. Be sure to check the date before using them. - Serving suggestions for a colorful display: Use a bright platter to serve your cheesecake cups. This adds color to your table. You can also arrange them in a circle or line. It makes a fun centerpiece! - Garnishing ideas to enhance visual appeal: Fresh mint leaves add a pop of green. You can also sprinkle some extra berries on top. This not only looks good but also tastes great! For a final touch, drizzle some berry sauce around the cups for extra flair. Follow these tips, and your No-Bake Cheesecake Cups will be a hit! For the full recipe, check the section above. {{image_4}} You can change up the flavors in your no-bake cheesecake cups. Here are some fun ideas: - Chocolate cheesecake option: Mix in melted chocolate or cocoa powder into the cream cheese mix. It adds a rich and sweet flavor that chocolate lovers will adore. - Lemon or citrus-infused cheesecake: Use fresh lemon juice and zest. This gives your cheesecake a bright and zesty taste that wakes up your palate. - Seasonal fruit variations: Swap the mixed berries for seasonal fruits. Think peaches in summer or apples in fall. Each fruit brings its own unique flavor. Toppings can add color and texture to your cheesecake cups. Consider these options: - Different berries or fruit compotes: Use strawberries, blueberries, or even mango puree. These toppings not only look great but also bring extra taste. - Whipped cream or chocolate shavings: A dollop of whipped cream adds lightness, while chocolate shavings give a touch of luxury. - Nut toppings for crunch: Sprinkle crushed nuts like almonds or walnuts on top. They add a nice crunch and a nutty flavor that pairs well with the creamy cheesecake. Feel free to mix and match these variations to create your perfect no-bake cheesecake cups. For the full recipe, check out the No-Bake Berry Delight Cheesecake Cups. To keep your No-Bake Cheesecake Cups fresh, store them in the fridge. Place the cups in an airtight container. This stops air from drying them out. If you want to save some for later, freezing is an option. Wrap each cup tightly in plastic wrap and then place them in a freezer-safe bag. This way, they stay fresh for longer. In the fridge, your cheesecake cups will stay fresh for about 3 to 5 days. After this time, they may not taste as good. Watch for signs of spoilage. If you see any mold or if they smell off, it’s best to toss them. Enjoy your treats while they are at their best! Yes, you can make these cheesecake cups a day in advance. This helps the flavors blend well. Just keep them in the fridge until you are ready to serve. The longer they chill, the better they taste. If you want a lighter option, use ricotta cheese. It gives a nice texture and taste. Another option is mascarpone cheese, which is also creamy and rich. The cheesecake cups are set when they feel firm to the touch. You can also check by gently shaking the cup. If the filling jiggles slightly, it needs more time in the fridge. Yes, you can! Use dairy-free cream cheese or cashew cream. Greek yogurt can be swapped for a dairy-free yogurt. This way, you can enjoy a tasty dessert that fits your diet. In this post, we explored how to make no-bake cheesecake cups. We covered the key ingredients, like cream cheese, fresh berries, and graham crackers. You learned step-by-step instructions to mix, whip, and chill your dessert. I also shared tips to avoid common mistakes, plus ideas for toppings and flavors. Remember, these treats are easy to store and adapt. Whether you stick to classic flavors or try new ones, enjoy the process. No-bake cheesecake cups are fun and tasty for everyone!

No-Bake Cheesecake Cups Creamy Delight Recipe

If you crave a sweet treat without the fuss of baking, you’ll love my No-Bake Cheesecake Cups! This creamy delight

Older posts
Newer posts
← Previous Page1 … Page9 Page10 Page11 … Page72 Next →

dsad

© 2025 tastyhatch • Built with GeneratePress

Our Policies

  • Copyright Policy
  • Cookie Policy
  • GDPR Policy
  • Privacy Policy
  • Disclaimer
  • Terms Of Use

More Information

  • Home
  • About
  • Contact
  • Appetizers
  • Dessert
  • Dinner
  • Drinks
©2025, tastyhatch About Back To Top