Skip to content
DisclaimerTerms Of UseGDPR PolicyCookie Policy

tastyhatch

  • Home
  • Drinks
  • Appetizers
  • Dinner
  • Dessert
  • About
  • Contact
  • Privacy Policy
DisclaimerTerms Of UseGDPR PolicyCookie Policy

Olivia

For a tasty Zucchini Noodle Pad Thai, you need the right ingredients. Here’s what you’ll use: - 4 medium zucchinis, spiralized into noodles - 1 cup fresh bean sprouts - 1 cup shredded carrots - 1 red bell pepper, thinly sliced into strips - 3 green onions, chopped finely - 2 cloves garlic, minced - 1 tablespoon fresh ginger, grated - 3 tablespoons creamy peanut butter (or almond butter for a nuttier flavor) - 2 tablespoons soy sauce (or tamari for a gluten-free option) - 2 tablespoons fresh lime juice - 1 tablespoon fragrant sesame oil - 1 teaspoon chili paste (adjust according to your spice preference) - 1/4 cup roasted peanuts, roughly chopped for garnish - Fresh cilantro leaves for garnish These ingredients create a bright and fresh dish. The zucchini noodles replace traditional rice noodles, making it light and healthy. The crunchy veggies add color and texture. The peanut butter and soy sauce blend for a creamy, savory sauce. Each bite bursts with flavor, and the garnishes take it to the next level. You can check out the Full Recipe for detailed steps and tips! Spiralizing the zucchinis First, grab your spiralizer or a vegetable peeler. Take the zucchinis and turn them into noodle-like strands. This step is fun and easy. Place the spiralized zucchini in a bowl and set it aside for later. Sautéing the aromatics and vegetables Next, heat your skillet or wok over medium-high heat. Add the sesame oil. Once it's hot, toss in the minced garlic and grated ginger. Sauté these for about 30 seconds. You want to smell those wonderful aromas! Then, add the sliced red bell pepper and shredded carrots. Cook them for 2-3 minutes. They should soften but still have a nice crunch. Combining with sauce and serving Now it’s time for the star of the show: the zucchini noodles. Gently add them to the skillet. Cook for another 2-3 minutes, stirring gently. You want to keep them firm. In a separate bowl, whisk together the peanut butter, soy sauce, lime juice, and chili paste. Pour this sauce over the veggies and noodles in the skillet. Stir well to coat everything evenly. Finally, add the fresh bean sprouts and chopped green onions. Toss everything together until heated through. Serve your dish hot, topped with chopped roasted peanuts and fresh cilantro leaves. For the full recipe, check out the complete details above. Enjoy your colorful and tasty Zucchini Noodle Pad Thai! Maintaining the texture of zucchini noodles To keep zucchini noodles firm, avoid cooking them too long. Sauté them just until they warm. This keeps them crunchy and tasty. If you want more texture, you can briefly salt the noodles before cooking. This draws out some moisture. Adjusting spice levels If you love spice, add more chili paste. Start with one teaspoon, and taste as you go. You can always add more but can’t take it out once mixed. For a milder dish, reduce the chili paste. You can also use sweet chili sauce for a sweet twist. Importance of fresh ingredients Using fresh veggies makes a big difference. Crisp bell peppers and vibrant green onions boost flavor and color. Fresh lime juice adds brightness, while garlic and ginger give depth. Always choose the best ingredients you can find. This will lift your dish and impress your guests. For the full recipe, check out the Zucchini Noodle Pad Thai 🥒 section. {{image_4}} You can easily change this Zucchini Noodle Pad Thai to fit your diet. - Vegan substitutions: To make this dish vegan, use plant-based peanut butter and tamari. This keeps the creamy texture and flavor without animal products. - Gluten-free options: If you need gluten-free, swap soy sauce for tamari. It tastes great and keeps your dish safe for those with gluten issues. - Adding protein sources: If you want more protein, add tofu, chickpeas, or cooked chicken. Tofu is a great vegan option. Just sauté it until golden brown before mixing it with the other veggies. These adaptations make this dish flexible. You can enjoy it no matter your dietary needs. For the full recipe, check the Zucchini Noodle Pad Thai 🥒 section. To keep your Zucchini Noodle Pad Thai fresh, store leftovers in an airtight container. Place the container in the fridge. This dish stays good for 2-3 days if stored properly. When you're ready to eat, reheating is key. Use a skillet over low heat. Add a splash of water to help steam the noodles. This method keeps them from turning mushy. Stir gently as they warm up to maintain their texture. If you have extra sauce, heat it up separately. This way, you can add it for extra flavor when serving. Enjoy your delicious leftovers just like the first time! Can I make this dish ahead of time? Yes, you can prepare some parts in advance. Spiralize the zucchinis and chop the veggies ahead of time. Store them in the fridge. This makes cooking quick and easy. However, I suggest making the sauce fresh for the best flavor. How do I store zucchini noodles? Store zucchini noodles in an airtight container. Place a paper towel in the container to absorb excess moisture. This keeps them fresh for about 2-3 days. Avoid freezing them, as it changes the texture. What can I use instead of peanut butter? If you need a swap, try almond butter. It adds a nice nutty taste. Sunflower seed butter also works well for a nut-free option. Each choice gives a unique flavor, so feel free to experiment. - Full Recipe Reference: Zucchini Noodle Pad Thai 🥒 In this blog post, we explored how to create a tasty Zucchini Noodle Pad Thai. We covered the main ingredients, including the fresh veggies and sauces. The step-by-step guide made cooking easy. Tips helped maintain the perfect texture. We discussed dietary options for everyone, plus ways to store and reheat leftovers. Overall, making this dish is simple and fun. With these ideas, you can enjoy a healthy twist on a classic favorite. Dive into your kitchen and give it a try!

Zucchini Noodle Pad Thai Flavorful and Easy Recipe

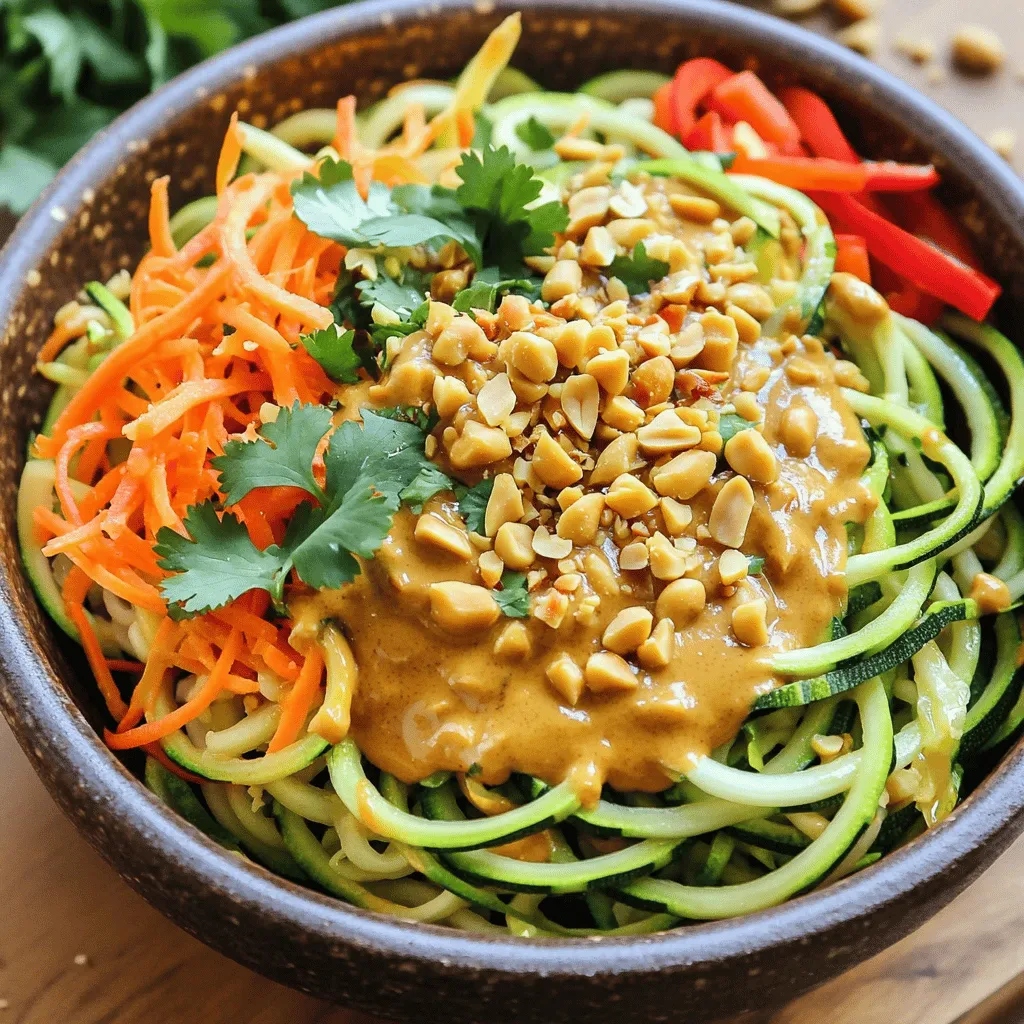
Looking for a fresh twist on a classic dish? My Zucchini Noodle Pad Thai is both tasty and easy to

When making Peach Brie Puff Pastry Bites, gather these fresh ingredients. Each one adds flavor and texture. - 1 sheet of puff pastry, thawed - 8 ounces brie cheese, cut into small cubes - 2 ripe peaches, thinly sliced - 2 tablespoons honey - 1 tablespoon fresh thyme leaves (or 1 teaspoon dried thyme) - 1 egg, beaten (for egg wash) - Salt and pepper, to taste Using high-quality ingredients makes a big difference. The puff pastry should be flaky and light. Choose ripe peaches for natural sweetness. The brie cheese should be creamy, creating a rich filling. Fresh thyme adds a nice herbal note. Honey brings a touch of sweetness that balances the flavors. You can find the full recipe for these bites in my article. Make sure to follow the steps closely for the best results. Enjoy the cooking process, and feel free to get creative! - Preheat Oven: First, set your oven to 400°F (200°C). This helps the pastry become golden and flaky. - Roll Out Puff Pastry: Take your thawed puff pastry and place it on a clean surface. Lightly flour the surface to avoid sticking. Roll out the pastry to smooth it out. - Cut into Squares: Use a sharp knife or pastry cutter to slice the pastry into 2x2 inch squares. These will hold your tasty filling. - Adding Brie Cheese: Place a small cube of brie cheese in the center of each pastry square. The brie will melt nicely as it bakes, adding creaminess. - Layering Peach Slices: On top of the brie, lay a few thin slices of ripe peach. This adds sweetness and a fresh flavor to every bite. - Drizzling Honey and Seasoning: Drizzle a bit of honey over the peach slices. Then, sprinkle fresh thyme, salt, and pepper to enhance the flavors. - Folding and Sealing: Fold the corners of each pastry square toward the center. Pinch the edges firmly to seal in the cheese and fruit. - Applying Egg Wash: Use a pastry brush to apply the beaten egg on top of each bite. This gives them a shiny, golden finish when baked. - Baking Time and Temperature: Place the filled pastry bites on a lined baking sheet, leaving space between them. Bake for 15-20 minutes until they puff up and turn golden brown. For the complete method, check out the Full Recipe. Enjoy your delightful Peach Brie Puff Pastry Bites! Choosing the Best Brie Pick a ripe brie for the best flavor. It should be soft and creamy. Look for a brie with a nice white rind. This adds texture and taste to your bites. If you can, try different brands to find your favorite. Ensuring Proper Puff Pastry Thickness Roll your puff pastry to about 1/8 inch thick. This ensures it puffs up nicely. If it's too thick, it won't cook evenly. If it's too thin, it may tear during baking. Keep your surface lightly floured while rolling to avoid sticking. Presentation Ideas Serve these bites warm on a wooden board. A rustic slate platter also works well. Add extra thyme sprigs on top for color. Drizzle more honey over the bites for an elegant touch. This makes them look appealing and taste even better. Ideal Accompaniments Pair these bites with a crisp white wine. A light rosé also complements the flavors well. Add a simple green salad on the side for a balanced meal. You can even serve them at parties for a delightful appetizer. Spice Variations Try adding a pinch of cayenne pepper for a kick. Paprika can also add warmth without too much heat. If you prefer sweetness, consider cinnamon or nutmeg. These spices enhance the peach flavor nicely. Substitutions for Seasonal Fruits If peaches are out of season, use pears or apples. Both fruits work well with brie and honey. You can also try figs for a unique twist. Each fruit will give your bites a different flavor profile. For the full recipe, refer to the [Full Recipe]. {{image_4}} You can change up the cheese in your peach brie puff pastry bites. Try goat cheese or creamy mascarpone for a new twist. These cheeses bring different flavors and textures. You can also mix brie with sharp cheddar for an exciting blend. Adding nuts or dried fruits can enhance the bites too. Chopped walnuts or pecans give a nice crunch. Dried cranberries or figs add a sweet touch. These additions make each bite more interesting. Mixing sweet and savory flavors creates a delightful contrast. Pair peaches with maple syrup instead of honey for a deeper sweetness. A dash of balsamic glaze can add a tangy kick. You can also try herb alternatives. Instead of thyme, consider rosemary or basil. These herbs add a fresh, aromatic quality. Experimenting with flavors keeps your bites exciting. Make-ahead options help save time when hosting. You can assemble the bites a few hours before baking. Just cover them and keep them in the fridge until you’re ready to bake. Freezing is another great way to prepare ahead. Assemble the bites and place them on a baking sheet. Freeze until firm, then transfer them to a freezer bag. You can bake them straight from the freezer. Just add a few extra minutes to the baking time. For the full recipe, check the details above. Enjoy these delicious variations! To keep your Peach Brie Puff Pastry Bites fresh, store them in the fridge. Place them in an airtight container. They can stay good for about three days. If you want to reheat them, use an oven. Set it to 350°F (175°C) and bake for 10 minutes. This keeps the pastry crispy. - Puff Pastry: Unopened, it lasts in the freezer for up to a year. Once opened, use it within a few days. - Cooked Brie Cheese: It keeps well in the fridge for about five days. Always check for any unusual smell before using. Use glass or plastic containers with tight lids for the best storage. Avoid stacking the bites on top of each other. This prevents them from getting squished. If you have extra space, consider wrapping them in foil before placing them in the container. This keeps them even fresher. For longer storage, you can freeze the unbaked bites. Just make sure to follow the Full Recipe for guidance. Can I use phyllo dough instead of puff pastry? Yes, you can use phyllo dough. However, it will not puff up as much. Phyllo gives a different texture. It will still taste good, but it won't be as flaky or airy as puff pastry. How can I ensure my puff pastry rises properly? To help puff pastry rise, keep it cold before baking. Make sure your oven is preheated to 400°F (200°C). Avoid opening the oven door while baking. This keeps the heat inside, which helps the pastry rise nicely. What substitutes can I use for peaches? You can use nectarines or apricots for a similar flavor. Plums also work well. If you want something unique, try figs or berries. Each adds a nice sweetness. Can these be made ahead and frozen? Yes, you can make these ahead. Assemble the bites and freeze them before baking. When you are ready to eat, bake them straight from the freezer. Just add a few extra minutes to the baking time. What is the best way to reheat puff pastries? The best way to reheat puff pastries is in the oven. Set it to 350°F (175°C) and bake for about 10 minutes. This keeps the pastry crispy. Avoid the microwave, as it can make them soggy. How do I know when they are done baking? Your puff pastries are done when they are golden brown. The edges should be puffed and flaky. If you see a nice color, they are ready to come out. Enjoy your Peach Brie Puff Pastry Bites! These puff pastry bites are simple yet delicious. You start with puff pastry and brie cheese, then layer in ripe peaches, honey, and thyme. The baking process transforms these ingredients into golden, tasty treats. Focus on quality ingredients and presentation to impress your guests. In conclusion, mastering this recipe opens doors for creativity. Use different cheeses or fruits to make each batch unique. Enjoy the process and share your delightful creations with friends.

Peach Brie Puff Pastry Bites Irresistible Appetizer

Looking for a simple yet delicious appetizer? Let me introduce you to Peach Brie Puff Pastry Bites. These tasty treats

To make a vibrant Summer Squash Ribbon Salad, you need fresh, simple ingredients. Here’s what to gather: - 2 medium yellow summer squash - 1 medium zucchini - 1 cup cherry tomatoes, halved - 1/4 cup feta cheese, crumbled - 1/4 cup walnuts, toasted and chopped - 1/4 cup fresh basil leaves, torn into pieces - 2 tablespoons extra virgin olive oil - 2 tablespoons fresh lemon juice - Sea salt and freshly ground black pepper to taste Each ingredient plays a vital role in this dish. The summer squash and zucchini provide a fresh crunch. The cherry tomatoes add a pop of color and sweetness. Feta cheese gives a creamy texture, while walnuts add a nice crunch. Fresh basil brings a lovely aroma and bright flavor. When choosing your squash, look for firm ones with smooth skin. This ensures your salad will be crisp and flavorful. For the best taste, use fresh herbs and quality olive oil. You can find the Full Recipe for more detailed steps. Enjoy making this fresh and flavorful dish! First, wash the summer squash and zucchini well. Use cool running water to clean them. Next, trim off both ends of each vegetable. This step ensures the veggies are tidy. After that, it’s time to create ribbons. Grab a vegetable peeler or a mandoline slicer. Carefully slice the summer squash and zucchini into long, thin strips. Aim for delicate ribbons that enhance texture and look. Now, let’s mix the ingredients. In a large bowl, combine the squash and zucchini ribbons. Add the halved cherry tomatoes to this mix. Make sure the ingredients are evenly mixed. In a separate small bowl, whisk together the dressing. Use extra virgin olive oil and fresh lemon juice. Add a pinch of sea salt and some freshly ground black pepper. Whisk until everything blends well. Taste the dressing and adjust the seasoning to your liking. Next, it’s time to assemble the salad. Drizzle the dressing over the vegetable mixture. Toss gently using a spatula. Be careful not to break the ribbons. After that, sprinkle in the crumbled feta cheese, toasted walnuts, and torn basil leaves. Toss again to mix these toppings evenly. Finally, let the salad rest for about 10 minutes. This wait helps the flavors blend. You will notice the taste improves as the salad sits. This step is key before serving. It allows for a more delicious experience. Enjoy your vibrant and refreshing salad with every bite! For the full recipe, check the previous sections. To get the best texture, pick fresh, firm summer squash and zucchini. Look for bright colors and smooth skin. Using a spiralizer can create fun, curly shapes. This can make your salad look more appealing and fun to eat. Your dressing plays a big role in flavor. Adjust the acidity and seasoning to fit your taste. For the best flavor, always use freshly squeezed lemon juice. It brightens the salad and adds a zesty kick that pairs well with the squash. This summer squash ribbon salad shines as a side dish for summer barbecues. It adds freshness to grilled meats and fish. You can also enjoy it as a light lunch on its own. Pair it with crusty bread or a simple protein for a complete meal. {{image_4}} You can easily switch up the cheese in this salad. Goat cheese or Parmesan adds a new flavor. If you have nut allergies, replace walnuts with pecans or sunflower seeds. Both options still give a nice crunch. Need more flavor? Try adding sliced olives or capers. They bring a briny taste that balances the salad. You can also mix in other seasonal veggies. Bell peppers or carrots add color and crunch. Want a vegan version? Just leave out the cheese and use a plant-based dressing. It’s just as tasty! For those needing gluten-free meals, ensure you use certified gluten-free ingredients. This way, everyone can enjoy this fresh dish. For the full recipe, check out the complete guide! After enjoying your summer squash ribbon salad, store any leftovers in an airtight container. This keeps the salad fresh and crunchy. I recommend eating it within 1-2 days. The flavors taste best when fresh. If your salad feels a bit bland the next day, don’t worry! Just add some extra dressing to bring the flavors back to life. You can also toss in fresh herbs like basil or parsley. This adds brightness and makes the salad feel vibrant again. To make summer squash ribbons, you need a vegetable peeler or a mandoline slicer. Start with clean summer squash. Trim off the ends. Hold the squash and peel long, thin ribbons. Keep the pressure even to ensure they are uniform. The thinner the ribbons, the better they blend into your salad. Yes, you can add other veggies! Carrots and cucumbers work well. Bell peppers add color and crunch. Radishes bring spice and zest. Feel free to mix and match based on your taste! This salad is very healthy! Summer squash is low in calories and high in vitamins. It has fiber, which is great for digestion. Cherry tomatoes boost your vitamin C intake. Feta and walnuts add healthy fats and protein. It’s a nutritious choice for any meal. It takes about 15 minutes to prep. The total time, including tossing everything together, is around 25 minutes. It’s a quick meal option for busy days. You can whip it up in no time! You can prep the salad in advance! Make the ribbons and chop the veggies. Store them in the fridge but keep the dressing separate. Mix everything together just before serving. This way, your salad stays fresh and crisp. This salad combines fresh summer squash, zucchini, and tomatoes for a tasty dish. I showed you how to prepare the ingredients, mix them, and let the salad rest for flavor. You can also tweak it with variations to suit your taste or dietary needs. Remember to store any leftovers properly, as they are best eaten within two days. Enjoy this colorful salad at your next barbecue or as a light lunch!

Summer Squash Ribbon Salad Fresh and Flavorful Dish

Summer is the perfect time to enjoy fresh flavors, and my Summer Squash Ribbon Salad hits the mark! This vibrant

- 1 medium zucchini, grated - 1 medium carrot, grated - 1 cup all-purpose flour - 1/2 cup whole wheat flour - 1/2 cup brown sugar, packed - 1/4 cup granulated sugar The main flavors in these muffins come from the grated zucchini and carrot. They add moisture and a subtle sweetness. The combination of all-purpose and whole wheat flour gives a nice texture. Brown sugar adds richness, while granulated sugar brings out the natural flavors. - 1/2 cup chopped walnuts or pecans - 1/4 cup raisins or chocolate chips You can add chopped nuts for crunch. If you prefer a sweeter muffin, throw in some raisins or chocolate chips. These optional ingredients can make your muffins unique. - 1/2 teaspoon baking soda - 1 teaspoon baking powder - 1/2 teaspoon ground cinnamon - 1/4 teaspoon ground nutmeg - 1/2 teaspoon salt These baking staples help your muffins rise and create a lovely flavor. Baking soda and baking powder are important for texture. The cinnamon and nutmeg add warmth and spice. Salt enhances all the flavors in the mix. For the full recipe, check out the detailed steps in our guide. - Preheat the oven to 350°F (175°C). - Prepare your muffin tin by lining it with paper liners or spraying it lightly with cooking spray to prevent sticking. - In a medium bowl, combine the grated zucchini and grated carrot. Let them sit for a few minutes to drain excess moisture. - In a large bowl, whisk together the all-purpose flour, whole wheat flour, brown sugar, granulated sugar, baking soda, baking powder, ground cinnamon, ground nutmeg, and salt. Blend these dry ingredients well. - In a separate bowl, whisk the vegetable oil, eggs, and vanilla extract until smooth. - Gradually pour the wet mixture into the dry ingredients. Stir gently until just combined. It’s fine if a few lumps remain in the batter. - Carefully fold in the drained zucchini and carrot mixture. You can also add chopped nuts, raisins, or chocolate chips. - Using a spoon or ice cream scoop, fill each muffin cup about two-thirds full. This allows space for the muffins to rise. - Bake in the preheated oven for about 18 to 22 minutes. Check with a toothpick; it should come out clean. - After baking, let the muffins cool in the tin for about 5 minutes. Transfer them to a wire rack to cool completely. This recipe is simple and fun. Follow the [Full Recipe] for detailed instructions and enjoy your delicious muffins! To make the best zucchini carrot muffins, avoid overmixing the batter. Mixing too much makes the muffins tough. Stir gently until just combined. It’s okay to have some lumps. Check for doneness by inserting a toothpick into the center of a muffin. If it comes out clean, your muffins are ready. If it has wet batter, bake a few more minutes. You can adjust the spices to enhance flavor. Try adding more cinnamon or nutmeg for a warm taste. If you love a kick, add a pinch of ginger or cloves. Toppings can also boost flavor. Sprinkle chopped nuts or chocolate chips on top before baking. You can add a drizzle of honey after baking for extra sweetness. Choose a non-stick muffin tin for easy removal. Silicone muffin pans work well too. They help muffins lift out cleanly. Keep an eye on your oven temperature. If it’s too hot, the muffins can burn. An oven thermometer helps ensure accurate baking. Always preheat your oven to 350°F for the best results. For the full recipe, check out the details above. Enjoy your baking! {{image_4}} You can change the flour in your zucchini carrot muffins for a new taste. If you need a gluten-free version, try using almond or coconut flour. These flours add a nutty flavor. They also make your muffins tender and moist. Just remember, these flours absorb more moisture, so adjust your liquid ingredients. Adding a twist to your muffins is fun! You can mix in citrus zest, like lemon or orange, for a fresh taste. This brightens the muffins and gives them a lovely aroma. Dried fruits, such as cranberries or apricots, can also add sweetness. You can play with flavors to make them your own. Do you want to cut back on sugar? You can reduce the sugar in the recipe without losing flavor. Try using natural sweeteners like honey or maple syrup. These options add depth and richness to your muffins. Adjust the amount of liquid in your batter if you use these sweeteners. This way, your muffins will stay moist and delicious. For the full recipe, check out the detailed instructions above! To keep your zucchini carrot muffins fresh, store them at room temperature. Place them in an airtight container. This way, they stay soft and moist for up to three days. If you want them to last longer, refrigeration is an option. Wrap them tightly in plastic wrap or foil. Store them in the fridge for about a week. Freezing is a great way to save muffins for later. Begin by letting them cool completely. Wrap each muffin in plastic wrap. Then, place them in a freezer bag. Remove as much air as you can. This helps prevent freezer burn. When you are ready to eat, just take one out and reheat. The best way to reheat is in the microwave for about 20-30 seconds. You can also use an oven. Heat at 350°F for about 10-15 minutes. Zucchini carrot muffins can last a few days at room temperature, about one week in the fridge, and up to three months in the freezer. Always check for signs of spoilage. If you see mold or smell something off, it’s best to toss them. Enjoy these muffins fresh for the best taste! For the full recipe, check out the link in the introduction. You can make these muffins healthier by using less sugar and oil. - Substitute half the sugar with applesauce or mashed banana. - Use coconut oil or unsweetened applesauce for oil. - Swap all-purpose flour for whole wheat or almond flour for added fiber. Yes, you can use frozen zucchini and carrots. - Thaw them first and drain off excess water. - This helps prevent soggy muffins. - Frozen veggies can add convenience without losing flavor. You can replace eggs with several options for vegan muffins. - Use 1/4 cup of unsweetened applesauce for each egg. - Flaxseed meal works well too; mix 1 tablespoon with 2.5 tablespoons of water. - Silken tofu is another great choice; blend 1/4 cup until smooth. To check if the muffins are done, use the toothpick test. - Insert a toothpick into the center of a muffin. - If it comes out clean or with a few crumbs, they are ready. - If it has wet batter, bake for a few more minutes. Yes, you can make mini muffins. - Just adjust the baking time to about 12 to 15 minutes. - Keep an eye on them to prevent overbaking. - They will be fun, bite-sized treats! For the full recipe, check out the detailed instructions above. In this guide, we explored how to make delicious zucchini carrot muffins. We covered essential ingredients, including zucchini, carrot, and various flours. The step-by-step instructions helped you prepare and bake with ease. I shared tips to perfect your muffins, variations for different tastes, and storage ideas for freshness. Remember, these muffins can be healthy and tasty with simple swaps. Bake, enjoy, and share your creations with friends! Happy baking!

Zucchini Carrot Muffins Flavorful and Easy Recipe

Looking for a tasty treat that’s easy to make? Zucchini Carrot Muffins are just what you need! Packed with veggies,

To make your Lemon Garlic Orzo Salad, gather the following: - 1 cup orzo pasta - 2 cups vegetable broth - 1 cup cherry tomatoes, halved - 1 cucumber, diced - 1/4 red onion, finely chopped - 1 cup corn (fresh or frozen and thawed) - 1/4 cup fresh parsley, finely chopped - 1/4 cup feta cheese, crumbled - 1/4 cup extra virgin olive oil - 3 tablespoons freshly squeezed lemon juice - 2 cloves garlic, minced - Salt and freshly ground black pepper to taste If you need a gluten-free option, you can use gluten-free orzo. It works well with the same cooking method. Orzo pasta is a great source of carbohydrates, giving you energy. It is low in fat, making it a healthy choice. The vegetables provide vitamins and minerals. For example: - Cherry tomatoes are rich in vitamin C and antioxidants. - Cucumbers hydrate and are low in calories. - Corn adds fiber and sweetness to the mix. - Parsley is packed with vitamins K and C. - Feta cheese offers protein and calcium. Each serving of this salad contains around 200-250 calories, depending on the amount of feta and oil used. It’s a light yet filling dish, perfect for lunch or as a side. To cook orzo, start by bringing two cups of vegetable broth to a boil in a medium saucepan. This broth adds great flavor. Once it boils, add one cup of orzo pasta. Cook it for about 8 to 10 minutes or until it is al dente. Al dente means it should be firm, not mushy. After cooking, drain the orzo in a colander. Rinse it under cold water. This stops the cooking process and keeps the orzo from sticking. Rinsing also helps keep the pasta fresh and separate. In a large mixing bowl, combine the cooled orzo with fresh ingredients. Add one cup of halved cherry tomatoes, one diced cucumber, and a finely chopped red onion. Include one cup of corn, either fresh or thawed from frozen. Toss in one-fourth cup of finely chopped parsley for color and flavor. For the dressing, whisk together one-fourth cup of extra virgin olive oil, three tablespoons of freshly squeezed lemon juice, and two cloves of minced garlic. Add a pinch of salt and pepper. Drizzle the dressing over the salad and toss gently. This ensures all the flavors mix well without breaking the pasta or veggies. To serve your Lemon Garlic Orzo Salad, use a large salad bowl. This allows for a beautiful presentation. Sprinkle one-fourth cup of crumbled feta cheese on top. This adds a nice salty flavor. For extra flair, garnish with lemon wedges and sprigs of parsley. These bright colors make the dish stand out. Pair this salad with grilled chicken or fish for a complete meal. You can also enjoy it as a light lunch on its own. For the full recipe, check out the details above. You can make this Lemon Garlic Orzo Salad suit your taste. Here are some good ideas: - Vegetarian and vegan options: Omit the feta cheese to keep it vegan. You can add avocado for creaminess. - Seasonal ingredients: Use fresh herbs like basil or mint in summer. In fall, try roasted butternut squash. Each season brings new flavors. Proper storage keeps the salad fresh. Here’s how: - Storing leftovers: Place the salad in an airtight container. It helps keep the ingredients crisp. - Freshness duration: The salad stays fresh in the fridge for 3 to 4 days. Just be sure to add any toppings like cheese right before serving. {{image_4}} How long can I keep the Lemon Garlic Orzo Salad in the fridge? You can keep the Lemon Garlic Orzo Salad in the fridge for about three days. After that, it may lose its freshness. Store it in an airtight container to keep it tasty. Can I prepare this salad a day in advance? Yes, you can make this salad a day ahead. It helps the flavors blend well. Just keep it in the fridge until you are ready to serve. Can I use a different type of pasta? Absolutely! You can swap orzo for other small pasta shapes like couscous or ditalini. Just adjust the cooking time based on the pasta you choose. How do I enhance the flavor of the dressing? To boost the dressing's flavor, add more lemon juice or zest. You can also mix in mustard or a pinch of red pepper flakes for a kick. This Lemon Garlic Orzo Salad comes together quickly. First, you cook the orzo in vegetable broth. Next, mix in fresh veggies like tomatoes and cucumbers. Then, whisk together a zesty lemon dressing. Finally, toss everything together and add feta cheese. For complete instructions, check out the Full Recipe. To make your dish shine, serve it in a large bowl. Take photos in natural light for the best results. Garnish with extra lemon wedges and fresh parsley. This adds color and a fresh look to your salad. You want it to look as good as it tastes! If you love the Lemon Garlic Orzo Salad, you might enjoy other orzo dishes. Orzo pasta is versatile and works well in many salads. Here are a few ideas: - Mediterranean Orzo Salad: This salad adds olives, bell peppers, and artichokes for a bold taste. - Orzo Caprese Salad: Combine orzo with fresh mozzarella, basil, and ripe tomatoes for a classic mix. - Pesto Orzo Salad: Toss orzo with basil pesto, cherry tomatoes, and spinach for a fresh, green flavor. For refreshing salads, consider these options: - Quinoa Salad: Quinoa is packed with protein and pairs well with veggies and vinaigrette. - Greek Salad: This salad features cucumbers, tomatoes, and feta, giving a tasty Mediterranean touch. - Spinach Strawberry Salad: Sweet strawberries and spinach create a nice balance of flavors. To enhance your Lemon Garlic Orzo Salad, choose the right drinks and main dishes. Here are my top picks: - Beverages: - Lemonade: A refreshing, tart drink that matches the salad's bright flavors. - Iced Tea: A light tea with lemon can be a great, cool complement. - Sauvignon Blanc: This white wine has citrus notes that work well with the salad. - Main Dishes: - Grilled Chicken: Simple grilled chicken adds protein and pairs nicely with the salad. - Fish Tacos: Their light flavors and crunch balance the salad's freshness. - Vegetable Stir-Fry: A colorful mix of veggies adds more texture and taste. These pairings make your meal more enjoyable. For the full recipe, check out the detailed steps! You've learned how to make a delicious Lemon Garlic Orzo Salad. We explored key ingredients, their benefits, and how to prepare each part. Remember the steps for cooking and mixing to create great flavors. We also shared tips on variations and how to store leftovers. This salad is versatile and easy to make. I encourage you to try it yourself. Enjoy the freshness and good health it brings to your meals!

Lemon Garlic Orzo Salad Flavorful and Fresh Delight

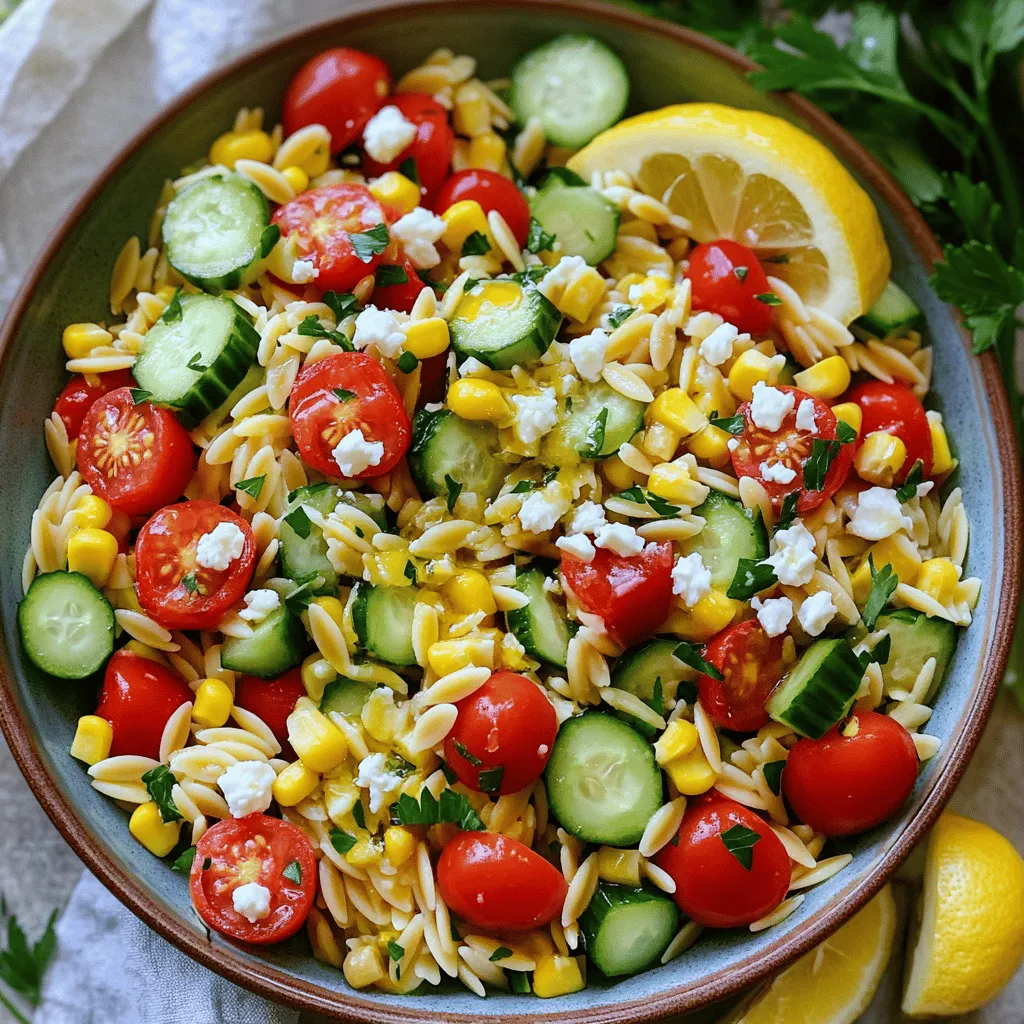
Looking for a simple yet tasty dish? My Lemon Garlic Orzo Salad is the perfect mix of flavor and freshness.

- 1 lb boneless, skinless chicken breasts - 2 tablespoons olive oil - 1 bell pepper, diced - 1 zucchini, sliced - 1 cup cherry tomatoes, halved - 2 cloves garlic, minced - 1 teaspoon dried Italian herbs - Salt and pepper to taste - Fresh parsley for garnish For this easy chicken and veggie skillet, I focus on fresh and simple ingredients. The chicken breasts provide lean protein, while the colorful veggies add vitamins and fiber. Olive oil gives a nice flavor and healthy fats. This dish has about 350 calories per serving. You get around 30 grams of protein, 15 grams of fat, and 20 grams of carbs. The chicken is high in protein. Bell peppers offer vitamin C, and zucchini is full of water and fiber. Tomatoes add antioxidants, too. If you want to switch things up, you can try different veggies. Broccoli, asparagus, or spinach work well. For a protein substitute, use tofu or chickpeas. Both add great texture and flavor. You can also make it vegetarian by skipping the meat entirely! To start, gather your ingredients. You need: - 1 lb boneless, skinless chicken breasts, cut into bite-sized pieces - 2 tablespoons olive oil - 1 bell pepper (any color), diced - 1 zucchini, sliced into half-moons - 1 cup cherry tomatoes, halved - 2 cloves garlic, minced - 1 teaspoon dried Italian herbs - Salt and pepper to taste - Fresh parsley, chopped (for garnish) Next, wash and chop all the vegetables. Preparing them in advance makes cooking easier. You will need a large skillet, a cutting board, and a sharp knife. Now it’s time to cook. Heat the olive oil in the skillet over medium heat. Wait until it shimmers. Add the chicken pieces and spread them evenly. Sprinkle salt, pepper, and half of the dried herbs on top. Cook for about 5-7 minutes. Stir occasionally until the chicken is brown and cooked through. After the chicken is ready, add the minced garlic. Stir for about 30 seconds until it smells good. Then, add the diced bell pepper and sliced zucchini. Cook these for another 5 minutes. They should be soft but still crisp. Next, mix in the halved cherry tomatoes with the rest of the herbs. Let everything cook for about 3-4 minutes. The tomatoes should soften and release their juices. Taste and add more salt or pepper if you like. Once done, take the skillet off the heat. Garnish with fresh parsley before serving. For a nice look, serve the chicken and veggie skillet in a large bowl. This shows off the colorful veggies. You can also dish it onto individual plates. Top with more parsley for color. Pair this meal with crusty bread for dipping or serve it over fluffy rice. This adds a nice touch and makes it filling. Enjoy your meal! Check out the Full Recipe for more details. To ensure chicken is cooked properly, cut it into small, even pieces. This helps it cook fast and evenly. Use a meat thermometer to check the inside temperature. It should reach 165°F (75°C). This ensures it is safe to eat. For crisp vegetables, don’t overcrowd the skillet. Give them space to brown. Cook them on medium-high heat. This keeps them tender yet firm. You can also add them in stages. Add the bell pepper first, then the zucchini. This way, each one gets the right cooking time. Prepping ingredients in advance saves time. Chop the veggies and chicken the night before. Store them in airtight containers in the fridge. This makes cooking a breeze on busy days. Utilizing frozen vegetables is another great tip. They are often just as nutritious as fresh ones. Plus, they require no washing or chopping. Just toss them in the skillet, and you’re good to go! To boost flavor, try adding different seasonings. A pinch of smoked paprika can add warmth. Cumin gives a nice, earthy taste. Experiment with your favorites to find new flavors. Incorporating fresh herbs can elevate your dish. Basil or thyme pairs well with chicken and veggies. Chop them fine and mix them in right before serving. This keeps their bright flavors intact. For more ideas, check the Full Recipe. {{image_4}} You can change the Easy Chicken and Veggie Skillet to suit your taste. For a spicy version, add chili flakes while cooking. This gives the dish a nice kick. You can also try a Mediterranean twist. Just mix in olives and feta cheese for a tangy flavor. These small changes can make the dish feel new and exciting. If you're looking for gluten-free options, this recipe works well. Just ensure your chicken broth and any added sauces are gluten-free. For those on a low-carb diet, skip the zucchini and use only low-carb veggies. Bell peppers and broccoli are great choices. These adjustments help you enjoy the dish while sticking to your diet. Using fresh vegetables based on the season can change the flavor. In spring, add asparagus or peas for a light touch. Summer is perfect for fresh corn or green beans. In fall, try butternut squash or carrots. In winter, root veggies like sweet potatoes work well. Adjusting your recipe with seasonal produce keeps your meals fresh and vibrant. To keep your Easy Chicken and Veggie Skillet fresh, store leftovers in an airtight container. Place it in the fridge within two hours of cooking. This keeps the food safe and tasty. For later use, you can freeze the dish. Use a freezer-safe container or bag to avoid freezer burn. Make sure to label it with the date, so you remember when you made it. When you want to eat your leftovers, the best way to reheat them is on the stove. This method helps keep the chicken and veggies juicy. Heat on medium-low and stir often. If you use a microwave, place the food in a microwave-safe dish. Cover it with a lid or microwave-safe wrap to trap steam. Heat in short bursts, stirring in between to ensure even warming. To refresh your meal, add a splash of broth or a drizzle of olive oil. This adds moisture and flavor back to the dish. Your Easy Chicken and Veggie Skillet will last for about three to four days in the fridge. In the freezer, it can stay good for up to three months. Always check for signs of spoilage before eating. Look for off-smells, strange colors, or a slimy texture. If you see any of these signs, it’s best to toss it out. Enjoy your meal with confidence! What can I serve with Easy Chicken and Veggie Skillet? You can serve this dish with simple sides like rice, quinoa, or crusty bread. These pair well and soak up the juices. A fresh salad also works great to add a crisp touch. Can I make this meal ahead of time? Yes, you can prepare this skillet meal ahead. Cook and cool it, then store it in the fridge. Just reheat it when you’re ready to eat. This helps save time on busy days. Can I use frozen chicken or vegetables? Yes, you can use frozen chicken or vegetables. Just make sure to thaw the chicken before cooking. The veggies can go in frozen but may need extra cooking time to soften. How to adjust cooking time for larger portions? For larger portions, increase the cooking time slightly. Always check the chicken’s doneness. Use a meat thermometer to ensure it reaches 165°F (75°C) for safe eating. How to get chicken tender and juicy? To get tender chicken, don’t overcook it. Cook until it’s no longer pink inside. Marinating the chicken beforehand also helps keep it juicy and adds flavor. Alternatives for skillet cooking method If you don’t have a skillet, you can use a wok or a large pot. Both can cook the ingredients evenly. You can also bake the chicken and veggies in the oven for a hands-off approach. This blog post covered a simple and tasty chicken and veggie skillet recipe. We looked at ingredients and nutrients, offering tips for good meals and storage. Cooking steps were clear, making it easy to follow along. Don’t forget to try different veggies or add spices for fun twists. Eating healthy can be easy and enjoyable. I hope you feel ready to cook and experiment with your meals. Enjoy your cooking adventure!

Easy Chicken and Veggie Skillet Fast and Flavorful Meal

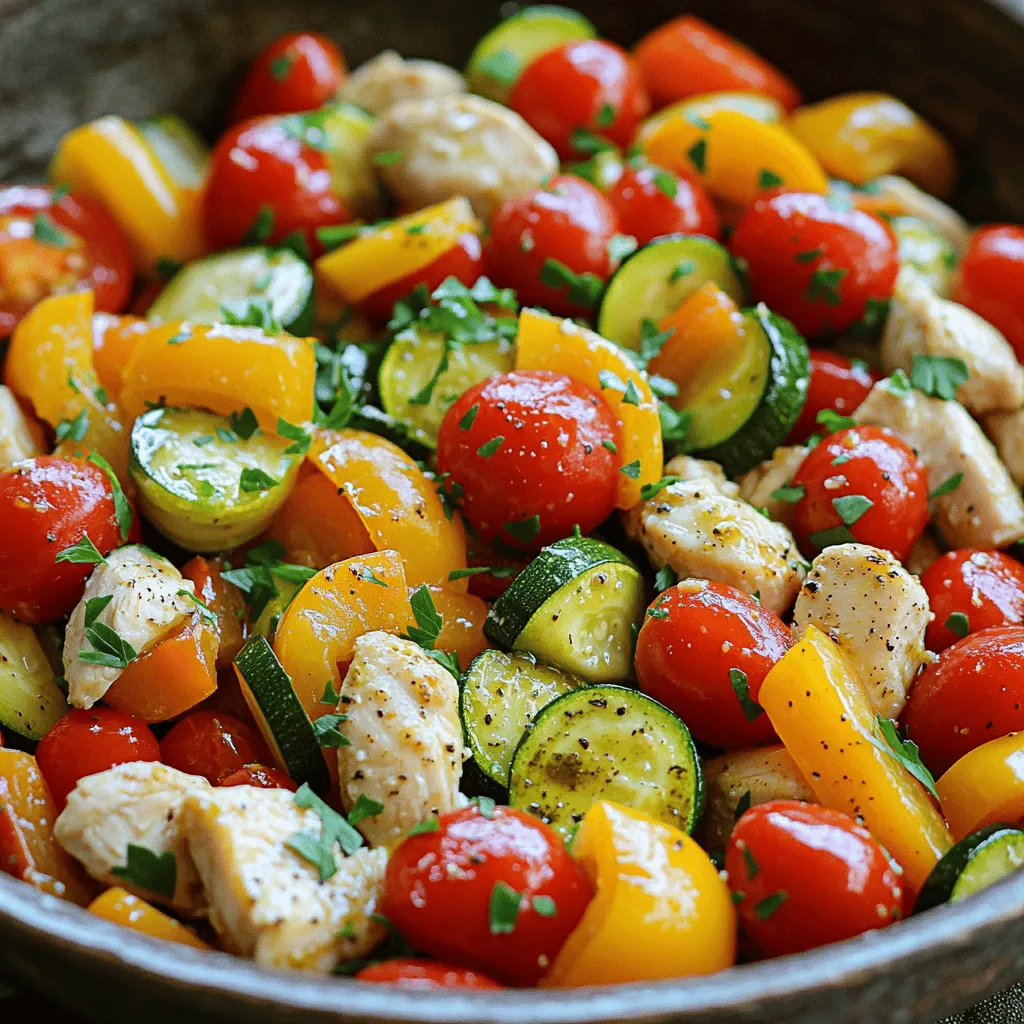
Looking for a quick, tasty meal? This Easy Chicken and Veggie Skillet is just what you need! In less than

- 1 can (15 oz) chickpeas, thoroughly drained and rinsed - 1/4 cup smooth tahini - 2 tablespoons extra virgin olive oil - 1 clove garlic, finely minced - 2 tablespoons freshly squeezed lemon juice - 1/2 teaspoon ground cumin - Sea salt, to taste - 3 tablespoons cold water, adjusted as needed - Paprika, for garnish - Fresh parsley, finely chopped Using fresh and high-quality ingredients makes a big difference in taste. The chickpeas provide a creamy base, while tahini adds richness. Olive oil brings a nice flavor, and garlic gives it a kick. Lemon juice brightens up the dish, and cumin adds warmth. You can adjust the salt to fit your taste. When you prepare your ingredients, take a moment to enjoy their colors and smells. Each item has a role, and together, they create a delicious hummus. This is a great recipe to share with friends or family. You can also make a big batch and enjoy it all week long. Check out the Full Recipe to guide you through the steps and make this classic dish shine! - First, drain and rinse the chickpeas. This step helps remove the canning liquid. - Next, measure out the tahini, olive oil, garlic, lemon juice, ground cumin, and salt. Having everything ready makes cooking easy. - Combine all the ingredients in a food processor. This includes the chickpeas, tahini, garlic, olive oil, lemon juice, cumin, and salt. - Process the mix until it is smooth and creamy. You may need to stop and scrape down the sides to ensure everything blends well. - Add cold water gradually, one tablespoon at a time. This helps reach the perfect creamy texture. - Taste your hummus and adjust the seasoning to your liking. You can add more salt, lemon juice, or garlic if needed. Enjoy this simple and delicious dish by following these steps! For the complete recipe, check out the Full Recipe. To get your hummus just right, focus on the texture first. A smooth and creamy hummus is key. If your hummus seems thick, try adding a bit more cold water. Add it one tablespoon at a time. Blend well after each addition. This step helps make it lusciously creamy. Next, you want to balance the flavors. If your hummus tastes bland, add more lemon juice or garlic. A little sea salt can make all the difference. Taste as you go. Adjust until it feels just right. When it comes to serving, think about what pairs well with hummus. Warm pita bread is a classic choice. You can also use fresh vegetables like carrots and cucumbers. They add a nice crunch. For a beautiful presentation, create a mezze platter. Place your hummus in the center. Surround it with pita, veggies, olives, and cheese. This not only looks great but makes sharing easy. Check out the Full Recipe for detailed steps on making this classic dish. {{image_4}} You can make hummus even better with simple tweaks. Adding roasted garlic gives a sweet and rich flavor. Just roast a few cloves until soft, then blend them into your mix. Fresh herbs like basil or cilantro can also add a new twist. They add freshness and depth to the taste. Spices can transform your hummus too! Smoked paprika brings a warm, smoky flavor. Just a pinch can go a long way. You might also try cumin for an earthy note or red pepper flakes for some heat. Each of these options can make your dish stand out even more. Hummus is great for many diets. It is already vegan, so it fits perfectly for plant-based eaters. If you have gluten-free needs, you’re in luck! Hummus is naturally gluten-free and pairs well with fresh veggies or gluten-free crackers. For those with nut allergies, fear not! You can easily enjoy hummus without nuts. Just skip any nut-based additions like certain oils or toppings. Instead, focus on the classic flavors of chickpeas and tahini. You can still create a creamy, delicious dish that everyone can enjoy. Feel free to explore these variations to make your hummus unique. Check the Full Recipe for more ideas! To keep your hummus fresh, store it in an airtight container. This method prevents air from spoiling the taste. Place a thin layer of olive oil on top before sealing. This helps to lock in moisture and flavor. For longer storage, consider freezing your hummus. Divide it into smaller portions. Use freezer-safe containers or bags. This way, you can thaw only what you need. In the fridge, homemade hummus lasts about five to seven days. Check for any off smells or changes in texture before using. You can get creative with leftover hummus. Use it as a spread on sandwiches or wraps. Mix it into pasta for a creamy sauce. You can even add it to soups for extra flavor and creaminess. Explore these options to make the most of your delicious hummus! What can I use instead of tahini? If you don’t have tahini, try using peanut butter or sunflower seed butter. Both options give a nutty flavor. You can also skip it and add more olive oil for creaminess. How can I make hummus spicier? To add heat, mix in chopped jalapeños or crushed red pepper flakes. You can also add spicy paprika for a nice kick. Adjust the amount to your taste. Can I use dried chickpeas instead of canned? Yes, you can use dried chickpeas. Soak them overnight, then boil until soft. This gives a great texture, but it takes more time than using canned chickpeas. What are the best oils for hummus? Extra virgin olive oil is the best choice for hummus. It adds flavor and richness. You can also try avocado oil for a different taste and healthy fats. What are the health benefits of hummus? Hummus is high in protein and fiber. It supports digestion and keeps you full longer. It also contains healthy fats from olive oil and tahini, which are good for your heart. How many calories are in classic hummus? A serving of classic hummus, about two tablespoons, has around 70 calories. This can vary based on added ingredients. Enjoy it as a healthy snack or with meals. This blog post covered how to make delicious hummus from scratch. We explored the key ingredients, detailed step-by-step instructions, and shared tips for perfecting texture and flavor. You learned about dietary variations and proper storage. Enjoying homemade hummus adds flavor and nutrition to your meals. Experiment with spices and serve it with fresh veggies or pita. With the right techniques, your hummus will impress every time. Keep it fresh and share it with others!

Classic Hummus Recipe Simple and Delicious Dish

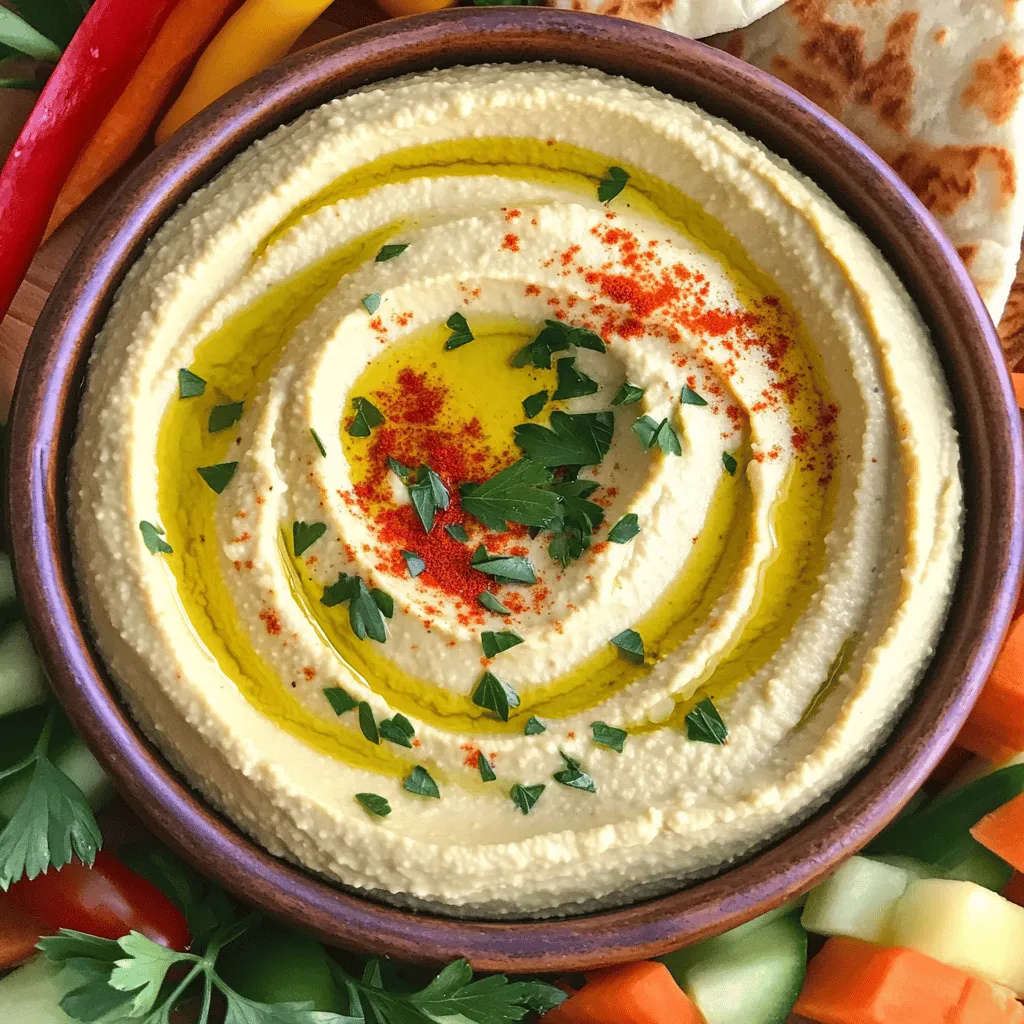
Are you ready to whip up a classic hummus that will impress everyone? This simple and delicious dish uses just

- 1 cup dried chickpeas (soaked overnight) - 1 small onion, roughly chopped - 3 garlic cloves, peeled - 1/2 cup fresh parsley leaves, lightly packed - 1/2 cup fresh cilantro leaves, lightly packed - 1 teaspoon ground cumin - 1 teaspoon ground coriander - 1 teaspoon baking powder - 1/4 teaspoon cayenne pepper (optional for extra heat) - Salt and black pepper to taste - 2 tablespoons olive oil - Parchment paper (optional, for easier cleanup) To measure dried chickpeas, use a standard measuring cup. One cup of dried chickpeas will yield about two to three cups when soaked and cooked. If you can’t find fresh herbs, you can use dried ones. Use one-third of the amount when substituting dried herbs for fresh. Falafel is rich in protein and fiber. A typical serving provides around 150 calories, 6 grams of protein, and 7 grams of fiber. It is vegan and gluten-free, making it a great option for many diets. Start by soaking the dried chickpeas. Place one cup in a big bowl. Cover them with cold water. Make sure the water is several inches above the chickpeas. Let them soak for at least eight hours or overnight. This makes them soft and ready to blend. Soaking helps create a great texture for the falafel. Next, drain and rinse the chickpeas. In a food processor, add the soaked chickpeas, chopped onion, garlic, parsley, cilantro, cumin, coriander, baking powder, and cayenne if you like heat. Pulse the mix until it’s coarse and crumbly. Be careful not to over-process it into a paste. You want a nice texture that holds together well. Now it's time to shape the falafel. Transfer the mixture to a bowl. Use your hands to form small balls. Aim for one to two inches in size. Keep them uniform to ensure even cooking. If the mix feels too soft, chill the balls in the fridge for 30 minutes. This helps them firm up and keeps their shape. Before cooking, preheat your air fryer to 350°F (175°C). This step is key for crispy falafel. Brush or spray the falafel balls with olive oil. This helps them become golden brown and crispy. Place the falafel in a single layer in the air fryer basket. Do not overcrowd them; leave space for air to flow. Cook the falafel for 15 to 20 minutes. Flip them halfway through for even browning. They should have a nice golden color when done. These steps will give you the perfect crispy air fryer falafel. Enjoy your cooking journey! To get a crispy falafel, oil is key. A light coat of olive oil helps the outside turn golden and crunchy. Use a brush or spray for even coverage. Space matters too. Don’t crowd the air fryer basket. Leave room for air to circulate. This airflow is what gives your falafel that perfect crunch. One common mistake is over-processing the ingredients. Blend just enough to get a coarse mix. If you turn it into a paste, your falafel will not hold shape or get crispy. Another pitfall is moisture. If your mixture is too wet, the falafel won’t crisp up. Drain chickpeas well after soaking. You can also blot the mixture with a paper towel to remove extra moisture. Falafel pairs well with many dips and sides. Try serving it with tahini sauce for a creamy touch. Hummus is another great option that complements the flavors well. You can also add fresh veggies on the side. Slices of cucumber or tomatoes brighten the dish. Don’t forget to serve warm pita bread for a complete meal! {{image_4}} You can easily change the taste of your falafel. Adding spices makes it fun and unique. Try mixing in: - 1 teaspoon smoked paprika for a smoky flavor. - 1 teaspoon curry powder for a warm twist. - 1 tablespoon tahini for a nutty taste. These simple swaps add depth to your falafel. Feel free to experiment with your favorite spices. If you want to try something new, use different beans. You can swap chickpeas with: - 1 cup of dried black beans for a rich color. - 1 cup of lentils for a softer texture. - 1 cup of fava beans for a traditional taste. Each bean offers a different flavor. This way, you can create a falafel that fits your mood. You don’t have to use an air fryer for falafel. You can bake or fry them too. Here’s how: - Baking: Preheat your oven to 400°F (200°C). Place falafel on a baking sheet. Bake for 20-25 minutes, flipping halfway. This method is healthy but may not be as crispy. - Frying: Heat oil in a pan to 350°F (175°C). Fry falafel for about 3-4 minutes on each side. This gives a golden crust but adds more fat. Each method has its charm. Choose what suits your kitchen style. To keep your crispy air fryer falafel fresh, store them in an airtight container. Place a piece of paper towel at the bottom. This helps absorb moisture and keeps the falafel crispy. You can refrigerate them for up to four days. For longer storage, freeze the falafel. Wrap each one in plastic wrap. Then place them in a freezer bag. They will stay good for about three months. When you are ready to eat your leftovers, reheating is key. To keep them crispy, use the air fryer again. Preheat it to 350°F (175°C). Place the falafel in a single layer in the basket. Heat for about 5-7 minutes. This method helps restore their crunchy texture. You can also use an oven if you don’t have an air fryer. Just make sure to heat them on a baking sheet. Cooked falafel can last in the fridge for about four days. If frozen, they can last for three months. Always check for any off smells or changes in color before eating. Enjoy your falafel while they are fresh for the best taste! Yes, you can use canned chickpeas! Canned chickpeas save time and effort. Here are some tips for using them: - Rinse and drain: Always rinse the canned chickpeas well. This helps remove excess salt and preservatives. - Dry them: Pat the chickpeas dry with a towel. Less moisture leads to crispier falafel. - Adjust the spices: Canned chickpeas can taste milder. You might need to add more spices to boost flavor. Falafel pairs well with many sides and dips. Here are some great suggestions: - Tahini sauce: This classic dip adds a nutty flavor. - Yogurt sauce: A cool yogurt sauce with herbs complements the spices. - Pita bread: Stuff the falafel into warm pita for a satisfying meal. - Salad: A fresh salad with tomatoes and cucumber adds crunch. Watch for these signs of perfect falafel: - Color: They should be golden brown on the outside. - Crispiness: The outside should feel firm and crispy. - Internal texture: A fluffy and tender inside indicates they are cooked well. Yes, air-fried falafel is healthier than deep-fried. Here are the health benefits: - Less oil: Air frying uses much less oil, cutting down on fat. - Lower calories: With less oil, the calorie count drops. - Crispiness: You still get that great crispy texture without frying. For the complete falafel recipe, including step-by-step instructions and tips, refer to the above sections. In this post, we explored how to make falafel from scratch. We covered essential ingredients, measuring tips, and nutritional facts. You learned step-by-step instructions, from soaking chickpeas to cooking them in an air fryer. We also discussed tips for the best texture and what to avoid. Finally, we shared how to customize your falafel with variations and storage tips. With this knowledge, you can create delicious, crispy falafel that fits your dietary needs. Enjoy experimenting with flavors and serving your tasty creations!

Crispy Air Fryer Falafel Tasty and Simple Recipe

Looking for a tasty and simple way to enjoy falafel? You’ve come to the right place! My crispy air fryer

- 2 ripe pears, thinly sliced - 1 cup mixed salad greens (arugula, spinach, or your choice) - 1/2 cup walnuts, toasted - 1/2 cup feta cheese, crumbled - 1/4 red onion, thinly sliced - 1/4 cup dried cranberries - Dressing ingredients: 3 tablespoons extra virgin olive oil, 1 tablespoon balsamic vinegar, 1 tablespoon honey, salt and pepper to taste When I make this pear walnut salad with feta, I love the mix of flavors. Each ingredient adds something special. The ripe pears bring sweetness, while the walnuts add crunch. Feta cheese gives a creamy touch, balancing the dish perfectly. The salad greens offer freshness, making each bite delightful. I often choose arugula for a peppery kick, but spinach works well too. The red onion adds a sharp bite, and the dried cranberries bring a hint of tartness. Now, let’s talk about the dressing. It’s simple yet delicious. Extra virgin olive oil gives richness, while balsamic vinegar adds tang. Honey sweetens the mix, and a pinch of salt and pepper rounds it off. This blend of ingredients creates a salad that is not just tasty but also colorful. You can find the full recipe in the section below. Toasting walnuts adds great flavor and crunch. Start by grabbing a dry skillet. Turn the heat to medium. Add the walnuts to the skillet. Stir them often for about five minutes. You want them to turn a nice golden brown. The smell will be nutty and warm. Once they look perfect, take them off the heat. Set them aside to cool before adding to your salad. Now it’s time to make the salad. In a large mixing bowl, combine your ingredients. Add the mixed salad greens first. Then, toss in the thinly sliced pears. Don’t forget the toasted walnuts! Next, sprinkle in the crumbled feta cheese. Add the sliced red onion and dried cranberries too. Gently toss everything together. Be careful not to bruise the pears while mixing. You want all the flavors to blend well. Let’s move on to the dressing. Take a small bowl and add the extra virgin olive oil. Then, pour in the balsamic vinegar. Add the honey next for a touch of sweetness. Sprinkle in a pinch of salt and some pepper. Now, whisk these ingredients together. Make sure to taste the dressing. You can adjust the seasoning if needed. Once it’s just right, drizzle it over the salad. Use tongs to toss the salad gently. This helps coat all the ingredients evenly. For the best taste, serve the salad right away, or chill it for up to 20 minutes. Enjoy this vibrant and tasty dish! - Choosing the best pears and walnuts: For this salad, select ripe pears that yield slightly to gentle pressure. Varieties like Bartlett or Anjou work great. Choose fresh walnuts that are firm and have a rich, nutty smell. Toast them lightly in a skillet to enhance their flavor. - How to prevent browning of pears: To keep your pears looking fresh, use lemon juice. Squeeze a bit over the sliced pears before adding them to the salad. This keeps them from turning brown and adds a nice hint of flavor. - Presentation styles: family-style vs. individual plating: For a family-style presentation, serve the salad in a large bowl, allowing everyone to help themselves. For individual plating, arrange the salad in small bowls. Top each with extra feta and walnuts for a touch of elegance. - Enhancements: additional toppings for variety: Consider adding sliced apples or pomegranate seeds for extra color and taste. A sprinkle of chia seeds or sunflower seeds can add crunch and nutrition. - Best practices for keeping the salad fresh: To keep your salad fresh, store it in an airtight container in the fridge. Keep the dressing separate until you are ready to serve. This helps maintain the crispness of the greens and pears. - Duration for refrigerated storage: The salad stays fresh for up to two days in the fridge. However, it is best enjoyed within the first day for optimal flavor and texture. {{image_4}} You can try different ingredients to fit your needs. If you want a nut-free salad, skip the walnuts. You can use sunflower seeds instead. For vegan options, swap feta with a plant-based cheese. If you need gluten-free, check your dressing for gluten. You can use fresh herbs instead of dried cranberries for a fresh twist. Adding spices or herbs can change the taste of your salad. A pinch of cinnamon can add warmth, while fresh basil lends a sweet touch. If you like heat, a sprinkle of red pepper flakes works well. You can even try some lemon zest for a bright flavor. These small changes can make your salad shine in new ways. You can adjust your salad based on the season. In spring, add fresh strawberries for a sweet touch. In summer, try peaches or nectarines for juicy bites. Autumn calls for apples or pomegranate seeds, while winter can use citrus like oranges or grapefruits. These seasonal fruits keep your salad fresh and exciting. For the full recipe, check the earlier section for all the tasty details! To keep your salad fresh, follow these tips: - Add dressing just before serving. This helps the greens stay crisp. - Use a salad spinner. After washing the greens, remove excess water. - Serve in a chilled bowl. A cool bowl helps keep the salad fresh longer. - Layer ingredients wisely. Place heavier items like walnuts and feta on top. Yes, you can make this salad ahead of time, but with care. Here’s how: - Prepare ingredients early. Slice pears and chop greens a few hours before serving. - Store everything separately. Keep the dressing, nuts, and greens in separate containers. - Assemble right before serving. Mix everything together no more than 30 minutes prior. This salad pairs well with many dishes. Here are some ideas: - Grilled chicken or fish. The protein complements the salad's flavors. - Crusty bread. A nice bread can make a filling meal. - Soup. A light soup, like tomato or butternut squash, works great. - Cheese platter. Add some cheese for a fun snack or starter. For the full recipe, check out the complete instructions and ingredients for a delicious Pear Walnut Delight Salad. The Pear Walnut Delight Salad is a tasty mix of flavors and textures. This salad is easy to prepare and perfect for any meal. Here’s a quick look at what you need and how to make it. Ingredients: - 2 ripe pears, thinly sliced - 1 cup mixed salad greens (arugula, spinach, or your choice) - 1/2 cup walnuts, toasted - 1/2 cup feta cheese, crumbled - 1/4 red onion, thinly sliced - 1/4 cup dried cranberries - 3 tablespoons extra virgin olive oil - 1 tablespoon balsamic vinegar - 1 tablespoon honey - Salt and pepper, to taste Steps: 1. Start by toasting the walnuts in a dry skillet. Cook them on medium heat for about 5 minutes. Stir often until they turn golden brown and smell nutty. This step adds a great crunch. 2. Next, grab a large bowl. Mix the salad greens, sliced pears, toasted walnuts, crumbled feta, red onion, and cranberries. Toss gently to combine. Be careful not to crush the pears. 3. For the dressing, whisk olive oil, balsamic vinegar, honey, salt, and pepper in a small bowl. Adjust the taste as needed. You want a nice balance. 4. Drizzle the dressing over the salad and toss again. Make sure every bite gets some dressing. 5. Serve the salad right away for that fresh crunch. If you want deeper flavors, chill it for up to 20 minutes before serving. You can find the full recipe details and instructions included above. Enjoy making this fresh and flavorful dish! This blog post covered how to make a delicious Pear Walnut Delight Salad. You learned about the key ingredients and their nutritional value. I shared steps for preparing walnuts, assembling your salad, and making the dressing. Tips helped you choose quality ingredients and keep the salad fresh. I also offered variations to suit different tastes and answered common questions. Enjoy this fresh and tasty salad for your meals. It's easy to prepare and full of flavor. You’ll love how it looks and tastes!

Pear Walnut Salad with Feta Fresh and Flavorful Dish

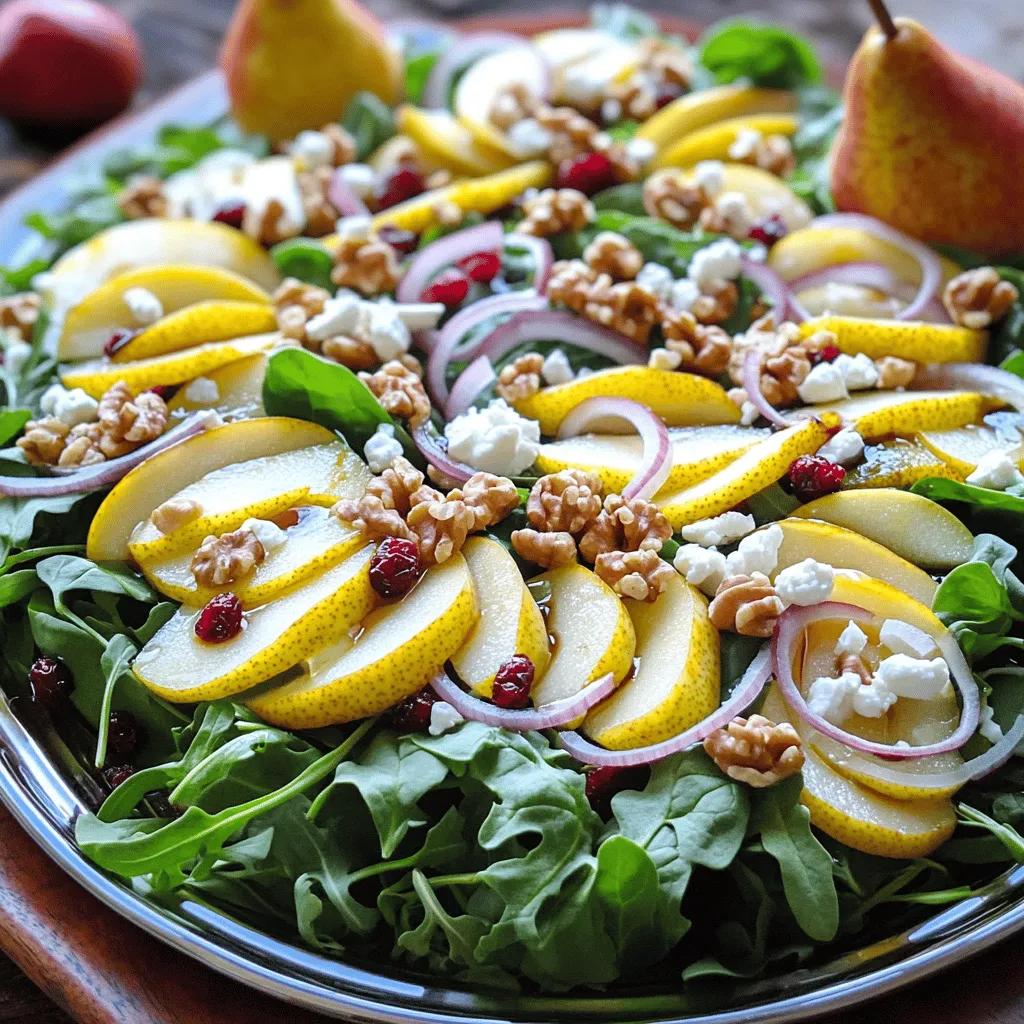
If you’re looking for a fresh and tasty dish, you’ve found it! This Pear Walnut Salad with Feta combines sweet

- 1 cup rolled oats - 1 ripe banana, well-mashed - 1 cup almond milk or any preferred milk - 1 teaspoon baking powder - 1 teaspoon pure vanilla extract - 1/2 teaspoon ground cinnamon - Pinch of sea salt - 2 tablespoons maple syrup - Coconut oil or cooking spray for greasing the pan To make Healthy Banana Oat Pancakes, you need simple and wholesome ingredients. The main ingredients include rolled oats, a ripe banana, and your choice of milk. I prefer almond milk for a nutty flavor, but any milk works fine. Next, you add baking powder for fluffiness, vanilla extract for sweetness, and cinnamon for warmth. These ingredients make every bite taste amazing. You can also use optional ingredients. A pinch of sea salt enhances flavor. If you like your pancakes sweeter, add maple syrup. Finally, use coconut oil or cooking spray to grease your pan. This helps prevent sticking and gives a nice crisp to your pancakes. Check out the Full Recipe for exact measurements and tips. To make oat flour, I start with rolled oats. I place 1 cup of rolled oats in my high-speed blender. I blend them on high until they turn into fine flour. This makes the pancakes light and fluffy. Next, I add the mashed banana, 1 cup of almond milk, and other ingredients to the blender. This includes 1 teaspoon of baking powder, 1 teaspoon of pure vanilla extract, 1/2 teaspoon of ground cinnamon, and a pinch of sea salt. If you like, you can add 2 tablespoons of maple syrup for sweetness. I blend everything until it is smooth. After blending, I let the batter rest for 5 to 10 minutes. This helps the oats soak up some liquid. While it rests, I preheat my non-stick skillet over medium heat. I lightly grease it with coconut oil or cooking spray. For each pancake, I pour about 1/4 cup of batter onto the skillet. I cook them for 2 to 3 minutes until bubbles form. Then, I flip the pancakes and cook for another 2 to 3 minutes until golden brown. I repeat this for the remaining batter, adding more oil if needed. My pancakes are best served warm. I like to top them with fresh fruit or a drizzle of maple syrup. You can find the Full Recipe for all the details. Resting the batter is key for great pancakes. When you let the batter sit, the oats soak up the liquid. This makes the batter thicker and the pancakes fluffier. Aim for a resting time of 5 to 10 minutes. You’ll notice the difference in texture. For cooking, set your skillet on medium heat. A hot skillet helps create a nice golden color. Before pouring in the batter, grease the pan lightly. You can use coconut oil or cooking spray. Just a little will prevent sticking and help the pancakes cook evenly. Make your pancakes look fun and tasty! Stack them high on a plate. Add some sliced bananas on top. A light sprinkle of cinnamon adds charm. You can also place some vibrant berries on the side. This not only makes your dish pretty but also adds fresh flavors. {{image_4}} You can change the taste of your pancakes by adding spices. Try adding ground nutmeg for warmth or fresh ginger for a zing. A dash of cardamom can also add a unique touch. These spices pair well with banana and oats. Just sprinkle in a little to start, then adjust to your taste. If you need gluten-free pancakes, use certified gluten-free oats. This simple swap keeps the recipe safe for those with gluten sensitivities. For a vegan option, replace the almond milk with a plant-based milk like oat or soy. You can also skip the egg by using flaxseed meal mixed with water. Toppings can make your pancakes even better. Sliced strawberries or blueberries add sweetness and color. Chopped nuts, like walnuts or almonds, give a nice crunch. If you want something extra, sprinkle some dark chocolate chips in the batter. These add a fun twist. Each topping can change the flavor and make your meal special. To keep your pancakes fresh, use these easy methods. First, let them cool completely. Then, stack them with parchment paper between each pancake. This helps prevent sticking. Place the stack in an airtight container. You can also wrap them tightly in plastic wrap. If you want to freeze them, use a freezer-safe bag. Make sure to squeeze out any air before sealing. This keeps them safe from freezer burn. To enjoy your pancakes again, reheat them properly. For the best results, use a skillet. Heat it over medium-low heat. Add a little coconut oil if needed. Place the pancakes in the skillet for about 1-2 minutes on each side. You can also use a microwave. Just heat them for about 20-30 seconds. If you want them warmer, heat in 10-second intervals. These pancakes stay good in the fridge for about 3-4 days. If you freeze them, they can last up to 2-3 months. Just remember to label your containers with the date. This way, you know when to use them by. Enjoy your delicious banana oat pancakes whenever you want! For the full recipe, check out the earlier section. You can try using regular flour, but the texture will change. Oats add fiber and nutrients that white flour lacks. If you want a gluten-free option, stick with oats. Rolled oats blend into a smooth flour and give pancakes a hearty feel. You can also use oat flour if you prefer not to blend. To make these pancakes sugar-free, skip the maple syrup. The ripe banana gives natural sweetness. You can add unsweetened applesauce for extra moisture and taste. Using spices like cinnamon can enhance flavor without sugar. Yes, these pancakes are great for meal prep. You can make a big batch and store them in the fridge. They keep well for about three days. Just reheat them in the microwave or on a skillet. This saves time on busy mornings. These pancakes pair well with fresh fruit like berries or sliced bananas. A dollop of Greek yogurt adds creaminess and protein. For extra flavor, drizzle with honey or a bit of nut butter. These options create a balanced meal that keeps you full. For the full recipe, check out the detailed instructions above. Healthy banana oat pancakes are simple and tasty. You need few key ingredients like oats, banana, and almond milk. I showed you how to make oat flour and blend everything together. Cooking tips help you get the right texture and perfect pancakes every time. You can even customize flavors and toppings. These pancakes store well for later, making meal prep easy. Enjoy a delicious, healthy treat any day!

Healthy Banana Oat Pancakes Quick and Tasty Recipe

Are you ready to whip up a breakfast that’s both healthy and quick? These Healthy Banana Oat Pancakes are a

Older posts
Newer posts
← Previous Page1 … Page11 Page12 Page13 … Page72 Next →

dsad

© 2025 tastyhatch • Built with GeneratePress

Our Policies

  • Copyright Policy
  • Cookie Policy
  • GDPR Policy
  • Privacy Policy
  • Disclaimer
  • Terms Of Use

More Information

  • Home
  • About
  • Contact
  • Appetizers
  • Dessert
  • Dinner
  • Drinks
©2025, tastyhatch About Back To Top