Skip to content
DisclaimerTerms Of UseGDPR PolicyCookie Policy

tastyhatch

  • Home
  • Drinks
  • Appetizers
  • Dinner
  • Dessert
  • About
  • Contact
  • Privacy Policy
DisclaimerTerms Of UseGDPR PolicyCookie Policy

Olivia

- 1 lb sirloin steak, cut into bite-sized pieces - 4 tablespoons unsalted butter - 4 cloves garlic, finely minced - Fresh herbs: rosemary and thyme The main ingredient in this dish is sirloin steak. It’s tender and full of flavor. Cut the steak into small pieces. This helps with even cooking and makes it easier to eat. The next key ingredient is unsalted butter. It adds richness and helps the garlic and herbs shine. Garlic gives the dish its name. Use fresh garlic for the best taste. Finely mince it to release the flavor. Fresh herbs like rosemary and thyme add a lovely aroma and taste. They can really elevate the dish. - Olive oil for cooking - Fresh parsley for garnish - Salt and black pepper to taste You can use olive oil for cooking the steak bites. It helps prevent sticking and adds a nice flavor. Fresh parsley makes a great garnish. It adds color and freshness to the dish. Don’t forget salt and black pepper. They enhance the flavors of the steak and garlic. Seasoning is key for a delicious meal. For the full recipe, check out the details above. Start by seasoning the steak bites. Use salt and black pepper for great flavor. Don’t hold back! Every piece needs to be coated well. Cut the steak into uniform chunks. This helps them cook evenly. If some pieces are bigger, they will not cook at the same time. Now, let’s heat the oil. In a large skillet, add olive oil. Heat it on medium-high until it shimmers. This means it is hot enough. Carefully add the steak bites in a single layer. Avoid overcrowding the pan; it’s okay to cook in batches. Sear them for 2-3 minutes on one side. When they have a nice brown crust, flip them. Cook for another 2 minutes for a perfect doneness. Next, we move to the garlic butter. Reduce the heat to medium. Add unsalted butter and let it melt. Then, add minced garlic, rosemary, and thyme. Stir gently for about a minute. You want the garlic to become fragrant and slightly golden. Be careful, as burnt garlic tastes bitter. Finally, return the cooked steak bites to the skillet. Toss them in the garlic butter mixture. Make sure each piece is well coated. Heat everything through, so the flavors meld together nicely. This is where the magic happens! To get your steak bites just right, you need to know the doneness levels. Here’s a quick guide: - Rare: Bright red inside, 120-125°F. - Medium Rare: Warm red center, 130-135°F. - Medium: Pink center, 140-145°F. - Medium Well: Slightly pink, 150-155°F. - Well Done: No pink, 160°F and above. For cooking times, think about thickness. A 1-inch piece takes about 2-3 minutes per side for medium rare. Thicker cuts will need more time. Always use a meat thermometer for accuracy. You can kick up the flavor of your garlic butter steak bites. Here are some ideas: - Spices: Try adding smoked paprika or cumin for a twist. - Sauces: A splash of Worcestershire sauce adds depth. - Herbs: Fresh basil or oregano can brighten the dish. Pair your steak bites with sides that balance the rich garlic butter. Good options include: - Roasted vegetables for a healthy crunch. - Creamy mashed potatoes for comfort. Serving is just as important as cooking. Here are some fun ways to present your garlic butter steak bites: - Serving Board: Use a rustic wooden board for a homey feel. - Drizzle: Show off that garlic butter by drizzling it over the top. - Garnish: Sprinkle chopped parsley for color and freshness. Remember, a well-presented dish makes eating even more enjoyable. The visual appeal can make your meal feel special. {{image_4}} You can use different cuts of steak for this dish. Tenderloin offers a buttery texture, while ribeye gives a rich flavor. Both cuts work great in garlic butter steak bites. If you want a lighter option, try chicken or shrimp. Both will soak up the garlic butter and bring a new twist to this tasty recipe. You can try different herbs to change the taste. Fresh basil or oregano can add a nice touch. If you like spice, add red pepper flakes or smoked paprika. These ingredients bring heat and depth to the dish. Feel free to mix and match until you find your perfect flavor. These steak bites pair well with many sides. Roasted vegetables add color and nutrition. Creamy mashed potatoes are a classic choice that balances the dish. You can also get creative and serve these bites as appetizers. Skewering them on toothpicks makes for easy eating at parties. For the full recipe, check out the [Full Recipe]. To keep your garlic butter steak bites fresh, let them cool first. Place them in a single layer on a plate to speed up the cooling process. Once they are cool, transfer them to an airtight container. This helps lock in flavor and keeps them safe from bacteria. Use containers made of glass or BPA-free plastic. These are great for refrigeration. To reheat your steak bites, use a skillet over low heat. This helps them warm evenly without drying out. Heat them for about 5 to 7 minutes, stirring gently. You can also use a microwave, but do this carefully. Heat in short bursts of 30 seconds, checking often. This will help keep the texture and flavor intact. If you want to freeze the garlic butter steak bites, first make sure they are completely cool. Then, place them in a freezer-safe bag or container. Remove as much air as possible to prevent freezer burn. They can last up to three months in the freezer. When ready to eat, thaw them in the fridge overnight. Reheat them gently to enjoy their full flavor. You can easily prep garlic butter steak bites in advance. Start by cutting the steak into bite-sized pieces. Season them with salt and pepper. Store the seasoned steak in an airtight container in the fridge. You can also make the garlic butter ahead. Just mix the butter, minced garlic, and herbs, then store it in the fridge. When you are ready to cook, take them out and follow the cooking steps. This makes dinner quick and easy! Garlic butter steak bites pair well with many sides. Here are some great ideas: - Roasted vegetables like broccoli, carrots, or asparagus - Mashed potatoes or creamy polenta - Crusty bread to soak up the garlic butter sauce - A fresh salad with a light vinaigrette To check if your steak bites are done, use a meat thermometer. Aim for 130°F for medium-rare or 145°F for medium. If you don’t have a thermometer, you can also use the touch test. Press the steak; it should feel firm but still have a little give. This method helps you know without cutting into the meat. Yes, the garlic butter sauce is very versatile! You can use it on: - Roasted chicken for added flavor - Sautéed shrimp or scallops for a seafood twist - Veggies like green beans or mushrooms for a tasty side - Pasta dishes to create a rich, savory sauce Reheating steak bites can be tricky. To keep them tender, use a low heat method. Place the steak bites in a skillet over medium-low heat. Add a little garlic butter to keep them moist. Heat for about 3-4 minutes, stirring gently. You can also use a microwave, but do so in short bursts to avoid toughening the meat. This method helps keep the flavor and texture just right. Garlic butter steak bites are easy and tasty. Remember the key ingredients: sirloin steak, butter, garlic, and fresh herbs. Follow the steps carefully for perfect doneness, and don’t forget to experiment with flavors and presentation. You can make variations with other meats or spices. Store leftovers smartly for future meals. Now, you can enjoy this dish anytime. Happy cooking!

Garlic Butter Steak Bites Savory and Simple Recipe

Want a quick, tasty meal? Garlic Butter Steak Bites are your answer! This savory, simple recipe is packed with flavor

- Shredded chicken breast - Buffalo sauce - Dinner rolls or slider buns For the main part of the sliders, use cooked and shredded chicken breast. You can use rotisserie chicken for a quick option. The buffalo sauce gives these sliders their famous kick. Adjust the amount to match your heat preference. Choose soft dinner rolls or slider buns for the best texture. - Shredded lettuce - Diced tomatoes - Blue cheese crumbles Toppings add freshness and crunch. Shredded lettuce cools the heat of the buffalo sauce. Diced tomatoes bring sweetness to balance the spice. Blue cheese crumbles add a creamy and tangy element. Feel free to mix in your favorite toppings for a personal touch. - Sour cream - Lemon juice - Olive oil, salt, and pepper For the sauce, blend sour cream with lemon juice. This creamy mix pairs well with the spicy chicken. Olive oil adds richness, while salt and pepper enhance all the flavors. Adjust these seasonings to make it just right for you. Check the Full Recipe to see all these ingredients in action! First, combine shredded chicken with buffalo sauce in a large bowl. Make sure every piece of chicken gets coated. You can adjust the amount of buffalo sauce based on your spice preference. Next, heat olive oil in a skillet over medium heat. Once the oil is hot, add the chicken mixture. Cook for about 3-5 minutes, stirring often, until the chicken is warm. Remove it from the heat and set it aside. In another bowl, mix blue cheese crumbles, sour cream, and lemon juice. Stir until you get a smooth mixture. Taste it and add salt and pepper as needed. This drizzle adds a creamy touch to your sliders. Slice the dinner rolls in half. Toast the bottom halves in the same skillet over medium heat. Keep an eye on them and toast for 1-2 minutes until they are golden. Once toasted, layer the buffalo chicken mixture on each roll bottom. Then, add shredded lettuce and diced tomatoes on top. Finally, drizzle the blue cheese mix over everything. Place the top halves of the rolls back on, pressing down gently. Your delicious sliders are now ready to serve! To make the best sliders, coat your chicken well with buffalo sauce. This ensures each bite is packed with flavor. Stir gently when heating the chicken mixture. Overcooking can dry it out, making it less tasty. Serve your sliders with extra buffalo sauce and blue cheese on the side. This adds a nice touch for those who want more flavor. You can also garnish your platter with fresh parsley. It brightens the dish and looks inviting. One mistake is using too much or too little sauce. This can change the taste and texture. Another error is not toasting the rolls properly. Toasting adds crunch and keeps the sliders from getting soggy. For the full recipe, you can refer to the earlier sections. {{image_4}} You can kick up the heat in your sliders by adding sliced jalapeños or extra hot sauce. This gives your dish a nice spicy kick. You can also try different types of buffalo sauces. Some brands offer sweet or smoky options. Experiment with flavors to find your favorite! Want a lighter version? Try using ground turkey or tofu instead of chicken. This makes the sliders lower in fat and calories. Whole wheat slider buns are a great swap too. They add fiber and nutrients, making your meal healthier. For a twist, use barbecue sauce instead of buffalo sauce. This gives a sweet and tangy flavor. You can also add avocado or crispy bacon to your sliders. These ingredients add richness and balance the spice from the buffalo sauce. For the complete recipe, check out the Full Recipe for Buffalo Chicken Sliders with Blue Cheese Drizzle. To keep your leftover sliders fresh, store them in the fridge. Place them in an airtight container. This helps prevent them from drying out. You can store them for up to three days. After that, they may lose flavor and texture. Reheat your sliders slowly to keep them moist. The best way is to use the oven. Preheat the oven to 350°F (175°C). Wrap the sliders in foil to retain moisture. Heat for about 10-15 minutes. If you use a microwave, put them on a plate. Cover with a damp paper towel. Heat in short bursts of 30 seconds. Check if they are warm enough before serving. You can freeze sliders for up to three months. Wrap each slider in plastic wrap, then place them in a freezer bag. This helps avoid freezer burn. When you're ready to eat, thaw them in the fridge overnight. For a quick thaw, use the microwave on the defrost setting. After thawing, follow the reheating tips to warm them up. Enjoy your tasty game day delight anytime! For the full recipe, check out the link above. Yes, you can make Buffalo Chicken Sliders ahead of time! Start by cooking the chicken and mixing it with the buffalo sauce. You can do this a day before your event. Store the chicken mix in the fridge. On game day, simply heat it in a skillet. Toast the rolls and assemble right before serving. This keeps everything fresh and warm! If blue cheese isn't your favorite, try these options: - Feta cheese for a tangy twist - Creamy goat cheese for a milder flavor - Cheddar cheese for a classic taste These choices work well with the spicy chicken and add a nice touch! Buffalo Chicken Sliders can be as spicy as you want! The heat comes from the buffalo sauce. To adjust the spice level: - Use less buffalo sauce for a milder taste - Add more sauce for extra heat - Include diced jalapeños for an added kick Try different levels to find your perfect heat balance! Side dishes can enhance your slider experience. Here are some great options: - Crispy potato wedges - Fresh veggie sticks with ranch dip - Classic coleslaw for crunch - Sweet corn on the cob These sides complement the bold flavors of the sliders and round out your game day feast! For the full recipe, check out the link provided. Buffalo chicken sliders are easy to make and full of flavor. We explored the key ingredients, like shredded chicken and buffalo sauce, along with tasty toppings. You learned how to prepare and assemble your sliders step by step. Remember to avoid common mistakes to get the best results. There are also fun variations and smart storage tips to keep in mind. Try these sliders for your next gathering. They are sure to impress!

Buffalo Chicken Sliders Tasty and Easy Game Day Delight

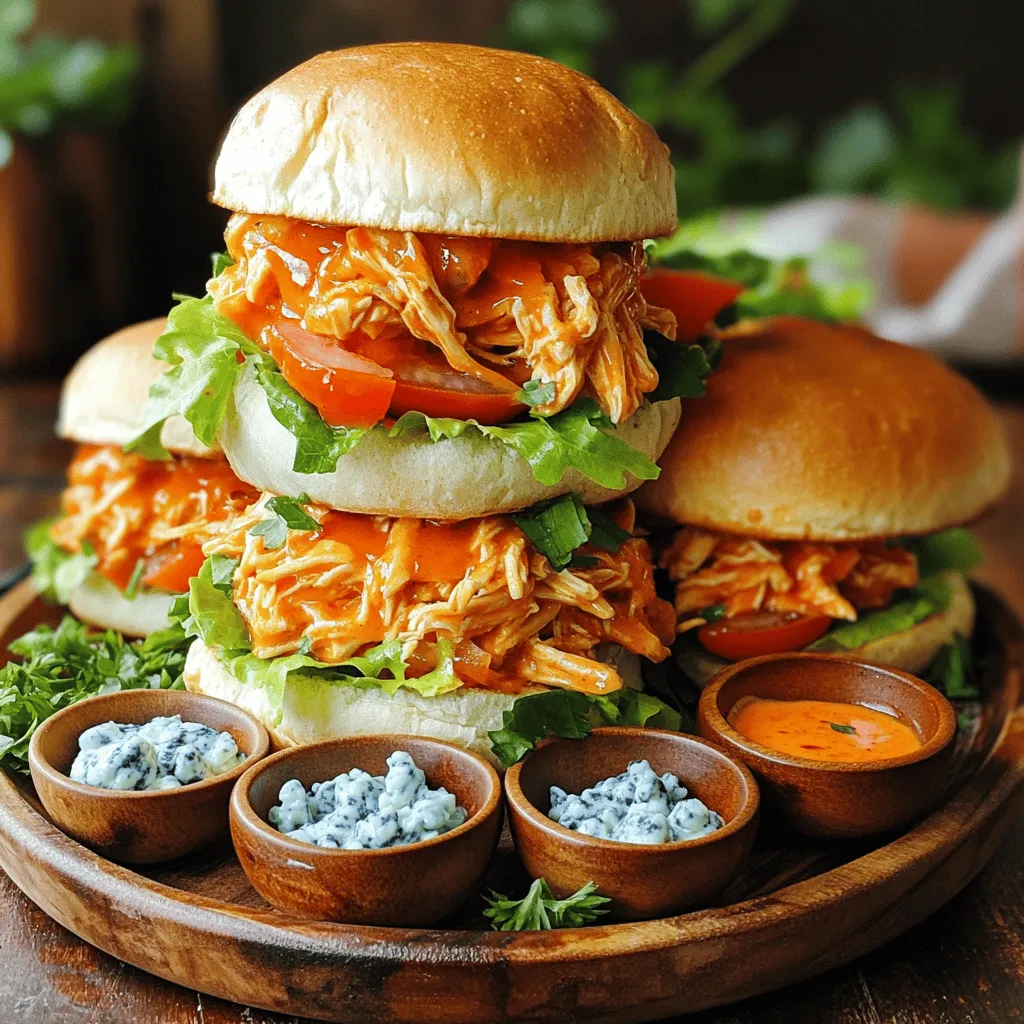
Get ready to score big with these Buffalo Chicken Sliders, a simple and tasty game-day treat! You’ll love how easy

To make your Chicken Parmesan sliders, gather these key ingredients: - 1 lb boneless, skinless chicken breasts - 1 cup Italian seasoned breadcrumbs - 1/2 cup finely grated Parmesan cheese - 1 teaspoon garlic powder - 1 teaspoon dried oregano - 1/2 teaspoon salt - 1/4 teaspoon freshly cracked black pepper - 2 large eggs, beaten - 1 cup marinara sauce - 1 1/2 cups shredded mozzarella cheese - 12 slider buns - Olive oil, for frying These ingredients will give you a rich flavor and crispy texture. You can add a few tasty garnishes for extra flavor: - Fresh basil leaves - Extra marinara sauce for dipping These will enhance the look and taste of your sliders. To make these sliders, you will need: - A large skillet for frying - A baking sheet for the oven - Two mixing bowls for coating the chicken - A spatula for flipping the chicken Having the right tools makes cooking easier and more fun. For the full recipe, refer to the instructions included above. 1. Preheat the Oven: First, set your oven to 375°F (190°C). Get a baking sheet and grease it lightly with olive oil or non-stick spray. 2. Prepare the Chicken: Take 1 pound of boneless, skinless chicken breasts and slice them in half. This gives you thin cutlets for the sliders. 3. Mix the Coating: In a bowl, mix 1 cup of Italian seasoned breadcrumbs with 1/2 cup of grated Parmesan cheese, 1 teaspoon of garlic powder, 1 teaspoon of dried oregano, 1/2 teaspoon of salt, and 1/4 teaspoon of black pepper. 4. Prepare the Egg Wash: In another bowl, beat 2 large eggs until mixed well and a bit frothy. 5. Coat the Chicken: Dip each chicken cutlet in the egg wash. Make sure to coat it well. Next, move it to the breadcrumb mix and press the crumbs on each side. 6. Fry the Chicken: In a large skillet, heat a good amount of olive oil over medium-high heat. Add the chicken cutlets once the oil is hot. Fry them for about 3-4 minutes on each side until they are golden brown. When done, take them out and put them on the greased baking sheet. 7. Add Sauce and Cheese: Spoon marinara sauce over each fried chicken piece. Then sprinkle 1 1/2 cups of shredded mozzarella cheese on top. 8. Bake to Perfection: Place the baking sheet in your preheated oven. Bake for about 10 minutes, or until the cheese is melted and bubbly. 9. Toast the Buns: While the chicken bakes, take your slider buns. Lightly toast them in the same skillet. This will give them a nice crunch and flavor. 10. Assemble the Sliders: To build each slider, place a cheesy chicken cutlet on the bottom half of a toasted bun. Add a few fresh basil leaves for extra flavor. Top with the other half of the bun. 11. Serve and Enjoy: Serve the warm Chicken Parmesan Sliders right away. Enjoy every delicious bite! For the full recipe, check out the Chicken Parmesan Sliders section! To make the best Chicken Parmesan Sliders, start with fresh chicken. Slice the chicken breasts thinly. This helps them cook evenly. Use a mix of breadcrumbs and Parmesan for a tasty crust. Make sure to coat each piece well in egg and breadcrumbs. Fry the chicken in hot oil. This gives a crispy outside. Fry for about 3-4 minutes on each side until golden brown. Toasting the buns adds flavor and crunch. Use the same skillet after frying chicken. Just wipe it clean and add the buns. Toast them lightly over medium heat. This will soak up some chicken flavor, making them even better. Keep a close eye so they don’t burn. You want them golden, not dark brown. When ready to serve, stack the sliders high. Place a piece of fried chicken on each bun. Add marinara sauce and gooey mozzarella cheese. Top with fresh basil for color and taste. For a fun touch, serve extra marinara on the side. This way, everyone can dip as they like. Arrange the sliders on a vibrant platter. This makes them look as good as they taste. For the full recipe, check out the Chicken Parmesan Sliders . {{image_4}} If you want to switch things up, try using turkey or pork. These meats work well in sliders. You can also use chicken thighs for more flavor. For a spicy kick, consider adding pepper jack cheese on top. You can make these sliders vegan by using plant-based chicken. Tofu or eggplant cutlets also work great. For the cheese, use a dairy-free mozzarella. Use marinara sauce that is free from animal products to keep it vegan. Add different herbs to the breadcrumb mix for extra flavor. Try basil or thyme for a fresh taste. You might also mix in some red pepper flakes for heat. Drizzle balsamic glaze over the finished sliders for a sweet touch. For a full recipe, check out the Chicken Parmesan Sliders section. To store leftover sliders, let them cool to room temperature. Place them in an airtight container. You can stack them, but separate layers with parchment paper. This keeps them from sticking together. Store the container in the fridge. They will stay fresh for about three days. When reheating, you want to keep the sliders warm and tasty. Preheat your oven to 350°F (175°C). Place the sliders on a baking sheet. Cover them with foil to keep moisture in. Heat for about 10-15 minutes. You can also use a microwave. Heat them for 30 seconds. Check and heat more if needed until warm. If you want to freeze them, wrap each slider in plastic wrap. Then, put them in a freezer bag. Remove as much air as you can. They can stay in the freezer for up to three months. When ready to eat, thaw them in the fridge overnight. Reheat them as mentioned before. Enjoy the flavors just like when you first made them! The best cheese is mozzarella. It melts well and adds a creamy texture. You can also mix in some Parmesan for a richer flavor. This blend gives you that classic Chicken Parmesan taste. Yes, you can prepare the chicken and sauce ahead of time. Just store them in separate containers. When you are ready to eat, simply bake the chicken and assemble the sliders. This saves time and makes hosting easier. You can use crushed cornflakes or ground almonds instead of breadcrumbs. Both options give a nice crunch. Another choice is to use a mixture of grated cheese and nuts. This keeps the dish gluten-free and delicious. Absolutely! Store-bought sauce saves time and still tastes great. Choose a high-quality brand for better flavor. You can also add herbs or spices to enhance the taste. To keep sliders warm, wrap them in foil after baking. Place them in a slow cooker on low heat. This will keep them warm without drying out. These sliders pair well with a fresh salad or crispy fries. You can also serve them with extra marinara sauce for dipping. This makes for a fun and tasty meal. Yes, chicken thighs add more flavor and stay juicy. Just ensure they are cooked through for safety. You can use the same recipe steps with thighs. They last up to three days in the fridge. Store them in an airtight container. Reheat in the oven for best results. Yes! Kids love the cheesy, savory taste of these sliders. They are easy to hold and fun to eat. Make sure to supervise younger kids while eating. Absolutely! You can add red pepper flakes to the marinara sauce. Another option is to use pepper jack cheese for a spicy kick. Adjust the heat to fit your taste! For the full recipe, check out the detailed instructions above. To make Chicken Parmesan Sliders, you need simple ingredients. Here’s what you will need: - 1 lb boneless, skinless chicken breasts - 1 cup Italian seasoned breadcrumbs - 1/2 cup finely grated Parmesan cheese - 1 teaspoon garlic powder - 1 teaspoon dried oregano - 1/2 teaspoon salt - 1/4 teaspoon freshly cracked black pepper - 2 large eggs, beaten - 1 cup marinara sauce - 1 1/2 cups shredded mozzarella cheese - 12 slider buns - Fresh basil leaves for garnish - Olive oil, for frying This recipe is easy to follow. First, preheat your oven to 375°F (190°C). Then, grease a baking sheet with olive oil. Next, slice the chicken breasts in half. This makes thin cutlets that fit in the buns. In a bowl, mix the breadcrumbs, Parmesan cheese, garlic powder, oregano, salt, and pepper. In another bowl, beat the eggs until they are a bit frothy. Now, dip each chicken piece into the egg, then into the breadcrumb mix. Make sure they are well-coated. Heat olive oil in a skillet over medium-high heat. Fry each chicken cutlet for 3-4 minutes on both sides. They should turn golden brown. After frying, place them on the baking sheet. Spoon marinara sauce over each piece of chicken. Then, add a layer of mozzarella cheese. Bake them for about 10 minutes until the cheese melts and bubbles. While the chicken bakes, toast the slider buns in the same skillet. This adds flavor and crunch. To assemble, put a chicken cutlet on the bottom half of a toasted bun. Add some fresh basil leaves, then place the top half of the bun on. Serve your Chicken Parmesan Sliders warm. Enjoy the savory, cheesy goodness! Check out the Full Recipe for more details. In this post, we explored how to make Chicken Parmesan Sliders, from key ingredients to tips. You learned about the best chicken and cheese options, along with cooking steps. We also shared storage tips and fun variations to spice things up. Now, you can whip up these sliders easily. Enjoy them with friends or family for a tasty meal. Get creative with flavors and find what you love best!

Savory Chicken Parmesan Sliders Easy and Tasty Recipe

Are you ready to enjoy a delicious twist on a classic? These Chicken Parmesan Sliders are simple to make and

To make delicious Turkey and Swiss sliders, gather these ingredients: - 1 lb ground turkey - 8 slider buns - 8 slices Swiss cheese - 1/4 cup finely chopped onion - 1/4 cup breadcrumbs - 1 large egg, beaten - 1 teaspoon garlic powder - 1 teaspoon dried thyme - Salt and pepper to taste - 1/4 cup honey - 2 tablespoons Dijon mustard - 2 tablespoons mayonnaise - 2 tablespoons unsalted butter, melted - Sesame seeds for topping These ingredients create a tasty mix. Ground turkey is lean and full of flavor. Swiss cheese adds creaminess and a mild taste. The onion gives a nice crunch and sweetness. Breadcrumbs help bind everything together, while the egg keeps it moist. Garlic powder and thyme add depth to the flavor. Honey and Dijon mustard make a sweet and tangy glaze that enhances the sliders. Using fresh ingredients makes a big difference. I always recommend using high-quality ground turkey. It gives the best taste and texture. You can also switch up the cheese or add spices to suit your taste. For the full recipe, check the details provided. Set your oven to 350°F (175°C). This will help the sliders cook evenly. In a large bowl, combine all the turkey ingredients. Add the ground turkey, chopped onion, breadcrumbs, beaten egg, garlic powder, thyme, salt, and pepper. Use your hands or a spatula to mix until everything is well blended. Divide the mixture into 8 equal parts. Shape each part into a small patty. Make sure the patties match the size of your slider buns. Heat a skillet over medium heat. Place the patties in the skillet, cooking them for about 4-5 minutes on each side. Check that they reach 165°F (75°C) inside. Just before taking the patties off the heat, add a slice of Swiss cheese on top of each. Cover the skillet for a minute. This helps the cheese melt perfectly over the patties. In a small bowl, whisk together the honey, Dijon mustard, and mayonnaise. This glaze gives your sliders a sweet and tangy flavor that makes them special. Lay the slider buns flat on a baking sheet. Put each turkey patty with melted cheese on the bottom half of the buns. Drizzle the honey mustard glaze generously over each patty. Top with the upper halves of the buns. Brush melted butter on top of the buns and sprinkle sesame seeds for extra flavor. Place the baking sheet in the oven and bake for about 10 minutes. Your sliders should heat through and the tops should turn golden brown. Now, you can serve these warm sliders and enjoy every bite! For the full recipe, check out the recipe section. To ensure even cooking, make your patties the same size as the buns. This helps them cook at the same rate. Use a kitchen scale if you want exact portions. I usually make mine about two ounces each. When you cook in a skillet, don’t crowd the patties. Leave space between them so heat can flow. Cook them for about 4-5 minutes on each side. Use a meat thermometer to check the internal temperature. It should reach 165°F for safe eating. You can switch up the glaze for new flavors. Try adding hot sauce for a spicy kick. If you want a sweet twist, mix in some maple syrup instead of honey. For a tangier taste, use apple cider vinegar with the Dijon mustard. You can even add herbs like thyme or rosemary to change the flavor profile. This glaze adds a unique touch to every bite. These sliders pair well with many sides. Serve them with crispy sweet potato fries for a fun twist. A simple green salad balances the richness of the sliders. You can also offer pickles on the side for a crunchy contrast. For a heartier meal, try coleslaw. It adds a nice crunch and creaminess. Enjoy the sliders warm and fresh from the oven for the best experience. {{image_4}} You can use different meats instead of ground turkey. Ground chicken works well for a lighter option. Beef is a classic choice that adds richness. If you like pork, ground pork will give you a juicy slider. You can also try mixing meats, like turkey and beef, for a unique taste. If you want a vegan or vegetarian slider, there are tasty substitutes. Use black beans or lentils as a base for the patty. You can mash them up and mix with breadcrumbs and spices. For cheese, try vegan Swiss or avocado slices. Nutritional yeast adds a cheesy flavor too. These options keep the sliders delicious and plant-based. Adding local spices can change the flavor of your sliders. If you love spice, try adding chipotle or jalapeño. For an Italian twist, mix in Italian herbs like oregano and basil. You can even use BBQ sauce for a southern flavor. Each region has its own special tastes, so feel free to experiment! To store leftover sliders, let them cool first. Place the sliders in an airtight container. This keeps them fresh and prevents them from drying out. You can also wrap them tightly in plastic wrap. Store them in the fridge for up to three days. This way, you can enjoy them later without losing any flavor. When you want to reheat the sliders, preheat your oven to 350°F (175°C). Place the sliders on a baking sheet. Cover them with aluminum foil to keep them moist. Heat for about 10-15 minutes. This helps the cheese melt and the turkey warm up nicely. You can also use the microwave, but it may make the buns a bit soggy. If you want to freeze the sliders, wrap each one in plastic wrap. Then, place them in a freezer-safe bag. Remove as much air as possible to avoid freezer burn. You can freeze them for up to three months. When ready to eat, thaw them in the fridge overnight before reheating. This keeps the flavors fresh and tasty. For the full recipe, check out the details to make these delicious sliders! You can store Turkey and Swiss Sliders in the fridge for up to three days. Keep them in an airtight container. This keeps them fresh and tasty. Yes, you can make these sliders ahead of time. Prepare the patties and glaze. Then, store them separately in the fridge. You can bake them later when you are ready to eat. These sliders go well with many sides. Try serving them with: - Sweet potato fries - Coleslaw - Garden salad - Chips These sides add balance and crunch to your meal. Yes, you can use other types of cheese. Cheddar, provolone, or pepper jack will work well. Each cheese gives a different flavor to the sliders. Each slider has about 200 calories. They provide protein from turkey and calcium from the cheese. They also contain healthy fats from the butter and mayo. You can find the full recipe for Turkey and Swiss Sliders [Full Recipe]. This will guide you through each step to make these tasty treats. Turkey and Swiss sliders are simple and tasty. We covered the key ingredients, smart tips, and easy steps to make them. You can customize flavors and even switch meats. Store and reheat them well for great leftovers. Whether you make them for a party or a cozy night, they will impress everyone. I hope you feel ready to try this recipe and enjoy every bite.

Turkey and Swiss Sliders Flavorful Comfort Food Recipe

Looking to spice up your next meal? You’re in for a treat with my Turkey and Swiss Sliders! These flavorful

- Shredded chicken - Cream cheese - Buffalo sauce - Ranch dressing - Cheddar cheese These ingredients create the rich and spicy filling for your pinwheels. I use cooked chicken that I shred myself. You can use rotisserie chicken for ease. The cream cheese adds creaminess. Buffalo sauce brings heat, so adjust it to your taste. Ranch dressing balances the flavors, and cheddar cheese adds a nice bite. - Additional seasonings - Vegetables (e.g., bell peppers) - Herbs or spices Feel free to customize your pinwheels. You can add garlic powder or onion powder for more flavor. Diced vegetables like bell peppers add crunch. Fresh herbs, such as cilantro or parsley, can brighten the dish. These extras make your pinwheels unique and special. - Tortilla types - Garnishes You can use different types of tortillas. Flour tortillas are soft and easy to roll. Corn tortillas are gluten-free but may crack. For garnishes, consider fresh herbs or a drizzle of extra buffalo sauce. Present your pinwheels on a colorful platter for a fun touch. Serve with ranch dressing or extra buffalo sauce for dipping. This makes the meal even more enjoyable. For the full recipe, check the previous section. - First, combine the shredded chicken, cream cheese, buffalo sauce, and ranch dressing in a large bowl. Use a spatula or fork to mix it all well. You want a creamy and smooth blend. - Next, gently fold in the shredded cheddar cheese and chopped green onions. This adds great flavor and texture. Taste the mixture and add salt and pepper as you like. - Now, take a tortilla and lay it flat on a clean surface. Use a spatula to spread a quarter of the buffalo chicken mixture over the tortilla. Leave about an inch from the edge to avoid spillage. - Starting from one end, carefully roll the tortilla up tightly. Tuck in the filling as you go. This keeps everything inside and neat. Repeat this with the other tortillas. - Once you roll all the tortillas, wrap each one tightly in plastic wrap. Chill them in the fridge for at least 30 minutes. This helps them firm up, making them easier to slice. - After chilling, unwrap the tortillas and use a sharp knife to slice each roll into 1-inch thick pinwheels. - Arrange the sliced pinwheels on a colorful platter. Drizzle with more buffalo sauce or ranch dressing if you like. This adds extra flavor and looks great! For the full recipe, check the details above. - Adjust the spice level by using less buffalo sauce. Start small and taste as you go. - Ensure even distribution of the filling. Spread it from edge to edge, avoiding clumps. This way, every bite has flavor. - For plating, use a colorful platter. A bright background makes the pinwheels pop. - Offer extra dipping options. Buffalo sauce and ranch dressing work great on the side. - Store uncooked pinwheels in plastic wrap. This keeps them fresh until you’re ready to serve. - To freeze, wrap each pinwheel tightly. Label them with the date, and use within three months. {{image_4}} You can switch up the taste of your buffalo chicken pinwheels easily. Instead of buffalo sauce, try BBQ sauce for a sweet twist. Ranch dressing adds a creamy touch and balances the heat. You can also use other proteins, like shredded turkey or tofu, for a different flavor. Each choice brings a new vibe to this dish. If you have dietary needs, you can still enjoy these pinwheels. Use gluten-free tortillas to make them safe for those with gluten sensitivities. For a vegan or vegetarian option, replace chicken with chickpeas or shredded veggies. You can also substitute cream cheese with a vegan spread. These swaps keep the pinwheels tasty and friendly for everyone. Get creative with your pinwheels by adding fruits or nuts. Chopping apples adds a fresh crunch and sweetness. You can also mix in nuts or seeds for extra texture and flavor. Walnuts or sunflower seeds work well. These twists make your buffalo chicken pinwheels unique and fun to eat. For the full recipe, check out the recipe section above. To store leftover Buffalo Chicken Pinwheels, wrap them tightly in plastic wrap. This keeps them fresh and tasty. You can also use an airtight container for extra protection. Store them in the fridge for up to three days. After that, the flavors may fade, and the texture may change. If you want to save some pinwheels for later, freezing is a great option! First, wrap each pinwheel tightly in plastic wrap. Then, place them in a freezer-safe bag or container. They can last in the freezer for up to three months. When you are ready to eat them, thaw the pinwheels in the fridge overnight. To reheat, simply place them in the microwave for about 30 seconds, or until warm. In the fridge, these pinwheels last about three days. Check for signs of spoilage before eating. If they smell off or look slimy, it’s best to discard them. Enjoy your Buffalo Chicken Pinwheels fresh for the best taste! If you want the full recipe, check it out. To make buffalo chicken pinwheels, start with cooked chicken. Shred it and place it in a bowl. Add cream cheese, buffalo sauce, and ranch dressing. Mix until it's smooth. Then, fold in shredded cheddar cheese and green onions. Grab a tortilla, spread the chicken mix on it, and roll it tightly. Wrap the roll in plastic wrap and chill for about 30 minutes. After chilling, slice the roll into pinwheels. Serve them on a platter with extra buffalo sauce or ranch. Check the [Full Recipe] for detailed steps. Yes, you can make buffalo chicken pinwheels ahead of time. Prepare the pinwheels and wrap them tightly in plastic wrap. Store them in the fridge for up to 24 hours. This helps the flavors meld together. If you want to freeze them, wrap them well and store in a freezer-safe bag. Just make sure to thaw them in the fridge before slicing. Buffalo chicken pinwheels pair well with various sides. You can serve them with fresh veggies like carrots and celery. A side of chips or pretzels also works great. For dips, ranch dressing or blue cheese dressing complements the spicy flavor. Yes! You can use other cheeses in buffalo chicken pinwheels. Creamy mozzarella melts well and adds a mild flavor. Pepper jack cheese adds a nice kick. You could also use a blend of cheeses for varied taste. To increase the spice, add more buffalo sauce to the mix. You can also mix in diced jalapeños or crushed red pepper flakes. For an extra kick, try sprinkling some hot sauce on the finished pinwheels before serving. Buffalo chicken pinwheels are fun and easy to make. We covered the main and optional ingredients, along with tips for rolling and storing them. I shared variations to fit diets and tastes. You can even tweak the spice level. Remember, these pinwheels can be prepped ahead and stored for later. Try them at your next gathering. They’re sure to impress! Enjoy experimenting with flavors and serving ideas to create a dish your friends will love.

Buffalo Chicken Pinwheels Tasty and Easy Recipe

Craving a fun and tasty snack? You’ll love these Buffalo Chicken Pinwheels! They’re easy to make and packed with flavor.

- Fresh spinach - Cream cheese - Shredded mozzarella cheese - Grated Parmesan cheese - Garlic powder - Onion powder - Red pepper flakes (optional) - Salt and black pepper - Flour tortillas - Alternative tortilla options When making Cheesy Spinach Pinwheels, fresh ingredients truly make a difference. I use fresh spinach to add a bright flavor. Cream cheese gives a rich and smooth base. Shredded mozzarella melts perfectly, while grated Parmesan adds a nice bite. For seasoning, I reach for garlic powder for a punch of taste. Onion powder adds depth, and I love a pinch of red pepper flakes if I want some heat. Salt and black pepper round it all out. Tortillas are key! I prefer large flour tortillas. They roll up well and hold the filling. If you want a twist, you can try whole wheat or spinach tortillas for extra flavor and nutrition. Using these ingredients helps create a tasty snack that everyone loves. You can find the full recipe above to get started on your Cheesy Spinach Pinwheels! 1. Preheat your oven to 350°F (175°C). This step is key for a good bake. 2. In a medium bowl, mix the filling. Combine 1 cup of finely chopped spinach, 1 cup of softened cream cheese, 1 cup of shredded mozzarella, and 1/2 cup of grated Parmesan cheese. Add 1 teaspoon of garlic powder, 1 teaspoon of onion powder, and a pinch of red pepper flakes if you want heat. Season with a little salt and black pepper. Stir until smooth. 1. Take a flour tortilla and lay it flat. Spoon about one quarter of the filling onto the center. Spread it evenly, leaving a little space around the edges. 2. Starting from one end, tightly roll the tortilla. Make sure the filling stays inside. Repeat this for the rest of the tortillas and filling. 1. Use a sharp knife to slice each roll into 1-inch thick pinwheels. You should get about 12-15 pieces. 2. Arrange the sliced pinwheels cut side up on a baking sheet lined with parchment paper. Brush the tops lightly with olive oil for a crispy finish. 3. Place the baking sheet in the oven. Bake for about 15-20 minutes, until golden brown and the cheese melts perfectly. 4. Once baked, take them out and let them cool for a few minutes before serving warm. For the full recipe, check out the earlier section. To make your cheesy spinach pinwheels shine, you can adjust the cheese blend. Try mixing in a bit of feta for a tangy kick. You might also swap mozzarella for a sharp cheddar to change the flavor profile. You can experiment with seasoning variations too. Add herbs like basil or oregano for freshness. If you want more heat, increase the red pepper flakes. A sprinkle of smoked paprika can add a fun twist. For presentation, arrange the pinwheels on a colorful platter. Garnish with freshly chopped parsley for a touch of green. You can also sprinkle chili flakes for a vibrant look. Dipping sauce options can enhance your pinwheels. Try serving them with marinara or ranch dressing. A garlic aioli also pairs well and adds a creamy finish. The optimal baking time is 15-20 minutes at 350°F (175°C). This ensures the pinwheels become golden brown and crispy. Keep an eye on them to avoid burning. For the right texture, allow them to cool for a few minutes after baking. This helps the cheese set, making each bite delicious and satisfying. Enjoy your tasty snack! {{image_4}} You can easily switch some ingredients in Cheesy Spinach Pinwheels to suit your taste. - Additional vegetables: Try adding finely chopped bell peppers, mushrooms, or artichokes for more flavor and texture. These veggies blend well with spinach and cheese. - Cheese alternatives: If you're not a fan of cream cheese, try ricotta or cottage cheese. They will give a unique taste and texture. You can also mix different cheeses like feta or gouda for a twist. Boost the taste of your pinwheels with some simple changes. - Spice additions: Add a pinch of cayenne pepper or chili powder for a spicy kick. You can also use smoked paprika for a subtle smoky taste. - Herbs for freshness: Fresh herbs like basil, dill, or parsley can brighten up your pinwheels. Just chop them finely and mix them into your filling. Want to cater to different diets? Here are some easy swaps. - Making it gluten-free: Use gluten-free tortillas instead of regular flour tortillas. This change keeps the flavor while making it safe for those with gluten sensitivities. - Vegan-friendly options: Substitute cream cheese with a plant-based cream cheese. You can also use vegan cheese instead of mozzarella and Parmesan. This way, everyone can enjoy the tasty pinwheels. For the full recipe, check out the detailed instructions above. To keep your cheesy spinach pinwheels fresh, store them in the fridge. Use an airtight container to lock in moisture. Place a paper towel inside to absorb any extra moisture. This will help prevent sogginess. You can also wrap them in plastic wrap for added protection. If you want to freeze them, wrap each pinwheel in plastic wrap or foil. Then, place them in a freezer bag. Make sure to remove as much air as possible. They will stay fresh in the freezer for up to three months. When ready to eat, thaw them in the fridge overnight. When reheating pinwheels, the oven works best. Preheat it to 350°F (175°C). Place the pinwheels on a baking sheet. Heat them for about 10-15 minutes. This keeps them crispy and tasty. You can also use an air fryer for a quick option. Set it to 350°F and heat for about 5-7 minutes. Avoid using the microwave if you can. It may make the pinwheels soggy. If you must use a microwave, heat them for short bursts. Check often to keep them from getting too soft. In the fridge, cheesy spinach pinwheels last about 3-5 days. Always check for signs of spoilage before eating. If they smell off or look discolored, it's time to toss them. When frozen, they can last up to three months. However, for the best taste, eat them within one month. Keep an eye out for freezer burn, which can affect flavor and texture. Yes, you can make Cheesy Spinach Pinwheels ahead of time. Prepare the filling and roll the tortillas. Wrap each roll in plastic wrap. Store them in the fridge for up to 24 hours. When ready to bake, just slice and cook as directed. This saves time and makes serving easier. To add spice, mix in more red pepper flakes or diced jalapeños. You can also use pepper jack cheese instead of mozzarella. These small changes can bring a nice kick to your pinwheels. Adjust the heat to suit your taste! These pinwheels pair well with a variety of dips. Try marinara sauce, ranch, or even a spicy aioli. Fresh veggies are also great on the side. They add crunch and balance the creaminess of the pinwheels. You can make a colorful platter for your guests. Yes, Cheesy Spinach Pinwheels are perfect for meal prep. You can batch-cook them and store leftovers easily. They freeze well, too. Wrap individual pinwheels in foil and store in a zip-top bag. This way, you can enjoy a quick snack or meal anytime! In this post, we covered how to make Cheesy Spinach Pinwheels. We looked at key ingredients, like fresh spinach and different cheeses. You learned the easy steps for preparation and baking, plus tips for serving and storing. Remember, you can mix flavors or adjust for dietary needs. These pinwheels are simple and fun. Enjoy them as a snack or a meal. With a few tweaks, your pinwheels can be just how you like them! Keep experimenting and have fun in the kitchen.

Cheesy Spinach Pinwheels Quick and Tasty Snack

Are you looking for a quick and tasty snack? Look no further! Cheesy Spinach Pinwheels are the perfect blend of

To make pull-apart cheesy garlic bread, gather these simple ingredients: - 1 large sourdough loaf (or any soft, crusty bread) - 1/2 cup unsalted butter, melted - 4 cloves garlic, finely minced - 1 cup shredded mozzarella cheese - 1/2 cup shredded sharp cheddar cheese - 1/4 cup fresh parsley, finely chopped - 1 teaspoon garlic powder - Salt and freshly cracked black pepper, to taste Using fresh ingredients is key. Fresh garlic packs a punch of flavor. It helps your bread taste vibrant and alive. Fresh herbs, like parsley, add color and freshness. They make the bread look appealing. When you use fresh cheese, it melts better. This gives you a gooey, cheesy texture. Always choose high-quality ingredients for the best results. If you don't have some ingredients, don't worry! You can swap some items. For example, any crusty bread can work. If you can't find sourdough, try a French baguette or Italian bread. For cheese, use provolone or gouda instead of mozzarella and cheddar. You can also add other herbs, like thyme or rosemary, for a twist. Want to make it spicy? Add crushed red pepper flakes for some heat! These changes keep the recipe fun and suited to your taste. Check the Full Recipe for more details! First, gather your ingredients. You will need: - 1 large sourdough loaf - 1/2 cup unsalted butter, melted - 4 cloves garlic, finely minced - 1 cup shredded mozzarella cheese - 1/2 cup shredded sharp cheddar cheese - 1/4 cup fresh parsley, finely chopped - 1 teaspoon garlic powder - Salt and freshly cracked black pepper, to taste Next, preheat your oven to 375°F (190°C). This helps the bread bake evenly. Now, take your sourdough loaf and slice it in a grid pattern. Cut into diamond or square shapes on the top. Make sure to leave the bottom intact. This keeps the loaf together. In a bowl, whisk the melted butter, minced garlic, garlic powder, chopped parsley, salt, and pepper. Mix until smooth. Use a pastry brush or spoon to drizzle the garlic butter into the cuts. Get it deep into the crevices for great flavor. Then, stuff the shredded mozzarella and cheddar into those cuts. Pack it generously! Wrap the loaf in aluminum foil, sealing the edges tightly. Place it on a baking sheet to catch any melted butter. Bake for 15 minutes. After this, open the foil and bake for another 10-15 minutes. You want the cheese to melt and the bread to turn golden brown. To ensure the bread cooks evenly, always preheat your oven. Check the bread halfway through the bake time. Rotate the loaf if needed. This helps it brown nicely on all sides. Let the bread cool for a few minutes after baking. This makes it easier to pull apart without burning your fingers. You can serve it warm on a rustic board, adding a sprinkle of parsley for a fresh touch. Enjoy this cheesy treat! For the full recipe, check out the details above. To get that perfect cheese pull, use a mix of mozzarella and sharp cheddar. Mozzarella melts great and gives a nice stretch. The cheddar adds a sharp bite that complements the garlic. Stuff the cheese deep into the cuts of the bread. This ensures every bite has gooey goodness. Bake until the cheese bubbles and starts to brown. This adds to the flavor and texture. Moisture is key for great pull-apart bread. Make sure to generously drizzle the garlic butter mixture into all the cuts. Wrapping the loaf in foil while baking helps trap steam. This steam keeps the bread soft and moist. After the first 15 minutes, unwrap the foil. This allows the top to crisp up nicely. If you want a stronger garlic kick, use roasted garlic. Roasting softens the flavor and adds sweetness. Mix the roasted garlic into your butter mixture for a rich taste. You can also add garlic powder for extra flavor. Finally, fresh herbs like parsley bring brightness to the dish. {{image_4}} You can play with cheese to make pull-apart bread even better. Mozzarella is great, but try mixing in some provolone or gouda. They melt well and add new flavors. For a sharper taste, use aged cheddar or pepper jack. You can even mix in cream cheese for a rich texture. Each mix gives a fun twist to your cheesy bread. Herbs and spices can really enhance the taste. Besides parsley, try adding basil or oregano. These herbs bring a fresh flavor that pairs well with garlic. A pinch of red pepper flakes adds a nice kick, too. Don’t forget some cracked black pepper for a bit of heat. You can even sprinkle in some Italian seasoning for a unique twist. If you need a gluten-free option, you can use gluten-free bread. Many brands offer delicious choices that work great. Just make sure the bread is soft and crusty. Follow the same steps from the Full Recipe, and enjoy every cheesy bite without worry. You won’t miss the gluten at all! To keep your cheesy garlic bread fresh, wrap it tightly in plastic wrap or foil. You can also place it in an airtight container. Store it in the fridge if you plan to eat it within three days. This helps keep the bread soft and the cheese tasty. To reheat your leftover pull-apart bread, preheat your oven to 350°F (175°C). Place the bread on a baking sheet and cover it with foil. Heat for about 10 to 15 minutes. This warms the bread and melts the cheese nicely. If you want a crispier crust, remove the foil for the last few minutes. You can freeze this cheesy garlic bread for up to three months. Wrap it well in plastic wrap and then foil. When you're ready to enjoy it, thaw it in the fridge overnight. Reheat it in the oven as mentioned above. This way, you can enjoy this treat later without losing any flavor! Yes, you can use other types of bread. A soft, crusty bread works best. You might try ciabatta or French bread for great results. Just make sure the bread has a nice texture. This helps hold the cheese and garlic butter inside. The key is to keep the loaf intact while cutting. To make this dish vegan, swap butter for plant-based butter. You can also use vegan cheese instead of regular cheese. Look for cheese that melts well and has good flavor. Fresh herbs add a nice touch too. You can use the same steps in the full recipe, just with these substitutes. I love using mozzarella and sharp cheddar together. Mozzarella melts well and gives a nice stretch. Sharp cheddar adds rich flavor that balances the garlic. You can mix in other cheeses too, like gouda or parmesan, for more taste. Just be sure to choose cheeses that melt easily for the best pull-apart effect. We covered how to use fresh ingredients for the best pull-apart bread. I shared steps for prep, baking, and ways to keep each bite perfect. With tips on cheese pulls and flavor boosts, you can enhance your dish. Remember, there are many fun variations and storage methods to try. Experimenting will make your baking even more enjoyable. Now, it’s time to get in the kitchen and create something delicious!

Pull Apart Cheesy Garlic Bread Irresistible Treat

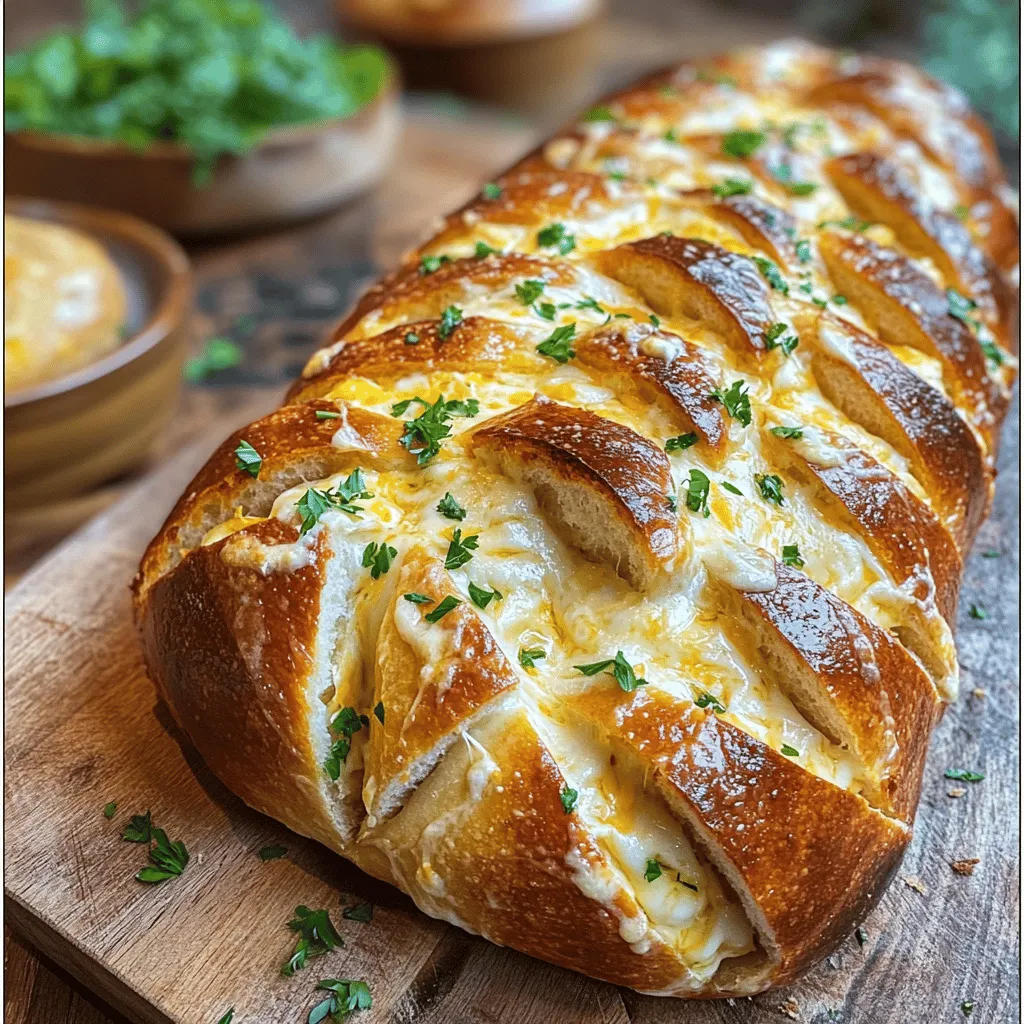
If you love garlic bread melted with cheese, you’ve hit the jackpot! My Pull Apart Cheesy Garlic Bread is easy

- 1 large French bread loaf - 1 cup cooked chicken breast, shredded - 1/2 cup basil pesto - 1 cup mozzarella cheese, shredded - 1/2 cup cherry tomatoes, halved - 1/4 cup Parmesan cheese, grated - 2 tablespoons olive oil - 1 teaspoon garlic powder - Fresh basil leaves, for garnish - Salt and pepper, to taste In this recipe, the main ingredients set the stage for a tasty dish. The French bread loaf acts as the base, providing a soft and crispy crust. You can use any cooked chicken you like. Shredded chicken breast works well for this pizza. Use store-bought or homemade basil pesto for a bright flavor. The mozzarella cheese melts nicely, adding creaminess. Cherry tomatoes give a sweet burst in each bite. Adding Parmesan cheese on top gives a salty kick. For seasoning, olive oil adds richness, while garlic powder brings depth. Fresh basil leaves add a lovely touch at the end. Don’t forget salt and pepper to make all the flavors pop. By using these ingredients, you create a delightful pizza that is easy to make. For the full recipe, check out the details above. Enjoy this savory dinner delight! - Preheat your oven to 375°F (190°C). This step gets your oven ready for baking. - Prepare the French bread loaf by slicing it in half lengthwise. Place the halves on a baking sheet with the cut sides facing up. - Season the bread by brushing the cut sides with olive oil. Then, sprinkle garlic powder, salt, and pepper on both halves. This adds great flavor. - Add basil pesto on top of each half. Spread it evenly to cover the bread well. - Distribute the seasoned chicken over the pesto. Make sure to spread it out for even bites. - Top with halved cherry tomatoes. They will add a sweet touch and color. - Cheese it up! Sprinkle shredded mozzarella and grated Parmesan cheese over the entire pizza. This makes it extra cheesy and delicious. - Bake in the oven for 15-20 minutes. Keep an eye on it until the cheese melts and turns golden brown. - Cool for a few minutes after baking. This helps the pizza set and makes slicing easier. - Slice the French bread pizza into portions. Garnish with fresh basil leaves for a nice finish. Serve warm to enjoy the tasty flavors. For the full recipe, check out the details provided above. - Ensure even distribution of toppings: This step is key for a balanced taste. Spread the chicken, cheese, and tomatoes evenly over the bread. This way, every bite bursts with flavor. - Use fresh ingredients for optimum flavor: Fresh basil, ripe tomatoes, and high-quality pesto make a huge difference. Fresh ingredients enhance the taste and look of your pizza. - Suggested spices to add more depth: Try adding red pepper flakes for a bit of heat. A dash of oregano or Italian seasoning can boost the flavor profile too. Just sprinkle them lightly before baking. - Ideal sides to serve with the pizza: A crisp green salad pairs well with this pizza. You can also serve it with a side of garlic bread for a delicious treat. - Perfect pairings for drinks and sides: A chilled lemonade complements this pizza perfectly. For adults, a light white wine can enhance the meal's flavors too. - Creative ways to present the dish: Slice the pizza into small pieces and serve it on a wooden board. Garnish with fresh basil leaves for a pop of color. This makes for a beautiful and inviting presentation. For the full recipe, check out the Pesto Chicken French Bread Pizza. {{image_4}} You can easily switch up the protein in your pesto chicken French bread pizza. Try turkey instead of chicken for a leaner choice. If you prefer a plant-based option, tofu works well too. For a quick meal, use shredded rotisserie chicken. It saves time and still tastes great. If you want a meat-free pizza, this dish can shine without chicken. Load it up with extra veggies for flavor and nutrients. Bell peppers, spinach, or mushrooms can add great taste and texture. You can easily make it a colorful feast. Don't feel limited to basil pesto. Explore other types of pesto like sun-dried tomato or arugula. You could also swap pesto for tomato sauce for a different flavor profile. This change can create a new twist on your pizza, making it uniquely yours. To store your leftovers, let the pizza cool first. Place slices in an airtight container. You can keep it in the fridge for up to three days. When you're ready to eat, preheat your oven to 375°F (190°C). Reheat the pizza for about 10-15 minutes. This helps to keep the cheese melty and the bread crispy. You can freeze both unbaked and baked pizza. To freeze unbaked pizza, wrap it tightly in plastic wrap, then foil. This keeps the air out. For baked pizza, let it cool completely. Cut it into slices, then place in a freezer bag. Be sure to remove as much air as possible. This way, it will stay fresh. In the fridge, leftover pizza lasts about three days. In the freezer, it can last up to three months. Always check for signs of spoilage. If you see mold or an off smell, it’s best to toss it out. Enjoy your Pesto Chicken French Bread Pizza fresh, but if you have leftovers, you now know how to store them! To make homemade pesto, use fresh basil, garlic, pine nuts, and olive oil. Combine these in a food processor. You can also add Parmesan cheese for more flavor. Blend until smooth. If you want a nut-free version, try sun-dried tomatoes instead. Homemade pesto tastes fresh and bright. Store it in the fridge for up to a week. Yes, you can prepare this pizza ahead of time. Slice the bread and add pesto, chicken, and toppings. Wrap it in plastic wrap. Store it in the fridge for up to 24 hours. When ready, bake it straight from the fridge. Just add a few extra minutes to the baking time. This way, you save time during dinner. You can use various bread types for this pizza. Ciabatta or Italian bread works well. If you want a gluten-free option, try gluten-free bread or tortillas. Just ensure the bread is sturdy enough to hold the toppings. Each option adds its own unique flavor and texture to the pizza. Absolutely! Feel free to customize your pizza. You can add vegetables like bell peppers, spinach, or olives. Try different cheeses, like goat cheese or feta. You can even use different proteins, like turkey or shrimp. The options are endless, so let your creativity shine. Each addition makes your pizza unique and delicious. For the full recipe, check out the detailed instructions above! This blog post shows you how to make a tasty Pesto Chicken French Bread Pizza. We covered the main ingredients, preparation steps, and baking tips. You learned how to add variety with proteins and sauces, and I gave you useful storage advice. Now, enjoy your pizza fresh out of the oven or save leftovers for later. Remember, cooking should be fun and creative, so don’t hesitate to experiment with toppings. Enjoy your delicious creation!

Pesto Chicken French Bread Pizza Savory Dinner Delight

Are you ready to elevate your dinner game? This Pesto Chicken French Bread Pizza is a savory delight that’s easy

To make Caprese Garlic Bread, gather these key ingredients: - 1 large baguette or ciabatta loaf - 1/2 cup unsalted butter, softened - 4 cloves garlic, finely minced - 1 cup cherry tomatoes, halved - 1 cup fresh mozzarella balls, halved - 1/2 cup fresh basil leaves, finely chopped - 1 tablespoon balsamic glaze - Salt and freshly ground black pepper, to taste You can add some extra flavor with these optional items: - Red pepper flakes for a spicy kick - A pinch of dried oregano for herbal notes - A drizzle of olive oil for richness If you need to change things up, try these substitutions: - Use whole wheat bread instead of white for more fiber - Swap mozzarella for feta cheese for a tangy taste - Replace fresh basil with arugula for a peppery twist This recipe is flexible, so feel free to mix and match! You can find the full recipe above. First, preheat your oven to 400°F (200°C). This step is key for even baking. Next, grab a medium bowl. Mix 1/2 cup of softened unsalted butter with 4 cloves of minced garlic. Blend well to spread the garlic flavor evenly. Set this tasty mixture aside for later. Now, take your large baguette or ciabatta loaf. Slice it in half lengthwise. Place the halves cut-side up on a baking sheet lined with parchment paper. This makes clean-up easy. Take the garlic butter mix and spread it generously over both halves. Make sure every spot gets a taste. Then, in another bowl, combine 1 cup of halved cherry tomatoes, 1 cup of halved fresh mozzarella balls, and 1/2 cup of finely chopped fresh basil leaves. Add a pinch of salt and freshly ground black pepper. This mix adds freshness and color to your bread. Once your bread is ready, spoon the tomato and mozzarella mix onto the garlic buttered halves. Spread it evenly for balanced bites. Now, it’s time to bake. Place the baking sheet in your preheated oven. Bake for about 12-15 minutes. Look for melted mozzarella and golden brown edges. This is when the magic happens! After baking, carefully remove your garlic bread from the oven. Drizzle it with balsamic glaze for sweetness. If you want some heat, sprinkle red pepper flakes on top. Adjust the amount based on your taste. Slice the garlic bread into serving-sized pieces. Serve it warm for the best experience. To make it look great, arrange the slices on a rustic board or colorful platter. Add some fresh basil leaves for a pop of color. This way, your Caprese Garlic Bread looks as good as it tastes! If you want the full recipe, just refer to the details above. Enjoy your cooking adventure! To make great garlic butter, start with softened unsalted butter. This ensures it spreads easily. Add finely minced garlic. Use fresh garlic for the best taste. Mix both well until you see no lumps. For an extra kick, add salt and a pinch of red pepper flakes. Taste it to see if you want more garlic or salt. This butter will make your bread shine! Balsamic glaze adds sweetness and tang. Drizzle it on after baking. This keeps the glaze from burning. Use a spoon or small bottle for control. Aim for even coverage across the bread. Don't overdo it; a little goes a long way. If you like a stronger flavor, you can add more glaze at the table. This way, everyone can enjoy it their way. A crispy crust makes all the difference! Preheat your oven to 400°F (200°C). Bake the bread for 12-15 minutes. Keep an eye on it towards the end. Look for golden-brown edges and melted cheese. If you want it extra crunchy, leave it in for a couple more minutes. Just be careful not to burn it! Remember, the best garlic bread is golden and bubbly. This will make everyone want a piece! {{image_4}} To make a vegan version of Caprese garlic bread, swap the butter for a plant-based alternative. You can use vegan margarine or olive oil. For the cheese, try using vegan mozzarella shreds. This keeps the creamy texture while being dairy-free. The rest of the recipe stays the same. You still get all those bright flavors without any animal products. If you need a gluten-free option, choose gluten-free bread. Look for gluten-free baguettes or ciabatta at your local store. Just check the label for gluten-free certification. The rest of the ingredients remain the same. You still enjoy the garlic, tomatoes, and basil. Your gluten-free guests will love this tasty treat! You can change the toppings based on the season. In summer, add fresh zucchini or grilled peppers. In fall, think about roasted butternut squash or caramelized onions. Winter is great for adding sautéed mushrooms or spinach. Each change brings new flavors to your Caprese garlic bread. Experiment and find your favorite combination! For the full recipe, check out Caprese Garlic Bread Delight. To keep your leftover garlic bread fresh, wrap it tightly in plastic wrap or foil. Place it in an airtight container. This keeps the bread moist and prevents it from drying out. Store it in the fridge for up to three days. If you want to keep it longer, freezing is a great option. When you're ready to enjoy your garlic bread again, preheat your oven to 350°F (175°C). Place the garlic bread on a baking sheet. Cover it loosely with foil to keep it from browning too much. Heat for about 10-15 minutes, or until warmed through. This method keeps the bread soft and tasty. To freeze your garlic bread, slice it first. Wrap each slice in plastic wrap or foil. Then, place the wrapped slices in a freezer bag. This way, you can grab one or two slices at a time. Your garlic bread can last in the freezer for up to three months. When you want to eat it, just follow the reheating tips above. Enjoy your Caprese Garlic Bread whenever you like with these simple storage methods! Yes, you can use many types of bread. A baguette gives a nice crunch. Ciabatta is soft and airy. You might also try sourdough for a tangy twist. Each type adds its own flavor and texture. Just make sure the bread can hold the toppings well. You can store Caprese Garlic Bread for about 2-3 days. Wrap it tightly in plastic wrap or foil to keep it fresh. This helps avoid drying out. If you plan to keep it longer, consider freezing it. Frozen bread can last up to 3 months. To reheat, use an oven for the best results. Preheat your oven to 350°F (175°C). Place the bread on a baking sheet and cover it with foil. This keeps it from getting too hard. Heat for about 10 minutes or until warm. You can also use a toaster oven for smaller pieces. For extra crispiness, remove the foil for the last few minutes. For the full recipe, you can check the Caprese Garlic Bread Delight. This blog post covered how to make delicious Caprese Garlic Bread. We discussed the necessary ingredients, optional flavor boosters, and smart substitutions. I shared step-by-step instructions for preparation and baking, along with tips for serving. You learned ways to perfect your garlic butter and use balsamic glaze. We also explored vegan and gluten-free variations. Finally, we looked at storing and reheating tips. Enjoy experimenting with this tasty recipe, and let your kitchen creativity thrive!

Caprese Garlic Bread Flavorful and Easy Recipe

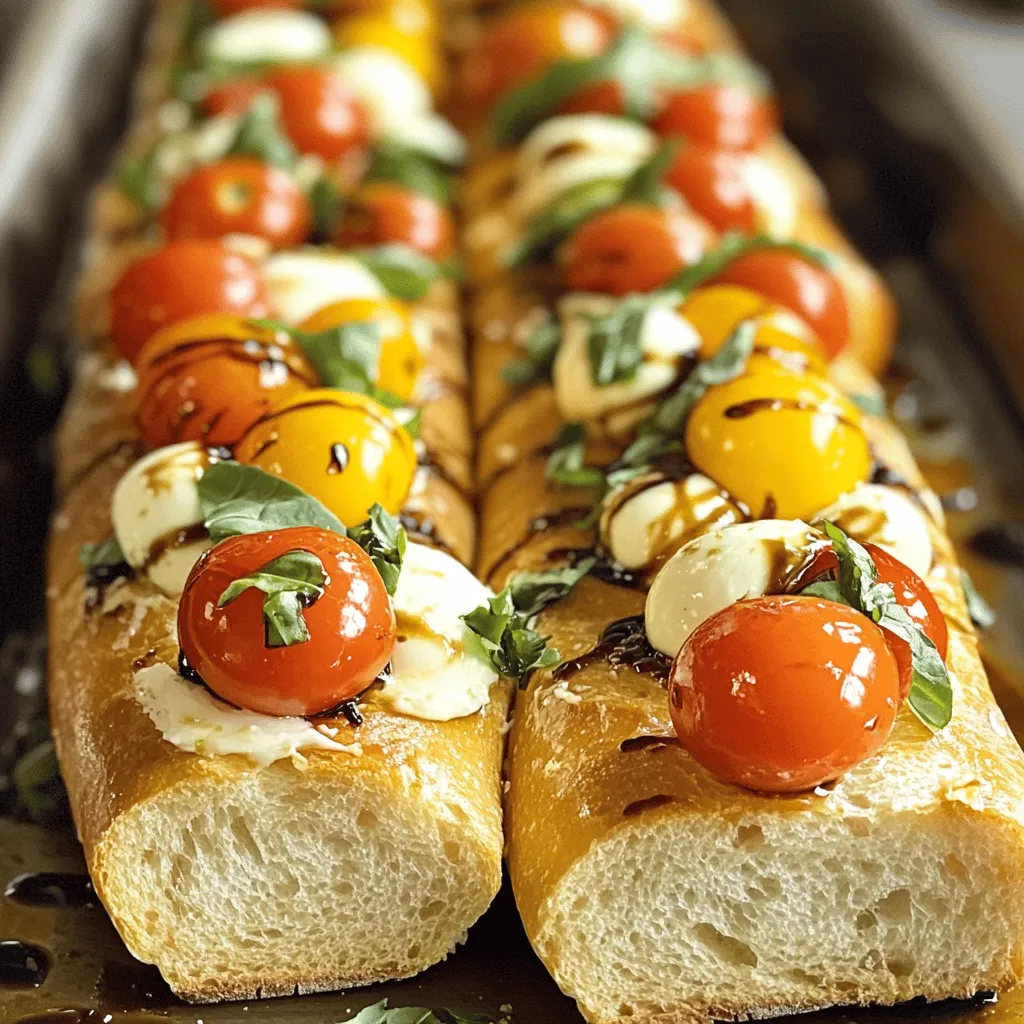
Looking for a tasty, quick dish that impresses? You need to try my Caprese Garlic Bread! It’s simple to make

When making a Veggie Lovers Flatbread Pizza, it's key to gather fresh, tasty ingredients. Here's what you need: - Whole wheat flatbread - Pizza sauce (store-bought or homemade) - Fresh mozzarella cheese - Bell peppers - Cherry tomatoes - Zucchini - Red onion - Mushrooms - Dried oregano - Crushed red pepper flakes - Fresh basil leaves - Olive oil - Salt and pepper Each ingredient plays a big role in flavor and texture. Whole wheat flatbread gives a hearty base. The pizza sauce adds a rich, zesty kick. Fresh mozzarella melts beautifully, creating that gooey texture we all love. Bell peppers, cherry tomatoes, zucchini, red onion, and mushrooms bring color and crunch. They also add vital nutrients. Dried oregano gives that classic pizza taste. If you like heat, crushed red pepper flakes are a great touch. Fresh basil leaves are perfect for finishing. They give a fresh aroma and bright flavor. A drizzle of olive oil adds richness, while salt and pepper enhance all these flavors. This mix of ingredients makes your pizza fresh, tasty, and a joy to eat. For the complete recipe, check the Full Recipe section. - Preheating the oven: First, set your oven to 450°F (232°C). This step is vital for a crispy crust. - Arranging the flatbreads: Next, place two large pieces of whole wheat flatbread on a baking sheet. Leave space between them for even cooking. - Spreading the sauce: Grab a spatula and spread one cup of pizza sauce evenly on each flatbread. Leave about half an inch at the edges for the crust. - Adding cheese and vegetables: Sprinkle one cup of shredded fresh mozzarella cheese over the sauce. Then, layer your veggies. Start with bell peppers, then add zucchini, red onion, halved cherry tomatoes, and mushrooms. Make sure to spread them out for a tasty bite. - Seasoning and drizzling: Sprinkle 1/4 teaspoon of dried oregano over the top. If you like heat, add some crushed red pepper flakes. Finish with a pinch of salt and black pepper. Drizzle a little olive oil on top for extra flavor. - Baking time and temperature: Place the baking sheet in the oven and bake for 10-12 minutes. Look for bubbly cheese and golden brown edges. Now your Veggie Lovers Flatbread Pizza is ready for cooling and garnishing! Follow the [Full Recipe] for more tips and serving suggestions! To get a crispy flatbread, follow these steps: - Use fresh flatbread. Stale bread can become soggy. - Preheat your oven to a high temperature. I suggest 450°F (232°C). - Lightly brush the flatbread with olive oil before baking. This helps crisp the edges. - If you have one, use a pizza stone. It gives the crust a perfect crunch. Adding spices and toppings can boost flavor: - Sprinkle dried oregano on top for a classic taste. - Try crushed red pepper flakes for some heat. - Consider using garlic powder or Italian seasoning as well. - For cheese, fresh mozzarella is great, but you can mix it with goat cheese or feta for a twist. To cook your flatbread evenly, do these things: - Place your flatbreads on the middle rack of the oven. This helps with air circulation. - Keep an eye on them as they bake. They can go from perfect to burnt quickly. - If you notice uneven cooking, rotate the flatbreads halfway through baking. This ensures they cook evenly. These tips will help you make a delicious Veggie Lovers Flatbread Pizza. For the full recipe, check out the earlier sections. {{image_4}} If you need a gluten-free flatbread, try using gluten-free tortillas or cauliflower crust. They work well and give a nice texture. You can find gluten-free versions in most stores. Just make sure to check the labels for ingredients. For a vegan flatbread pizza, you can swap out the cheese. Use vegan mozzarella or nutritional yeast for a cheesy flavor. You can also try hummus or a cashew-based sauce. These options add creaminess without dairy. Don't forget to pick a vegan pizza sauce too! Seasonal veggies can change your flatbread pizza game. In spring, use asparagus and peas. Summer is great for zucchini and fresh corn. In fall, try roasted pumpkin and kale. Winter calls for hearty root veggies like sweet potatoes and Brussels sprouts. The options are endless! Feel free to mix and match your favorites for a unique taste. For the full recipe, check out Veggie Lovers Flatbread Pizza. Store leftover veggie flatbread pizza in an airtight container. This keeps it fresh and tasty. Place it in the fridge within two hours of cooking. It will last for about three days. When you are ready to eat, remove it from the fridge. To reheat your flatbread pizza, use an oven or a toaster oven. Preheat it to 375°F (190°C). Place the pizza on a baking sheet or directly on the oven rack. Bake for about 8-10 minutes. This method keeps the crust crispy and the toppings warm. You can also use a skillet on the stove. Heat it on medium for about 5-7 minutes. Cover it with a lid to help warm the toppings. To freeze your flatbread pizzas, wrap each one tightly in plastic wrap. Then, place them in a freezer bag. Remove as much air as possible to prevent freezer burn. They will stay good for up to three months. When you're ready to eat, thaw them in the fridge overnight. Bake in the oven at 375°F (190°C) for 12-15 minutes. This restores the fresh taste and texture. For the full recipe, refer to the earlier section. Yes, you can use many different toppings. Try using: - Spinach - Artichokes - Broccoli - Olives - Eggplant - Avocado Mix and match to find your favorite flavors. Each veggie adds a new twist! Bake your flatbread pizza for 10-12 minutes. Check when the cheese bubbles. The edges should be crispy and golden brown. A hot oven helps the crust stay firm! You can prep the flatbread pizza ahead. Assemble it, then store it in the fridge for a few hours. I suggest baking it fresh for the best taste. If you make it too early, the crust might become soggy. Pair your pizza with a crisp side salad. A fresh green salad with lemon dressing works well. You can also serve it with: - Garlic bread - Roasted vegetables - A bowl of soup These sides add a nice touch to your meal! This blog covered how to make delicious veggie flatbread pizza. You learned about the key ingredients and easy steps to prepare it. I shared tips to enhance flavors and ensure a crispy crust. We also explored variations, including gluten-free and vegan options. Finally, I offered storage and reheating advice. Try making this pizza at home. Experiment with toppings and share your creations. Enjoy your cooking adventure!

Veggie Lovers Flatbread Pizza Fresh and Tasty Meal

If you love fresh, tasty meals, you’ll adore this Veggie Lovers Flatbread Pizza. With vibrant colors and rich flavors, this

Older posts
Newer posts
← Previous Page1 Page2 Page3 … Page71 Next →

dsad

© 2025 tastyhatch • Built with GeneratePress

Our Policies

  • Copyright Policy
  • Cookie Policy
  • GDPR Policy
  • Privacy Policy
  • Disclaimer
  • Terms Of Use

More Information

  • Home
  • About
  • Contact
  • Appetizers
  • Dessert
  • Dinner
  • Drinks
©2025, tastyhatch About Back To Top