Skip to content
DisclaimerTerms Of UseGDPR PolicyCookie Policy

tastyhatch

  • Home
  • Drinks
  • Appetizers
  • Dinner
  • Dessert
  • About
  • Contact
  • Privacy Policy
DisclaimerTerms Of UseGDPR PolicyCookie Policy

Olivia

When making eggnog cake, using the right ingredients is key. Here’s what you need: - 2 cups all-purpose flour - 1 ½ teaspoons baking powder - ½ teaspoon baking soda - ½ teaspoon ground nutmeg - ½ teaspoon ground cinnamon - ½ teaspoon salt - 1 cup unsalted butter, softened - 1 ½ cups granulated sugar - 4 large eggs, at room temperature - 1 cup eggnog (store-bought or homemade) - 1 teaspoon pure vanilla extract - 1 cup powdered sugar (for frosting) - 2 tablespoons unsalted butter, softened (for frosting) - 2 tablespoons eggnog (for frosting) - Ground nutmeg for garnish Each ingredient plays a vital role. Flour gives the cake structure. Baking powder and baking soda help it rise. Nutmeg and cinnamon add that warm, festive flavor. Butter and sugar create a sweet, moist base. Eggs bind everything together, while eggnog adds richness. You can use homemade eggnog for a personal touch. Store-bought eggnog works well too. For the frosting, the powdered sugar and butter make a smooth, sweet topping. Top it off with ground nutmeg for a lovely finish. Ready to bake? Check out the Full Recipe for the detailed steps! - Set temperature to 350°F (175°C) - Prepare cake pans Start by preheating your oven to 350°F (175°C). This step is key for even baking. Next, grab two 9-inch round cake pans. Grease them with butter and dust them lightly with flour. This will stop the cake from sticking. - Combine flour and leavening agents - Set aside dry mixture In a medium bowl, combine 2 cups of all-purpose flour, 1 ½ teaspoons of baking powder, ½ teaspoon of baking soda, ½ teaspoon of ground nutmeg, ½ teaspoon of ground cinnamon, and ½ teaspoon of salt. Whisk these ingredients together until they are well mixed. Set this dry mixture aside for later. - Beat until light and fluffy - Add eggs and vanilla In a large bowl, use an electric mixer to cream 1 cup of softened unsalted butter with 1 ½ cups of granulated sugar. Mix on medium speed for about 3-4 minutes. The mixture should look light and fluffy. Then, add 4 large eggs, one at a time. Mix well after each egg. Don’t forget to add 1 teaspoon of pure vanilla extract and mix until combined. - Alternate adding dry and wet ingredients - Mix just until combined Now, it’s time to mix the wet and dry ingredients. Start by adding a portion of the dry mixture to the butter and sugar mix. Then, add 1 cup of eggnog. Alternate between the dry mix and eggnog, mixing on low speed. Stop mixing as soon as everything is combined. Overmixing can ruin the cake's texture. - Fill pans and smooth the top - Timing for baking (25-30 minutes) Take the batter and divide it evenly between the two prepared cake pans. Smooth the tops with a spatula. Place the pans in the preheated oven. Bake for about 25-30 minutes. To check if they’re done, insert a toothpick in the center. It should come out clean or with a few moist crumbs. - Cool and frost the cakes - Garnish with nutmeg After baking, let the cakes cool in the pans for about 10 minutes. Carefully move them to a wire rack to cool completely. While they cool, you can make the frosting. Beat together 1 cup of powdered sugar and 2 tablespoons of softened butter until fluffy. Gradually blend in 2 tablespoons of eggnog until it’s smooth. Once the cakes are cool, place one layer on a serving plate. Spread the eggnog frosting on top, then place the second layer on top. Frost the top and sides of the cake with the remaining frosting. For a festive touch, sprinkle ground nutmeg on the top. Enjoy your eggnog cake! For the complete details, check the Full Recipe. - Avoid overmixing: Mix the batter just until the dry and wet ingredients blend. Overmixing makes the cake tough. - Room temperature ingredients: Use eggs and butter at room temperature. This helps create a smooth batter. - How to get a smooth frosting: Beat the butter until it’s light and fluffy. Gradually add powdered sugar. Blend in eggnog slowly. This step ensures a creamy, smooth texture. - Tips for flavor adjustments: You can add a splash of rum or extra spices to the frosting. This adds a fun twist to the flavor. - Serving suggestions: Serve slices on elegant plates. This adds a festive touch to your table. - Add-ons or pairings: Pair each slice with a small glass of eggnog. It enhances the holiday feel and adds fun. You can find the complete recipe in the Full Recipe section. Enjoy making your eggnog cake! {{image_4}} You can boost the flavor of your eggnog cake with spices. Cinnamon, nutmeg, and cloves work perfectly. These spices enhance the holiday vibe. You can also try other flavorings. Consider adding a splash of rum or bourbon for a grown-up twist. Almond extract adds a nice layer too. Remember, a little goes a long way! If you need gluten-free options, use a gluten-free flour blend. This swap keeps the cake moist and tasty. Just ensure your baking powder is also gluten-free. For vegan substitutes, replace eggs with flaxseed meal or applesauce. You can use plant-based butter and almond milk instead of eggnog. This keeps the flavor rich and delightful. You have many choices for frostings. A cream cheese frosting pairs well with eggnog flavors. Or, try a whipped cream topping for a light touch. Get creative with garnishes! You can sprinkle cocoa powder or add chocolate shavings. Fresh berries or candied nuts can add color and crunch. Each of these options makes your cake a real showstopper. To keep your eggnog cake fresh, store it in an airtight container. This helps keep moisture in and air out. I recommend using a cake dome or a plastic cake container. These options work well to protect the cake from drying out. You can keep the cake at room temperature for up to three days. If you need it to last longer, place the cake in the fridge. It can last about a week in there. If you have leftover cake, freezing is a great option. First, let the cake cool completely. Wrap each layer tightly in plastic wrap. Then, place the wrapped layers in a freezer-safe bag or container. This keeps the cake from getting freezer burn. You can freeze the cake for up to three months. When it’s time to enjoy, take the cake out. Put it in the fridge for several hours or overnight to thaw. If you’re in a hurry, you can let it sit at room temperature for about an hour. This way, your eggnog cake will taste just as good as when you first made it. For more details on the eggnog cake preparation, check out the Full Recipe. To make eggnog cake from scratch, gather fresh ingredients. Start by preheating your oven to 350°F (175°C). Mix flour, baking powder, baking soda, nutmeg, cinnamon, and salt in a bowl. Cream softened butter and sugar in another bowl. Add eggs and mix well. Gradually combine both mixtures while adding eggnog. Pour the batter into prepared pans and bake for about 25-30 minutes. Cool and frost with eggnog frosting. Yes, you can use store-bought eggnog. It saves time and still tastes great. Choose a brand you enjoy for the best flavor. Use the same amount as you would homemade eggnog in the recipe. If you need to replace eggnog, you can use a mix of milk and nutmeg. Combine 1 cup of milk with 1 teaspoon of nutmeg and 1 teaspoon of vanilla extract. This will give you a similar flavor profile. You can also try using any non-dairy milk with spices for a vegan option. To ensure your cake rises well, use fresh baking powder and baking soda. Make sure your ingredients are at room temperature. Avoid overmixing the batter; this can lead to a dense cake. Lastly, fill your cake pans only halfway to allow room for rising. Yes, you can make this cake ahead of time. Bake the cake and let it cool completely. Wrap each cake layer in plastic wrap. Store in the fridge for up to 3 days or freeze for longer storage. Frost the cake just before serving for the best texture. Serve eggnog cake chilled or at room temperature. Slice it into generous portions. For a festive touch, add a sprinkle of ground nutmeg on top. You can pair slices with a glass of eggnog for a delightful holiday treat. Enjoy each bite! In this post, we explored a simple eggnog cake recipe. You learned about the key ingredients, easy steps, and helpful tips for success. Remember, room temperature items and avoiding overmixing are key. You can make this cake your own with flavors or dietary swaps. Store it right, and enjoy every slice. Baking this cake can be fun, tasty, and festive. Trust me, your friends and family will love it.

Eggnog Cake Delightful Holiday Dessert Recipe

Looking for the perfect treat for your holiday gatherings? This Eggnog Cake is a delightful dessert that captures the spirit

To make crispy garlic Parmesan potatoes, gather these ingredients: - 1.5 lbs baby potatoes, halved - 4 tablespoons extra virgin olive oil - 4 cloves garlic, finely minced - 1 teaspoon dried oregano - 1 teaspoon smoked paprika - ½ cup freshly grated Parmesan cheese - Salt and freshly ground black pepper, to taste - Chopped fresh parsley, for garnish You will need a few basic tools: - A large mixing bowl - A baking sheet - Parchment paper - A spatula - A knife and cutting board Feel free to play with the recipe! You can use different types of potatoes, like Russets or Yukon Golds. For a spicy kick, add red pepper flakes. If you prefer a cheese swap, try feta or cheddar. Fresh herbs like rosemary or thyme can add unique flavors. Enjoy making this dish your own! First, gather all your ingredients. You will need baby potatoes, olive oil, garlic, oregano, smoked paprika, Parmesan cheese, salt, and pepper. Wash the baby potatoes and slice each in half. This helps them cook evenly. Next, take a large bowl and mix the halved potatoes with olive oil, minced garlic, oregano, smoked paprika, salt, and pepper. You want every potato to be covered in flavor. Toss them gently but well. Preheat your oven to 425°F (220°C). This high heat helps achieve that crispy finish we all love. After mixing the potatoes, spread them on a baking sheet. Make sure they are cut-side down. This position helps them get crispy. Roast your potatoes for 25 to 30 minutes. Halfway through, use a spatula to flip them. This ensures they brown nicely on both sides. To get super crispy potatoes, do not crowd the baking sheet. Each piece needs space for air to flow. Also, use fresh, high-quality olive oil. It helps enhance the flavor and crispiness. When they are golden brown, take them out and sprinkle Parmesan cheese on top. Pop them back in the oven for another 5 minutes. This melts the cheese and adds a rich taste. Finish with chopped parsley for color and freshness. Enjoy your crispy garlic Parmesan potatoes! For the full recipe, refer to the earlier section. For great flavor, use fresh ingredients. Fresh garlic packs a punch. I love using high-quality olive oil. It adds depth and richness. Don't be shy with salt and pepper. They enhance the taste of the potatoes. A sprinkle of oregano and smoked paprika gives a nice touch. Mix everything well to coat all the potatoes evenly. This way, every bite is full of flavor. Roasting at the right temperature is key. I preheat my oven to 425°F (220°C). This helps the potatoes get crispy. Spread the potatoes out in a single layer on the baking sheet. Cut sides should face down. This maximizes browning. Halfway through, flip them to ensure even cooking. The outside should be golden, while the inside stays tender. If your potatoes aren't crispy, check a few things. They may be crowded on the baking sheet. Give them space to breathe. If they are cut too thick, they may need more time. Try roasting them longer, checking every few minutes. If needed, broil them for a minute or two at the end. This can add that extra crunch. For the best results, follow the Full Recipe for guidance. {{image_4}} You can swap out Parmesan for other cheeses. Try using cheddar for a sharper taste. Feta adds a nice tang, while mozzarella gives a gooey texture. You can even mix cheeses for a fun twist. Just remember to adjust the amount to keep the dish balanced. Feel free to change the herbs in this dish. If you want a fresh kick, use fresh rosemary or thyme instead of dried oregano. Basil works well too, especially if you love a bit of sweetness. You can also try adding a pinch of chili flakes for some heat. Want to make this dish a full meal? Add protein to the potatoes. Cooked chicken or shrimp pairs great with the garlic and cheese. You can toss in some cooked bacon bits for a savory crunch. Just remember to adjust the cooking time if you add meat. For more ideas and a complete recipe, check out the Full Recipe. To keep your crispy garlic Parmesan potatoes fresh, let them cool. Place them in an airtight container. You can store them in the fridge for up to three days. Avoid leaving them out too long, as they can get soggy. For the best taste, reheat these potatoes in the oven. Preheat your oven to 400°F (200°C). Spread the potatoes on a baking sheet. Heat them for about 10-15 minutes. This method helps restore their crispiness. You can also use an air fryer at 350°F (175°C) for about 5-7 minutes. If you want to freeze the potatoes, let them cool completely. Spread them out on a baking sheet in a single layer. Freeze them for about an hour until firm. Then, transfer them to a freezer bag. Seal tightly and label with the date. They can stay frozen for up to three months. When ready to eat, thaw in the fridge overnight before reheating. For the full recipe, check out the Crispy Garlic Parmesan Potatoes section. I recommend using baby potatoes for this dish. They are small and tender. They cook quickly and get crispy on the outside. If you can’t find baby potatoes, try Yukon Gold or red potatoes. These types also work well and give great flavor. Yes, you can make this recipe vegan! Simply replace the Parmesan cheese with a vegan cheese option. Nutritional yeast is a great choice, as it adds a cheesy flavor without dairy. You can also skip the cheese altogether for a lighter dish. To stop the potatoes from sticking, use parchment paper on your baking sheet. This helps them slide off easily. Make sure to coat the potatoes well with olive oil. The oil creates a barrier that keeps them from sticking while they roast. To add some heat, sprinkle crushed red pepper flakes over the potatoes. You can also mix in cayenne pepper with the seasonings. Adjust the amount to suit your taste. If you like a stronger kick, consider adding diced jalapeños to the mix. Enjoy experimenting with spice! You learned about key ingredients, necessary tools, and how to customize your dish. We covered step-by-step cooking tips for crispy perfection. The importance of seasoning and storage methods helps keep your meal fresh. Plus, you can explore variations like herbs and proteins. Enjoy experimenting with all these great options. With this guide, you can create a tasty dish every time. Happy cooking!

Crispy Garlic Parmesan Potatoes Simple and Tasty Dish

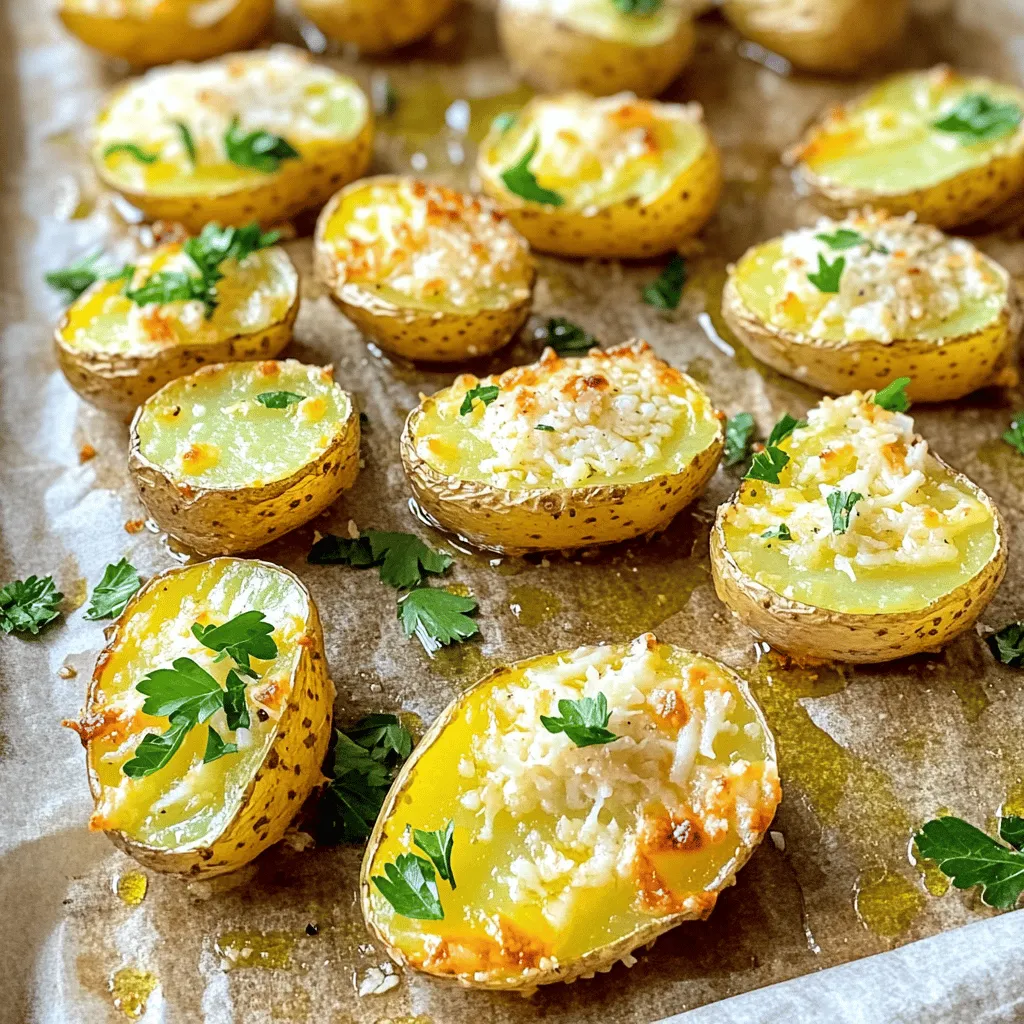
If you’re craving a crispy, flavorful side dish, you’ve hit the jackpot! My Crispy Garlic Parmesan Potatoes are easy to

For the base of this dish, you will need: - 2 cans (16 oz each) of refrigerated biscuit dough This dough is soft and fluffy. It bakes up golden and delicious. You can use any brand you like, but I find the flaky varieties work best. Next, we add the good stuff: - 1 cup shredded mozzarella cheese - 1 cup pepperoni slices (or substitute with diced bell peppers for a veggie alternative) The mozzarella melts beautifully, while the pepperoni adds a savory punch. If you prefer veggies, bell peppers work great too, giving color and crunch. To enhance the flavors, gather these items: - 1/2 cup pizza sauce (plus additional for dipping) - 2 tablespoons olive oil - 1 teaspoon Italian seasoning - 1/2 teaspoon garlic powder - 1/4 teaspoon crushed red pepper flakes (optional for added spice) - Fresh basil leaves for garnish (optional) The olive oil helps the dough to crisp. Italian seasoning brings a classic pizza flavor. Garlic powder adds depth, and red pepper flakes can spice things up if you like heat. Fresh basil adds a nice touch at the end. For full details, check the Full Recipe. First, you need to preheat your oven to 350°F (175°C). This step is key for even cooking. While the oven warms up, grab your bundt pan and grease it well. Use non-stick spray to help the monkey bread come out easily later. Next, open the cans of biscuit dough. Carefully pull apart each biscuit and cut them into four pieces. This makes it easier to mix. Place all the pieces in a big mixing bowl. Now, drizzle olive oil over the biscuit pieces. Sprinkle in the Italian seasoning, garlic powder, and crushed red pepper flakes if you like it spicy. Toss everything together until each piece is well coated. It's time to add the fun stuff! Fold in the shredded mozzarella and pepperoni (or bell peppers for a veggie twist) into the biscuit mixture. Make sure they are mixed evenly throughout. Spoon half of this mixture into the greased bundt pan. Spread it out so it forms an even layer. Next, pour half of the pizza sauce over this layer. Then, add the rest of the mixture on top, followed by the remaining pizza sauce. Use a spatula to make it nice and smooth. Place the bundt pan into the preheated oven. Bake for 25-30 minutes. The top should turn a lovely golden brown. To check if it’s done, stick a toothpick into the center. If it comes out clean, you are good to go! Once it's done baking, take it out and let it cool for 5-10 minutes. Then, invert the pan onto a serving plate. This helps release the monkey bread easily. For an extra touch, add some fresh basil leaves on top. Serve it warm with extra pizza sauce for dipping. This recipe is a fun way to enjoy cheese pizza flavors in a new form. I love how the warm, gooey cheese pulls apart easily and makes for a great party treat. For Cheese Pizza Monkey Bread, you should choose flaky biscuit dough. I recommend using refrigerated dough that comes in a can. This dough is light and easy to work with. It puffs up nicely when baked. You can find it in most grocery stores. Look for brands that have no artificial ingredients for better taste. Baking time may vary based on your oven. I suggest you check the monkey bread around the 25-minute mark. It should be golden brown on top. If it looks pale, give it a few more minutes. Use a toothpick to test doneness. Insert it into the center; it should come out clean. If you see raw dough, bake a bit longer. Serve your Cheese Pizza Monkey Bread warm. It pairs well with extra pizza sauce for dipping. You can also add some fresh herbs on top. Fresh basil leaves add color and taste. If you want more fun, try serving it on a wooden board. This makes it look festive for parties. For a twist, offer different dipping sauces like ranch or marinara. Enjoy this cheesy treat with friends! {{image_4}} To make a vegetarian version, swap the pepperoni for fresh veggies. Use diced bell peppers, mushrooms, or black olives. These add great color and flavor. You can also throw in some spinach for extra nutrients. This version stays true to the pizza theme while being meat-free. It’s a fun twist that everyone can enjoy. Cheese is key in this recipe. While mozzarella is classic, you can mix it up. Try using cheddar for a sharp taste or provolone for a smooth melt. A blend of cheeses can elevate the flavor. Mixing in some parmesan adds a nice, salty touch. Play around with different cheese combinations to find your favorite blend. If you love spice, add crushed red pepper flakes to the biscuit mixture. This gives a nice heat to the bread. You can also use spicy cheese like pepper jack for an extra kick. For more flavor, include jalapeños or banana peppers in the filling. This spicy version will surely be a hit at your next gathering. Try these options for a twist on the classic Cheese Pizza Monkey Bread. For the full recipe, check out the main section. To store your Cheese Pizza Monkey Bread, let it cool first. After it cools, wrap it tightly in plastic wrap. You can also place it in an airtight container. This method keeps it moist and fresh. Store it in the fridge for up to three days. When you're ready to enjoy leftovers, preheat your oven to 350°F (175°C). Place the monkey bread in an oven-safe dish. Cover it with foil to keep it from drying out. Heat for about 15-20 minutes. You can also microwave it for quick reheating. Just heat it in 30-second intervals until warm. If you want to save some for later, freezing works great! Wrap the cooled monkey bread tightly in plastic wrap. Then, place it in a freezer bag or container. It can last up to three months in the freezer. To eat it, thaw it overnight in the fridge. Then, reheat it in the oven for best results. For the full recipe, check back for more delicious ideas! You can prepare Cheese Pizza Monkey Bread in advance. Follow the steps up to the baking part. Then, cover the bundt pan with plastic wrap and place it in the fridge. You can bake it the next day. This makes it easy for parties. Just remember to add a few extra minutes to the bake time if it’s cold. Yes, you can change the cheese or toppings. Use cheddar, gouda, or even vegan cheese. For toppings, try mushrooms, olives, or onions. This recipe is flexible and allows you to get creative. Just keep the amount similar to maintain the texture. Serve Cheese Pizza Monkey Bread warm from the oven. Place it on a big plate or a rustic board. Pair it with extra pizza sauce for dipping. You can also sprinkle fresh basil on top. This adds color and a nice flavor boost. Leftovers can last for about three days in the fridge. Store them in an airtight container. To enjoy them again, just reheat in the oven or microwave. This keeps them tasty and fresh. Yes, you can make a gluten-free version. Look for gluten-free biscuit dough in stores. The rest of the ingredients are usually gluten-free. Just double-check the labels to be sure. This way, everyone can enjoy this fun treat! In this post, we explored how to make Cheese Pizza Monkey Bread. We started with the right ingredients, like biscuit dough and tasty fillings. Then, I shared step-by-step instructions to guide you through the process. We also covered helpful tips and variations to make this dish your own. Final thoughts: This dish is fun to make and share. It suits any occasion and is sure to please. Enjoy creating your Cheese Pizza Monkey Bread!

Cheese Pizza Monkey Bread Flavorful Party Treat

Looking for a fun party treat that everyone will love? You can’t go wrong with Cheese Pizza Monkey Bread! This

- 1 sheet of puff pastry, thawed - 1 cup wild blueberries (fresh or frozen) - ½ cup cream cheese, softened to room temperature Puff pastry is light and flaky. It gives the danishes a nice, airy texture. You can find it in the freezer aisle. Thaw it overnight in the fridge or let it sit at room temp for a bit. Wild blueberries are the star here. They pack a punch of flavor and are rich in nutrients. Fresh blueberries work great, but frozen ones are fine too. Just add them straight from the bag to your pastry. Cream cheese is smooth and creamy, which helps balance the sweetness. Let it sit out to soften, so it mixes easily with other ingredients. - ¼ cup granulated sugar - 1 teaspoon pure vanilla extract - ½ teaspoon ground cinnamon (optional) Granulated sugar gives the filling a sweet taste. It pairs well with the tartness of blueberries. You can adjust the amount based on your taste. Pure vanilla extract adds a warm flavor. It enhances the sweetness and makes everything more aromatic. Always choose pure over imitation for the best taste. Adding ground cinnamon is optional. It gives a cozy, warm flavor that works well with blueberries. If you love cinnamon, don't hold back! - ¼ cup powdered sugar - 1 tablespoon fresh lemon juice - 1 egg (for egg wash) - 1 tablespoon milk (for egg wash) Powdered sugar makes the glaze sweet and smooth. It’s easy to blend with lemon juice for a tangy finish. Fresh lemon juice brightens the flavor. It cuts through the sweetness and adds a refreshing taste. Use freshly squeezed juice for the best results. The egg wash is key for that golden color. Mix the egg with milk to make it shiny and appealing. Apply it before baking to get that perfect crust. For the full recipe, check out the Wild Blueberry Coffee Cake Danishes. First, preheat your oven to 400°F (200°C). This step is key for a crispy finish. Next, take a baking sheet and line it with parchment paper. This helps prevent sticking. Now, let's roll out the puff pastry. Place the thawed puff pastry on a lightly floured surface. Gently roll it out to remove creases. Use a knife or pizza cutter to cut the pastry into four equal squares, each about 5 inches on each side. Now it’s time to make the filling. In a medium bowl, combine softened cream cheese, granulated sugar, and pure vanilla extract. If you like, add ground cinnamon for extra flavor. Mix until it’s smooth and creamy. This mixture will be the star of your danishes! Place a generous tablespoon of this cream cheese mixture in the center of each pastry square. Spread it slightly, making a cozy bed for the wild blueberries. Now, evenly distribute the wild blueberries over the cream cheese. Each danish should be packed with these juicy gems. Next, we’ll fold and seal the danishes. Carefully fold each corner of the pastry squares towards the center. Pinch the edges to create a sealed pocket. Make sure there are no gaps; we want to keep all that tasty filling inside! Now, let’s prepare the egg wash. In a small bowl, whisk together the egg and milk. Use a pastry brush to apply the egg wash over the tops of the danishes. This will give them a beautiful golden color when baked. Place the danishes in your preheated oven. Bake them for 15-20 minutes. Watch them closely to avoid over-baking. While they bake, prepare the glaze. In a small bowl, mix powdered sugar with fresh lemon juice until smooth. Adjust the mixture for your desired consistency. Once the danishes are golden brown, take them out and let them cool for a few minutes. Drizzle the lemon glaze over the warm pastries for a sweet and tangy finish. Enjoy your delightful Wild Blueberry Coffee Cake Danishes! To handle puff pastry well, keep it cold. If it gets warm, it can become hard to shape. Lightly flour your surface to prevent sticking. Roll it gently to avoid tearing. To avoid gaps in your danishes, pinch the corners tightly. Make sure the filling is centered. Seal the edges well to lock in the tasty mix. If there are gaps, the filling may leak out during baking. For a golden-brown finish, bake at 400°F (200°C). Keep an eye on the danishes as they bake. They should puff up nicely and turn golden after 15-20 minutes. If they are browning too fast, lower the oven temperature slightly. Let them cool for about five minutes after baking. This helps the filling set a bit more. If you glaze them when too hot, the glaze may run off too quickly. To get the right glaze, mix powdered sugar with fresh lemon juice. Start with a tablespoon of lemon juice and add more if needed. Aim for a smooth, pourable consistency. For a twist, try adding vanilla extract or a pinch of cinnamon to your glaze. These flavors add a nice touch. You can also use orange juice for a different taste. For the full recipe, check out the Wild Blueberry Coffee Cake Danishes. Enjoy the process! {{image_4}} You can change the fruit in this recipe. Raspberries and strawberries work great too. Use whatever is in season. They add their own sweet touch. You might also try adding spices. A pinch of nutmeg or a drop of almond extract can boost flavor. Just start with a small amount to see what you like best. If you need a gluten-free option, use gluten-free puff pastry. Many brands offer good choices. Just check the label to ensure it's safe. For a vegan twist, swap out the cream cheese. You can use a plant-based cream cheese. It has a similar taste and texture. This way, everyone can enjoy the danishes. These danishes are great with coffee or tea. Serve them warm for the best taste. You can also add a dollop of whipped cream on top. Fresh fruit like berries or slices of peach pair well too. They bring extra color and flavor to your plate. The mix of flavors is sure to impress your guests. To keep leftover danishes fresh, store them in an airtight container. This will help prevent them from drying out. Place parchment paper between layers if stacking. The danishes will stay fresh in the fridge for about 3 days. After that, the pastry may lose its crispness. If you want to save danishes for later, freezing is a great option. Wrap each danish in plastic wrap and place them in a freezer bag. This keeps them from getting freezer burn. They can last up to 2 months in the freezer. To enjoy them, thaw the danishes in the fridge overnight. Once thawed, reheat them in the oven at 350°F (175°C) for about 10 minutes. This will help restore their nice, flaky texture. Enjoy them warm for the best taste! If you're looking for a full recipe, check the linked [Full Recipe]. How to make Wild Blueberry Coffee Cake Danishes from scratch? To make these danishes, start with puff pastry. Roll it out and cut it into squares. Mix cream cheese, sugar, and vanilla. Place this mix in the center of each square. Add wild blueberries on top. Fold the corners to seal the filling. Brush with egg wash and bake until golden. You can find the full recipe for detailed steps. Can I use other types of fruit for this recipe? Yes, you can use other fruits. Raspberries, strawberries, or blackberries work well. Just make sure to adjust the sugar. Each fruit has a different level of sweetness. How long do danishes stay fresh? Danishes are best when fresh. They stay good for about two days at room temperature. If you store them in the fridge, they can last up to a week. For longer storage, freeze them right after baking. What is the best way to reheat leftover danishes? To reheat danishes, preheat your oven to 350°F (175°C). Place them on a baking sheet. Heat for about 10 minutes. This method keeps them crisp and warm, just like fresh. Can I make these danishes ahead of time? Yes, you can make the filling a day ahead. Just keep it in the fridge. You can also assemble the danishes and freeze them. Bake them fresh when you are ready to serve. What can I serve with Wild Blueberry Coffee Cake Danishes? These danishes pair well with coffee or tea. You can also serve them with whipped cream or fresh fruit. A scoop of vanilla ice cream adds a nice touch too! This blog post explored making Wild Blueberry Coffee Cake Danishes. We discussed key ingredients like puff pastry, blueberries, and cream cheese. Then, we outlined step-by-step instructions for preparation, filling, and baking. Finally, we shared tips for perfecting the dough and glazing for a sweet finish. With these insights, you can try these delicious danishes with ease. Whether for yourself or to share, they are sure to impress. Enjoy baking and tasting your tasty creations!

Wild Blueberry Coffee Cake Danishes Delightful Treat

Welcome to a tasty adventure! Today, I’m sharing my favorite recipe for Wild Blueberry Coffee Cake Danishes. If you love

To make pistachio filled croissants, you need a few key ingredients. Here’s what you will use: - 1 package of store-bought puff pastry (2 sheets) - 1 cup shelled pistachios, finely ground - 1/4 cup granulated sugar - 1/4 cup unsalted butter, softened to room temperature - 1 large egg (for egg wash) - 1 teaspoon pure vanilla extract - 1/2 teaspoon almond extract - Pinch of salt - Powdered sugar, for dusting These ingredients combine to create a delicious filling and flaky pastry. While the key ingredients shine on their own, a few extras can elevate the taste: - A splash of orange blossom water for a floral note - A dash of cinnamon for warmth - Chopped dark chocolate for a rich twist These optional ingredients can add depth and make your croissants unique. Choosing the right brands can make a big difference. Here are some I recommend: - Puff Pastry: Dufour is a popular choice for its quality. - Pistachios: Look for Wonderful Pistachios; they are fresh and flavorful. - Butter: Use Kerrygold for its rich taste. - Vanilla Extract: Nielsen-Massey offers high-quality options. Using these brands helps ensure your pistachio filled croissants turn out great. For the full recipe, check out the instructions above. Start by gathering your ingredients. You need shelled pistachios, sugar, butter, vanilla, almond extract, and salt. In a medium bowl, mix the finely ground pistachios with the sugar and butter. Add the vanilla and almond extracts along with a pinch of salt. Use a spatula to blend everything together until you have a smooth paste. This filling will add a rich, nutty flavor to your croissants. Next, roll out the puff pastry. Dust a clean surface with flour and place a sheet of pastry on it. Roll it into a rectangle that is about 1/8 inch thick. With a sharp knife or pizza cutter, cut it into four triangles. At the base of each triangle, spoon about 1 tablespoon of your pistachio filling. Now, start rolling each triangle from the wide end to the tip. Tuck in the sides as you roll to form a crescent shape. This helps them puff nicely when baking. Now, it's time to bake! Preheat your oven to 400°F (200°C) and line a baking sheet with parchment paper. Arrange your shaped croissants on the sheet, leaving space between them. In a small bowl, beat the egg for the egg wash. Brush this mix over the croissants for a golden finish. Bake for 15 to 20 minutes until they puff up and turn golden brown. Let them cool for a few minutes, then dust with powdered sugar. Enjoy your delightful pistachio filled croissants! For a full recipe, check the details above. To get the best puff in your croissants, keep your dough cold. The colder your puff pastry, the better it puffs. When you roll out the dough, work quickly. If it warms up, pop it back in the fridge for a bit. Always preheat your oven fully before baking. This helps the croissants rise quickly. One mistake is using too much filling. If you overfill, the croissants may burst open. Make sure to roll them tightly. A loose roll can lead to flat croissants. Also, don’t skip the egg wash. It gives a lovely golden color. Lastly, remember to space your croissants on the baking sheet. They need room to puff up. If you have extra pistachio filling, store it well. Place it in an airtight container. You can keep it in the fridge for up to a week. Use it as a spread on toast or pancakes. It also works great in pastries or as a topping for ice cream. Enjoy your tasty pistachio filling in many ways! For the full recipe, check out the detailed instructions above. {{image_4}} You can easily swap pistachios for other nuts. Almonds, hazelnuts, and walnuts work great. Just grind them finely like pistachios. Each nut brings a unique flavor. Almonds add a sweet touch. Hazelnuts add a rich, buttery taste. Walnuts offer a nice crunch. Experiment with your favorite nuts to find the best mix. If you love chocolate, try adding it to the filling. Mix in some finely chopped dark chocolate. It melts and makes the filling richer. You can also add fresh fruits. Chopped figs or dried cherries blend well with pistachios. These additions create a sweet and tangy contrast. They make each bite exciting and new. You can make these croissants vegan and gluten-free. For a vegan version, use plant-based butter. Replace the egg wash with almond milk for a golden finish. For gluten-free, look for gluten-free puff pastry. These options keep the taste while meeting dietary needs. You still get that flaky, delicious treat that everyone loves. Check out the Full Recipe for more details on how to make these variations! To keep your pistachio-filled croissants fresh, store them in a cool place. Use an airtight container to lock in moisture and flavor. If you want to keep them for a longer time, consider wrapping them in plastic wrap. Place them in a container to avoid crushing. To enjoy your croissants warm, preheat your oven to 350°F (175°C). Place the croissants on a baking sheet. Heat them for about 5-10 minutes. This restores the flaky texture. You can also use a toaster oven for quick reheating. Avoid the microwave, as it can make them soggy. If you need to store croissants for a long time, freezing is the best option. Wrap each croissant in plastic wrap. Then, place them in a freezer-safe bag. This helps to keep out air and prevents freezer burn. When you're ready to eat, thaw them in the fridge overnight. Reheat as mentioned above for the best taste. For the perfect pistachio-filled croissants, check out the Full Recipe. To make pistachio filled croissants, start with store-bought puff pastry. I like to use two sheets. First, preheat your oven to 400°F (200°C). Then, mix finely ground pistachios, sugar, softened butter, vanilla, almond extract, and a pinch of salt in a bowl. This creates a nice filling. Roll out the pastry into rectangles and cut them into triangles. Place a tablespoon of the pistachio mix at the wide end of each triangle. Roll it up tightly to form a crescent shape. After arranging them on a baking sheet, brush with an egg wash. Bake for 15-20 minutes until golden brown. For the full recipe, check the details above. Yes, you can use other types of pastry dough. While puff pastry gives a light and flaky texture, you can try Danish dough or even homemade croissant dough. Each type will create a distinct taste and feel. Danish dough adds sweetness, while homemade dough can be richer. Ensure that whatever dough you choose, it layers well for that flaky texture. Pistachio croissants pair well with many items. You can enjoy them with coffee or tea for a classic touch. They also go great with honey drizzled on top, enhancing their flavor. Fresh fruits like berries add a nice contrast. If you're feeling adventurous, try serving them with a scoop of vanilla ice cream. This combo makes for a delightful dessert. Pistachio-filled croissants offer a delightful twist on a classic treat. We discussed key ingredients, step-by-step instructions, and useful tips for success. You learned about variations to keep things exciting and how to store them for freshness. Remember, practice makes perfect. Don't be afraid to try new flavors or ideas. Enjoy the baking journey and savor your creations!

Pistachio Filled Croissants Delightfully Flaky Treat

If you crave a flaky treat that bursts with flavor, you’ve come to the right place! Our Pistachio Filled Croissants

For the crispy chickpeas, you need: - 1 can (15 oz) chickpeas, rinsed and thoroughly drained - 2 tablespoons extra virgin olive oil - 1 teaspoon smoked paprika - 1 teaspoon garlic powder - 1/2 teaspoon ground cumin - Salt and freshly cracked black pepper, to taste Chickpeas are packed with protein and fiber, making them a healthy choice. The oil and spices add great flavor and help them get crispy when roasted. For the salad base, gather: - 4 cups of mixed greens (spinach, arugula, and romaine) - 1 cup cherry tomatoes, halved - 1 medium cucumber, diced into bite-sized pieces - 1/4 red onion, finely sliced - 1/4 cup feta cheese, crumbled (optional) The mixed greens provide freshness. Cherry tomatoes and cucumber add crunch. Red onion gives a nice bite, and feta can add a creamy touch if you like. For the dressing, you will need: - 2 tablespoons freshly squeezed lemon juice - 1 tablespoon balsamic vinegar - Fresh herbs (like parsley or cilantro) for garnish This dressing is simple yet bright. The lemon juice adds tang, while balsamic vinegar brings a nice sweetness. Fresh herbs finish the dish with flavor and color. For the complete recipe, check out the Full Recipe. Start by preheating your oven to 425°F (220°C). This heat will make the chickpeas crispy. Rinse one can of chickpeas and drain them well. In a bowl, mix the chickpeas with two tablespoons of extra virgin olive oil. Add one teaspoon of smoked paprika, one teaspoon of garlic powder, and half a teaspoon of ground cumin. Sprinkle salt and black pepper to taste. Toss the chickpeas until they are well coated in the oil and spices. Line a baking sheet with parchment paper for easy cleanup. Spread the chickpeas in a single layer on the sheet. Make sure they have space between them to roast nicely. Place the baking sheet in the oven and roast for 25 to 30 minutes. Halfway through, shake the pan to ensure even cooking. The chickpeas should turn golden brown and crispy when done. While the chickpeas roast, grab a large mixing bowl. Combine four cups of mixed greens, one cup of halved cherry tomatoes, one diced cucumber, and one finely sliced red onion. In a small bowl, whisk together two tablespoons of freshly squeezed lemon juice and one tablespoon of balsamic vinegar. Drizzle this mixture over the salad ingredients and toss gently. Once the chickpeas are ready, let them cool slightly before adding them to the salad. If you like, sprinkle a quarter cup of crumbled feta cheese on top. Finally, add some freshly chopped herbs for a burst of flavor. For the full recipe, check the details above! To make sure your chickpeas are crispy, start by rinsing and draining them well. Remove as much moisture as you can. Dry them with a clean kitchen towel or paper towel. The drier your chickpeas, the crisper they will be. Use a hot oven, set to 425°F (220°C). This high temperature helps the chickpeas roast quickly and evenly. Spread them out on the baking sheet in a single layer. If they are too close together, they will steam instead of roast. Shake the pan halfway through cooking to help them crisp up all around. You can serve this salad in many ways. For a quick lunch, enjoy it alone. The crispy chickpeas make it filling. Add grilled chicken or shrimp for extra protein. This salad also pairs well with whole grain pita or crusty bread. You can serve it as a side dish at dinner. For a bigger meal, add quinoa or brown rice. This salad is great for sharing, too. Present it in a large bowl, so everyone can dig in. Meal prepping this salad is simple and saves time. Roast a big batch of chickpeas at once. Store them in an airtight container in the fridge. They will stay crispy for about three days. Keep the salad components separate until serving. Mix greens, veggies, and dressing in separate containers. This way, your salad stays fresh and crunchy. When you're ready to eat, just combine everything. You can also add your favorite nuts or seeds for a nice crunch. Check out the Full Recipe for more detailed steps! {{image_4}} You can boost the protein in your crispy chickpea salad. Here are some ideas: - Add grilled chicken for extra flavor and richness. - Toss in sliced hard-boiled eggs for a creamy touch. - Use quinoa for a nutty flavor and added texture. - Mix in roasted tofu for a plant-based protein. These options will make your salad heartier and more filling. You can easily adjust the recipe to suit your taste. This salad is already vegan and gluten-free with a few tweaks. Here’s how to keep it that way: - Swap feta cheese for avocado or a vegan cheese. - Ensure the balsamic vinegar is gluten-free; most brands are. - Use gluten-free grains like quinoa if you’d like to add more texture. These changes keep your salad fresh and nutritious while meeting dietary needs. You can change the ingredients based on the season. Here are some great swaps: - In spring, use fresh peas or asparagus for a pop of color. - In summer, swap cherry tomatoes for diced bell peppers. - In fall, try adding roasted sweet potatoes for warmth and sweetness. - In winter, kale works well instead of mixed greens. These seasonal swaps keep your salad exciting and packed with flavor. For the full recipe, check back to ensure you have everything you need! Store leftover crispy chickpea salad in an airtight container. Keep it in the fridge. It will stay fresh for about three days. The chickpeas might lose some crunch, but the salad will still taste great. To keep your ingredients fresh, follow these tips: - Chickpeas: Use canned or cooked chickpeas for quick meals. Rinse them well to reduce sodium. - Greens: Store mixed greens in a dry container. Keep a paper towel inside to absorb moisture. - Veggies: Keep diced cucumbers and cherry tomatoes in separate containers. This way, they stay crisp. - Dressing: Store the dressing separately. Combine it with the salad just before serving. Reheating crispy chickpeas is easy. Use an oven or an air fryer. Here’s how: - Preheat the oven to 400°F (200°C). - Spread chickpeas on a baking sheet. - Heat for about 10 minutes. Check often to prevent burning. This method helps regain some crunch. Avoid using a microwave as it can make them soggy. Yes, you can use canned chickpeas. Canned chickpeas are convenient and save time. Just rinse them well and drain before using. This helps remove extra salt and can improve the taste. Canned chickpeas also work well in this salad, giving you great flavor and texture. If you want, you can also use dried chickpeas. Just soak and cook them first. This adds an extra step, but it can be rewarding. For this salad, I love using a mix of greens. Spinach, arugula, and romaine are my top picks. Spinach adds a soft texture. Arugula gives a peppery bite. Romaine adds crunch. You could also try kale or mixed salad greens. Each green brings its own taste and texture. Feel free to mix and match based on what you like or have on hand. Freshness is key to making this dish shine. To make this salad more filling, add some protein. You can use grilled chicken or shrimp for a heartier meal. Tofu or chickpeas are great for plant-based options. Adding nuts or seeds, like almonds or sunflower seeds, adds crunch and healthy fats. Quinoa or farro can also bulk up your salad. These additions not only make the salad more filling but also add flavor and nutrition. You can play around with different combinations to find what you love best. For the full recipe, check out the instructions above! In this blog post, we explored how to create a delicious chickpea salad. We discussed each ingredient, from chickpeas to dressing. I shared step-by-step instructions to prep, roast, and assemble your salad. Tips helped ensure crispy chickpeas and suggested great serving ideas. We also covered variations like adding protein and making it vegan or gluten-free. This salad is flexible, tasty, and perfect for meal prep. Enjoy your fresh, healthy dish!

Crispy Chickpea Salad: Fresh and Nutritious Meal

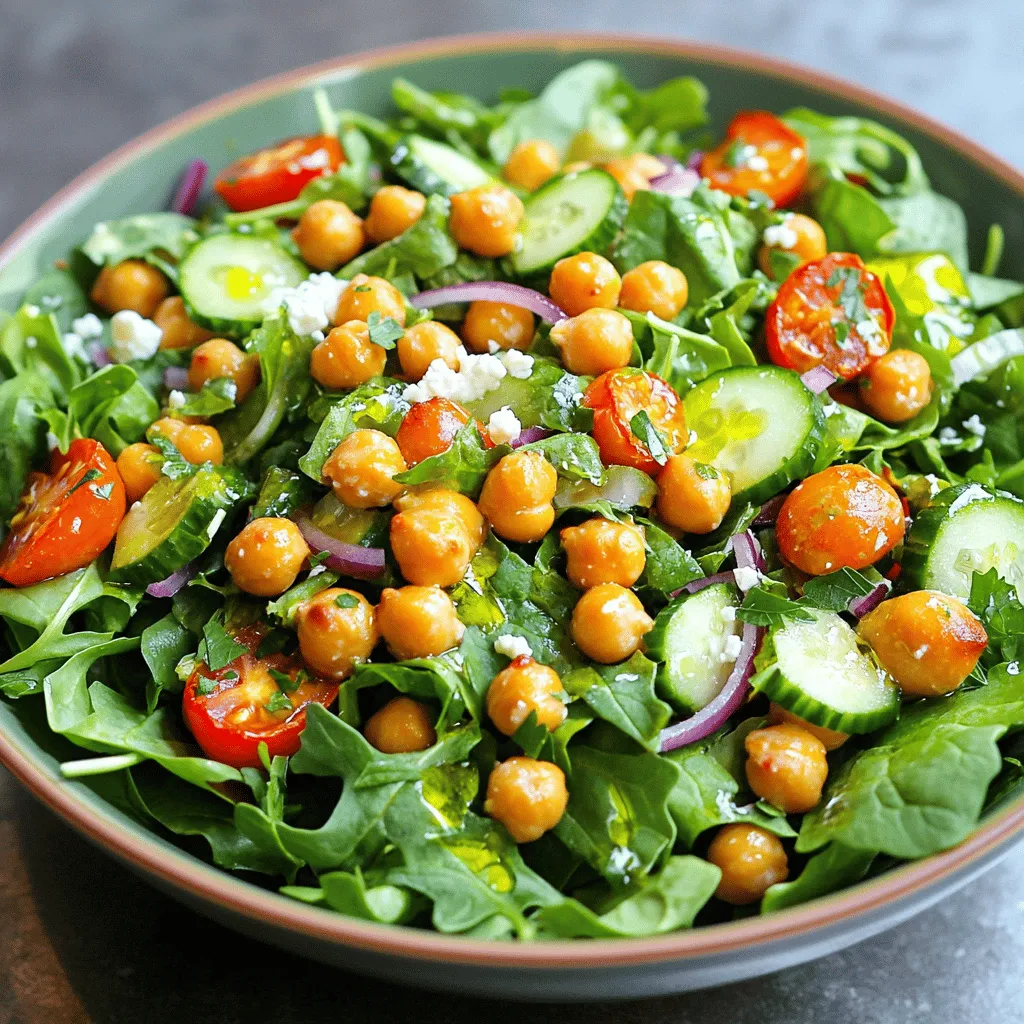
Looking for a meal that’s both fresh and healthy? You’re in the right place! This Crispy Chickpea Salad is packed

When making homemade granola bars, using the right ingredients makes all the difference. Here's what you'll need: - 2 cups rolled oats - 1 cup mixed nuts (almonds, walnuts, cashews), chopped - 1/2 cup honey or maple syrup - 1/2 cup nut butter (almond or peanut butter) - 1/2 cup dried fruits (raisins, cranberries, apricots) - 1/4 cup dark chocolate chips (optional) - 1 teaspoon pure vanilla extract - 1/2 teaspoon salt - 1/2 teaspoon ground cinnamon These simple ingredients come together to create a tasty and healthy snack. Rolled oats form the base of our bars. They provide fiber and make you feel full. The mixed nuts add crunch and healthy fats. Honey or maple syrup serves as the sweetener, giving your bars just the right amount of sweetness. Next, we have nut butter. It adds creaminess and binds everything together. Dried fruits bring in natural sugars and chewy texture. Dark chocolate chips can be a fun treat if you choose to add them. Finally, vanilla extract, salt, and cinnamon enhance the flavors. Salt brings out sweetness, while cinnamon adds warmth. This mix of ingredients is not only nutritious but also delicious. You can find the full recipe for these crunchy nutty granola bars in the recipe section. 1. Preheat the oven and prepare baking dish. Start by preheating your oven to 350°F (175°C). Grab an 8x8-inch baking dish and line it with parchment paper. Leave some paper hanging over the sides. This helps you lift the bars out later. 2. Mix dry ingredients in a large bowl. In a big bowl, add 2 cups of rolled oats, 1 cup of chopped mixed nuts, 1/2 teaspoon of salt, and 1/2 teaspoon of ground cinnamon. Mix well until everything is even. 3. Make the honey-nut butter mixture. In a small saucepan, combine 1/2 cup of honey (or maple syrup) with 1/2 cup of nut butter. Heat this on low. Stir until it’s smooth. Once melted, take it off the heat and add 1 teaspoon of pure vanilla extract. 4. Combine mixtures and fold in extras. Pour the warm honey-nut butter mix over the dry ingredients. Stir it well to coat everything. Then, fold in 1/2 cup of dried fruits and 1/4 cup of dark chocolate chips, if you want. 1. Transfer to baking dish and press down. Put the mixture into your baking dish. Spread it evenly. Use a spatula to press it down firmly. This helps the bars hold together. 2. Bake until golden brown. Place the dish in your preheated oven. Bake for 20-25 minutes. Look for a lovely golden brown on the edges. 3. Cool and cut into bars. After baking, take the dish out and let it cool completely. Once cool, use the parchment paper to lift the granola block out. Place it on a cutting board and cut it into bars or squares as you like. For the complete recipe, check out the [Full Recipe]. To get the best granola bars, baking time matters. If you want chewy bars, bake for about 20 minutes. For crispier bars, try 25 minutes. Keep an eye on them. You want a nice golden edge. Pressing the mixture firmly in the pan is key. This helps the bars hold together. When you press down hard, they stick better. Use a spatula or your hands. Just make sure it's compact and even. If you want to switch up sweeteners, try agave or brown rice syrup. Both work great and add a unique flavor. Each gives a slightly different taste, so you can experiment. For those with nut allergies, there are options! Use seeds like pumpkin or sunflower seeds instead of nuts. You can also skip them altogether. The bars will still taste amazing! Granola bars are great for pairing. Serve them with some fresh fruit, like apples or bananas. You can even add yogurt for a tasty dip. These bars also work well as meal prep snacks. Make a batch on the weekend. Grab one each day for a quick breakfast or snack. They are perfect for on-the-go eating! For the full recipe, check out the Crunchy Nutty Granola Bars section. {{image_4}} You can get creative with flavor add-ins for your granola bars. Here are some fun options: - Dried Fruits: Try using different dried fruits like mango, figs, or apricots. Each fruit brings a unique taste and texture. Dried mango adds a tropical flair, while figs give a chewy richness. - Nut and Seed Combinations: Mix and match nuts and seeds to find your favorite blend. Almonds, walnuts, and cashews work well together. You could also add sunflower seeds or pumpkin seeds for extra crunch and nutrition. If you have specific dietary needs, here are some easy swaps: - Gluten-Free Substitutions: You can make your bars gluten-free by using gluten-free oats. This way, everyone can enjoy them without worry. - Vegan Options: For a vegan option, simply replace honey with maple syrup. This keeps the sweetness while making it plant-based. These variations let you customize your homemade granola bars to fit your taste and dietary needs. Check out the Full Recipe for more ideas on how to make these tasty treats! To keep your homemade granola bars fresh, store them in an airtight container. This keeps moisture out and helps maintain their crunch. You can use plastic containers or glass jars with tight lids. At room temperature, granola bars last about a week. If you want them to last longer, refrigerate them. In the fridge, they stay fresh for up to two weeks. Freezing your granola bars is easy and a great way to save them. First, wrap each bar in plastic wrap. Then, place the wrapped bars in a freezer-safe bag. You can freeze them for up to three months. When you want to eat them, take a bar out and let it thaw at room temperature. To keep the texture nice, avoid microwaving them. Instead, let them sit for about 30 minutes. This way, they will be just as tasty as when you first made them. For the full recipe, check out the detailed steps above and enjoy your healthy snack! How to make granola bars less crumbly? To make your granola bars less crumbly, press the mixture firmly into the pan. This helps hold everything together. You can also add more nut butter or honey. These ingredients act as a binder. Can I add protein powder to the recipe? Yes, you can add protein powder! It boosts nutrition. Start with 1/4 cup and mix it in with your dry ingredients. Make sure to adjust the liquid slightly if needed. How long do homemade granola bars last? Homemade granola bars last about one week at room temperature. For longer storage, keep them in the fridge. They can last up to two weeks if stored properly. Are granola bars healthy for a snack? Granola bars can be a healthy snack. They provide fiber, protein, and healthy fats. However, check the sugar content. Make your own, like the recipe I shared, for a healthier option. Can I make these without nuts? Absolutely! You can skip nuts if you have allergies or dislike them. Replace nuts with seeds like sunflower or pumpkin seeds. Dried fruits can add extra flavor and texture. Can I use quick oats instead of rolled oats? You can use quick oats, but the texture will change. Quick oats will make the bars more chewy and less crunchy. Rolled oats give a better bite and help hold the bars together. You can easily make tasty, healthy granola bars using simple ingredients. We broke down each step, from mixing to baking, ensuring you create the perfect snack. Remember to adjust your baking time for your desired texture. Feel free to customize flavors and find ingredient swaps for your needs. Store these bars properly for freshness. Enjoy your delicious creation as a snack or meal prep option. Homemade granola bars offer great taste and nutrition in every bite. You have all the tools to make your snack time better!

Homemade Granola Bars Easy Recipe Healthy Snack Treat

Want a tasty snack that’s both healthy and easy to make? I’ve got the perfect recipe for you! These homemade

- 2 medium sweet potatoes, peeled and diced into ¾-inch cubes - 1 can (15 oz) black beans, drained and rinsed thoroughly - 1 medium onion, finely diced - 2 cloves garlic, minced - 1 red bell pepper, diced - 1 can (14 oz) diced tomatoes, including their juices - 2 cups vegetable broth (low-sodium recommended) Sweet potatoes add a sweet and creamy texture. Black beans provide protein and fiber. Onions and garlic give depth to the flavor. Diced tomatoes add acidity and moisture. The vegetable broth ties everything together, making the chili hearty. - 1 tablespoon chili powder - 1 teaspoon ground cumin - 1 teaspoon smoked paprika - ½ teaspoon cayenne pepper (adjust based on desired heat level) Chili powder brings warmth to the dish. Cumin adds an earthy taste, while smoked paprika gives a hint of smokiness. Cayenne pepper can spice it up, so you can adjust it to your liking. - Fresh cilantro leaves, for garnish - Ripe avocado slices, for serving - Lime wedges Fresh cilantro adds a pop of color and flavor. Creamy avocado enhances the texture. Lime wedges give a burst of freshness when squeezed over the chili. For the full recipe, check out the [Full Recipe]. This chili is not just tasty; it's good for you too. Enjoy it with friends or family for a cozy meal. - Start by peeling and dicing the sweet potatoes into ¾-inch cubes. - Next, finely dice the onion and red bell pepper. - Mince the garlic cloves and set them aside for later. - In a large pot, heat the olive oil over medium heat. - Add the diced onion and sauté for about 5 minutes. Look for a soft, translucent look. - Then, add the minced garlic and diced red bell pepper. Cook for 3-4 minutes until tender. - Now, stir in the diced sweet potatoes along with chili powder, cumin, smoked paprika, cayenne, salt, and pepper. Mix well to coat the sweet potatoes. - Pour in the can of diced tomatoes and vegetable broth. Stir to blend everything. Bring the mix to a gentle boil, then reduce the heat and cover the pot. - Let the chili simmer for 25-30 minutes. The sweet potatoes should be fork-tender. - Once cooked, gently fold in the black beans. Heat for another 5-10 minutes. - Taste the chili and adjust the seasoning if needed. Remove it from the heat and let it rest for a few minutes. For the full recipe, check out [Full Recipe]. Enjoy your savory sweet potato and black bean chili! - Using canned vegetables: Canned vegetables save time. They are already cooked and ready to use. For this chili, you can use canned black beans and diced tomatoes. Just drain and rinse the beans. This helps reduce prep time and makes cooking faster. - Prepping ingredients in advance: Chop your vegetables the night before. Dicing sweet potatoes, onions, and bell peppers takes time. If you prep them ahead, you will make cooking easier. Store them in a sealed bag in the fridge. This way, you can whip up your chili quickly. - Adjusting spice levels: You can make this chili your own by adjusting the spice level. If you like it mild, skip the cayenne pepper. For more heat, add more cayenne or fresh chilies. Spice is personal, so taste as you go. - Adding extra toppings: Toppings can add fun to your chili. Try fresh cilantro, ripe avocado slices, or a squeeze of lime. Each topping adds flavor and texture. They also make your dish look pretty! - Best pot options for simmering: A large pot or Dutch oven works best for this chili. These pots distribute heat evenly. They also allow for a good simmer, which enhances the flavors. Choose a pot that has a lid to help keep moisture in. - Signs of readiness for sweet potatoes: Sweet potatoes are ready when they are soft. You can check this by piercing them with a fork. If the fork goes in easily, they are done. This usually takes about 25-30 minutes of simmering. Keep an eye on them to avoid overcooking. {{image_4}} You can switch out black beans for other beans. Kidney beans or chickpeas work well. They add different flavors and textures. You can also add more veggies. Try zucchini or corn for a fresh twist. Each choice makes the chili unique and tasty. You can make your chili mild or spicy. If you like it hot, add fresh chilies. Jalapeños or serranos are great options. For less heat, just skip the cayenne pepper. Adjusting the spice level makes it perfect for everyone. Chili is great on its own, but you can get creative. Serve it as a topping for nachos for a fun snack. Just layer the chili over crispy tortilla chips. You can also stuff it in baked sweet potatoes. This adds a hearty twist to your meal. For more ideas, check out the Full Recipe for ways to enjoy this chili! To store your sweet potato and black bean chili, let it cool first. Then, transfer it to an airtight container. This helps lock in flavors and freshness. I recommend using glass containers for better heat resistance. Label and date your container to keep track of how long it’s been stored. You can freeze this chili to enjoy later. First, let the chili cool completely. Pour it into freezer-safe bags or containers. Remove as much air as possible to avoid freezer burn. When you're ready to eat, thaw it in the fridge overnight. To reheat, warm it on the stove over medium heat, stirring often. You can also use the microwave for quick reheating. In the fridge, your chili lasts about 4-5 days. Always check for signs of spoilage. If you see mold or unusual smells, it's best to discard it. Fresh ingredients ensure the best taste and safety. Storing correctly helps you enjoy your chili for days! For the full recipe, check out the Spicy Sweet Potato & Black Bean Chili. You can use butternut squash or regular potatoes. Both add a nice flavor. They cook similarly and give a sweet taste. Yes, you can make this chili in a slow cooker. Just add all your ingredients and stir. Set the cooker on low for 6-8 hours. This lets the flavors blend well. Yes, this chili is gluten-free. All the ingredients are safe for a gluten-free diet. Just check your broth and canned goods to be sure. To add more heat, increase the cayenne pepper. You can also add fresh chopped jalapeños. Adjust to your taste, but start small. You can add meat like ground turkey or beef. Brown the meat first before adding. This adds richness and protein to your meal. For the full recipe, check out the detailed steps above. This chili combines flavorful sweet potatoes, hearty black beans, and spices. You can easily adapt it with different vegetables or spice levels. Remember to store leftovers properly and enjoy them later. You can even try new serving ideas like nachos or baked sweet potatoes. Cooking this chili is simple and fun. I hope you feel inspired to make your own version. Enjoy your delicious chili, knowing it’s healthy and satisfying!

Savory Sweet Potato and Black Bean Chili Recipe

Are you ready for a warm and hearty meal? My Savory Sweet Potato and Black Bean Chili is packed with

- 1 pound ground turkey - 1/2 cup breadcrumbs - 1/4 cup grated Parmesan cheese These three main ingredients form the base of your turkey meatballs. Ground turkey keeps the meatballs lean and tasty. Breadcrumbs help bind everything together, giving them the right texture. Parmesan cheese adds a lovely salty flavor, enhancing the overall taste. - 1/4 cup fresh parsley, finely chopped - 2 cloves garlic, minced - 1 teaspoon Italian seasoning You can add fresh parsley for a pop of color and freshness. Garlic gives a rich, aromatic flavor. Italian seasoning brings in a mix of herbs that complement the meatballs perfectly. - Olive oil for cooking - 2 cups marinara sauce (your choice of store-bought or homemade) Use olive oil for cooking the meatballs. It helps them brown nicely and adds flavor. For the sauce, you can choose store-bought for quick prep or make your own for a fresh taste. Both options work well, so pick what fits your time and mood. For the full recipe, you can refer to the section titled Full Recipe. To make tasty turkey meatballs, first gather your ingredients. In a big bowl, combine: - 1 pound ground turkey - 1/2 cup breadcrumbs - 1/4 cup grated Parmesan cheese - 1/4 cup fresh parsley, finely chopped - 1 large egg - 2 cloves garlic, minced - 1 teaspoon onion powder - 1 teaspoon Italian seasoning - Salt and black pepper to taste Use your hands to mix everything gently. Be careful not to over-mix, or your meatballs will be tough. Once the mix looks good, form it into small balls, about 1 inch wide. You should get around 18-20 meatballs. Place them on a tray as you go. Now let’s cook the meatballs. Heat a large skillet over medium heat and add some olive oil. You want enough oil to coat the bottom of the pan. When the oil is hot, add your meatballs in batches. Don't crowd them, or they won’t brown well. Cook for about 5-7 minutes, turning them around to get an even golden-brown crust. Once your meatballs look great, it’s time for the marinara. Pour your favorite marinara sauce over the meatballs in the skillet. Lower the heat and let it simmer for 10-15 minutes. This allows the flavors to blend. The meatballs should be cooked through, reaching an internal temperature of 165°F. For the full recipe, check out the details above. Enjoy your delicious turkey meatballs! - Avoiding over-mixing: When you mix the meatball ingredients, do it gently. Over-mixing can make your meatballs tough. Just combine until everything is mixed, and stop there. - Ideal meatball size: Aim for meatballs about 1 inch in diameter. This size cooks evenly and is easy to handle. If they are too big, they may not cook through. - Alternative seasoning options: You can change the flavor by adding spices. Try smoked paprika for a warm taste or red pepper flakes for heat. Fresh herbs like basil or oregano can also add a fresh twist. - Suggestions for marinara enhancements: To boost your marinara, add sautéed onions or bell peppers. A splash of red wine can deepen the flavor. Don’t forget a pinch of sugar to balance the acidity. - Pairing with pasta or bread: Serve your meatballs over spaghetti for a classic dish. You can also place them in a warm sub roll for a tasty sandwich. A side of garlic bread complements the meal nicely. - Plating presentation ideas: Use a deep dish to hold the meatballs. Pour marinara sauce generously over the top. Add extra grated Parmesan and chopped parsley for color. This makes the dish look inviting and delicious. {{image_4}} You can switch up your meatballs by using chicken instead of turkey. Chicken meatballs have a lighter taste and are just as easy to make. Use the same recipe but swap the ground turkey for ground chicken. This change will still give you a tasty result. For those who want a vegetarian option, try using lentils or chickpeas. You can mash them and mix with breadcrumbs and spices. This makes for a hearty meatball that is full of flavor. You can also add grated vegetables like zucchini or carrots for a nutrition boost. If you want to try a different sauce, consider a creamy white sauce. A simple alfredo sauce pairs well with meatballs. You can make it by melting butter and mixing in heavy cream and Parmesan. For those who like a kick, spicy marinara is a great choice. Add red pepper flakes to your marinara sauce for some heat. You can also blend in roasted red peppers for added flavor and zest. You can either bake or fry your meatballs. Baking them is easier and a bit healthier. Just place them on a baking sheet and bake at 400°F for 20 minutes. They will brown nicely without much fuss. Frying gives meatballs a crispy crust. Heat olive oil in a skillet and cook until golden brown. Another great method is using a slow cooker. Place the meatballs in the cooker with marinara sauce. Cook on low for 6 to 8 hours. This method makes the meatballs super tender and allows the flavors to blend well. For the full recipe, check out the steps above. To keep your turkey meatballs fresh, refrigerate them right away. Place them in an airtight container. This helps to prevent drying and keeps them tasty. If you have extra marinara sauce, store it in a separate container. You can freeze meatballs too. Just cool them first, then place them in a freezer bag. Remove as much air as possible before sealing. This helps prevent freezer burn. For reheating in the oven, preheat it to 350°F. Place meatballs on a baking sheet. Cover with foil to keep them moist. Heat for about 15-20 minutes, or until hot. If you're using the microwave, put a few meatballs on a plate. Add a splash of marinara sauce to keep them juicy. Heat for 1-2 minutes, checking often to avoid overcooking. In the fridge, your turkey meatballs will last for about 3-4 days. If you freeze them, they can stay good for up to 3 months. Always label your containers with the date. This helps you keep track of what you have. Enjoy your turkey meatballs again with ease, whether you reheat them or add them to a new dish. For the full recipe, check back at the top! You can use several alternatives to breadcrumbs. Try crushed oats, ground nuts, or cooked quinoa. Each option helps bind the meatballs while adding unique flavors. Experiment to find what you like best! To keep turkey meatballs moist, add ingredients that hold moisture. Incorporate grated vegetables, like zucchini, or add a bit of broth. Also, avoid overcooking. A quick simmer in marinara sauce helps maintain juiciness. Yes, you can use pre-made marinara sauce. Look for options without added sugars or preservatives. A high-quality sauce enhances the flavor of your meatballs. Always read labels for the best choices. Cooking time depends on the size of your meatballs. Standard 1-inch meatballs need about 15-20 minutes. If you make larger ones, check for doneness at 165°F. Adjust cooking time as needed. In this blog post, we explored how to make delicious turkey meatballs. We discussed key ingredients like ground turkey, breadcrumbs, and seasoning options. You learned step-by-step instructions for preparing and cooking the meatballs. We also shared valuable tips for achieving the perfect texture and flavor. Variations help you customize your dish, while storage tips keep leftovers fresh. Cooking turkey meatballs is simple and fun. Enjoy your time in the kitchen and create a meal your family will love.

Easy Turkey Meatballs with Marinara Quick Recipe

Looking for a simple, tasty meal? You’re in the right place! This Easy Turkey Meatballs with Marinara Quick Recipe will

- 2 medium zucchinis, finely grated - 1 teaspoon sea salt - 1/2 cup all-purpose flour - 1/2 cup freshly grated Parmesan cheese - 1/2 cup shredded mozzarella cheese - 2 large eggs, lightly beaten - 1/4 cup green onions, finely chopped - 1 teaspoon garlic powder - 1/2 teaspoon freshly ground black pepper - 1/4 teaspoon cayenne pepper (optional for an extra kick) - Olive oil, for frying Fresh zucchini makes all the difference. Choose firm, vibrant zucchinis for the best taste. Look for ones with a smooth skin and no blemishes. Using quality cheese enhances flavor. Freshly grated Parmesan gives a rich, nutty taste. Shredded mozzarella adds creaminess. Choose these cheeses for a satisfying bite. For substitutions, you can use different cheeses. Goat cheese or feta adds a tangy twist. If you're dairy-free, try vegan cheese. Flour can be swapped for gluten-free options, like almond flour. Always aim for fresh and high-quality ingredients for the best results. Grating and Salting First, take two medium zucchinis and grate them finely. You can use a box grater or a food processor. Place the grated zucchini in a large bowl. Sprinkle one teaspoon of sea salt evenly over the zucchini. Let it sit for about 10 minutes. This step helps pull out extra moisture. Moisture Removal Technique After resting, the zucchini will lose water. Grab a clean kitchen towel or cheesecloth. Wrap the zucchini in the towel and twist it tightly. Squeeze to remove as much moisture as you can. This step is key to making crispy fritters. Combining All Components In the same bowl with the drained zucchini, add the following ingredients: half a cup of all-purpose flour, half a cup of freshly grated Parmesan cheese, half a cup of shredded mozzarella cheese, and two large eggs that are lightly beaten. Add a quarter cup of finely chopped green onions, one teaspoon of garlic powder, half a teaspoon of black pepper, and a quarter teaspoon of cayenne pepper if you want some heat. Ensuring Proper Consistency Mix everything well with a spoon. You want all the ingredients to blend smoothly. The mixture should feel thick and sticky. If it seems too runny, add a little more flour. Heating the Skillet Place a large skillet on medium heat. Pour in a drizzle of olive oil, just enough to cover the bottom of the skillet. Wait until the oil is hot and shimmering. This step ensures the fritters get a nice sear. Frying Techniques for Perfect Fritters Use a tablespoon to scoop out portions of the zucchini mix. Gently drop them into the hot skillet. Flatten each scoop a bit with the back of the spoon to form fritters. Fry for about 3-4 minutes until golden brown on one side. Carefully flip them to cook for another 3-4 minutes. They should be crispy and golden on both sides. Once done, remove the fritters and place them on a paper towel-lined plate to drain excess oil. Repeat with the remaining mixture, adding more olive oil as needed. For the full recipe, check the section above. To make your fritters crispy, start with dry zucchini. Grating the zucchini is just the first step. After grating, sprinkle the zucchini with sea salt. Let it sit for about 10 minutes. This process draws out moisture. You want to squeeze out as much liquid as you can. Use a clean kitchen towel or cheesecloth for this. The drier your zucchini, the crispier your fritters will be. Next, pay attention to cooking temperature. Heat your skillet over medium heat. If the skillet is too cool, the fritters will soak up oil. If it’s too hot, they will burn. You want a nice shimmer on the oil before frying. This means it’s ready. Always fry in small batches. This helps maintain the right temperature. When it comes to serving, pair your fritters with dips or sauces. A homemade garlic yogurt sauce is a great choice. Just mix yogurt, minced garlic, and fresh herbs. This adds a refreshing taste. You can also serve them with a tangy salsa or spicy aioli. For side dishes, consider a fresh garden salad. The cool crunch of the salad balances the warm fritters. You might also try serving them with roasted vegetables. This makes a colorful and satisfying meal. There are a few common mistakes to watch for. First, avoid overcrowding the pan. If you add too many fritters at once, they won’t cook evenly. Each fritter needs space to crisp up. Another mistake is not salting the zucchini properly. Salting is key for removing moisture. If you skip this step, your fritters may turn out soggy. Remember, a little salt goes a long way in enhancing flavor. These tips and tricks can help you create the best savory cheesy zucchini fritters. For the complete recipe, check the Full Recipe section above. {{image_4}} You can spice up your fritters easily. Add finely chopped peppers for a kick. Jalapeños or serranos work great. This heat pairs well with the cheese. You can also try herbs like basil, dill, or parsley. Each herb adds fresh notes. You might love how basil brightens the dish. Dill gives a nice, savory touch. Parsley adds color and a mild flavor. Switching up the cheese can change your fritters. Goat cheese brings a tangy taste. It melts well and adds creaminess. If you want a dairy-free option, use vegan cheese. Look for one that melts nicely. It can still give you that cheesy flavor without the dairy. Need gluten-free fritters? No problem! You can swap all-purpose flour for almond flour. This keeps the fritters light and fluffy. Some people like to use ground nuts as a binding agent. They add a nice crunch and flavor. Just make sure to adjust the amount. You want the mixture to hold together well. For the full recipe, check out the details above. To keep your zucchini fritters fresh, store them right. Place them in an airtight container in the fridge. This helps keep them crispy. Use parchment paper between layers to absorb moisture. This way, they won’t get soggy. Try to eat them within three days for best flavor. When reheating, the oven works best. Preheat it to 375°F (190°C). Place the fritters on a baking sheet. Heat for about 10 minutes or until warm. This keeps them crispy. The microwave is quicker but can make them soft. If you use the microwave, heat for just 30 seconds at a time. To freeze fritters, let them cool completely first. Lay them in a single layer on a baking sheet. Freeze them for about an hour. Once frozen, transfer them to a freezer bag. Make sure to remove as much air as possible. They can last up to two months in the freezer. When you're ready to eat, thaw them in the fridge overnight. Reheat in the oven for best texture. For the full recipe, check out the Savory Cheesy Zucchini Fritters section above. To make zucchini fritters crispy, you need to remove moisture from the zucchini. Grate the zucchini and sprinkle it with salt. Let it sit for about 10 minutes. Then, drain it well using a clean towel. This step is key. It keeps the fritters from becoming soggy when cooked. Yes, you can prepare zucchini fritters ahead of time. Mix the ingredients and shape the fritters. Place them on a tray, then freeze them for later. When ready to cook, just fry them straight from the freezer. This saves time and gives you a tasty meal fast. Zucchini fritters are great on their own, but you can serve them with many sides. A fresh garden salad pairs well. You can also add a dip like garlic yogurt or a spicy sauce. These options add flavor and make your meal more fun. You can tell the fritters are done when they turn golden brown on both sides. Cook them for about 3-4 minutes on each side. If you see a nice crust and they feel firm, they are ready to eat. Always check one first to be sure! Yes, you can bake zucchini fritters instead of frying them. Preheat the oven to 400°F (200°C). Place the fritters on a baking sheet lined with parchment paper. Bake for about 20 minutes, flipping halfway through. This method is healthier and still gives a nice texture. Absolutely! You can mix in other veggies like carrots, corn, or bell peppers. Just make sure to chop them finely, so they cook well. This adds variety and flavor to the fritters. Feel free to get creative with your veggies! For the full recipe, check it out here: [Full Recipe]. Zucchini fritters are simple to make and delicious. We discussed the key ingredients like fresh zucchini and quality cheeses. Following the step-by-step guide helps ensure perfect cooking every time. I shared tips for crispy fritters and ideas for serving them. You can try flavorful variations and store leftovers easily. Remember, the right techniques lead to tasty and satisfying fritters. Enjoy making these and sharing them with others. You'll impress everyone with your cooking skills!

Savory Cheesy Zucchini Fritters Crispy and Delicious

Are you ready to enjoy a tasty treat that’s both crispy and cheesy? Savory cheesy zucchini fritters are the perfect

Older posts
Newer posts
← Previous Page1 … Page27 Page28 Page29 … Page45 Next →

dsad

© 2025 tastyhatch • Built with GeneratePress

Our Policies

  • Copyright Policy
  • Cookie Policy
  • GDPR Policy
  • Privacy Policy
  • Disclaimer
  • Terms Of Use

More Information

  • Home
  • About
  • Contact
  • Appetizers
  • Dessert
  • Dinner
  • Drinks
©2025, tastyhatch About Back To Top