Skip to content
DisclaimerTerms Of UseGDPR PolicyCookie Policy

tastyhatch

  • Home
  • Drinks
  • Appetizers
  • Dinner
  • Dessert
  • About
  • Contact
  • Privacy Policy
DisclaimerTerms Of UseGDPR PolicyCookie Policy

Olivia

- 4 boneless, skinless chicken thighs - 2 tablespoons olive oil - 4 cloves garlic, minced (about 2 teaspoons) - 1 cup heavy cream - 1 cup chicken broth (low sodium recommended) - 1 teaspoon dried thyme - 1 teaspoon dried rosemary - ½ cup freshly grated Parmesan cheese - Salt, to taste - Black pepper, to taste - Fresh parsley, chopped (for garnish) To start, I choose chicken thighs for their rich flavor and tenderness. They cook well without drying out. I use olive oil for a nice sear and garlic for that classic flavor. Heavy cream gives the sauce its smoothness, while chicken broth adds depth. Dried herbs like thyme and rosemary bring in warmth and aroma. Parmesan cheese makes the sauce extra creamy and cheesy. I always season with salt and pepper to enhance all the flavors. Finally, I like to sprinkle fresh parsley on top for a bright finish. You can find the full recipe [here](#). This list makes it easy to gather what I need, ensuring a smooth cooking process. Seasoning the chicken thighs First, you need to season the chicken thighs. Use salt and black pepper. Make sure to cover both sides. This helps the chicken taste great. Searing in the skillet Next, heat olive oil in a large skillet over medium-high heat. When the oil shimmers, add the seasoned chicken. Sear the chicken for about 5-6 minutes on each side. Look for a golden-brown crust. Check that the inside reaches 165°F or 74°C. Once done, remove the chicken and set it aside. Sautéing garlic and deglazing In the same skillet, lower the heat to medium. Add minced garlic and sauté for 1-2 minutes. Stir often until the garlic smells good and turns light gold. Don’t let it burn, or it will taste bad. Then, pour in the chicken broth. Use a wooden spoon to scrape the bottom of the pan. This gets all the tasty bits off. Creating the creamy sauce Now, stir in heavy cream, dried thyme, and dried rosemary. Mix well and let the sauce simmer for 3-4 minutes. It should thicken a bit. Stir often to keep it from sticking. Incorporating chicken with sauce Return the seared chicken thighs to the skillet. Nestle the chicken in the creamy sauce. Let it simmer for another 2-3 minutes. This makes sure the chicken is hot and well-coated. Adjusting seasoning and serving suggestions Before serving, taste the sauce. Add more salt and pepper if needed. Serve the creamy garlic chicken skillet hot. Garnish with freshly chopped parsley. This adds a nice touch. Pair it with crusty bread, rice, or pasta to enjoy every drop of sauce. For the full recipe, check out the details above. To get a golden-brown crust, start with dry chicken. Pat the thighs with a paper towel. Season both sides with salt and black pepper. The oil must be hot before adding the chicken. Sear for 5-6 minutes on each side until golden. To ensure the chicken is cooked through, use a meat thermometer. The internal temperature should reach 165°F (74°C). If you don’t have one, cut into the thickest part. The juices should run clear, not pink. For a flavorful sauce, you can mix in different herbs. Try adding basil or oregano for a twist. You can also use fresh herbs if you have them. They add a nice touch of brightness. To achieve the right consistency, keep the sauce on low heat. Stir frequently to avoid sticking. If it’s too thick, add a splash of broth or water. If it’s too thin, let it simmer longer. This dish pairs well with many sides. Serve it over rice, pasta, or with crusty bread. These options soak up the creamy sauce nicely. For a beautiful presentation, serve the chicken in the skillet. This gives a rustic look. You can also transfer it to individual plates. Top with fresh parsley for color and freshness. {{image_4}} You can easily swap out chicken thighs for other proteins. Turkey works well and has a similar taste. Tofu is a great option for a plant-based meal. If you need to avoid dairy, use coconut cream or a nut-based cream. These will still give you that luscious texture without the milk. To make your dish even better, add some vegetables. Spinach adds color and nutrients. Mushrooms bring a nice earthiness to the meal. You can also mix in different cheeses. Try gouda for a smoky twist or feta for a tangy bite. These changes can elevate your creamy garlic chicken skillet to a new level. Feel adventurous? Try a Cajun-style twist! Add some cayenne pepper and smoked paprika for heat. This will give your dish a warm, spicy flavor. For an Italian-inspired version, toss in sun-dried tomatoes. They add a sweet and tangy flavor that pairs perfectly with the cream sauce. Each adaptation makes for a unique and tasty meal experience. To store leftovers, let the dish cool first. Then, place it in an airtight container. This keeps it fresh. In the fridge, your creamy garlic chicken will stay good for about 3 to 4 days. When you're ready to eat, the best way to reheat is on the stove. Place it in a skillet over low heat. Stir gently to warm it up. This helps keep the creamy texture. If you need to, add a splash of chicken broth or cream to help. To freeze this dish, first cool it completely. Then, divide it into portions and place in freezer-safe bags. Remove as much air as possible to avoid freezer burn. This meal can be frozen for up to 3 months. Just thaw it in the fridge overnight before reheating. For the full recipe, check out the section above! Cook chicken thighs for about 5-6 minutes on each side. They should reach 165°F. This ensures they are juicy and safe to eat. Yes, you can use chicken breasts. They will cook faster, so check them after 4-5 minutes per side. Adjust cooking time as needed to avoid dryness. Absolutely! Use coconut milk or almond milk instead of heavy cream. For cheese, try nutritional yeast for a cheesy flavor without dairy. You can use Pecorino Romano or nutritional yeast for a dairy-free option. These substitutes add a nice flavor to the sauce. To thicken the sauce, let it simmer longer to reduce. You can also add a slurry of cornstarch and water. Stir it in until the desired thickness is achieved. In this post, we explored the steps to make creamy garlic chicken. We started with the key ingredients like chicken thighs and heavy cream. Next, we covered how to prepare the chicken and create a delicious sauce. I shared tips for perfecting your dish and variations to keep it exciting. Finally, we talked about proper storage and answered common questions. This dish is simple yet impressive. With practice, you can make it your own!

Creamy Garlic Chicken Skillet Simple and Tasty Meal

Looking for a quick and tasty dinner? Try my Creamy Garlic Chicken Skillet! This dish brings together juicy chicken thighs

- 1 lb ground beef - 1 cup prepared mashed potatoes - 1/2 cup shredded sharp cheddar cheese - 1/2 cup cooked bacon, crumbled (optional) - 1/4 cup finely chopped green onions - 1/4 cup milk - 1 large egg - 1 tablespoon Worcestershire sauce - 1 teaspoon garlic powder - 1 teaspoon onion powder - 1/2 teaspoon salt - 1/2 teaspoon freshly ground black pepper - 1/2 cup ketchup (for glaze) In this loaded potato meatloaf, the main ingredients shine together. The ground beef gives it a solid base. Mashed potatoes add creaminess and help bind the meatloaf. Sharp cheddar cheese brings a nice, rich flavor. If you like, add crumbled bacon for a smoky touch. Green onions add a hint of freshness. For the additional ingredients, milk makes the mixture moist. The egg acts as a binder, holding everything together. Worcestershire sauce adds depth. Garlic and onion powder enhance the taste. Finally, the glaze ingredients complete the dish. Salt and pepper help season the meatloaf. Ketchup on top creates a sweet and tangy glaze that caramelizes as it bakes. For more details, check the Full Recipe. - Preheat the oven to 350°F (175°C). - In a large mixing bowl, combine: - 1 lb ground beef - 1 cup prepared mashed potatoes - 1/2 cup shredded sharp cheddar cheese - 1/2 cup cooked bacon, crumbled (optional) - 1/4 cup finely chopped green onions - 1/4 cup milk - 1 large egg - 1 tablespoon Worcestershire sauce - 1 teaspoon garlic powder - 1 teaspoon onion powder - 1/2 teaspoon salt - 1/2 teaspoon freshly ground black pepper Mix these ingredients gently. You want them combined but not overmixed. This helps keep the meatloaf tender. - Transfer the mixture into a greased loaf pan. - Shape it into a loaf form. Pack it gently, but not too tight. - Spread 1/2 cup ketchup evenly over the top. This glaze adds flavor and sweetness. - Bake for 50-60 minutes. The meatloaf is done when it reaches an internal temperature of 160°F (70°C). - After baking, let the meatloaf rest for 10 minutes. This helps keep it juicy when you slice it. Check the [Full Recipe] for more details. Enjoy your hearty and comforting meal! Keep your meatloaf tender by not overmixing the ingredients. When you mix too much, the meatloaf can become tough. Just combine everything until it’s mixed, then stop. Use ground beef with a bit of fat, like 80/20. This fat adds flavor and keeps the meatloaf moist. To make your loaded potato meatloaf taste even better, add some spices. Try a bit of smoked paprika or a dash of cayenne pepper for heat. Fresh herbs like parsley or thyme can also enhance the flavor. When it comes to cheese, use freshly grated cheese instead of packaged cheese. Fresh cheese melts better and gives a creamier texture. For the best glaze, make sure your ketchup is a bit thick. You can mix it with a little brown sugar for sweetness. If you want a twist, try using barbecue sauce or a mix of ketchup and mustard. This adds a nice tangy flavor to the top of your meatloaf. {{image_4}} You can switch out the ground beef for other meats. Ground turkey or chicken works well. These options make the meatloaf lighter. Mixing meats can also add unique flavor. Try combining beef with pork for a rich taste. Each protein gives its own twist to the dish. For a vegetarian meatloaf, you can use lentils or black beans. These ingredients give great texture and flavor. You can also use quinoa or chickpeas as a base. To bind the mixture, add oats or breadcrumbs. This keeps the loaf from falling apart. You can change the flavor by adding different cheeses. Try mozzarella for a gooey texture or feta for a salty bite. Adding veggies like bell peppers or zucchini adds color and taste. For some spice, include jalapeños or crushed red pepper. Each ingredient makes the dish more exciting. For the full recipe, check the details above. To store your loaded potato meatloaf, let it cool first. Place leftovers in an airtight container. This keeps the meatloaf fresh and prevents odors from mixing. You can also wrap it tightly in plastic wrap. Make sure to seal it well to avoid air exposure. To freeze meatloaf, let it cool completely. Wrap it in plastic wrap, then place it in a freezer bag. Squeeze out any air before sealing. This helps prevent freezer burn. For thawing, move it to the fridge overnight. To reheat, bake it at 350°F (175°C) until warmed through. This usually takes about 30 minutes. In the fridge, your loaded potato meatloaf lasts about 3-4 days. If you freeze it, it can last up to 3 months. Always check for signs of spoilage. Look for an off smell, discoloration, or a slimy texture. If you see any of these, it’s best to throw it away. Loaded potato meatloaf takes about 1 hour and 10 minutes to make. This includes a prep time of 15 minutes and a cook time of 50 to 60 minutes. You want to bake it at 350°F (175°C) until it reaches a safe internal temperature. Yes, you can make this meatloaf ahead of time. Prepare the meatloaf mixture and shape it in the pan. Cover it with plastic wrap and store it in the fridge for up to one day. When ready, just bake it straight from the fridge. You may need to add a few extra minutes to the cooking time. Several sides pair nicely with loaded potato meatloaf. Here are some great options: - Steamed broccoli - Mashed potatoes - Green beans - Mixed salads - Roasted carrots These sides add color and nutrition to your meal. To check if the meatloaf is done, use a meat thermometer. Insert it into the center of the meatloaf. It should read 160°F (70°C) for safe eating. If you don’t have a thermometer, check if the meatloaf is firm to the touch and the juices run clear. This meatloaf recipe combines tasty beef, creamy potatoes, and yummy cheese. We covered the key ingredients, from the main mix to the glaze. I shared how to bake it for the best flavor and texture. Remember, you can swap proteins or try new toppings to fit your taste. Proper storage keeps leftovers fresh. With these tips, you can enjoy a delicious meatloaf that’s simple to make and customize. Dive in and have fun with your cooking!

Loaded Potato Meatloaf Hearty and Comforting Dish

Are you ready for a dish that warms your heart and fills your belly? Loaded Potato Meatloaf is your answer!

- 8 oz elbow macaroni - 2 cups sharp cheddar cheese, finely shredded - 1 cup Gruyère cheese, finely shredded - 1 cup whole milk - 1 cup heavy cream - 4 tablespoons unsalted butter - 3 tablespoons all-purpose flour - 1 teaspoon Dijon mustard - 1 teaspoon garlic powder - 1/2 teaspoon onion powder - Salt and freshly ground black pepper to taste - 1 tablespoon truffle oil - 1 cup panko breadcrumbs - Fresh parsley, finely chopped for garnish (optional) This list has everything you need to make the best mac and cheese. The elbow macaroni gives a great bite. Sharp cheddar and Gruyère create a rich, creamy cheese sauce. Whole milk and heavy cream add a smooth texture. Butter and flour make the roux that thickens your sauce. Dijon mustard, garlic powder, and onion powder add depth to the flavor. You can adjust the salt and pepper to your taste. The truffle oil adds an elegant touch that elevates your dish. Panko breadcrumbs bring that crispy topping everyone loves. Fresh parsley not only looks nice but also adds a pop of color. For the full recipe, refer to the section above. To start, we need to cook the pasta. First, grab a large pot and fill it with water. Place it on the stove and bring it to a rolling boil. Add a good pinch of salt to the water; this helps flavor the pasta. Once the water is boiling, add the elbow macaroni. Cook the macaroni according to the package instructions until it is al dente. This usually takes about 8 to 10 minutes. After cooking, drain the pasta well and set it aside for later. Next, we’ll make the cheese sauce. In a medium saucepan, melt 4 tablespoons of unsalted butter over medium heat. When the butter is bubbling, whisk in 3 tablespoons of all-purpose flour to create a roux. Keep whisking for about 1 to 2 minutes until the mixture turns light golden. Now, slowly pour in 1 cup of whole milk and 1 cup of heavy cream, whisking as you go. This prevents any clumps from forming. Cook this mixture over medium heat, stirring often, until it thickens. This should take around 3 to 5 minutes. Once it’s thickened, stir in 1 teaspoon of Dijon mustard, 1 teaspoon of garlic powder, and 1/2 teaspoon of onion powder. Add salt and freshly ground black pepper to taste. Remove the saucepan from the heat and start adding the shredded cheeses—2 cups of sharp cheddar and 1 cup of Gruyère. Stir until the cheese melts and the sauce is smooth. Now it’s time to bring it all together. In a large mixing bowl, combine the drained macaroni with the creamy cheese sauce. Mix well so each piece of pasta is covered in the sauce. For an extra touch, stir in 1 tablespoon of truffle oil. Next, preheat your oven to 350°F (175°C). Lightly grease a baking dish with butter or cooking spray. Transfer the macaroni and cheese mixture into the dish, spreading it evenly. For the topping, take 1 cup of panko breadcrumbs and mix it with a drizzle of olive oil. If you like, add an extra splash of truffle oil for flavor. Sprinkle this mixture over the mac and cheese to create a crispy top. Place your baking dish in the oven and bake for 25 to 30 minutes. Look for a golden brown top and bubbly cheese at the edges. When it’s done, let it cool for a few minutes before serving. Enjoy! To make the best cheese sauce, start by preventing clumps while whisking. Warm your milk and cream before adding them to the roux. This step helps the sauce mix smoothly. Whisk continuously as you pour. If you see clumps, keep whisking until they disappear. Next, you want to achieve the right thickness. Cook the sauce over medium heat. Stir often until it thickens. This usually takes about 3-5 minutes. Remember, a thick sauce coats the pasta well. If it gets too thick, add a splash of milk to loosen it. A golden, crispy topping makes mac and cheese special. Use panko breadcrumbs for the best crunch. Mix them with a little olive oil before adding. This helps them crisp up in the oven. Bake until they turn a lovely golden brown. To add more flavor with your breadcrumbs, try mixing in spices or herbs. Garlic powder or Italian seasoning can elevate the taste. You could even add some grated cheese to the breadcrumb mix for extra richness. For an inviting presentation, serve your mac and cheese in individual ramekins. This makes each serving feel special. You can also use a large serving dish and scoop out portions. Garnishing is key to a beautiful dish. Finely chopped fresh parsley adds a pop of color. For a touch of luxury, drizzle a few drops of truffle oil on top just before serving. It enhances the aroma and makes the dish look fancy. For the full recipe, check out the Luxurious Truffle Mac & Cheese. {{image_4}} You can switch up your cheeses to create new flavors. Instead of using just sharp cheddar and Gruyère, try these options: - Monterey Jack: It melts great and adds creaminess. - Fontina: It gives a rich, nutty taste. - Cream Cheese: For a super smooth texture. If you want a vegan option, consider these cheeses: - Nutritional Yeast: It gives a cheesy flavor without dairy. - Cashew Cheese: Blend soaked cashews with spices for a creamy mix. - Store-bought Vegan Cheese: Look for brands that melt well. Mix-ins can make your mac and cheese even better! Here are some ideas: - Vegetables: Spinach, broccoli, or tomatoes add color and nutrients. - Proteins: Consider adding chicken, bacon, or even chickpeas for extra protein. - Spicy Options: Add jalapeños or hot sauce for a kick. - Tangy Flavors: Stir in some pickled jalapeños or a splash of vinegar for zest. You can serve mac and cheese in many ways. Here are some ideas: - As a main dish: Pair it with a simple salad for a complete meal. - As a side dish: Serve it alongside grilled chicken or steak. - For a party: Make mini portions in ramekins for easy serving. When you mix and match these ideas, each meal can feel fresh and exciting. For the full recipe, check out the Luxurious Truffle Mac & Cheese. To store leftover mac and cheese, place it in an airtight container. Make sure to cool it first to avoid moisture build-up. You can refrigerate it for up to three days. If you want to keep it longer, freezing is a great option. When you reheat mac and cheese, you want it creamy and tasty. The best method is to use the oven. Preheat your oven to 350°F (175°C). Place the mac and cheese in a baking dish. Add a splash of milk on top to help it stay moist. Cover it with foil to avoid drying out. Heat for about 20 minutes. Stir halfway through for even warmth. To freeze mac and cheese, first let it cool completely. Transfer it to a freezer-safe container or bag. Remove as much air as possible to prevent freezer burn. It can last in the freezer for up to two months. When ready to eat, thaw it overnight in the fridge. Reheat as mentioned before for the best results. For mac and cheese, I love using sharp cheddar and Gruyère. Sharp cheddar gives a strong flavor. Gruyère adds a nutty taste and melts beautifully. You can also try mozzarella for stretchiness or fontina for creaminess. Mixing different cheeses can give your dish a unique flavor. Yes, you can! To prep in advance, cook the pasta and make the cheese sauce. Mix them together, then store in a baking dish. Cover it tightly and place it in the fridge. When you are ready, bake it straight from the fridge. Just add a few extra minutes to the baking time. If you don't have truffle oil, don't worry! You can use olive oil or garlic-infused oil. Both can give a nice flavor. You could also add a sprinkle of truffle salt for a similar taste. These options keep your dish tasty without the oil. To lighten up mac and cheese, try these tips: - Use whole wheat pasta for more fiber. - Swap heavy cream for low-fat milk or almond milk. - Add vegetables like spinach or broccoli for nutrients. - Use less cheese or a reduced-fat version. These changes can make your meal lighter and still delicious. For the full recipe, check out the luxurious truffle mac & cheese. This guide covers all you need to know about making the perfect mac and cheese. We explored the key ingredients like elbow macaroni, sharp cheddar, and Gruyère. We delved into step-by-step instructions, along with tips for a creamy cheese sauce and a crispy topping. Variations allow you to customize your dish, and proper storage tips ensure you enjoy leftovers later. Remember, the right cheese and toppings make all the difference. Enjoy making this comfort food, and share it with friends and family!

The Best Mac & Cheese Simple and Creamy Delight

Comfort food doesn’t get better than this! In The Best Mac & Cheese: Simple and Creamy Delight, I’ll show you

- 1 pound potato gnocchi - 2 tablespoons olive oil - 1 small onion, finely chopped - 3 cloves garlic, minced - 2 cups cherry tomatoes, halved - 1 teaspoon dried oregano - 1 teaspoon red pepper flakes (optional) - Salt and freshly ground black pepper to taste - 1 cup vegetable broth - ½ cup heavy cream - 1 ball of burrata cheese - Fresh basil leaves for garnish To make this savory dish, gather fresh ingredients. Start with one pound of potato gnocchi. This gives you a soft and pillowy base. You’ll need two tablespoons of olive oil to sauté the onions and garlic. A small onion, finely chopped, adds sweetness. Three cloves of minced garlic bring aromatic depth. For the vegetables, use two cups of halved cherry tomatoes. They add brightness and flavor. One teaspoon of dried oregano enhances the dish with herbal notes. If you like heat, add one teaspoon of red pepper flakes. Season with salt and freshly ground black pepper to taste. For the sauce, you need one cup of vegetable broth. This creates a rich base. Half a cup of heavy cream adds creaminess and body. Finally, a ball of burrata cheese provides a luxurious finish. Fresh basil leaves will garnish and brighten your plate. This combination of ingredients ensures a tasty gnocchi dish. Check the [Full Recipe] for complete instructions. - Bring a large pot of salted water to boil. - Add gnocchi and cook until they float (2-3 minutes). - Drain and set aside. Cooking gnocchi is simple and fast. Use a large pot and plenty of water. Salt the water well; this adds flavor. Once the water is boiling, gently add in the gnocchi. As they cook, they will float to the top, which means they are done. This usually takes about 2-3 minutes. Afterward, drain them and let them rest. - Heat olive oil in a skillet over medium heat. - Sauté the onion until translucent (3-4 minutes). - Add minced garlic and cook for an additional minute. Next, heat olive oil in a skillet. Use medium heat to avoid burning. Add the finely chopped onion. Sauté for about 3-4 minutes until it turns translucent. This step makes the onion sweet and soft. Then, add minced garlic and stir for one more minute. The smell will be amazing! - Add cherry tomatoes, oregano, and seasoning to skillet. - Cook for about 5 minutes, allowing tomatoes to soften. - Pour in vegetable broth and simmer for 5 minutes. Now it’s time for the sauce. Toss in halved cherry tomatoes, dried oregano, and your seasoning. Cook this mix for about 5 minutes. You want the tomatoes to soften and release their juices. After that, pour in vegetable broth and let it simmer for another 5 minutes. This builds great flavor. - Stir in heavy cream and allow to thicken (2-3 minutes). - Toss in the cooked gnocchi to coat evenly. - Serve with torn burrata and garnish with fresh basil. Finally, stir in the heavy cream. Let it thicken for 2-3 minutes. This makes the sauce creamy and rich. Next, add the cooked gnocchi to the skillet. Toss gently to coat each piece. Serve it all up with torn burrata on top. Finish with a sprinkle of fresh basil for color and taste. For the full recipe, check out the complete guide. To know when gnocchi is done, watch for them to float. When they rise to the top of the water, they are ready. This usually takes about 2 to 3 minutes. If you cook them too long, they can become mushy. To prevent gnocchi from sticking, use plenty of salted water. Stir gently as they cook. After draining, toss them lightly in a bit of olive oil. This keeps them from sticking together while you prepare the sauce. For added flavor in your tomato sauce, try using fresh basil, thyme, or rosemary. A pinch of sugar can balance the acidity of the tomatoes. I often add black pepper for a little kick. If you like heat, the red pepper flakes work well here. To adjust the sauce thickness, simmer it longer to reduce liquid. If it's too thick, add a splash of vegetable broth or water. Stir well to blend your sauce to the desired consistency. For a beautiful finish, drizzle a little olive oil over the dish just before serving. This adds shine and a rich flavor. You can also sprinkle fresh black pepper on top for a touch of spice. Serve the gnocchi with crusty bread on the side. This bread is perfect for soaking up the creamy sauce. For a touch of elegance, arrange the bread on a wooden board beside the gnocchi. For the full recipe, check out the detailed instructions above. {{image_4}} You can easily add protein to your dish. Chicken and shrimp are great options. Simply cook them in the skillet before adding the tomatoes. For chicken, use boneless breasts and cut them into small pieces. Cook until golden. For shrimp, cook until they turn pink. If you want a vegan option, try chickpeas or lentils. These add protein and a nice texture. Just mix them in with the sauce. They soak up flavors well. Burrata cheese adds a creamy touch. If you can't find it, use ricotta or mozzarella. Ricotta gives a light, fluffy taste, while mozzarella adds a nice stretch. Both will still taste great in this dish. Crumbled feta can also work if you want a tangy flavor. Just sprinkle it on top before serving. Seasonal vegetables can change your dish. Spinach is a lovely addition. Add it right before serving to keep it bright and fresh. Zucchini works well too. Just slice it thin and cook it with the onions. Adjust cooking times for different veggies. Harder vegetables like carrots need more time, while softer ones like bell peppers need less. Keep an eye on them to avoid overcooking. To keep your gnocchi fresh, refrigerate it right away. Place it in an airtight container. This keeps moisture in and prevents drying out. Make sure to store it within two hours of cooking. The gnocchi will stay good for up to three days. To reheat, I recommend using the stovetop. This helps keep the gnocchi soft. Add a splash of water or broth to the pan. Heat on low and stir gently. If you prefer the microwave, use a microwave-safe dish. Add a little water and cover it. Heat in short bursts, stirring in between. This way, the gnocchi won’t become chewy. Yes, you can freeze gnocchi dishes! For best results, freeze the dish before adding burrata. Place the cooled gnocchi in a freezer-safe bag. Squeeze out the air to prevent freezer burn. When you’re ready to eat, thaw it overnight in the fridge. Reheat it on the stovetop, adding a bit of water or broth to restore moisture. Enjoy your delicious meal later! For the full recipe, check the link above. This dish takes about 30 minutes total. You need 10 minutes to prep. Then, the cooking time is around 20 minutes. This quick meal is perfect for busy days. Yes, you can! Look for gluten-free gnocchi made from rice or corn flour. These options taste great and work well in this recipe. You can pair this dish with a fresh salad or crusty bread. A light arugula salad adds a nice touch. Garlic bread also complements the flavors well. Absolutely! Use vegan gnocchi and replace the burrata with a plant-based cheese. For cream, choose a non-dairy option like coconut cream or cashew cream. Try adding fresh herbs like basil or parsley. You can also mix in some fresh spinach or a splash of balsamic vinegar. A pinch of smoked paprika brings a nice depth to the sauce. For the full recipe, check out the [Full Recipe]. In this blog post, we explored how to make a delicious tomato gnocchi with burrata. We covered key ingredients and detailed cooking steps. I shared tips for perfect gnocchi and ways to enhance your sauce. You also learned about variations and storage options. No matter your skill level, this dish is easy and fun. Enjoy your cooking journey, and don't hesitate to experiment with flavors and ingredients. Each bite will be a delight!

Savory 30 Minute Tomato Gnocchi with Burrata Recipe

Are you ready to whip up a mouthwatering meal in just 30 minutes? This Savory 30 Minute Tomato Gnocchi with

- Sirloin or Ribeye Steak - Russet Potatoes - Cheddar Cheese To get the most flavor, I recommend using sirloin or ribeye steak. Both cuts are tender and juicy. When you cube the steak, aim for bite-sized pieces. This size helps them cook evenly. The russet potatoes add heartiness. Peel and dice them into small cubes. They soak up all the good flavors, making each bite a delight. Finally, don't skip the cheddar cheese. It melts beautifully and adds richness to the dish. - Garlic Powder - Onion Powder - Smoked Paprika Seasoning is key to great flavor. I use garlic powder for its rich taste. Onion powder adds a nice depth, too. Smoked paprika brings a warm, smoky flavor to the mix. These three seasonings work together to make your steak and potatoes sing. Remember, seasoning is not just for the steak; it also enhances the potatoes. - Beef Broth - Olive Oil - Sour Cream The liquids are just as important. Beef broth adds moisture and flavor. It helps the steak and potatoes cook perfectly. Use high-quality broth for the best results. Olive oil is great for searing the steak. It creates a nice crust and keeps the meat juicy. Finally, sour cream adds creaminess and tang. Mix it with green onions for a fresh topping. This will elevate your dish to a whole new level. For the full recipe, check out the complete details above! Seasoning the Steak Cubes Start by cutting your steak into bite-sized cubes. In a bowl, mix garlic powder, onion powder, smoked paprika, salt, and black pepper. Toss the steak cubes in this mix. Make sure every piece is covered well. This step adds lots of flavor to your dish. Searing the Steak Next, heat olive oil in a large skillet over medium-high heat. Once hot, add the seasoned steak cubes. Sear them for 3-4 minutes. Turn the steak often for even browning. Once browned, remove the skillet from heat and set the steak aside. This step locks in the juices and adds a nice crust. Layering Potatoes and Steak In your crockpot, spread the diced potatoes evenly on the bottom. Next, place the seared steak cubes on top of the potatoes. Make sure they are evenly distributed. This way, the flavors meld together as they cook. Adding Beef Broth Now, pour the beef broth over the layered steak and potatoes. This liquid is key to keeping everything moist while cooking. It helps the potatoes cook through and keeps the steak tender. Setting the Crockpot Cover the crockpot with its lid. Set it to cook on low for 6-8 hours or on high for 3-4 hours. Cooking low and slow really enhances the flavors and tenderness of the meat and potatoes. Finalizing with Cheese and Sour Cream In the last 30 minutes, sprinkle shredded cheddar cheese on top. Let it melt and blend into the dish. In another bowl, mix sour cream with chopped green onions. This mix adds a fresh touch to your meal. Once done, stir it all together and serve warm. Top each bowl with a generous scoop of the sour cream mix for a loaded finish. For the full recipe, refer to the Crockpot Loaded Steak and Potato Bake. You can adjust cooking times based on your schedule. The low setting takes 6-8 hours. This lets flavors develop deeply. The high setting cooks in 3-4 hours. It’s faster but may not blend flavors as well. If you're in a hurry, use high. If you have more time, low is best. You can swap out cuts of meat for different flavors. Try chuck steak or flank steak for a different taste. Both work well in this dish. For a leaner option, use chicken breast or turkey. These meats will cook faster, so adjust your time. If you need a dairy-free option, use a dairy-free cheese. This will give creaminess without the dairy. You can also replace sour cream with a vegan option or cashew cream. These choices keep the dish tasty and satisfying. Fresh herbs can brighten up your dish. Try adding parsley or cilantro as a garnish. They add color and freshness. You can also sprinkle some on top before serving. This will impress your guests and family. For extra toppings, consider crispy bacon bits or jalapeños. These add a salty crunch and a bit of spice. You can even try adding some avocado slices for a creamy touch. Serve it all in deep bowls for a hearty meal. For the full recipe, check the section above. {{image_4}} - Monterey Jack: This cheese melts well and adds a creamy texture. It has a mild flavor that pairs nicely with steak. You can mix it with cheddar for a tasty twist. - Provolone: For a sharper taste, use provolone. It adds depth to the dish. It also melts beautifully, creating a rich layer of flavor. - Bell Peppers: These add crunch and sweetness. Dice them small and layer them with the potatoes. They cook down nicely in the crockpot. - Mushrooms: Sliced mushrooms add an earthy flavor. They soak up the broth, becoming tender and full of taste. Add them for a hearty touch. - Adding Spices: Experiment with spices like cumin or chili powder. They can give the dish a warm kick. Just a pinch can elevate the overall taste. - Using Different Broths: Swap beef broth for chicken or vegetable broth. This change alters the final flavor profile. Each broth brings its unique taste, making the dish versatile. Try these variations to make the Crockpot Loaded Steak and Potato Bake your very own. For the full recipe, check back to ensure everything fits together perfectly! To store leftovers, let the dish cool down first. Place it in an airtight container. This helps keep the food fresh. Always refrigerate within two hours of cooking. Leftovers can stay good for about three to four days. For best taste, eat them sooner rather than later. If you want to freeze leftovers, it’s best to do it right away. Use freezer-safe containers or heavy-duty bags. Make sure to leave some space for the food to expand. Label each bag with the date. Frozen meals can last up to three months. Just remember, the longer they stay frozen, the more flavor they lose. You can reheat your dish in two ways: microwave or oven. For the microwave, place a portion in a bowl. Heat it for about 2-3 minutes, stirring halfway. In the oven, preheat to 350°F (175°C). Place the food in an oven-safe dish, cover it with foil, and heat for 15-20 minutes. Both methods work, but the oven keeps the dish crispier. Enjoy your Crockpot Loaded Steak and Potato Bake! For the full recipe, click here. You can store leftovers for about three days. Keep them in an airtight container. This helps keep the flavors fresh. Make sure to cool the dish before sealing it. Use a microwave or stove to reheat it. Yes, you can make this recipe in advance. Prepare it the night before and store it in the fridge. Just layer the ingredients in the crockpot. On the day you want to eat, plug in your crockpot and let it cook. This saves time when you are busy. You can serve this dish with a side salad or steamed veggies. Fresh greens add a nice crunch. You can also pair it with crusty bread. This helps soak up the tasty sauce. For a fun twist, add pickled jalapeños for spice. Check out the Full Recipe for more ideas! This blog post covered all you need to make a great Crockpot Loaded Steak and Potato Bake. We explored the best ingredients, like sirloin steak and russet potatoes, and how to layer them for the perfect dish. I shared cooking tips, how to store leftovers, and fun variations to try. With these ideas, you can make a meal that your family will love every time. Enjoy cooking and let your creativity shine!

Crockpot Loaded Steak and Potato Bake Flavor Boost

Get ready to dig into comfort food at its finest! My Crockpot Loaded Steak and Potato Bake is packed with

- 4 large bell peppers (choose a mix of colors for visual appeal) - 1 lb ground turkey (lean) - 1 cup cooked quinoa (can use any variety, such as white or red) - 1 teaspoon ground cumin - 1 teaspoon chili powder - 1 teaspoon smoked paprika (for depth of flavor) - 2 cloves garlic, minced - 1 small onion, finely chopped - 1 cup shredded cheese (cheddar or Monterey Jack work well) - 1 can (15 oz) black beans, rinsed and drained (for added protein) - 1 cup corn kernels (fresh, canned, or frozen, thawed) - Fresh cilantro for garnish - Preheat the oven to 375°F (190°C). This step helps cook the peppers evenly. - For the bell peppers, cut off the tops and remove the seeds and membranes. Make sure they stand upright in a baking dish. - Heat a tablespoon of oil in a large skillet over medium heat. - Add the chopped onion and sauté for about 3-4 minutes until soft. - Next, add minced garlic and stir for one more minute. This adds great flavor. - Increase the heat and add the ground turkey. Sprinkle in cumin, chili powder, smoked paprika, salt, and pepper. Cook for 6-8 minutes until browned. - Mix in the cooked quinoa, black beans, and corn. Stir well and heat for 2-3 minutes, letting the flavors blend. - Remove the skillet from heat. Stir in half a cup of shredded cheese until it melts. - Stuff each bell pepper generously with the turkey mixture. Press it down for a good fit. - Top each pepper with the rest of the cheese for a melty layer. - Cover the dish with foil to keep moisture in. Bake for 25 minutes. - After 25 minutes, remove the foil and bake for another 10-15 minutes until the cheese is bubbly and golden. - Let the peppers cool for a few minutes. Before serving, add chopped cilantro for a fresh touch. These steps will guide you to a delicious plate of stuffed bell peppers with ground turkey. For the complete recipe, check out the Full Recipe. To make your stuffed peppers burst with flavor, pay attention to seasoning. Start with the ground turkey. Use salt, pepper, cumin, chili powder, and smoked paprika. These spices add depth and warmth. Mix them in well as the turkey cooks. You want each bite to pack a punch. Balancing flavors is key. If your filling tastes flat, try adding a splash of lime juice. Fresh herbs like cilantro brighten the dish. A pinch of sugar can help balance the acidity of tomatoes, if used. Always taste as you go! Choosing colorful bell peppers makes your dish pop. A mix of red, yellow, and green peppers is stunning. Their bright colors attract the eye and make the meal more fun. For presentation, arrange the stuffed peppers on a colorful platter. You can also serve them with a side salad or tortilla chips. This adds crunch and freshness. A sprig of cilantro on top brings it all together. If you have dietary needs, you can adjust the recipe. For a low-carb option, skip the quinoa and add more veggies. Cauliflower rice is a great substitute. Want to save time? Use an air fryer. Set it to 375°F and cook for about 15 minutes. This method gives you crispy skin and juicy filling. Just keep an eye on them to avoid overcooking. {{image_4}} You can easily switch up the protein in this dish. Ground turkey is a great choice, but beef or chicken work well too. If you prefer plant-based meals, try lentils or mushrooms for a hearty filling. For grains, quinoa adds a nice texture. However, you can also use rice, couscous, or barley. Each grain brings its own flavor and can change the dish. So feel free to experiment! Want to spice things up? A Mexican twist can add fun! Toss in some salsa or fresh avocado for creamy flavor. You can also add black olives and feta cheese for a Mediterranean vibe. These flavors make each bite special and different. If you enjoy heat, adding jalapeños is a fantastic idea! You can mix them into the filling or slice them on top. Hot sauce is another easy way to kick up the spice. When it comes to cheese, choose mild options for a gentle taste. Spicy cheese can add a kick if you like it hot. You can mix and match as you prefer. Enjoy creating your perfect stuffed pepper! For the full recipe, check out the details above. To keep your cooked stuffed peppers fresh, let them cool first. Place them in an airtight container. Store them in the fridge. They stay tasty for up to 4 days. Always check for any strange smells before eating leftovers. If you want to freeze stuffed bell peppers, follow these steps: - Let them cool completely. - Wrap each pepper in plastic wrap. - Place them in a freezer bag or container. They can last up to 3 months in the freezer. When you are ready to eat, thaw them in the fridge overnight. Reheat in the oven at 350°F (175°C) for about 20-25 minutes or until heated through. You can assemble stuffed peppers in advance for quick dinners. Just prepare the filling and stuff the peppers. Store them in the fridge for up to 2 days before baking. For busy weeks, batch cook the filling. Use it for wraps, tacos, or salads too. This way, you can enjoy different meals with one base. You can pair stuffed bell peppers with many tasty sides. Here are some ideas: - A fresh green salad for crunch - Tortilla chips for a fun twist - Rice or quinoa for extra carbs - Roasted vegetables for added flavor - A dollop of sour cream for creaminess Yes, you can prepare stuffed peppers in advance. Here’s how: - Cook the filling and stuff the peppers. - Cover the dish tightly with plastic wrap or foil. - Store in the fridge for up to 24 hours. - Bake them when you are ready to eat. To tell if your stuffed peppers are ready, look for these signs: - The cheese should be bubbly and golden. - The peppers should be tender but not mushy. - A meat thermometer can check if the filling is 165°F (74°C). Absolutely! You can mix it up with different cheeses. Here are some great choices: - Mozzarella for a stretchy, gooey texture - Feta for a tangy flavor - Pepper Jack for a spicy kick - Parmesan for a nutty taste Using different cheeses can change the dish's flavor and texture. Check out the Full Recipe for more details. Stuffed bell peppers are a tasty, easy meal. We covered key ingredients like ground turkey and quinoa. Adding spices like cumin makes them full of flavor. You learned to prep, cook, and assemble them step-by-step. Consider your own twists on this dish. Adjust flavors or swap ingredients to fit your taste. With these tips in hand, you can create a nourishing, colorful meal that impresses. Make today the day you enjoy a warm plate of stuffed bell peppers!

Stuffed Bell Peppers with Ground Turkey Flavor Blast

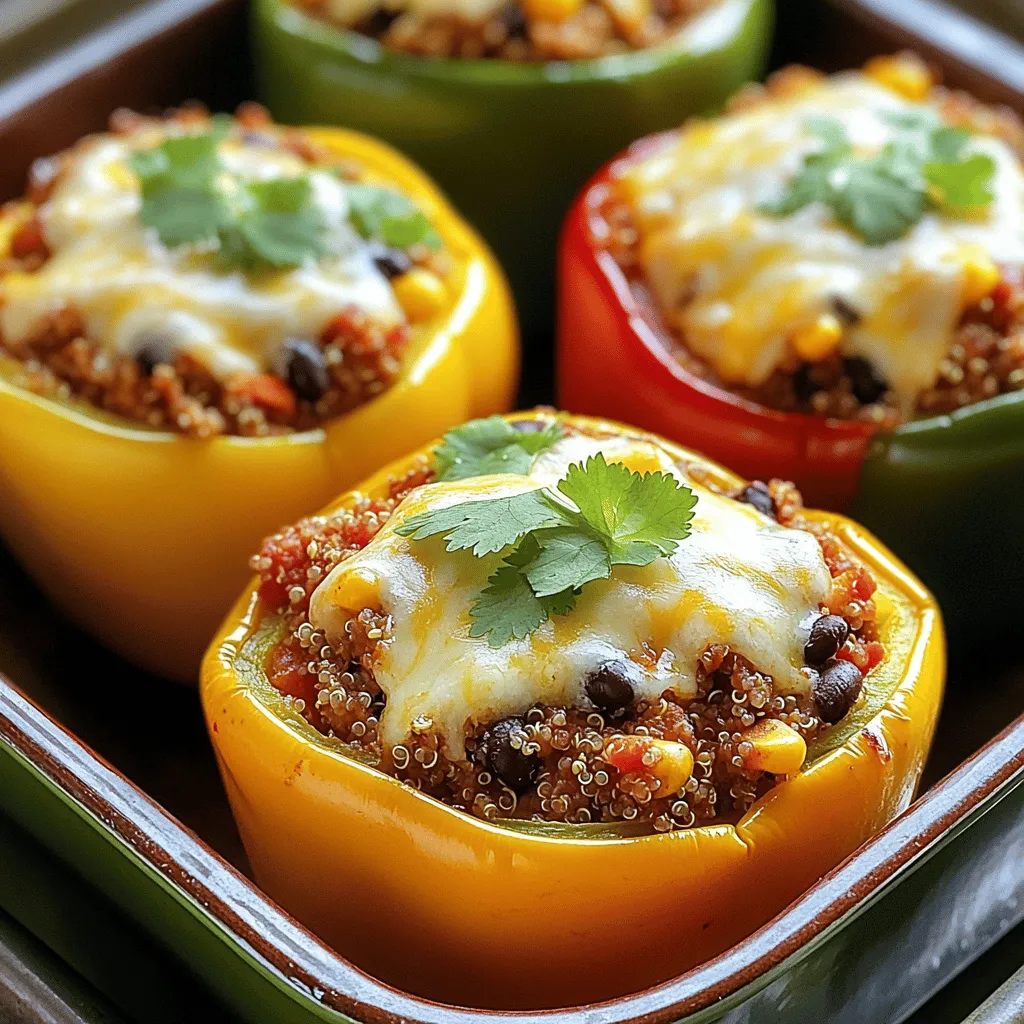
Are you ready for a flavor explosion? Stuffed bell peppers with ground turkey will delight your taste buds! This dish

Gathering the right ingredients is key to making a great creamy tomato basil soup. Here’s what you need: - 4 cups ripe tomatoes, chopped - 1 medium onion, finely chopped - 3 cloves garlic, minced - 2 cups vegetable broth - 1 cup fresh basil leaves, tightly packed - 1 cup heavy cream (or coconut cream for a vegan option) - 2 tablespoons olive oil - 1 teaspoon granulated sugar - Salt and freshly ground black pepper to taste - Crispy croutons and additional fresh basil for garnish Each ingredient plays an important role in building flavor. The ripe tomatoes give the soup its rich base. The onion and garlic add depth and aroma. Fresh basil brings in a bright note, making the soup taste fresh and vibrant. Using heavy cream adds that creamy texture, but coconut cream is a great choice for a vegan option. Olive oil helps in sautéing the onions and garlic, enhancing the overall flavor. Granulated sugar balances the acidity of the tomatoes, making the soup taste round and rich. Finally, don’t forget to season with salt and pepper to elevate all the flavors. For a delightful finish, top each bowl with crispy croutons and more fresh basil. This adds a nice crunch and an extra burst of flavor. With these ingredients ready, you are all set to create a comforting bowl of creamy tomato basil soup. For the full recipe, make sure to check out the complete guide! First, heat 2 tablespoons of olive oil in a large pot over medium heat. This oil adds flavor and helps cook the onions well. Once the oil is hot, add 1 medium onion, finely chopped. Sauté the onion for about 5 minutes. You want it to turn soft and translucent. Next, stir in 3 cloves of minced garlic. Cook this for just 1 minute. The aroma will be wonderful, but make sure it does not burn. Now, add 4 cups of chopped ripe tomatoes and 1 teaspoon of granulated sugar to the pot. The sugar helps balance the acidity of the tomatoes. Cook this mixture for about 10 to 12 minutes. Stir occasionally until the tomatoes soften and release their juices. Then, pour in 2 cups of vegetable broth. Bring the mixture to a boil. Once boiling, reduce the heat and let it simmer for 15 minutes. This allows all the flavors to blend nicely. After simmering, remove the pot from the heat. Stir in 1 cup of fresh basil leaves. This adds a fresh taste to the soup. Using an immersion blender, blend the soup until it is silky-smooth. If you prefer, you can use a countertop blender, but be careful with the hot soup. Once blended, return it to low heat. Stir in 1 cup of heavy cream. For a vegan option, you can use coconut cream instead. Warm it gently, but do not let it boil. Finally, season the soup with salt and freshly ground black pepper to taste. Serve hot, garnished with crispy croutons and more fresh basil. For the full recipe, check out the details above! To achieve the right consistency for your creamy tomato basil soup, focus on blending. I recommend using an immersion blender. This tool helps you control the texture. Blend until smooth, but if you like some chunks, stop earlier. If the soup feels too thick, just add a bit more broth. Adjusting seasoning is key to a balanced flavor. Start with salt and pepper. Taste as you go. If it needs more depth, add a pinch of sugar. This brings out the tomato's sweetness. Fresh basil adds a bright flavor. Stir it in and taste again to find what you love. For the best accompaniments, serve with crispy croutons. They add a nice crunch that contrasts with the creamy soup. A slice of crusty bread works well too. You can also pair it with a fresh salad for a complete meal. Garnishing can elevate your dish. Use fresh basil leaves for a pop of color. A drizzle of extra virgin olive oil adds richness. Try adding a sprinkle of grated cheese for extra flavor. These simple touches make your soup look as good as it tastes. You can find the full recipe for creamy tomato basil soup to help guide your cooking. {{image_4}} You can make a vegan version of creamy tomato basil soup by using coconut cream. It gives the soup a rich, creamy texture. Just swap the heavy cream for one cup of coconut cream in the Full Recipe. The flavor will still shine through, and you won't miss the dairy. To enhance the flavor of your soup, try adding spices like smoked paprika or red pepper flakes. A pinch of nutmeg can also bring warmth and depth. You might want to add a splash of balsamic vinegar for a tangy kick. Fresh herbs like oregano or thyme can give your soup a fresh twist too. If you're looking for a lighter soup, use low-fat cream or omit it altogether. You can replace the cream with more vegetable broth. This still keeps the soup flavorful while cutting down on fat. Adjust your seasonings to maintain a tasty balance. Enjoy your creamy tomato basil soup while staying mindful of your diet! Store leftover creamy tomato basil soup in an airtight container. Place it in the fridge within two hours of cooking. This keeps the soup fresh for about three to four days. When ready to eat, reheat it on the stove or in the microwave. Stir often to avoid sticking. If the soup thickens, add a splash of broth or water. You can freeze creamy tomato basil soup for longer storage. Let the soup cool completely before transferring it to a freezer-safe container. Leave some space at the top, as the soup will expand. It can last up to three months in the freezer. To reheat, thaw it overnight in the fridge. Then, gently heat it on the stove, stirring until warm. If it seems too thick, add a bit of broth or water to reach your desired consistency. For the full recipe, check the Creamy Tomato Basil Bliss Soup section. How to make creamy tomato basil soup without cream? You can use coconut cream as a great substitute. It gives a rich flavor without dairy. Just add it at the end of cooking like you would with heavy cream. Can I use canned tomatoes instead of fresh? Yes, canned tomatoes work well. They save time and still add lots of flavor. Use whole or diced tomatoes. Just adjust your cooking time to ensure they heat through. How long does creamy tomato basil soup last in the fridge? This soup lasts about 3 to 5 days in the fridge. Store it in an airtight container to keep it fresh. What are the nutritional benefits of tomato basil soup? Tomato basil soup is low in calories and full of vitamins. Tomatoes give you vitamin C and antioxidants. Basil adds flavor and has anti-inflammatory benefits. Is this soup suitable for gluten-free diets? Yes, this soup is gluten-free. Just check the vegetable broth to ensure it is gluten-free too. Where to find the best creamy tomato basil soup? Many local cafes and bistros make great creamy tomato basil soup. Look for restaurants that focus on fresh ingredients. You can also check online reviews for recommendations in your area. In this post, we covered how to make creamy tomato basil soup. We listed the key ingredients, provided step-by-step instructions, and shared tips for perfecting your recipe. You can also find variations, storage tips, and answers to common questions. Enjoy your homemade soup! It's delicious and easy to make. Feel free to experiment with flavors and share your results. This comforting dish is great for any time of year, and each bowl is filled with warmth and flavor.

Creamy Tomato Basil Soup Simple and Flavorful Delight

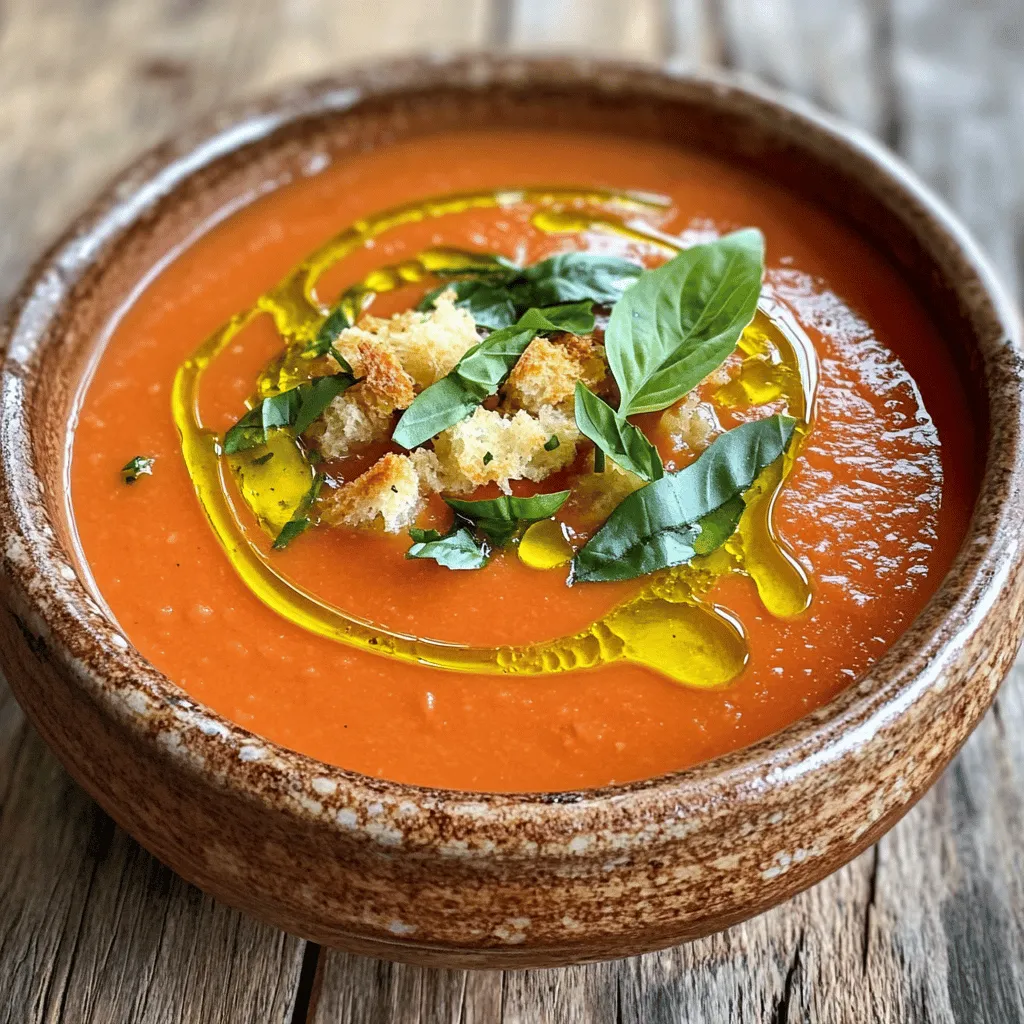
If you’re craving a warm, creamy bowl of comfort, look no further. My Creamy Tomato Basil Soup is simple to

To make a tasty Chocolate Banana Smoothie, gather these key ingredients: - 2 ripe bananas, peeled and roughly chopped - 2 tablespoons unsweetened cocoa powder - 1 tablespoon almond butter (or your favorite nut butter) - 1 cup unsweetened almond milk (or any milk of your preference) - 1 tablespoon honey or maple syrup (adjust based on your sweetness preference) - 1/2 teaspoon pure vanilla extract - A pinch of sea salt - Ice cubes (optional, for a creamier consistency) You can boost the flavor of your smoothie with some extra ingredients: - A scoop of protein powder for added nutrition - A handful of spinach for a green twist - A tablespoon of chia seeds for extra fiber - A dash of cinnamon for warmth and spice - A few berries for a fruity kick Each ingredient packs a nutritional punch. Here’s how they help you: - Bananas provide potassium and energy. They make the smoothie creamy. - Cocoa powder is rich in antioxidants and adds a deep chocolate flavor. - Almond butter offers healthy fats and protein to keep you full. - Almond milk is low in calories and dairy-free, perfect for different diets. - Honey or maple syrup gives natural sweetness with vitamins. - Vanilla extract adds a lovely aroma and extra flavor. - Sea salt enhances the overall taste of the smoothie. For the full recipe, check the section above. Enjoy blending your smoothie! Start by gathering your ingredients. You will need ripe bananas, cocoa powder, and almond butter. Peel the bananas first. Break them into smaller pieces. This makes blending easier. Measure out the cocoa powder and almond butter. Use a measuring spoon for accuracy. Get your almond milk ready too. It helps create a creamy texture. Now, put the banana pieces into your blender. Add the cocoa powder and almond butter next. Pour in the almond milk. Then, add honey or maple syrup for sweetness. Don’t forget the vanilla extract and a pinch of sea salt. If you want it chilled, add ice cubes. Blend everything on high speed for 1-2 minutes. Stop to scrape the sides if needed. You want a smooth and creamy mix. After blending, taste your smoothie. If it’s not sweet enough, add more honey or maple syrup. Blend again briefly to mix. If the smoothie is too thick, add a splash more almond milk. Blend again until it reaches your desired texture. Pour the smoothie into glasses and enjoy this tasty drink! For a fun twist, check the Full Recipe for extra tips. Choose bananas that are yellow with few brown spots. This shows they are ripe and sweet. Avoid green bananas, as they are not sweet enough. If your bananas are still green, leave them at room temperature for a few days. You can speed up ripening by placing them in a paper bag. This traps gases that help bananas ripen faster. To get a smooth texture, use ripe bananas and blend at high speed. Start with the liquids first, like almond milk, before adding the banana and cocoa powder. This helps mix well. If you want a thicker smoothie, add ice cubes. If it’s too thick, add more liquid until you reach your desired consistency. Blending longer can also help create a creamier drink. A high-speed blender is best for this smoothie. It ensures everything blends smoothly. If you don’t have one, a regular blender works, but you may need to blend longer. A measuring cup and spoons help you get the right amounts. A rubber spatula is handy for scraping down the sides of the blender. This ensures all ingredients mix well. For serving, use tall glasses to show off your delicious creation. {{image_4}} You can boost your smoothie with protein. This helps keep you full longer. Try adding a scoop of your favorite protein powder. It blends in well and adds nutrition. Greek yogurt is another great option. It gives a creamy texture and a protein punch. Use about half a cup for a balanced option. If you need dairy-free options, swap almond milk for oat or coconut milk. These work well without changing the taste much. For nut-free alternatives, use sun butter instead of almond butter. You can also skip the nut butter if you prefer. Just add a little more banana to keep the sweetness. Want to jazz it up? Add spices like cinnamon or nutmeg. These give a warm flavor that pairs nicely with banana and chocolate. You can also mix in other fruits. Try adding a handful of spinach for greens or berries for a fruity twist. Each option brings a new taste to your chocolate banana smoothie. Explore the [Full Recipe] for more ideas on creating your perfect smoothie! If you have leftover smoothie, pour it into a clean glass jar. Seal it tightly with a lid. Store it in the fridge for up to 24 hours. This keeps it fresh. When you're ready to drink, give it a good shake. If the smoothie has separated, that’s normal. Just mix it back up. You can freeze your smoothie ingredients for later use. Peel and chop ripe bananas, then place them in a freezer bag. Add cocoa powder and almond butter to individual bags, too. This makes it easy to blend later. Just remember to label your bags. Include the date so you know when to use them. To enjoy your frozen smoothie, take it out of the freezer. Let it thaw in the fridge for a few hours. If you're in a rush, you can blend it straight from the freezer. Just add a bit more almond milk to help it blend smoothly. Blend until it reaches your desired texture. Enjoy your tasty drink anytime! For the full recipe, check out the Choco-Banana Bliss Smoothie. Yes, you can make this smoothie ahead of time. Just blend all the ingredients and store it in the fridge. It tastes best when fresh, but it will stay good for one day. If you want to keep it longer, pour it into ice cube trays. You can blend the cubes later for a quick treat! If you don’t have almond butter, try peanut butter or sunflower seed butter. These options give a rich flavor, just like almond butter. You can also use tahini for a nut-free choice. Each option brings its unique taste, so feel free to experiment! Yes, this smoothie is perfectly vegan! It uses almond milk and plant-based sweeteners. Just make sure to pick a nut butter that is also vegan. This drink is healthy and fits well into any vegan meal plan. Enjoy it without worry! This blog post covered everything you need for a great chocolate banana smoothie. You learned the key ingredients, how to prep and blend them, and tips for the perfect texture. We also explored tasty variations and how to store leftovers. In my final thoughts, enjoy being creative with your smoothies. Simple swaps can lead to new favorites. Keep experimenting, and enjoy your delicious and healthy choices!

Chocolate Banana Smoothie Healthy and Tasty Drink

If you crave a quick and tasty drink, the Chocolate Banana Smoothie is your answer. With just a few simple

- 2 medium zucchinis, spiralized into noodles - 1 cup firm tofu, cut into bite-sized cubes - 1 cup fresh bean sprouts - 2 large eggs, lightly beaten - 1 red bell pepper, thinly sliced into strips - 3 green onions, finely chopped - 3 cloves garlic, minced - 2 tablespoons tamari or soy sauce - 1 tablespoon freshly squeezed lime juice - 1 tablespoon creamy peanut butter - 1 teaspoon sesame oil - 2 tablespoons crushed peanuts, for garnish - Fresh cilantro, for garnish - Salt and black pepper, to taste When making Zucchini Noodle Pad Thai, measuring ingredients accurately helps. Use medium zucchinis for balance. One cup of tofu gives great protein. A red bell pepper adds color and flavor. Fresh bean sprouts bring that crunch. Use 2 large eggs for richness and 3 cloves of garlic for that aromatic kick. Finally, the tamari or soy sauce and lime juice balance the dish perfectly. If you're vegan, skip the eggs and add more tofu. You can swap tofu for chicken or shrimp if you want meat. For nut allergies, use sunbutter or tahini instead of peanut butter. If gluten-free, ensure your tamari is certified gluten-free. Enjoy this dish no matter your dietary needs! For the full recipe, check out the details above. To start, you need to spiralize the zucchinis. This turns them into fun noodles. Use a spiralizer or a julienne peeler. Aim for long, thin strands. Once you finish, place the noodles in a bowl. Set them aside while you prepare the other ingredients. Next, heat a non-stick skillet over medium heat. Add the sesame oil and let it warm up. Once hot, toss in the cubed tofu. Cook the tofu for 5 to 7 minutes. You want it golden brown on all sides. When done, remove the tofu from the skillet and place it on a plate. In the same skillet, add minced garlic and sliced red bell pepper. Sauté them for about 2 to 3 minutes. Stir often until the pepper turns tender. Move the veggies to one side of the skillet. Pour the beaten eggs in the empty space. Scramble the eggs gently until they just set. Mix the eggs with the veggies after cooking. Now it’s time to bring everything together. Add the spiralized zucchini and cooked tofu back into the skillet. Toss all the ingredients together carefully. In a small bowl, mix the tamari, lime juice, and peanut butter. Whisk until smooth. Pour this sauce over the noodles. Stir to coat everything nicely. Finally, fold in the fresh bean sprouts and chopped green onions. Keep tossing for another 1 to 2 minutes. Taste your dish and add salt and black pepper if needed. When it’s all heated through, remove the skillet from the heat. Serve your Zucchini Noodle Pad Thai in colorful bowls. Top with crushed peanuts and fresh cilantro for a lovely finish. For the full recipe, check out the details above! To make perfect zucchini noodles, use a spiralizer. This tool turns zucchini into long, curly noodles. Pick firm zucchinis for the best results. Wash them well before spiralizing. Cut off the ends and then spiralize. Aim for even noodles. If you don’t have a spiralizer, a vegetable peeler works too. Just make thin ribbons instead. Let the noodles sit in a towel to remove excess water before cooking. Seasoning is key to a tasty Zucchini Noodle Pad Thai. Start with garlic and onion for a strong base. Use tamari or soy sauce for saltiness and umami. Fresh lime juice adds brightness to the dish. Peanut butter gives a creamy texture and rich flavor. Don't forget to add salt and black pepper to taste. Mix these ingredients well to enhance the overall flavor. Feel free to adjust based on your preference. Tofu can make or break your dish. Use firm tofu for the best texture. Cut it into small cubes for even cooking. Sauté the tofu in sesame oil for about 5-7 minutes until golden brown. This adds flavor and crispness. Don’t overcrowd the pan; cook in batches if needed. Remove the tofu once cooked and set it aside. This keeps it crispy for later. Incorporating these techniques will make your dish shine. Check out the Full Recipe for a step-by-step guide! {{image_4}} To make this dish vegan, simply skip the eggs. The zucchini noodles and tofu still create a tasty meal. You can add more bean sprouts or extra veggies for texture. The sauce will still give you that authentic Pad Thai flavor without the eggs. If you prefer meat, chicken or shrimp works great. Just cook the chicken in the skillet until it's golden and fully cooked. For shrimp, add them in the last few minutes of cooking. Both options boost the protein and make the dish heartier. Want some heat? Add Sriracha to the sauce. Start with a small amount, like a teaspoon, and mix it in. You can always add more if you like it spicy. This twist adds a zing that elevates the whole dish. For the full recipe, check out the steps above to create your Zucchini Noodle Pad Thai. You can store Zucchini Noodle Pad Thai in the fridge. Place it in an airtight container. It will stay fresh for up to three days. Make sure the noodles are not too wet before storing. This keeps them from getting soggy. Freezing Zucchini Noodle Pad Thai is not the best option. Zucchini noodles can become mushy when thawed. If you must freeze it, separate the sauce and noodles. Store them in separate containers. You can freeze the sauce for up to three months. The noodles should be used fresh. To reheat your Zucchini Noodle Pad Thai, use a skillet. Heat it on medium. Add a splash of water or oil to prevent sticking. Stir the dish until heated through. You can also use the microwave. Heat for 1-2 minutes, stirring halfway. Enjoy it warm for the best taste. Yes, you can use regular noodles. Rice noodles work best for Pad Thai. They add a chewy texture. However, using zucchini keeps the dish light and healthy. If you want a low-carb option, stick with zucchini noodles. To make it more filling, add protein. You can use chicken, shrimp, or more tofu. Another option is to increase the number of eggs. You can also serve it over brown rice or quinoa. This extra base gives you more fiber and keeps you full longer. If you need a substitute for peanut butter, try almond butter or sunflower seed butter. Both give a nice flavor. You can also use tahini, which is made from sesame seeds. If you're allergic to nuts, sunflower seed butter is a great choice. It still keeps the dish creamy and tasty. For the complete recipe, check out the [Full Recipe]. This article covered the key ingredients for a tasty dish, from zucchini noodles to substitutes. You learned how to prepare and cook, plus tips for the best results. We explored delicious variations, including vegan options and spicy twists. Lastly, I shared how to store your creation for later enjoyment. Using these tips, you can make a great meal. Enjoy experimenting with flavors and techniques!

Zucchini Noodle Pad Thai Flavorful Healthy Meal

Are you ready to enjoy a healthy twist on a classic dish? My Zucchini Noodle Pad Thai is packed with

- Chicken breast - Honey - Soy sauce - Garlic and ginger - Vegetables (bell pepper, broccoli, snap peas) I love using chicken breast for this dish because it cooks quickly and stays juicy. Honey adds a sweet touch that balances the saltiness of soy sauce. Garlic and ginger bring bold flavors that make this meal truly special. I like to mix in colorful vegetables like bell pepper, broccoli, and snap peas. They add crunch and nutrients, making my stir-fry tasty and healthy. - Sesame seeds - Green onions For a fun finish, I sprinkle on sesame seeds and green onions. This adds a nice texture and fresh flavor. You can skip them, but I think they make the dish pop! - Vegetable oil - Salt and pepper Having the right cooking essentials is key. I use vegetable oil for frying since it has a high smoke point. Don’t forget to season with salt and pepper to boost the flavors. For the complete recipe, check out the Full Recipe. First, we need to marinate the chicken. In a medium bowl, mix honey, soy sauce, minced garlic, and grated ginger. This mix creates a sweet and savory sauce. Add the chicken strips to the bowl and toss them well to coat. Cover the bowl and let the chicken marinate for at least 15 minutes. This step helps the chicken soak up all the flavors. Next, heat the oil in a large skillet or wok over medium-high heat. Make sure the oil is hot but not smoking. This temperature helps the chicken cook evenly. Add the marinated chicken to the skillet. Stir-fry the chicken for about 5 to 7 minutes. Keep stirring frequently until the chicken turns golden brown and is fully cooked. A sprinkle of salt and pepper adds flavor. Now it's time to add the vegetables. Toss in the sliced bell pepper, broccoli florets, and snap peas. Stir-fry them with the chicken for another 3 to 4 minutes. This keeps the veggies vibrant and crunchy. You want them to be tender but still crisp. This way, you enjoy the full flavor and nutrients. For the complete cooking steps, check the Full Recipe. To ensure your chicken is cooked through, cut it into thin strips. This helps the chicken cook quickly and evenly. Always stir-fry it until it turns golden brown with no pink inside. Use a meat thermometer if you're unsure; chicken should reach 165°F (75°C). When you adjust cooking times for different vegetables, remember that each type has its own cooking time. For example, bell peppers cook fast, while broccoli takes a bit longer. Add the quick-cooking veggies later in the process. This way, they stay crisp and full of color. To add more flavor, think about spices like black pepper or red pepper flakes. A pinch of crushed red pepper can give the dish a nice kick. You might also try adding a splash of rice vinegar for extra tang. Incorporating other sauces can create new flavors. Try adding teriyaki sauce for a sweet twist, or a dash of oyster sauce for umami. You can mix and match to find the perfect balance for your taste. Pair your honey garlic chicken stir-fry with fluffy jasmine rice or whole grain quinoa. Both options soak up the sauce nicely and balance the flavors. For a fun presentation, serve the stir-fry in a large bowl. Top it with extra sesame seeds and chopped green onions. It makes the dish look vibrant and inviting. Consider adding lime wedges on the side for an extra burst of freshness. You can find the full recipe for this dish to explore more delicious ideas. {{image_4}} You can swap chicken for other proteins. Beef or tofu works well in this dish. If using beef, slice it thinly for quick cooking. For tofu, choose firm or extra-firm tofu for a better texture. When cooking beef, stir-fry for about 4-5 minutes until it browns. If using tofu, cook it for around 5-7 minutes until golden. Adjust the cooking time based on the protein you choose. Feel free to mix up the vegetables in your stir-fry. Carrots, snap peas, and mushrooms add great flavor. You can also try snow peas or zucchini for a fresh twist. Seasonal veggies are great too. In spring, add asparagus or peas. In fall, consider using butternut squash or Brussels sprouts. This keeps your dish vibrant and full of nutrients. Want some heat? Add chili sauce to your honey garlic sauce. This gives your meal a spicy kick. Just a teaspoon or two can make a big difference. If you want a low-calorie option, skip the sugar. The honey adds sweetness, so you can reduce the amount for a lighter dish. For a tangy twist, try adding a splash of rice vinegar. For the full recipe, check out the complete guide on Honey Garlic Chicken Stir-Fry. To store leftover stir-fry, let it cool first. Place it in a clean, airtight container. This helps keep it fresh. I recommend using glass or plastic containers with tight lids. Store in the fridge for up to three days. When reheating, use the stove or microwave. The stove helps maintain texture. Heat in a pan over medium heat. Stir often for even warming. If using a microwave, cover the dish to keep moisture. Heat in short bursts, checking often. You can freeze the stir-fry for longer storage. Use a freezer-safe container or bag. Remove as much air as you can to prevent freezer burn. It lasts up to three months in the freezer. To thaw, place it in the fridge overnight before reheating. You can also use the microwave on defrost mode for quick thawing. Then, reheat it on the stove for best results. Enjoy your meal later with all the great flavors intact! For the full recipe, check the details above. The best way to cook chicken for stir-fry is to slice it thinly. Thin strips cook quickly and evenly. Use a hot skillet or wok with oil to sear the chicken. This method gives you a nice brown color, which adds flavor. Always stir the chicken to avoid burning. Cook it for about 5-7 minutes until it's no longer pink. Yes, you can make honey garlic chicken stir-fry ahead of time. It’s great for meal prep. Cook the chicken and vegetables, then store them in an airtight container. You can refrigerate it for up to three days. When ready to eat, just reheat in a skillet or microwave. Add a splash of water to keep it moist. Making homemade honey garlic sauce is simple. Mix these ingredients in a bowl: - 2 tablespoons honey - 3 tablespoons soy sauce - 3 cloves garlic, minced - 1 tablespoon fresh ginger, grated Combine everything well. You can adjust the sweetness by adding more honey. This sauce is great for stir-fry, including the honey garlic chicken stir-fry. For the full recipe, check out the details above. This blog post covered how to make a tasty honey garlic chicken stir-fry. We discussed the main ingredients like chicken, honey, and fresh veggies. I shared step-by-step cooking instructions and useful tips to enhance flavor and presentation. In summary, you now have a fun and easy recipe that you can customize. Try different proteins, veggies, or sauces to make it your own. Enjoy cooking and sharing this dish with friends and family!

Honey Garlic Chicken Stir-Fry Simple and Tasty Meal

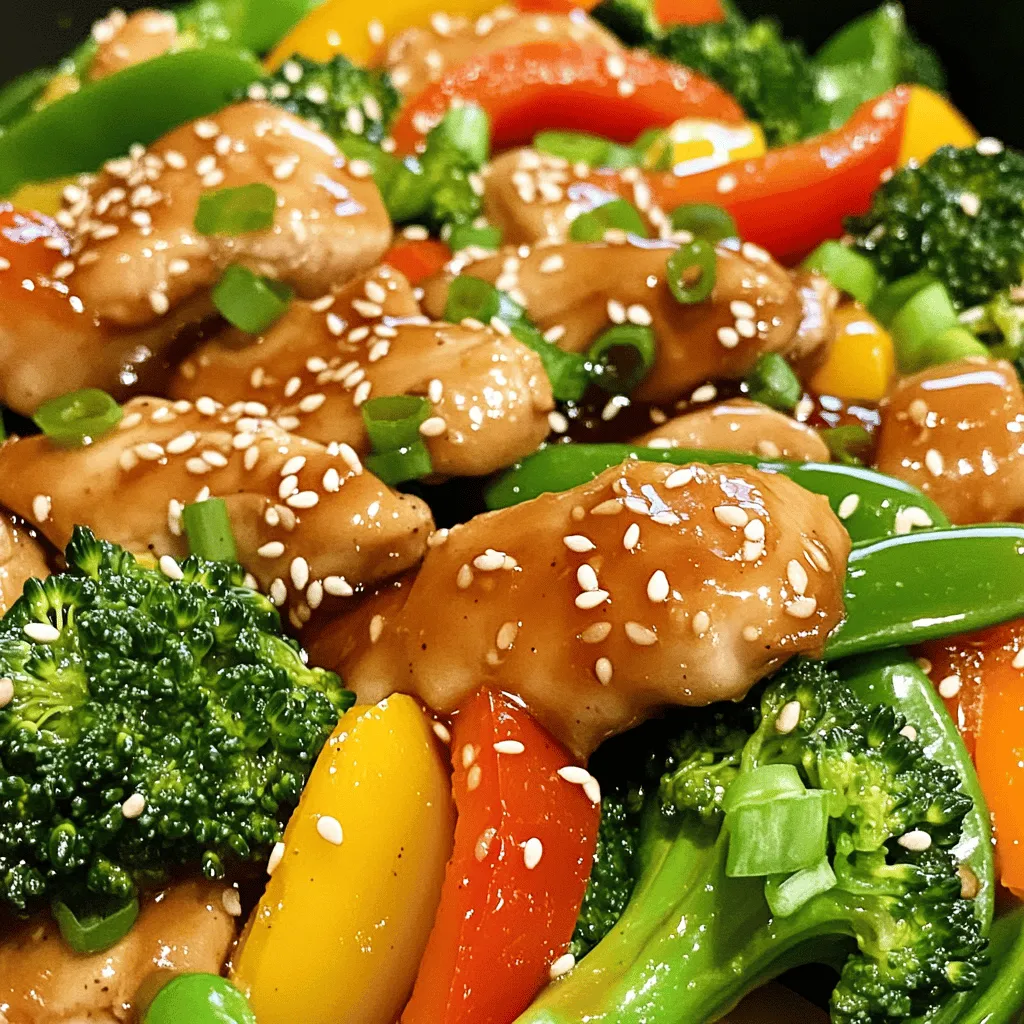
Are you ready to whip up a quick and tasty meal? Honey Garlic Chicken Stir-Fry is the answer! This dish

Older posts
Newer posts
← Previous Page1 … Page28 Page29 Page30 … Page44 Next →

dsad

© 2025 tastyhatch • Built with GeneratePress

Our Policies

  • Copyright Policy
  • Cookie Policy
  • GDPR Policy
  • Privacy Policy
  • Disclaimer
  • Terms Of Use

More Information

  • Home
  • About
  • Contact
  • Appetizers
  • Dessert
  • Dinner
  • Drinks
©2025, tastyhatch About Back To Top