Skip to content
DisclaimerTerms Of UseGDPR PolicyCookie Policy

tastyhatch

  • Home
  • Drinks
  • Appetizers
  • Dinner
  • Dessert
  • About
  • Contact
  • Privacy Policy
DisclaimerTerms Of UseGDPR PolicyCookie Policy

Olivia

- 1 cup creamy peanut butter - 1 cup rolled oats - 1/2 cup honey or maple syrup - 1/2 cup unsweetened cocoa powder - 1/2 cup dark chocolate chips - 1/4 cup unsweetened shredded coconut (optional) - 1/4 teaspoon fine sea salt - 1 teaspoon pure vanilla extract When I set out to make no-bake chocolate peanut butter bars, I always gather my favorite ingredients first. The creamy peanut butter is rich and adds great flavor. Rolled oats give a nice texture and make the bars hearty. You can choose honey or maple syrup for sweetness—both work well. Cocoa powder is key for that rich chocolate taste. Dark chocolate chips melt beautifully on top, adding a smooth finish. Shredded coconut gives a fun twist, but it's optional. A sprinkle of sea salt balances all the sweet flavors. Finally, vanilla extract enhances everything, making it truly special. - Mixing bowls - Baking dish (8-inch by 8-inch) - Parchment paper - Spatula - Microwave-safe bowl Having the right tools makes cooking easier. I love using mixing bowls for combining my ingredients. An 8-inch by 8-inch baking dish works perfectly for this recipe. Lining it with parchment paper helps with easy removal later. A spatula is great for mixing and spreading the mixture evenly. Lastly, a microwave-safe bowl is a must for melting chocolate smoothly. For the full recipe, refer to the section above. - In a medium bowl, combine 1 cup of creamy peanut butter, 1/2 cup of honey (or maple syrup), and 1 teaspoon of pure vanilla extract. Mix well until smooth. - In another bowl, mix 1 cup of rolled oats, 1/2 cup of unsweetened cocoa powder, and 1/4 teaspoon of fine sea salt. Stir until blended. - Slowly add the dry mixture to the peanut butter mixture. Stir until well combined. If you want coconut, fold in 1/4 cup of unsweetened shredded coconut. - Prepare an 8-inch by 8-inch baking dish by lining it with parchment paper. Leave some paper hanging over the sides. - Place 1/2 cup of dark chocolate chips in a microwave-safe bowl. Heat in 30-second increments, stirring after each time, until melted and smooth. - Pour the melted chocolate over the peanut butter mixture in the baking dish. Use a spatula to spread it evenly. - Cover the dish with plastic wrap or foil. Place it in the fridge for at least 2 hours, or until the bars are firm. - Once set, lift the bars out using the parchment paper. Place them on a cutting board and cut into squares. For the full recipe, check the detailed instructions above. - Ensure room temperature for smooth mixing. Cold peanut butter does not blend well. - Press mixture firmly for even bars. A good press helps the bars hold together. - Dust with cocoa powder for a rich look. It adds a nice touch. - Add a sprinkle of shredded coconut. This gives a tropical twist to your bars. - Not properly measuring ingredients can ruin the taste. Use measuring cups for accuracy. - Overheating the chocolate makes it grainy. Heat in short bursts for the best results. For the Full Recipe, check out the steps to create this delightful treat! {{image_4}} You can switch things up by using almond butter instead of peanut butter. Almond butter adds a nice nutty taste. For a nutrition boost, consider adding protein powder. This makes the bars filling and extra healthy. Drizzling caramel or white chocolate on top gives a sweet touch. You can also sprinkle nuts or seeds for a satisfying crunch. These toppings make each bite fun and tasty. If you want a different sweetener, use agave syrup in place of honey. This gives you a vegan option. For a gluten-free version, simply use gluten-free oats. These swaps help everyone enjoy the bars. For the full recipe, check the section above! To keep your no-bake chocolate peanut butter bars fresh, follow these simple steps: - Store in an airtight container. - Keep refrigerated for up to one week. This helps maintain their flavor and texture. I find that using a glass container works best. It seals tight and prevents moisture. Want to keep your bars longer? You can freeze them! Here’s how: - They can be frozen for longer shelf life. - Thaw before serving. Cut the bars into pieces first. Then, wrap them in plastic wrap. Place them in a freezer-safe bag. When you're ready to enjoy, just remove the desired amount and let them sit at room temperature. Enjoy your treat anytime! For the full recipe, check the section above. To make these bars vegan, substitute honey with maple syrup. This swap keeps the sweetness. Ensure you use dairy-free chocolate for the topping. Many brands offer great options that taste just as good. Yes, you can omit cocoa. Instead, add more rolled oats or peanuts. This change will keep the bars tasty and satisfying. You can play around with flavors while sticking to the base recipe. These bars stay fresh for up to one week in the fridge. If you want to keep them longer, freeze them. They can last several months when frozen. Just thaw them before you eat. If you need an alternative to chocolate chips, try using carob chips. Chopped dried fruits work too. Both options add a nice twist to your bars and keep them delicious. You now know how to make delicious no-bake peanut butter bars. We covered the ingredients, tools, and step-by-step instructions. I shared tips to perfect your bars and variations to fit your taste. Always remember to store them properly for freshness. These bars are quick, easy, and packed with flavor. Enjoy making them your own while keeping it simple and fun!

No-Bake Chocolate Peanut Butter Bars Delightful Treat

If you’re craving a sweet treat but don’t want to bake, I’ve got you covered! These No-Bake Chocolate Peanut Butter

When I whip up a zucchini noodle stir-fry, I love using fresh and colorful ingredients. They not only add flavor but also make the dish look amazing. Here’s what you need: - 2 medium zucchinis, spiralized into noodles - 1 cup bell peppers, sliced into thin strips - 1 cup carrots, cut into matchstick pieces - 1 cup snap peas, trimmed - 1 tablespoon fresh ginger, finely minced - 2 cloves garlic, minced - 2 tablespoons soy sauce or Tamari - 1 tablespoon sesame oil - 1 teaspoon chili paste - 2 green onions, chopped - 1 tablespoon sesame seeds - Salt and freshly cracked black pepper to taste Each ingredient plays a role. The zucchinis are your noodles, giving the dish a light base. Bell peppers add sweetness and crunch, while carrots bring a nice texture. Snap peas are a tasty bonus for freshness. The garlic and ginger give a warm kick, while soy sauce or Tamari adds umami flavor. Sesame oil brings depth, and chili paste gives it a bit of heat. Green onions and sesame seeds finish it all off with a pop of flavor and crunch. This combination creates a bright and tasty meal. For the full recipe, check out the Zesty Zucchini Noodle Stir-Fry. You can mix and match the veggies based on what you have. Get creative and enjoy! Start by spiralizing two medium zucchinis into noodle forms. You can use a spiralizer or a simple vegetable peeler to create long strands. Once you have your zoodles, place them in a large bowl and set them aside. This keeps them ready for cooking later. Next, heat a tablespoon of sesame oil in a non-stick skillet or wok over medium-high heat. Let it shimmer for a moment. Add two cloves of minced garlic and one tablespoon of finely minced ginger. Sauté them for about 30 seconds. You want them fragrant and lightly golden. Now, it’s time to add color! Toss in one cup of sliced bell peppers, one cup of julienned carrots, and one cup of trimmed snap peas. Stir-fry these veggies for about 3 to 5 minutes. You want them to stay vibrant and tender-crisp. This step adds a nice crunch to your dish. Gently add your prepared zucchini noodles to the pan. Pour in two tablespoons of soy sauce and one teaspoon of chili paste. Using tongs or a spatula, toss everything together. Make sure the noodles are evenly coated with the sauce for great flavor. Continue to stir-fry the mixture for another 2 to 3 minutes. This warms the zoodles while keeping their crunch. Check for taste and add salt and freshly cracked black pepper as needed. Once done, transfer the stir-fry to a serving dish. Garnish it with chopped green onions and sesame seeds. For a pop of flavor, consider adding a sprinkle of crushed red pepper flakes. Serve warm and enjoy this simple and flavorful meal! To make a great stir-fry, you need high heat. Heat your skillet until the oil shimmers. This helps cook the veggies fast and keeps them crisp. If your noodles get soggy, try cooking them separately. Add them at the end to keep their texture. Want to boost flavor? Add spices like garlic powder or crushed red pepper. You can also try sauces like teriyaki or hoisin. They add a nice kick! Fresh herbs, like basil or cilantro, brighten the dish. Just sprinkle them on top before serving for extra freshness. Serve your stir-fry on a wide, flat dish. This lets the colors shine. For garnish, add extra sesame seeds or green onions. You can also place lime wedges on the side for a zesty touch. Get creative and make it fun! For the full recipe, check out the Zesty Zucchini Noodle Stir-Fry. {{image_4}} You can easily add protein to your zucchini noodle stir-fry. Tofu, chicken, or shrimp work best. For tofu, press and cut it into cubes. Sauté it first until golden. If you choose chicken, cut it into thin strips. Cook it until it’s no longer pink. Shrimp cooks quickly, so add it after the veggies. Just stir-fry until they turn pink and curl up. Many people seek gluten-free options. Tamari is a great substitute for regular soy sauce. You can also swap out vegetables based on what you have. Broccoli, mushrooms, or spinach all taste good in this dish. Feel free to be creative with your veggie choices! Changing the sauce can add new flavors. Try hoisin sauce for a sweet kick. For a spicy touch, use sriracha or a sweet chili sauce. Adjust spice levels by adding more or less chili paste. You can also mix sauces to create something unique. Explore different combinations to find your favorite! For the full recipe, check out the Zesty Zucchini Noodle Stir-Fry 🥢. To keep your zucchini noodle stir-fry fresh, store it in the fridge. Use an airtight container to prevent air from getting in. This helps keep the flavors strong and the noodles firm. I recommend using glass containers if you have them. They are safe and easy to clean. When you reheat your stir-fry, aim to keep the noodles from getting mushy. Heat it gently in a skillet over low heat. Stir often to warm it evenly. You can also use a microwave. Just heat it in short bursts and stir in between. This keeps the noodles intact and tasty. Yes, you can freeze zucchini noodles! However, it’s best to freeze the stir-fry without the noodles. Zucchini can become watery after freezing. To freeze, place the cooled stir-fry in a freezer bag. Be sure to squeeze out the air before sealing. This way, your meal stays fresh for up to three months. When ready to eat, thaw it in the fridge overnight, then warm it up. Enjoy your delicious meal again! Zucchini noodles are low in calories but high in nutrients. They offer fiber, vitamins A and C, and potassium. Compared to traditional pasta, zucchini noodles have fewer carbs and calories. This makes them a great choice for those watching their weight or managing blood sugar. If you don’t have a spiralizer, you can use a vegetable peeler. Simply peel the zucchini into long strips. You can also use a box grater for wider noodles. Just be sure to cut them thin for even cooking. Yes, you can easily make this dish vegan. Swap the soy sauce for a gluten-free version like Tamari. You can also use coconut aminos if you want a different flavor. For added protein, consider using tofu or tempeh. Cooked zucchini noodles last for about 3 to 5 days in the fridge. Store them in an airtight container to keep them fresh. If you want to extend their life, you can freeze them, but expect a change in texture. Zucchini noodle stir-fry pairs well with many dishes. Consider serving it with grilled chicken or shrimp for added protein. You can also enjoy it with a light salad or a side of steamed broccoli for a complete meal. This blog post showed how to make a tasty zucchini noodle stir-fry. We covered the ingredients, steps to cook, and tips for the best flavor. Remember to cook your veggies until they’re bright and crisp. You can add protein or different sauces to mix things up. Storing leftovers is simple, and reheating keeps your dish just right. Enjoy experimenting with this fun recipe. It’s a healthy option that’s easy to enjoy!

Zucchini Noodle Stir-Fry Simple and Flavorful Meal

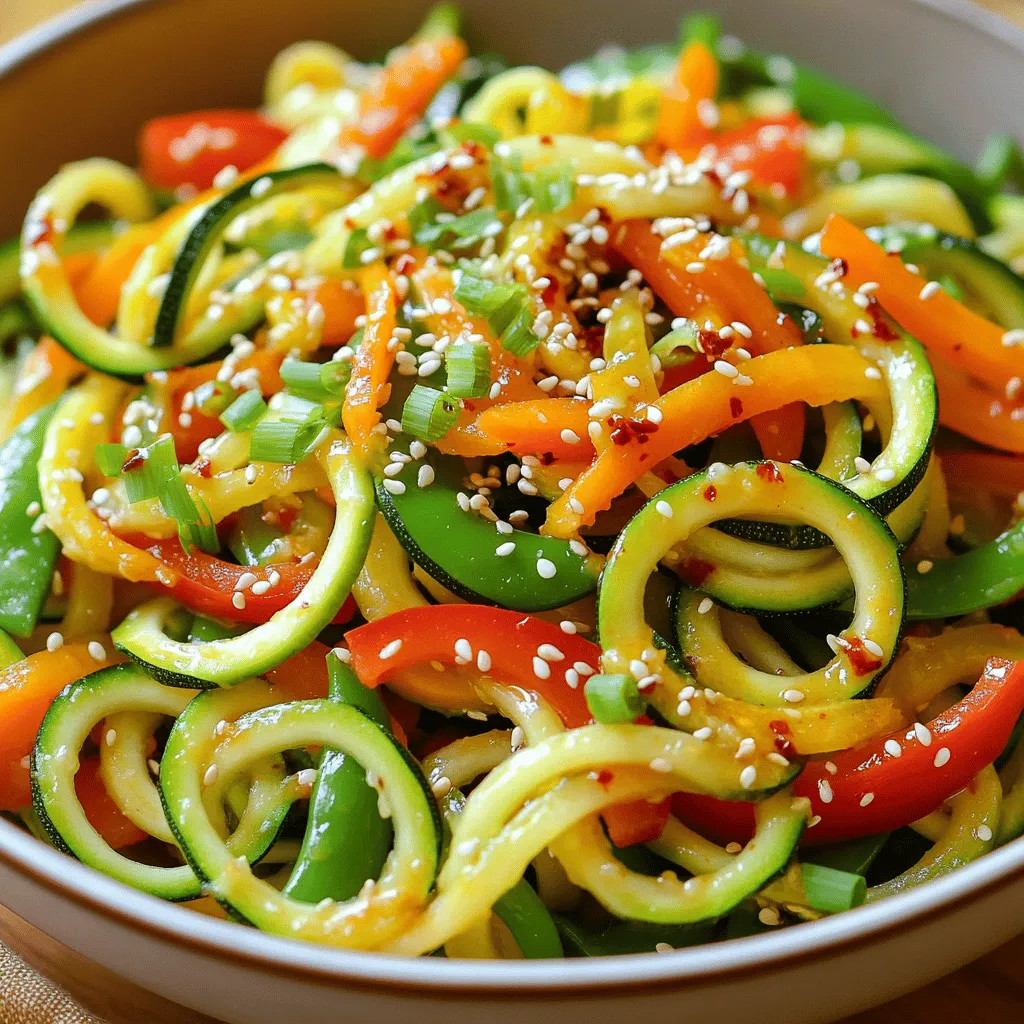
Are you ready for a quick, tasty meal that won’t weigh you down? My Zucchini Noodle Stir-Fry is simple, fresh,

To make your Instant Pot creamy mushroom risotto, gather these key ingredients: - 1 cup Arborio rice - 2 cups vegetable broth - 1 cup mushrooms (either cremini or white button), sliced - 1 small onion, finely chopped - 2 cloves garlic, minced - 1/2 cup heavy cream - 1/2 cup grated Parmesan cheese - 2 tablespoons olive oil - 1 teaspoon fresh thyme (or 1/2 teaspoon dried thyme) - Salt and pepper to taste - Fresh parsley, chopped, for garnish Each ingredient plays a role in creating the rich, creamy texture and amazing flavor. The Arborio rice is key. Its high starch content gives risotto that classic creaminess. The mushrooms add depth, while onion and garlic bring in savory notes that make each bite delightful. You can adjust the flavors to your taste. For instance, add more thyme for a stronger herbal taste. You can also use different mushrooms to explore new flavor profiles. If you want to see the full recipe, please check the section titled Full Recipe. Start by setting your Instant Pot to 'Sauté' mode. Pour 2 tablespoons of olive oil into the pot and let it heat for about a minute. Next, add 1 small finely chopped onion. Cook it for 3 to 4 minutes. Stir it often until the onion turns translucent. Then, add 2 cloves of minced garlic. Cook for another minute until it smells great. Now, introduce 1 cup of sliced mushrooms. You can use either cremini or white button mushrooms. Sauté them for 5 to 7 minutes. Stir occasionally until they get a nice golden-brown color. Season the mushrooms with salt, pepper, and 1 teaspoon of fresh thyme. This adds wonderful flavor to the dish. Pour in 1 cup of Arborio rice. Gently stir it with the mushrooms and aromatics. Let the rice toast for 1 to 2 minutes. This step helps develop a deeper flavor in your risotto. Next, add 2 cups of vegetable broth to the pot. Stir well to mix the rice with the liquid. Secure the Instant Pot lid, making sure the steam release valve is set to sealing. Select the 'Manual' setting and set the timer for 6 minutes at high pressure. After the cooking time is up, allow the Instant Pot to naturally release pressure for about 5 minutes. After this, carefully switch the steam release valve to venting. This will let out any remaining steam safely. When you open the lid, your risotto should be creamy and well-cooked. Stir in 1/2 cup of heavy cream and 1/2 cup of grated Parmesan cheese. Mix until everything is creamy and combined. If you want a thinner risotto, feel free to add more vegetable broth to reach your desired consistency. Stirring is key to creamy risotto. It helps the rice release starch. This starch makes the dish rich and smooth. I always stir often while cooking. Choosing the right rice matters too. Arborio rice is the best choice. It has a high starch content. This makes your risotto extra creamy. Other types of rice won't give the same result. Want to boost the flavor? Try adding fresh herbs like basil or rosemary. These herbs add depth and freshness. White wine enhances the dish too. It brings acidity and brightness. Just a splash while cooking makes a big difference. Avoiding the burn notice is crucial. Always put enough liquid in the pot. The rice needs broth to cook well. Stir well to prevent sticking. Adjust the cooking time for different sizes. If you double the recipe, increase cooking time slightly. For smaller servings, reduce the time. Always check the rice for doneness. For the complete recipe, check the [Full Recipe]. {{image_4}} You can easily change this risotto to fit a vegetarian diet. Adding seasonal vegetables enhances flavor and nutrition. Try mixing in butternut squash, asparagus, or zucchini. These veggies bring color and taste. You can also toss in spinach or peas. They cook quickly and add a vibrant touch. Just stir them in at the end to keep them fresh. If you want to make the dish heartier, consider adding protein. Chicken or shrimp work great. Just sauté them in the pot before the mushrooms. This adds depth to the dish. For a vegetarian protein swap, use chickpeas or lentils. They blend well with the risotto and pack a protein punch. The broth you choose can change the taste of your risotto. You may use chicken or beef broth for a richer flavor. Homemade broth is often best, as it has no preservatives. However, store-bought broth is quick and convenient. Just pick a low-sodium option to control salt levels. The broth adds moisture and richness to your dish. To keep your risotto fresh, store it right. Place it in a sealed container. Make sure it cools down first. Then, put it in the fridge. It should last for about 3-4 days. Use glass or BPA-free plastic containers for best results. They keep the flavor intact. You can freeze risotto too. Start by letting it cool completely. Then, scoop it into freezer bags. Flatten the bags for easy stacking. This way, it takes up less space. It will keep well for up to 2 months. When ready to eat, thaw it in the fridge overnight. To reheat, you can either microwave or use the stovetop. When reheating, the stovetop often gives the best results. Place it in a pot over low heat. Add a splash of water or broth. This helps restore creaminess. Stir often to heat evenly. If you choose the microwave, use a bowl. Cover it and heat in short bursts. Add liquid as needed to keep it moist. Your creamy mushroom risotto will taste great, just like fresh! You can find the full recipe above. No, use Arborio rice for best results. Arborio rice is a starchy short-grain rice. This starch gives risotto its creamy texture. Other rice types, like long-grain, lack this quality. They won't absorb liquid the same way. This means your risotto won't have the right creaminess. So, stick with Arborio for a perfect dish. To make risotto on the stove, start with a pot. Heat olive oil and sauté onions and garlic. Add mushrooms and cook until soft. Then, stir in Arborio rice and let it toast. Slowly add warm broth, one cup at a time. Stir often until the rice absorbs the liquid. This process takes about 20-30 minutes. When it's creamy, stir in heavy cream and cheese. You can use several options instead of heavy cream. Try full-fat coconut milk for a dairy-free choice. It adds creaminess and a hint of sweetness. Greek yogurt is another option. It will make your risotto tangy and rich. Use half-and-half as a lighter choice. Adjust the amount to get the right creaminess you want. Yes, you can easily make this risotto vegan. Replace heavy cream with coconut milk or cashew cream. You can also skip the cheese or use a vegan cheese substitute. Ensure your broth is vegetable-based. Add extra herbs or nutritional yeast for flavor. These swaps keep the dish tasty and satisfying. This post guides you through making creamy risotto in an Instant Pot. You learned about key ingredients like Arborio rice and the right broth. I covered sautéing aromatics, cooking mushrooms, and pressure cooking techniques. Tips on stirring and adjusting flavors help enhance your dish. You can customize it with veggies or proteins. When storing, follow the best practices to keep it fresh. Risotto is simple and tasty. With these steps, you can create a perfect meal every time. Enjoy experimenting with your risotto!

Instant Pot Creamy Mushroom Risotto Delight

If you’ve ever craved a warm, creamy bowl of risotto, I have the perfect dish for you! My Instant Pot

Here is what you need to make Chocolate Chip Cookie Dough Dip: - 1 cup all-purpose flour (heat-treated for safety) - 1 cup packed brown sugar - ½ cup granulated sugar - 1 cup cream cheese, softened to room temperature - ½ cup unsalted butter, softened to room temperature - 2 teaspoons pure vanilla extract - 1 cup mini chocolate chips - ¼ cup chopped walnuts (optional) - A pinch of salt Let's break down each ingredient. The all-purpose flour gives the dip its cookie-like feel. Heat-treating the flour is key. It makes the dip safe to eat. You can use gluten-free flour if you're avoiding gluten. Brown sugar adds moisture and a rich flavor. If you want a lighter taste, use more granulated sugar. Cream cheese and butter give the dip a nice, creamy base. You can swap cream cheese with Greek yogurt for a lighter dip. Vanilla extract boosts flavor. Always use pure vanilla for the best taste. Mini chocolate chips stay soft and add sweetness. You could use dark chocolate chips for a richer flavor. The chopped walnuts add crunch but are optional. If you want a nut-free dip, just leave them out. Why heat-treat flour? Raw flour can hold harmful bacteria. Heating it removes this risk. To heat-treat flour, microwave it for one minute. This simple step keeps your dip safe to enjoy. It also helps the flour blend better in the dip. Always remember, safety is key when making tasty treats! To start, gather your ingredients. You need: - 1 cup all-purpose flour (heat-treated for safety) - 1 cup packed brown sugar - ½ cup granulated sugar - 1 cup cream cheese, softened to room temperature - ½ cup unsalted butter, softened to room temperature - 2 teaspoons pure vanilla extract - 1 cup mini chocolate chips - ¼ cup chopped walnuts (optional) - A pinch of salt First, place the flour in a microwave-safe bowl. Heat it in the microwave for 1 minute. This step kills any harmful bacteria. Let it cool slightly before using. In a large bowl, use an electric mixer. Cream the softened cream cheese and butter together. Mix for 2-3 minutes until smooth and fluffy. Then, slowly add the brown and granulated sugars. Keep mixing until everything is smooth. Next, mix in the vanilla extract and a pinch of salt. Ensure the flavors blend well. Now, carefully add the heated flour. Stir gently until the mixture is smooth. Finally, fold in the mini chocolate chips and walnuts, if you like. Once mixed, transfer the dip to a serving bowl. Cover it and refrigerate for at least 30 minutes. This cooling time helps the flavors meld together. When ready to serve, take it out and enjoy with dippers like graham crackers, apple slices, or pretzels. For a fun touch, sprinkle more mini chocolate chips on top before serving. You can find the complete recipe in the [Full Recipe]. To get the best texture for your dip, start with softened ingredients. Use room temperature cream cheese and butter. This makes mixing easy and helps create a smooth blend. After mixing in the flour, the dip should be thick but creamy. If you find it too thick, add a splash of milk. This will help loosen it up without losing flavor. Want to take your dip to the next level? Try these ideas: - Add a pinch of cinnamon for warmth. - Use dark chocolate chips for a richer taste. - Mix in a spoonful of peanut butter for a nutty twist. These options make the dip fun and unique, perfect for any gathering! When serving your dip, present it with a variety of dippers. Here are some tasty options: - Graham crackers - Fresh apple slices - Crunchy pretzels - Mini vanilla wafers For a fun touch, sprinkle some mini chocolate chips on top. This not only looks great but also adds extra flavor. If you want to try something new, serve it with cookies for a double chocolate treat! For the complete recipe, check out the full recipe section. {{image_4}} You can change up the flavor of your dip to keep things fun. One tasty option is peanut butter chocolate chip dip. Just swap out half the butter for creamy peanut butter. Mix it in with the cream cheese and sugars. You will get a sweet and nutty flavor that pairs well with mini chocolate chips. Another great idea is to add a hint of coffee. Just mix in one tablespoon of instant coffee granules to the cream cheese and butter mix. This gives your dip a rich, mocha twist. The coffee flavor adds depth and works well with the chocolate. If you need gluten-free options, replace all-purpose flour with almond flour or gluten-free flour. Just ensure the flour is heat-treated. It helps keep the dip safe to eat. For a vegan version, use dairy-free cream cheese and coconut oil instead of butter. You can also use brown sugar made from coconut for a healthier choice. To make it refined sugar-free, opt for maple syrup or honey. Both sweeteners blend well into the dip. Adjust the amount based on how sweet you want it to be. You can also add seasonal flavors to your dip. For fall, try a pumpkin spice dip. Add ½ cup of pumpkin puree and one teaspoon of pumpkin spice to the mix. This gives the dip a warm, cozy flavor perfect for gatherings. During the holidays, mix in crushed peppermint candies or a few drops of peppermint extract. This creates a refreshing twist that brings festive cheer to your snack table. Each of these variations makes the original dip even more special. Enjoy exploring new flavors! To keep your Chocolate Chip Cookie Dough Dip fresh, store it in an airtight container. Make sure the lid fits tightly. This will help prevent any odors or moisture from ruining your dip. Place it in the fridge right after serving, and don't leave it out too long. It’s best to enjoy it cold, and it helps the flavors blend well. If you want to save some dip for later, freezing is a great option. First, scoop the dip into a freezer-safe container. Leave some space at the top since it will expand as it freezes. Cover it tightly with plastic wrap, then add a lid. When you're ready to enjoy it again, let it thaw in the fridge overnight. This keeps the dip creamy and tasty. When stored correctly, the dip lasts about a week in the fridge. You might notice signs of spoilage if it gets a strange smell or changes color. If you see any mold, throw it out right away. Always trust your senses; if it doesn’t smell or look right, it’s better to be safe and not eat it. Yes, you can use other types of chocolate chips. Dark chocolate, milk chocolate, or even white chocolate work well. You can also try flavored chips like mint or peanut butter. Each type will give the dip a unique taste. Experiment to find your favorite blend. Raw flour can contain harmful bacteria. To make it safe, heat-treat the flour before using it. Microwave the flour for one minute to kill any germs. This step makes it safe to enjoy your dip without worry. Always prioritize safety when making treats! You can make this dip ahead of time. Prepare the dip, cover it well, and refrigerate it. It stays fresh for up to three days. Just remember to stir it before serving. This makes it easy to serve at parties or gatherings. For the full recipe, check out the complete instructions above. In this post, we explored key ingredients and their importance, especially the heat-treated flour. We provided clear steps for mixing and serving your dip perfectly. I shared tips for great consistency and flavor, along with fun variations to try. Proper storage methods help keep your dip fresh. Remember, cooking is fun and should be easy. Enjoy experimenting with flavors and impressing friends with what you create.

Chocolate Chip Cookie Dough Dip Tasty and Simple Treat

Get ready to indulge in the creamy goodness of Chocolate Chip Cookie Dough Dip! This tasty and simple treat will

- 2 ripe avocados, halved and pitted - 1 cup cherry tomatoes, halved - 1 cup fresh mozzarella balls (bocconcini), halved - 1/4 cup fresh basil leaves, finely chopped - 2 tablespoons balsamic glaze - 1 tablespoon extra virgin olive oil - Salt and freshly ground black pepper to taste When making Caprese stuffed avocados, fresh ingredients are key. The ripe avocados serve as a creamy base. Look for avocados that yield slightly when pressed. This shows they are ready. Cherry tomatoes add a juicy burst of flavor. Choose bright red, ripe ones for the best taste. Fresh mozzarella balls are soft and creamy. They melt in your mouth, making each bite delightful. Basil leaves give the dish a fresh, herbal note. Finely chop them for even distribution in the filling. Balsamic glaze adds sweetness and tang, enhancing the overall flavor. Olive oil brings richness and helps to combine the ingredients. - Extra balsamic glaze for drizzling - Fresh basil sprigs for decoration - Crusty bread for serving Garnishes add flair and extra flavor. A drizzle of balsamic glaze makes the dish stand out. Fresh basil sprigs can elevate the look and taste. Serve with crusty bread to make it a complete meal. Enjoy this fresh and flavorful delight! - Preheat the oven (optional): If you want your dish warm, set your oven to 350°F (175°C). If you prefer it cold, skip this step. - Prepare the filling mixture: In a medium bowl, combine halved cherry tomatoes, mozzarella balls, and finely chopped basil. Stir gently to mix. - Season the mixture: Drizzle the mixture with olive oil and balsamic glaze. Add salt and freshly ground black pepper to taste. Toss everything gently until well coated. - Hollow the avocados: Use a spoon to scoop out a little flesh from each avocado half. This creates space for the filling. Save the scooped avocado for smoothies or guacamole. - Fill the avocados: Spoon the tomato and mozzarella mixture into the hollowed avocado halves. Pack the filling well for a hearty bite. - Bake the avocados (optional): If you like, place the stuffed avocados on a baking sheet. Bake for about 10 minutes, or until the cheese melts slightly. If you prefer it cold, skip this step. - Garnish and serve: If baked, drizzle extra balsamic glaze over each stuffed avocado. Enjoy your Caprese stuffed avocados warm or cold. They work great as an appetizer or light main dish. For the complete recipe, check out the [Full Recipe]. - Choosing ripe avocados: Look for avocados that yield slightly to gentle pressure. If they feel hard, they need more time to ripen. A ripe avocado will have a dark green skin, but not be too mushy. You can ripen them at room temperature. Placing them in a paper bag with bananas can speed up the process. - Selecting fresh mozzarella: Choose mozzarella balls that are plump and firm. They should feel springy when you press them. Look for mozzarella packed in water for the best flavor. Fresh mozzarella has a creamy texture that adds richness to your dish. - Ideal occasions for serving: Caprese stuffed avocados shine at summer picnics or casual dinners. They also work well as a light lunch or starter for elegant meals. Their vibrant colors and fresh flavors impress guests. - Pairing with a beverage: Enjoy these stuffed avocados with a crisp white wine like Sauvignon Blanc. A refreshing sparkling water with lemon also pairs well. Both options enhance the dish's flavors without overpowering them. - Options for additional spices or ingredients: To boost the flavor, consider adding a pinch of red pepper flakes or garlic powder. You can also mix in chopped olives or sun-dried tomatoes for a savory twist. - How to customize the balsamic glaze: If you want a sweeter glaze, simmer balsamic vinegar with a touch of honey until it thickens. For a tangy kick, mix balsamic with a splash of lemon juice. This customization adds personal flair to your dish. For the full recipe, refer to the Caprese Stuffed Avocado recipe provided above! {{image_4}} You can switch up the cheese in this recipe. Try using feta or goat cheese for a tangy twist. These cheeses will add unique flavors to the dish. If you want to keep it lighter, consider using ricotta. Drizzling oils or sauces can change the taste too. Instead of balsamic glaze, use pesto for a fresh, herby taste. You could also try a lemon vinaigrette for a zesty kick. For a vegan option, skip the mozzarella. You can use marinated tofu or a nut-based cheese instead. These will still give you a creamy texture without dairy. If you need a gluten-free version, you’re in luck! This recipe is naturally gluten-free. Just make sure your balsamic glaze has no added gluten ingredients. Feel free to add more veggies for extra nutrients. Chopped bell peppers or zucchini will work well. They add crunch and color to your plate. You can also serve these stuffed avocados as a salad. Just cut them into smaller pieces and mix with greens. They make a great appetizer too. People love the fresh taste and lovely presentation. For the full recipe, check out the Caprese Stuffed Avocado section. How long do stuffed avocados last? They stay fresh for about 1-2 days in the fridge. After that, the avocados may brown and lose flavor. To keep them fresh, store them in an airtight container. What are the best practices for storing leftovers? Keep the stuffed avocados whole. If you cut them, the flesh will brown. You can also sprinkle lemon juice over the exposed flesh to slow down browning. Make sure to cover them tightly. Can you freeze stuffed avocados? Freezing is not ideal for stuffed avocados. When thawed, the texture of the avocado changes. The filling may also lose its taste. How do you properly freeze and thaw? If you still want to freeze them, wrap each avocado tightly in plastic wrap. Place them in a freezer-safe bag. To thaw, leave them in the fridge overnight. Just know that you might not enjoy the texture as much. Can I make Caprese stuffed avocados ahead of time? Yes, you can prepare the filling a few hours before serving. Keep it covered in the fridge. Cut the avocados just before you fill them. This helps keep them fresh and green. What can I do with extra avocado flesh? You can use the leftover avocado flesh in many ways. Try adding it to smoothies for creaminess. You can also mash it for guacamole or spread it on toast. How many calories are in Caprese stuffed avocados? Each serving of Caprese stuffed avocados has about 400 calories. This can vary based on the size of your avocados and the amount of cheese used. Are Caprese stuffed avocados healthy? Yes, they are quite healthy! Avocados provide good fats and fiber. Tomatoes add vitamins, and mozzarella gives protein. This dish is a balanced choice for a snack or meal. Can I grill the stuffed avocados instead of baking? Absolutely! Grilling adds a nice smoky flavor. Just preheat your grill, fill the avocados, and place them on the grill for about 5-7 minutes. Keep an eye on them to prevent burning. How do I make a cold version of the recipe? To make a cold version, skip the baking step. Just mix the filling, scoop it into the avocados, and serve right away. It will still taste fresh and delicious! You can find the Full Recipe for more details. Caprese stuffed avocados offer a fresh and tasty way to enjoy healthy ingredients. We discussed key ingredients, step-by-step instructions, and helpful tips. You can customize the recipe with different flavors or dietary needs. Proper storage keeps leftovers fresh for later enjoyment. Whether for a party or easy meal, these stuffed avocados shine. Explore variations to match your taste. Enjoy creating this dish your way!

Caprese Stuffed Avocado Fresh and Flavorful Delight

Are you ready to elevate your snack game? My Caprese Stuffed Avocado is a fresh and flavorful delight that combines

- Large shrimp: Use 1 pound of large shrimp. They need to be peeled and deveined. This size cooks well and has great flavor. The shrimp should be fresh or properly thawed if frozen. - Fresh garlic: You will need 3 cloves, minced. Garlic adds a strong, savory taste. It brings depth to the dish when sautéed. - Lemon juice and zest: Use the juice and zest of one lemon. The juice gives a bright tang, while the zest adds aromatic oils. Together, they enhance the shrimp's flavor. - Red pepper flakes: Add 1 teaspoon for heat. This gives a nice kick without overpowering the dish. - Fresh herbs: You can use parsley or basil for a fresh taste. They can add color and enhance the flavor. Feel free to mix and match based on your preference. - Alternative serving options: You can serve the shrimp over cooked pasta or rice. These sides soak up the delicious garlic butter sauce perfectly. For the complete recipe, check out the Full Recipe. Start by prepping the shrimp. It’s key to keep them dry. Pat them with a paper towel. This step helps the shrimp sear well. Next, season lightly with salt and black pepper. This simple seasoning brings out their natural flavor. Now, let’s cook the garlic and butter. Use a large skillet for even cooking. Melt 2 tablespoons of unsalted butter over medium heat. Keep an eye on the temperature. Too hot can burn the garlic. Once the butter bubbles, add minced garlic and optional red pepper flakes. Sauté for 1-2 minutes. You want the garlic fragrant but not browned. Next, it’s time to cook the shrimp. Add them to the skillet in a single layer. Avoid overcrowding, as this can steam them. Cook for 2-3 minutes on one side. Watch for that vibrant pink color! Flip them over and cook for another 1-2 minutes. They should be opaque and fully cooked. Finally, let’s create the garlic butter sauce. Squeeze fresh lemon juice over the shrimp and sprinkle in lemon zest. Add the remaining 2 tablespoons of butter and stir gently. This helps the butter melt and mix with the garlic and lemon. Taste the dish, then adjust with more salt or pepper if needed. Garnish with chopped fresh parsley for a pop of color. Serve the shrimp over pasta or rice, drizzling that luscious garlic butter sauce on top. For the full recipe, check out the complete guide! To know when shrimp are done, look for a vibrant pink color. They should curl into a C shape. Overcooking makes shrimp tough and rubbery. Cook them until they are opaque. This usually takes about 3 to 5 minutes. Shrimp cook fast, so watch them closely. Pairing your lemon garlic butter shrimp with side dishes makes the meal shine. I suggest serving it over cooked pasta or rice. Both soak up the tasty sauce well. You can also add a simple salad or steamed veggies. These sides balance the rich flavors and add freshness. Store leftovers in an airtight container. Refrigerate them for up to 2 days. If you want to keep them longer, freeze shrimp for up to 3 months. When reheating, do it gently. Use low heat on the stove to warm them up. This keeps the shrimp tender and tasty. For the best flavor, add a splash of fresh lemon juice while reheating. {{image_4}} You can add more flavor to your Lemon Garlic Butter Shrimp using spices and herbs. Try adding paprika for a smoky taste. Cumin offers a warm flavor that works well too. For a fresh twist, mix in some chopped basil or cilantro. These herbs give the dish a bright note. You can also play with the level of heat. If you like spice, add more red pepper flakes. Just a pinch can change the whole dish! There are two great ways to cook your shrimp: grilling and stovetop. Grilling gives the shrimp a nice char. It adds a smoky flavor that is hard to beat. Just make sure to skewer the shrimp to keep them from falling through the grill. Stovetop cooking is quicker and easier. It lets you control the heat better. Both methods work well, so choose what suits you best! When it comes to serving, be creative! You can serve the shrimp on a bed of pasta or rice for a full meal. Or, try serving it in a taco shell with fresh toppings. For a party, use small skewers. This way, guests can easily grab them. You can also serve it with crusty bread. The garlic butter sauce is perfect for dipping! You can store leftover shrimp in the fridge or freezer. If you plan to eat them soon, refrigeration works well. Place the shrimp in an airtight container. They stay fresh this way for up to three days. If you want to keep them longer, freezing is the best option. Use a freezer-safe bag or container. This way, they can last for up to three months. For the best freshness, use airtight containers. Glass containers are great because they do not absorb odors. If you prefer plastic, make sure it is BPA-free. Vacuum-sealed bags are also excellent for freezing. They help prevent freezer burn and keep the shrimp tasting fresh. Leftover shrimp can last in the fridge for three days. After that, they start to lose quality. If you freeze them, they can last for about three months. Always check for any off smells or changes in color before eating. If you notice anything unusual, it’s best to throw them away. Shrimp are fully cooked when they turn pink and opaque. You can also check if they curl into a C shape. Overcooked shrimp will curl tightly into an O shape. Cooking shrimp usually takes about 3 to 5 minutes. Keep an eye on them to avoid chewy shrimp. Yes, you can use frozen shrimp. Just ensure to thaw them first. The best way to thaw shrimp is to place them in the fridge overnight. If you need to thaw them quickly, place them in a bowl of cold water for about 15-20 minutes. Pat them dry before cooking to avoid excess moisture. If you want a dairy-free option, you can use olive oil or coconut oil. Both oils will provide a nice flavor. For a vegan choice, try a plant-based butter. These options will keep the dish flavorful while meeting your dietary needs. To make this dish low-carb, skip the pasta or rice. Serve the shrimp over zucchini noodles or cauliflower rice instead. These options keep the meal light while still being satisfying. You can also reduce the amount of butter if you want fewer calories. For the full recipe, check out the [Full Recipe]. In this article, we covered the essential ingredients for lemon garlic butter shrimp, including large shrimp, fresh garlic, and lemon juice. You learned step-by-step instructions for preparing and cooking the dish. We also explored tips for perfect shrimp texture, flavor enhancements, and storage practices. Remember, cooking is all about experimenting. Don’t be afraid to add your own twist. Whether you spice it up or try new methods, enjoy the process. Your kitchen can become a place of fun and flavor!

Lemon Garlic Butter Shrimp Flavorful and Easy Recipe

If you crave a quick and tasty dish, Lemon Garlic Butter Shrimp is a winner. This simple recipe packs a

To make the Ultimate Greek Chicken Marinade, you will need several key ingredients. Each one plays a role in creating that vibrant, tasty flavor. - Chicken: - 4 boneless, skinless chicken breasts - Marinade Components: - 1/4 cup high-quality olive oil - 1/4 cup plain Greek yogurt - 3 cloves of garlic, finely minced - Juice of 2 fresh lemons - Zest of 1 lemon - 2 teaspoons dried oregano - 1 teaspoon dried thyme - 1 teaspoon sea salt - 1/2 teaspoon freshly ground black pepper - 1 tablespoon honey - 1 tablespoon Dijon mustard - Optional Garnishes: - Fresh parsley, finely chopped These ingredients blend together to create a marinade that is rich and full of flavor. The olive oil adds smoothness, while the yogurt gives a creamy texture. Fresh garlic and lemon juice bring a zesty punch. The dried herbs add depth, and honey balances the tanginess with sweetness. You can customize the garnish with fresh parsley for a bright touch. For the full recipe, check out the Ultimate Greek Chicken Marinade. To make the marinade, you need a few simple steps. First, gather your ingredients. You will need: - 1/4 cup high-quality olive oil - 1/4 cup plain Greek yogurt - 3 cloves of garlic, finely minced - Juice of 2 fresh lemons - Zest of 1 lemon - 2 teaspoons dried oregano - 1 teaspoon dried thyme - 1 teaspoon sea salt - 1/2 teaspoon freshly ground black pepper - 1 tablespoon honey - 1 tablespoon Dijon mustard In a medium mixing bowl, combine all these ingredients. Whisk them together until they form a smooth mixture. This delicious marinade will make your chicken extra tasty. Next, it's time to marinate the chicken. Take 4 boneless, skinless chicken breasts and place them in a large resealable plastic bag or a shallow dish. Pour the marinade over the chicken. Ensure that each piece gets fully coated. This step is key for flavor. Seal the bag tightly or cover the dish with plastic wrap. Place the chicken in the refrigerator. I recommend letting it marinate for at least 2 hours. If you have time, let it sit overnight. This longer marinating time makes the chicken even more flavorful. When you’re ready to cook, preheat your grill or grill pan to medium-high heat. Make sure it is hot before you add the chicken. This helps get that nice char. Remove the chicken from the marinade and let any excess drip off. Discard the leftover marinade for safety. Place the chicken on the grill and cook for about 6-7 minutes on each side. You want the internal temperature to reach 165°F (75°C). - Resting the Chicken After grilling, take the chicken off the grill. Let it rest for 5 minutes. This resting time is important. It helps the juices go back into the meat. Your chicken will be juicy and tender. Before serving, sprinkle some fresh chopped parsley on top for a pop of color and extra flavor. Enjoy this ultimate Greek chicken with a side of Greek salad or warm pita bread to make it a meal. Don't forget to check out the Full Recipe for more details! To get the best flavor from your chicken, use a few simple tips. First, always use fresh ingredients. Fresh garlic and lemons give a bright taste. Next, make sure your chicken is dry before marinating. This helps the marinade stick better. Use a resealable bag or a shallow dish for marinating. This way, the chicken stays covered in the marinade. When grilling, always preheat your grill. A hot grill gives a nice sear and keeps the juices inside. Cook each side of the chicken for about 6-7 minutes. Check the internal temperature; it should reach 165°F (75°C). Let the chicken rest after grilling. This allows the juices to settle, making the chicken juicy and tender. Want to boost the flavors even more? Consider adding fresh herbs to your marinade. Fresh dill or mint can brighten up the dish. You can also sprinkle feta cheese on the chicken after grilling for a salty kick. For the best taste, marinate your chicken for at least 2 hours. If you have time, overnight is even better. The longer it marinates, the more the flavors soak in. Just remember not to marinate for too long, as acidity from the lemon can break down the chicken. For the complete guide on making this delightful dish, check out the Full Recipe. {{image_4}} You can switch herbs in this marinade. Fresh herbs work well. Try using fresh oregano or thyme. They add bright flavors. You can also use dill for a unique twist. Just chop them finely and mix them in. Adding spices can boost the flavor. Consider adding smoked paprika for a hint of smoke. A pinch of cayenne pepper gives it a nice kick. If you like it sweet, try some ground cinnamon. It pairs well with chicken. Grilling is great, but you have options. You can bake the chicken for a juicy result. Set your oven to 375°F (190°C) and cook for about 25-30 minutes. Another method is pan-searing. This gives a nice crust. Just use a little olive oil in a hot pan. - Serving Suggestions: Serve the chicken with a refreshing Greek salad. Add some tzatziki for a creamy dip. Warm pita bread is perfect on the side. You can also pair it with roasted veggies for a full meal. For more ideas, check out the Full Recipe. After grilling, let your chicken cool down first. Place any leftovers in an airtight container. This keeps the chicken fresh and moist. You can store it in the fridge for up to three days. If you want to keep it longer, freezing is a great option. To freeze leftover chicken, wrap each piece tightly in plastic wrap. Then, place it in a freezer-safe bag or container. Be sure to label the bag with the date. Frozen chicken stays good for about three months. When ready to eat, thaw it in the fridge overnight. To reheat, you can use an oven, microwave, or stovetop. If using an oven, set it to 350°F (175°C). Place the chicken on a baking sheet and cover it with foil. Heat for about 15-20 minutes. For the microwave, place the chicken on a microwave-safe plate. Heat in 30-second bursts until warmed through. Remember, don’t overheat, or it may dry out. You can keep the marinade in the fridge for up to one week. Store it in a sealed jar. If you want to use it later, consider freezing it in ice cube trays. This way, you can use small amounts as needed. Always remember to discard any leftover marinade that touched raw chicken for food safety. Enjoy your flavorful Greek chicken with confidence! Yes, you can use frozen chicken. Just remember to thaw it first. Thawing ensures the marinade soaks in well. It’s best to thaw chicken in the fridge overnight. This keeps it safe and allows for even marinating. You can marinate chicken for 2 to 24 hours. The longer it sits, the more flavor it gains. However, do not exceed 24 hours. Too much time can change the chicken's texture. Aim for at least 4 hours for great results. You can serve Greek chicken with many sides. A fresh Greek salad pairs nicely. Add warm pita bread for an extra touch. Roasted vegetables or rice also work well. These sides balance the flavors and complete the meal. - Is this recipe suitable for meal prep? Yes, this recipe is great for meal prep. You can marinate the chicken ahead of time. Grill it and store in the fridge for 3 to 4 days. It reheats well and keeps its flavor. This makes it perfect for quick lunches or dinners. For the complete process, check out the Full Recipe. This blog post covered how to prepare and grill Greek chicken using simple ingredients. We discussed marinating tips, grilling steps, and ways to enhance the flavor. Variations allow you to customize the dish, while proper storage ensures freshness. In conclusion, you can enjoy delicious Greek chicken anytime. With these steps, you’ll have a great meal ready in no time. Embrace the many flavors and get creative in the kitchen! Your taste buds will thank you.

Ultimate Greek Chicken Marinade Tasty Flavor Boost

Are you ready to transform your chicken dishes? The Ultimate Greek Chicken Marinade is here to give your meals a

To make Korean gochujang noodles, you need simple yet key items. Here’s what you’ll need: - 200g noodles (choose from udon, soba, or rice noodles) - 2 tablespoons gochujang (Korean chili paste) - 1 tablespoon sesame oil - 1 tablespoon soy sauce - 1 tablespoon honey or maple syrup - 2 cloves garlic, minced - 1 teaspoon fresh ginger, grated - 1 cup bell peppers, thinly sliced (a vibrant mix of red, yellow, and green) - 1 cup baby spinach leaves - 2 green onions, sliced (green and white parts) - 1 tablespoon sesame seeds, toasted - Optional: thinly sliced cucumber and fresh cilantro for garnish These ingredients create a tasty blend of flavors. The gochujang gives a spicy kick, while honey adds a touch of sweetness. You can swap some ingredients based on what you have. Here are a few ideas: - Noodles: Use any noodle you like. Rice noodles are gluten-free. - Gochujang: If you can’t find gochujang, try sriracha or another chili paste. It won't taste the same but will still be spicy. - Vegetables: Feel free to use other veggies like carrots or snap peas. - Sweetener: If you don’t have honey, agave syrup or sugar works too. These swaps keep the dish fun and fresh. When choosing products, quality matters. Here are some brands I trust: - Gochujang: Look for brands like Chung Jung One or Sunchang. They offer rich flavor and good heat. - Noodles: For udon, try Hakubaku. For soba, I like the brand King Soba. If you want rice noodles, check out Thai Kitchen. These brands provide flavors that shine in your dish. For the full recipe, refer to the section above. To cook the noodles, fill a large pot with water. Add some salt for flavor. Bring the water to a vigorous boil. Once it boils, add the noodles of your choice. Cook them according to the package instructions. You want them al dente, so don’t overcook. When they are ready, drain the noodles in a colander. Rinse them under cold water. This stops the cooking process and keeps them from getting mushy. In a medium bowl, mix the gochujang, sesame oil, soy sauce, and honey (or maple syrup). Whisk these together until smooth. Next, add the minced garlic and grated ginger. Stir until everything is combined well. This sauce gives your noodles a rich, spicy flavor. Set the sauce aside for later. Grab a large skillet or wok and heat it over medium-high heat. Add a splash of vegetable oil to the pan. When the oil is hot, toss in the thinly sliced bell peppers. Sauté them for 3-4 minutes. You want them to be soft but still crunchy. After that, add the baby spinach. Stir for about 1 minute until it wilts. This step adds color and freshness to your dish. Now, you are ready to combine everything! For the full recipe, refer back to the earlier sections. Stir-frying noodles is quick and fun. Here are some steps to follow: - Use High Heat: Keep your skillet or wok hot. This helps the noodles cook fast. - Don't Overcrowd: Stir-fry in small batches. This way, everything cooks evenly. - Prep Ahead: Have all your ingredients ready before you start cooking. This keeps the flow smooth. - Use Oil Wisely: Add just enough oil to prevent sticking. Too much can make the dish greasy. You can make your gochujang noodles milder or spicier based on your taste. Here are some ideas: - Less Gochujang: Start with one tablespoon instead of two. You can add more later if needed. - Add Sweetness: Mix in honey or maple syrup to balance the heat. - Dairy Help: Serve with a dollop of sour cream or yogurt. This cools down the spice. - Use Vegetables: Add more veggies like cucumbers or bell peppers. They help tone down the heat. You can prep your gochujang noodles in advance. Here’s how: - Cook Noodles: Follow the cooking steps but stop before adding sauce. Rinse and store them in the fridge. - Make Sauce: Prepare the gochujang sauce and keep it in a sealed jar. It lasts about a week in the fridge. - Store Veggies: Cut your bell peppers and green onions. Store them in airtight bags. - Combine Later: When ready to eat, reheat the noodles and veggies. Add the sauce for a quick meal. For more details, check the Full Recipe. {{image_4}} If you want a vegetarian twist, you can swap out meat for veggies. Use mushrooms, zucchini, or carrots to add texture and flavor. You can also add tofu, which absorbs the sauce well. Firm tofu works best, as it holds its shape. Just cube it and sauté until golden. This makes a hearty meal without any meat. Adding protein can make these noodles more filling. If you like tofu, use the method above. For chicken, slice it thin and sauté until it’s cooked through. Beef can also be a great choice. Use thin strips of flank steak and cook it until brown. Both meats take on the gochujang flavor well. Just remember to adjust the cooking time based on the protein you choose. If you're gluten-free, don’t worry! You can use rice noodles or gluten-free pasta. Rice noodles are light and soak up the sauce nicely. Just cook them based on the package directions. If you prefer, look for gluten-free brands of udon or soba noodles, too. This way, everyone can enjoy these tasty gochujang noodles. For the full recipe, check out the ingredients list above! To keep your Korean gochujang noodles fresh, store them in an airtight container. Make sure they cool down first. This helps prevent sogginess. You can keep them in the fridge for up to three days. If you plan to eat them later, it’s best to store the noodles and sauce separately. This way, the noodles won’t absorb too much sauce and become mushy. When it’s time to enjoy your leftovers, reheating is key. You can use the microwave or a pan. If you choose the microwave, heat in short bursts. Stir between each burst to ensure even heating. If you use a pan, add a splash of water or broth to help steam the noodles. This keeps them moist and flavorful. Heat until warm but avoid overcooking. You can freeze the noodles and sauce if you want to save them for later. Place the noodles in a freezer-safe bag or container. Make sure to remove as much air as possible to prevent freezer burn. For the sauce, store it in a separate container. When you’re ready to eat, thaw them in the fridge overnight. Reheat them as described above for a quick, tasty meal. Gochujang is a thick, red chili paste from Korea. It has a unique blend of heat, sweetness, and umami. You use it in many dishes, like stews, marinades, and, of course, noodles. It adds depth and flavor to meals. The paste is made from fermented soybeans, glutinous rice, and salt. This mix gives it a rich taste that enhances any dish. Yes, you can! If you want a noodle-free meal, use vegetables instead. Try zucchini noodles, cauliflower rice, or even sautéed mushrooms. These substitutes keep the dish tasty and light. Just follow the same steps for sauce and veggies. It’s a fun twist for those who want to skip the carbs. To tone down the heat, adjust the gochujang amount. Use only one tablespoon instead of two. You can also add more honey or maple syrup. This sweet balance will cut the spice. Incorporating more vegetables helps too. The added bell peppers and spinach can help cool the dish. Korean Gochujang noodles offer delicious flavors with simple steps. You learned about key ingredients, cooking methods, and flavor tips. We discussed veggie options, protein choices, and safe storage. Making these noodles is easy and fun. Remember, the sauce can adjust spice, making it great for everyone. Enjoy your tasty creation. With practice, you'll master this dish and impress your friends!

Korean Gochujang Noodles Flavorful and Easy Recipe

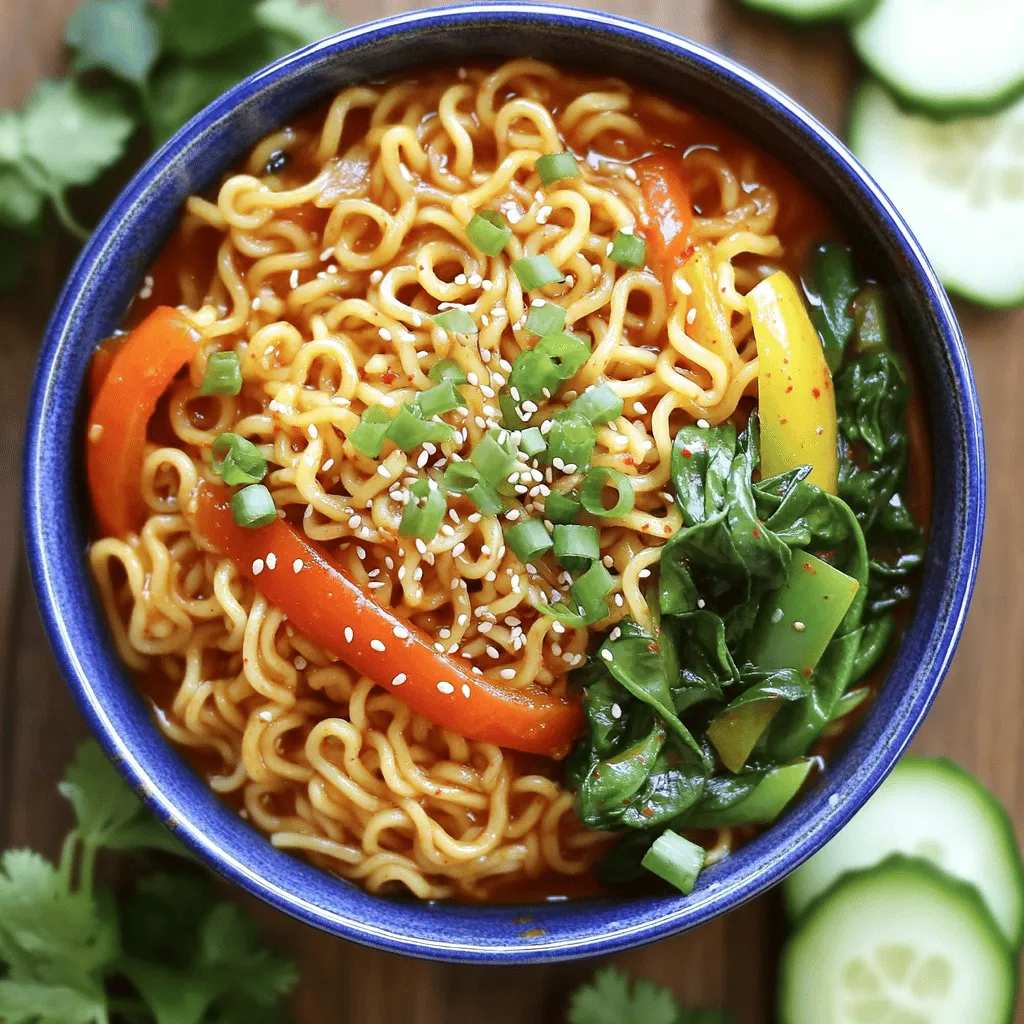
If you crave a dish packed with flavor but easy enough for any home cook, Korean Gochujang Noodles are your

To make Sausage Alfredo Pasta, gather these key ingredients: - 12 oz fettuccine pasta - 1 lb Italian sausage (mild or spicy, casing removed) - 3 tablespoons olive oil - 3 cloves garlic, minced - 1 cup heavy cream - 1 cup grated Parmesan cheese - 1/2 teaspoon black pepper - 1/4 teaspoon ground nutmeg - Salt, to taste - Fresh parsley, chopped (for garnish) These ingredients create a rich and creamy dish full of flavor. The fettuccine pasta soaks up the sauce well, making each bite delightful. The Italian sausage adds a hearty touch. You can pick mild sausage for a gentle flavor or spicy for a kick. You can swap out some ingredients if you need to: - For fettuccine, use penne or spaghetti. - Swap heavy cream with half-and-half for a lighter sauce. - Use any cheese like Pecorino Romano instead of Parmesan. - Ground turkey or chicken can replace the sausage for a lighter option. These swaps can still give you a tasty meal without losing the essence of the dish. To cook this pasta, you need a few basic tools: - A large pot for boiling the pasta. - A colander to drain the pasta. - A large skillet for the sauce. - A spatula for breaking up the sausage and mixing ingredients. - Measuring cups and spoons for accuracy. Having these tools ready will help you cook efficiently. You'll enjoy the process and the wonderful aroma that fills your kitchen. For the complete recipe, check out the Full Recipe section. To start, fill a large pot with water. Add salt to the water; this makes the pasta tasty. Bring the water to a rolling boil. Add the fettuccine pasta and cook it as per the package instructions. Stir it occasionally. Cook it until it is al dente, which usually takes about 8 to 10 minutes. Once done, save one cup of the pasta water. Drain the pasta in a colander and set it aside. Next, grab a large skillet and set it over medium heat. Pour in three tablespoons of olive oil. When the oil starts to shimmer, add one pound of Italian sausage to the skillet. Use a spatula to break it up as it cooks. Cook it for about 5 to 7 minutes. The sausage should be browned and no longer pink. Now, add three cloves of minced garlic to the sausage. Sauté for about one minute, stirring all the time. The garlic should smell nice but not brown. Now, lower the heat to a gentle simmer. Pour in one cup of heavy cream and mix it well with the sausage. Gradually add one cup of grated Parmesan cheese while stirring. Keep stirring until the sauce is creamy and well combined. Season the sauce with half a teaspoon of black pepper, a quarter teaspoon of ground nutmeg, and salt to taste. If your sauce is too thick, add small amounts of the reserved pasta water until you reach a creamy consistency. Gently add the drained fettuccine to the skillet. Toss it in the creamy sauce until fully coated. Let it heat on low for 2 to 3 minutes, stirring gently. When ready, remove it from the heat and sprinkle chopped parsley on top for color. For the full recipe, check the section above! To cook perfect pasta, always use plenty of water. A large pot helps keep the pasta from sticking. Add salt to the boiling water before adding the fettuccine. This adds flavor to the pasta. Stir the pasta a few times while it cooks. Check for doneness a minute before the package time. You want it al dente, which means firm but not hard. Remember to reserve a cup of pasta water before draining. This water can help adjust your sauce later. To make the creamiest sauce, use heavy cream. It gives a rich texture that blends well with the cheese. Add the cream to the sausage only after it has browned. This step adds depth to the flavor. Gradually stir in the Parmesan cheese. This prevents clumps and ensures a smooth sauce. If the sauce is too thick, use the reserved pasta water. Add a little at a time until you reach the desired consistency. Serve your Sausage Alfredo Pasta in deep bowls for a nice presentation. Garnish with extra Parmesan cheese and chopped parsley. This adds color and freshness. Pair it with a simple green salad or garlic bread. A crisp white wine goes well with this dish too. If you want a bit of heat, sprinkle red pepper flakes on top. Enjoy your meal with family or friends for a cozy night in. For the full recipe, check the link above. {{image_4}} You can make Sausage Alfredo Pasta even better by adding vegetables. Broccoli, spinach, or bell peppers are great choices. Cook the vegetables in the same skillet after the sausage. This method keeps the flavors rich and fresh. Aim for about 2 cups of your favorite veggies. They add color and nutrition to the dish. For a twist, try sun-dried tomatoes for a burst of flavor. If you want to switch up the protein, use chicken or shrimp. For chicken, use about 1 pound of boneless pieces. Cook it until golden brown before adding garlic. If you like shrimp, add 1 pound of peeled shrimp and cook until pink. Both options blend well with the creamy sauce. They bring a different taste but keep the dish rich and filling. To make this dish vegetarian, swap the sausage for plant-based sausage. Use the same amount for flavor and texture. For a vegan version, replace heavy cream with coconut cream. Nutritional yeast can replace Parmesan cheese. This gives a cheesy flavor without dairy. Use your favorite veggies to boost the meal. This way, you keep the creamy goodness without any animal products. To keep your Sausage Alfredo Pasta fresh, store leftovers in an airtight container. Wait until the pasta cools down to room temperature before sealing it. This helps prevent steam buildup and keeps the pasta from getting soggy. Place the container in the fridge. The pasta will stay good for about three days. When you’re ready to enjoy leftovers, gently reheat the pasta. The best way is to use a skillet. Add a splash of water or cream to the pan to keep it moist. Heat over low to medium heat, stirring often. This helps the sauce stay creamy. You can also microwave it. Just cover the bowl with a lid or microwave-safe wrap to trap steam. Heat in short bursts, stirring in between to avoid hot spots. You can freeze Sausage Alfredo Pasta if you want to save some for later. First, let it cool completely. Place it in a freezer-safe container or bag. Make sure to remove as much air as possible to prevent freezer burn. This dish can stay frozen for about two months. When you're ready to eat, thaw it in the fridge overnight and reheat it as mentioned above. Keep in mind, the texture may change slightly, but it will still taste great! For the full recipe and more cooking tips, check out the Full Recipe. Yes, you can. Any pasta shape works well. I recommend penne or rigatoni for a fun twist. They hold the sauce nicely. Just make sure to cook the pasta according to the package. Sausage Alfredo Pasta can be rich in calories. It has heavy cream and sausage, which add fat. However, you can make it healthier. Use lean sausage and substitute cream with Greek yogurt. To make this dish gluten-free, choose gluten-free pasta. Many brands offer good options. Check the label to ensure it's certified gluten-free. The rest of the recipe stays the same. You can serve this dish with a fresh salad. A Caesar salad complements it well. Garlic bread is also a great side. It adds crunch and flavor to your meal. To boost the flavor, try adding herbs. Fresh basil or thyme works well. A pinch of red pepper flakes adds heat. You can also use smoked paprika for a unique twist. Sausage Alfredo Pasta is simple and tasty. You learned about key ingredients, tools, and step-by-step cooking. I shared tips for the best pasta and creamy sauce. You can even add veggies or alternative proteins. Remember to store leftovers well and reheat carefully. This dish offers endless possibilities, so make it your own. Enjoy your cooking and impress your friends with this delicious meal!

Sausage Alfredo Pasta Simple Weeknight Meal Idea

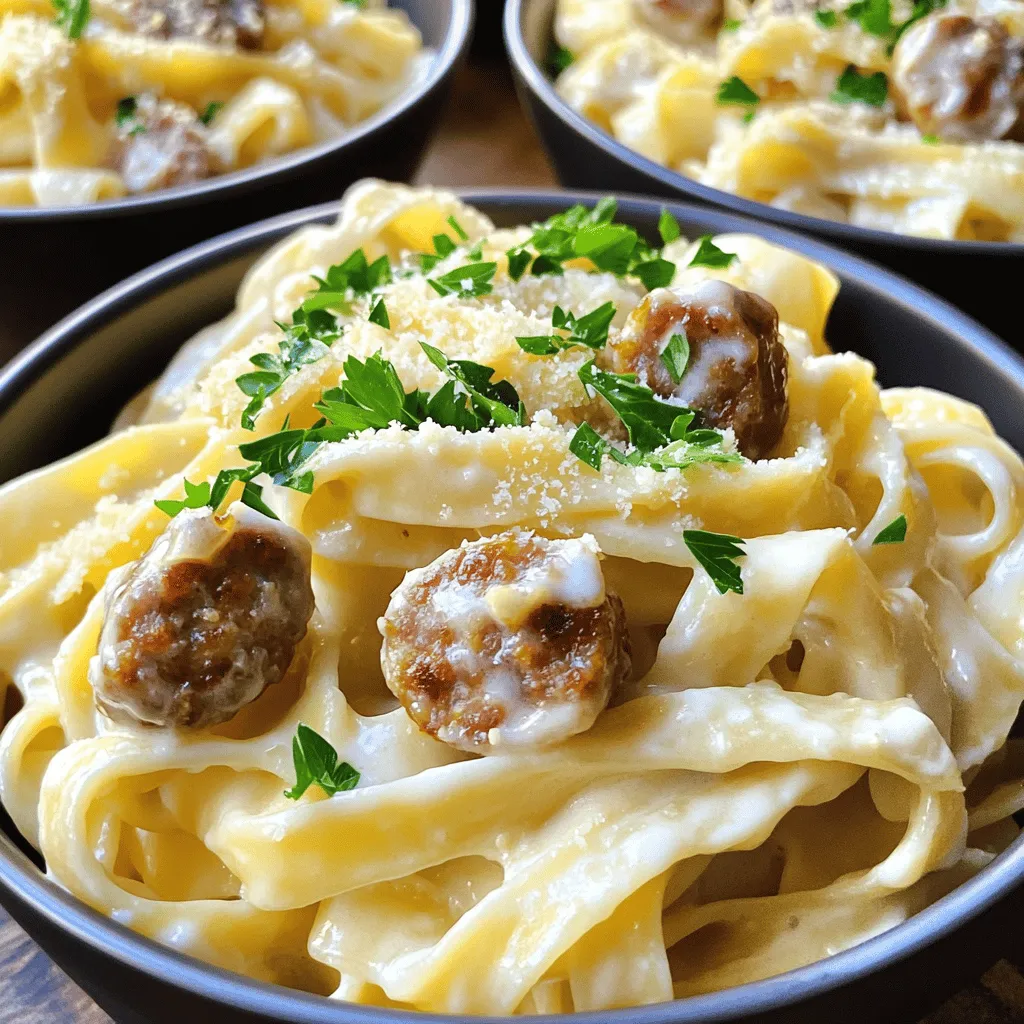
Craving a delicious meal but short on time? This Sausage Alfredo Pasta is the answer! With just a few simple

- 12 oz bowtie pasta - 1 lb ground beef - 1 cup heavy cream The main ingredients give this dish its heartiness. The bowtie pasta has a fun shape that holds sauce well. Ground beef adds rich flavor and protein. Heavy cream creates that creamy, dreamy sauce that makes this dish so enjoyable. - ½ teaspoon crushed red pepper flakes - Fresh parsley, chopped You can add crushed red pepper flakes for a little heat. Fresh parsley adds a pop of color and freshness. Both options help you customize the dish to your taste. - 1 teaspoon Italian seasoning - ½ cup grated Parmesan cheese Italian seasoning brings a warm flavor to the dish. Grated Parmesan cheese adds a salty, nutty taste. Both enhance the overall flavor and make your creamy beef bowtie pasta even more delicious. You can find the full recipe [here](#). - Bring a large pot of salted water to a boil. - Add the bowtie pasta and cook until al dente, about 8-10 minutes. Cooking pasta is simple but vital. Salted water enhances flavor. Al dente means the pasta will be firm but not hard. This texture helps it hold up in the sauce. - In a skillet over medium heat, brown the ground beef. - Break it apart as it cooks for 5-7 minutes. - Drain excess fat from the skillet. Browning the beef adds rich flavor. Make sure to drain any fat to keep the sauce light. Nobody likes a greasy dish! - Add diced onion and minced garlic to the beef. - Sauté for 2-3 minutes until the onion turns clear. - Mix in sliced mushrooms and cook for 3-4 minutes. The onion and garlic create a tasty base. Mushrooms add earthiness. This mix builds a great flavor for your sauce. - Pour in beef broth and Worcestershire sauce. - Stir in heavy cream and seasonings. The beef broth adds depth, while Worcestershire sauce gives a savory kick. Heavy cream makes the sauce smooth and rich. - Mix the cooked pasta with the beef and sauce in the skillet. - Season with salt and black pepper to taste. - Toss until the pasta is well-coated. This step is key. You want every bite to be creamy and flavorful. Adjust seasoning to match your taste. Serve your creamy beef bowtie pasta hot, and enjoy! For the full recipe, check the earlier section. - How to prevent sticky pasta: Use plenty of salted water when boiling the pasta. Stir the pasta gently right after adding it to the pot. This helps keep it from sticking together. Remember to drain it while it's still slightly firm, or al dente. This lets the sauce stick better. - Avoiding a greasy sauce: When you cook the ground beef, drain any excess fat from the skillet. This step is key for a smooth sauce. If your sauce gets too thick, add a bit of reserved pasta water. It helps create a creamy texture without adding grease. - Best accompaniments: Serve creamy beef bowtie pasta with a fresh side salad. A simple garden salad with a light vinaigrette works well. Garlic bread also pairs nicely for a hearty meal. - Presentation ideas: For a nice touch, serve the pasta in deep bowls. Drizzle some extra cream on top for elegance. A sprinkle of freshly cracked black pepper adds a pop of flavor and color. - Adding herbs and spices: Fresh herbs like basil or thyme can boost flavor. You can also try adding a bay leaf while the sauce simmers for extra depth. A pinch of smoked paprika adds a nice kick, too. - Customizing heat levels: If you like spice, add more crushed red pepper flakes. For less heat, skip them or use just a pinch. You can also add a dash of hot sauce for a different flavor twist. {{image_4}} You can switch ground beef for ground turkey or chicken. These lean meats work well with the creamy sauce. They still give you great flavor but cut down on fat. If you want a plant-based option, try using plant-based ground beef. It offers a similar taste and texture while being meat-free. Both options help you create a delicious dish that fits your diet. Making this dish gluten-free is easy. Simply use gluten-free bowtie pasta. Many brands offer great options that taste just as good. For those needing dairy-free alternatives, try using coconut cream instead of heavy cream. You can also skip the cheese or use dairy-free cheese. These swaps allow you to enjoy creamy beef bowtie pasta without compromise. You can get creative with sauces in this recipe. Swap the beef broth for chicken broth for a lighter taste. You can also mix in different sauces, like pesto or Alfredo, for a unique twist. Adding seasonal vegetables can enhance the dish too. Spinach, bell peppers, or zucchini can add color and nutrition. These choices let you personalize the creamy beef bowtie pasta to your liking. Check the [Full Recipe](#) for more ideas! To store leftovers of creamy beef bowtie pasta, let it cool first. Place it in an airtight container. This will keep it fresh. You can store it in the fridge for up to three days. When you're ready to enjoy it again, reheat it gently. Use a microwave or a skillet. Add a splash of beef broth or cream to keep it creamy. You can freeze creamy beef bowtie pasta for later. It’s best to freeze it after cooking. Let it cool completely before packing. Use a freezer-safe container or a heavy-duty freezer bag. Remove as much air as you can. This helps prevent freezer burn. It will last for about three months in the freezer. When ready to eat, let it thaw in the fridge overnight. Then reheat it as needed. If you want more details, check the Full Recipe. Creamy beef bowtie pasta lasts about 3 to 5 days in the fridge. To store it, let it cool down first. Then, place it in an airtight container. This keeps it fresh and tasty for your next meal. Yes, you can make creamy beef bowtie pasta ahead of time. To prep, cook the pasta and beef as directed. Let everything cool and then store it in the fridge. When you're ready to eat, just reheat it on low heat. You may need to add a splash of beef broth or cream to keep it creamy. You can serve creamy beef bowtie pasta with a side salad for some crunch. A simple green salad works well. Garlic bread is another tasty choice. It soaks up the creamy sauce and adds flavor. You could also try steamed vegetables for extra nutrition. If you don’t have bowtie pasta, don’t worry! You can use other shapes. Penne, fusilli, or farfalle are great options. Just cook them the same way as bowtie pasta. Each shape gives a different twist to the dish! For the full recipe, check out the earlier sections. In this post, I covered how to make creamy beef bowtie pasta. We explored the key ingredients, step-by-step instructions, and helpful tips. You learned about storage options and variations to suit your taste. This dish is versatile, quick, and delicious. You can adjust flavors and ingredients to fit any diet. I hope you feel equipped to create your own creamy beef bowtie pasta at home. Enjoy your cooking adventure!

Creamy Beef Bowtie Pasta Flavorful and Easy Recipe

Looking for a quick dinner that packs a punch of flavor? This Creamy Beef Bowtie Pasta recipe is just what

Older posts
Newer posts
← Previous Page1 … Page30 Page31 Page32 … Page43 Next →

dsad

© 2025 tastyhatch • Built with GeneratePress

Our Policies

  • Copyright Policy
  • Cookie Policy
  • GDPR Policy
  • Privacy Policy
  • Disclaimer
  • Terms Of Use

More Information

  • Home
  • About
  • Contact
  • Appetizers
  • Dessert
  • Dinner
  • Drinks
©2025, tastyhatch About Back To Top