Skip to content
DisclaimerTerms Of UseGDPR PolicyCookie Policy

tastyhatch

  • Home
  • Drinks
  • Appetizers
  • Dinner
  • Dessert
  • About
  • Contact
  • Privacy Policy
DisclaimerTerms Of UseGDPR PolicyCookie Policy

Olivia

- 3 ripe peaches, diced - 1 cup cream cheese, softened - 1/2 cup plain Greek yogurt - 1/3 cup powdered sugar - 1 teaspoon vanilla extract - 1 cup cinnamon granola - 1 teaspoon ground cinnamon - 1/2 cup mini marshmallows - Fresh mint leaves for garnish The ingredients for this Peach Cobbler Cheesecake Salad are simple, fresh, and easy to find. The star of the show is the peaches. Ripe peaches add a sweet and juicy flavor. You want to choose peaches that are soft and fragrant. Cream cheese and Greek yogurt make the base creamy. They mix well together and give a nice tang. The powdered sugar adds sweetness. A splash of vanilla extract enhances the flavors. Cinnamon granola adds crunch. It brings a warm spice that pairs well with the peaches. Ground cinnamon adds even more warmth. Mini marshmallows add a fun, fluffy texture. Finally, fresh mint leaves are a lovely garnish. They give a pop of color and a hint of freshness. This salad is not only tasty but also quite nutritious. Each serving has about: - Calories: 250 - Total Fat: 10g - Sugar: 20g The calories come mainly from the cream cheese and granola. The sugar is from the peaches and powdered sugar. This dish offers a balance of sweetness and creaminess, making it a delightful treat. If you can't find cream cheese, try using mascarpone cheese. It has a similar texture and flavor. For Greek yogurt, you can use regular yogurt. Just make sure it's thick enough to hold up in the salad. If you want a dairy-free option, use vegan cream cheese and coconut yogurt. For the granola, any crunchy cereal will work. Just be sure it has a bit of sweetness and spice. You can mix and match these ingredients to create your perfect Peach Cobbler Cheesecake Salad! For the full recipe, check out the details above. 1. Mixing the cream cheese and yogurt Start by taking your medium mixing bowl. Add the softened cream cheese, plain Greek yogurt, powdered sugar, and vanilla extract. Use an electric mixer on medium speed. Beat until the mixture is smooth and creamy. Make sure there are no lumps. 2. Folding in the peaches and marshmallows Once your cream cheese mixture is smooth, gently fold in the diced peaches and mini marshmallows. Use a rubber spatula for this step. Be careful not to break down the peaches. You want them to stay chunky for great texture. 1. Instructions for layering the ingredients Grab your serving bowls or a large trifle dish. Start by spooning in a layer of the peach cheesecake mixture. Next, add a layer of cinnamon granola. Repeat this process until you use all the ingredients. End with a layer of the peach cheesecake mixture on top. 2. Tips for creating a visually appealing presentation To make your salad look stunning, use clear glass dishes. This way, guests can see the beautiful layers. Before serving, sprinkle extra cinnamon granola on top. Add fresh peach slices for a colorful touch. 1. Recommended chill time Cover your salad with plastic wrap. Chill in the refrigerator for at least 30 minutes. This allows the flavors to blend and deepen. 2. Final garnishing touches When you're ready to serve, add fresh mint leaves on top. This adds color and a nice aroma. Now your Peach Cobbler Cheesecake Salad is ready to impress! For the full recipe, check out the complete instructions above. Enjoy your refreshing summer delight! To achieve a creamy texture, always start with room temperature cream cheese. This helps the cream cheese blend smoothly with the yogurt. If it's too cold, you'll end up with lumps. Mix it well until it’s light and fluffy. To prevent peach breakdown during mixing, be gentle. After you combine the cream cheese and yogurt, fold in the diced peaches with a rubber spatula. This keeps them intact and gives your salad a nice texture. Pair this salad with a refreshing iced tea or lemonade. The cool drinks balance the sweet and creamy flavors. You can also serve it with a scoop of vanilla ice cream for a fun twist! This dish shines at summer gatherings. It’s perfect for picnics, barbecues, or family reunions. The vibrant colors and flavors will impress your guests. For capturing the dish, use natural light. A bright kitchen or outdoor setting works best. Try to shoot from above to show off the layers. Consider making a step-by-step video tutorial. This can guide others on how to create this delightful salad. It makes the cooking process fun and easy for everyone. {{image_4}} You can swap peaches for many other fruits. Try ripe strawberries, juicy blueberries, or sweet cherries. Each fruit brings a unique flavor to your salad. Seasonal fruits like blackberries or raspberries can also shine in this dish. Enjoying different fruits makes this salad fun year-round. You can even mix fruits for a colorful twist! Let your creativity flow with toppings and mix-ins. You might add chopped nuts for crunch. Walnuts or almonds work great! For a sweet touch, drizzle honey over the top. You can also play with flavors by using different spices. A pinch of nutmeg or a splash of almond extract can enhance the taste. These little changes can make a big difference. If you have dietary needs, don’t worry! You can easily adapt this recipe. Use dairy-free cream cheese and yogurt for a dairy-free salad. Coconut yogurt adds a tasty twist. For a gluten-free option, choose gluten-free granola. These changes keep the flavor and texture without missing out. Your guests will love it just as much! To keep your Peach Cobbler Cheesecake Salad fresh, store it in the refrigerator. Use an airtight container to prevent it from absorbing other odors. Place the salad in the fridge as soon as you finish serving. This keeps the flavors bright and tasty. If you want to freeze it, note that creamy textures may change. I recommend not freezing this salad due to its ingredients. Consume your salad within three days for the best flavor. After that, the peaches may start to break down. Look for signs of spoilage, such as a sour smell or a change in texture. If the salad looks watery or slimy, it’s best to toss it. For leftovers, enjoy them cold straight from the fridge. If you want to soften the texture, let it sit at room temperature for a few minutes. Avoid reheating in the microwave, as it can make the salad watery and ruin the creamy feel. Keep it simple and delicious by serving it cold! Peach Cobbler Cheesecake Salad is a sweet and creamy dish. It combines fresh peaches, cream cheese, and yogurt. The flavors blend well with cinnamon and granola. This salad tastes like a peach cobbler but is lighter. You get a mix of creamy and crunchy textures in every bite. The mini marshmallows add extra sweetness and fun. It's a perfect treat for summer days. Yes, you can make this salad ahead of time. Preparing it a few hours before serving works best. Just cover the dish and chill it in the fridge. This allows all the flavors to mix together. If you want to prepare it a day ahead, that’s fine too. Just keep it tightly covered to maintain freshness. Be sure to add the mint leaves right before serving for a fresh look. To adjust sweetness, you can change the amount of powdered sugar. If you like it sweeter, add more sugar. If you want it less sweet, use less. You can also swap the marshmallows for a healthier option. Try adding fresh fruit instead. Just taste as you go to find the right balance for you. Yes, this recipe is great for potlucks. It’s easy to share and looks beautiful. You can make it in a large dish or individual cups. Just remember to keep it chilled before serving. People love its unique flavor, and it’s sure to impress. Plus, it’s simple to prepare, making it a stress-free option for gatherings. This blog post outlines how to make a delicious Peach Cobbler Cheesecake Salad. You learned about key ingredients and possible swaps. I provided step-by-step instructions for easy preparation and serving tips. The variations section helps you customize the recipe to your taste. Lastly, I shared storage tips to keep your salad fresh. This dish is perfect for gatherings or simple family meals. Enjoy making it your own!

Peach Cobbler Cheesecake Salad Refreshing Summer Delight

Are you ready for a refreshing treat this summer? Peach Cobbler Cheesecake Salad delivers all the flavors of your favorite

To bake this moist and tasty tropical pineapple carrot cake, gather the following ingredients: - 2 cups all-purpose flour - 1 ½ teaspoons baking powder - 1 teaspoon baking soda - 1 teaspoon ground cinnamon - ½ teaspoon ground nutmeg - ½ teaspoon salt - 1 cup granulated sugar - ½ cup packed brown sugar - 1 cup vegetable oil - 4 large eggs - 2 cups finely grated carrots (approximately 4 medium carrots) - 1 cup crushed pineapple, well-drained - 1 teaspoon vanilla extract - ½ cup chopped walnuts or pecans (optional) - ½ cup shredded coconut (optional) You can add even more flavor to your cake. Here are some optional items: - ½ cup chopped walnuts or pecans - ½ cup shredded coconut These ingredients add crunch and texture. They also enhance the tropical taste. Feel free to adjust these based on your preference. To make this cake, you will need some basic tools: - Two 9-inch round cake pans - Mixing bowls (one medium, one large) - Whisk - Spatula or wooden spoon - Measuring cups and spoons - Toothpick (to test if the cake is done) - Wire rack (for cooling) Having the right tools makes the baking process smooth. You can find many of these items in your kitchen. If you want the full recipe, you can refer to the earlier section. Make sure you have everything ready before you start! First, preheat your oven to 350°F (175°C). This step gets your oven ready for baking. While it warms up, prepare two 9-inch round cake pans. Grease them with butter or oil, then dust them with flour. You can also line the bottoms with parchment paper. This makes it easier to take out the cakes later. In a medium bowl, sift together the dry ingredients. Use 2 cups of all-purpose flour, 1 ½ teaspoons of baking powder, 1 teaspoon of baking soda, 1 teaspoon of ground cinnamon, ½ teaspoon of ground nutmeg, and ½ teaspoon of salt. Mixing these well helps the cake rise evenly. Take a large mixing bowl and add 1 cup of granulated sugar and ½ cup of packed brown sugar. Pour in 1 cup of vegetable oil. Use a whisk to mix these until smooth. This step creates a sweet base for your cake. Now, crack 4 large eggs into the sugar-oil mixture. Add them one by one. Beat well after each egg. This helps to create a fluffy texture. Stir in 1 teaspoon of vanilla extract for added flavor. Gradually add your dry ingredients to the wet mixture. Use a spatula or wooden spoon. Stir gently until just combined. Be careful not to over-mix. This keeps the cake light and airy. Next, fold in the fun stuff! Add 2 cups of finely grated carrots and 1 cup of well-drained crushed pineapple. If you like, you can also add ½ cup of chopped walnuts or pecans, and ½ cup of shredded coconut. Make sure everything is mixed evenly. Now, divide the batter evenly between your prepared cake pans. Smooth the tops with a spatula. Place the pans in the preheated oven. Bake for 30-35 minutes. To check, insert a toothpick into the center. It should come out clean when done. Once baked, let the cakes cool in the pans for about 10 minutes. Use a knife to gently run around the edges. This helps them come out easily. Flip them onto a wire rack to cool completely. Once cool, frost them with your favorite cream cheese frosting. For the full recipe on frosting, check out the Full Recipe. Enjoy your delightful tropical treat! To keep your cake moist, use fresh, well-drained crushed pineapple. This adds sweetness and moisture. Grating carrots finely also helps. The smaller pieces distribute better, ensuring a moist bite in every slice. Mix wet and dry ingredients gently. Over-mixing can lead to a dense cake, which is not what you want. Stir until just combined and then fold in the carrots and pineapple. This keeps the texture light and fluffy. For a smooth frosting, ensure your cream cheese and butter are at room temperature. Beat them until creamy and add powdered sugar slowly. This helps prevent lumps. Use a spatula to spread an even layer on the cake. Top with toasted coconut or nuts for a beautiful touch. For the complete recipe, check the Full Recipe. {{image_4}} You can make this cake gluten-free by using gluten-free flour. Many brands offer a one-to-one substitute for all-purpose flour. This option keeps the taste and texture similar to the original. Be sure to check that your baking powder is also gluten-free. To create a vegan cake, swap the eggs for flax eggs or applesauce. Use 1 tablespoon of ground flaxseed mixed with 2.5 tablespoons of water for each egg. Replace the vegetable oil with a plant-based oil, like coconut oil. Check that your sugar is vegan-friendly, as some brands use bone char in their processing. You can adjust the flavors in many ways. Try adding spices like ginger or cardamom for a warm kick. For extra texture, fold in raisins or dried cranberries. If you love citrus, add some orange or lemon zest. You can even mix in chocolate chips for a sweet twist! Always remember to balance the flavors so each bite is delightful. Check the [Full Recipe] for the basics before experimenting. To keep your Tropical Pineapple Carrot Cake fresh, wrap it well. Use plastic wrap or foil to cover the cake completely. Store it in an airtight container. This prevents the cake from drying out and losing flavor. You can freeze this cake for later enjoyment. First, let the cake cool completely. Then, cut it into slices or keep it whole. Wrap each slice or the whole cake in plastic wrap, then place it in a freezer bag. Remove as much air as possible before sealing. It stays good for up to three months in the freezer. When stored at room temperature, the cake will stay fresh for up to three days. If you keep it in the fridge, it can last up to a week. However, for the best taste and texture, enjoy it within the first few days after baking. This way, you experience the full flavor of the cake. For the complete recipe, refer to the Full Recipe section. To boost the flavor, add spices. Try using more cinnamon or nutmeg. You can also mix in vanilla extract or almond extract for a nutty taste. Fresh grated ginger adds a nice zing. Consider using brown sugar instead of granulated sugar for a deeper sweetness. Yes, you can use fresh pineapple. Just make sure to chop it finely. Remove excess juice to avoid a soggy cake. Fresh pineapple gives a bright flavor that many love. It adds a great texture and a tropical vibe to the cake. There are many options for nuts and fruits. Chopped walnuts or pecans add crunch. You can also use macadamia nuts for a tropical touch. For fruits, try adding raisins or coconut for more flavor. Dried fruits like mango or apricots can give a sweet twist. This cake has sugar, so it may not be ideal for diabetics. You can reduce sugar and use sugar substitutes. Always consult a doctor or dietitian. They can help tailor the recipe to fit dietary needs. Enjoying small portions can also make it more manageable. This cake pairs well with fresh fruit. Think of sliced pineapple or strawberries on the side. A scoop of vanilla ice cream can complement the flavors nicely. You can also serve it with whipped cream for extra creaminess. Don’t forget a cup of tea or coffee to round out the meal. For the full recipe, check the section above. This blog post covered everything you need for the perfect Tropical Pineapple Carrot Cake. We discussed key ingredients, helpful tips, and different ways to enjoy or adapt the cake. I shared ways to ensure a moist texture and professional frosting techniques. Remember, you can make this recipe gluten-free or vegan. With proper storage, your cake will stay fresh for days. Enjoy baking and savoring this delightful dessert!

Tropical Pineapple Carrot Cake Delightful and Easy

Craving a sweet twist on your classic cake? This Tropical Pineapple Carrot Cake is a must-try! Bursting with flavor and

To make this creamy garlic parmesan pasta, you need a few simple ingredients. Here’s what you will need: - 8 ounces of fettuccine or spaghetti - 4 tablespoons of unsalted butter - 4 cloves of garlic, finely minced - 1 cup of heavy cream - 1 cup of freshly grated Parmesan cheese (plus extra for serving) - 1/2 teaspoon of salt (adjust to taste) - 1/4 teaspoon of freshly ground black pepper - 1/4 teaspoon of red pepper flakes (optional for added spice) - 2 tablespoons of fresh parsley, finely chopped (for garnish) Each ingredient plays a key role in creating the rich and creamy flavor we love. The butter adds a smooth base, while the garlic gives a bold taste. Heavy cream makes the sauce luscious, and Parmesan cheese enriches it. Don’t forget to adjust the salt and pepper to your liking. If you want some heat, add red pepper flakes. The parsley at the end adds a fresh touch and color. You can find the full recipe in the article. Start by filling a large pot with water. Add a good amount of salt. This step adds flavor to the pasta. Bring the water to a rolling boil. Once boiling, add 8 ounces of fettuccine or spaghetti. Cook according to the package instructions until al dente, which means it should have a bit of firmness. Before you drain the pasta, save about 1 cup of the starchy water. Drain the pasta and set it aside. In the same pot or a large skillet, melt 4 tablespoons of unsalted butter over medium heat. Once the butter starts to foam, add 4 cloves of finely minced garlic. Sauté the garlic for 1-2 minutes. Stir constantly to keep it from burning. You want the garlic to smell great, not brown. Now, slowly pour in 1 cup of heavy cream while stirring. Let the mixture come to a gentle simmer. Allow it to bubble softly for about 2-3 minutes. This helps thicken the cream and makes the sauce nice and smooth. Next, gradually add 1 cup of freshly grated Parmesan cheese to the cream. Add 1/2 teaspoon of salt and 1/4 teaspoon of freshly ground black pepper. If you like a little heat, add 1/4 teaspoon of red pepper flakes. Stir until the cheese melts completely into the sauce. Carefully add the drained pasta to your creamy garlic sauce. Toss gently to make sure every strand is well coated. If the sauce looks too thick, stir in some reserved pasta water. Add it a little at a time until you reach the creaminess you want. Spoon the creamy pasta into deep bowls for a nice presentation. Sprinkle with extra Parmesan cheese and 2 tablespoons of finely chopped fresh parsley. This adds color and freshness to your dish. For a lovely touch, consider adding a slice of garlic bread on the side. Enjoy your Creamy Garlic Parmesan Pasta Delight in minutes! To maximize garlic flavor, use fresh cloves. Mince them finely to release more oils. Sauté the garlic gently. This brings out its sweet notes. You can also add herbs like basil or thyme for more depth. A pinch of crushed red pepper can add nice heat. To prevent a broken sauce, keep the heat low. High heat can cause the cream to separate. Stir the sauce gently as you add cheese. This helps it melt smoothly. For perfect pasta, always salt the water. Cook until al dente for the best texture. Serve the creamy pasta in deep, warm bowls. This keeps it cozy and inviting. Top with extra Parmesan and fresh parsley for a lovely look. Pair it with garlic bread or a crisp salad for balance. A glass of white wine complements the dish perfectly. For more ideas, check the Full Recipe. {{image_4}} You can easily add protein to your creamy garlic parmesan pasta. Chicken, shrimp, or tofu work great. - Chicken: Use cooked, diced chicken breast. Add it when you mix the pasta with the sauce. - Shrimp: Sauté shrimp in butter until pink. This takes about 3-4 minutes. Then, add it to your pasta. - Tofu: Use firm tofu. Cut it into cubes and pan-fry until golden. Mix it in for a tasty, plant-based option. Adding veggies boosts flavor and nutrition. Spinach, mushrooms, or peas are great choices. - Spinach: Add fresh spinach to the sauce and stir until wilted. This takes just 1-2 minutes. - Mushrooms: Sauté sliced mushrooms in butter before adding garlic. This adds a nice earthy flavor. - Peas: Stir in frozen peas at the end. They only need a few minutes to heat through. You can easily adjust this recipe to fit your needs. Here are some ideas. - Gluten-free pasta: Use gluten-free spaghetti or fettuccine. Cook it just like regular pasta. - Dairy-free alternatives: For a dairy-free version, swap heavy cream for coconut milk. Use nutritional yeast instead of cheese for flavor. Explore these variations to make creamy garlic parmesan pasta your own! For the full recipe, check the previous section. To store your creamy garlic parmesan pasta, place it in an airtight container. Cool the pasta to room temperature before sealing. This helps keep it fresh. You can store it in the fridge for up to three days. When you're ready to eat, just reheat it on the stove or in the microwave. Add a splash of cream or pasta water if it seems dry. If you want to freeze your creamy garlic parmesan pasta, follow these steps: - Allow the pasta to cool completely. - Transfer it into freezer-safe bags or containers. - Label the bags with the date. You can freeze it for up to three months. When you're ready to enjoy it, thaw it overnight in the fridge. Reheat it gently on the stove. Be careful, as freezing may change the texture. The sauce might not be as creamy, but the flavor will still be great! The best pasta for this dish is fettuccine or spaghetti. Both types hold the creamy sauce well. Fettuccine has a flat shape, which helps grab the sauce. Spaghetti is long and thin, making it fun to twirl. You can use any pasta you love, but these two work best. You can prepare the pasta and sauce ahead of time. Cook the pasta and set it aside. Make the sauce and let it cool. Store them in separate containers in the fridge. When ready to eat, reheat the sauce and stir in the pasta. To add spice, include red pepper flakes in the sauce. Start with 1/4 teaspoon for a mild kick. Want more heat? Add extra flakes to taste. You can also use diced jalapeños or a splash of hot sauce to spice it up. Yes! You can make a vegan version of this dish. Use vegan butter and a non-dairy cream like coconut or cashew cream. For cheese, look for vegan Parmesan or nutritional yeast. This way, you enjoy the same creamy flavors without dairy. This pasta pairs well with many sides. A fresh salad with lemon dressing adds brightness. Garlic bread is a classic choice for a cozy meal. Consider roasted vegetables for a healthy touch. You can also serve grilled chicken or shrimp for extra protein. For the full recipe, check the complete section above. In this blog post, we covered the tasty creamy garlic Parmesan pasta. You learned about the key ingredients, step-by-step cooking methods, and tips to avoid mistakes. I shared ways to enhance flavor and even add protein and veggies. Remember, proper storage can keep leftovers fresh, and creative plating makes a difference. Enjoy experimenting with this dish and customizing it to your taste. Simple steps can lead to a delightful meal every time. Dive in and create something delicious today!

Creamy Garlic Parmesan Pasta Delight in Minutes

Craving a quick, creamy pasta dish that hits all the right notes? Look no further! My Creamy Garlic Parmesan Pasta

- 4 large bell peppers (choose a mix of colors for a bright presentation) - 1 cup quinoa, rinsed thoroughly - 2 cups vegetable broth (for more flavor) - 1 can (15 oz) black beans, rinsed and drained well - 1 cup corn (can be fresh or frozen; if frozen, thaw it beforehand) - 1 cup diced tomatoes (fresh or canned works well) - 1 teaspoon ground cumin - 1 teaspoon smoked paprika - ½ teaspoon garlic powder - ½ teaspoon onion powder - Salt and freshly ground black pepper to taste - 1 cup shredded cheese (choose between cheddar and mozzarella for a cheesy topping) - Fresh cilantro or parsley, chopped for garnish - Bell Peppers: High in vitamins A and C; great for skin health. - Quinoa: A complete protein; helps build muscle and keeps you full. - Black Beans: Rich in fiber; aids digestion and keeps your heart healthy. - Corn: Provides energy; also contains fiber and antioxidants. - Diced Tomatoes: Packed with vitamins; good for heart health due to lycopene. - Spices: Cumin and paprika add flavor and may have health benefits. - Cheese: Adds calcium; choose lower-fat options if you prefer. - Cilantro/Parsley: Adds freshness; also has vitamins and antioxidants. - Quinoa: Use rice or couscous if you prefer. - Black Beans: Swap with lentils or chickpeas for a different taste. - Corn: Omit if allergic; you can add diced zucchini instead. - Cheese: Use dairy-free cheese for a vegan option. - Vegetable Broth: Use water or chicken broth if you prefer. - Herbs: Use basil or dill if you dislike cilantro. For the full recipe, check the vibrant quinoa-stuffed bell peppers instructions. To start, rinse 1 cup of quinoa under cold water. This step helps remove its natural coating, called saponin, which can taste bitter. Next, pour the rinsed quinoa into a medium saucepan. Add 2 cups of vegetable broth for added flavor. Bring this mix to a boil over medium-high heat. Once it boils, lower the heat, cover the pot, and let it simmer for about 15 minutes. The quinoa will absorb all the broth and become fluffy. After cooking, fluff it gently with a fork. While the quinoa cooks, prepare your bell peppers. Take 4 large peppers and slice off the tops, removing seeds and membranes. Keep the tops for later use if you like. Place the hollowed peppers in a baking dish, standing upright. In a large bowl, combine the cooked quinoa, 1 can of rinsed black beans, 1 cup of corn, and 1 cup of diced tomatoes. Add spices like 1 teaspoon of ground cumin, 1 teaspoon of smoked paprika, and ½ teaspoon each of garlic powder and onion powder. Season with salt and pepper. Mix everything well. Now, take the filling and stuff each bell pepper. Press down gently to pack it in. Preheat your oven to 375°F (190°C). After stuffing the peppers, top each one with shredded cheese, about 1 cup total. You can put the pepper tops back on if you want. Cover the dish with aluminum foil to keep moisture in. Bake for 25 minutes. Then, remove the foil and bake for another 10 to 15 minutes. The peppers should be tender, and the cheese will melt and turn golden. Once done, let them cool for about 5 minutes before serving. For a fresh touch, sprinkle chopped cilantro or parsley on top. For the full recipe, check out the details above! To make your quinoa light and fluffy, rinse it well before cooking. This removes the bitter coating called saponin. Use two cups of vegetable broth for one cup of quinoa. This gives a rich flavor. Bring it to a boil, then lower the heat and cover the pot. Let it simmer for about 15 minutes. Once done, fluff the quinoa with a fork. This step helps separate the grains, making it perfect for stuffing. When picking bell peppers, look for ones that feel firm and heavy. They should have smooth skin with no bruises or soft spots. A mix of colors makes your dish more fun and appetizing. Red, yellow, and green peppers all have different flavors. Red peppers are sweet, while green ones taste more bitter. Choose what you like best! For the cheese topping, both cheddar and mozzarella work great. Cheddar adds a sharp taste, while mozzarella melts beautifully and gives a creamy feel. You can mix the two for a balance of flavor and texture. If you want something unique, try feta or goat cheese. They can add a tangy twist. Remember to sprinkle the cheese on just before baking for a golden crust. {{image_4}} You can add fun twists to your stuffed peppers. Try adding sautéed mushrooms, spinach, or zucchini for extra texture. You can also mix in nuts like walnuts or pine nuts for a crunchy bite. Adding herbs like basil or oregano can boost the flavor too. You can layer in different cheeses, like feta or goat cheese, for a tangy kick. These add-ons keep the dish fresh and exciting. For those who want more protein, consider adding diced tofu or shredded chicken. Tofu works well when you sauté it first with spices. This adds flavor and helps it absorb the sauce. For chicken lovers, use rotisserie chicken for quick prep. Simply shred it and mix it into the filling. Ground turkey is another great choice. It keeps the dish light while giving it a hearty feel. If you need a gluten-free option, this recipe is already a great fit! Quinoa is naturally gluten-free. Use gluten-free cheese to keep it safe for those with allergies. Ensure that canned goods, like beans and tomatoes, are also labeled gluten-free. These small changes keep your dish safe and tasty for everyone. For the full recipe, check out the Vibrant Quinoa-Stuffed Bell Peppers section. To store your leftover stuffed bell peppers, let them cool first. Place them in an airtight container. This keeps them fresh for up to three days in the fridge. Use parchment paper between layers if you stack them. This step prevents them from sticking together. You can freeze stuffed bell peppers for up to three months. Wrap each pepper tightly in plastic wrap. Then, place them in a freezer-safe bag or container. Label the container with the date, so you know when to use them. When ready to eat, thaw them in the fridge overnight. To reheat, preheat your oven to 350°F (175°C). Place the stuffed peppers in a baking dish. Cover the dish with foil to keep moisture in. Bake for about 20-25 minutes or until heated through. You can also use a microwave. Just heat them on high for about 2-3 minutes. Enjoy your flavorful stuffed peppers again! For the full recipe, check out the vibrant quinoa-stuffed bell peppers. You can tell stuffed peppers are done when they are soft. The cheese should be melted and slightly golden. A fork should easily pierce the pepper. If it's hard to poke, bake them longer. The goal is to have tender peppers with warm, flavorful filling inside. Yes! You can prepare stuffed peppers a day before. Just stuff the peppers and cover them. Store them in the fridge. When you are ready to cook, take them out and bake as usual. This makes meal prep easy and quick. Stuffed bell peppers pair well with many sides. Here are some ideas: - A fresh green salad for crunch. - Brown rice or quinoa for added carbs. - A dollop of sour cream or yogurt for creaminess. - Roasted veggies for more flavor. - Crusty bread to soak up any juices. These sides boost the meal and make it more filling. You can pick what you like best! In this post, we explored the ingredients and steps for tasty stuffed bell peppers. I shared helpful tips for cooking fluffy quinoa and selecting the best peppers. You learned how to customize the dish with different proteins and enjoy variations. We also covered storage tips for leftovers and answered common questions. With these insights, you can create delicious stuffed peppers anytime. Enjoy experimenting with flavors and making this dish your own. Happy cooking!

Flavorful Stuffed Bell Peppers with Quinoa Recipe

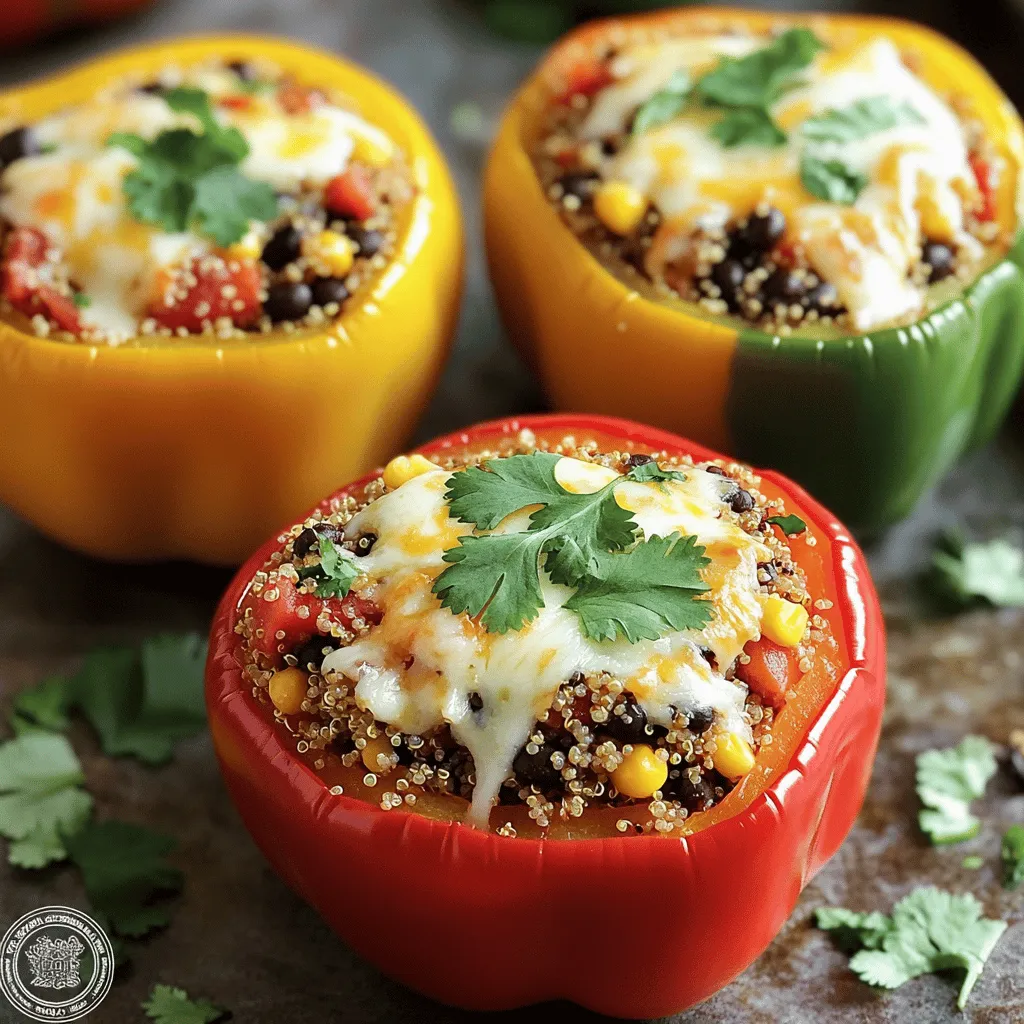
Are you ready to enjoy a healthy dish that bursts with flavor? My Stuffed Bell Peppers with Quinoa recipe is

- 1 ½ cups all-purpose flour - 1 cup fresh blueberries (or frozen blueberries, thawed) - ½ cup granulated sugar - ½ teaspoon baking soda - ½ teaspoon baking powder - ¼ teaspoon salt You need basic ingredients to make these muffins. All-purpose flour gives a nice texture. Blueberries add sweetness and flavor. You can use fresh or frozen blueberries, depending on what you have. Granulated sugar balances the tartness of the lemon. Baking powder and baking soda help the muffins rise. Salt enhances all the flavors in the recipe. - 1 large egg - ½ cup buttermilk - ⅓ cup vegetable oil - 1 tablespoon freshly grated lemon zest - 2 tablespoons fresh lemon juice - 1 teaspoon vanilla extract Wet ingredients bring moisture and flavor to your muffins. The large egg binds everything together. Buttermilk keeps the muffins soft and adds a slight tang. Vegetable oil keeps them moist and fluffy. Fresh lemon zest and juice give a bright, zesty kick. Vanilla extract rounds out the flavor profile beautifully. - 2 tablespoons coarse sugar for topping - Garnishes for presentation You can add coarse sugar on top for a sweet crunch. It makes the muffins look pretty, too. For presentation, consider garnishing with a few fresh blueberries or a sprinkle of lemon zest. These small details make a big difference in how your muffins look and taste. For the complete recipe, check out the Full Recipe section. Preheat your oven to 375°F (190°C). This step is key for even baking. While the oven heats, prepare a 12-cup muffin tin. You can either line each cup with paper liners or grease them with cooking spray. This keeps the muffins from sticking. In a medium bowl, whisk together the all-purpose flour, granulated sugar, baking powder, baking soda, and salt. Make sure to mix until everything is uniform. This helps the muffins rise well. In another bowl, crack a large egg and beat it lightly. Add buttermilk, vegetable oil, lemon zest, lemon juice, and vanilla extract. Mix these wet ingredients until they blend perfectly. This mixture adds moisture and flavor to the muffins. Carefully pour the wet mixture into the dry ingredients. Using a spatula, gently fold them together. It's important not to overmix. A few lumps are okay, as they help keep the muffins fluffy. Now, gently fold in the blueberries. Make sure they are evenly distributed throughout the batter. Be careful not to crush them; you want whole berries in your muffins for juicy bites. Divide the batter evenly among the prepared muffin cups, filling each about ¾ full. If you like, sprinkle coarse sugar on top for a sweet crunch. Bake the muffins for 18 to 20 minutes. Check for doneness by inserting a toothpick into the center. It should come out clean. Once done, let the muffins cool in the tin for about 5 minutes before moving them to a wire rack. For the full recipe, refer to the section above. Enjoy your delicious Lemon Blueberry Muffins! To avoid tough muffins, do not overmix your batter. Mix just until the wet and dry ingredients combine. A few lumps are okay. Overmixing makes muffins dense and chewy. Use a gentle folding technique when adding blueberries. This keeps them whole and juicy, which enhances your muffins' taste. When it comes to blueberries, fresh ones are great. They burst with flavor and color. Frozen blueberries are also good; just thaw and drain them first. If you lack buttermilk, mix milk with a teaspoon of vinegar or lemon juice. Let it sit for a few minutes to thicken. This gives you a similar tangy flavor. To keep muffins fresh, store them in an airtight container. They can last up to three days at room temperature. For longer storage, freeze them. Wrap each muffin in plastic wrap, then place them in a freezer bag. When you want to eat one, just reheat it in the oven or microwave. This restores their soft texture and warmth. For a delightful breakfast, serve them warm with a pat of butter! {{image_4}} You can really make lemon blueberry muffins your own with fun add-ins. - Nuts or seeds: Try adding walnuts or sunflower seeds for crunch. - Other fruits or spices: Mix in raspberries or cinnamon for a twist. Need to adjust the recipe for dietary needs? It’s simple! - Gluten-free adaptations: Use a gluten-free flour blend. They can still be fluffy and tasty. - Vegan options with substitutes: Replace the egg with a flax egg and use plant-based milk. Explore different ways to bake these muffins. - Mini muffins: Bake for less time and enjoy bite-sized treats. - Loaves: Pour the batter into a loaf pan for a delicious bread. You can find the full recipe above to get started on these variations! After baking your lemon blueberry muffins, let them cool completely. Store them at room temperature in an airtight container. This keeps them fresh for up to three days. If you want to keep them for longer, avoid placing them in the fridge. The cold air can make them dry out quickly. To enjoy muffins later, freeze them. Wrap each muffin tightly in plastic wrap. Then, place them in a freezer bag or container. You can freeze them for up to three months. When you're ready to eat, simply take them out and let them thaw at room temperature. To warm your muffins, preheat the oven to 350°F (175°C). Place the muffins on a baking sheet. Heat them for about 10 minutes. This helps restore their fresh taste and soft texture. You can also microwave them for about 15-20 seconds. Just be careful not to overheat, or they can become tough. Enjoy your muffins warm for the best flavor! Yes, you can use frozen blueberries. Just thaw them first. To thaw, place them in a bowl. Let them sit at room temperature for about 30 minutes. You can also microwave them for 30 seconds. Drain any excess liquid before adding them to the batter. This helps keep your muffins from turning blue. If you run out of buttermilk, don’t worry! You can make your own. Mix one cup of milk with one tablespoon of vinegar or lemon juice. Let it sit for five minutes. You can also use plain yogurt or sour cream. Just thin it with a bit of milk if needed. To get those beautiful, tall tops, fill the muffin cups higher. Fill them about ¾ full. Also, start baking at a higher temperature. Bake at 425°F (220°C) for the first five minutes. Then, lower the temperature to 375°F (190°C) for the rest of the time. This method helps create a nice dome. Homemade lemon blueberry muffins can last for about three days at room temperature. Keep them in an airtight container. If you want to keep them longer, freeze them. They can stay fresh for up to three months in the freezer. Just wrap them well in plastic wrap and foil. Lemon blueberry muffins are a delightful treat to make at home. We covered the essential ingredients, from fresh blueberries to buttermilk, ensuring a tasty outcome. The baking process is simple, with clear steps to follow for best results. I shared tips for perfect muffins and explored fun variations. In the end, you can customize these muffins to suit your taste. Imagine enjoying warm, fresh muffins anytime. With these strategies, you can bake confidently and share delicious treats with loved ones. Enjoy your baking journey!

Lemon Blueberry Muffins Irresistible Morning Treat

Start your day right with my delicious Lemon Blueberry Muffins! These soft, fluffy treats are packed with fresh flavors that

To make the best homemade tomato basil soup, gather these key items: - 2 tablespoons extra virgin olive oil - 1 medium onion, finely chopped - 3 cloves garlic, minced - 4 cups fresh ripe tomatoes, chopped (or 2 cans of whole peeled tomatoes) - 2 cups vegetable broth - 1 teaspoon granulated sugar - 1 teaspoon sea salt - 1/2 teaspoon freshly ground black pepper - 1/2 cup fresh basil leaves, roughly torn or chopped - 1/2 cup heavy whipping cream (optional) - Crusty bread (optional, for serving) You can add these items to boost the soup's flavor: - Red pepper flakes for heat - A splash of balsamic vinegar for sweetness - Fresh thyme or oregano for herbal notes - Grated Parmesan cheese for extra richness If you don’t have some ingredients, here are easy swaps: - Use garlic powder instead of fresh garlic. - Swap vegetable broth for chicken broth. - Replace heavy cream with coconut milk for a lighter option. - Fresh tomatoes can be replaced with canned tomatoes for ease. These choices keep the soup tasty and fun to make! For full details on how to prepare this delightful dish, check out the Full Recipe. To start, heat the olive oil in a large pot over medium heat. This oil adds flavor and helps cook the onions. Next, add the finely chopped onion. Cook it for about 5 minutes. You want it soft and clear but not brown. This step builds a nice base for your soup. After the onion is ready, add the minced garlic. Stir it for about 1 minute. Watch it closely so it doesn’t burn. Burned garlic can make your soup taste bitter. Now, add the chopped fresh tomatoes. If you use canned tomatoes, just add them as they are. Cook this for 10 to 15 minutes. The tomatoes should break down and release juices. This stage is key for flavor. Pour in the vegetable broth next. This will create the soup base. Add the sugar, salt, and black pepper. The sugar helps balance the acidity in the tomatoes. Bring this mix to a gentle simmer. Let it cook for about 20 minutes. This allows the flavors to blend nicely. If you see any foam or skin on the soup, skim it off. It keeps your soup smooth. After simmering, remove the pot from the heat. Use an immersion blender to puree the soup until it is smooth. If you don’t have one, carefully use a regular blender in batches. For a smooth texture, an immersion blender is best. It lets you blend the soup right in the pot. If using a countertop blender, fill it halfway. Hot soup can expand and splatter. Blend in small batches for safety. If your soup is too thick after blending, add more broth or water. This will help reach your desired consistency. Serve the soup hot. Drizzle some extra virgin olive oil over the top for added flavor. This step gives it a rich finish. Pair the soup with crusty bread for a complete meal. Enjoy every bite of this delightful and simple meal. For the full recipe, check out the detailed steps above. To make your tomato basil soup shine, use ripe, fresh tomatoes. They give the best flavor. If fresh tomatoes are not in season, canned whole tomatoes work well too. They are packed at peak ripeness. Adding a teaspoon of sugar balances the soup's acidity. Fresh basil is key too; add it at the end for a bright taste. If you like creaminess, stir in heavy cream just before serving. This makes the soup rich and satisfying. For this soup, a heavy-bottomed pot is a must. It helps heat evenly and prevents burning. An immersion blender is great for pureeing the soup. If you don’t have one, a countertop blender works too. Just be careful when blending hot liquids. Always let it cool for a moment to avoid splatter. A good cutting board and knife make chopping the veggies quick and easy. Lastly, a ladle helps when serving the soup. One common mistake is overcooking the garlic. It can turn bitter quickly, ruining the soup. Always add garlic after the onions are soft. Another mistake is not tasting your soup before serving. Adjust the seasoning to your liking. Some people skip the sugar, but it really helps balance flavors. Lastly, don’t skip the basil; it adds a fresh note that’s hard to replace. For the full recipe, check the detailed steps above. {{image_4}} You can change the flavor of your soup by using different herbs. Instead of just basil, try adding thyme or oregano for a warm touch. If you want a fresh kick, add parsley or cilantro. Each herb brings a unique taste and aroma, making your soup special every time. To make a vegan version, skip the heavy cream. Use coconut milk or cashew cream instead. These options add creaminess without dairy. Check your broth to ensure it is vegan as well. This soup remains hearty and full of flavor without any animal products. Get creative with your tomato basil soup! Add roasted red peppers for a sweet taste. You can also stir in some spinach or kale for extra nutrients. A splash of balsamic vinegar adds depth. Try serving it with grilled cheese for a fun pairing. These twists keep the dish exciting while still honoring the classic recipe. For the complete recipe, check the [Full Recipe]. To keep your homemade tomato basil soup fresh, let it cool first. Once cooled, pour the soup into an airtight container. Seal it well to avoid air exposure. Store it in the fridge for up to 5 days. Make sure to label the container with the date. This helps you keep track of its freshness. Freezing your soup is a great way to save it for later. First, let the soup cool completely. Then, divide it into smaller portions. Use freezer-safe bags or containers for best results. Remove as much air as possible before sealing. You can freeze the soup for up to 3 months. When you’re ready to eat, just pull it from the freezer. To reheat your soup, use a pot on the stove for the best taste. Heat it on low to medium heat, stirring often. This keeps the soup smooth and prevents it from sticking. If the soup seems thick, add a splash of broth or water to thin it out. You can also use a microwave, but stir it halfway through to heat evenly. Enjoy your delicious soup warm! Yes, you can use canned tomatoes in your soup. They work well and save time. If you choose canned, use whole peeled tomatoes. This option gives you rich flavor. Just make sure to drain them before adding to the pot. It’s a great way to enjoy this soup year-round. Crusty bread is a classic side that complements tomato basil soup. You can also serve a simple salad. A green salad with mixed greens adds freshness. Grilled cheese sandwiches are another favorite. They add a nice crunch and extra flavor. Homemade tomato basil soup lasts about 4 to 5 days in the fridge. Store it in an airtight container. If you want to keep it longer, freeze it. It can last up to 3 months in the freezer. Just thaw it in the fridge before reheating. Enjoy the flavors even after some time! For the full recipe, check out Homemade Tomato Basil Bliss. This blog post covers everything you need for the perfect tomato basil soup. We discussed the key ingredients, detailed the cooking process, and shared tips to enhance flavor. You learned about variations, storage tips, and answers to common questions. Creating this soup should feel easy and fun. Remember to experiment with ingredients and methods. Enjoy your cooking and taste the joy in each bowl. Your homemade soup can become a family favorite!

Homemade Tomato Basil Soup Delightful and Simple Meal

Looking for a warm, tasty meal that’s easy to make? Homemade Tomato Basil Soup is a classic choice! With just

- 1 large red bell pepper, cut into 1-inch pieces - 1 large yellow bell pepper, cut into 1-inch pieces - 1 medium zucchini, sliced into thick rounds - 1 red onion, cut into wedges - 1 cup cherry tomatoes - 1 cup mushrooms, whole or halved - 4 tablespoons extra virgin olive oil - 2 teaspoons garlic powder - 1 teaspoon smoked paprika - Sea salt and freshly cracked black pepper, to taste These main ingredients create a colorful and tasty mix. Each vegetable adds its unique flavor. The olive oil and spices enhance the dish, making it even better. - Additional vegetables (e.g., eggplant, asparagus) - Fresh herbs for garnish (e.g., parsley, cilantro) Using optional vegetables gives you room for creativity. You can pick what you love most. Fresh herbs add a nice touch and brighten the dish. - Skewers (wooden or metal) - Grill (gas or charcoal) - Mixing bowl and whisk You need simple tools to make this recipe. Skewers help hold the veggies together. A grill cooks them perfectly, and a mixing bowl helps combine flavors. For the full recipe, check out Grilled Rainbow Vegetable Skewers! Start by washing your vegetables. Rinse them under cool water to remove any dirt. Then, cut the vegetables into the right shapes. I like to cut the red and yellow bell peppers into 1-inch pieces. The zucchini should be sliced into thick rounds. The red onion can be cut into wedges. Lastly, keep the cherry tomatoes whole and the mushrooms either whole or halved. Next, we need to marinate the vegetables. In a large mixing bowl, whisk together these ingredients: - 4 tablespoons extra virgin olive oil - 2 teaspoons garlic powder - 1 teaspoon smoked paprika - Sea salt and freshly cracked black pepper to taste Once mixed, add the cut vegetables to the bowl. Gently toss them until each piece is covered in the marinade. This step adds great flavor to the veggies. Now, it’s time to thread the vegetables onto skewers. Grab a skewer and start with a piece of bell pepper. Then, add a slice of zucchini, followed by a wedge of onion. Keep alternating colors and types. This makes your skewers look fun and colorful. Aim for 4-5 pieces of each vegetable on every skewer. When you finish, make sure to leave a little space between each piece. This helps them cook evenly. Use metal or soaked wooden skewers to prevent burning. Before grilling, preheat your grill to medium-high heat. Make sure the grates are clean to avoid sticking. Once hot, place the vegetable skewers on the grill. Cook them for about 10-12 minutes. Remember to turn them occasionally using tongs. This helps them get nice grill marks and keeps them from burning. To check if they are done, look for tender vegetables with a slight char. They should be soft but not mushy. Once finished, carefully remove the skewers from the grill. Let them rest for a minute before serving. This helps the flavors settle. For the final touch, garnish with fresh basil leaves for a pop of color and flavor. Enjoy the vibrant taste of your grilled vegetable skewers! For the complete recipe, you can refer to the [Full Recipe]. To grill vegetable skewers well, keep the grill at the right heat. Aim for medium-high heat. This temperature helps cook the veggies evenly and gives nice grill marks. Avoid common mistakes such as overcrowding the skewers. When you jam too many pieces on one skewer, they cook unevenly. Leave space between the vegetables for hot air to flow. Also, don’t flip them too often. Let them sit for a bit to get those perfect char marks. To boost flavor, use marinades. A simple mix of olive oil, lemon juice, and herbs works great. Try adding balsamic vinegar for a tangy twist. You can also marinate overnight for deeper taste. Herbs and spices are key too. Fresh basil, oregano, or thyme can elevate your skewers. Use garlic powder and smoked paprika to give a warm, rich flavor. These add depth without overpowering the veggies. Grilled vegetable skewers pair well with many side dishes. Serve them alongside quinoa, rice, or a fresh salad. They also go great with dips like hummus or tzatziki. For presentation, arrange the skewers on a large platter. Drizzle some extra olive oil over the top for shine. You can sprinkle chopped fresh herbs as a colorful touch. This makes the dish not just tasty, but also beautiful. {{image_4}} You can mix and match vegetables to create colorful skewers. Use seasonal veggies for the best flavors. Try eggplant, asparagus, or even sweet corn in summer. For a Mediterranean theme, add artichokes and zucchini. For an Asian twist, use shiitake mushrooms and bok choy. The more colors and shapes, the prettier your skewers will look. Want to boost protein? Tofu is a great plant-based option. Cut it into cubes and marinate it like your veggies. If you love seafood, shrimp works well too. Just thread the shrimp on the skewers with your veggies. Chicken is another favorite. Cut it into bite-sized pieces and marinate before grilling. Each protein adds its own flavor and texture to the dish. Try different marinades to spice things up. For an Asian-inspired flavor, use soy sauce, ginger, and sesame oil. A spicy marinade can include chili paste and lime juice. If you prefer tangy, mix vinegar with herbs like rosemary or thyme. Each marinade will change the taste of your skewers, making every meal exciting. For the full recipe, check out Grilled Rainbow Vegetable Skewers . To keep your grilled vegetable skewers fresh, store them in an airtight container. This helps prevent moisture loss. Place them in the fridge within two hours after grilling. If you leave them out too long, they may spoil. You can store skewers assembled or unassembled. Assembled skewers save time when you want to eat later. However, unassembled skewers allow the veggies to stay crisp longer. If you choose unassembled, keep the veggies in separate containers. When reheating grilled vegetable skewers, you have a few options. You can use a microwave, oven, or grill. The microwave is the quickest method. Heat them in short intervals to avoid overcooking. For the oven, preheat it to 350°F (175°C). Place the skewers on a baking sheet and cover with foil. Heat for about 10 minutes. This keeps the veggies moist. If you use the grill, warm them over low heat for a few minutes. Always check to make sure they are heated through. Yes, you can freeze grilled vegetable skewers! This is a great way to save leftovers. First, let the skewers cool completely. Then, wrap them tightly in plastic wrap or aluminum foil. Place them in a freezer-safe bag or container. When you're ready to eat, thaw them in the fridge overnight. Reheat them using the tips I shared earlier. This helps maintain taste and texture. Enjoy your grilled vegetable skewers even after they’ve been frozen! For the full recipe, check out the ingredients and steps to create these delicious skewers. Grill your vegetable skewers for about 10 to 12 minutes. This time lets the veggies cook well. You want them tender, but still crisp. Turn them often using tongs. Look for nice grill marks. This shows they are ready to eat. You can use frozen vegetables, but there are pros and cons. Frozen veggies can save time. They are often pre-cut and ready to use. However, they may lose some texture and flavor when grilled. Fresh veggies give you the best taste and crunch. If using frozen, thaw them first and pat dry to remove excess moisture. Grilled vegetable skewers go well with many sides. Try serving them with quinoa or couscous salads. A light pasta salad also works. You can pair them with dips like hummus or tzatziki. For drinks, try a chilled white wine or a refreshing lemonade. These options make a great meal. Yes, these skewers are vegan and gluten-free! They use only vegetables and olive oil. For gluten-free eaters, check the spices. Most are safe, but it's good to verify. If you want to add protein, try tofu or chickpeas. This keeps everything plant-based and delicious. For the full recipe, check the section above. Grilled vegetable skewers are simple and fun to make. You learned about the main and optional ingredients, as well as the right tools. I shared step-by-step instructions for prepping, assembling, and grilling. Tips on flavoring and serving made it all better. Don’t forget to try different veggie combos or proteins for variety. Enjoy leftovers with my storage tips, and feel free to customize your meal. Grilling is about creativity, so have fun and get cooking!

Grilled Vegetable Skewers Flavorful and Simple Recipe

Are you ready to elevate your outdoor cooking? Grilled vegetable skewers are a simple and vibrant dish that everyone will

When you make a strawberry shortcake trifle, you need a few key ingredients. Here’s what you will need: - 2 cups fresh strawberries, hulled and sliced - 1/4 cup granulated sugar - 1 cup heavy cream - 1/3 cup powdered sugar - 1 teaspoon vanilla extract - 1 store-bought pound cake or sponge cake, cut into bite-sized cubes - 1/2 cup Greek yogurt (optional, for added creaminess) - Fresh mint leaves, for garnish Each ingredient plays a special role in the trifle. The strawberries bring sweetness and freshness. Granulated sugar helps to enhance their flavor. Heavy cream creates a rich, fluffy layer. Powdered sugar adds sweetness to the cream. Vanilla extract gives a warm, rich taste. The pound cake or sponge cake acts as the base. Greek yogurt adds creaminess and a slight tang if you choose to use it. Lastly, fresh mint leaves make the dish look extra nice. You can find the full recipe to see how everything comes together in this delightful dessert! To start, place the sliced strawberries in a mixing bowl. Sprinkle 1/4 cup of granulated sugar over the strawberries. Toss them gently to coat. This step is crucial. It helps the strawberries release their sweet juices. Set them aside for about 15 minutes. This process is called macerating. You will see the strawberries become juicy and flavorful. Next, grab a separate bowl for the cream. Pour in 1 cup of heavy cream. Add 1/3 cup of powdered sugar and 1 teaspoon of vanilla extract. Use an electric mixer to whip the mixture. Set it to medium-high speed. You want to whip until soft peaks form. This means the cream should look fluffy. If you want a creamier texture, fold in 1/2 cup of Greek yogurt gently. This adds richness to your whipped cream. Now, it's time to assemble your trifle. Use a clear trifle dish or individual glasses. Start by adding a layer of cake cubes at the bottom. Use 1 store-bought pound cake or sponge cake, cut into bite-sized pieces. This creates a solid base. Next, spoon a layer of the macerated strawberries over the cake cubes. Make sure to spread them evenly. Follow this with a generous layer of whipped cream. Smooth it out with a spatula for a nice finish. Repeat this layering process. Start with more cake cubes, then add more strawberries, and finally, another layer of whipped cream. Keep layering until your dish is filled. Finish with a lovely layer of whipped cream on top. For a beautiful touch, garnish the trifle with whole strawberries and fresh mint leaves. This adds color and freshness to your dessert. For the full recipe, check the previous section. To make the best whipped cream, start with chilled tools. Use a cold bowl and beaters. This helps the cream whip up nicely. Whip until you see soft peaks form. Soft peaks mean the cream holds its shape but is still fluffy. If you want a richer flavor, mix in Greek yogurt. It adds creaminess and a slight tang. Just fold it in gently so you keep the airiness. When layering your trifle, aim for even layers. This makes each bite delightful. Start with cake cubes at the bottom. Use a spatula to spread the strawberries evenly. The goal is to have each layer show through the glass. If you plan to store it, assemble it just before serving. This keeps the cake from getting soggy. Garnishing your trifle makes it pop. Use whole strawberries on top. They look fresh and inviting. Add mint leaves for a splash of color. If you want a fun twist, consider using small jars instead of a big trifle dish. It makes serving easy and looks cute too. {{image_4}} You can change the fruit in your trifle to match the seasons. Use peaches or blueberries in the summer. In the fall, try apples or pears. Mixing different fruits adds unique flavors. For a berry mix, use strawberries, blueberries, and raspberries together. This gives a colorful look and a burst of taste. Infusing your trifle with different extracts can elevate its taste. Almond extract creates a nutty flavor that pairs well with fruit. Coconut extract adds a tropical vibe. Adjust the sweetness by changing the sugar amount. If you like it less sweet, reduce the sugar in the whipped cream. You can even add a splash of lemon juice for a tangy kick. You can easily make gluten-free options for this dessert. Use gluten-free cake instead of regular pound cake. For vegan-inspired alternatives, replace heavy cream with coconut cream or whipped aquafaba. Adjust the sugar to your taste, and ensure all your ingredients are plant-based. These swaps make the trifle enjoyable for everyone. For the full recipe, check out the Strawberry Shortcake Trifle Delight. To store your Strawberry Shortcake Trifle, cover it well with plastic wrap or a lid. This helps keep it fresh. Place the trifle in the fridge. The trifle stays good for about 3 days in the fridge. After that, the cake may get soggy, and the cream may lose its fluffiness. You can freeze parts of the trifle, but not the whole dish. Freeze the cake cubes and the strawberries separately. This way, they stay fresh. The whipped cream does not freeze well, so I recommend making that fresh when you serve. To thaw, place the frozen cake and strawberries in the fridge overnight. Once thawed, layer everything again for a fresh taste. Enjoy your trifle with a dollop of fresh whipped cream on top. For the full recipe, check the details above. You can make a lighter trifle by using low-fat ingredients. Try these substitutions: - Use a low-fat whipped topping instead of heavy cream. - Choose a sugar substitute like stevia or monk fruit for sweetening. - Replace pound cake with angel food cake for fewer calories. - You can also add more fresh strawberries for natural sweetness and flavor. These swaps will keep your dessert light yet still tasty. Yes, you can prepare this trifle ahead of time! It is best to assemble it a few hours before serving. This allows the flavors to blend well. However, if you need to make it even earlier, layer the components separately. Store the cake, strawberries, and whipped cream in the fridge. Assemble them just a few hours before serving for the best taste. If you want an alternative to powdered sugar, you have some good options: - Use granulated sugar and blend it until fine to mimic powdered sugar. - Try a sugar-free sweetener, like erythritol or xylitol, for a healthier choice. - Maple syrup can also work, but it might alter the texture slightly. These options will still give you sweetness without powdered sugar. This recipe serves about 6 to 8 people. If you want to adjust the portion sizes, simply change the amount of cake and strawberries used. For a bigger crowd, double the recipe. If you need fewer servings, halve the ingredients. Enjoy this delightful treat with friends and family! This blog post guides you through making a delicious Strawberry Shortcake Trifle. You learned about the key ingredients, like sugar, heavy cream, and cake. I outlined easy steps to prepare strawberries, whip cream, and layer your dessert. Don’t forget the tips for perfect cream and presentation. Try seasonal fruits or flavor twists to make it your own. Lastly, I shared how to store leftovers and make it ahead. Enjoy every bite of your trifle, and let your creativity shine!

Strawberry Shortcake Trifle Delightful Layered Dessert

Are you ready to impress your friends and family with a show-stopping dessert? My Strawberry Shortcake Trifle is a delightful

- 2 ripe avocados - 4 slices of whole-grain bread - 1 cup cherry tomatoes, halved - 1 small cucumber, thinly sliced - 1/4 cup feta cheese, crumbled - 1/4 cup pomegranate seeds - 1 tablespoon olive oil - 1 tablespoon lemon juice - Salt and pepper to taste - Fresh herbs (such as basil or cilantro), for garnish To make this dish, you need ripe avocados. They should feel soft but not too mushy. Whole-grain bread gives a hearty base, full of flavor. I love using cherry tomatoes; they add a burst of sweetness. For a cool crunch, cucumber is perfect. Feta cheese gives a salty kick that pairs well with the creamy avocado. Pomegranate seeds provide a nice pop of color and taste. Don't forget the olive oil and lemon juice. They enhance the flavors and keep the avocado fresh. Always season with salt and pepper. Fresh herbs like basil or cilantro add a nice touch at the end. For the full recipe, check out Avocado Toast Delight 🥑. This recipe will guide you through each step for a perfect meal. Toasting your bread is key for a great avocado toast. I recommend using whole-grain bread for its nutty flavor and health benefits. Preheat your toaster or oven to a medium setting. Toast the slices until they are golden brown and crisp. This adds a nice crunch, making each bite more enjoyable. Start by slicing the ripe avocados in half. Remove the pit carefully with a spoon. Scoop the green flesh into a bowl. Use a fork to mash the avocado to your desired creaminess. I like it a bit chunky! Add one tablespoon of olive oil and one tablespoon of lemon juice. These add flavor and keep your avocado fresh. Season with salt and pepper to taste. Mix well until all ingredients blend together. Now, it’s time to spread the avocado mixture. Use a knife or a spatula to apply a generous layer on each slice of toast. Cover every edge to lock in flavor. For the first variation, layer halved cherry tomatoes on two slices. Sprinkle crumbled feta cheese over the tomatoes. This adds a savory kick. For the second variation, top the other two slices with thinly sliced cucumber. Scatter pomegranate seeds over the cucumbers for a sweet crunch. Finish by garnishing all four pieces with fresh herbs like basil or cilantro. These not only look great but also add a fresh taste. Enjoy your tasty meal! For the full recipe, check out Avocado Toast Delight. To make great avocado toast, start by choosing ripe avocados. Look for avocados that are slightly soft when you press them gently. Their skin should be dark green or almost black. Avoid hard avocados, as they are not ready to eat. Next, focus on your bread. Different breads require different toasting methods. If you use whole-grain bread, toast it until golden brown. This creates a sturdy base for your toppings. For softer breads, like sourdough, a quick toast is best to keep it fluffy. Spice up your toast with some extra flavor. Garlic powder adds depth, while red pepper flakes give a nice kick. You can also sprinkle in some smoked paprika for a smokey taste. For toppings, the options are endless. Eggs are perfect for protein. A poached egg on top of your toast creates a creamy sauce. Smoked salmon adds a rich, savory flavor. If you prefer something crispy, add some cooked bacon. How you arrange your toast matters. Start by placing the toast on a clean white plate. This makes the vibrant colors pop. Layer your toppings in a way that looks appealing. For example, place tomatoes in a line or arrange cucumber slices in a fan shape. Don't forget garnishes! Fresh herbs like cilantro or basil add color and aroma. A drizzle of olive oil on top gives a nice shine. You can serve your toast on a rustic wooden board for a cozy look. For fun, scatter some pomegranate seeds around the plate. This adds a burst of color and freshness. For a full recipe to get started, check out the Avocado Toast Delight. {{image_4}} The classic avocado and tomato combo brings a great taste. The creamy avocado pairs well with the juicy tomatoes. This mix is fresh and satisfying. The tomatoes add a burst of flavor and a nice color. The salt enhances the sweetness of the tomatoes. Cucumbers are cool and crisp. They add a nice crunch to your toast. They are low in calories and high in water, which helps keep you hydrated. Pomegranates are sweet and tangy. They pack a punch of antioxidants and vitamins. Together, they make a healthy and tasty topping. Get creative with your avocado toast! Try adding thinly sliced radishes for a peppery bite. Smoked trout gives a rich and savory flavor, perfect for seafood lovers. Chickpeas add protein and a creamy texture. You can mix and match these toppings for fun, tasty meals. To keep cut avocados from browning, store them in an airtight container. You can also squeeze some lemon juice on the flesh. The acid helps slow down the browning process. If you want, place the pit back in the avocado half. This can help reduce air exposure. If you have leftover avocado toast, wrap it tightly in plastic wrap. Store it in the fridge for up to a day. However, the bread may get soggy. For the best taste, eat the toast fresh. - Ripe avocados: Best if used within 1-2 days after cutting. - Whole-grain bread: Stays fresh for about a week at room temperature. - Cherry tomatoes: Good for 5-7 days in the fridge. - Cucumber: Lasts about 1 week in the fridge. - Feta cheese: Keeps well for 5-7 days after opening. - Pomegranate seeds: Use within 3-5 days for best flavor. - Olive oil: Should be used within 6 months for quality. - Lemon juice: Fresh juice lasts for about a week in the fridge. For the full recipe, check out the Avocado Toast Delight 🥑. Common ingredients in avocado toast include ripe avocados, whole-grain bread, and various toppings. You can add cherry tomatoes, cucumbers, feta cheese, or even pomegranate seeds. Olive oil and lemon juice help enhance flavor. Salt and pepper are essential for seasoning. Fresh herbs like basil or cilantro add a beautiful touch. Yes, you can prepare avocado toast ahead of time. To do this, toast the bread and prepare the avocado mixture. Store them separately. Keep the bread in a sealed bag to stay crisp. Place the avocado mixture in an airtight container. When ready to eat, spread the avocado on the toast for a fresh meal. If you want alternatives to bread, consider using sweet potatoes or rice cakes. Sweet potato slices can be roasted or toasted as a base. Rice cakes offer a crunchy option and are gluten-free. These substitutes provide a fun twist while still allowing you to enjoy the avocado goodness. To keep your avocado fresh and green, use lemon juice. The acid in lemon juice slows browning. Store cut avocados with the pit in them, as it helps preserve freshness. Wrap them tightly in plastic wrap. You can also store them with sliced onions, which can reduce browning. Avocado toast is a simple, tasty dish. We covered important ingredients, including ripe avocados, whole-grain bread, and fresh herbs. I shared steps to prepare, assemble, and customize it with different toppings. You can serve it beautifully to impress your guests. Explore these tips to make your avocado toast even better. With the right ingredients and techniques, you’ll create a dish full of flavor. Enjoy every bite, and let your creativity shine!

Savory Avocado Toast Variations for Tasty Meals

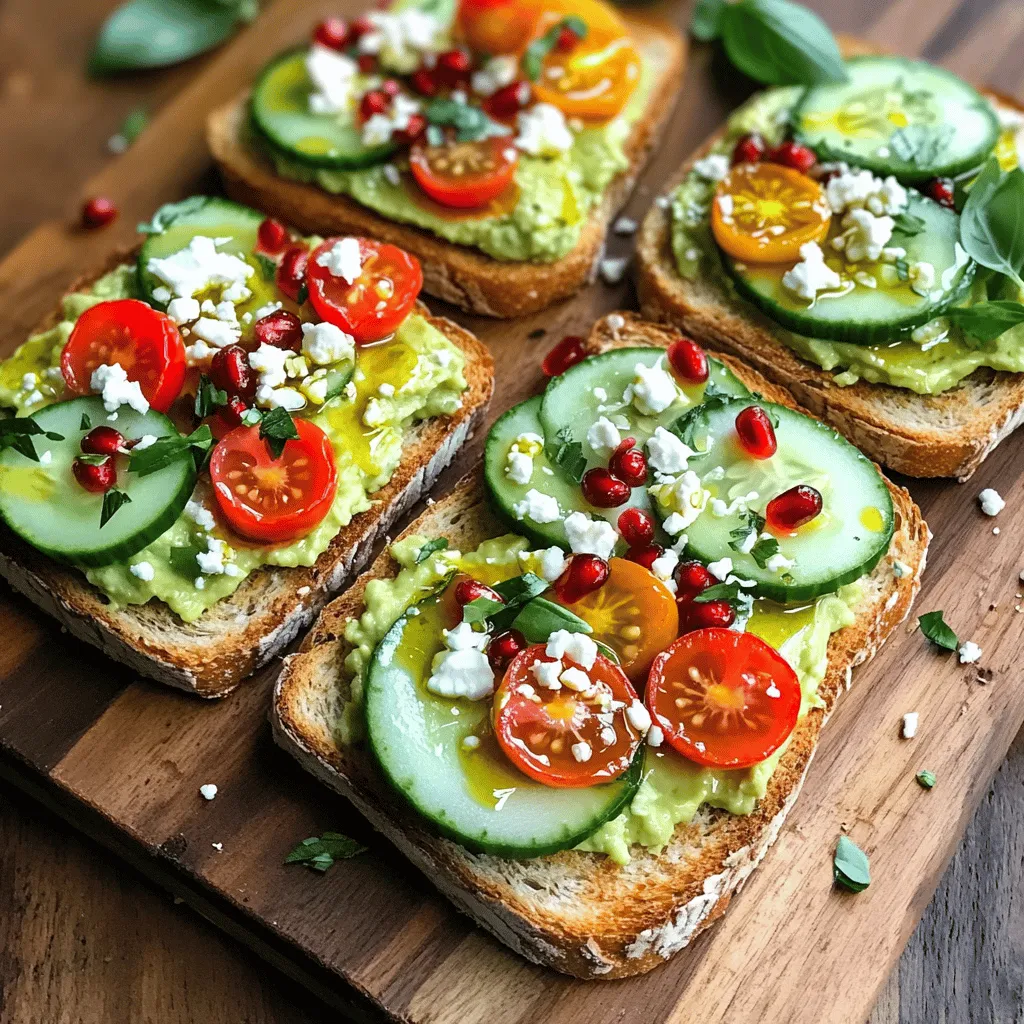
Avocado toast isn’t just a breakfast treat; it’s a canvas for your creativity! In this article, I’ll share delicious variations

To make a delicious chocolate lava cake, you need just a few key items: - 1/2 cup unsalted butter (plus extra for greasing) - 1 cup semi-sweet chocolate chips - 2 large eggs - 2 large egg yolks - 1/4 cup granulated sugar - 2 tablespoons all-purpose flour - 1/2 teaspoon pure vanilla extract - A pinch of salt These ingredients work together to create a rich and gooey center, making the cake truly special. While the cake is rich on its own, some garnishes can elevate it further: - Powdered sugar for dusting - Fresh berries for a pop of color - A scoop of vanilla ice cream that melts into the warm cake These extras add flavor and make your dessert look stunning, perfect for impressing guests. You can adjust some ingredients if needed: - Use dark chocolate chips for a more intense flavor. - Swap granulated sugar with brown sugar for a richer taste. - For a gluten-free option, use a gluten-free flour blend. - If you want a dairy-free version, try coconut oil in place of butter. These substitutions can help you tailor the recipe to your dietary needs while keeping it delicious. For the full recipe, refer to the details provided above. Start by preheating your oven to 425°F (220°C). Grab four 6-ounce ramekins. Use some unsalted butter to grease the insides well. Then, dust a little flour inside each ramekin. This helps the cakes come out easily after baking. In a microwave-safe bowl, put your butter and chocolate chips together. Heat it in the microwave for 30 seconds. Stir the mix well. If it’s not melted, keep heating it in 15-second bursts. Stir each time until it becomes smooth. Let it cool for a few minutes. This step is key to avoid cooking the eggs later. While the chocolate mixture cools, take another bowl. Whisk the eggs, egg yolks, and sugar together. Keep whisking until the mix gets thick and pale, about 3 minutes. Then, gently fold the cooled chocolate mixture into this egg mix. Be careful not to deflate it. Next, sift the flour, vanilla, and a pinch of salt over the batter. Fold these dry ingredients in gently. You want to mix until just combined. Now, fill each ramekin about three-quarters full with batter. Place them on a baking sheet for easy handling. Bake them for 12-14 minutes. The edges should be firm while the center stays soft. After baking, let the ramekins sit for 1 minute. Use a butter knife to run around the edges. Carefully flip each ramekin onto a plate and tap gently to release the cake. For serving, dust each cake with powdered sugar. Add some fresh berries on the side for color. If you want to be extra indulgent, top it with vanilla ice cream. It will melt into the warm cake, creating a delightful treat. For complete details, refer to the Full Recipe. To get that ooey-gooey center, timing is key. Bake the cakes for just 12-14 minutes. The edges should be firm, but the center needs to be soft. If you bake too long, the center will set. Use a toothpick to test. Insert it into the edge, not the center. If it comes out mostly clean, it's time to take them out. One common mistake is overmixing the batter. This will make the cakes dense. Instead, gently fold the chocolate into the egg mixture. Another mistake is not greasing the ramekins well. If they stick, you won’t get that perfect flip. Lastly, don’t skip resting the cakes after baking. This helps the structure before you invert them. Presentation makes a big difference. Dust each cake with powdered sugar for a snowy effect. Add fresh berries to the side for color and freshness. You can also serve with a scoop of vanilla ice cream. The warm cake and cold ice cream create a delightful contrast. For the full recipe, check out the details above. {{image_4}} Adding flavors to chocolate lava cake can make it even more exciting. You can stir in some raspberry puree for a fruity touch. The tartness of raspberries pairs well with rich chocolate. For a coffee kick, mix in espresso powder. This will enhance the chocolate taste and give your cake a bold flavor. You can also try adding orange zest for a citrusy twist. Each of these flavors brings a new life to the classic recipe. If you want a gluten-free version, it’s simple. Replace all-purpose flour with almond flour or gluten-free flour. Both options work well and keep the cake moist. Just make sure your chocolate chips are gluten-free too. This way, you can enjoy a delicious treat without worries. The texture may differ slightly, but the flavor remains rich and delightful. For a vegan chocolate lava cake, swap eggs with flaxseed meal. Mix one tablespoon of flaxseed meal with three tablespoons of water. Let it sit for five minutes to thicken. You can also use dairy-free chocolate and coconut oil instead of butter. This keeps the cake moist and tasty. Remember that the cooking time might change slightly, so keep an eye on the cakes as they bake. Try these options to enjoy a rich dessert that fits your diet. To explore the full recipe, check out the [Full Recipe]. After enjoying your chocolate lava cake, you may have some left. To store these treats, let them cool completely. Place them in an airtight container. This keeps them fresh for up to two days in the fridge. If you want to enjoy them later, freezing is a great option. To reheat your lava cakes, take them out of the fridge. Place them in the microwave for about 10 to 15 seconds. Check if they are warm enough. You want them hot but not overly cooked. If you froze them, let them thaw overnight in the fridge first. Then, follow the same reheating method. For freezing, wrap each lava cake tightly in plastic wrap. Then, place them in a freezer-safe bag or container. This helps prevent freezer burn. You can freeze them for up to three months. When you’re ready to eat, just thaw and reheat. Enjoy your delicious chocolate lava cake later! For the full recipe, check out the complete instructions to make this delightful dessert. Yes, you can prepare the batter ahead. Mix everything and pour it into greased ramekins. Cover them and store in the fridge for up to a day. When you’re ready, bake them straight from the fridge. This keeps the cakes fresh and ready to bake. If your cake did not ooze, it might have baked too long. Bake it for 12-14 minutes only. The edges should look firm, but the center must stay soft. If the center is set, it won’t ooze. Also, ensure the oven temperature is accurate. You can serve chocolate lava cake with a scoop of vanilla ice cream. Fresh berries add a nice touch, too. A drizzle of chocolate sauce or a sprinkle of powdered sugar makes it look fancy. Pairing it with whipped cream can also enhance the dessert. For the full recipe, check the section above. You now know all about chocolate lava cakes. We covered key ingredients, from must-haves to swaps. You learned step-by-step how to prep, bake, and serve these rich desserts. I shared tips for that perfect molten center and common mistakes to avoid. We also explored fun flavor twists and storage tips. Enjoy making your lava cakes and delight in every bite! Trust me, they are worth it.

Chocolate Lava Cake Rich and Decadent Delight

Indulge your senses with a Chocolate Lava Cake that’s rich and decadent! This delightful dessert boasts a warm, gooey center

Older posts
Newer posts
← Previous Page1 … Page31 Page32 Page33 … Page43 Next →

dsad

© 2025 tastyhatch • Built with GeneratePress

Our Policies

  • Copyright Policy
  • Cookie Policy
  • GDPR Policy
  • Privacy Policy
  • Disclaimer
  • Terms Of Use

More Information

  • Home
  • About
  • Contact
  • Appetizers
  • Dessert
  • Dinner
  • Drinks
©2025, tastyhatch About Back To Top