Skip to content
DisclaimerTerms Of UseGDPR PolicyCookie Policy

tastyhatch

  • Home
  • Drinks
  • Appetizers
  • Dinner
  • Dessert
  • About
  • Contact
  • Privacy Policy
DisclaimerTerms Of UseGDPR PolicyCookie Policy

Olivia

To make the red velvet cinnamon rolls, you will need these simple ingredients. They create a tasty treat that everyone loves. - 2 ½ cups all-purpose flour - 1 packet (2 ¼ teaspoons) instant yeast - ½ cup granulated sugar - ½ teaspoon salt - 2 tablespoons unsweetened cocoa powder - ½ cup milk (warmed to 110°F) - ¼ cup unsalted butter (melted) - 1 large egg - 2 tablespoons red food coloring - 1 teaspoon vanilla extract - ½ cup brown sugar (packed) - 2 teaspoons ground cinnamon - ¼ cup unsalted butter (softened for filling) - Cream cheese frosting (for topping) Each ingredient plays a key role. The flour gives structure, while the yeast helps the rolls rise. Sugar adds sweetness, and cocoa gives that rich flavor. The red food coloring makes the rolls pop with color, turning them into a festive dessert. You can find the full recipe within this article. It will guide you through every step to make these delightful rolls. Remember, great ingredients lead to great results! 1. Start by grabbing a large mixing bowl. Add 2 ½ cups of all-purpose flour. 2. Next, sprinkle in one packet of instant yeast, ½ cup of granulated sugar, ½ teaspoon of salt, and 2 tablespoons of cocoa powder. Whisk these dry ingredients well. 3. In another bowl, mix ½ cup of warmed milk, ¼ cup of melted unsalted butter, one large egg, 2 tablespoons of red food coloring, and 1 teaspoon of vanilla extract. Whisk until smooth. 4. Slowly pour the wet mixture into the dry ingredients. Stir gently until the dough forms. Add more flour as needed until a soft dough forms. 1. Turn the dough out onto a floured surface. Knead the dough for about 5-7 minutes. It should become smooth and elastic. 2. Shape the dough into a ball. Place it in a greased bowl. Cover with a towel and let it rise in a warm area for about 1 hour, or until it doubles in size. 1. Once the dough has risen, punch it down gently. Roll it out on a floured surface into a rectangle about 10x18 inches. 2. Spread ¼ cup of softened butter over the dough. In a small bowl, mix ½ cup of packed brown sugar and 2 teaspoons of ground cinnamon. Sprinkle this mixture evenly over the buttered dough. 3. Start from one long edge and roll the dough into a tight cylinder. Pinch the edges to seal it well. 4. Using a sharp knife, cut the roll into 12 equal pieces. Place the cut rolls in a greased 9x13 inch baking dish, leaving space in between. Cover with a towel and let rise for another 30 minutes. 1. Preheat your oven to 350°F (175°C). Once the rolls have risen, bake them for 25-30 minutes. They should look golden on top. 2. After baking, let the rolls cool for about 10 minutes. Drizzle with cream cheese frosting before serving. This recipe is simple and fun! Check the Full Recipe for more details. Enjoy your delicious red velvet cinnamon rolls! Using the right flour and yeast is key for great rolls. I prefer all-purpose flour for its balance. Instant yeast works fast and gives a nice rise. Always check the date on your yeast; old yeast won’t rise well. When it comes to warmth for rising, choose a cozy spot in your kitchen. Yeast loves warmth, so avoid cold areas. Try placing the dough near a warm oven or on a sunny windowsill. Cover it with a towel. This keeps the dough warm and helps it rise. For cream cheese frosting, I recommend a classic recipe. Mix cream cheese with butter, sugar, and vanilla. This is rich and pairs well with the rolls. You can also add a pinch of salt for balance. Drizzling techniques add charm. Use a squeeze bottle for precise drizzles. You can also use a spoon for a more rustic look. Just don’t be shy; a generous drizzle makes it more inviting! For special occasions, serve these rolls on a large platter. They look stunning stacked high. Warm rolls are best, so heat them just before serving. For plating, consider adding garnishes. A light dusting of cocoa powder or colorful sprinkles can brighten the dish. Fresh berries or mint leaves also add a pop of color. Your guests will love this visual appeal! {{image_4}} You can easily change the flavor of your red velvet cinnamon rolls. Adding chocolate chips gives a sweet surprise inside. Nuts like pecans or walnuts add a nice crunch, too. You can also explore different frosting flavors. Try a vanilla or chocolate frosting instead of cream cheese. This adds a unique twist to each roll, making them a fun treat! For a healthier version, consider using whole wheat flour. This adds fiber and nutrients, while still keeping the rolls soft. Reducing sugar can also make the rolls healthier. You can cut the sugar by a third without losing taste. Using mashed bananas or applesauce can help keep the sweetness. These small changes make a big impact on your cinnamon rolls! Making mini cinnamon rolls is simple and fun. Roll the dough into a smaller rectangle before cutting. You can cut them into smaller pieces for bite-sized treats. This is great for brunch or parties. Serve them on a platter with different frostings for guests to enjoy. You can even add toppings like sprinkles for a festive look. For more delicious ideas, check out the Full Recipe for Red Velvet Cinnamon Rolls! To keep your red velvet cinnamon rolls fresh, wrap them well. Use plastic wrap or foil. Store them in the fridge. They stay good for about 3 to 5 days. Make sure they are cool before wrapping. This keeps the rolls from becoming soggy. You can freeze unbaked rolls for later use. After cutting the rolls, place them on a baking sheet. Freeze them for about 2 hours until firm. Then, transfer them to a freezer bag. They can last up to 3 months in the freezer. To reheat frozen rolls, let them thaw in the fridge overnight. Once thawed, bake them at 350°F (175°C) for about 15 to 20 minutes. This will warm them up and make them soft again. For best results, reheat your leftover rolls in an oven. Preheat the oven to 350°F (175°C). Place the rolls in a baking dish. Cover them with foil to keep moisture in. Heat for about 10 to 15 minutes. You can also use a microwave, but they may not be as soft. Heat them for 20 to 30 seconds. Enjoy your delicious red velvet cinnamon rolls warm! Making Red Velvet Cinnamon Rolls takes about 2 hours. This includes 30 minutes for prep and about 1 hour for the dough to rise. You then bake for 25-30 minutes. Timing is key for the perfect roll! Yes, you can make the dough ahead of time! After mixing, cover it and place it in the fridge. Leave it overnight for a slower rise. This method helps develop flavors. Before rolling, let the dough sit at room temperature for 30 minutes. You can find pre-made Red Velvet Cinnamon Rolls at local bakeries. Many grocery stores also stock them in the bakery section. Check places like Whole Foods or specialty shops. Always look for fresh options for the best taste! If you want a change from cream cheese frosting, try buttercream. It’s sweet and fluffy. You could also use vanilla glaze for a lighter touch. For a fruity twist, consider a strawberry or raspberry frosting. Each option adds a unique flavor! This post covered how to make delightful red velvet cinnamon rolls from scratch. We discussed the key ingredients, detailed instructions, and helpful tips. You can also explore fun variations and storage methods to keep your rolls fresh. Whether you serve them for brunch or enjoy them as a special treat, these rolls will surely impress. Get ready to savor each bite and share these tasty creations with friends and family!

Red Velvet Cinnamon Rolls Delightful and Easy Recipe

Are you ready to elevate your breakfast game? These Red Velvet Cinnamon Rolls are not just tasty—they’re a feast for

Cooking creamy sausage rigatoni is easy when you have the right ingredients. Here’s what you need: - 12 oz. rigatoni pasta - 1 lb. Italian sausage (mild or spicy, with casings removed) - 1 cup heavy cream These three key items create a rich and satisfying meal. The rigatoni holds the sauce well due to its shape. The Italian sausage adds a savory flavor that pairs perfectly with the cream. - 1/2 teaspoon red pepper flakes - 1 cup fresh spinach, roughly chopped - Fresh basil leaves, for garnish Adding red pepper flakes gives a nice kick, while fresh spinach adds color and nutrients. Basil on top not only looks great but adds fresh flavor. Feel free to mix and match these optional items to make the dish your own. For the full recipe, check out the detailed instructions I provided earlier. - Bring Water to Boil: Start by filling a large pot with water. Add a good pinch of salt. Turn the heat on high until the water boils. This step is key for flavor. - Cook Pasta Al Dente: Once boiling, add the rigatoni. Cook according to the package instructions, usually about 10-12 minutes. Test a piece to make sure it is firm but not hard. Drain and set aside. - Heating Olive Oil: Grab a large skillet and heat one tablespoon of olive oil over medium heat. This oil will help to brown the sausage nicely. - Browning the Sausage: Add the Italian sausage to the hot skillet. Use a wooden spoon to break it into smaller bits. Cook for about 5-7 minutes until it turns a deep brown. Make sure it is fully cooked. - Adding Onion and Garlic: Once the sausage is browned, toss in one diced onion. Sauté for about 3-4 minutes until the onion looks soft. Add three minced garlic cloves and, if you like heat, toss in half a teaspoon of red pepper flakes. Cook for another 1-2 minutes until the garlic smells great. - Incorporating Cream and Broth: Now, gently pour in one cup of heavy cream and one cup of chicken broth. Stir well to mix all the flavors. Bring the mixture to a gentle simmer for about 5 minutes. This will thicken the sauce nicely. In this step-by-step guide, you'll find everything you need to make a delightful creamy sausage rigatoni. For the full recipe, refer to the earlier section. Cooking to Al Dente To make the perfect rigatoni, cook it until it's al dente. This means it should be firm to the bite. Generally, this takes about 10 to 12 minutes. Check the package for exact times. If you overcook it, the pasta can become mushy. To avoid this, taste the pasta a minute or two before the time is up. Properly Folding in Cheese When adding cheese to your sauce, do it slowly. This helps the cheese melt evenly. Remove the skillet from the heat first. Then, stir in the grated Parmesan cheese in small amounts. This makes a smooth and creamy sauce. If you add it too fast, you might end up with clumps. Serving Suggestions For a beautiful presentation, use shallow bowls. This allows the creamy sausage rigatoni to shine. Add a drizzle of olive oil on top. It gives a nice shine and flavor. Divide the pasta evenly among the bowls. Garnishing Your Dish Fresh basil leaves are a great garnish. They add color and a fresh taste. Just tear a few leaves and place them on top of each serving. You can also sprinkle more grated cheese if you like. These small touches make your dish look and taste gourmet. For the full recipe, check out the [Full Recipe]. {{image_4}} Using Alternative Sausages You can switch the Italian sausage for other types. Try chicken, turkey, or plant-based sausage. Each type adds a unique taste. These swaps let you cater to different diets. A spicy sausage brings a nice heat. A mild sausage creates a cozy flavor. Dairy-Free or Vegan Options For a dairy-free meal, use coconut cream instead of heavy cream. Nutritional yeast can replace Parmesan cheese. This option still keeps the dish creamy. You can also use lentils or mushrooms for added texture. These swaps will keep the dish rich and flavorful. Adding Vegetables Adding veggies boosts nutrition and taste. Try bell peppers, zucchini, or mushrooms. Sauté them with the onions for full flavor. Spinach is already in the recipe, but you can add kale or broccoli too. These veggies add color and make the dish pop. Incorporating Different Cheeses You can mix up the cheese to change the flavor. Try using ricotta for a creamy twist. Goat cheese adds tanginess that brightens the dish. For a sharper flavor, use aged cheddar. Each cheese choice makes the rigatoni unique and exciting. For the full recipe, check the details above. To keep your creamy sausage rigatoni fresh, store it in an airtight container. This will lock in flavor and keep it safe. Make sure to cool the dish to room temperature first. Once cooled, cover tightly and place it in the fridge. How long does it last in the fridge? You can enjoy leftovers for up to 3 days. After that, the quality may drop, and it might not taste as good. You can reheat creamy sausage rigatoni in two main ways: the microwave or stovetop. - Microwave: Place your serving in a microwave-safe dish. Cover it with a lid or paper towel to keep moisture in. Heat it for 1-2 minutes, stirring halfway through to ensure even heating. - Stovetop: For stovetop reheating, add a splash of chicken broth or cream to the pan. This helps revive the creamy texture. Heat over medium-low heat, stirring gently until warm. Tips for Keeping Creamy Texture: Always add a little liquid when reheating. This keeps your dish smooth and creamy instead of dry. Enjoy your creamy sausage rigatoni just as delicious as the first time! For the full recipe, check out the [Full Recipe]. How to Make it Spicier? To add spice, include red pepper flakes. Start with 1/2 teaspoon and adjust to taste. You can also use spicy Italian sausage for a bolder flavor. If you want more heat, try adding diced jalapeños or hot sauce. Can I Freeze Creamy Sausage Rigatoni? Yes, you can freeze this dish. Allow it to cool completely before packing it into an airtight container. It can last up to three months in the freezer. To reheat, thaw it in the fridge overnight and warm it on the stove with a splash of cream or broth. What Can I Serve with This Dish? Creamy sausage rigatoni pairs well with garlic bread or a fresh salad. A simple green salad with vinaigrette balances the richness of the pasta. You can also serve it with roasted vegetables for a healthy touch. Is it Possible to Make It Ahead of Time? Absolutely! You can prepare the sauce and cook the pasta ahead of time. Store them separately in the fridge. When ready to serve, combine them in a skillet, heat, and enjoy your creamy sausage rigatoni. For the full recipe, check the main section above. This blog post covered how to make delicious creamy sausage rigatoni. We discussed key ingredients like rigatoni, sausage, and cream. I shared detailed steps on cooking the pasta, preparing the sausage, and making the sauce. You can experiment with variations and storage tips too. Remember, cooking is all about having fun and being creative. Enjoy your dish and share it with friends and family! You’ll impress them with your skills.

Creamy Sausage Rigatoni Flavorful Dinner Delight

Looking for a fast, delicious dinner idea? You’ve just found it! In this blog post, I’ll share my favorite recipe

- Chicken thighs - Buttermilk - Fresh lemon zest - Lemon-flavored tea bags - All-purpose flour - Spices and seasoning - Vegetable oil - Garnish Where can you find these ingredients? Most items are at local grocery stores. Buttermilk and fresh lemon zest may be in specialty shops. Check online for lemon-flavored tea if your store doesn't carry it. For common substitutes, you can use yogurt instead of buttermilk. You can also skip lemon zest if you have lemon juice. The flavor won't be the same, but it will still be tasty. Use any chicken parts if you can't find thighs. Just adjust cooking time based on size. This Lemon Tea Fried Chicken recipe is simple and fun. You get to play with flavors and textures! - Start by boiling 1 cup of water in a small saucepan. - Once it boils, remove it from heat. - Add 2 lemon tea bags and steep for 5 minutes. - After steeping, take out the tea bags. - Let the brewed tea cool to room temperature. - In a large bowl, whisk together buttermilk, lemon zest, and cooled tea. - Add 4 chicken thighs, making sure they are fully covered. - Cover the bowl with plastic wrap. - Refrigerate for at least 2 hours, or overnight for best flavor. - In another bowl, mix 1 ½ cups flour, paprika, garlic powder, onion powder, cayenne, salt, and pepper. - Stir the mixture well, ensuring all spices are blended. - Once marinated, take the chicken out and let excess buttermilk drip off. - Dredge each piece in the flour mix, pressing lightly. - Place the coated chicken on a wire rack and let it rest for 10 minutes. - In a heavy skillet, pour about 2 inches of vegetable oil. - Heat oil to 350°F (175°C) on medium-high heat. - Carefully add coated chicken, skin side down. - Fry in batches to avoid overcrowding. - Cook for 7-8 minutes per side, until golden brown and the chicken reaches 165°F (74°C). - Once cooked, transfer chicken to a wire rack or paper towels to drain excess oil. - Let it rest for at least 5 minutes to keep it juicy. For the complete experience, check the Full Recipe. To get that crispy coating, use dry chicken. Pat it with paper towels before marinating. This helps the coating stick well. Use a seasoned flour mix, too. The spices enhance the flavor. Maintain the oil temperature at 350°F (175°C). Use a thermometer for accuracy. If the oil is too hot, the coating burns. If it's too cool, the chicken absorbs oil. Fry in batches. This keeps the temperature steady. Marinate your chicken for at least 2 hours. For best results, let it sit overnight. This allows the flavors to seep deep into the meat. The buttermilk makes the chicken tender. Add extra lemon zest to boost the lemon flavor. You can also include herbs like thyme or rosemary. This adds depth and freshness to the dish. Lemon Tea Fried Chicken pairs well with light side dishes. Try a fresh salad or classic coleslaw. The crunch and creaminess balance the crispy chicken. For drinks, serve iced tea or lemonade. These drinks complement the lemon flavor. A light beer or sparkling water can also be great choices. Enjoy your meal with friends or family for a delightful feast! {{image_4}} Want to turn up the heat? You can easily add spice to your Lemon Tea Fried Chicken. Just mix in more cayenne pepper or add crushed red pepper flakes to your flour coating. You can even use a spicy lemon tea blend for a unique kick. This variation is perfect for those who love bold flavors. The spicy notes will balance well with the lemony freshness. Trust me, this twist can make your fried chicken even more exciting! Herbs can take your chicken to the next level. You can swap lemon tea for other herbal teas. Try chamomile or mint for a different taste. Fresh herbs like thyme or rosemary can also add depth. Just chop them finely and mix them into your buttermilk marinade. This change will create a fragrant and tasty chicken dish that surprises your taste buds. Experimenting with herbs lets you craft flavors you love. You can choose different ways to cook your Lemon Tea Fried Chicken. Air frying gives you a healthier option. It needs less oil and still makes the chicken crispy. Just set your air fryer to 375°F (190°C) and cook the chicken for about 25 to 30 minutes. Flip halfway through for even cooking. If you prefer traditional frying, that’s great, too. This method gives you that classic crispy texture. Baking is another choice if you want a lighter meal. Preheat your oven to 400°F (200°C), place the chicken on a baking sheet, and bake for about 35 to 40 minutes. No matter the method, you’ll still enjoy that delightful lemon flavor! For the full recipe, check out [Full Recipe]. To keep your Lemon Tea Fried Chicken fresh, store it in the fridge. Place the chicken in an airtight container. Make sure it cools down before sealing it up. This way, it won’t trap steam, which can make the chicken soggy. The chicken stays good for 3 to 4 days in the fridge. Reheating is key to keeping it crispy. I recommend using an oven. Preheat your oven to 375°F (190°C). Place the chicken on a wire rack over a baking sheet. This lets air circulate around it, keeping it crispy. Heat for about 10 to 15 minutes, or until warmed through. You can also use an air fryer for a quicker option. If you want to freeze Lemon Tea Fried Chicken, first, let it cool completely. Wrap each piece in plastic wrap, then place them in a freezer-safe bag. Try to remove as much air as possible. This helps prevent freezer burn. You can freeze it for up to 3 months. When ready to eat, thaw in the fridge overnight before reheating. For the full recipe, visit the [Full Recipe]. Lemon Tea Fried Chicken is a unique dish that blends flavors of lemon and tea. The chicken soaks in a mix of buttermilk, lemon zest, and lemon tea. This gives it a bright, zesty flavor that is hard to resist. The result is crispy chicken with a hint of lemony goodness that makes it stand out. Check the internal temperature of the chicken. It should reach 165°F (74°C). You can use a meat thermometer for this. The chicken should also be golden brown and crispy on the outside. If the color looks good, but the heat is not right, keep cooking. Yes, you can! Marinating the chicken overnight allows the flavors to soak in deeper. This makes the chicken even more tasty. The longer it marinates, the juicier and more flavorful it becomes. Just make sure to keep it in the fridge. Lemon Tea Fried Chicken pairs well with many sides. You might enjoy it with a light side salad or some coleslaw. Other good options include mashed potatoes or corn on the cob. These sides balance the flavors and make a complete meal. Making lemon-flavored tea is simple. Just boil water and steep lemon tea bags for about five minutes. Remove the bags and let the tea cool. You can add fresh lemon slices for extra flavor. This tea is perfect for the marinade. You can use different cuts of chicken, like breasts or wings. Each cut will change the cooking time. Thighs stay juicier, while breasts cook faster. Just keep an eye on the temperature to ensure they cook properly. For more details on this recipe, check the Full Recipe. Lemon Tea Fried Chicken combines a unique zest with crispy goodness. You learned about the best ingredients, marinating techniques, and frying methods to achieve perfect results. Remember to consider variations and serving pairs to elevate your dish. Aim for crispy coating and flavorful meat. With proper storage and reheating, your leftovers can stay delicious. Enjoy this dish with family and friends, bringing them together over a delightful meal. Now, get cooking and savor every bite you create!

Lemon Tea Fried Chicken Crispy and Flavorful Delight

Get ready to spice up your dinner routine with Lemon Tea Fried Chicken! This dish isn’t just crispy; it bursts

- 4 boneless pork chops (approximately 1-inch thick) - 2 tablespoons olive oil - Salt and black pepper, to taste - 1 teaspoon garlic powder - 1 teaspoon smoked paprika - 1 medium onion, thinly sliced - 2 cups fresh mushrooms, sliced (such as cremini or button) - 1 cup chicken broth - 1 tablespoon Dijon mustard - 1 cup heavy cream - 1 teaspoon thyme (fresh or dried) - Fresh parsley, finely chopped (for garnish) For my irresistible smothered boneless pork chops, I focus on fresh, quality ingredients. The boneless pork chops are the star here. They should be about 1-inch thick for even cooking. I always use olive oil for searing. It gives a rich, deep flavor to the meat. Seasoning is key in this dish. I use salt, black pepper, garlic powder, and smoked paprika. These spices add depth and warmth. The smoked paprika is a game-changer, giving a subtle smokiness. Next, I layer in the veggies. Onions and mushrooms bring sweetness and earthiness. I slice the onions thinly for quick cooking. The mushrooms add a nice texture and soak up the sauce flavor. For liquid, I use chicken broth and Dijon mustard. The broth adds richness, and the mustard gives a tangy kick. Finally, the cream and thyme create a luxurious sauce. I use heavy cream for its rich texture. Fresh parsley makes a bright garnish, adding color and freshness to the dish. You can find the full recipe for these irresistible smothered boneless pork chops to make this delicious meal. First, you need to season your pork chops. Salt, black pepper, garlic powder, and smoked paprika are key. Generously coat both sides of the chops with these spices. This step ensures great flavor. For thickness, I recommend using boneless pork chops that are about 1-inch thick. This size cooks evenly and stays juicy. Next, it’s time to sear the pork chops. Start by heating 2 tablespoons of olive oil in a large skillet over medium-high heat. The oil should shimmer before you add the chops. Sear each chop for about 4-5 minutes on each side. You want a rich, golden-brown crust. To achieve this crust, avoid moving the chops too much while they cook. Let them sit in the pan to form that nice color. Now let’s make the sauce. After removing the chops, add sliced onions and mushrooms to the same skillet. Sauté these for about 5-7 minutes. Stir often until the onions are clear and the mushrooms are tender. Next, pour in 1 cup of chicken broth and 1 tablespoon of Dijon mustard. Scrape the tasty bits stuck to the pan. Let this mixture simmer for about 3 minutes. This helps the flavors come together. To thicken the sauce, reduce the heat and whisk in 1 cup of heavy cream and 1 teaspoon of thyme. Stir for about 3-4 minutes until it thickens. Now, return the seared pork chops to the skillet and spoon the sauce over them. Cover and simmer for 5-7 minutes. Aim for an internal temperature of 145°F (63°C). For the complete instructions, refer to the Full Recipe. Enjoy making this delicious dish! To make your smothered pork chops shine, adjust the spices. You can add more garlic powder or smoked paprika for a bolder taste. If you like it spicy, a pinch of cayenne pepper works wonders. You can also enhance richness by adding a splash of white wine or a spoonful of apple cider vinegar to the sauce. These small tweaks make a big difference! For juicy pork chops, aim for a cooking temperature of 145°F (63°C). Use a meat thermometer to check. A cast-iron skillet gives you a great sear, but any heavy skillet will do. Once cooked, let the pork chops rest for about five minutes. This step keeps the juices inside, making every bite tender and flavorful. Pair your smothered pork chops with creamy mashed potatoes or fluffy rice. The sauce is perfect for soaking into these sides. For a colorful plate, add steamed green beans or roasted broccoli. To make it look fancy, sprinkle fresh parsley on top. This adds a nice touch and fresh flavor. These simple steps will impress your guests! {{image_4}} You can switch to bone-in pork chops for more flavor. Bone-in chops often stay juicier during cooking. If you prefer leaner meats, try turkey cutlets or chicken breasts. Both options work well with the same sauce. Want to change up the veggies? You can add spinach or bell peppers for a colorful twist. These vegetables add vitamins and a fresh taste. For herbs, rosemary or basil will bring a new depth of flavor. Just toss them in the sauce as it simmers. If you need a gluten-free dish, use gluten-free broth. This keeps the recipe safe for those with gluten issues. For a dairy-free or low-fat option, swap heavy cream for coconut milk or a dairy-free cream alternative. This change still gives you a creamy texture without the dairy. For the full recipe, check out the details above. To store your smothered boneless pork chops, let them cool first. Place them in an airtight container. This keeps them fresh for longer. You can store them in the fridge for up to four days. If you want to keep them longer, freezing is a good option. When it’s time to eat your leftovers, reheating is key. I suggest using the stovetop for best results. Heat a skillet over low heat and add a splash of chicken broth. Place the pork chops in the skillet and cover it. This method helps keep the meat juicy. Stir the sauce occasionally to avoid burning. To freeze the smothered pork chops, make sure they are fully cooled. Wrap them tightly in plastic wrap, then place in a freezer bag. Remove as much air as possible. They can last up to three months in the freezer. When you’re ready to eat, thaw them in the fridge overnight. Reheat them gently in the skillet, just like before, to keep the flavors intact. If you want a creamy texture but need an alternative, try these options: - Coconut milk: It adds a light sweetness. - Greek yogurt: Use it for a tangy twist. - Cream cheese: Mix with milk for a rich flavor. - Silken tofu: Blend it for a vegan option. These substitutes work well in sauces and keep the dish creamy. To know if your pork chops are done, check the internal temperature. Aim for 145°F (63°C). Look for these signs: - The meat should change from pink to white. - Juices should run clear, not pink. - The texture should be firm yet slightly springy. Using a meat thermometer helps ensure perfect doneness every time. Yes, you can prepare this dish ahead of time. Here are some tips: - Cook the pork chops: Follow the recipe but do not add the sauce yet. - Store separately: Keep the chops and sauce in airtight containers. - Reheat carefully: Warm the sauce on low heat and add the chops back. This method keeps the flavors fresh and the pork tender. Enjoy your meal! This blog post walked you through cooking boneless pork chops with a rich sauce. You learned about key ingredients such as seasoning, vegetables, and cream. I shared tips on preparing the pork, cooking techniques, and enhancing flavors. Remember, you can make this recipe your own with different meats and flavors. Whether you enjoy it fresh or saved for later, the steps are simple. Get ready to impress with a tasty dish any night of the week. Enjoy your cooking!

Irresistible Smothered Boneless Pork Chops Recipe

Get ready to impress your family and friends with irresistible smothered boneless pork chops! This easy recipe combines juicy pork

- 4 boneless, skinless chicken breasts - 4 slices of ham (preferably prosciutto for depth of flavor) - 4 slices of Swiss cheese - 1 cup all-purpose flour - 2 large eggs, beaten - 1 cup panko breadcrumbs - 1 teaspoon garlic powder - 1 teaspoon dried thyme - Salt and pepper to taste - ½ cup cream cheese, softened (for a rich, creamy filling) - ¼ cup Dijon mustard (adds a tangy kick) - 2 tablespoons fresh parsley, chopped (for garnish) - Cooking oil (for frying) To boost the taste of your Chicken Cordon Bleu, consider adding: - Smoked paprika for a smoky flavor - Fresh herbs like basil or oregano for an aromatic touch - A splash of white wine to the frying oil for depth The right oil makes a difference in frying. Use these oils for best results: - Canola oil: High smoke point and neutral flavor - Peanut oil: Adds a subtle nutty taste with a high smoke point - Olive oil: Great for a rich flavor, but use with care due to a lower smoke point These choices help you achieve that perfect crispy, golden crust while keeping the inside creamy and delicious. For the full recipe, check out the details above. Start by preheating your oven to 375°F (190°C). Take one chicken breast and place it between two sheets of plastic wrap. Use a meat mallet to gently pound it until it is about ¼ inch thick. This step helps the chicken cook evenly. Repeat this for all the chicken breasts. Make sure they are nice and flat for easy rolling. For each chicken breast, spread 1 tablespoon of softened cream cheese evenly over the top. Next, add 1 tablespoon of Dijon mustard for that tangy flavor. Layer on 1 slice of ham and 1 slice of Swiss cheese. This filling balances the rich and creamy elements of the dish. Set up three shallow dishes. One should hold seasoned flour mixed with garlic powder, thyme, salt, and pepper. The second dish contains beaten eggs. The last dish is filled with panko breadcrumbs. Take each rolled chicken breast. First, dredge it in the seasoned flour, shaking off any extra. Next, dip it in the egg wash, letting the excess drip off. Finally, roll it in the panko breadcrumbs. Make sure each piece is well-coated for that crispy finish. Ready to fry? Heat about ¼ inch of cooking oil in a large skillet over medium-high heat. Once shimmering, place the chicken rolls in the hot oil. Fry them for about 4-5 minutes on each side until they are golden brown and crispy. Avoid overcrowding the pan. You may need to fry in batches. Once fried, transfer the chicken rolls to a baking dish and place them in your preheated oven. Bake for an extra 15-20 minutes. Ensure the internal temperature reaches 165°F (74°C) for safety. After baking, remove any toothpicks from the chicken rolls. Slice each piece diagonally and arrange them on a platter. Sprinkle with chopped parsley for a pop of color. For the full recipe, check out the complete guide! For that ideal crunch, use panko breadcrumbs. They are lighter than regular breadcrumbs. Make sure to coat the chicken well. Dredge it in seasoned flour, then dip into the egg, and finally roll in panko. This method creates a thick, crispy layer. Fry the chicken until golden brown. Fry in batches to keep the oil hot. To keep the filling creamy, use softened cream cheese. Mix it with Dijon mustard for extra flavor. Spread both evenly on the chicken before adding ham and Swiss cheese. This combination keeps the filling rich and moist. Don’t skip this step; it makes all the difference in taste. Fry each chicken roll for about 4-5 minutes per side. This helps achieve a golden crust. Once fried, bake the chicken in the oven for 15-20 minutes. This ensures the chicken cooks through without drying out. Always check the internal temperature; it should reach 165°F (74°C). This way, you secure a juicy and safe meal. For the full recipe, check out the detailed steps to create this dish! {{image_4}} If you want a lighter version of crispy creamy chicken cordon bleu, try swapping out a few ingredients. Use turkey or chicken ham instead of regular ham. This change cuts down on fat and calories while still giving you that savory taste. For cheese, opt for low-fat Swiss or even mozzarella. These options melt well and keep the dish creamy. Instead of cream cheese, choose Greek yogurt for a tangy twist. It adds creaminess but with fewer calories. While Swiss cheese is classic, you can experiment with other cheeses. Try provolone for a sharper taste. It melts beautifully and adds a nice zing. Gouda gives a rich, nutty flavor, which is excellent for a unique twist. If you enjoy blue cheese, add a little for a bold kick. Just remember, different cheeses can change the dish’s overall flavor. Mix and match to find your favorite! Get creative with your stuffing! Instead of ham and Swiss, try chicken or spinach for a veggie-packed version. Adding roasted red peppers gives a sweet and smoky flavor. You can also use sun-dried tomatoes for a Mediterranean flair. If you want a spicy kick, add jalapeños or pepper jack cheese. This flexibility allows you to tailor the dish to your tastes. The full recipe can guide you through these variations while keeping the dish delicious. To keep your chicken cordon bleu fresh, store leftovers in an airtight container. Let the chicken cool down first. Place parchment paper between layers to avoid sogginess. Your leftovers will stay tasty for up to three days in the fridge. You can freeze both uncooked and cooked chicken cordon bleu. For uncooked rolls, wrap each one tightly in plastic wrap, then place them in a freezer bag. This way, they won’t stick together. You can freeze them for up to three months. For cooked rolls, let them cool, then wrap and freeze them. They will keep well for about two months. To reheat your chicken cordon bleu and keep it crispy, use the oven. Preheat the oven to 375°F (190°C). Place the chicken on a baking sheet and heat for about 15-20 minutes. This method helps keep the coating crunchy. Avoid the microwave, as it can make the chicken soggy. For extra crunch, you can also briefly pan-fry them again in a bit of oil. To keep your chicken juicy, pound it evenly. This helps it cook at the same rate. Use a meat thermometer to check the temperature. Chicken should reach 165°F to be safe and tender. Also, don’t overcook it. Frying and then baking helps seal in moisture. Yes, you can prepare Chicken Cordon Bleu ahead of time. Assemble the rolls and coat them, then place them in the fridge for a few hours. You can also freeze them. Just remember to thaw before frying or baking. This saves time on busy days. Many sides go well with Chicken Cordon Bleu. Here are some tasty options: - Mixed greens salad - Roasted vegetables - Garlic mashed potatoes - Steamed asparagus - Rice pilaf These sides complement the rich flavors of the chicken. They also add color and texture to your plate. For the full recipe, check out the [Full Recipe]. You can make Crispy Creamy Chicken Cordon Bleu easy and fun. Start with the right ingredients, like chicken breasts and tasty cheese. Follow the simple steps for a delicious meal. Remember the tips for crispiness and creaminess. Try different flavors and store leftovers properly. Your cooking can impress family and friends. Enjoy your cooking journey with this classic dish!

Crispy Creamy Chicken Cordon Bleu Simple and Tasty

Are you ready to impress your family with a dish that combines crunch and creaminess? In this blog post, I’ll

- 4 bone-in pork chops - Salt and freshly ground black pepper, to taste - 1 tablespoon extra-virgin olive oil - 1 medium onion, thinly sliced - 2 cloves garlic, minced - 1 teaspoon smoked paprika - 1 teaspoon dried thyme leaves - 1 cup beef broth - 1 cup heavy cream - 4 large potatoes, peeled and thinly sliced - 1 cup shredded sharp cheddar cheese - 1/2 cup grated Parmesan cheese - Fresh parsley, chopped, for garnish Gathering fresh ingredients is key to a great dish. I love using bone-in pork chops. They add flavor and keep the meat juicy. Salt and black pepper are essential for taste. Olive oil helps sear the chops perfectly. Next, onions and garlic add a wonderful aroma. Smoked paprika gives a nice depth. Thyme adds a fresh note. Beef broth and heavy cream create a rich sauce that makes everything creamy and dreamy. For the base, we need potatoes. They will soak up all the flavors. Lastly, sharp cheddar and Parmesan cheese finish the dish with a cheesy crust. Don’t forget fresh parsley for a bright garnish! This recipe is a delightful mix of flavors and textures. It’s perfect for family dinners or special occasions. Check out the Full Recipe to create this delicious meal! - Preheat the oven: Start by preheating your oven to 375°F (190°C). This helps cook the casserole evenly. - Seasoning pork chops: Generously season both sides of the pork chops with salt and freshly ground black pepper. This adds great flavor. - Searing the pork chops: In a large skillet, heat the olive oil over medium-high heat. When the oil shimmers, add the pork chops. Sear each side for about 4-5 minutes until golden brown. Remove and set aside. - Sautéing onions and garlic: In the same skillet, lower the heat to medium. Add the sliced onions and sauté for 3-4 minutes until soft. Then, add the minced garlic and sauté for another minute until fragrant. - Creating the creamy sauce: Sprinkle in the smoked paprika and dried thyme. Pour in the beef broth and heavy cream. Stir well and simmer for about 5 minutes to let the sauce thicken. Adjust seasoning with salt and pepper if needed. - Layering potatoes and sauce: Lightly grease a 9x13 inch casserole dish. Layer half of the thinly sliced potatoes on the bottom. Drizzle half of the creamy sauce over the potatoes. Then, sprinkle half of the shredded cheddar cheese. - Adding pork chops and remaining ingredients: Place the seared pork chops on top of the cheese layer. Add the rest of the sliced potatoes, followed by the remaining creamy sauce. This ensures every bite is full of flavor. - Covering and baking time: Cover the casserole dish tightly with aluminum foil and place it in the oven. Bake for 45 minutes. - Final uncovered baking steps: After 45 minutes, carefully remove the foil. Continue to bake for another 15-20 minutes. The dish is done when the potatoes are tender and the cheese is bubbly and golden brown. For the full recipe, check the detailed instructions to create this delicious dish! To boost the taste of your smothered pork chop and scalloped potato casserole, consider these herbs and spices: - Rosemary: Adds a lovely pine flavor. - Oregano: Offers a warm, earthy note. - Garlic powder: Enhances the savory depth. Marinating your pork chops can also help. Try a mix of olive oil, garlic, and herbs. Let them soak for at least 30 minutes. This adds flavor and moisture. To avoid mushy potatoes, slice them thin but not too thin. Aim for about 1/8 inch thick. This keeps them tender but firm. Also, par-cook the potatoes for a few minutes before layering them in the dish. For a cheesy crust, mix the cheddar and Parmesan well. Spread them evenly on top. This ensures every bite is creamy and cheesy. Pair your casserole with bright sides. Steamed green beans or a crisp salad work well. They add color and crunch to your meal. For presentation, serve directly from the casserole dish for a cozy feel. You can also scoop out portions onto plates. Top each with fresh parsley for a pop of color. Explore more cooking tips and recipes on my site to enhance your culinary skills! Check out the Full Recipe for step-by-step guidance. {{image_4}} You can switch pork for chicken or beef. Chicken thighs work well and stay juicy. Beef can add a rich flavor, too. If you want a dairy-free dish, use coconut milk instead of cream. For cheese, try a nut-based option. These swaps can keep the dish tasty. Adding veggies can make this dish even better. Broccoli or bell peppers offer a nice crunch. You can also add spinach for a pop of green. For cheese, consider gouda or mozzarella. These options can give your casserole a fun twist. Want to save time? Use a slow cooker. Just layer everything inside, set it, and forget it. It will cook while you do other things. You can also use an Instant Pot for faster cooking. Just follow the same steps but adjust the cooking time. This way, you get a comforting meal in no time. To store leftovers, let the dish cool first. Once cool, place it in an airtight container. This keeps the flavors fresh and prevents drying out. Try to eat the leftovers within three days for the best taste. Use glass or plastic containers that seal well. If you want to freeze the casserole, let it cool completely. Cut it into portions for easy use later. Wrap each piece in plastic wrap, then place them in a freezer-safe bag. This helps prevent freezer burn. When you're ready to eat, thaw it in the fridge overnight. To reheat, bake it in the oven at 350°F (175°C) until heated through. In the fridge, the casserole lasts up to three days. In the freezer, it can keep for about three months. Signs of spoilage include off smells, mold, or an unusual texture. If you see any of these signs, it’s best to toss it. Always trust your senses to ensure safety. Yes, you can use boneless pork chops. They will cook faster than bone-in chops. Just ensure they are evenly seasoned. Sear them until golden brown. This will add great flavor. Adjust your cooking time to avoid overcooking. You can freeze the casserole for up to three months. Make sure it is cooled completely before freezing. Use an airtight container or freezer bag to store it. Label it with the date. This way, you can track its freshness. To reheat, first, thaw the casserole in the fridge overnight. Preheat your oven to 350°F (175°C). Cover the dish with foil to keep it moist. Heat for about 30-40 minutes or until it's warm throughout. You can uncover it for the last few minutes to crisp up the cheese. - How long do I bake the casserole? Bake for 45 minutes covered, then 15-20 minutes uncovered. - Can I add vegetables? Yes! Consider adding broccoli or bell peppers for extra nutrition and flavor. - What if I don’t have beef broth? Chicken broth works well as a substitute, too. This blog post covered making a delicious smothered pork chop and scalloped potato casserole. You learned about the key ingredients and how to prepare them. The step-by-step instructions make cooking simple. Tips and variations offer ways to tweak the dish to your taste. Remember, you can store leftovers properly and even freeze them for later. I hope you feel inspired to try this easy casserole at home. Your family will love it, and it might become a new favorite!

Smothered Pork Chop and Scalloped Potato Casserole Delight

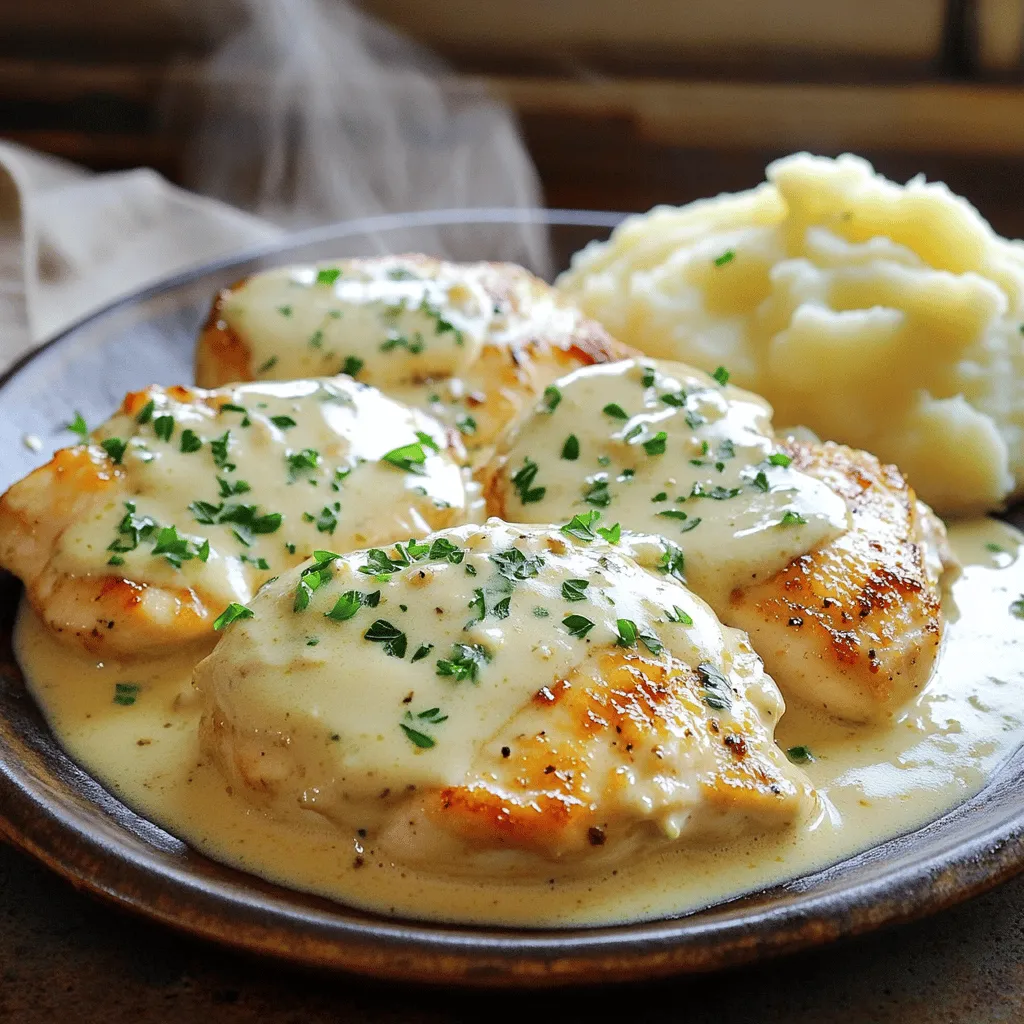
Welcome to your next favorite comfort food! In this post, I’ll show you how to make Smothered Pork Chop and

- 4 boneless, skinless chicken breasts - 6 cloves garlic, minced - 1 cup heavy cream - Seasonings: - 1 teaspoon Italian seasoning - 1 teaspoon smoked paprika - Salt and freshly ground black pepper, to taste - 4 tablespoons olive oil - 1 tablespoon unsalted butter - 1 cup low-sodium chicken broth - Fresh parsley, finely chopped (for garnish) - First, season the chicken. - Use salt, black pepper, smoked paprika, and Italian seasoning. - Cover both sides well for the best flavor. - Next, prepare your cooking area. - Gather all your ingredients and tools. - Start by searing the chicken. - Heat olive oil in a large skillet over medium-high heat. - Carefully add the chicken breasts. - Cook for about 5-7 minutes per side. - The chicken should be golden brown and reach 165°F. - After cooking, remove the chicken and let it rest. - Now, sauté the garlic. - In the same skillet, add butter. - Once melted, add minced garlic. - Sauté for about 1 minute until fragrant. - Next, make the sauce. - Pour chicken broth into the skillet. - Scrape browned bits from the pan for flavor. - Bring to a gentle simmer and cook for 2-3 minutes. - Stir in heavy cream and simmer for 3-4 minutes. - This thickens the sauce, making it rich and creamy. - Time to combine chicken and sauce. - Return the chicken to the skillet. - Nestle it into the creamy garlic sauce. - Spoon the sauce over the chicken to coat it. - Cook for an additional 2-3 minutes to warm through. - Finally, garnish before serving. - Remove from heat and add chopped parsley. - Serve hot with your choice of sides. - For a great meal, try creamy mashed potatoes or rice. For the complete preparation process, refer to the Full Recipe. To get that perfect sear on chicken, start with a hot skillet. Use medium-high heat and add olive oil. Wait until the oil shimmers before adding chicken. This helps create a nice golden crust. Cook the chicken for about 5-7 minutes on each side. Use a meat thermometer to check for an internal temperature of 165°F (74°C). For garlic sautéing, make sure your pan is not too hot. When you add minced garlic, it can burn quickly. Cook it for about one minute, stirring all the time. Once it’s fragrant and golden, you’ll know it’s ready. This step adds depth to your creamy garlic sauce. Want to boost the flavor? Try adding a pinch of red pepper flakes for heat. You can also mix in a bit of lemon zest for a bright touch. Experiment with herbs like thyme or rosemary. These options can make your dish stand out. For sides, creamy garlic chicken pairs well with fluffy rice or creamy mashed potatoes. You can also serve it with steamed veggies for a fresh contrast. Choose sides that soak up the sauce for a delightful meal. If you want to swap proteins, turkey works well in this dish. Tofu is a great choice for a vegetarian option. Just make sure to cook them until golden and crispy. It’s a fun twist that keeps the flavors intact. For a dairy-free alternative, use coconut cream or a plant-based cream. This keeps the sauce rich without dairy. Adjust the seasoning to match your taste. You can add fresh herbs like basil or cilantro for different profiles. These herbs can change the entire flavor of the dish. If you like spice, try adding jalapeños or cayenne pepper. Adjust the heat to your liking for a customized meal. For the full recipe, check out the details above and enjoy your cooking adventure! To store your creamy garlic chicken, let it cool first. Place the leftovers in a container. Use an airtight container to keep the dish fresh. Glass containers work well, but you can also use plastic ones. Make sure to label the container with the date. This helps you track how old the food is. When reheating, I recommend using the stove. Heat it in a skillet over low heat. Stir gently to avoid burning the sauce. If you use a microwave, do it in short bursts. This helps prevent the sauce from separating. Add a splash of chicken broth or cream if the sauce thickens too much. How to make creamy garlic sauce? To make the sauce, sauté garlic in butter, then add chicken broth and cream. Let it simmer until thick. Can I substitute heavy cream? Yes, you can use half-and-half or coconut cream for a lighter option. How long will leftovers last? Leftovers can last up to three days in the fridge if stored properly. What to serve with creamy garlic chicken? I suggest creamy mashed potatoes, fluffy rice, or vibrant steamed veggies as great sides. Can I make this recipe in advance? Yes, you can prepare the chicken and sauce ahead of time. Just reheat before serving. Is this recipe suitable for meal prep? Absolutely! It stores well and reheats nicely, making it perfect for meal prep. {{image_4}} This article covered the key ingredients for creamy garlic chicken and how to prepare it. I shared step-by-step instructions, tips for perfect cooking, and variations to suit your taste. Whether you stick to chicken or try different proteins, the rich flavors will impress. Remember to store your leftovers properly and reheat them carefully. Enjoy your cooking journey, and don’t hesitate to experiment with new flavors. Happy cooking!

Creamy Garlic Chicken Savory and Simple Delight

Craving a dinner that’s both easy and full of flavor? You’re in the right place! In this post, I’ll share

- 4 bone-in pork chops (approximately 1 inch thick) - Salt and freshly ground pepper, to taste - 2 tablespoons extra virgin olive oil - 1 medium onion, thinly sliced - 2 cloves of garlic, minced - 1 cup low-sodium chicken broth - 1 tablespoon Worcestershire sauce - 1 teaspoon dried thyme - 1 teaspoon smoked paprika - 1 cup heavy cream - 1 tablespoon cornstarch mixed with 2 tablespoons cold water (optional, for thickening) - Fresh parsley, finely chopped (for garnish) You can add a few extra ingredients to boost taste. For a tangy twist, try adding a splash of lemon juice. A dash of hot sauce can bring some heat. If you prefer a sweeter sauce, consider adding a tablespoon of honey or brown sugar. You can swap some ingredients for different flavors. Use boneless chops if you like. Chicken broth can be replaced with vegetable broth for a lighter option. Instead of heavy cream, you can use coconut milk for a dairy-free version. If you want less salt, use low-sodium options for all broth and sauces. First, take your pork chops and pat them dry with a paper towel. This helps the seasoning stick better. Then, rub salt and pepper on both sides of the chops. Don’t be shy with the seasoning; it adds great flavor. Let the chops sit for a few minutes. This step allows the salt to penetrate the meat. Next, heat two tablespoons of extra virgin olive oil in a large skillet over medium-high heat. When the oil shimmers, it's time to add your pork chops. Sear each chop for about 4-5 minutes on each side. You want a nice golden brown crust. This crust locks in the juices and adds flavor. Once done, remove the chops and place them on a plate. In the same skillet, add the sliced onions. Sauté them for 3-4 minutes until they become soft and clear. Now, add the minced garlic and cook for another minute. The garlic should smell fragrant. Pour in one cup of low-sodium chicken broth and one tablespoon of Worcestershire sauce. Use a wooden spoon to scrape any tasty bits stuck on the skillet. Stir in one teaspoon of dried thyme and one teaspoon of smoked paprika. Let this mixture simmer gently. After a few minutes, return the pork chops to the skillet. Spoon some of that delicious sauce over each chop. Cover the skillet with a lid and lower the heat. Allow the chops to simmer for about 15 minutes. This helps the meat absorb the flavors. After 15 minutes, remove the lid and stir in one cup of heavy cream. If you want a thicker sauce, mix one tablespoon of cornstarch with two tablespoons of cold water and add it now. Let it cook for an additional five minutes. Taste the sauce and adjust the seasoning if needed. Finally, place each chop on a plate, spoon the creamy sauce over them, and enjoy! For a colorful touch, garnish with finely chopped fresh parsley. You can also serve these chops with fluffy mashed potatoes or rice to soak up that rich sauce. To get a great sear, start with a hot skillet. Heat your olive oil until it shimmers. This means it is ready. Place the pork chops in the pan without crowding. This helps them brown nicely. Cook for about four to five minutes on each side. Watch for a golden crust. It adds flavor and texture to your dish. Simmering is key for tender pork chops. After searing, return the chops to the skillet. Cover them and reduce the heat. This slow cooking makes the meat juicy. The sauce also adds flavor. Let them cook for about 15 minutes. This step is crucial for a rich, tasty meal. One mistake is not seasoning enough. Salt and pepper enhance the pork's flavor. Another mistake is moving the meat too soon. Let the chops sear without flipping them too early. Lastly, don’t skip the simmering step. It keeps the pork tender and juicy. Follow these tips for the best result in your delicious smothered pork chops. {{image_4}} You can easily switch up flavors in your smothered pork chops. Try using different herbs and spices. For a fresh taste, use rosemary or sage. These herbs add depth and richness. If you like heat, add cayenne or chili powder. For a sweet touch, cinnamon can bring warmth. Experimenting with spices can change the dish completely. The cream sauce is key to this dish, but you can change it. Instead of heavy cream, try sour cream for a tangy kick. Greek yogurt is also a great light option. It adds creaminess without the extra fat. For a dairy-free choice, use coconut milk. It gives a unique flavor and keeps it rich. You can make this meal fit dietary needs. For a low-fat option, use lean pork chops. You can also reduce the amount of cream. Use more broth and less cream for a lighter sauce. Add veggies like mushrooms or spinach to boost nutrition. This way, you keep the taste while making it healthier. For more detailed steps on making these variations, check out the Full Recipe! To keep your smothered pork chops fresh, store them in an airtight container. This helps prevent moisture loss and keeps the meat juicy. Make sure to let the pork chops cool to room temperature before placing them in the fridge. This avoids condensation, which can lead to sogginess. Properly stored, they can last up to three days in the refrigerator. To reheat your pork chops, use the oven or stovetop. For the oven, preheat it to 350°F (175°C). Place the chops in a baking dish, cover with foil, and heat for about 15-20 minutes. If you prefer the stovetop, warm them in a skillet over medium heat. Add a splash of chicken broth to keep them moist. Heat until they are warmed through, about 5-7 minutes. You can freeze leftover smothered pork chops for up to three months. Wrap each chop tightly in plastic wrap, then place them in a freezer bag. Remove as much air as possible to avoid freezer burn. When you’re ready to eat, thaw them in the fridge overnight. Reheat as mentioned above. This method keeps the flavors intact and makes your meal quick and easy later on. You can serve many sides with smothered pork chops. Here are some great options: - Fluffy mashed potatoes - Fragrant rice - Steamed green beans - Roasted vegetables - Creamy coleslaw These sides balance the rich sauce and make your meal complete. To add spice to your pork chops, try these tips: - Add cayenne pepper to the seasoning mix. - Use hot sauce in the cream sauce. - Mix in diced jalapeños while cooking the onions. - Swap smoked paprika for regular paprika. These adjustments will give your dish a nice kick. Yes, you can use a slow cooker! Follow these steps: 1. Sear the pork chops first for flavor. 2. Place them in the slow cooker. 3. Add the sautéed onions, garlic, broth, and seasonings. 4. Cook on low for 6-8 hours. 5. Stir in the cream before serving. This method makes the pork chops super tender and tasty. The recipe for delicious smothered pork chops is easy and rewarding. You will create a rich and creamy sauce that pairs perfectly with tender pork. Here’s a closer look at what you need and how to make this meal shine. Ingredients: - 4 bone-in pork chops (approximately 1 inch thick) - Salt and freshly ground pepper, to taste - 2 tablespoons extra virgin olive oil - 1 medium onion, thinly sliced - 2 cloves of garlic, minced - 1 cup low-sodium chicken broth - 1 tablespoon Worcestershire sauce - 1 teaspoon dried thyme - 1 teaspoon smoked paprika - 1 cup heavy cream - 1 tablespoon cornstarch mixed with 2 tablespoons cold water (optional, for thickening) - Fresh parsley, finely chopped (for garnish) This dish takes about 35 minutes from start to finish. You will serve four people with this recipe. The first step is to season the pork chops with salt and pepper. This step is important for flavor. Next, heat olive oil in a large skillet over medium-high heat. Sear the pork chops for about 4-5 minutes on each side until they are golden brown. Remove them from the skillet and let them rest on a plate. Now, it’s time to sauté the onions. Add sliced onions to the same skillet. Cook them for 3-4 minutes until they are soft. Add minced garlic and cook for another minute. The smell will be amazing! Then, pour in the chicken broth and Worcestershire sauce. Be sure to scrape the bottom of the skillet to get all the flavors. Add dried thyme and smoked paprika, letting it simmer gently. Return the pork chops to the skillet, spooning some sauce over them. Cover the skillet and reduce the heat to low. Let it simmer for about 15 minutes. This helps the pork become tender and flavorful. After simmering, pour in the heavy cream. Stir it gently to mix with the sauce. If you want a thicker sauce, add the cornstarch slurry now. Let it cook for another 5 minutes. Taste the sauce and adjust the seasoning. Finally, serve the pork chops on plates with that creamy sauce on top. Don’t forget to garnish with fresh parsley. This dish goes great with mashed potatoes or rice to soak up the sauce. Get ready for a delicious meal that everyone will love! In this post, we explored how to make delicious smothered pork chops, from ingredient choices to cooking tips. You learned about key ingredients, how to properly sear the chops, and simple storage tips. Remember, with the right techniques, you can make this dish flavorful and tender. Don’t hesitate to try different herbs or sauces based on your taste. I hope you feel ready to create your own tasty version of smothered pork chops!

Delicious Smothered Pork Chops Rich and Tasty Meal

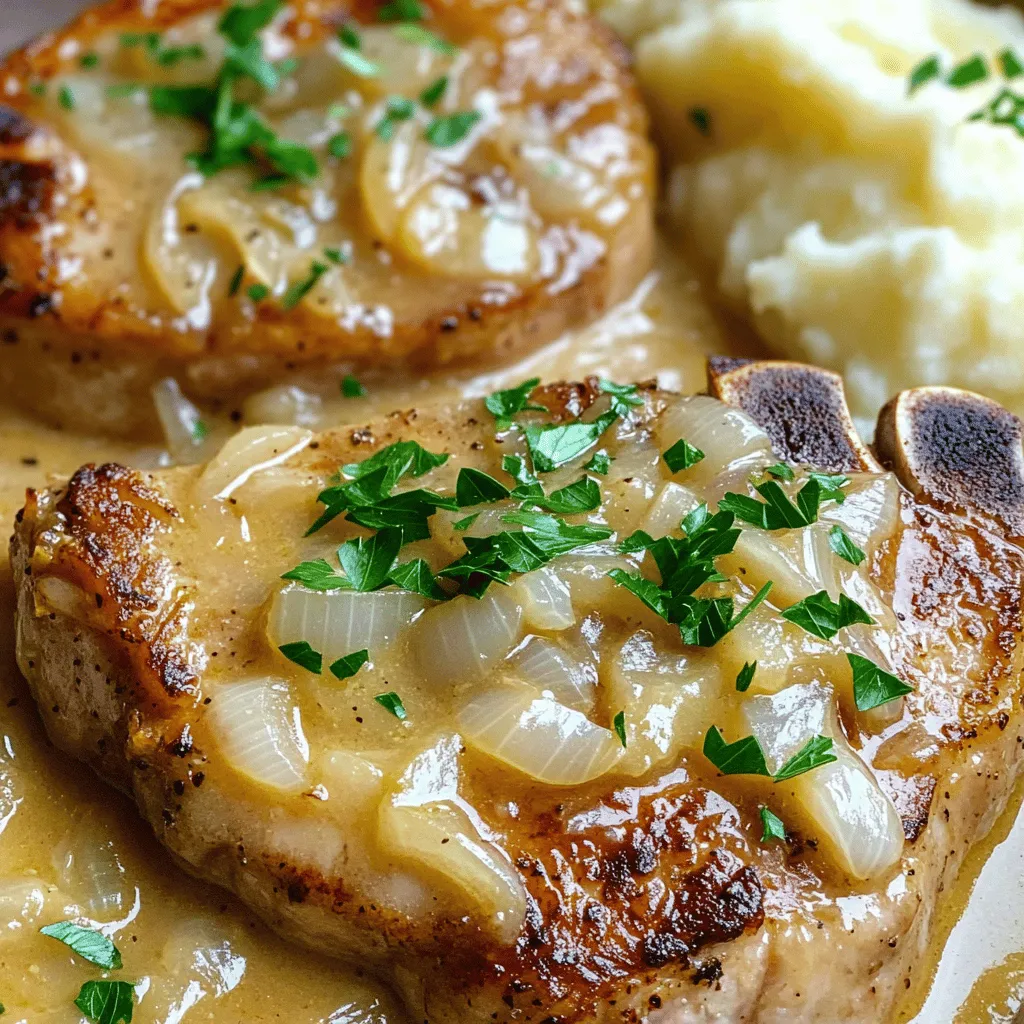
Are you ready to dive into a world of flavor? Today, we’re making Delicious Smothered Pork Chops that will satisfy

- 2 cups all-purpose flour - 1/2 teaspoon sugar - 1 teaspoon salt - 1 teaspoon baking powder - 1/2 teaspoon baking soda - 3/4 cup warm water - 2 tablespoons plain yogurt - 2 tablespoons olive oil - 3 cloves garlic, minced - 2 tablespoons fresh cilantro or parsley, finely chopped - Melted butter for brushing

Naan Bread Recipe Simple and Flavorful Delight

Are you craving warm, fluffy naan bread that’s easy to make at home? You’ve come to the right place! In

To make flavorful chicken spaghetti, gather these ingredients: - 2 boneless, skinless chicken breasts, cut into bite-sized cubes - 8 ounces spaghetti - 1 tablespoon olive oil - 1 medium onion, finely diced - 3 cloves garlic, minced - 1 red bell pepper, thinly sliced - 1 zucchini, sliced into half-moons - 1 can (14 ounces) diced tomatoes, undrained - 1 cup chicken broth - 1 teaspoon dried basil - 1 teaspoon dried oregano - ½ teaspoon red pepper flakes (adjust to your heat preference) - Salt and pepper to taste - Fresh basil leaves, for garnish - Grated Parmesan cheese, for serving

Flavorful Chicken Spaghetti Packed with Goodness

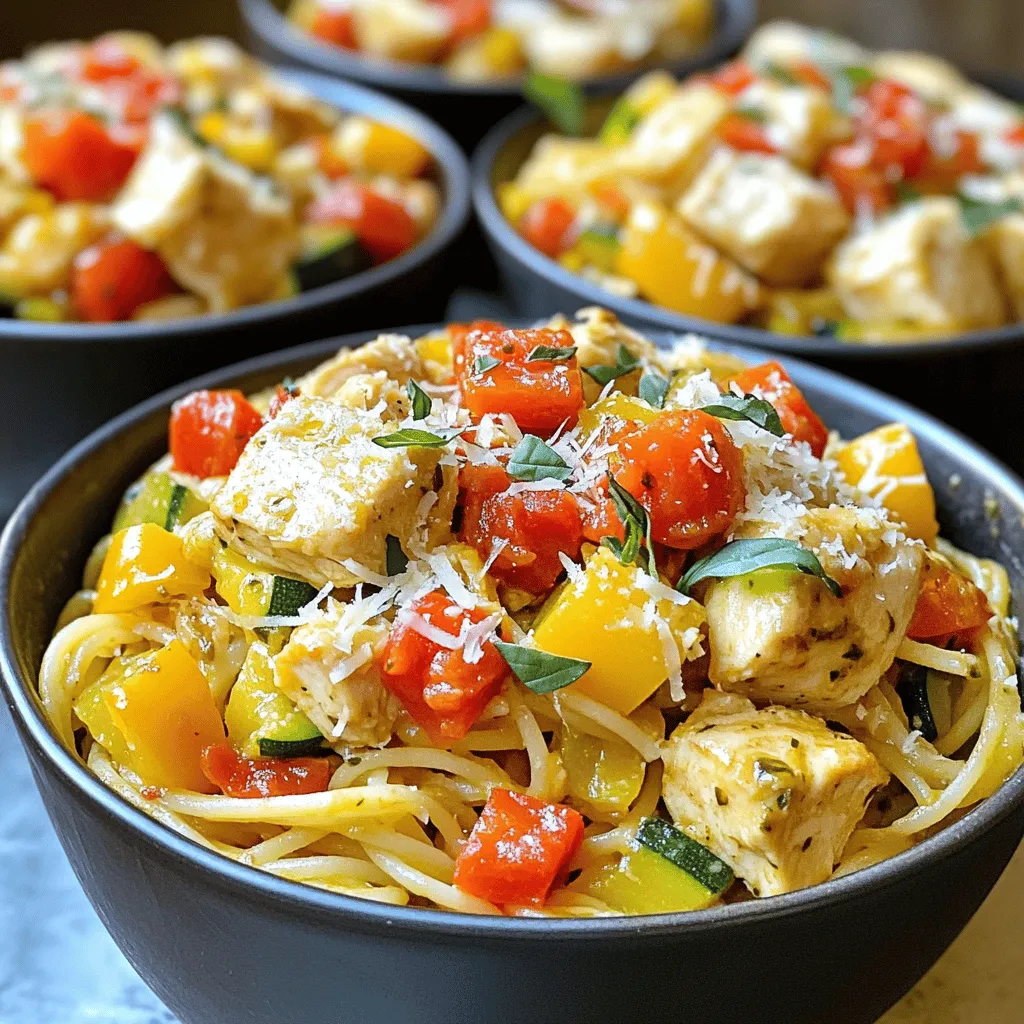
Welcome to your new favorite dish: Flavorful Chicken Spaghetti Packed with Goodness! I’m excited to share this easy recipe that

Older posts
Newer posts
← Previous Page1 … Page36 Page37 Page38 Next →

dsad

© 2025 tastyhatch • Built with GeneratePress

Our Policies

  • Copyright Policy
  • Cookie Policy
  • GDPR Policy
  • Privacy Policy
  • Disclaimer
  • Terms Of Use

More Information

  • Home
  • About
  • Contact
  • Appetizers
  • Dessert
  • Dinner
  • Drinks
©2025, tastyhatch About Back To Top