Skip to content
DisclaimerTerms Of UseGDPR PolicyCookie Policy

tastyhatch

  • Home
  • Drinks
  • Appetizers
  • Dinner
  • Dessert
  • About
  • Contact
  • Privacy Policy
DisclaimerTerms Of UseGDPR PolicyCookie Policy

Olivia

- 1 medium butternut squash, peeled and cut into 1-inch cubes - 1 cup coconut milk (canned, full-fat for creaminess) - 4 cups vegetable broth (low-sodium if preferred) The butternut squash gives the soup its sweet and creamy base. I love using coconut milk for a rich texture. Vegetable broth adds depth to the flavor, making each spoonful comforting. - 1 teaspoon ground ginger - 1 teaspoon ground cinnamon - 2 cloves garlic, minced - 1 medium onion, finely diced Ground ginger adds a warm kick. Ground cinnamon brings a hint of sweetness. Fresh garlic and onion are key for a savory kick. These aromas fill the kitchen and make cooking fun. - Fresh herbs for garnish (such as parsley or cilantro, finely chopped) - Sea salt and freshly ground black pepper to taste Fresh herbs add a pop of color and flavor. A sprinkle of sea salt and cracked pepper enhances the taste, making the soup perfect. For the full recipe, check out the detailed instructions on preparing this delightful dish. Peeling and Cutting the Butternut Squash Start by peeling the butternut squash. Use a sharp knife and be careful with your hands. Cut the squash in half, scoop out the seeds, and slice it into 1-inch cubes. This size helps it cook evenly and blend smoothly. Dicing the Onion and Carrots Next, take a medium onion and finely dice it. Then, chop two medium carrots into small pieces. These veggies add flavor and texture to the soup. Sautéing the Aromatics In a large pot, heat 1 tablespoon of extra virgin olive oil over medium heat. Add the diced onion and cook for about 5 minutes until it softens. Stir in 2 cloves of minced garlic and the diced carrots. Sauté for 2-3 minutes until they are fragrant. Adding Squash and Broth Now, add the butternut squash cubes to the pot. Pour in 4 cups of vegetable broth, and sprinkle in 1 teaspoon of ground ginger and 1 teaspoon of ground cinnamon. Stir the mixture well. Bring it to a boil, then lower the heat and let it simmer. Cover the pot and cook for 20 minutes or until the squash is fork-tender. Pureeing the Soup Once the squash is soft, use an immersion blender to puree the soup right in the pot. If you don’t have one, carefully transfer the soup to a stand blender in batches. Blend until the soup is smooth and creamy. Adding Coconut Milk and Seasoning Return the soup to the pot if you used a stand blender. Stir in 1 cup of coconut milk for a rich, creamy texture. Warm the soup on low heat, stirring often. Finally, season with sea salt and freshly ground black pepper to taste. For a complete guide, check out the Full Recipe. To make your soup shine, consider adding spices like nutmeg or cayenne. Nutmeg brings warmth, while cayenne adds heat. Both can elevate the taste and make your soup unique. If you want a thicker soup, blend in less broth or add more squash. You can also simmer the soup longer to reduce liquid. For making soup, use a heavy pot. A Dutch oven or stockpot works best. These pots distribute heat evenly, which helps cook the squash well. When blending, an immersion blender is great for convenience. It allows you to blend right in the pot. If you use a stand blender, do it in small batches to avoid spills. One big mistake is not cooking the squash long enough. Make sure it's fork-tender before you blend. This ensures a smooth soup. Another common error is skipping the coconut milk. This ingredient adds creaminess and flavor. Without it, your soup may taste flat. Enjoy making your vegan creamy butternut squash soup with these tips to help! You can find the Full Recipe for more details. {{image_4}} Adding Other Vegetables You can add many vegetables to your soup. Try sweet potatoes or parsnips for extra sweetness. Kale or spinach can add color and nutrients. Simply chop them and add them when you add the butternut squash. This soup is flexible! Using Different Types of Milk If coconut milk isn't your thing, try almond or cashew milk. Both options give a nice creaminess. You can also use oat milk for a lighter taste. Each milk changes the flavor just a bit, so feel free to experiment! Gluten-Free Options This soup is naturally gluten-free! All the ingredients are safe for those avoiding gluten. You don’t need to change a thing for this diet. Just follow the Full Recipe to keep it that way. Low-FODMAP Adjustments For a low-FODMAP version, skip the onion and garlic. You can use the green parts of scallions instead. They add flavor without the FODMAPs. Also, check the broth to ensure it is low-FODMAP friendly. Pairing with Bread or Salad This soup is perfect with warm bread. A nice crusty loaf or soft rolls work great. You can also serve it with a fresh salad for a complete meal. The crunch of the salad balances the soup's creaminess. Preparing as a Meal Prep Option This soup is great for meal prep. Make a big batch and store it in containers. It keeps well in the fridge for a week. You can also freeze it for up to three months! Just heat and enjoy when you want a quick meal. How long does vegan butternut squash soup last in the fridge? It lasts about 3 to 5 days. Store it in an airtight container to keep it fresh. What are the best storage containers? I recommend using glass containers with tight lids. They help maintain flavor and prevent spills. How do I freeze butternut squash soup? First, let the soup cool completely. Then, pour it into freezer-safe bags or containers. Leave some space for expansion as it freezes. What is the best way to reheat frozen soup? Thaw it in the fridge overnight. Then, reheat it on the stove over low heat. Stir often to warm it evenly. What are some creative ways to use leftover soup? You can blend it with pasta for a creamy sauce. You can also use it as a base for a grain bowl. How can I incorporate it into other dishes? Try using it as a sauce for roasted vegetables. You can also mix it into risotto for a rich flavor. Find more ideas in the Full Recipe. Vegan butternut squash soup lasts about 5 days in the fridge. Store it in an airtight container to keep it fresh. If you want to enjoy it later, consider freezing it. Frozen soup keeps well for about 3 months. Just thaw it in the fridge before reheating. Yes, you can use fresh herbs! Fresh herbs add a bright flavor. Use about three times more fresh herbs than dried. For example, if the recipe calls for 1 teaspoon of dried herbs, use 1 tablespoon of fresh. Fresh herbs like parsley or cilantro work great for garnish. An immersion blender is best for this soup. It allows you to blend right in the pot. This cuts down on cleanup, and you avoid spills. If you don’t have one, use a stand blender. Blend in small batches to prevent splatters. Always let the soup cool a bit before blending. To add heat, try a pinch of cayenne pepper or red pepper flakes. You can also add chopped jalapeños for a fresh kick. Another option is to include a dash of hot sauce at the end. Just taste as you go to find the right spice level for you. For the full recipe, check here: [Full Recipe]. This blog post covered all you need to make vegan butternut squash soup. We discussed key ingredients like squash, coconut milk, and vegetable broth, plus the right spices. I shared step-by-step instructions for preparing and cooking the soup. Remember, you can customize flavors and store leftovers easily. I hope you feel ready to create this delightful dish. Enjoy your cooking adventure!

Vegan Creamy Butternut Squash Soup Rich and Smooth

Looking for a cozy and delicious soup to warm your heart? Meet my Vegan Creamy Butternut Squash Soup! This rich

- 1 lb boneless, skinless chicken breasts - 1 small onion - 2 cloves garlic - 1 bell pepper - 1 can black beans - 1 can enchilada sauce - 1 cup sweet corn - 1 teaspoon chili powder - 1 teaspoon ground cumin - 1 cup shredded cheddar cheese - Fresh cilantro - Sour cream (optional) The first step to making this Easy Cheesy Chicken Enchilada Skillet is gathering your ingredients. You want to use fresh items for the best flavor. Start with boneless, skinless chicken breasts. This chicken cooks fast and stays tender. Next, grab a small onion, some garlic, and a colorful bell pepper. These will give your dish a nice base and aroma. The black beans provide protein and texture, while the enchilada sauce adds that classic flavor. Don't forget the sweet corn! It brings a hint of sweetness and a lovely pop of color. The spices, like chili powder and cumin, will add warmth and depth. Finally, the shredded cheddar cheese melts beautifully, creating that cheesy goodness we all love. Fresh cilantro will add brightness, and sour cream is a nice touch if you want a creamy finish. You can find the Full Recipe with all the cooking steps to create this delightful dish! - Step 1: Heat the oil In a large, non-stick skillet, pour in one tablespoon of olive oil. Turn the heat to medium and wait until the oil shimmers. This means it's ready for cooking. - Step 2: Cook the chicken Add one pound of cubed chicken to the skillet. Spread it out evenly. Sauté the chicken for about 5 to 7 minutes. It should become golden brown and fully cooked. Once done, transfer the chicken to a plate and set it aside. - Step 3: Sauté the vegetables In the same skillet, add one small diced onion and one diced bell pepper. Sauté these for 4 to 5 minutes until they are soft and translucent. Then, add two cloves of minced garlic and cook for one more minute. The aroma will fill your kitchen! - Step 4: Combine the ingredients Return the cooked chicken to the skillet with the veggies. Pour in one can of drained black beans, one cup of frozen corn, and one can of enchilada sauce. Sprinkle in one teaspoon each of chili powder and cumin. Stir everything together until well mixed. - Step 5: Simmer the mixture Let the combined ingredients simmer gently for about 5 minutes. This step helps all the flavors blend together beautifully. - Step 6: Melt the cheese Evenly sprinkle one cup of shredded cheddar cheese on top of the mixture. Cover the skillet with a lid. Cook for an additional 2 to 3 minutes until the cheese melts and becomes bubbly. - Step 7: Serve Remove the skillet from heat. Garnish with freshly chopped cilantro. Serve the dish hot with a dollop of sour cream on the side, if you want some extra creaminess. This Easy Cheesy Chicken Enchilada Skillet is a quick and tasty meal. Enjoy your cooking! For more details, check out the Full Recipe. What is the best way to cook chicken? To cook the chicken, I recommend using a non-stick skillet. Heat a tablespoon of olive oil over medium heat. Add your cubed chicken and spread it out. Cook for about 5-7 minutes until it turns golden brown. This method keeps the chicken juicy and tender. How can I keep vegetables vibrant and fresh? To keep your veggies bright, sauté them quickly. Use medium-high heat and stir often. Cook the onion and bell pepper until soft but not mushy. Add garlic last, so it stays fragrant. This method enhances their color and crunch. What seasoning variations do you recommend? You can mix up the spices for different flavors. Try adding smoked paprika for a smoky taste. Or, sprinkle in some cayenne pepper for heat. Fresh lime juice can also brighten the dish. How can I add extra toppings? Toppings can elevate your skillet dish! Consider adding sliced jalapeños for spice. Crumbled queso fresco offers a creamy, tangy kick. Chopped avocado adds creaminess and balances flavors. Don’t forget fresh cilantro for a burst of freshness. For the complete recipe and more tips, check out the Full Recipe. {{image_4}} For those seeking gluten-free options, use corn tortillas instead of flour. This small swap keeps the dish tasty while meeting dietary needs. Always check labels to ensure all ingredients are gluten-free. If you prefer vegetarian meals, swap the chicken for hearty black beans or lentils. Both options add protein and flavor. You can also add more veggies like zucchini or mushrooms for extra texture. Cheese is key to this dish. You can use pepper jack for a spicy kick or Monterey Jack for a milder taste. Goat cheese adds a tangy flavor, while cream cheese gives a rich, creamy texture. For proteins, try ground turkey or shredded beef instead of chicken. If you want plant-based options, use tofu or tempeh. Both absorb flavors well and add a nice bite. Feel free to mix in different vegetables. Spinach or kale can add a fresh element. You can even use frozen mixed veggies for a quick option. The beauty of this recipe lies in its flexibility. To keep your Easy Cheesy Chicken Enchilada Skillet fresh, cool it first. Then, place it in an airtight container. This helps keep moisture in and smells out. You can store it in the fridge for up to four days. If you want to keep it longer, consider freezing it. It can last in the freezer for up to three months. Just remember to label the container with the date. When it’s time to enjoy your leftovers, you have two great options: the microwave or the stovetop. The microwave is quick. Just heat in short bursts, stirring in between. This helps to warm it evenly. The stovetop takes a bit longer but can keep the dish from getting soggy. Heat it in a skillet over medium-low heat, stirring often. To maintain texture and flavor, add a splash of water or broth when reheating. This keeps the dish moist and delicious. Enjoy every cheesy, flavorful bite! How can I make this recipe spicier? To add some heat, you can use spicy enchilada sauce. You could also add diced jalapeños or a pinch of cayenne pepper. If you like a kick, try adding hot sauce when serving. Can I use frozen chicken? Yes, frozen chicken works well. Just make sure to thaw it completely before cooking. This helps the chicken cook evenly in the skillet. You can soak it in cold water for quick thawing. What to serve with chicken enchiladas? This dish pairs great with rice, beans, or a fresh green salad. You could also serve it with tortilla chips and salsa for a fun side. Can I prepare this meal in advance? You can prep the ingredients ahead of time. Chop the veggies and cook the chicken. Store them in the fridge until you are ready to cook. This saves time on busy nights. For complete details and variations, check out the Full Recipe. This blog post shared a simple recipe for chicken enchiladas. We covered main and extra ingredients, plus preparation steps. You now know how to cook, enhance flavor, and store leftovers. I encourage you to explore different variations and make this dish your own. Enjoy cooking and sharing these flavorful enchiladas with friends and family. Dive into new ideas and get creative in the kitchen!

Easy Cheesy Chicken Enchilada Skillet Delight

Are you ready for a delicious dinner that brings the flavors of Mexico to your home? My Easy Cheesy Chicken

- 1 can (15 oz) chickpeas, drained and rinsed - 4 cups romaine lettuce, chopped into bite-sized pieces - 1/2 cup cherry tomatoes, sliced in half - 2 tablespoons olive oil - 1 teaspoon smoked paprika - 1 teaspoon garlic powder - Salt and pepper, to taste - 1/4 cup Parmesan cheese, shaved - Croutons (optional, for added crunch) - Fresh parsley, chopped, for garnish - 1/4 cup Caesar dressing (store-bought or homemade) - Check out links for homemade Caesar dressing recipes The key to this salad is fresh, simple ingredients. The chickpeas give a great crunch, while the romaine adds crispness. Cherry tomatoes bring a sweet burst of flavor. The right seasonings make all the difference. Olive oil adds richness, smoked paprika gives a smoky kick, and garlic powder provides depth. For toppings, I love shaved Parmesan cheese. It adds creaminess and a savory note. Croutons are optional, but they offer extra texture. Fresh parsley brightens the dish and makes it look beautiful. You can easily adjust the dressing, too. You can use store-bought Caesar dressing for speed. If you want to get creative, try making your own. This Crispy Chickpea Caesar Salad recipe is all about balance. Each ingredient works together to create a tasty and healthy meal. For the full recipe, check out the details provided earlier. First, preheat your oven to 400°F (200°C). This heat helps make the chickpeas crispy. In a mixing bowl, add the drained and rinsed chickpeas. Pour in 2 tablespoons of olive oil. Then, sprinkle 1 teaspoon of smoked paprika and 1 teaspoon of garlic powder over them. Add a pinch of salt and pepper, too. Toss everything well so the chickpeas are coated with the seasoning. Next, spread the seasoned chickpeas onto a baking sheet. Make sure they are in a single layer. This helps them roast evenly. While the chickpeas roast, grab a large salad bowl. Add 4 cups of chopped romaine lettuce and 1/2 cup of halved cherry tomatoes. Those bright tomatoes add a nice touch! Now, pour 1/4 cup of Caesar dressing over the greens. Gently toss everything together. The dressing should coat all the veggies well. When the chickpeas are golden and crispy, take them out of the oven. Let them cool for a few minutes. Then, add the warm chickpeas to your salad bowl. For a lovely finish, garnish with 1/4 cup of shaved Parmesan cheese. Sprinkle some fresh parsley on top for color. If you want extra crunch, toss in some croutons before serving. Serve right away. Enjoy the warm, crispy chickpeas with fresh, crunchy greens. For the full recipe, check the earlier section. To get perfectly crispy chickpeas, follow a few key steps. First, preheat your oven to 400°F (200°C). This hot temperature helps to dry out the chickpeas, making them crispy. Bake them for 25 to 30 minutes. Be sure to stir them halfway through. This step ensures even cooking and prevents burning. When you assemble your salad, coat the greens with dressing evenly. Start with a small amount of dressing and toss gently. You can always add more if needed. Aim for about a quarter cup of dressing for four cups of greens. This gives you the best flavor without making the salad soggy. Store leftover salad and chickpeas separately. This keeps the salad fresh and the chickpeas crispy. Use airtight containers to keep them fresh. For the chickpeas, place them in the fridge. To keep them crispy longer, reheat them in the oven for a few minutes before serving. This trick revives their crunch and flavor. If you want the full recipe, check out the Crispy Chickpea Caesar Salad recipe above! {{image_4}} You can make your crispy chickpea Caesar salad even better! Try adding avocado for creaminess. Sliced bell peppers bring a nice crunch and sweet flavor. You can also swap in different greens. Kale or spinach works well and adds more nutrients. While Caesar dressing is tasty, you can explore other options. Ranch dressing offers a creamy twist. A light vinaigrette can make it refreshing. Customizing your dressing lets you fit your taste and dietary needs. Enjoy experimenting to find your favorite flavor! If you want a vegan version, there are easy swaps. Use a dairy-free cheese or skip it entirely. For croutons, try baked chickpeas or seeds for crunch. Make sure all ingredients match your dietary needs. With a few tweaks, anyone can enjoy this salad! To keep your salad fresh, store leftovers in an airtight container. You can use glass or plastic containers. This helps keep the flavors locked in. Ideally, eat the salad within 2 days for the best taste and texture. If the chickpeas sit too long, they may lose their crispness. If you want to re-crisp the chickpeas, use the oven. Preheat it again to 400°F (200°C). Spread the chickpeas on a baking sheet and bake for 5-10 minutes. This will bring back their crunch. For the salad, add fresh greens or a little more dressing to brighten it up. Toss before serving to mix everything well. You can make this salad in parts to save time. Prepare the chickpeas and store them separately. Wash and chop your lettuce and veggies a day in advance. Keep them in the fridge in a sealed bag. Combine everything just before serving. This keeps the salad fresh and tasty. Enjoy the perfect mix of flavors right when you eat! Yes, you can use dried chickpeas. Here’s how to cook them: 1. Soak: Place 1 cup of dried chickpeas in a bowl. Cover them with water. Let them soak overnight. 2. Cook: Drain the soaked chickpeas. Add them to a pot with fresh water. Bring to a boil. Lower the heat and simmer for about 1 to 1.5 hours. 3. Test: The chickpeas are ready when they are soft but not mushy. Drain them well before using in the salad. Using dried chickpeas adds a great texture and taste. They are also more cost-effective and less salty than canned. To make this salad nut-free, skip any nut-based toppings. Here are some tasty substitutes: - Seeds: Try sunflower seeds or pumpkin seeds for crunch. - Cheese: Use more Parmesan cheese or try a nut-free cheese alternative. - Croutons: Make sure your croutons do not contain nuts. Many store-bought options are safe. These substitutes keep your salad crunchy and delicious without nuts. If you need a gluten-free salad, here are some options: - Gluten-Free Croutons: Look for croutons labeled gluten-free. Many brands offer them. - Homemade Croutons: Make your own using gluten-free bread. Cut it into cubes, toss with olive oil, and bake. - Alternative Crunch: Instead of croutons, use roasted chickpeas or seeds for added texture. These choices help you enjoy the salad without gluten. You can boost the protein in this salad with several tasty options: - Grilled Chicken: Add sliced grilled chicken breast for a hearty touch. - Tofu: Use firm tofu, grilled or sautéed, for a plant-based option. - Shrimp: Grilled shrimp adds a nice flavor and pairs well with Caesar dressing. These options make the salad filling and nutritious. For the full recipe, refer to the Crispy Chickpea Caesar Salad recipe above. We covered how to make a delicious chickpea salad. You learned about key ingredients, like chickpeas, greens, and tasty dressings. I shared easy steps to prepare and assemble the salad. You also got tips on perfecting crispy chickpeas and meal prep. In the end, customize your salad to suit your taste. Enjoy making this healthy dish your own! Happy cooking!

Crispy Chickpea Caesar Salad Flavorful and Healthy Recipe

Looking for a fresh twist on a classic? This Crispy Chickpea Caesar Salad is both tasty and healthy. Packed with

For the best pumpkin cream cheese stuffed muffins, gather these main ingredients: - 1 ½ cups all-purpose flour - 1 teaspoon baking soda - 1 teaspoon baking powder - ½ teaspoon salt - 1 teaspoon ground cinnamon - ½ teaspoon ground nutmeg - ½ teaspoon ground ginger - ½ cup granulated sugar - ½ cup packed brown sugar - 1 cup canned pumpkin puree - ¼ cup vegetable oil - 2 large eggs - 1 teaspoon vanilla extract These ingredients create a moist and flavorful muffin base. The pumpkin puree gives it a soft texture and a rich taste. The spices add warmth and depth. Next, gather the ingredients for the creamy filling that makes these muffins special: - 8 oz cream cheese, softened - ¼ cup powdered sugar - 1 tablespoon all-purpose flour - 1 teaspoon vanilla extract The cream cheese filling adds a delightful surprise. It contrasts perfectly with the pumpkin taste. You can make your muffins even better with these optional toppings: - Powdered sugar for dusting - Cream cheese glaze for drizzling - Chopped nuts for crunch These enhancements add beauty and flavor. They make your muffins stand out on any table. For the full recipe, check the description above. Start by preheating your oven to 350°F (175°C). This temperature is perfect for baking. Next, grab a muffin tin and line it with paper liners. This makes it easy to remove the muffins later. Make sure the liners fit snugly in each cup. In a medium bowl, whisk together the dry ingredients. You need flour, baking soda, baking powder, salt, cinnamon, nutmeg, and ginger. This mix gives the muffins a warm spice flavor. In a large bowl, mix the sugars, pumpkin puree, vegetable oil, eggs, and vanilla extract. Whisk until smooth. Slowly fold the dry mix into the wet mix. Do this gently to keep the muffins light and fluffy. For the cream cheese filling, take another bowl. Mix the softened cream cheese, powdered sugar, flour, and vanilla extract. Beat it until smooth. This filling adds a rich taste to each bite of your muffins. Spoon the pumpkin batter into each muffin liner, filling them halfway. Then, add a tablespoon of cream cheese filling on top. Offset it slightly to create a swirl. Lastly, cover the cream cheese with the remaining pumpkin batter. Make sure the filling is hidden. Place the muffin tin in the oven and bake for 18 to 20 minutes. Check if they are done by inserting a toothpick into the center. If it comes out clean, they are ready. Let the muffins cool in the tin for 5 minutes, then move them to a wire rack. This step keeps them fluffy and delicious. For the full recipe, check out the details above. To keep your muffins light, do not overmix the batter. Mixing too much can lead to dense muffins. Once you combine the wet and dry ingredients, stir gently until just mixed. It’s okay if a few lumps remain! Also, measure your flour correctly. Use a spoon to fill the measuring cup, then level it off with a knife. This method prevents adding too much flour, which can make the muffins heavy. Make sure your cream cheese is soft and at room temperature before mixing. This helps it blend smoothly with the other ingredients. When preparing the filling, beat it until it’s silky and free of lumps. This texture ensures that the filling will be creamy and delightful in each bite. Remember to offset the cream cheese filling slightly when adding it to the muffins. This creates a lovely swirl effect that looks great and adds flavor. After baking, let your muffins cool completely. For a nice touch, dust them with powdered sugar. You can also drizzle a simple cream cheese glaze on top for added sweetness. Arrange the muffins on a decorative platter for a beautiful display. Pair them with spiced nuts or a warm beverage like chai tea. These muffins shine during fall gatherings or any cozy morning. Check out the Full Recipe for more details! {{image_4}} For a gluten-free twist, swap regular flour with a gluten-free blend. Look for one that includes xanthan gum. This helps mimic the texture of all-purpose flour. Mix the gluten-free flour with the other dry ingredients. You can still enjoy these tasty muffins without gluten. To make these muffins dairy-free, use plant-based cream cheese. Brands like Tofutti or Daiya work well. Replace regular eggs with flax eggs. Combine one tablespoon of ground flaxseed with three tablespoons of water. Let it sit for five minutes. This mixture acts as a great egg substitute. You can add fun flavors to your muffins. Chocolate chips give a sweet touch. Use semi-sweet or dark chocolate. If you prefer crunch, add chopped nuts like walnuts or pecans. Fold these extras into the pumpkin batter for a tasty surprise. These variations make each muffin unique and exciting. For the full recipe, check out the guide above. Enjoy experimenting with these ideas! To keep your pumpkin cream cheese stuffed muffins fresh, place them in an airtight container. This helps keep moisture in while preventing them from drying out. You can store them at room temperature for about 2 to 3 days. If you want to keep them longer, the fridge is a great option, but they may dry out a bit. Freezing muffins is simple and effective. First, let them cool completely. Then, wrap each muffin in plastic wrap or place them in a freezer bag. Be sure to press out as much air as possible. They can last in the freezer for up to 3 months. When you want to enjoy one, simply thaw it in the fridge overnight or pop it in the microwave for a quick warm-up. Reheating your muffins can restore their soft texture. For the best results, use an oven or toaster oven. Preheat it to 350°F (175°C) and warm the muffins for about 5 to 10 minutes. If using a microwave, heat for 15 to 20 seconds. Keep an eye on them to avoid drying. Enjoy the warm, gooey cream cheese filling all over again! Yes, you can use fresh pumpkin. To do this, roast or steam a small pumpkin. Once it’s soft, scoop the flesh and mash it until smooth. Use this fresh puree in place of canned pumpkin. The flavor may be a bit brighter and fresher, giving your muffins a unique twist. To check if the muffins are done, use a toothpick. Insert it into the center of a muffin. If it comes out clean or with just a few crumbs, the muffins are ready. If wet batter sticks to the toothpick, bake them a few more minutes. If you need an egg substitute, try using unsweetened applesauce. Use 1/4 cup of applesauce for each egg you replace. You can also use mashed banana or a tablespoon of ground flaxseed mixed with water. These substitutes keep your muffins moist and fluffy. These muffins stay fresh for about three days at room temperature. Store them in an airtight container to keep them soft. If you want them to last longer, freeze them. They can stay good in the freezer for up to three months. Just thaw them overnight in the fridge before enjoying. You’ve learned how to make delicious pumpkin cream cheese stuffed muffins. We covered the main ingredients, step-by-step instructions, and helpful tips. I shared ways to adapt the recipe for different diets and all about storage. Now, get ready to enjoy your homemade muffins. They’re tasty and easy to share. With these tips, you will make perfect muffins every time. Happy baking!

Delicious Pumpkin Cream Cheese Stuffed Muffins Recipe

Fall is here, and nothing says cozy like homemade Pumpkin Cream Cheese Stuffed Muffins. These muffins are soft, warm, and

- 2 cups cooked shredded chicken - 1 cup BBQ sauce (store-bought or homemade) - 1 bag (12 oz) tortilla chips - 2 cups shredded cheddar cheese - 1 cup black beans, drained and rinsed - 1 cup corn kernels (fresh, frozen, or canned) - 1 jalapeño, sliced (optional for heat) - 1/2 red onion, finely chopped - 1 avocado, diced - Fresh cilantro, chopped (for garnish) - Sour cream (for serving) - Lime wedges (for serving) The heart of this dish lies in its ingredients. You want to start with cooked shredded chicken. This can be leftover rotisserie chicken or cooked chicken breast. Mix this with your favorite BBQ sauce. I often use a homemade sauce, but store-bought works great too. Next, grab a bag of tortilla chips. The chips should be sturdy enough to hold the toppings. You don’t want them to get soggy. For the cheese, I love using shredded cheddar cheese. It melts beautifully and adds that rich, creamy flavor. Black beans add protein and fiber, while corn kernels add sweetness and texture. Now, let’s talk about fresh additions. I like adding sliced jalapeños for some heat. If you prefer less spice, skip the jalapeños. Finely chopped red onion adds a nice crunch and flavor. To finish off, we need avocado, freshly chopped cilantro, sour cream, and lime wedges. These toppings bring freshness and brightness to the nachos. For the full recipe, refer to the instructions above. Enjoy making these delicious nachos! - Preheat the oven to 375°F (190°C). This step is key. A hot oven makes the nachos crispy and delicious. - In a medium bowl, mix 2 cups of cooked shredded chicken with 1 cup of BBQ sauce. Stir well until the chicken is fully coated. You can adjust the sauce to fit your taste. - Line a large baking sheet with parchment paper. This makes cleanup easier once the nachos are done. - Spread a bag of tortilla chips evenly across the sheet. Make sure they are not overlapping too much. You want every chip to get toppings and cheese! - Distribute the BBQ chicken mix over the chips. This adds great flavor to every bite. - Next, sprinkle black beans, corn, and finely chopped red onion on top. If you like heat, add sliced jalapeños. - Finish by generously sprinkling 2 cups of shredded cheddar cheese on top. Cheese is the star here! - Carefully place the prepared sheet pan in the preheated oven. - Bake for 15-20 minutes. Keep an eye on the cheese as it melts and turns golden. You want it bubbly and slightly browned but not burnt. This is how you create a tasty and easy dish that everyone will love. For the full recipe, check the section above. Enjoy your cooking! To make the best nachos, always use fresh ingredients. Fresh veggies and meats bring out great flavors. If you want more sweetness or tang, adjust the BBQ sauce to fit your taste. For a fun look, serve your nachos on a wooden platter or slate board. This adds a rustic touch and lets all the colors pop. Arrange lime wedges around the nachos for visual appeal. The bright green limes will make your dish look even better. Baking your nachos for 15 to 20 minutes is ideal. This time makes the cheese melt perfectly and gives a nice golden color. To avoid sogginess, watch the nachos closely. If you layer them too thick, they may get wet. Keep an eye on them and enjoy your crispy nachos! {{image_4}} You can switch up the protein in your nachos. Pulled pork or beef adds a rich flavor. These meats work great with BBQ sauce. If you prefer vegetarian options, try black beans or tofu. Both are tasty and satisfying. They soak up the BBQ sauce well. You can mix and match proteins to suit your taste. Want to spice things up? Add different peppers or hot sauce. Chipotle or poblano peppers can give a nice kick. You can also layer in toppings like jalapeños or olives. These add crunch and flavor. Each choice brings something new to the nachos. Don't be afraid to get creative with what you add. Cheese is key to great nachos. While I love cheddar, you can try other varieties. Monterey Jack or pepper jack cheese can add unique flavors. For a dairy-free option, use vegan cheese. It melts well and tastes great. Mixing different cheeses can create a rich, cheesy experience. Experiment to find your favorite combination. To keep your nachos fresh, let them cool down first. Warm nachos can create steam inside the container. This steam can make them soggy. Once cool, place them in airtight containers. This helps trap flavor and keep them from drying out. When it's time to enjoy your leftovers, use the oven or an air fryer. These methods help keep the chips crunchy. Preheat the oven to 350°F (175°C) and bake for about 10 minutes. If you use an air fryer, set it to 350°F and heat for 5 minutes. You can add fresh toppings like more cheese or diced avocado before reheating. These toppings can enhance flavor and freshness. Leftover nachos last about 3 days in the fridge. Make sure they stay sealed in an airtight container. If you want to store them longer, you can freeze them. However, freezing may change the texture. It’s best to eat nachos fresh for the best taste. Making BBQ sauce is easy. You need just a few simple ingredients. Here’s a quick recipe: - 1 cup ketchup - 1/4 cup apple cider vinegar - 1/4 cup brown sugar - 1 tablespoon Worcestershire sauce - 1 teaspoon garlic powder - 1 teaspoon onion powder - Salt and pepper to taste Mix all these ingredients in a bowl. Adjust the taste if needed. You can make it sweeter or tangier based on your preference. Yes, you can prep the nachos in advance. Here are some tips to save time: - Cook and shred the chicken earlier. Store it in the fridge. - Mix the chicken with BBQ sauce and keep it in an airtight container. - Chop the vegetables and store them separately. When you're ready to bake, just layer everything on the chips and pop them in the oven. This saves time and helps you enjoy the meal more. BBQ chicken nachos taste great with sides. Here are some ideas: - Coleslaw: The crunch adds freshness. - Guacamole: Creamy and rich, it complements the nachos well. - Salsa: A zesty kick brightens up the dish. These sides balance the flavors and make your meal even more enjoyable. You now have all the tools to make tasty BBQ chicken nachos. We covered the key ingredients like shredded chicken and cheese, plus tips on baking and storage. Remember, fresh toppings can enhance flavor and presentation. Experiment with different proteins and cheeses to suit your taste. Lastly, don’t forget to enjoy them with great sides. Make your next nacho night fun and delicious!

Sheet Pan BBQ Chicken Nachos Easy and Delicious Meal

Get ready to elevate your snack game with my easy Sheet Pan BBQ Chicken Nachos! This dish is not just

To make No Bake Chocolate Chip Cookie Dough Bars, gather the following ingredients: - 1 cup unsalted butter (softened at room temperature) - 1 cup brown sugar (packed firmly) - 2 teaspoons vanilla extract - 2 cups all-purpose flour - 1 can (14 oz) sweetened condensed milk - 1 cup semi-sweet chocolate chips - 1/2 cup walnuts (chopped, optional) - A pinch of salt These ingredients blend to create a rich, creamy dough. Start by softening your butter. It should be easy to mix. The brown sugar adds sweetness and a nice texture. Vanilla extract gives a warm flavor, making the bars taste homemade. All-purpose flour is key for structure. Sweetened condensed milk adds moisture and helps bind the dough together. Chocolate chips give a delightful burst of flavor, while walnuts add crunch, if you choose to include them. A pinch of salt enhances all the flavors, balancing the sweetness. Remember, you can find the full recipe above. This sweet treat is a perfect no-bake option for any occasion! To start, you need to cream the butter and sugar. Take 1 cup of softened butter and 1 cup of packed brown sugar. Use an electric mixer on medium speed. Mix until the butter and sugar are smooth and creamy. This step is key for good texture. Next, incorporate vanilla extract. Add 2 teaspoons of vanilla to the butter-sugar mix. Continue mixing until the vanilla is fully blended in. This adds a nice flavor. Now, it’s time to add the dry ingredients. Gradually mix in 2 cups of all-purpose flour and 1 can of sweetened condensed milk. Stir until you form a smooth dough. Make sure all the flour is mixed in well. Now, fold in your chocolate chips and walnuts. Use 1 cup of semi-sweet chocolate chips and 1/2 cup of chopped walnuts if you like. Gently mix them into the dough so they are evenly spread. This gives a great crunch and burst of flavor. Next, transfer the dough to a baking dish. Prepare an 8x8-inch baking dish by lining it with parchment paper. Leave some paper hanging over the edges for easy removal. Spoon the cookie dough into the dish and spread it out evenly. To set the bars, you must press the mixture evenly into the dish. Use a spatula to press it down firmly. This helps the bars hold their shape. Smooth the top for a nice finish. Finally, freeze the dish for optimal texture. Place it in the freezer for at least 30 minutes. This will help the bars set well. Once firm, lift them out using the parchment paper. Cut them into squares, and enjoy! For the full recipe, refer to the section above. To ensure a creamy texture, start with softened butter. This helps you mix the butter and sugar easily. Use a mixer to beat them until fluffy. If the mixture feels dry, you may not have mixed it enough. Avoid common mistakes like adding flour too quickly. This can create lumps that won't mix well. Also, be sure to fold in the chocolate chips gently. You want them spread evenly without breaking. For serving suggestions, cut the bars into neat squares. Arrange them on a pretty platter. You can also stack them for a fun look. Garnishing tips for visual appeal include a sprinkle of sea salt. This adds flavor and contrast. You might also dust the bars with cocoa powder for an elegant touch. Enjoy these cookie dough bars at parties or treat yourself at home! {{image_4}} You can easily change the flavor of these no bake chocolate chip cookie dough bars. Try adding peanut butter or almond butter for a nutty twist. Just mix in half a cup of your favorite nut butter when you combine the butter and sugar. This will give your bars a creamy texture and a rich taste. You can also experiment with different types of chocolate. Instead of semi-sweet chocolate chips, consider using dark chocolate or white chocolate. Dark chocolate adds a bold flavor, while white chocolate brings a sweet and creamy touch. Mix and match to see what you like best! If you have dietary needs, this recipe is flexible. For a gluten-free version, swap regular flour for almond flour or gluten-free all-purpose flour. This keeps the bars soft and tasty without gluten. For a dairy-free option, use coconut oil instead of butter. You can also replace sweetened condensed milk with a dairy-free version, like coconut cream. These swaps let everyone enjoy this sweet treat without worry! For the full recipe, make sure to check out the details in the earlier sections. To keep your no bake chocolate chip cookie dough bars fresh, use an airtight container. This will help keep moisture out. I recommend a glass or plastic container with a tight lid. If you plan to eat them within a week, store them in the fridge. For longer storage, you can freeze the bars. Wrap each piece in plastic wrap, then place them in a freezer-safe bag. This method helps prevent freezer burn and keeps the bars tasty. These cookie dough bars are best enjoyed fresh but can last a bit longer. When stored in the fridge, they stay good for about one week. Freezing extends their life to about three months. To keep them fresh, avoid leaving the bars out at room temperature for long. Always seal them properly. This way, you can enjoy a sweet treat whenever you like! Can I make these bars in advance? Yes, you can make these bars a day or two ahead of time. Just store them in the fridge. This allows the flavors to blend well. You can enjoy them fresh and delicious when you’re ready. What if I don’t have walnuts? No problem! You can skip the walnuts or swap them for any nut you like. You can also use seeds, like sunflower or pumpkin seeds. This keeps the bars tasty and crunchy. How to tell when the bars are set properly? After freezing for at least 30 minutes, the bars should feel firm to touch. You can also check the edges; they should pull away from the dish slightly. This shows they are set and ready to slice. What to do if the mixture is too dry? If your mixture feels too dry, try adding a bit more sweetened condensed milk. This will help bring the dough together. Mix well until you reach a smooth, cohesive texture. Solutions for uneven bars If your bars are uneven, use a sharp knife to trim the edges after slicing. This gives you neat, square pieces. Press the mixture more firmly into the dish next time for a more even set. You now know how to make tasty no-bake cookie dough bars. We covered the ingredients, mixing steps, and tips for perfect texture. You can even try fun variations to suit your taste. This dessert is easy to store and can last a while if kept right. Enjoy making these bars for yourself and others. They are sure to impress! Your kitchen will be a happy place with these treats. Remember, cooking can be simple and fun. Happy baking!

No Bake Chocolate Chip Cookie Dough Bars Delight

Get ready to dive into a sweet treat with my No Bake Chocolate Chip Cookie Dough Bars Delight! These bars

To start, you need fresh green beans. Choose green beans that are bright and crisp. Trim the ends and wash them well. You want one pound for this recipe. Fresh beans give the best flavor and crunch. Next, gather your breadcrumbs and cheese. Use 3/4 cup of Panko breadcrumbs for that perfect crunch. Add in 1/4 cup of freshly grated Parmesan cheese. This cheese adds a nice salty flavor. The combination creates a tasty coating for your green beans. Finally, we need some seasonings. For this recipe, use: - 1 teaspoon garlic powder - 1 teaspoon onion powder - 1/2 teaspoon smoked paprika - 1/4 teaspoon black pepper - Salt to taste These seasonings add depth and warmth to your fries. Mix them well with the breadcrumbs and cheese. This will give every green bean a burst of flavor. Don't forget one large egg and 2 tablespoons of extra virgin olive oil. The egg helps the coating stick, while the olive oil adds richness. For the full details, check the Full Recipe above. First, set your air fryer to 400°F (200°C). Preheating it takes about 5 minutes. This step is key to getting crispy fries. In a large bowl, mix the Panko breadcrumbs, Parmesan cheese, garlic powder, onion powder, smoked paprika, black pepper, and salt. Stir well to combine. This mix gives the fries a tasty crunch. Now, take your green beans. Dip each one into the bowl with the beaten egg and olive oil. Make sure they are well coated. Let any extra egg drip off before moving to the next step. Next, place the egg-coated beans into the breadcrumb mix. Gently toss them until fully covered. Each bean should look nice and crunchy. Place the coated green beans in a single layer in the air fryer basket. Avoid stacking them to keep them crispy. Cook for 8 to 10 minutes. Shake the basket halfway through. This ensures they cook evenly. Once done, take out the basket and let the fries cool for a minute. Serve them with your favorite dipping sauce, like ranch or garlic aioli. For a fun touch, stack the fries in a cone. Sprinkle some extra Parmesan on top and add fresh herbs for color. Enjoy your crispy green bean fries! For the full recipe, check the details above. To make your green bean fries crispy, use Panko breadcrumbs. They give a light, airy crunch. Make sure to coat each green bean well with the egg mix. The egg helps the breadcrumbs stick, creating a perfect crust. Don't overcrowd the air fryer basket. Give them space to cook evenly. Shake the basket halfway through cooking for extra crispiness. You can prepare the green bean fries ahead of time. Coat them and place them in the fridge. When you are ready to eat, just air fry them. This saves time for busy days. They still taste great when cooked later. Dipping sauces can enhance the flavor of your green bean fries. Try ranch dressing for a classic taste. Garlic aioli adds a creamy touch. For a spicy kick, use sriracha mayo. You can also explore other sauces, like honey mustard or tzatziki. Experiment to find your favorite! {{image_4}} To add some heat, try spicy green bean fries. You can mix in cayenne pepper or chili powder with the breadcrumbs. Start with 1/4 teaspoon and taste. Adjust the spice to your liking. For a fiery kick, add some hot sauce to the egg mixture. This gives the fries a nice zing. Pair these with a cooling dip like yogurt sauce for balance. For a more savory flavor, make parmesan herb green bean fries. Combine dried herbs like oregano and thyme into the breadcrumb mix. You can also use fresh herbs for a brighter taste. Add an extra sprinkle of Parmesan cheese for a richer flavor. This version is great for those who love classic Italian herbs. If you want a vegan-friendly version, swap the egg for a flaxseed mixture. Mix 1 tablespoon of ground flaxseed with 2.5 tablespoons of water. Let it sit for 5 minutes to thicken. Use nutritional yeast instead of Parmesan cheese for a cheesy flavor. These changes make the recipe plant-based but still tasty. Enjoy these fries with a vegan dip like hummus for a healthy treat. For the full recipe, check out the Crispy Air Fryer Green Bean Fries section. After enjoying your crispy green bean fries, store any leftovers in an airtight container. Keep them in the fridge for up to three days. Make sure they are completely cool before sealing the container. This helps maintain their crispiness. To reheat your green bean fries, I suggest using the air fryer. Preheat it to 375°F (190°C). Place the fries in the basket for about 3 to 5 minutes. This method makes them hot and crispy again. You can also use an oven. Set it to 375°F (190°C) and bake for 5 to 7 minutes. If you want to freeze your green bean fries, it's best to freeze them before cooking. Lay the coated fries on a baking sheet in a single layer. Freeze them for about an hour, then transfer them to a freezer bag. They can stay in the freezer for up to three months. When ready to cook, air fry them straight from the freezer. You may need to add a few extra minutes to the cooking time. For the full recipe, check earlier in the article. Yes, you can use frozen green beans. However, they may not be as crispy. It's best to thaw them first and pat them dry. This helps get rid of excess moisture. If you skip this step, the fries might turn out soggy. To keep your green bean fries crispy, here are some tips: - Make sure the green beans are dry before coating them. - Coat them lightly with oil; too much oil can lead to sogginess. - Avoid overcrowding the air fryer basket. Give them space to crisp up. - Shake the basket halfway through cooking to promote even crisping. Green bean fries go well with many dips. Some great options are: - Ranch dressing - Garlic aioli - Spicy ketchup - Hummus for a healthy twist Pairing them with your favorite dip makes for a fun snack! Crispy Air Fryer Green Bean Fries taste best right after cooking. If you have leftovers, store them in an airtight container. They last up to three days in the fridge. To reheat, use the air fryer for best results. This helps them stay crispy! For the full recipe, check out the Crispy Air Fryer Green Bean Fries section above. In this blog post, we explored how to make delicious air fryer green bean fries. We covered key ingredients like fresh green beans, breadcrumbs, and cheese. I shared step-by-step instructions for cooking, from preheating the air fryer to serving. We also discussed tips for crispiness and ideas for variations. In closing, these green bean fries are easy and tasty. You can store and reheat them well, making them great for snacks. So, go ahead and enjoy this fun twist on a classic veggie!

Crispy Air Fryer Green Bean Fries Delightful Snack

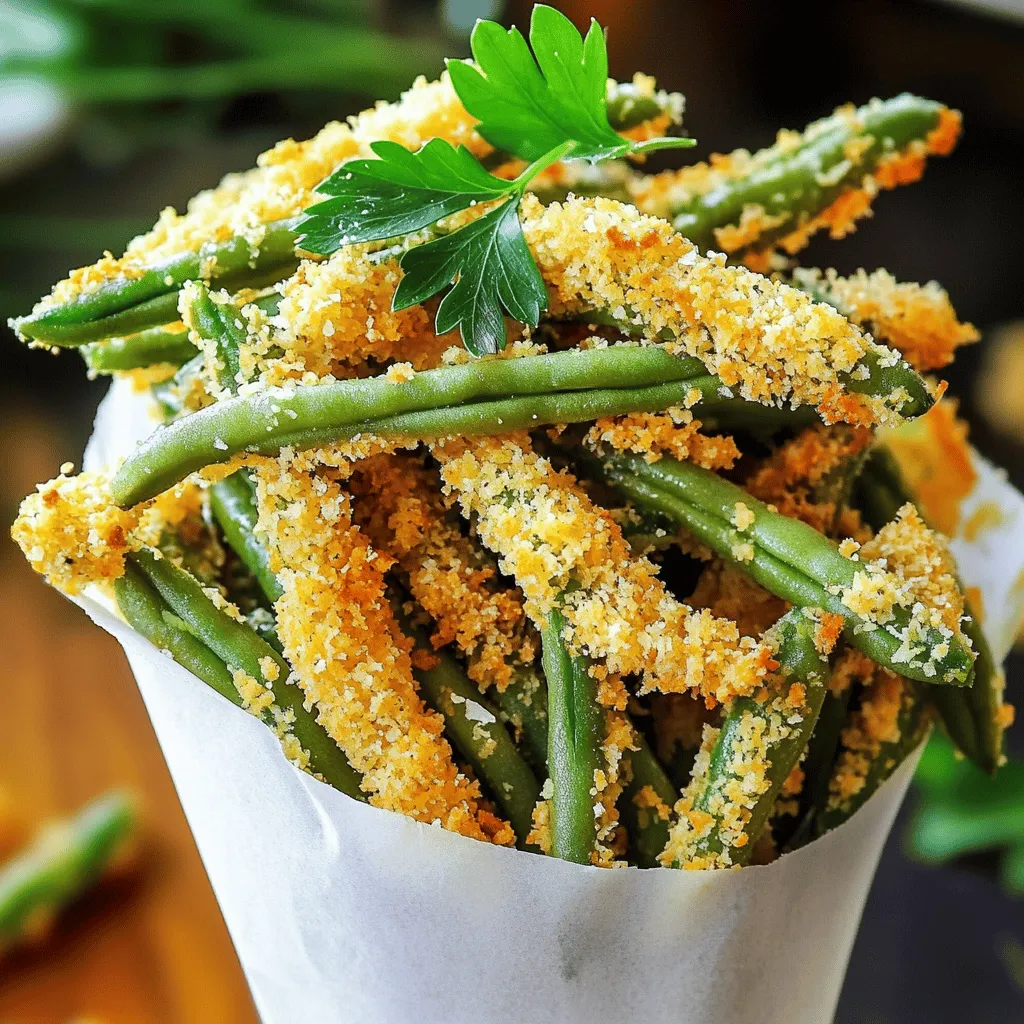
Are you ready to make a snack that’s both tasty and healthy? Crispy Air Fryer Green Bean Fries are here

- Ripe bananas (1 cup mashed) - Pure pumpkin puree (1 cup) - Sugars (granulated and brown) - Eggs and oil For this recipe, ripe bananas are key. They add natural sweetness and moisture. Aim for about two or three medium bananas. The pure pumpkin puree brings a lovely flavor and color. You can use canned pumpkin or make your own at home. Next, we need sugars. Granulated sugar gives sweetness, while brown sugar adds depth. The eggs help bind the batter, while the oil keeps it moist. You can use vegetable oil or coconut oil for extra flavor. - All-purpose flour (1 1/2 cups) - Baking soda and baking powder - Spices (cinnamon and nutmeg) - Salt Now, let’s look at the dry ingredients. All-purpose flour is the main base for our bread. It provides structure. Baking soda and baking powder help it rise. The spices, like cinnamon and nutmeg, add warmth and a cozy aroma. Finally, a pinch of salt enhances all the flavors. - Chocolate chips (1/2 cup) - Chopped walnuts (1/2 cup) Now for the fun part—optional add-ins! Chocolate chips make this bread extra special. They melt into gooey pockets of goodness. If you like a bit of crunch, add chopped walnuts. They add a nice texture. You can mix and match these to suit your taste. For the full recipe, check out the link above. Happy baking! - Preheat the oven to 350°F (175°C). - Prepare the loaf pan by greasing it with butter or oil, or use parchment paper. - In a large bowl, combine 1 cup of mashed bananas, 1 cup of pumpkin puree, 1/2 cup of granulated sugar, 1/2 cup of brown sugar, 1/2 cup of vegetable oil, 2 large eggs, and 1 teaspoon of vanilla extract. - Mix until smooth and all ingredients blend well. - In a separate bowl, sift together 1 1/2 cups of all-purpose flour, 1 teaspoon of baking soda, 1/2 teaspoon of baking powder, 1/2 teaspoon of salt, 1 teaspoon of cinnamon, and 1/2 teaspoon of nutmeg. - This helps to spread the dry ingredients evenly. - Gradually add the dry mixture to the wet mixture. - Stir gently with a spatula or wooden spoon until just combined. - Avoid overmixing to keep the bread light. - Fold in 1/2 cup of chocolate chips and 1/2 cup of walnuts, if using. - Pour the batter into the prepared loaf pan and smooth the top. - Bake for 55-65 minutes. Check doneness with a toothpick. - If it comes out clean, the bread is ready. To get the best texture, mix your batter gently. Overmixing leads to dense bread. After adding dry ingredients, stir just until combined. You want some lumps, and that is okay! This keeps your pumpkin chocolate chip banana bread light and fluffy. To check if your bread is done, use a toothpick. Insert it into the center of the loaf. If it comes out clean or with a few crumbs, your bread is ready! Do not wait for it to be completely dry. A few crumbs mean it will stay moist. You can change the oil type for different flavors. Use coconut oil for a richer taste. You can also add spices like ginger for a warm kick. If you want more crunch, add in nuts or extra chocolate chips. These small changes can make your bread truly unique. For the full recipe, check out the details above. {{image_4}} You can change the taste of your pumpkin chocolate chip banana bread. Adding spices can create new flavors. Try adding ginger or cloves for a warm kick. These spices mix well with pumpkin. A pinch of nutmeg can also enhance the bread's taste. Experiment with these spices for a fun twist! If you need a gluten-free version, use almond or oat flour. These flours work well and keep the bread moist. For a vegan option, swap the eggs. Use flax eggs or applesauce instead. Both will help bind the mixture without eggs. These adjustments let everyone enjoy this tasty treat. This bread tastes great on its own, but you can add toppings. Try spreading cream cheese on a slice for a rich flavor. A bit of butter also adds a nice touch. You can even sprinkle some nuts on top for extra crunch. Enjoy it with a warm drink for a cozy snack. If you want to see the full recipe, check out the Full Recipe section! After baking your pumpkin chocolate chip banana bread, let it cool for about 10 minutes in the pan. This helps the bread firm up a bit. Next, move it to a wire rack for full cooling. This step is key for keeping the bread light and fluffy. If you leave it in the pan too long, it might get soggy. Once cool, wrap it tightly in plastic wrap or store it in an airtight container. This keeps it fresh and tasty. If you have extra slices, freezing is a great option. First, let the bread cool completely. Then slice it into individual portions. Wrap each slice tightly in plastic wrap. After that, place the slices in a freezer bag or container. Make sure to remove as much air as possible to prevent freezer burn. You can freeze the bread for up to three months. When you want a slice, just thaw it at room temperature or pop it in the microwave for a few seconds. At room temperature, your pumpkin chocolate chip banana bread lasts for about 3 to 5 days. Store it in a cool, dry place. If you want it to last longer, the fridge is an option, but it may dry out. Always check for any signs of mold or off smells before eating. Enjoy your delicious treat fresh, or save it for later! For the full recipe, check out the complete guide. To ripen bananas quickly, place them in a brown paper bag. This traps ethylene gas, speeding up ripening. You can also leave them at room temperature. If you need them even faster, put them in a warm spot, like near a sunny window. Ripe bananas have brown spots and feel soft. These will give your bread a sweet taste. Yes, you can use fresh pumpkin. First, you need to cook it until soft. Cut the pumpkin, remove seeds, and roast or steam until tender. Then, mash it to make puree. This fresh puree can add a nice flavor to your bread. Just make sure to measure it the same as canned pumpkin. To check if your bread is done, insert a toothpick into the center. If it comes out clean or with a few moist crumbs, the bread is ready. If it has wet batter on it, bake a bit longer. Keep an eye on it around the 55-minute mark. Every oven is different, so check often. Absolutely! You can add more chocolate chips for extra sweetness. You can also mix in nuts, dried fruits, or spices like ginger. Just remember not to overfill the batter. This can make the bread dense. Stick to about 1 cup of add-ins for the best results. For the full recipe, check the detailed instructions above. In this post, we explored a delicious recipe for pumpkin banana bread. You learned about key ingredients like ripe bananas and pumpkin puree, along with tips for mixing and baking. The post shared helpful tricks for perfecting texture and offered fun variations to try. Remember, baking is all about enjoying the process. Experiment with flavors and find your favorite combinations. If you follow these steps, your pumpkin banana bread will be a hit. Happy baking!

Pumpkin Chocolate Chip Banana Bread Delightful Recipe

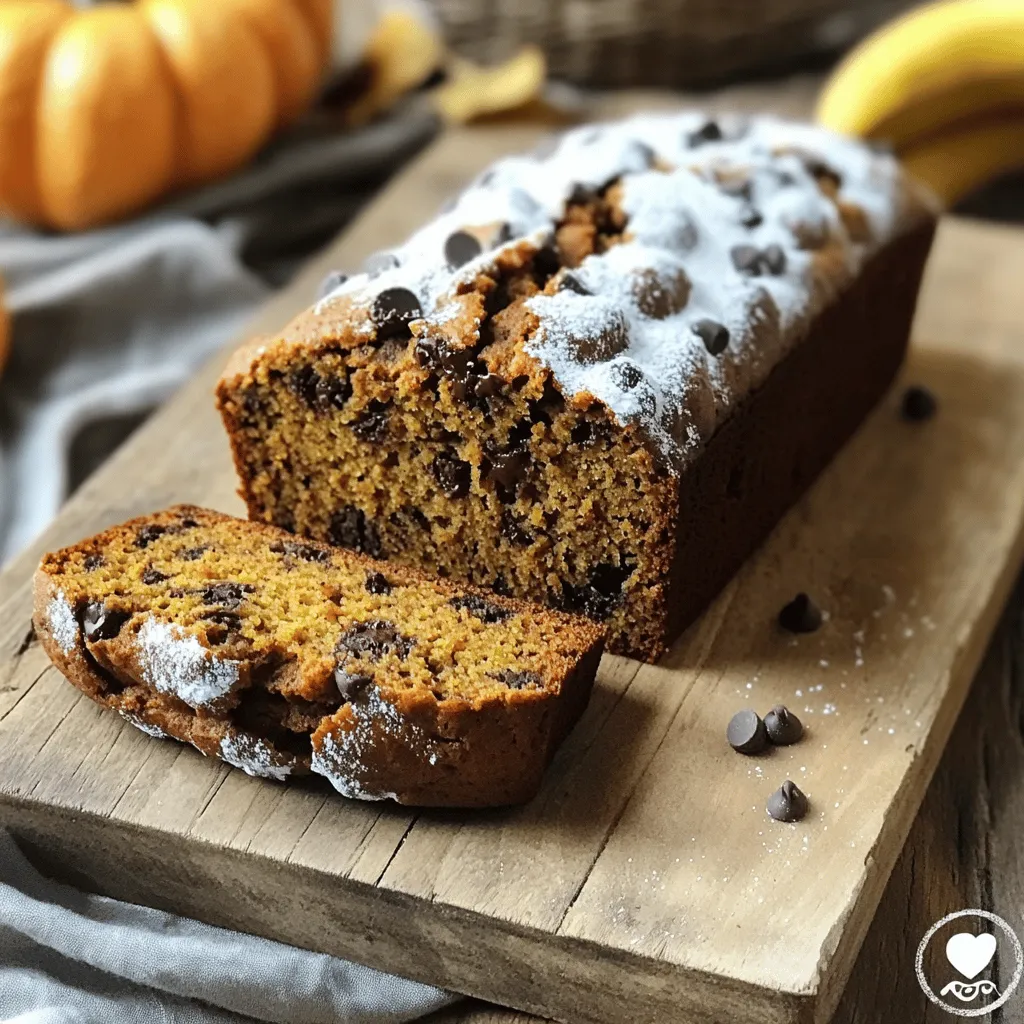
If you love the warm flavors of fall, then you’ll adore this Pumpkin Chocolate Chip Banana Bread. This recipe brings

For the Garlic Butter Steak and Potato Skillet, you will need these key ingredients: - 1 lb sirloin steak, cut into 1-inch cubes - 3 medium Yukon gold potatoes, diced - 4 tablespoons unsalted butter, divided - 4 cloves garlic, minced - 1 teaspoon dried rosemary - 1 teaspoon dried thyme - Salt and pepper to taste - 1 tablespoon olive oil - Fresh parsley, chopped (for garnish) You can add more flavor to your dish with optional seasonings like: - Paprika for a smoky touch - Red pepper flakes for heat - A splash of Worcestershire sauce for depth - Lemon juice for brightness This dish pairs well with: - A fresh green salad for crunch - Crusty bread to soak up the juices - Steamed veggies for added nutrition - A nice glass of red wine to elevate your meal These ingredients and accompaniments will help create a meal that is not just tasty but also satisfying. For the full recipe, be sure to check the steps to make this delightful dish shine. To start, we need to prep the potatoes. Grab a large skillet and warm 1 tablespoon of olive oil over medium heat. Once it’s hot, add 3 diced Yukon gold potatoes. Season them well with salt and pepper. Sauté the potatoes for about 10-12 minutes. Stir them often. This helps them cook evenly and prevents sticking. You want them soft with a nice golden color. After the potatoes are ready, take them out and set them aside in a bowl. In the same skillet, add 2 tablespoons of unsalted butter. Turn the heat up to medium-high. Now, add your 1 pound of cubed sirloin steak. Season it with salt, pepper, dried rosemary, and thyme. Sear the steak for about 4-5 minutes. Make sure to turn it often. You want it browned and cooked to your taste. Aim for an internal temperature of 135°F for medium-rare. Next, lower the heat back to medium. Add 4 minced garlic cloves to the skillet. Toss in the last 2 tablespoons of butter. Stir everything for about a minute. This lets the garlic get fragrant without burning. The smell will be amazing! Now, it’s time to bring it all together. Return the sautéed potatoes to the skillet. Gently stir to mix everything. This lets the potatoes soak up the tasty garlic butter from the steak. Cook for an extra 2-3 minutes. This ensures everything is heated through and well-combined. Before serving, sprinkle some chopped fresh parsley on top. This adds a burst of color and flavor. Serve the skillet dish hot, right from the pan. It looks rustic and inviting, perfect for sharing. For the full recipe, check back for more details! To cook steak just right, start with a good cut. I love sirloin for its flavor and texture. Cut the steak into 1-inch cubes for even cooking. Season it with salt and pepper before it hits the pan. When you add it to the hot skillet, let it sear. This locks in the juices. Cook for about 4-5 minutes, turning the cubes often. Use a meat thermometer to check the doneness. Aim for 135°F for medium-rare. For fluffy potatoes, choose Yukon gold. They are creamy and cook well. Dice them into even pieces for smooth cooking. Start by sautéing them in olive oil. This gives them a nice golden color. Don't rush the process; let them cook for 10-12 minutes. Stir them gently to avoid sticking. Season with salt and pepper. This simple step adds great flavor. Fluffy potatoes are key to a great dish. Aromatics make your dish pop. Garlic is a must in this recipe. Mince fresh garlic and add it in the last cooking stage. This keeps it fragrant and tasty. Don't let it burn; just cook for about a minute. Fresh herbs like rosemary and thyme add depth. They blend well with butter and steak juices. Add these to the steak to boost flavor. When combined, these elements create a rich taste that elevates your meal. For the full recipe, check out the complete guide. {{image_4}} You can make this dish even better by adding vegetables. Try bell peppers, onions, or green beans. They will add color and taste. Chop them into small pieces. Sauté them with the potatoes for extra flavor. You can also use spinach or kale. Just add them at the end to keep them fresh. If you want to switch things up, try using chicken or shrimp. Chicken thighs work well and stay juicy. Cut them into bite-sized pieces and cook them like the steak. Shrimp cooks fast, so add it last. Just sauté until it turns pink. This way, you can enjoy different flavors with the same great dish. Experimenting with spices can change the whole dish. Try using Cajun seasoning for a kick. Or, mix in some smoked paprika for a rich taste. Italian herbs like basil and oregano can give it a fresh twist. You can even go Asian with soy sauce and sesame oil. Each blend offers a new way to enjoy your garlic butter steak and potato skillet. For the full recipe, check out the main article. After enjoying your Garlic Butter Steak and Potato Skillet, let it cool down. Place the leftovers in an airtight container. This dish stays fresh for about three days in the fridge. If you want to keep it longer, consider freezing it. When you're ready to enjoy your leftovers, you can reheat them easily. Use a skillet over medium heat. Add a splash of water or broth to keep it moist. Stir occasionally until heated through, which should take about 5-7 minutes. You can also use a microwave. Heat in short bursts, stirring in between, until warm. If you want to freeze your Garlic Butter Steak and Potato Skillet, first cool it completely. Use freezer-safe containers or bags. Make sure to remove as much air as possible. Label each container with the date. This meal can last up to three months in the freezer. When ready to eat, thaw it in the fridge overnight before reheating. For the full recipe, check the previous sections. Yes, you can make this dish ahead of time. Cook the steak and potatoes and let them cool. Store them in the fridge in a sealed container. When ready to eat, reheat in a skillet over medium heat. Add a little butter for flavor. This keeps the taste fresh and delicious. You can use various cuts of steak for this recipe. Ribeye, flank, or tenderloin work well too. Just make sure to cut them into small cubes. This ensures even cooking and good flavor. Each cut will give a unique taste and texture. To make this dish healthier, use leaner cuts of steak. You can also add more veggies like bell peppers or spinach. Reducing butter helps cut down on fat. Using olive oil instead of butter when cooking the potatoes is another great option. Yes, you can cook this dish in the oven. Start by roasting the potatoes in a baking dish at 400°F for about 20 minutes. Then, add the seasoned steak and roast for another 15 minutes. This method allows the flavors to blend nicely, but the texture may be different. Be careful not to overcook the steak. It can turn tough if cooked too long. Also, make sure to season your potatoes well. They need flavor to match the steak. Lastly, don’t skip the garlic. It adds a special touch to the dish. For the full recipe, check out Garlic Butter Steak and Potato Skillet. When I think of comfort food, garlic butter steak and potato skillet comes to mind. This dish has tender steak and soft potatoes, all drenched in rich garlic butter. It’s a quick meal that fills your home with a warm, inviting aroma. To start, you need the right ingredients. Here’s what you’ll need for the full recipe: - 1 lb sirloin steak, cut into 1-inch cubes - 3 medium Yukon gold potatoes, diced - 4 tablespoons unsalted butter, divided - 4 cloves garlic, minced - 1 teaspoon dried rosemary - 1 teaspoon dried thyme - Salt and pepper to taste - 1 tablespoon olive oil - Fresh parsley, chopped (for garnish) This is a simple list, but each item plays a key role. The sirloin steak gives you that rich, meaty flavor. Yukon gold potatoes add creaminess and texture. Garlic and butter bring depth and richness to the dish. You can also tweak the recipe. Try adding veggies like green beans or bell peppers for a pop of color. Use different cuts of steak if you prefer. You can even switch seasonings based on what you like best. The great thing about this dish is its flexibility. You can serve it with a simple side salad or some crusty bread. You’ll have a full meal that satisfies everyone at the table. For the full recipe, you can follow the detailed steps to create this delicious skillet meal. Enjoy! This blog post covers how to make a delicious Garlic Butter Steak and Potato Skillet. We looked at ingredients, cooking methods, and tips for perfect results. You learned about variations and how to store leftovers. Remember, good cooking mixes flavor and fun. You can change recipes to fit your taste. Use fresh ingredients and enjoy the process. Happy cooking!

Garlic Butter Steak and Potato Skillet Delight

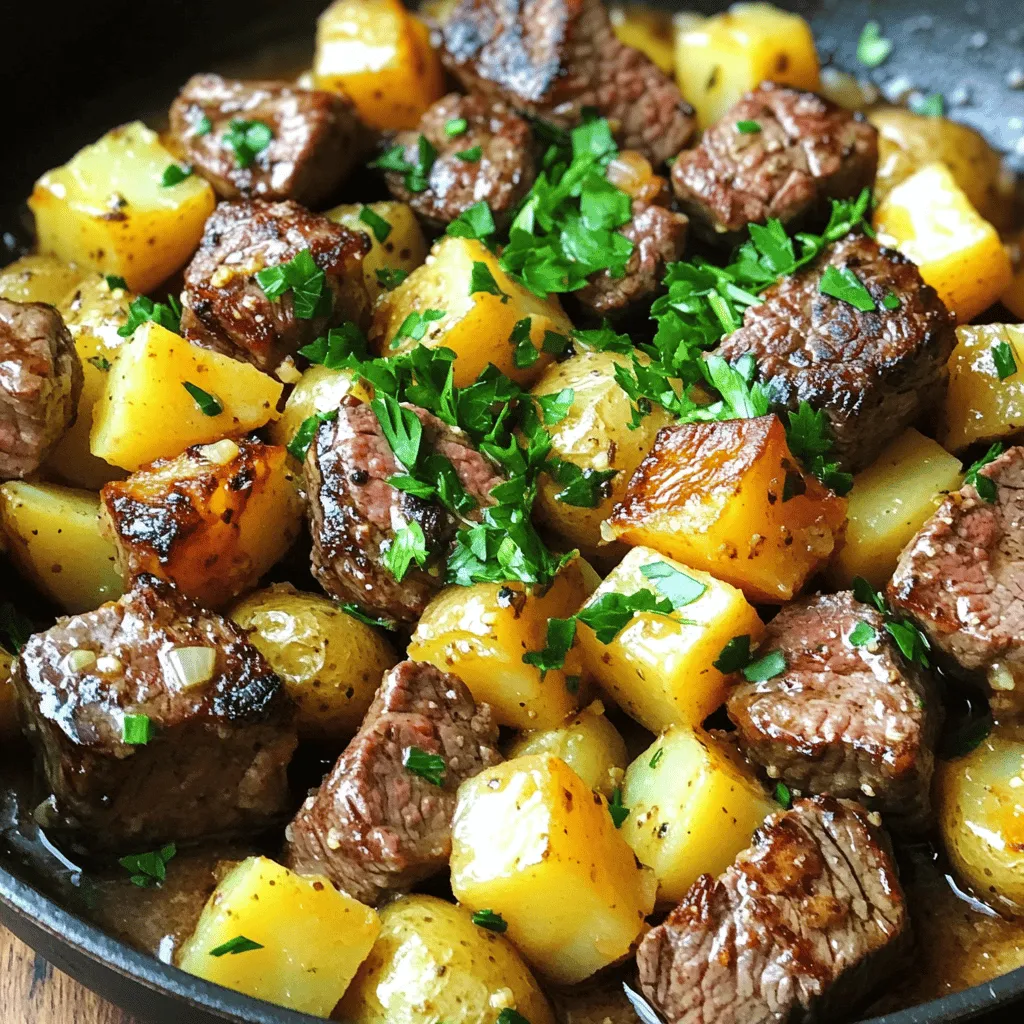
Are you ready for an easy and tasty dinner? The Garlic Butter Steak and Potato Skillet Delight brings you juicy

For the Vegan Creamy Butternut Squash Soup, you will need the following main ingredients: - 1 medium butternut squash, peeled and cut into 1-inch cubes - 1 tablespoon extra virgin olive oil - 1 onion, finely diced - 3 cloves garlic, minced - 1 teaspoon ground cumin - 1 teaspoon ground coriander - 4 cups vegetable broth (low sodium recommended) - 1 cup full-fat coconut milk (for optimal creaminess) - Sea salt and freshly cracked black pepper, to taste Optional garnishes and toppings can enhance your soup: - Fresh thyme leaves, for garnish (optional) - Crusty whole-grain bread, for serving - A light side salad, for a complete meal These ingredients come together to create a rich, creamy, and hearty soup that warms the soul. Using coconut milk adds a smooth texture, while spices bring depth and flavor. Follow the [Full Recipe] for step-by-step instructions to make this delicious dish. To make this vegan creamy butternut squash soup, start with the basics. First, heat one tablespoon of extra virgin olive oil in a large pot over medium heat. Add one finely diced onion and sauté it for about five minutes. You want the onions to turn translucent and smell sweet. Next, stir in three minced garlic cloves, one teaspoon of ground cumin, and one teaspoon of ground coriander. Cook this for one to two minutes. This step helps the spices bloom and adds great flavor. Now, it’s time to add the butternut squash. Use one medium squash, peeled and cut into one-inch cubes. Stir the squash well, coating it with the onion and spices. Let it cook for about five minutes. This helps the squash soften a bit. For blending, you have two choices. An immersion blender works well. It lets you blend right in the pot. If you use a countertop blender, pour the soup in batches. Fill it only halfway to avoid spills. Both methods create a smooth texture. After adding the cubed squash, pour in four cups of vegetable broth. Make sure the broth covers the squash completely. Bring the mixture to a boil. Then, lower the heat and let it simmer for about 20 minutes. Your squash should be fork-tender by then. Once the squash is soft, take the pot off the heat. If you used a countertop blender, return the pureed soup to the pot. Now, add one cup of full-fat coconut milk for that creamy finish. Mix it well until fully combined. Season with sea salt and freshly cracked black pepper to taste. If you want, you can gently heat the soup again before serving. Ladle it into bowls and garnish with fresh thyme leaves for a lovely touch. For the full recipe, check out the details above, and enjoy making this warm and hearty dish! To make your soup creamy, I love using full-fat coconut milk. It adds a rich texture and a hint of sweetness. If you have a nut allergy, try oat milk or soy milk. These options can also create a nice creaminess without using dairy. For a deeper flavor, I suggest adding spices like ground cumin and coriander. They bring warmth and depth to the soup. Fresh herbs like thyme or sage can also add a bright taste. Just sprinkle them in before serving for extra aroma. One common mistake is overcooking the squash. You want it tender but not mushy. Keep an eye on it while it simmers. Also, taste your soup while seasoning. Adding too much salt at once can overpower the flavors. Adjust little by little until it’s just right. {{image_4}} If you can't find butternut squash, don't worry! You can use sweet potatoes or carrots instead. Both options add a lovely sweetness. You can also mix in pumpkin for a different flavor. Each swap brings its own twist, making it fun to experiment. To enhance the creaminess, consider using nut creams like cashew or almond. These options add rich flavors while keeping it dairy-free. You might also try adding a splash of lemon juice for brightness. It balances the sweetness and gives a fresh taste. Serving this soup can be as fun as making it. Try topping it with crispy croutons for crunch. Roasted seeds, like pumpkin or sunflower, add extra texture and nutrition. Pair it with crusty bread for a comforting meal. Each bite brings warmth and satisfaction. After you finish your Vegan Creamy Butternut Squash Soup, let it cool. Pour the leftover soup into an airtight container. This helps keep it fresh. Store it in the fridge. For best taste, eat it within 3 to 5 days. Always reheat it gently on the stove or in the microwave. Stir often to keep it smooth and creamy. Want to save some soup for later? Freezing is a great option! First, cool the soup completely. Then, pour it into freezer-safe bags or containers. Leave some space at the top, as soup expands when frozen. Seal tightly and label with the date. When you’re ready to eat, thaw it overnight in the fridge. Reheat on the stove or microwave, stirring to keep it creamy. When stored properly, your soup lasts well. In the fridge, it stays fresh for about 3 to 5 days. In the freezer, it can last up to 3 months. After that, the flavor may fade. I recommend marking the date on your container. This way, you know when to enjoy every delicious drop! Yes, you can make this soup ahead of time. To prepare, follow all the steps in the recipe. Allow the soup to cool completely before storing. Use an airtight container for best results. You can keep it in the fridge for up to three days. If you want to store it longer, freeze it. Just make sure to leave some space in the container for expansion. When you're ready to eat, thaw it in the fridge overnight. Reheat on the stove over low heat, stirring often. Absolutely! If you want to skip coconut milk, you can use other options. Try using cashew cream for a creamy texture. Blend soaked cashews with water until smooth. Almond milk or soy milk can also work. Just be sure to pick unsweetened versions. This will keep the flavor balanced. You can also add a bit of silken tofu for creaminess. You can make this soup even healthier by adding some extras. Spinach or kale is a great choice. Just toss it in at the end and let it wilt. You can also add cooked lentils or chickpeas for protein. They blend well and add texture. If you want more fiber, consider adding diced carrots or sweet potatoes. These will enhance the flavor and nutrients. If you like heat, there are easy ways to spice it up. You can add a pinch of cayenne pepper or red pepper flakes. Mix them in when you add the garlic and spices. For more flavor, try adding chopped jalapeños. If you want a smoky taste, use smoked paprika. Just remember to start with a little and taste as you go. This way, you can control the heat level. This blog covers the key steps to make Vegan Creamy Butternut Squash Soup. You learned about ingredients, cooking steps, and tips for a creamy texture. I shared common mistakes to avoid and variations to try. Remember to store leftovers properly and consider flavor boosts. You can create a delicious meal that meets your taste and diet needs. Enjoy your cooking journey and feel free to experiment with this soup!

Vegan Creamy Butternut Squash Soup Hearty and Simple

Looking for a warm and cozy dish that fits your plant-based diet? My Vegan Creamy Butternut Squash Soup is both

Older posts
Newer posts
← Previous Page1 … Page5 Page6 Page7 … Page71 Next →

dsad

© 2025 tastyhatch • Built with GeneratePress

Our Policies

  • Copyright Policy
  • Cookie Policy
  • GDPR Policy
  • Privacy Policy
  • Disclaimer
  • Terms Of Use

More Information

  • Home
  • About
  • Contact
  • Appetizers
  • Dessert
  • Dinner
  • Drinks
©2025, tastyhatch About Back To Top