Skip to content
DisclaimerTerms Of UseGDPR PolicyCookie Policy

tastyhatch

  • Home
  • Drinks
  • Appetizers
  • Dinner
  • Dessert
  • About
  • Contact
  • Privacy Policy
DisclaimerTerms Of UseGDPR PolicyCookie Policy

Olivia

To make a Savory Quinoa Salad with Feta, gather these fresh ingredients: - 1 cup quinoa, thoroughly rinsed - 2 cups vegetable broth - 1 cup cherry tomatoes, halved - 1 cucumber, freshly diced - 1 bell pepper (red or yellow), diced - 1/2 red onion, finely chopped - 1/2 cup kalamata olives, pitted and sliced - 1 cup crumbled feta cheese - 1/4 cup fresh parsley, roughly chopped - 3 tablespoons extra virgin olive oil - 2 tablespoons freshly squeezed lemon juice - Salt and pepper to taste These ingredients bring bright colors and bold flavors to the dish. Quinoa serves as the base, giving you a healthy grain. Each vegetable adds crunch and nutrients, while feta brings a creamy texture and salty taste. Olive oil and lemon juice add a zing. This mix makes each bite exciting and fresh. For the full recipe, check out the instructions below! - Combine quinoa and vegetable broth in a medium saucepan. - Bring to a boil, reduce heat, cover, and simmer for 15 minutes. - Rest and fluff with a fork. Cooking quinoa is simple. Rinsing it first removes any bitter taste. Use vegetable broth for added flavor. When the broth boils, turn the heat low. Cover and let it cook. After 15 minutes, remove it from heat. Let it sit for five more minutes. Fluff it with a fork to make it light and fluffy. - Chop and mix tomatoes, cucumber, bell pepper, red onion, and olives in a large bowl. Fresh vegetables add color and crunch. Chop the tomatoes, cucumber, and bell pepper into small pieces. Finely chop the red onion. Slice the olives. Mix them all in a big bowl. This blend of vegetables makes your salad bright and tasty. - Mix the cooked quinoa with vegetables, olive oil, and lemon juice. - Gently fold in crumbled feta and parsley. - Adjust seasoning with salt and pepper. - Chill before serving for best flavor. Once your quinoa cools a bit, add it to the bowl of veggies. Drizzle olive oil and lemon juice on top. Toss everything gently with a spoon. Next, fold in crumbled feta cheese and parsley. This adds a creamy texture and fresh taste. Season with salt and pepper to your liking. For the best flavor, chill the salad for about 30 minutes. This helps the flavors blend well. For a complete guide, check the [Full Recipe]. To make perfect quinoa, start by rinsing it. This removes the bitter coating called saponin. Use a fine mesh strainer for best results. Rinse under cold water until the water runs clear. Next, cook the quinoa for the right texture. Combine one cup of rinsed quinoa with two cups of vegetable broth. Bring it to a boil on medium heat. Once it boils, reduce the heat to low. Cover the pot and let it simmer for 15 minutes. After 15 minutes, remove it from the heat and let it rest for five minutes. Fluff it with a fork for a light and fluffy texture. To enhance flavor, use simple seasonings and fresh herbs. A pinch of salt and pepper can boost the taste. Fresh herbs like parsley or basil add a nice touch. You can also try adding garlic powder or onion powder for more depth. If you're looking for alternative dressings, try balsamic vinegar or a yogurt-based dressing. These options can give your salad a different twist. Mix and match to find your perfect flavor balance. For serving, you can get creative. Serve the salad in a large bowl or on individual plates. This adds a personal touch. Garnish with extra parsley for vibrant color. Add whole olives on top for a nice pop. Lemon wedges on the side can add zest and freshness. These simple ideas make your dish look even more appealing. {{image_4}} You can switch up the cheese in this salad. Goat cheese adds a tangy twist. If you want, try using a sharp cheddar or a creamy blue cheese. For greens, consider adding baby spinach or arugula. They bring a nice crunch and freshness. You can also mix in roasted veggies like zucchini or asparagus. This makes your dish more colorful and tasty. If you want more protein, chickpeas work great. They blend well and add a nutty flavor. You can also add grilled chicken for a heartier meal. For a vegan option, consider using tofu or tempeh. These choices keep your salad filling while still being healthy. You can change this salad based on the season. In summer, add fresh corn or diced peaches for sweetness. In the fall, try roasted butternut squash or apples for warmth. These seasonal ingredients keep your dish exciting and fresh. Adapting your salad to the season makes it fun and delicious to eat. For the full recipe, check out the previous section. To keep your savory quinoa salad fresh, use an airtight container. Glass or plastic containers work well. Make sure to seal the lid tightly. Store the salad in the fridge at a cool temperature, around 40°F (4°C). This keeps the flavors bright and the ingredients crisp. Your quinoa salad can last about 3 to 5 days in the fridge. Check for signs of spoilage before eating. If the salad smells sour or looks slimy, it’s time to toss it. Always trust your senses! I do not recommend freezing this salad. The texture of the quinoa and veggies can change. If you must freeze it, store it in a freezer-safe bag. Remove as much air as possible. To reheat, thaw it in the fridge overnight. Then, gently warm it in a pan or the microwave. The salad will not taste as fresh, but it will still be safe to eat. For the full recipe, you can refer to the earlier section. Enjoy your cooking adventure! Yes, you can prepare this salad ahead of time. I recommend making it up to one day in advance. Just keep it in the fridge. This allows the flavors to blend well. To ensure your salad is gluten-free, use certified gluten-free quinoa. Check the labels of your vegetable broth to ensure it’s gluten-free too. Most of the other ingredients, like veggies and feta, are naturally gluten-free. This salad pairs well with grilled chicken or fish for protein. You can also serve it with pita bread or hummus for a light meal. It makes a great side dish for barbecues or picnics. Quinoa is a superfood packed with nutrients. It is high in protein and fiber, making it great for digestion. It also contains vitamins and minerals like magnesium and iron. The veggies and feta in this salad add even more health benefits. This quinoa salad is a simple, tasty dish that's great for any meal. We covered how to cook quinoa, prepare fresh veggies, and mix it all together for a bright salad. Add your favorite ingredients or protein to make it yours. Store it right, and you’ll have leftovers for days. This recipe is healthy and full of flavor. You can easily customize it based on your taste or what’s in season. Enjoy making your unique version of this delicious quinoa salad!

Savory Quinoa Salad with Feta Fresh and Flavorful Dish

Looking for a healthy and tasty dish? This Savory Quinoa Salad with Feta is just what you need! It’s fresh,

- 3 ripe avocados - 3 cloves garlic, minced - 1/4 cup fresh basil leaves, packed - 1/4 cup fresh lemon juice - 1/3 cup extra virgin olive oil - Salt and freshly ground black pepper, to taste - 300g spaghetti or your preferred pasta To make creamy avocado pasta, use ripe avocados for the best flavor. The garlic adds a nice kick. Fresh basil brings a fragrant touch, while lemon juice adds brightness. Extra virgin olive oil helps make the sauce smooth and rich. Finally, salt and pepper enhance all the tastes. - 1/2 cup cherry tomatoes, halved - 1/4 cup grated Parmesan cheese (optional) - Crushed red pepper flakes, for garnish (optional) You can add cherry tomatoes for a pop of color and freshness. If you like cheese, sprinkle some Parmesan on top. For a spicy twist, use crushed red pepper flakes. These add-ins let you customize the dish to your taste. For the full recipe, check out the Creamy Avocado Pasta section. To cook spaghetti or your preferred pasta, start by bringing salted water to a boil in a large pot. Add the pasta and let it cook according to the package instructions. I always aim for al dente, which means the pasta should be firm when you bite it. This usually takes about 8 to 10 minutes. Keep an eye on it! Once it's done, save 1 cup of that pasta water before draining the spaghetti. This water is useful later. For the creamy sauce, gather these ingredients: - 3 ripe avocados - 3 cloves garlic, minced - 1/4 cup fresh basil leaves, packed - 1/4 cup fresh lemon juice - 1/3 cup extra virgin olive oil - Salt and freshly ground black pepper, to taste In a food processor, combine the avocados, garlic, basil, lemon juice, and olive oil. Blend until smooth and creamy. If you want a thinner sauce, add some of the reserved pasta water a little at a time. Keep blending until you reach your desired thickness. Now it's time to bring it all together! In the same pot you used for cooking the pasta, add the warm spaghetti. Pour the creamy avocado sauce on top and toss gently. Make sure every strand of pasta gets coated. If the sauce feels too thick, add more of that reserved pasta water. Don’t forget to fold in some halved cherry tomatoes. They add a pop of color and sweetness to your dish. Enjoy your creamy avocado pasta! For the complete recipe, check out the Full Recipe. To make a smooth avocado sauce, choose ripe avocados. They should feel soft but not mushy. Cut them in half and scoop out the flesh into your blender. For blending, I recommend using a high-powered blender or a food processor. These tools create a silky-smooth texture that makes your sauce truly delightful. If your sauce is too thick, add some reserved pasta water slowly until you get the right creaminess. Seasoning is key to a great avocado pasta. Start by adding salt and freshly ground black pepper to your sauce. This step brightens the flavor. You can also try adding lemon zest for a fresh kick. For extra flavor, consider adding herbs like parsley or dill. A pinch of crushed red pepper flakes can add some heat if you enjoy a little spice. These tips will help you create a dish that bursts with flavor. For the complete recipe, check out the Full Recipe. {{image_4}} You can switch out some ingredients to fit your needs. If you want a creamy texture without dairy, use silken tofu or cashew cream instead of Parmesan cheese. These options keep your dish rich and smooth. They also add different flavors. For low-carb pasta, try zoodles (zucchini noodles) or spaghetti squash. These choices lower the carbs and fit a keto diet. They still give you a fun and tasty meal. To spice things up, add crushed red pepper flakes or a pinch of cayenne pepper. This gives the dish a nice kick. If you like heat, start with a little. You can always add more if you want. You can also add protein like grilled chicken or shrimp. This makes the meal heartier and more filling. Just cook the protein separately and mix it in with the pasta. This way, every bite is delicious and satisfying. For the full recipe and more ideas, check out the Creamy Avocado Pasta. To store creamy avocado pasta, place it in an airtight container. This keeps the dish fresh and tasty. Make sure to refrigerate it within two hours of cooking. The pasta can last in the fridge for about 2-3 days. After that, the avocados may brown and lose their creamy texture. When you're ready to eat your leftovers, you have a few good options. You can use the microwave or a stovetop. If using a microwave, heat it in short bursts. Stir between each burst to ensure even heating. For stovetop reheating, use a non-stick pan over low heat. Add a splash of olive oil or reserved pasta water to keep the sauce creamy. This helps adjust the consistency, so it doesn't get too thick. Enjoy your meal! If you need a substitute for avocados, try using ripe bananas or silken tofu. Both options give a creamy texture. However, the flavors will change. Bananas add sweetness, while tofu adds a neutral taste. You can also use cashew cream for a rich, nutty flavor. Yes, you can make the avocado sauce ahead of time! Store it in the fridge. To keep it fresh, add lemon juice. This will help prevent browning. Cover it tightly with plastic wrap or in an airtight container. Use it within 1-2 days for the best flavor. Absolutely! Creamy avocado pasta is great for meal prep. Cook a larger batch and divide it into portions. Store in airtight containers in the fridge. It will stay fresh for 3-4 days. Just remember to add cherry tomatoes just before eating for the best taste. To check if your pasta is al dente, taste a piece. It should be firm but not hard. You can also check the package instructions. Usually, it takes about 8-10 minutes to cook. When you drain the pasta, reserve some water for the sauce. This helps with texture. For the full recipe, visit the Creamy Avocado Pasta section above. Creamy avocado pasta is easy to make with fresh ingredients and simple steps. You blend ripe avocados, garlic, and lemon juice for a tasty sauce. Remember, you can add tomatoes or cheese for extra flavor. Store leftovers in the fridge for a few days, and heat them gently. I encourage you to try this recipe tonight. Enjoy the creamy goodness and impress your family!

Creamy Avocado Pasta Delightful and Quick Meal

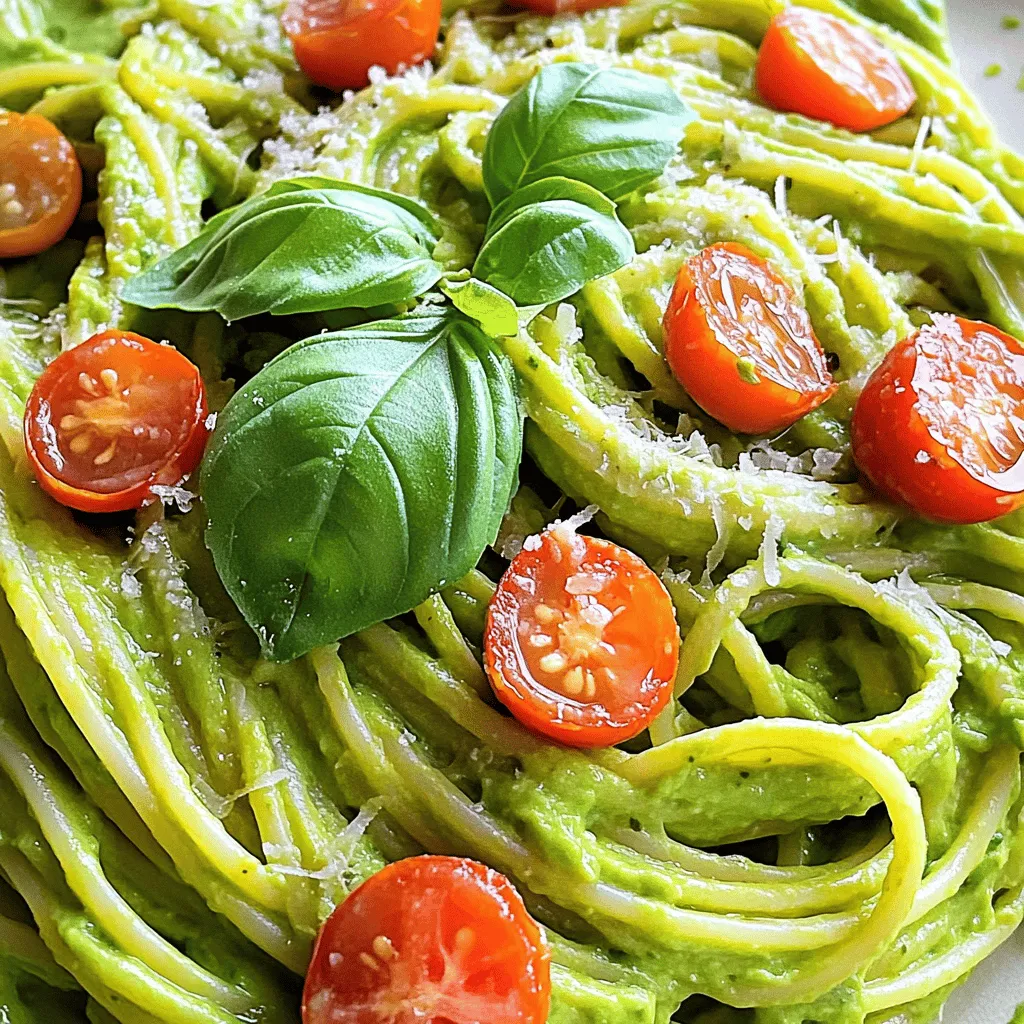
Are you ready to impress everyone with a quick and tasty meal? Creamy avocado pasta combines ripe avocados, garlic, and

To make spicy chickpea tacos, gather these main items: - 2 cans (15 oz each) chickpeas, drained and rinsed - 2 tablespoons extra virgin olive oil - 1 tablespoon chili powder - 1 teaspoon ground cumin - 1 teaspoon smoked paprika - ½ teaspoon cayenne pepper (adjust based on your spice tolerance) - 1 teaspoon garlic powder - Salt and freshly ground black pepper to taste - 8 small corn or flour tortillas These ingredients create a flavorful base. The chickpeas give protein, while spices add a tasty kick. For a fresh touch, grab these garnishing items: - 1 ripe avocado, sliced - 1 cup shredded purple cabbage - 1 cup diced fresh tomatoes - ¼ cup fresh cilantro, chopped finely - 2 tablespoons fresh lime juice These toppings help balance the heat. The avocado adds creaminess, and the lime juice brightens every bite. You can swap some ingredients to fit your taste. Use olive oil or any cooking oil you like. If you want more heat, add extra cayenne or jalapeños. For a different flavor, try smoked paprika or leave it out. If you can't find purple cabbage, green cabbage works too. You can even use lettuce for a lighter option. Feel free to mix and match based on what you have at home! For the complete step-by-step process, check the Full Recipe. Start by draining and rinsing the chickpeas. Use two cans of chickpeas. Place them in a large mixing bowl. Add olive oil, chili powder, ground cumin, smoked paprika, cayenne pepper, garlic powder, and salt and pepper. Toss the chickpeas well. Make sure they are fully coated with the spices. Heat a non-stick skillet over medium-high heat. Add the seasoned chickpeas to the skillet. Cook them for about 8 to 10 minutes. Stir the chickpeas often. This helps them become crispy and heated through. The spices will fill your kitchen with a great smell. While the chickpeas are cooking, grab another skillet. Set it over medium heat. Place the tortillas in the skillet for about 30 seconds on each side. They should be warm and flexible, but not too crispy. This step makes them easier to fold. Take a warm tortilla and lay it flat on a plate. Spoon a good amount of the spicy chickpeas into the center. Then, add fresh shredded purple cabbage, diced tomatoes, and avocado slices on top. Each layer adds flavor and texture. Drizzle fresh lime juice over the assembled tacos. Sprinkle chopped cilantro on top for extra flavor. This step brightens the dish. Serve the tacos right away to enjoy their warmth and taste. Repeat these steps for the remaining tortillas and ingredients. For the full recipe, check the detailed instructions above. To boost flavor, always use fresh spices. Old spices lose their punch. I love adding lime juice to brighten the dish. Fresh cilantro adds a nice herb taste. Consider mixing in some diced jalapeños for extra heat. You can also try adding a touch of honey or maple syrup for sweetness. For crispy chickpeas, dry them well after rinsing. Pat them down with a towel. Hot oil helps them crisp up nicely. Stir them often while cooking to avoid burning. If you want extra crunch, bake them at 400°F for 15 minutes after frying. Serve your tacos on a colorful plate for a pop of color. Stack the tacos neatly and sprinkle cilantro on top. Place lime wedges alongside for easy squeezing. You can also arrange toppings in small bowls for a fun taco bar. This lets everyone customize their tacos just how they like! {{image_4}} You can change the spice level in your tacos. If you like mild, skip the cayenne pepper. For medium heat, use half a teaspoon. If you want it hot, add more cayenne or a dash of hot sauce. You can also try using different spices. Chipotle powder gives a smoky flavor, while paprika adds color without too much heat. Toppings can make your tacos special. Instead of cabbage, use lettuce for a crunch. Black beans add protein and flavor. Fresh jalapeños or pickled onions can spice things up. For sides, rice and beans pair well. You can also serve corn on the cob or a fresh salad. These choices keep your meal fresh and fun. This recipe is already vegan, which is great! For gluten-free options, use corn tortillas. Make sure to check labels on all ingredients. Some spices may contain gluten. You can also add avocado or a nut-based cheese for a creamy feel. These swaps keep your diet in check while enjoying tasty tacos. For the Full Recipe, check back to the beginning of this article. To keep your leftover tacos fresh, separate the fillings and tortillas. Place the chickpea mixture in an airtight container. Store the tortillas in a zip-top bag. This keeps them from getting soggy. Your chickpeas will stay tasty for up to three days in the fridge. To reheat the chickpea filling, warm it in a pan over medium heat. Stir the mixture until it's hot. For the tortillas, heat them in a dry skillet for about 30 seconds on each side. This keeps them soft and pliable. You can also microwave the tortillas for a few seconds, but they may not be as good. To save time, you can prepare the chickpea filling in advance. Cook it and let it cool. Store it in the fridge for up to three days. You can also chop your veggies early. Keep them in separate containers. When you're ready to eat, just warm the chickpeas and assemble your tacos. For a quick meal, this makes it simple and easy. Don't forget to check the full recipe for more details! Yes, you can use dried chickpeas. First, soak them overnight. Then, cook them until soft. This process takes more time but adds great flavor. I love serving spicy chickpea tacos with: - Mexican rice - Black beans - Grilled corn - A fresh green salad These sides add color and taste to your meal. To boost the heat, add more cayenne pepper. You can also try: - Sliced jalapeños - Hot sauce - Fresh chili peppers These options will give your tacos an extra kick. Yes, this recipe is gluten-free. Just use corn tortillas instead of flour tortillas. Always check the labels to be safe. You can prepare the chickpeas ahead of time. Store them in the fridge for up to three days. When ready to serve, just warm them up and assemble the tacos. For the best taste, make them fresh on the day you plan to eat. For the full recipe, follow the steps provided in the main article. Spicy chickpea tacos are simple to make and full of flavor. We covered key ingredients, like main chickpeas and tasty garnishes. You learned step-by-step instructions, from cooking to serving. I shared tips for better flavor and crispy texture. Variations offer options for all tastes, including vegan and gluten-free choices. Now you can make these delicious tacos, customize them, and enjoy leftovers easily. I hope you try this recipe and share it with friends!

Spicy Chickpea Tacos Flavorful and Easy Recipe

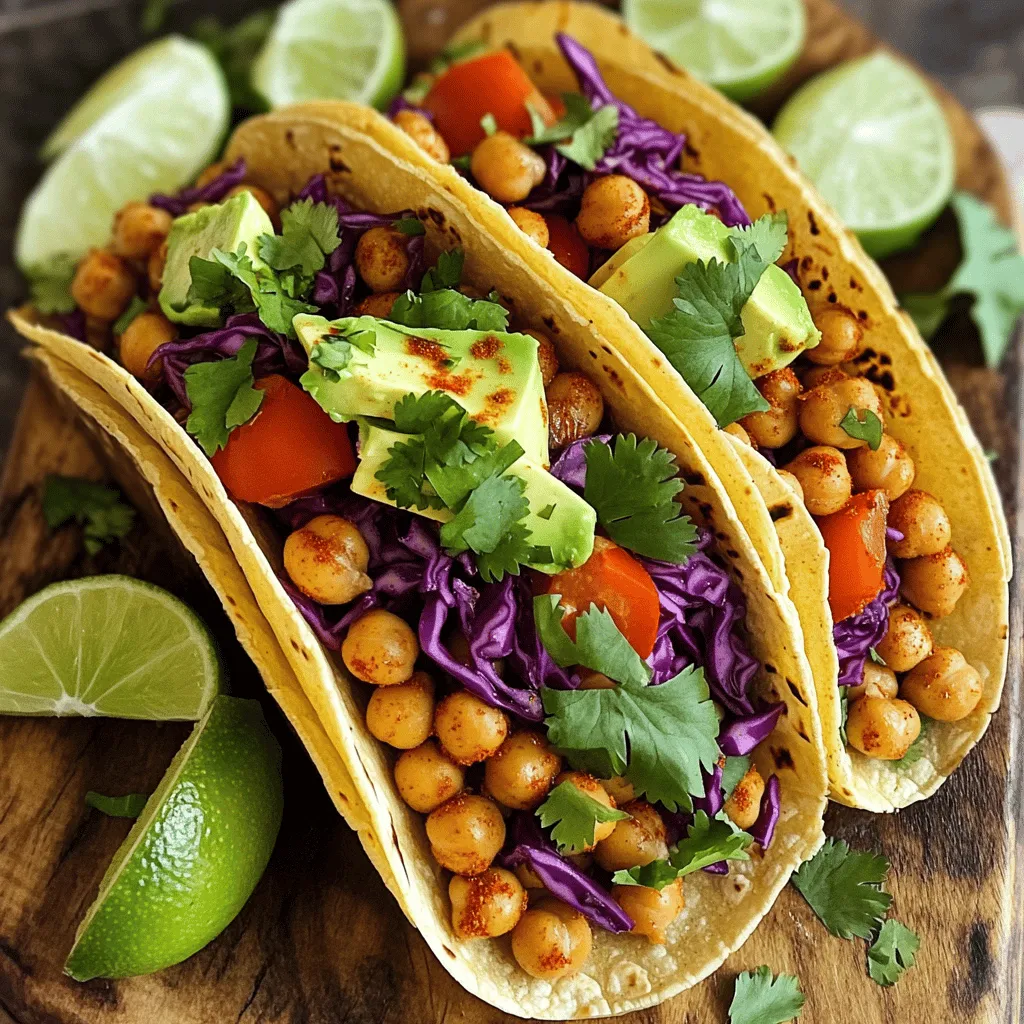
Craving something bold and satisfying? You’re in the right place! My Spicy Chickpea Tacos are not only packed with flavor

Quinoa: Preparation and Nutritional Benefits Quinoa is a super grain. It is full of protein and fiber. Start with one cup of quinoa. Rinse it well before cooking. This removes bitter saponins. Cook it in two cups of vegetable broth or water. This makes the quinoa tasty. Once cooked, it becomes fluffy and light. Fresh Vegetables: Suggested Variations Use a mix of colorful vegetables. I love using: - 1 medium red bell pepper, diced - 1 medium cucumber, diced - 1 cup cherry tomatoes, halved - 1 cup corn kernels, fresh or frozen - 1 ripe avocado, diced - ½ cup red onion, finely chopped - ½ cup fresh parsley, finely chopped Feel free to swap veggies based on your taste. You can try carrots, zucchini, or spinach. Just keep the colors bright for a fun look. Dressing Ingredients: Enhancing Flavor The dressing brings all the flavors together. For this salad, use: - ¼ cup extra virgin olive oil - 3 tablespoons freshly squeezed lemon juice - 1 teaspoon garlic powder - Sea salt and freshly ground black pepper to taste Mix the dressing in a small bowl. Pour it over the salad before serving. It adds zest and freshness to every bite. For the complete recipe, check the Full Recipe section. 1. Boiling Water and Adding Quinoa Start by bringing 2 cups of vegetable broth or water to a boil in a medium pot. This is crucial because hot water helps the quinoa cook evenly. Once the water is bubbling, add 1 cup of rinsed quinoa. Stir it gently to mix. 2. Simmering and Fluffing Techniques After adding the quinoa, lower the heat to a simmer. Cover the pot with a lid and let it cook for about 15 minutes. When done, the quinoa should be fluffy and all the water absorbed. Take a fork and fluff it gently to separate the grains. 3. Cooling the Quinoa for Mixing Set the cooked quinoa aside to cool to room temperature. This helps the salad stay fresh and not wilt the veggies. You can spread it on a plate to cool faster if you like. 1. Chopping Guidelines for Fresh Ingredients For a colorful salad, chop your vegetables into small, even pieces. I like to use a medium red bell pepper, a cucumber, and cherry tomatoes. Uniform cuts help the salad look nice and make each bite balanced. 2. Importance of Dicing and Mixing Sizes Dicing ensures that each vegetable mixes well with the quinoa. If some pieces are big, they may overpower the dish. Aim for small, bite-sized pieces for a better texture and taste. 1. Mixing the Vegetables and Quinoa In a large bowl, combine all your diced veggies: red bell pepper, cucumber, halved cherry tomatoes, corn, diced avocado, red onion, and parsley. Once mixed, add the cooled quinoa. Toss gently to combine everything. 2. Making the Dressing: Tips for Perfect Emulsion In a small bowl, whisk together ¼ cup of extra virgin olive oil, 3 tablespoons of lemon juice, 1 teaspoon of garlic powder, sea salt, and black pepper. This dressing brings life to the salad. Pour it over the quinoa and veggies, and mix everything well. Taste and adjust seasoning if needed. Now, you are ready to enjoy a vibrant dish! For the full recipe, check the guidelines above. To make your salad special, think about adding protein. Options like chickpeas or grilled chicken work well. Chickpeas add texture and nutrients. Grilled chicken gives a hearty feel. You can also try tofu for a plant-based choice. Next, consider seasonal vegetables. Fresh veggies change with the seasons. In spring, add peas or asparagus. In summer, use zucchini or bell peppers. In fall, sweet potatoes or roasted squash shine. Choose what is fresh and available. Fresh herbs can boost your salad's taste. Keep herbs like parsley or cilantro in water. Cover them with a plastic bag to keep them fresh longer. Store dressings in a jar. This way, you can shake them up before using. For a pretty display, use a colorful bowl. Layer the salad ingredients for a fun look. You can also serve it in mason jars. This makes a cute and portable meal. Watch your quinoa as it cooks. Overcooking can make it mushy. Aim for fluffy quinoa instead. Follow the cooking time closely for best results. Timing your dressing is important too. If you add it too early, it can make the salad soggy. Wait until just before serving to mix in the dressing. This keeps the salad fresh and crisp. For the full recipe, check out the vibrant rainbow vegetable quinoa salad! {{image_4}} For those who follow vegan diets, this salad is a great choice. All the ingredients are plant-based. Quinoa itself is gluten-free. You can enjoy this dish without worrying about gluten. If you want more protein, add chickpeas or black beans. These options boost the protein content while keeping it vegan. If you want to try something different, consider Mediterranean flavors. Add olives, feta cheese, and herbs like oregano. These will give the salad a nice twist. You can also explore Asian flavors. Try adding edamame, sesame seeds, and a splash of soy sauce. These ingredients will add depth and zest. Be mindful of common allergens. Nuts can cause problems for some people. If you want crunch, try sunflower seeds instead. Dairy is another common allergen. You can skip cheese or use a nut-based alternative. Always check for allergies when serving. This way, you keep everyone safe and happy. For a complete guide on making this tasty dish, check the Full Recipe. To keep your Vegetable Quinoa Salad fresh, store it in the fridge. Use an airtight container. This helps to keep moisture out and flavors in. When you put the salad in the fridge, it can last for about three days. For freezing, it’s best to freeze just the quinoa and veggies. Avoid dressing before freezing. This prevents sogginess. Place the salad in freezer-safe bags. Remove as much air as you can before sealing. It will stay good in the freezer for up to three months. To check if your salad is still fresh, look for signs. If the vegetables are mushy or smell bad, it’s time to toss it out. Fresh ingredients should stay crisp and bright. When reheating, do it gently. Use the microwave on low power. Heat just until warm, not hot. This keeps the texture and flavor better. Enjoy your leftovers within a day or two to get the best taste! You can store Vegetable Quinoa Salad in the refrigerator for 3 to 5 days. Keep it in a sealed container to maintain freshness. If you want the salad to stay bright and crisp, avoid adding dressings until you are ready to eat. This way, the veggies stay crunchy, and the flavors remain fresh. Yes, you can use other grains like rice, farro, or barley. Each grain brings its texture and flavor. For example, brown rice adds a chewy bite, while farro gives a nutty taste. These grains are also filling and healthy, making them great alternatives. Absolutely! This salad is perfect for meal prep. You can cook the quinoa and chop the veggies ahead of time. Store each component separately to keep everything fresh. When you are ready for a meal, mix them together. This saves time and ensures you have a quick, healthy meal. Quinoa is a superfood packed with nutrients. It is high in protein, making it great for energy. It contains fiber, which helps with digestion. Quinoa is also gluten-free, so many people can enjoy it. Plus, it has essential vitamins and minerals, like magnesium and iron, which keep you healthy. Yes, you can add dressings after making the salad. This is a great way to control the flavor. If you want a lighter taste, add just a little dressing. For a bolder flavor, go for more. Just remember to mix well to coat everything evenly. You can also try different dressings to change things up! In this post, we explored how to make a tasty Vegetable Quinoa Salad. We talked about preparing quinoa, picking fresh vegetables, and mixing in flavorful dressings. I shared tips on customizing your salad, avoiding common mistakes, and storing it safely. Remember, this salad is versatile and perfect for any meal. You can adjust the ingredients to fit your taste and dietary needs. Enjoy making this healthy dish, and have fun experimenting with flavors!

Vegetable Quinoa Salad Fresh and Flavorful Dish

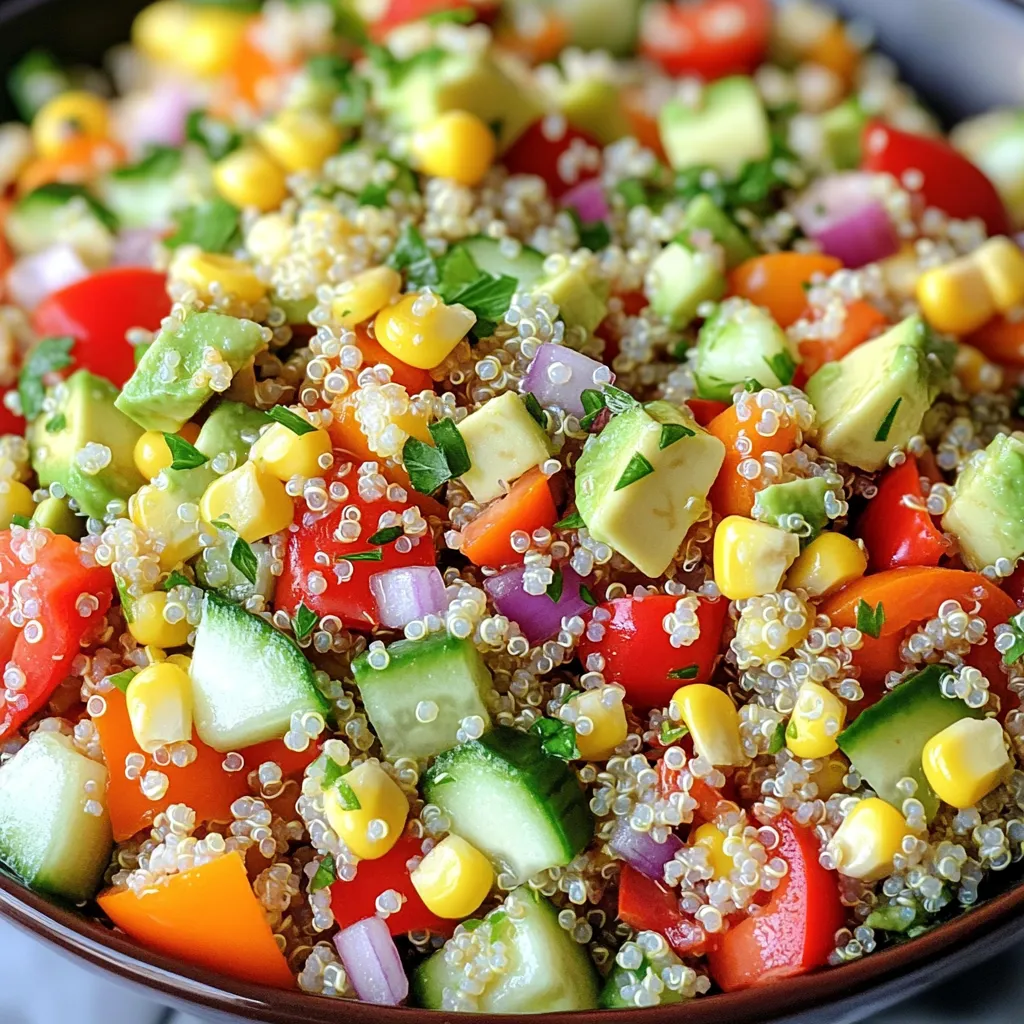
Looking for a fresh and flavorful dish to brighten your meals? This Vegetable Quinoa Salad is the perfect choice! Packed

To make perfect churros, you need simple ingredients. Gather these key items: - 1 cup water - 2 tablespoons granulated sugar - 1/2 teaspoon salt - 1/2 cup unsalted butter (1 stick) These ingredients create a rich dough. The water and butter blend well to form a tasty base. Next, we need a few more ingredients for flavor and coating. These are: - 1 cup all-purpose flour - 3 large eggs - 1 teaspoon vanilla extract - 1 cup granulated sugar (for coating) - 2 teaspoons ground cinnamon - Oil for frying (enough for deep frying) The flour gives churros their structure. Eggs add richness, while vanilla enhances the flavor. The sugar and cinnamon create that sweet, crispy coating. Churros are even better with dipping sauces. Here are some tasty options: - Chocolate sauce - Caramel sauce - Dulce de leche These sauces boost the flavor and make every bite more enjoyable. Choose your favorite or try them all! For the complete recipe, check the [Full Recipe]. Start by boiling your mixture. In a medium saucepan, combine 1 cup of water, 2 tablespoons of granulated sugar, 1/2 teaspoon of salt, and 1/2 cup of unsalted butter. Place it over medium heat. Stir often until it boils and the butter melts completely. Once boiling, remove the saucepan from heat. Add 1 cup of all-purpose flour all at once. Use a wooden spoon to stir vigorously. Mix until the dough forms a ball and pulls away from the sides of the pan. Let the dough cool for about 5 minutes. Now, add 3 large eggs one at a time. Mix well after each egg until fully blended. Finally, stir in 1 teaspoon of vanilla extract. Your dough should be smooth and ready for frying. Next, heat oil for frying. Use a deep fryer or a large pot and bring the oil to 350°F (175°C). While the oil heats, prepare the cinnamon sugar. In a shallow dish, mix 1 cup of granulated sugar with 2 teaspoons of ground cinnamon. Now, pipe the churro dough. Transfer it to a piping bag fitted with a star-shaped nozzle. Once the oil reaches the right temperature, carefully squeeze out strips of dough about 6 inches long into the hot oil. Use scissors to cut the strips free. Fry the churros in small batches. Cook them for about 2-3 minutes on each side, until they turn golden brown. Use a slotted spoon to transfer the churros to a plate lined with paper towels. This helps remove excess oil. While the churros are still warm, roll each one in the cinnamon sugar mixture. Make sure they are fully coated for that sweet, crunchy bite. Continue this with the remaining dough. For presentation, arrange the churros on a colorful serving plate. Serve them with small bowls of rich chocolate or sweet caramel sauce. To make it special, sprinkle a little extra cinnamon sugar on top. Enjoy your delicious, homemade churros! You can find the full recipe [here](Full Recipe). To make the best churros, focus on the dough. The right consistency is key. It should be thick but smooth. If it feels too runny, your churros will not hold their shape. After mixing the dough, let it cool for about five minutes. This step helps it firm up. Frying temperature is also important. Use a thermometer to check the oil. Aim for 350°F (175°C). If it is too hot, the outside cooks too fast. If too cool, the churros will soak in oil and become greasy. One common mistake is overcrowding the frying pan. Fry churros in small batches. This keeps the oil temperature steady. If you add too many, they can stick together. Another mistake is not cooling the dough. If you pipe the dough while it’s hot, it may not hold its shape. Always let it sit for a few minutes before using a piping bag. You can make your churros unique by adding flavors. Try mixing in chocolate chips for a sweet surprise. Citrus zest can add a nice brightness. Just a little lemon or orange zest can elevate the taste. For a twist, think about using different spices. Instead of just cinnamon, try nutmeg or cardamom. These small changes can make your churros stand out. {{image_4}} For a fun twist, you can fill churros with chocolate. Use a simple chocolate ganache. To make this, heat 1 cup of heavy cream until it's hot but not boiling. Pour it over 8 ounces of chopped chocolate. Stir until smooth. Once the churros cool, pipe this mix inside using a filling tip. Dark chocolate works best, but feel free to explore milk or white chocolate too. Churros don't need to be sweet! You can add spices to the dough. Try garlic powder or paprika. For even more flavor, mix in some cheese, like cheddar. Serve them with a spicy dip like salsa or guacamole. They make a great snack for parties or movie nights. If you want smaller treats, make churro bites. Cut the dough into bite-sized pieces before frying. This way, they cook faster, about 1-2 minutes per side. They are perfect for sharing or snacking. You can also serve them with a variety of dips, like chocolate sauce or caramel. For more ideas, check out the Full Recipe. To keep your churros fresh, place them in an airtight container. Layer parchment paper between the churros to prevent sticking. Store them in the fridge for up to three days. This method keeps them safe from moisture and helps maintain their crispiness. When it’s time to enjoy your leftover churros, the oven is best. Preheat your oven to 350°F (175°C). Place the churros on a baking sheet and heat for about 5-7 minutes. This keeps them crispy. The microwave can make them soggy, so avoid it if you can. To freeze churros, first let them cool completely. Place them in a single layer on a baking sheet and freeze for about an hour. Once frozen, transfer them to a freezer bag. They can last up to two months. For thawing, simply let them sit at room temperature for about 30 minutes before reheating. This way, they stay tasty and enjoyable. You can find the full recipe for making these churros above. You can dip churros in many tasty sauces. Some popular choices are chocolate sauce and caramel sauce. I love dulce de leche for a rich, sweet flavor. You can even try fruit sauces, like berry or mango, for a fun twist. If you want to be creative, mix cream cheese with sugar and vanilla for a creamy dip. The options are endless, so feel free to explore! You can make churros ahead of time! Store them in an airtight container at room temperature. They taste best fresh, but you can keep them for a day or two. If you have leftover churros, reheat them in the oven for about 5 minutes at 350°F (175°C). This keeps them warm and crispy. For longer storage, you can freeze them. Just make sure to wrap them well to prevent freezer burn. To check if the oil is hot enough, use a kitchen thermometer. You want it to reach 350°F (175°C). If you don't have a thermometer, drop a small piece of dough into the oil. If it sizzles and rises, the oil is ready! Another trick is to dip a wooden spoon into the oil. If bubbles form around the spoon, it's time to fry. Always be careful when working with hot oil to avoid burns. You now know how to make amazing cinnamon sugar churros. We covered the essential ingredients, like water and butter, plus tips for achieving the perfect dough. You learned about frying techniques and fun variations, such as chocolate-filled churros. Remember to store leftovers properly to keep them tasty. With these steps, you can impress friends and family. Enjoy your delicious churros, and don’t forget to share them! Happy cooking!

Cinnamon Sugar Churros Tasty and Easy Dessert Recipe

Craving something sweet and crispy? Look no further than my easy cinnamon sugar churros! This delightful dessert combines a crunchy

To make garlic butter shrimp skewers, gather these key items: - 1 pound large shrimp, peeled and deveined - 4 tablespoons unsalted butter - 4 cloves garlic, finely minced - 1 tablespoon fresh lemon juice - 1 teaspoon smoked paprika - ½ teaspoon red pepper flakes (optional for a spicy kick) - Sea salt and freshly cracked black pepper, to taste - 2 tablespoons fresh parsley, finely chopped - Wooden or metal skewers (if using wooden, soak in water for 30 minutes) You can enhance your skewers with these extras: - Fresh herbs like cilantro or dill for added flavor - A splash of white wine for a richer taste - Zucchini or bell peppers for colorful veggies on the skewers If you need to adjust the recipe, here are some easy conversions: - 1 tablespoon = 3 teaspoons - 1 pound = 16 ounces - 4 tablespoons = ½ cup These tips help ensure that your garlic butter shrimp skewers turn out just right. Using the right amounts makes a big difference in taste. Don't forget, for the complete recipe, check out the full recipe link. Start by melting the butter in a small saucepan over medium heat. Watch the butter closely. When it is fully melted, add minced garlic, smoked paprika, and red pepper flakes if you want some spice. Stir the mix for 1-2 minutes until the garlic smells good and turns a light golden. Take it off the heat and mix in lemon juice and half of the parsley. This garlic butter will add great flavor to the shrimp. In a mixing bowl, put the peeled and deveined shrimp. Pour half of the garlic butter over the shrimp. Add sea salt and freshly cracked black pepper for taste. Toss the shrimp gently to coat them well. Let them sit for 15-20 minutes. This helps the shrimp soak in all those lovely flavors. While the shrimp marinate, heat your grill or grill pan to medium-high. Take the marinated shrimp and carefully thread them onto the skewers. Aim for 4-5 shrimp per skewer. Make sure they are snug but not too tight. This allows even cooking. Once ready, place the skewers on the grill. Cook for about 2-3 minutes on each side. Look for the shrimp to turn pink and opaque. While they grill, use the rest of the garlic butter to brush over the shrimp. This adds more flavor and keeps them moist. For the full recipe, click here. To grill shrimp just right, start with a hot grill. Preheat it to medium-high heat. This helps the shrimp cook fast and evenly. Avoid overcooking; shrimp should be pink and opaque. Aim for about 2-3 minutes on each side. Use a brush to apply any leftover garlic butter while grilling. This adds extra flavor. You can also try using a grill basket for easier handling. It keeps the shrimp from falling through the grill grates. Fresh shrimp make a big difference. Look for shrimp that are firm and smell mild, not fishy. Large shrimp work best for skewers. They hold up well on the grill and look great on the plate. If you buy frozen shrimp, thaw them under cold water before cooking. This keeps them juicy. Always peel and devein them for the best taste and texture. Want to give your garlic butter shrimp a twist? Add a splash of white wine when making the garlic butter. It gives a nice depth. You can also mix in fresh herbs like thyme or basil for extra flavor. For heat lovers, increase the red pepper flakes or add a dash of hot sauce. Serve with lemon wedges for a bright finish. Try pairing with sides like rice or grilled veggies for a full meal. For the full recipe, check out the [Full Recipe]. {{image_4}} You can switch up the shrimp for other proteins. Chicken, scallops, or fish work great. Just keep the same garlic butter mix. If using chicken, cut it into bite-sized pieces. You will want to grill it longer than shrimp. For scallops, use large ones, and adjust grilling time to 2-3 minutes per side. Fish fillets like salmon or tilapia can also shine with this garlic butter. Want a kick? Add more red pepper flakes to the garlic butter. I suggest using one teaspoon if you love heat. You can also add hot sauce to the shrimp marinade. Another option is to mix in some chopped jalapeños when you sauté the garlic. This brings bold flavors that will excite your taste buds. You can easily make this dish vegetarian. Use firm tofu or portobello mushrooms. For tofu, press and cube it first, then marinate in the garlic butter mix. If you pick portobello mushrooms, cut them into thick slices. Grill them for about 4-5 minutes on each side. Adding bell peppers, zucchini, or cherry tomatoes can also add color and flavor. For the full recipe, check out the Garlic Butter Shrimp Skewers. To keep leftover garlic butter shrimp skewers fresh, place them in an airtight container. Make sure to let them cool completely before sealing. Store them in the fridge for up to three days. If you want to enjoy them later, use a container that keeps moisture away. You can freeze the skewers if you want to save them longer. First, let the skewers cool down. Then, wrap each skewer tightly in plastic wrap. Place the wrapped skewers in a freezer-safe bag. They will stay fresh for up to three months. When you’re ready to eat, just thaw them overnight in the fridge. Reheating shrimp skewers is easy. You can use an oven or a skillet. For the oven, preheat it to 350°F (175°C). Place the skewers on a baking sheet and cover with foil. Heat for about 10 minutes. If using a skillet, heat it over medium heat. Add a bit of butter and cook the skewers for 2-3 minutes. This keeps the shrimp juicy and tasty. For the full recipe, check out the Garlic Butter Shrimp Skewers section. You can tell shrimp are cooked when they turn pink. They also curl into a "C" shape. Cook them for about 2-3 minutes on each side. Overcooked shrimp become tough and rubbery, so watch them closely. Yes, you can use frozen shrimp. Just make sure to thaw them first. Place them in cold water for quick thawing. Once thawed, peel and devein them if needed. This makes the shrimp ready for the garlic butter. Great sides include grilled vegetables, rice, or a fresh salad. You can also serve them with garlic bread or pasta. These pair well and make your meal more filling. If you want to keep it light, a simple cucumber salad works well too. For the full recipe, check out the Garlic Butter Shrimp Skewers section above. In this post, we covered how to make delicious garlic butter shrimp skewers. You learned about the key ingredients, including optional ones, and measurement tips. I walked you through step-by-step instructions on preparing, marinating, and grilling your shrimp. We shared valuable cooking tips and flavor ideas to enhance your dish. Plus, we explored variations and storage methods for leftovers. Make these skewers tonight for a tasty meal that impresses! Enjoy the flavors, don’t forget to customize them, and share with friends!

Garlic Butter Shrimp Skewers Easy and Flavorful Recipe

If you’re looking for a quick and tasty meal, you’ve found it! These Garlic Butter Shrimp Skewers are easy to

- 2 slices of whole-grain bread - 1 ripe avocado - 2 large eggs - 1 tablespoon fresh lemon juice - Sea salt and freshly cracked black pepper, to taste - 1/4 teaspoon red pepper flakes - 1 tablespoon extra-virgin olive oil - Fresh herbs for garnish (cilantro or parsley) To create a delicious savory avocado toast with a poached egg, you will need a few key ingredients. Start with two slices of whole-grain bread. This bread gives the toast a hearty base and adds fiber. Next, grab a ripe avocado. The creaminess of the avocado elevates the dish. You'll also need two large eggs for poaching. For flavor, add a tablespoon of fresh lemon juice. This juice enhances the avocado's taste and keeps it bright. Don’t forget sea salt and freshly cracked black pepper to season your mash. If you want a bit of heat, consider including optional red pepper flakes. A drizzle of extra-virgin olive oil adds richness. Lastly, fresh herbs like cilantro or parsley make for a lovely garnish. For the full recipe, check the details below. Start by toasting the two slices of whole-grain bread. Use a toaster or a grill. Toast them until they turn golden brown and crispy. This crispiness adds a great texture to the dish. While the bread toasts, take your ripe avocado. Cut it in half and remove the pit. Scoop the green flesh into a bowl. Add one tablespoon of fresh lemon juice. It helps keep the color bright and adds flavor. Now, mash the avocado with a fork. You can make it as smooth or chunky as you like. Season the mixture with a pinch of sea salt and fresh black pepper. Taste it to adjust the seasoning if needed. Fill a medium-sized saucepan with water. Make sure it covers the eggs by about an inch. Heat the water until it simmers gently; you should see small bubbles. Crack each egg into a small bowl first. This helps keep the egg intact. Once the water simmers, gently slide in each egg. Poach them for about 3-4 minutes for a runny yolk. If you want a firmer yolk, add another minute. Once the bread is toasted and the avocado mash is ready, it’s time to assemble. Spread the avocado mix generously on each slice of toast. Make sure to reach the edges for a full bite. Drizzle some extra-virgin olive oil on top. If you like a bit of heat, sprinkle red pepper flakes over the avocado. Carefully lift the poached eggs from the water with a slotted spoon. Allow excess water to drain. Place one poached egg gently on each slice of toast. Be careful not to break the yolk. Finally, season with a little more salt and pepper. Top with chopped fresh herbs like cilantro or parsley for a pop of color and flavor. Enjoy your savory avocado toast with poached egg right away! For a full recipe, check out [Full Recipe]. To make a great poached egg, start with fresh eggs. Fresh eggs hold their shape better. Use a medium-sized pot and fill it with water, about 3 inches deep. Heat the water until it simmers gently. Don't let it boil. Add a splash of vinegar to help the egg whites stay together. Crack each egg into a small bowl first. This way, you can slide it in gently. Create a swirl in the water with a spoon before adding the egg. This helps the whites wrap around the yolk. Poach for 3 to 4 minutes. For a firmer yolk, add an extra minute. When selecting avocados, look for ones that feel slightly soft when squeezed. They should not be overly mushy. Check the skin color; a dark green or black hue usually indicates ripeness. Avoid any avocados with large dark spots. If they're hard, leave them at room temperature to ripen. You can speed up the process by placing them in a brown paper bag with an apple or banana. This traps ethylene gas and helps them ripen faster. You can add more flavor to your avocado toast with simple toppings. Try adding sliced tomatoes for freshness, or goat cheese for creaminess. A sprinkle of radish slices adds a nice crunch. For a kick, consider adding chili flakes or hot sauce. Fresh herbs like cilantro or parsley bring a burst of color and taste. A drizzle of balsamic glaze can add a sweet touch. Don't be afraid to mix and match! {{image_4}} If you want a vegan version of avocado toast, switch the eggs. Try using tofu instead. You can scramble firm tofu with spices for a tasty topping. Another option is to use chickpea flour to create a savory chickpea scramble. Both choices give a nice texture and flavor without eggs. You can use many types of bread for this dish. Whole-grain bread is popular, but you can also try sourdough or rye. If you need gluten-free options, look for gluten-free bread made from almond or coconut flour. This can still give you a satisfying crunch. To make your toast more exciting, try different toppings. Smoked salmon pairs well with avocado, adding a salty taste. Sliced tomatoes or radishes add a fresh crunch. You can also sprinkle feta cheese or nutritional yeast for an extra layer of flavor. Experiment with your favorite toppings to find your perfect combo. To keep leftover avocado mash fresh, store it in an airtight container. Press plastic wrap directly onto the mash before sealing the lid. This helps reduce air and slow down browning. Use it within one day for the best taste. If you notice dark spots, simply scrape them off and enjoy the rest. Reheating toast can be tricky. To keep it tasty, pop it back in the toaster for a short time. You can also place it in a hot skillet for a few seconds on each side. Avoid using the microwave, as it can make the toast soggy. You can freeze prepared avocado mash, but with some care. Scoop the mash into a freezer-safe bag. Press out as much air as you can. It will stay fresh for about three months. When ready to use, thaw it overnight in the fridge. Give it a good mix before serving. Toasts cannot be frozen, so make those fresh! For the full recipe, check out the details above. You want your poached eggs to be soft and runny. A good way to check is by timing. Set a timer for 3-4 minutes. If you like a firmer yolk, add a minute. Gently poke the egg with a spoon. It should feel slightly firm yet still soft. If it feels hard, it is overcooked. Yes, you can prep parts of this dish in advance. Make the avocado mash and store it in a sealed container. To keep it fresh, add a little lemon juice. However, I recommend poaching the eggs right before serving. They taste best when fresh. Avocado toast is packed with nutrients. Here are some benefits: - Avocado: Full of healthy fats, fiber, and vitamins. It helps your heart and keeps you full. - Eggs: Great source of protein, vitamins, and minerals. They support muscle health. - Whole-grain bread: Provides fiber and energy, good for digestion. Overall, this dish is a balanced meal full of good stuff. To make this dish gluten-free, choose gluten-free bread. Many brands offer tasty options. Look for whole-grain or seed-based bread for added nutrients. You can also use lettuce wraps for a low-carb choice. Just be sure to check labels for gluten-free certifications. Avocado toast is simple yet packed with flavor. You learned about key ingredients like whole-grain bread, ripe avocados, and poached eggs. I shared tips for perfect poaching and selecting ripe avocados. Variations allow for dietary needs, from vegan to gluten-free. Remember to store leftovers wisely to keep them fresh. By following these steps and tips, you can craft a delicious meal tailored to your taste. Enjoy your cooking journey with this healthy dish!

Savory Avocado Toast with Poached Egg Recipe

Imagine starting your day with a warm, crunchy slice of whole-grain bread topped with creamy avocado and a perfectly poached

To make a delicious Vegan Buddha Bowl, you need: - 1 cup quinoa, thoroughly rinsed - 2 cups vegetable broth - 1 cup chickpeas, either canned (drained and rinsed) or cooked - 1 medium sweet potato, peeled and diced into ½-inch cubes - 1 cup broccoli florets, fresh - 1 ripe avocado, sliced - 1 cup red cabbage, finely shredded - 1 large carrot, grated - 2 tablespoons olive oil (divided) - 1 teaspoon smoked paprika - Salt and freshly ground pepper to taste - Fresh lemon juice, for drizzling (about half a lemon) - 2 tablespoons tahini - Additional water to thin tahini, if needed These ingredients create a colorful and filling meal. Each item adds unique taste and texture. You can make your Buddha Bowl even better by adding: - Roasted nuts or seeds for crunch - Fresh herbs like parsley or cilantro for brightness - Pickled vegetables for tang - Diced bell peppers or cucumbers for freshness - Hot sauce for heat Try mixing and matching these add-ins. They help personalize your bowl and boost flavor. Each key ingredient offers great nutrition: - Quinoa: High in protein and fiber. It helps keep you full. - Chickpeas: Packed with protein and vitamins. They support muscle health. - Sweet Potatoes: Full of beta-carotene and fiber. They are good for vision. - Broccoli: Rich in vitamins C and K. It boosts your immune system. - Avocado: Provides healthy fats and fiber. It supports heart health. These ingredients work together to create a balanced meal. Enjoy the flavors while nourishing your body. For the full recipe, check out the detailed instructions. To make the quinoa, start by rinsing 1 cup of quinoa under cold water. This step removes any bitter taste. In a medium saucepan, mix the rinsed quinoa with 2 cups of vegetable broth. Bring the mix to a boil over high heat. Once it boils, lower the heat to a gentle simmer, and cover the pan with a lid. Let it cook for about 15 minutes until all the liquid is absorbed. Fluff the quinoa with a fork and let it rest, covered, for an extra 5 minutes. This makes it light and fluffy. Next, you will roast the sweet potatoes. Preheat your oven to 400°F (200°C). Take one medium sweet potato, peel it, and cut it into ½-inch cubes. On a parchment-lined baking tray, mix the sweet potato with 1 tablespoon of olive oil, 1 teaspoon of smoked paprika, salt, and pepper. Toss to coat the cubes evenly. Spread them out in a single layer. Roast for about 25 minutes, turning halfway, until they are tender and slightly caramelized. This step brings out their natural sweetness. Now, let’s prepare the broccoli. Bring a pot of salted water to a rolling boil. Add 1 cup of fresh broccoli florets to the pot. Blanch the broccoli for 1 to 2 minutes until it turns bright green and is tender-crisp. After that, quickly transfer the broccoli to a bowl of ice water. This stops the cooking and keeps the color vibrant. Let it sit for a few minutes, then drain and set it aside. This method keeps the broccoli fresh and crunchy. For the full recipe with all the steps, check the Full Recipe. To make fluffy quinoa, rinse it well before cooking. This removes the bitter coating. Use two cups of vegetable broth for one cup of quinoa. Bring it to a boil, then lower the heat. Cover it and let it simmer for about 15 minutes. Once done, fluff it with a fork. Let it sit for another five minutes off the heat. To make a tasty tahini dressing, mix two tablespoons of tahini with a little water. This makes it smooth and creamy. Add a pinch of salt to boost the flavor. Fresh lemon juice adds brightness. You can adjust the thickness by adding more water. This dressing brings the whole bowl together. A balanced meal should have a good mix of grains, veggies, and protein. For each bowl, use about half a cup of quinoa. Add one cup each of roasted sweet potato and chickpeas. Include a handful of broccoli and some fresh avocado. This gives you a well-rounded and filling meal. You can adjust the sizes based on your hunger. Enjoy your vibrant vegan Buddha bowl! {{image_4}} You can switch up your grain base for fun. Quinoa is great, but try brown rice or farro. Both give a nice chewy texture. If you want something lighter, use cauliflower rice. It brings a fresh taste and fewer carbs. Each grain adds its own flavor and nutrients. Seasonal veggies can keep your Buddha bowl exciting. In spring, use asparagus or snap peas for a crisp bite. In summer, add ripe tomatoes or zucchini for sweetness. Fall brings pumpkin and kale. Winter is perfect for hearty root vegetables like beets and turnips. Tailoring your bowl to the season makes it fresh and vibrant. Chickpeas are a great source of protein, but you have options. Try black beans for a different flavor profile. Tofu adds a nice texture and absorbs flavors well. For those who eat nuts, add almonds or walnuts for a crunchy twist. You can even use tempeh for a nutty taste and extra protein. This allows everyone to enjoy a Buddha bowl that suits their needs. To store leftovers, let the Buddha bowl cool first. Place the bowl in an airtight container. This helps keep your meal fresh. Store it in the fridge for up to three days. If you want to keep it longer, consider freezing the components. You can freeze quinoa and roasted sweet potatoes. Just remember to label your containers with dates. Meal prep can save time and make healthy eating easy. Cook a big batch of quinoa and roasted sweet potatoes at the start of the week. Store them in separate containers. This way, you can mix and match your meals. For added flavor, chop veggies in advance. Keep your tahini dressing in another small container. This keeps everything fresh and ready to use. When you’re ready to eat, reheat your Buddha bowl in the microwave. Heat it for about 1-2 minutes. If you want to keep the veggies crisp, heat the quinoa and sweet potatoes separately. Add fresh avocado and dressing after reheating. This keeps the flavors bright and fresh. Enjoy your meal like it was just made! A Vegan Buddha Bowl is a colorful and healthy meal. It features grains, veggies, and protein. You can customize it with your favorite ingredients. The bowl is often topped with a tasty dressing. This dish looks beautiful and tastes great. It is perfect for lunch or dinner. Yes, you can make this recipe gluten-free. Use gluten-free grains like quinoa or brown rice. Check that your tahini is gluten-free too. Most fresh vegetables and chickpeas are gluten-free. Always read labels to be sure. A Buddha bowl can last in the fridge for about three days. Store it in an airtight container. Keep the dressing separate until ready to eat. This way, your bowl stays fresh and tasty. Absolutely! You can add more protein options. Try tempeh, tofu, or lentils. You can also sprinkle some nuts or seeds on top. These options make your bowl even more filling. You can swap chickpeas for other beans. Black beans or kidney beans work well. You can also use lentils for a different taste. Each choice adds its own flavor and texture. Yes, a Vegan Buddha Bowl can support weight loss. It is full of nutrients and fiber. This helps you feel full longer. Plus, it is low in calories when you choose healthy ingredients. To boost flavor, add spices and herbs. Garlic powder, cumin, or fresh herbs work great. You can also use a zesty dressing. A squeeze of lemon brightens up the whole dish. Yes, you can easily meal prep this dish. Make a big batch and store it. Divide it into containers for easy lunches. Just add the dressing when you are ready to eat. You can use many different veggies in a Buddha bowl. Try bell peppers, spinach, or kale. Seasonal vegetables like zucchini or squash are great too. Mix and match for variety. Store tahini dressing in a sealed jar. Keep it in the fridge for about a week. If it thickens, just add a bit of water to thin it out. - 1 cup quinoa, thoroughly rinsed - 2 cups vegetable broth - 1 cup chickpeas, either canned (drained and rinsed) or cooked - 1 medium sweet potato, peeled and diced into ½-inch cubes - 1 cup broccoli florets, fresh - 1 ripe avocado, sliced - 1 cup red cabbage, finely shredded - 1 large carrot, grated - 2 tablespoons olive oil (divided) - 1 teaspoon smoked paprika - Salt and freshly ground pepper to taste - Fresh lemon juice, for drizzling (about half a lemon) - 2 tablespoons tahini - Additional water to thin tahini, if needed 1. Preheat the Oven: Start by preheating your oven to 400°F (200°C). This step is key to roasting the sweet potatoes perfectly. 2. Prepare the Sweet Potato: On a parchment-lined baking tray, add diced sweet potato. Mix in 1 tablespoon of olive oil, smoked paprika, a pinch of salt, and freshly ground pepper. Toss everything well. Spread the sweet potato in a single layer. Roast for about 25 minutes, turning halfway, until tender and caramelized. 3. Cook the Quinoa: In a medium saucepan, combine rinsed quinoa and vegetable broth. Bring to a vigorous boil. Reduce heat to low, cover, and let it simmer for 15 minutes. Once the liquid is absorbed, fluff the quinoa with a fork and let it sit for another 5 minutes. 4. Blanch the Broccoli: Boil salted water in a pot. Add broccoli florets and blanch for 1-2 minutes until bright green and tender-crisp. Quickly transfer to ice water to stop cooking. After a few minutes, drain and set aside. 5. Prepare the Bowl Ingredients: In a large serving bowl, layer ingredients. Start with quinoa, then add roasted sweet potatoes, blanched broccoli, chickpeas, avocado slices, shredded red cabbage, and grated carrot. 6. Make the Tahini Dressing: In a small bowl, mix tahini with a splash of water to make it smooth. Stir until creamy. Add more water if needed and season with salt. 7. Assemble the Bowl: Drizzle fresh lemon juice over the ingredients. Add tahini dressing on top for extra flavor. 8. Serve: Enjoy your Buddha bowl fresh. You can also divide it into containers for meal prep. - Prep Time: 15 minutes - Total Time: 50 minutes - Servings: 2 For a beautiful presentation, arrange the ingredients neatly. Garnish with microgreens or sesame seeds for a pop of color! In this post, we explored how to make a great Vegan Buddha Bowl. We covered essential ingredients, steps to prepare key components, and tips for a tasty meal. You can customize your bowl with different grains and seasonal veggies. Remember to focus on portion sizes for balance. Proper storage keeps leftovers fresh and tasty. With these ideas, you can create a vibrant meal for any diet. Enjoy your cooking adventure and savor the flavors!

Vegan Buddha Bowl Fresh and Nutritious Meal Idea

Looking for a fresh and nutritious meal idea? Let me introduce you to the Vegan Buddha Bowl! This colorful dish

To make this delightful chocolate chip cookie skillet, you will need: - 1 cup all-purpose flour - 1/2 teaspoon baking soda - 1/4 teaspoon salt - 1/2 cup unsalted butter, melted and slightly cooled - 1/2 cup packed brown sugar (light or dark) - 1/4 cup granulated sugar - 1 teaspoon pure vanilla extract - 1 large egg, at room temperature - 1 cup semi-sweet chocolate chips - 1/2 cup chopped nuts (optional; walnuts or pecans work well) If you run out of certain ingredients, don't worry! Here are some easy swaps: - Flour: Use whole wheat flour for a nuttier taste. - Butter: Coconut oil or margarine can replace butter. - Sugars: Use coconut sugar for a lower-glycemic option. - Chocolate Chips: Dark chocolate or white chocolate can add a twist. - Nuts: Replace walnuts with almonds or skip them altogether for nut-free cookies. Using fresh ingredients is key to making this dish shine. Fresh flour and butter give the best flavor and texture. Old ingredients can make your cookie tough or bland. Fresh eggs help the cookie rise and stay soft. Always check your ingredients before you bake. This small step makes a big difference in taste and quality! Start by preheating your oven to 350°F (175°C). If you have a cast-iron skillet, place it in the oven while it heats. This helps the cookie bake evenly. Make sure to handle the hot skillet with care. It can get really hot! In a medium bowl, mix the dry ingredients. Combine 1 cup of all-purpose flour, 1/2 teaspoon of baking soda, and 1/4 teaspoon of salt. Whisk them together well. In a large bowl, pour in 1/2 cup of melted butter. Stir in 1/2 cup of brown sugar and 1/4 cup of granulated sugar until smooth. Add 1 teaspoon of vanilla extract and 1 large egg. Mix until everything blends together nicely. Now, add the dry mix to the wet mix. Use a spatula to fold everything gently. You want it just combined with no flour visible. Next, fold in 1 cup of semi-sweet chocolate chips and 1/2 cup of chopped nuts, if you like. Carefully take the hot skillet out of the oven. Pour the cookie dough into it, spreading it evenly. Bake for 20 to 25 minutes. Look for golden edges and a soft center. Let it cool for about 10 minutes before serving. You can find the full recipe in the article above! To get that soft and chewy center, you need to mix right. Do not overmix the dough. Fold the dry and wet ingredients until just combined. This keeps the cookie soft. The butter should be melted but not too hot. If it is too hot, it can cook the egg when you mix them. Baking time is key for the best cookie. If you like a gooey center, bake for 20 minutes. If you prefer a firmer cookie, go for 25 minutes. Every oven is different, so check your cookie a few minutes early. Look for golden edges and a soft center. Serve your cookie warm from the skillet. Top each slice with vanilla ice cream for a tasty treat. A drizzle of warm chocolate sauce makes it even better. For a fancy touch, sprinkle a little flaky sea salt on top. This contrast brings out the chocolate flavor. Enjoy sharing this delightful dessert with friends and family. For the full recipe, click here. {{image_4}} You can easily change the taste of your chocolate chip cookie skillet. Try using dark chocolate chips instead of semi-sweet ones. This will give it a rich and bold flavor. For a fun twist, add a teaspoon of espresso powder. It enhances the chocolate and adds depth. Want something fruity? Add dried cranberries or chopped cherries. These will bring a nice tartness that balances the sweetness. You can make this cookie skillet gluten-free by swapping the all-purpose flour for almond flour or a gluten-free blend. Just be sure to check the blend has xanthan gum. If you're vegan, replace the butter with coconut oil or vegan butter. Use a flax egg instead of the real egg by mixing one tablespoon of ground flaxseed with three tablespoons of water. Let it sit for a few minutes to thicken. This keeps the texture nice and chewy. Toppings can take your cookie to the next level. Consider adding a mix of toppings like mini marshmallows, peanut butter chips, or even crushed candy bars. After baking, top the skillet with ice cream, whipped cream, or a drizzle of caramel. You can also sprinkle some sea salt on top to enhance the flavors. Each topping makes your cookie skillet unique and fun! Store any leftover cookie skillet in an airtight container. Let it cool completely before sealing. This will keep the cookie fresh and soft. You can also cover it with plastic wrap. It’s best to eat it within three days. To reheat, use the oven for the best results. Preheat your oven to 350°F (175°C). Place the skillet in the oven for about 10 minutes. This warms it up without making it dry. If you use a microwave, heat it in short bursts. Start with 15 seconds, then check. You can freeze the cookie skillet for later. Cut it into slices and wrap each piece tightly in plastic wrap. Then place the wrapped pieces in a freezer bag. This will keep them fresh for up to three months. When ready to eat, thaw overnight in the fridge, then reheat. Enjoy your treat anytime! To prevent burning, keep a close eye on your cookie while it bakes. Set a timer for 20 minutes. Check for golden edges and a soft center. If the edges look done but the center is still too soft, you can cover it with aluminum foil. This will help it bake evenly without burning. Always use an oven mitt when handling the hot skillet to avoid any burns. Yes, you can prep the dough ahead of time. Mix your dough and store it in the fridge for up to 24 hours. When you're ready to bake, just pour the chilled dough into the hot skillet. If you want to bake it later, you can freeze the dough. Just wrap it well in plastic wrap and then place it in a freezer bag. When you're ready to bake, let it thaw in the fridge overnight. You can find a quality skillet at many kitchen stores or online retailers. Look for cast-iron skillets, as they hold heat well and give a nice crust. Brands like Lodge and Le Creuset offer great options. Check reviews to find one that fits your budget and needs. A good skillet is an investment that lasts a long time and is great for many recipes, not just this cookie skillet. You’ve learned about the key ingredients for a cookie skillet and why fresh ones matter. I shared step-by-step instructions to help you bake it right. With tips to achieve the perfect texture and fun variations, your options are endless. Don’t forget proper storage to keep leftovers tasty. Baking gives you freedom to try new things. Enjoy each bite and impress others with your skills!

Chocolate Chip Cookie Skillet Irresistible Treat

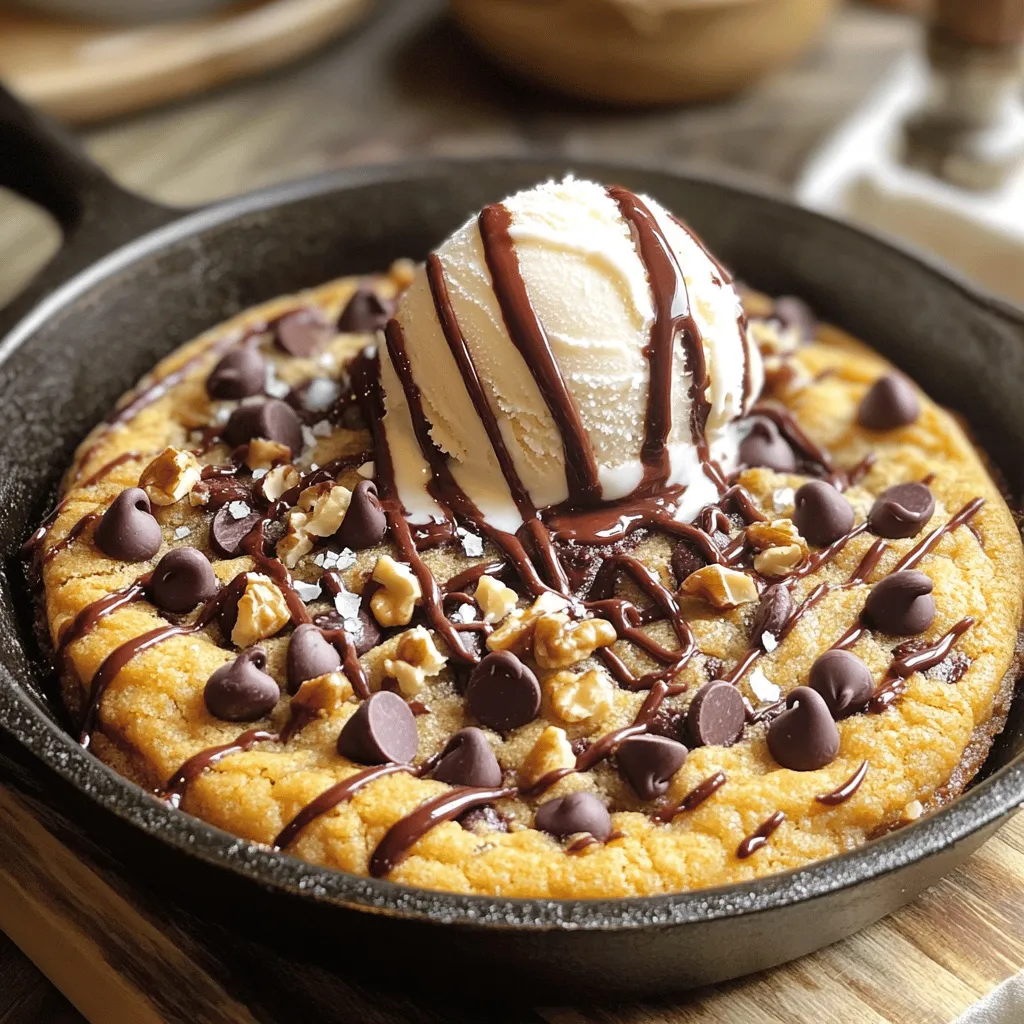
Are you ready to indulge in a warm, gooey Chocolate Chip Cookie Skillet? This delicious treat combines all the joy

- 4 medium zucchinis, spiralized into noodles - 1 red bell pepper, sliced into thin strips - 1 cup snap peas, trimmed for freshness - 3 cloves garlic, minced - 1 tablespoon fresh ginger, grated - 3 tablespoons soy sauce (or tamari) - 1 tablespoon sesame oil - 1 teaspoon red pepper flakes (optional) - Fresh cilantro and sesame seeds for garnish When making this dish, I love using fresh vegetables. The zucchinis become a perfect base. They soak up flavors and add a nice crunch. The red bell pepper brings sweetness and color. Snap peas add a crisp bite that brightens the dish. To enhance the taste, I always use garlic and ginger. These two ingredients create a warm and inviting aroma. Soy sauce adds depth. It ties all the flavors together in a savory way. Feel free to adjust the garnishes. I often sprinkle sesame seeds on top for texture. Fresh cilantro adds a burst of flavor. If you want some heat, the red pepper flakes work great. This dish is not only quick to make but also fun to eat! For the full recipe, check out the Zesty Zucchini Noodle Stir Fry. - Spiralizing the Zucchini Start by washing the zucchinis well. Use a spiralizer to turn them into noodles. Aim for long, thin strands. Place the noodles in a large bowl and set aside. - Prepping Other Vegetables Slice the red bell pepper into thin strips. Cut the carrot into matchsticks. Trim the snap peas for freshness. Mince the garlic and grate the ginger. These fresh flavors will shine in your dish. - Heating the Oil In a large skillet or wok, pour in the sesame oil. Heat it over medium-high until it shimmers. This step is key for a great stir fry. - Sautéing Aromatics Add the minced garlic and grated ginger to the hot skillet. Sauté for about 30 seconds. Stir often to release their rich aroma. You want your kitchen to smell great! - Adding Vegetables Toss in the sliced red bell pepper, snap peas, and julienned carrot. Stir-fry these for 3-4 minutes. Keep them moving in the pan until slightly tender, but still crunchy. - Incorporating Zucchini Noodles Gently add the spiralized zucchini noodles. Pour in the soy sauce and optional red pepper flakes. Toss everything well for 2-3 minutes. Make sure the noodles heat through, but don’t get mushy. - Seasoning the Stir Fry Taste your stir fry and add salt and pepper as needed. Adjust to your liking for the best flavor. - Garnishing and Serving Remove the stir fry from heat. Sprinkle sesame seeds and chopped green onions on top. For a fresh finish, add chopped cilantro before serving. Enjoy this colorful and quick meal! Check out the Full Recipe for more details. - Preventing Mushy Noodles: To stop zucchini noodles from getting mushy, avoid overcooking them. Cook them just until warm. If you add them too early, they release water and become soft. - How to Achieve the Best Texture: Use medium to high heat when cooking. This helps the noodles stay firm. Stir-frying for just a couple of minutes ensures they remain crunchy and fresh. - Substitutions for Soy Sauce: If you want a different flavor, try coconut aminos or tamari. These options work well for gluten-free diets, giving a similar umami taste. - Balancing Flavors with Acidity: Adding a squeeze of lime or lemon juice brightens your dish. It brings balance to the savory elements and adds a refreshing kick. - Serving Styles: Serve the stir fry in wide, shallow bowls. This allows the colors to pop and makes the dish look appealing. - Adding Color to the Plate: Add bright herbs like cilantro or parsley on top. You can also include colorful veggies like purple cabbage or cherry tomatoes for a visual boost. For a full recipe, check out the Zesty Zucchini Noodle Stir Fry 🥒. It’s a quick meal that will impress! {{image_4}} You can easily add protein to your zucchini noodle stir fry. Options like chicken, shrimp, or tofu work great. - Chicken: Use bite-sized pieces of chicken breast. Cook them first until golden. Then, add your veggies and noodles. - Shrimp: Shrimp cooks fast. Sauté it for about 2-3 minutes until pink. Mix in your veggies after. - Tofu: Firm tofu is perfect. Cube it and sauté until crispy. Then, toss it with the noodles and sauce. These proteins can elevate your dish, adding flavor and nutrition. Feel free to switch up the veggies in your stir fry. Seasonal produce can bring new life to this dish. - Bell Peppers: Different colors add visual appeal and taste. - Broccoli: This adds crunch and nutrients. - Mushrooms: They offer a rich, umami flavor. - Spinach: Toss in fresh spinach at the end for a pop of green. Mixing in seasonal produce can keep your meals fresh and exciting. You can easily adjust this recipe for vegan and gluten-free diets. - Vegan: All the ingredients here are plant-based. Just ensure your soy sauce is vegan, too. - Gluten-Free: Use tamari instead of soy sauce. This keeps the same great taste without gluten. These simple swaps ensure everyone can enjoy your zucchini noodle stir fry. For the full recipe, refer to the Zesty Zucchini Noodle Stir Fry. - Refrigeration Tips: Place any leftover stir fry in an airtight container. Store it in the fridge for up to three days. Make sure to cool it down before sealing. This helps keep the flavors fresh. - Freezing Suggestions: You can freeze the stir fry, but it's best to do this without the zucchini noodles. They can become mushy when thawed. Place the other veggies and sauce in a freezer-safe bag. Use within three months for best taste. - How to Maintain Texture and Flavor: When reheating, use a skillet over medium heat. Add a splash of water or broth to keep it moist. Stir often to heat evenly. Avoid microwaving, as it can make the noodles soggy. - Duration for Optimal Freshness: Enjoy your stir fry within three days when stored in the fridge. If frozen, eat it within three months. After this time, it may lose flavor and texture. Always check for signs of spoilage before eating. To spiralize zucchini, you need a spiralizer. Cut off the ends of the zucchini. Place it in the spiralizer and turn the handle. This will create long noodle shapes. You can also use a julienne peeler if you don’t have a spiralizer. It will give you similar results. Yes, you can prepare the stir fry ahead of time. Cook the veggies and noodles, then store them in the fridge. They will stay fresh for about two days. Reheat them in a pan before serving. This makes for a quick meal on busy days. Zucchini noodle stir fry pairs well with a variety of proteins. You can add chicken, shrimp, or tofu for extra flavor. Serve it with brown rice or quinoa for a wholesome meal. A light salad also complements the dish nicely. Absolutely! This dish is low in calories and high in nutrients. Zucchini is full of vitamins and minerals. Using fresh veggies adds fiber and antioxidants. Plus, you control the ingredients, making it a great choice for a healthy meal. To keep zucchini noodles firm, avoid overcooking them. Add them last in the stir fry and cook just until heated. You can also pat the noodles dry before cooking. This helps remove excess moisture. You can experiment with many sauces for stir fry. Try teriyaki sauce for sweetness or hoisin for a richer flavor. Coconut aminos is a great soy sauce alternative. For a spicy kick, add sriracha or chili paste. Each sauce brings its unique taste, so have fun mixing! This blog post covered a delicious zucchini noodle stir fry. We explored key ingredients like fresh vegetables and flavorful seasonings. I shared simple step-by-step cooking instructions to bring this dish to life. You learned tips for perfect texture and enhanced flavors, along with variations to suit your taste. Embrace the idea of easy, healthy meals that fit your lifestyle. With these recipes and tips, you can enjoy cooking while staying mindful of nutrition. Go ahead, get creative in the kitchen and make this dish your own!

Zucchini Noodle Stir Fry Flavorful and Quick Meal

Are you ready to whip up a tasty and healthy meal? My Zucchini Noodle Stir Fry is quick, easy, and

Older posts
Newer posts
← Previous Page1 … Page61 Page62 Page63 … Page72 Next →

dsad

© 2025 tastyhatch • Built with GeneratePress

Our Policies

  • Copyright Policy
  • Cookie Policy
  • GDPR Policy
  • Privacy Policy
  • Disclaimer
  • Terms Of Use

More Information

  • Home
  • About
  • Contact
  • Appetizers
  • Dessert
  • Dinner
  • Drinks
©2025, tastyhatch About Back To Top