Skip to content
DisclaimerTerms Of UseGDPR PolicyCookie Policy

tastyhatch

  • Home
  • Drinks
  • Appetizers
  • Dinner
  • Dessert
  • About
  • Contact
  • Privacy Policy
DisclaimerTerms Of UseGDPR PolicyCookie Policy

Olivia

- 12 oz pappardelle pasta - 1 teaspoon Calabrian chili paste - 1 cup heavy cream - ½ cup cherry tomatoes, halved - 1 cup fresh spinach leaves - Fresh basil for garnish - Large pot - Skillet - Whisk To make Creamy Calabrian Chili Pappardelle, you need a few key ingredients. Pappardelle pasta gives a great base. This wide pasta holds the sauce well. The Calabrian chili paste adds a nice kick. You can adjust this based on your spice level. Heavy cream makes the sauce rich and smooth. Optional ingredients can enhance your dish. Cherry tomatoes add sweetness and color. Fresh spinach leaves bring a nice pop of green. Basil adds freshness when you garnish your pasta. You will also need some tools. A large pot helps boil the pasta. A skillet cooks your sauce. A whisk combines everything well. For the full recipe, check out the instructions to bring all these elements together! First, fill a large pot with salted water. Bring it to a rolling boil. Add the pappardelle pasta. Cook it for about 7-9 minutes until al dente, which means it's firm yet tender. Be sure to reserve 1 cup of starchy pasta water before you drain the rest. This water helps the sauce stick to the pasta. Next, heat a large skillet over medium heat. Pour in 2 tablespoons of extra virgin olive oil. Once the oil is hot, add 3 cloves of finely minced garlic. Sauté the garlic for about 1 minute. You want it to smell nice but not brown. Burnt garlic can taste bitter and ruin your dish. Now, slowly pour in 1 cup of heavy cream while stirring. Keep stirring to mix everything well. Let the sauce simmer on low heat. After about 3-4 minutes, it should thicken a little. Stir it often to keep it from sticking to the pan. Once your sauce is ready, it’s time to combine. Add the drained pappardelle to the skillet. Gently toss the pasta to coat it evenly in the creamy sauce. Season with kosher salt and black pepper to taste. Adjust to your liking. Enjoy the beautiful blend of flavors in each bite. For the full recipe, refer to the instructions provided at the start. To change the heat in your Creamy Calabrian Chili Pappardelle, start with the chili paste. Use less for a milder dish. If you love heat, add more chili paste. You can also balance the spice by adding a touch of sugar or honey. Mixing in other spices, like smoked paprika or black pepper, can help create a rich flavor. For a perfect creamy sauce, watch your heavy cream closely. Pour it in slowly and stir well. This helps it blend nicely with the chili paste. Using freshly grated cheese makes a big difference. Pre-grated cheese may not melt as well. If the sauce gets too thick, add some reserved pasta water. This keeps it smooth and creamy. Pair your pappardelle with a fresh side salad. A simple arugula salad with lemon dressing works great. For wine, try a light white like Pinot Grigio. It matches well with the creamy sauce and chili heat. You can even serve it with crusty bread to soak up all that goodness. For the complete recipe, check out the Full Recipe link. {{image_4}} You can make this dish vegetarian by swapping some ingredients. Instead of chicken or sausage, use veggies like mushrooms or zucchini. These add great flavor and texture. You can also boost the dish with more veggies like bell peppers or kale. They add color and nutrients without losing the creamy vibe. Want to add protein? You can easily include chicken, shrimp, or sausage. For chicken, grill or sauté it first, then add it to the sauce. If you're using shrimp, cook them until they turn pink before tossing them in. Sausage needs to be browned before you mix it in. Adjust cooking times for each protein to ensure everything is perfectly cooked. If you need a gluten-free option, pick gluten-free pasta. Many brands offer great choices that taste good. Just make sure to follow the package directions for cooking times. Gluten-free pasta can cook faster or slower than regular pasta, so keep an eye on it to avoid mushiness. Check the [Full Recipe] for all the details needed to create this delicious meal! To store leftovers, let the creamy Calabrian chili pappardelle cool to room temperature. Place it in an airtight container. This keeps the dish fresh and tasty. You can expect it to last up to 3 days in the fridge. After this time, the flavors may fade and the cream can separate. To reheat, use low heat on the stove. Add a splash of reserved pasta water to keep it creamy. Stir often to ensure even warmth. Avoid the microwave if possible, as it can change the texture. Microwaving may cause the sauce to break and lose its silkiness. Yes, you can freeze this dish! To freeze, let it cool completely. Use a freezer-safe container and leave some space for expansion. This dish can stay good for about 2 months in the freezer. When ready to eat, thaw it overnight in the fridge. Reheat gently on the stove, adding cream or pasta water if needed for creaminess. Calabrian chili is a small, red pepper from Italy. - Flavor profile: It has a smoky and fruity taste. The heat level is medium to hot, which adds depth to dishes. - Common uses in cooking: You can use Calabrian chili in pastas, sauces, and marinades. It adds a burst of flavor, making your meals more exciting. Yes, you can prepare this dish in advance. - Tips for meal prep: Cook the pasta and sauce separately. Store them in airtight containers. When ready to serve, reheat each part and combine them. This keeps the pasta from getting mushy. Yes, it can be spicy. - How to control heat levels: Adjust the amount of Calabrian chili paste to your liking. Start with a small amount and taste as you go. - Serving recommendations for spice averse diners: Serve the dish with extra cheese or a splash of cream on top. This can help balance the heat. You can use other ingredients to create a creamy texture. - Alternative ingredients: Try using cashew cream, coconut milk, or a blend of silken tofu and vegetable broth. - Recipe adjustments needed: If using these alternatives, you may need to adjust the cooking time and add different spices for flavor. This blog post shared a tasty recipe that highlights key ingredients like pappardelle pasta, Calabrian chili paste, and heavy cream. We explored steps from boiling pasta to creating a rich sauce. You learned tips for spice levels and variations to fit different diets. Finally, I covered how to store leftovers and answered common questions. Enjoy making this dish your own. The flavors are worth the effort!

Creamy Calabrian Chili Pappardelle Delight

Craving a pasta dish that bursts with flavor? Look no further than my Creamy Calabrian Chili Pappardelle Delight. This recipe

- 8 oz wide rice noodles - 1 lb flank steak, thinly sliced against the grain - 4 tablespoons unsalted butter - 6 cloves garlic, minced - 2 green onions, chopped - 2 tablespoons soy sauce - 1 tablespoon oyster sauce - 1 tablespoon sesame oil - 1 teaspoon red pepper flakes (adjust to taste) - Salt and pepper to taste - Fresh cilantro, for garnishing - Lime wedges, for serving Gather these ingredients before you start cooking. Fresh, high-quality items make a big difference. I always choose flank steak for its great flavor and tenderness. The wide rice noodles pair well with the rich garlic butter sauce. Using fresh garlic adds a burst of taste. Green onions bring a nice crunch and color. The soy sauce and oyster sauce add depth, while sesame oil gives a hint of nuttiness. You can adjust the red pepper flakes for heat based on your taste. Don't forget the garnishes! Fresh cilantro and lime wedges brighten the dish. The lime juice balances the rich flavors, making every bite delicious. Check out the Full Recipe for more details on making this quick and flavorful meal. Boiling the Noodles Start by boiling a large pot of water. When it reaches a rolling boil, add 8 oz of wide rice noodles. Cook them until they are al dente, as shown on the package. This should take about 5-7 minutes. Rinsing and Setting Aside Once cooked, drain the noodles and rinse them under cold water. This stops the cooking process and keeps them from sticking together. Set the noodles aside for later. Heating the Skillet Grab a large skillet and heat 1 tablespoon of unsalted butter over medium-high heat. Seasoning and Cooking While the butter melts, season 1 lb of thinly sliced flank steak with salt and pepper. Once the butter is hot and bubbling, lay the steak slices in the skillet. Cook them for 2-3 minutes on each side. You want a nice, golden brown crust. After cooking, remove the steak and set it aside. Melting the Butter In the same skillet, add the remaining 3 tablespoons of butter. Let it melt fully. Sautéing the Garlic Next, toss in 6 cloves of minced garlic and a teaspoon of red pepper flakes. Sauté for about 1 minute, stirring often. The garlic should be golden and smell amazing. Don't let it burn, or it will taste bitter. Tossing the Noodles Add the reserved noodles back into the skillet. Toss them in the garlic butter sauce until they are well coated. Adding Sauces Pour in 2 tablespoons of soy sauce, 1 tablespoon of oyster sauce, and 1 tablespoon of sesame oil. Mix everything until the noodles absorb all the flavors. Incorporating Steak and Green Onions Return the seared flank steak to the skillet along with 2 chopped green onions. Gently mix everything together over medium heat for about 2-3 minutes. Adjusting Seasoning Taste the dish and adjust the seasoning with more salt and pepper if needed. Presentation Tips Transfer the garlic butter steak noodles to bowls or colorful platters. The bright green of the onions and cilantro will really stand out. Serving Suggestions Garnish with fresh cilantro and serve with lime wedges on the side. The lime adds a refreshing kick! For the full recipe, check out the details provided above. Enjoy your meal! Choosing the Right Cut For tender bites, I always pick flank steak. It is thin and cooks quickly. You can also use sirloin or ribeye if you want. These cuts are juicy and full of flavor. Best Cooking Techniques Searing the steak is key. Heat your skillet well before adding the meat. This helps form a nice crust. Cook each side for just 2-3 minutes. This keeps the meat juicy and tender. Preventing Sticking After boiling, rinse the noodles under cold water. This stops them from cooking further. It also helps to keep them from sticking together. If they stick, add a little oil. Achieving Perfect Texture Follow the package instructions for cooking time. Aim for al dente, which means firm to the bite. This gives the noodles a nice texture to soak up the sauce. Alternative Seasonings Want to mix it up? Try adding hoisin sauce for a sweet twist. You can also use lime juice for a fresh zing. Experiment with different herbs like basil or mint. Garnishing Ideas Garnish with fresh cilantro and chopped green onions. This adds color and brightness. A squeeze of lime on top gives it a refreshing kick. You can also sprinkle sesame seeds for crunch. {{image_4}} You can switch up the protein in garlic butter steak noodles for variety. - Chicken or Shrimp Alternatives: Use chicken breast or shrimp instead of steak. Chicken cooks quickly and absorbs flavors well. Shrimp adds a sweet, ocean taste to your dish. - Vegetarian Substitutes: For a vegetarian option, try tofu or tempeh. Both soak up the garlic butter sauce nicely. Slice them thin and sauté until golden for great texture. Changing the sauce can give your dish a new twist. - Spicy Garlic Butter Modification: Add more red pepper flakes for extra heat. You can also mix in sriracha or chili oil for a spicy kick. - Soy-Free Options: If you need a soy-free sauce, try coconut aminos. This sauce is a great substitute for soy sauce and is slightly sweeter. You have options when it comes to noodles. - Rice vs. Wheat Noodles: Wide rice noodles work well in this dish. However, you can use wheat noodles if you prefer. They add a nice chewiness to your meal. - Gluten-Free Options: For a gluten-free choice, stick with rice noodles or use zucchini noodles. Zucchini noodles are light and absorb flavors well, making them a fun alternative. For the full recipe, check out the [Full Recipe]. Refrigeration Guidelines You can store garlic butter steak noodles in the fridge. Place them in an airtight container. They will stay fresh for about 3 to 4 days. To keep the flavors intact, try to chill them quickly. Freezing the Dish If you want to freeze the leftovers, use a freezer-safe container. This dish can last up to 2 months in the freezer. When you want to eat it, thaw it in the fridge overnight before reheating. Best Methods for Reheating The best way to reheat garlic butter steak noodles is on the stove. Add a splash of water or broth to help steam the noodles and keep them moist. Heat over medium until warm. You can also use a microwave, but stir every 30 seconds for even heating. Maintaining Flavor and Texture To keep the flavor bright and the texture nice, avoid overheating. If using a microwave, cover the dish to trap moisture. Stir well and check the temperature. The goal is to enjoy every bite just like when it was fresh. It takes about 30 minutes to make garlic butter steak noodles. You can prep the ingredients in 15 minutes. Cooking the dish takes another 15 minutes. This quick meal fits well into a busy schedule. Yes, you can use different noodles. Rice noodles work great, but you can try egg noodles or udon. Just adjust the cooking time to match the noodle type. This keeps the meal tasty and fun. Garlic butter steak noodles pair well with many sides. You can serve them with a fresh salad or steamed veggies. Crispy spring rolls or dumplings also make great companions. These sides balance the rich flavors of the dish. Yes, this recipe is perfect for meal prep. You can cook a batch and store it in the fridge. Just keep the noodles and sauce separate until serving. This helps prevent soggy noodles and keeps the dish fresh. To change the spice level, adjust the red pepper flakes. Add a little for mild heat or more for a spicier kick. You can also add fresh chili or hot sauce for extra flavor. Tailor it to your taste! You learned how to make garlic butter steak noodles, a delicious and simple dish. We covered all the key steps, from cooking the noodles to searing the steak. I also shared tips for juicy steak and noodle perfection. You can switch up proteins and sauces to suit your taste. Don’t forget storage tips for leftovers and reheating methods. This meal is not only easy to make but also great for meal prep. Enjoy creating your version of this dish and impress your friends and family!

Garlic Butter Steak Noodles Quick and Flavorful Meal

Looking for a quick, flavorful meal that hits all the right notes? Garlic Butter Steak Noodles offer a perfect blend

- 1 lb ground beef (or chicken for a leaner choice) - 4 cloves garlic, finely minced - 4 tablespoons unsalted butter - 1/4 cup honey - 1/4 cup BBQ sauce (choose your favorite flavor for a personal touch) - 1 teaspoon smoked paprika - 1/2 teaspoon cayenne pepper (optional, for a spicy kick) - 8 small corn or flour tortillas These main ingredients create a balance of sweet, savory, and rich flavors. The garlic adds a nice aroma, while the honey and BBQ sauce give the dish its unique taste. - Ground turkey or pork for different meat options - Chipotle sauce for a smoky flavor - Avocado or guacamole for creaminess - Black beans for added protein and fiber - Salsa for extra zest Switching up these ingredients allows you to customize the tacos to your liking. Feel free to experiment based on what you enjoy. - 1 cup shredded lettuce - 1 cup diced tomatoes - 1 cup shredded cheese (such as cheddar or a Mexican blend) - Fresh cilantro leaves for garnish - Lime wedges for serving Using fresh garnishes brightens each bite. The lime adds a refreshing burst that pairs well with the sweet and savory tacos. For the full recipe, check out the complete guide. First, gather your ingredients. You need minced garlic and unsalted butter. Heat a large skillet over medium heat. Add the butter and let it melt. Once melted, add the minced garlic. Sauté the garlic for about 1-2 minutes. Stir it often until it smells great and turns golden. Now, it's time to add the meat. You can use ground beef or chicken. Add the meat to the skillet. Use a spatula to break it into smaller bits. Cook for about 5-7 minutes. Stir it now and then until the meat is brown and cooked through. After that, add honey, BBQ sauce, smoked paprika, and cayenne if you want some heat. Mix it well. Cook for another 2-3 minutes. This helps the flavors blend nicely. While your meat cooks, warm the tortillas in a separate dry skillet. Heat each tortilla for about 30 seconds on each side. They should be soft and easy to fold. Now, take a warm tortilla and put a good spoonful of the BBQ meat mix in the center. Top it with shredded lettuce, diced tomatoes, and cheese. Finish with fresh cilantro leaves. Serve right away with lime wedges on the side. Enjoy your flavorful and simple Garlic Butter Honey BBQ Tacos! Don't forget to check out the Full Recipe for more tips. When cooking the meat, choose ground beef or chicken. Use medium heat to keep it juicy. Break the meat into small pieces with a spatula. This helps it cook evenly. Add the garlic early to infuse its flavor into the meat. Once the meat is browned, mix in the honey and BBQ sauce. This step adds a sweet touch and makes your tacos shine. Warming tortillas is key for great tacos. Use a dry skillet over medium heat. Cook each tortilla for about 30 seconds on each side. You want them soft and flexible. Avoid overcooking, as this can make them tough. Keep them warm by stacking on a plate and covering with a towel. This keeps them fresh while you assemble your tacos. Presentation can make your tacos pop. Arrange the tacos on a large platter. Drizzle with extra BBQ sauce for extra flavor. This also looks nice! Add lime wedges for a fresh touch. It helps to balance the sweetness of the honey. Lastly, sprinkle fresh cilantro on top. This adds a burst of color and a hint of freshness. For more details, check the Full Recipe for ideas. {{image_4}} You can swap ground beef for other proteins. Ground chicken works great for a leaner choice. You can also use ground turkey for a lighter meal. If you want something different, try shredded pork or shrimp. Each option will give your tacos a unique taste. To make these tacos vegetarian, use black beans or lentils instead of meat. They provide protein and texture. For a vegan version, replace butter with vegan butter or olive oil. Use maple syrup in place of honey for sweetness. You can also include grilled veggies for added flavor. BBQ sauce is the star here, but you can change it up. Try hot sauce for some heat. Chipotle sauce adds a smoky twist. You can also use a tangy salsa for freshness. Experimenting with different sauces can bring new life to your tacos. Store leftover tacos in an airtight container. If possible, keep the meat and toppings separate. This helps keep the tortillas from getting soggy. Refrigerate for up to three days. If you have extra meat, that can last up to four days in the fridge. To reheat the tacos, warm them in a skillet over medium heat. This keeps the tortillas soft. Heat for about 2-3 minutes on each side. If you stored the meat separately, warm it in a skillet as well. Stir occasionally until heated through. For freezing, keep the cooked meat in a freezer-safe bag. Press out the air and seal it tightly. You can freeze for up to three months. When ready to use, thaw in the fridge overnight before reheating. Tortillas can also be frozen. Wrap them in foil or plastic wrap and store in a freezer bag. You can use ground chicken, turkey, or even tofu. Each option gives a unique flavor. Ground chicken is leaner and cooks quickly. Turkey is a great low-fat choice too. If you want a plant-based option, try crumbled tofu or tempeh. Both soak up flavors well and keep the dish light. Yes, you can prep the meat mixture in advance. Cook it, then cool it down and store it in the fridge. It stays fresh for up to three days. When you're ready, just reheat it on the stove. Warm up your tortillas right before serving for the best taste. Add more cayenne pepper to the meat mixture. You can also mix in diced jalapeños or a splash of hot sauce. For an extra kick, try adding some sliced serrano peppers as a topping. This way, each bite can be as spicy as you want. For the full recipe, check out the detailed instructions to create these delicious tacos! This blog post covered tasty garlic butter honey BBQ tacos, plus options to mix it up. You learned how to prepare the garlic butter, cook the meat, and assemble the tacos. We also talked about warming tortillas and storing leftovers. Feel free to explore alternative proteins and sauces for variety. Tacos are fun and easy to customize. Experiment with flavors and make your perfect taco. Enjoy tasty bites that you and your friends will love!

Garlic Butter Honey BBQ Tacos Flavorful and Simple

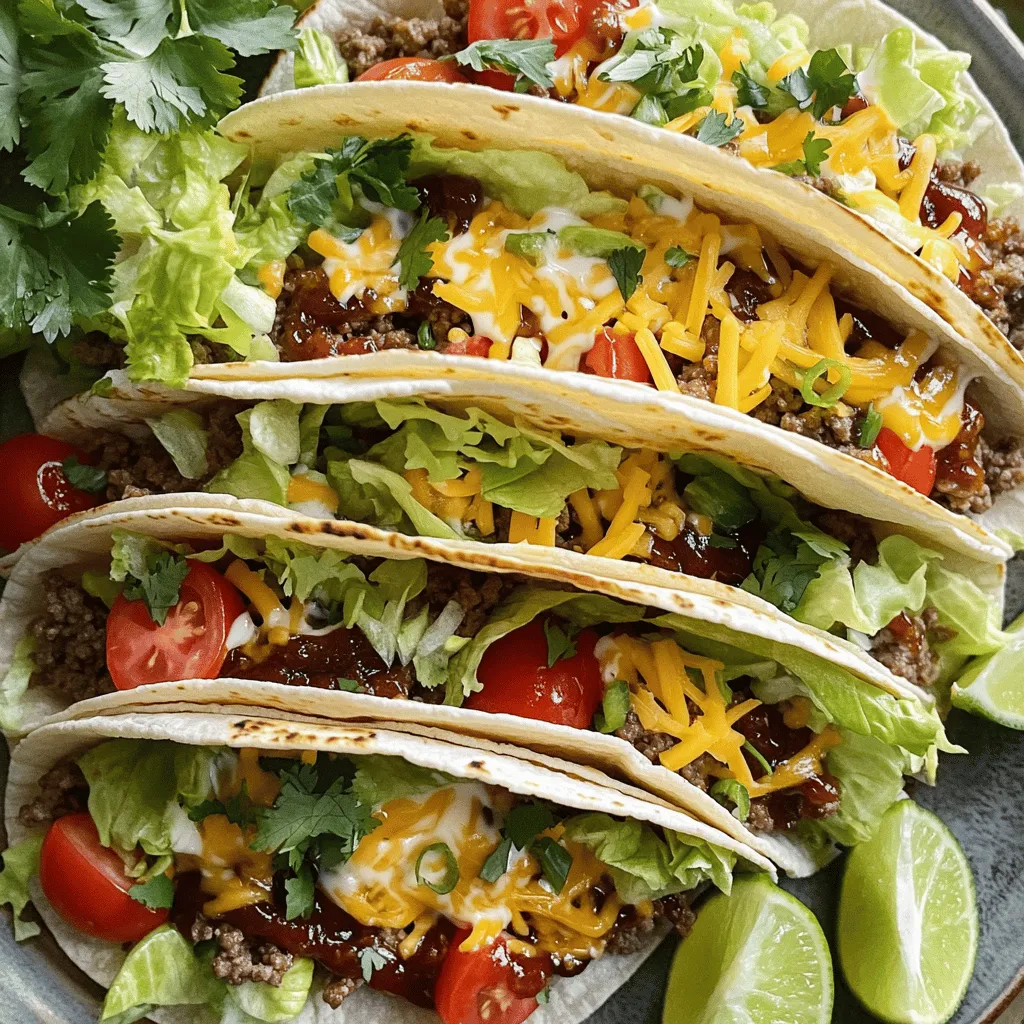
Are you ready for a tasty treat? These Garlic Butter Honey BBQ Tacos pack bold flavors without the fuss! You

- 4 cups stale bread (preferably brioche or challah), cubed - 3 ripe peaches, pitted and sliced - 2 cups whole milk - 1 cup heavy cream - 4 large eggs - 3/4 cup granulated sugar - 1/2 cup packed brown sugar (for topping) - 1/2 cup pecans, roughly chopped - 1/4 cup unsalted butter, melted - 1 teaspoon ground cinnamon - 1/2 teaspoon freshly grated nutmeg - 1/4 teaspoon sea salt Stale bread is key for this recipe. It soaks up the custard well. Fresh, ripe peaches add sweetness and flavor. Look for peaches that yield slightly when pressed. When measuring liquids, use a liquid measuring cup for accuracy. This ensures your bread pudding turns out just right. With these ingredients and tips, you are all set to make this Peach Cobbler Bread Pudding. For the complete instructions, check out the Full Recipe. First, preheat your oven to 350°F (175°C). This step is key for baking. While the oven heats, grab a 9x13 inch baking dish. Generously grease it with butter. Make sure to cover all corners. This will help the pudding not stick. In a large mixing bowl, combine the whole milk and heavy cream. Add in the eggs and granulated sugar. Then, pour in the pure vanilla extract. Sprinkle in the ground cinnamon, freshly grated nutmeg, and sea salt. Use a whisk to mix well. Whisk until the mixture is smooth. This helps create a rich custard. Take your stale bread and cut it into cubes. Gently fold the bread into the custard mixture. Ensure each piece is coated. Let it soak for about 15 minutes. This time is important for flavor absorption. Slice the ripe peaches and remove the pits. In a separate bowl, mix the peaches with packed brown sugar. Allow them to sit for about 10 minutes. This process, called macerating, brings out the natural sweetness of the peaches. Once the bread has soaked, stir in the roughly chopped pecans. Carefully fold in the macerated peaches. Make sure everything is evenly mixed. Pour the entire mixture into the greased baking dish. Drizzle melted butter over the top. Place the dish in the oven and bake for 40-45 minutes. The pudding is ready when the top is golden brown. The center should be soft but set. To get the right custard, use fresh eggs and whole milk. Mix them well with cream and sugar. Whisk until smooth, making sure there are no lumps. This step is key for a creamy outcome. To avoid drying out during baking, keep an eye on the time. Bake until the top gets golden brown, about 40 to 45 minutes. If you check in early, use a toothpick. It should come out clean, but not too dry. You can add more spices for depth. Try a pinch of ginger or allspice. These warm flavors make the dish pop. You can also swap in other fruits. Try apples, berries, or even nectarines for a fun twist. If using different fruits, remember to adjust the sugar. Some fruits are sweeter than peaches, so taste as you go. For a beautiful presentation, serve the pudding warm. Top each serving with a scoop of vanilla ice cream. A dollop of whipped cream adds a nice touch too. Garnish with a slice of peach or a sprinkle of cinnamon. This elevates the look and adds extra flavor. It’s all about making it visually appealing while keeping the taste amazing. {{image_4}} You can switch up the fruit in this recipe to match the seasons. Try using fresh berries in summer or apples in the fall. Each fruit will add a unique flavor to your bread pudding. When you change the fruit, also adjust the spices. For example, use more cinnamon with apples or add a hint of lemon zest with berries. This keeps your dish exciting all year round. If you need gluten-free options, choose gluten-free bread for your pudding. Many brands have tasty choices that work well. For a vegan version, substitute eggs with flaxseed meal or a commercial egg replacer. Use almond milk or coconut milk instead of dairy. These changes help everyone enjoy this treat without worry. Make your Peach Cobbler Bread Pudding a layered dessert by adding whipped cream or yogurt between layers. This creates a fun, visual treat. You can also serve it as a breakfast dish. Just warm it up and top it with fresh fruit and a drizzle of maple syrup. This makes a great start to your day! To keep your peach cobbler bread pudding fresh, refrigerate it in an airtight container. This helps to lock in moisture and flavor. It stays good for about three to four days. If you want to enjoy it later, make sure it cools down before sealing it up. When you're ready to eat it again, reheating is key. The best way to keep its texture is to use the oven. Preheat your oven to 350°F (175°C) and warm it for about 15 minutes. This helps restore its soft, creamy center. If you’re short on time, the microwave works too. Heat it in short bursts of 30 seconds, checking in between to avoid overheating. You can freeze peach cobbler bread pudding before or after baking. To freeze before baking, assemble it and wrap it tightly. When you’re ready, thaw it in the fridge overnight and bake as usual. For leftovers, allow it to cool completely, then slice and freeze in portions. To reheat, thaw in the fridge overnight, then warm it in the oven. This way, you enjoy its delicious taste any time! To keep your bread pudding firm, follow these tips for soaking the bread: - Use stale bread. Fresh bread absorbs too much liquid too fast. - Soak the bread just long enough. Aim for about 15 minutes. - Gently fold the bread into the custard. Avoid crushing the pieces. These steps help maintain the right texture. You want a nice, soft middle but not a soggy mess. Yes, you can prep this dish ahead. Here’s how: - Assemble the bread pudding, but do not bake it right away. - Cover it tightly with plastic wrap or foil. - Store it in the fridge for up to 24 hours. When you’re ready, bake it straight from the fridge. Just add a few extra minutes to the baking time. For serving, I love these ideas: - Serve it warm with a scoop of vanilla ice cream. - Top with freshly whipped cream for a rich touch. - Garnish with peach slices and a sprinkle of cinnamon. These additions enhance the flavors and make the dish look stunning. Yes, frozen peaches work well. Here’s what to know: - Thaw the peaches first and drain off any excess liquid. - This prevents the pudding from becoming too watery. - Frozen peaches may not be as firm, so adjust cooking time as needed. They still give you that sweet, peachy flavor. For the complete recipe, click here: Peach Cobbler Bread Pudding. It’s simple and delicious! In this post, we explored the key ingredients for a delicious peach cobbler bread pudding. We covered everything from stale bread to fresh peaches and spices. I shared step-by-step instructions, helpful tips, variations, and storage info. You can create this sweet treat easily and impress anyone. Remember to use ripe peaches and follow soaking tips for the best results. Enjoy making your peach cobbler bread pudding and savor each bite!

Peach Cobbler Bread Pudding Simple and Delicious Treat

If you love sweet, fruity desserts, you’re in for a treat! This Peach Cobbler Bread Pudding combines the warmth of

The main ingredients for this salad are simple and fresh. Here’s what you need: - 1 can (15 oz) chickpeas, thoroughly drained and rinsed - 1 cup cherry tomatoes, vibrant and halved - 1 medium cucumber, peeled and diced into bite-sized pieces - 1 red bell pepper, diced into small cubes - 1/2 red onion, finely chopped for a mild flavor - 1/2 cup Kalamata olives, pitted and sliced for briny goodness - 1/4 cup feta cheese, crumbled (optional but recommended for creaminess) - 2 tablespoons fresh parsley, finely chopped for freshness - 1 tablespoon fresh mint, finely chopped for an aromatic touch You can add a few optional ingredients for extra flavor. These include: - 3 tablespoons quality extra virgin olive oil - 2 tablespoons freshly squeezed lemon juice for brightness - 1 teaspoon dried oregano to enhance the Mediterranean flavor - Sea salt and freshly cracked black pepper to taste This salad is not just tasty; it’s also packed with nutrients. Chickpeas provide protein and fiber, making you feel full. Cherry tomatoes add vitamins A and C, while cucumbers keep you hydrated. Red bell peppers bring in antioxidants. Kalamata olives add healthy fats. Feta cheese gives a creamy texture and calcium. Fresh herbs like parsley and mint boost flavor and freshness. This dish is a colorful mix of health and taste. Enjoy the benefits of each ingredient as you savor every bite! For the full recipe, check out the Mediterranean Chickpea Delight. Start by gathering your ingredients. You need one can of chickpeas, one cup of cherry tomatoes, one cucumber, one red bell pepper, and half a red onion. Rinse the chickpeas well to remove any extra sodium. Halve the cherry tomatoes, peel and dice the cucumber, and chop the red bell pepper. Finely chop the red onion for a milder flavor. In a large mixing bowl, combine the prepared chickpeas, cherry tomatoes, cucumber, bell pepper, and onion. Stir gently to mix everything well. Next, add the sliced Kalamata olives and optional crumbled feta cheese. Fold these in gently to keep the cheese intact. In a small bowl, whisk together three tablespoons of extra virgin olive oil, two tablespoons of lemon juice, and one teaspoon of dried oregano. Add a pinch of sea salt and freshly cracked black pepper. Mix until the dressing is smooth and all parts are combined. Drizzle the dressing over the salad mix. Use a spatula to toss it gently so everything is coated. Sprinkle the fresh parsley and mint on top, then toss once more. For the best taste, let the salad sit for about 15 minutes at room temperature. This allows the flavors to blend. Before serving, taste and adjust the seasoning if needed. Enjoy this vibrant Mediterranean chickpea salad! For the full recipe, click here: [Full Recipe]. To make a great Mediterranean chickpea salad, focus on fresh ingredients. Use ripe cherry tomatoes for sweetness. Choose a crunchy cucumber for texture. For the best taste, rinse the chickpeas well. This helps remove excess salt and ensures a clean flavor. Chop your veggies into similar sizes. This gives the salad a uniform look and makes it easy to eat. Finally, let it sit for about 15 minutes. This helps the flavors blend nicely. To keep your salad fresh, store it properly. Use an airtight container for leftovers. This keeps the salad crisp and tasty. If you plan to eat it later, don’t add the dressing until just before serving. The dressing can make the salad soggy if it sits too long. You can also store the dressing separately. This way, you can enjoy a fresh salad each time. You can change the salad to fit your taste. Want more crunch? Add some toasted almonds or sunflower seeds. Like it spicy? Try adding some diced jalapeños or a dash of red pepper flakes. For a unique twist, mix in some diced avocado. This adds creaminess and healthy fats. You can also swap the feta for goat cheese. This gives a different flavor while still being delicious. Check out the Full Recipe for more ideas! {{image_4}} You can make this salad vegan by omitting the feta cheese. Instead, use avocado for creaminess. You could also add a sprinkle of nutritional yeast. This gives a cheesy flavor without dairy. Fresh herbs like dill or basil can add a nice touch. Try adding some roasted red peppers for a smoky flavor. This recipe is naturally gluten-free. Chickpeas are a great source of protein and fit right in. If you want to add grains, use quinoa or brown rice. Both are gluten-free and add texture. They also make the salad more filling. You can change up the ingredients based on the seasons. In summer, add fresh corn or zucchini. In fall, try roasted butternut squash or apples. In winter, incorporate hearty greens like kale or spinach. Each season brings different flavors and colors to your salad. This keeps the dish fresh and exciting. To keep your Mediterranean Chickpea Salad fresh, store it in an airtight container. Glass containers work best as they don’t stain and keep the flavors intact. If you have leftover dressing, store it separately for best results. This way, you can keep your salad crisp and tasty. When stored correctly, this salad will last for about 3 to 5 days in the fridge. The vegetables will stay crunchy, but the flavors will meld over time. If you notice any sogginess, it is time to toss it out. Always trust your senses when checking for freshness. When you’re ready to enjoy leftovers, give the salad a gentle toss. Taste it first. You may want to add more lemon juice or salt to boost the flavor. If the salad seems dry, drizzle in some olive oil. Serve it cold for a refreshing treat. You can also use it as a filling for wraps or pita bread for a new twist. For the full recipe, check out Mediterranean Chickpea Delight. Mediterranean Chickpea Salad comes from the Mediterranean region. This area includes countries like Greece, Italy, and Turkey. People here love fresh ingredients and bold flavors. Chickpeas are a staple in this cuisine. They provide protein and fiber. This salad celebrates the bright tastes of the Mediterranean. It mixes veggies, herbs, and olive oil. Each bite bursts with flavor. Yes, you can prepare this salad in advance. It actually tastes better after sitting for a bit. The flavors blend nicely as it chills. Make the salad a few hours ahead of time. Store it in the fridge until you are ready to serve. If you add feta cheese, do it right before serving to keep it fresh. Mediterranean Chickpea Salad pairs well with many dishes. Try it with grilled chicken or fish for protein. It also complements pita bread or hummus nicely. Serve it next to a hearty soup for a complete meal. If you want a light lunch, enjoy it with a slice of crusty bread. Each option enhances the salad’s vibrant flavors. Adding protein to your salad is simple. You can mix in grilled chicken or shrimp for a boost. Canned tuna or salmon works well, too. For a vegetarian option, toss in some cooked quinoa or lentils. If you want to keep it light, add some sliced avocado. This makes the salad filling and nutritious. This blog covered the key ingredients for Mediterranean chickpea salad, plus tips and storage. You learned how to prepare the salad with fresh ingredients and a tasty dressing. Don’t forget the optional flavors that can boost the dish. In the end, make it your own with easy swaps. Enjoy your healthy salad now and later!

Mediterranean Chickpea Salad Fresh and Flavorful Dish

Are you ready to make a fresh and tasty Mediterranean Chickpea Salad? This dish packs a punch with vibrant flavors

- 1 frozen ripe banana - 1 cup fresh strawberries, hulled and halved - 1/2 cup Greek yogurt (plain or vanilla) - 1 cup unsweetened almond milk (or your preferred milk) - 1 tablespoon honey or maple syrup (optional) - 1 tablespoon chia seeds - A pinch of ground cinnamon - Ice cubes (optional) You will need fresh produce to bring bright flavors to your smoothie. Start with a frozen ripe banana. This gives your smoothie a creamy texture. Next, add one cup of fresh strawberries. Make sure to hull and halve them for easy blending. For the dairy component, use half a cup of Greek yogurt. You can choose plain or vanilla based on your taste. This adds richness and protein. Next, include one cup of unsweetened almond milk. You can use any milk you prefer. If you want your smoothie sweeter, add one tablespoon of honey or maple syrup. This step is optional, so adjust it based on your taste. Chia seeds bring extra nutrition. Use one tablespoon for added fiber and omega-3s. A pinch of ground cinnamon adds warmth and depth to the flavor. If you like a thick smoothie, add a few ice cubes. This is also optional and depends on your texture preference. For the full recipe, check out the Berry Bliss Smoothie . Begin by placing the frozen banana and halved strawberries in the blender. The frozen banana gives a creamy texture. The strawberries add a sweet and tangy flavor. You want them hulled and halved to blend well. Next, include Greek yogurt and almond milk. The yogurt adds protein and creaminess. Almond milk keeps it light and refreshing. If you like your smoothie sweeter, add honey or maple syrup now. This step is optional, so you can skip it if you prefer less sweetness. Blend all the ingredients on high speed until smooth. This usually takes about 30 seconds to 1 minute. If the smoothie is too thick, add a splash more almond milk. Blend again until you reach your desired texture. For a thicker smoothie, add a few ice cubes and blend again. Taste the smoothie and adjust sweetness if needed before serving. Enjoy this Healthy Strawberry Banana Smoothie right away for the best flavor! For the full recipe, check out the Berry Bliss Smoothie! To get the right thickness for your smoothie, you can adjust it based on your taste. If you want a thinner drink, add a splash of almond milk. If you like it thicker, toss in a few ice cubes. Blend again until smooth. The frozen banana already helps to create a creamy texture, so adding ice cubes can enhance that creaminess. To change the flavor of your smoothie, consider adding a dash of vanilla extract. This can give your drink a warm and inviting taste. You can also try a small pinch of nutmeg or ginger for a unique twist. If you prefer it sweeter, add more honey or maple syrup. Just remember to blend it well after adding any extras. To make your smoothie look great, serve it in tall, clear glasses. This way, you can show off the lovely pink color. Garnish with a slice of strawberry on the rim and sprinkle some chia seeds on top for extra flair. Using colorful straws can make it even more fun. Presentation matters, so take a moment to make it look nice before enjoying! {{image_4}} You can mix things up with other fruits. If you want a twist, try using blueberries or raspberries instead of strawberries. These berries add a nice tartness. You can also use mango or peaches for a sweeter taste. Each fruit gives a unique flavor. So, feel free to swap them out! Want a health kick? Add some spinach to your smoothie. It blends right in and gives extra vitamins. You might also try protein powder for a filling boost. Nut butters like almond or peanut add creaminess and protein. Just one tablespoon can change the whole drink. These boosters make your smoothie even better! If you prefer dairy-free, use coconut yogurt instead of Greek yogurt. It’s creamy and tasty. For a vegan option, stick with almond milk or oat milk. You can also skip honey and use agave syrup for sweetness. Each choice keeps your smoothie delicious and kind to all diets. If you have leftover smoothie, store it in a sealed jar or container. Glass containers work best. Keep it in the fridge for up to 24 hours. Shake or stir well before drinking to mix the ingredients again. You can freeze the smoothie for later. Pour it into ice cube trays or silicone molds. Once frozen, transfer the cubes to a zip-top bag. This way, you can blend a few cubes with fresh ingredients later for a quick treat. To keep the smoothie fresh, drink it right after making it. If you can't, store it properly. The texture and taste are best when fresh. Use a squeeze of lemon juice to help maintain color and freshness if you plan to store it for a short time. You can adjust the sweetness of your smoothie easily. If you want it sweeter, add honey or maple syrup. Start with one tablespoon and blend. Taste it, then add more if needed. Remember, ripe bananas add natural sweetness too. Yes, you can use frozen strawberries. They add a nice chill to your smoothie. Just like frozen bananas, they help make the drink creamy. If using frozen strawberries, you might skip the ice cubes. Strawberries are low in calories and high in vitamin C. They help boost your immune system. Bananas are rich in potassium, good for your heart. Together, they make a great mix. They add fiber, which is good for digestion. This smoothie is a tasty way to enjoy these health benefits. This blog post shared a simple and tasty smoothie recipe. You learned about fresh ingredients like bananas and strawberries, plus how to blend them with yogurt and milk. We explored tips to get the best texture and ways to customize flavors. You can even freeze smoothies for later or switch up the fruits. Smoothies are a great way to stay healthy and enjoy fresh fruits. Try this recipe and make it your own. Enjoy every sip!

Healthy Strawberry Banana Smoothie Quick and Easy Recipe

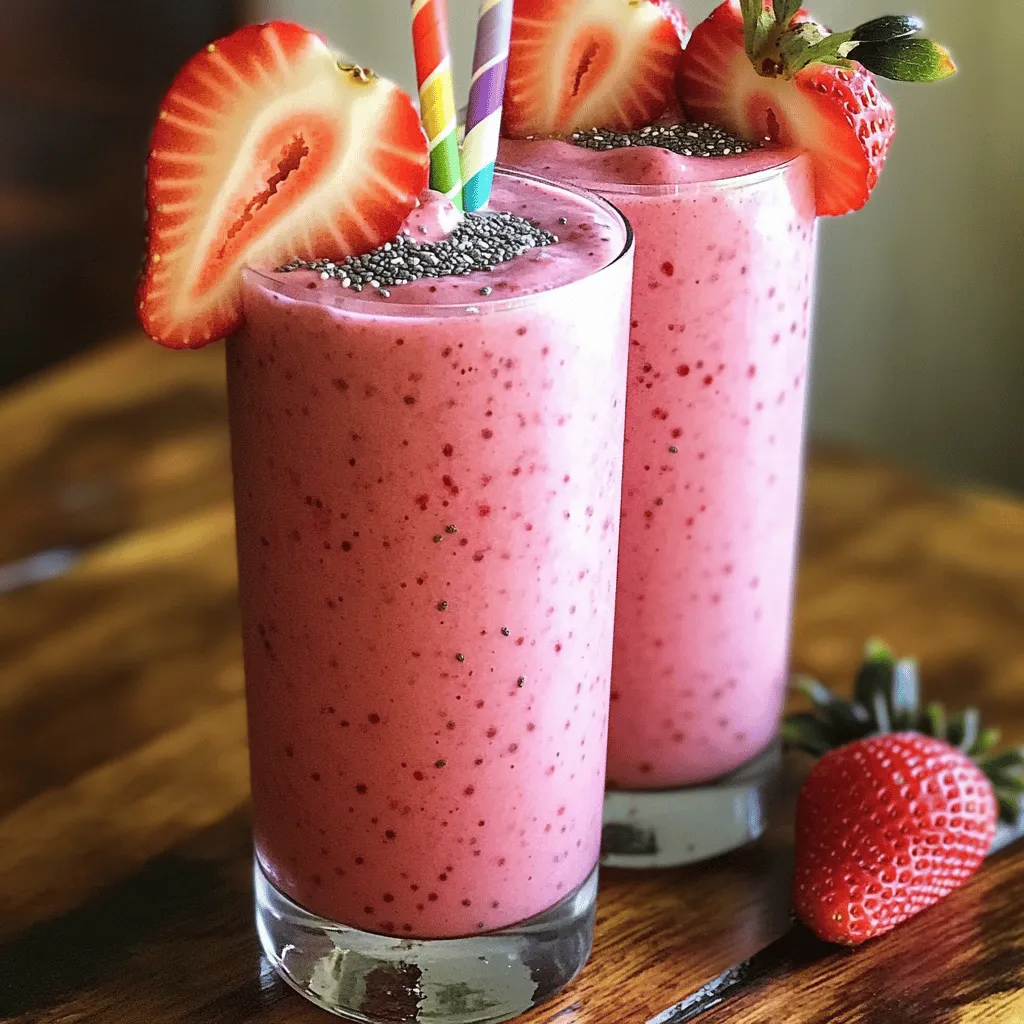
Are you ready to blend your way to a healthier snack? This quick and easy Healthy Strawberry Banana Smoothie recipe

Here’s what you need to make zucchini noodles with pesto: - 4 medium zucchinis - 1 ripe avocado - 1 cup fresh basil leaves, packed - 1/4 cup pine nuts, lightly toasted - 2 cloves garlic, minced - 1/4 cup nutritional yeast (for a cheesy flavor) - 2 tablespoons freshly squeezed lemon juice - 1/4 cup extra virgin olive oil, plus more for drizzling - Salt and black pepper, to taste - 1 cup cherry tomatoes, halved (for garnish) - Grated Parmesan or a vegan cheese alternative (optional, for serving) With these fresh ingredients, you can create a meal that’s not just healthy but also bursting with flavor. Zucchini gives a light, crunchy base, while avocado adds creaminess. Fresh basil brings a fragrant touch, and pine nuts offer a nutty crunch. You’ll love how simple, yet satisfying, this dish is! If you want to follow the full recipe, it’s all laid out for you to enjoy. To get started, you need to prepare the zoodles. First, grab your spiralizer. If you don’t have one, a vegetable peeler works too. - Using a Spiralizer or Vegetable Peeler Start by cutting the ends off each zucchini. Place them in the spiralizer and twist to create long, noodle-like strands. If using a peeler, slice the zucchini into thin ribbons. Both methods yield delicious zoodles. - Draining Excess Moisture After making the zoodles, it’s time to drain them. Place the zoodles in a colander. Sprinkle a little salt on them. Let them sit for about 10 minutes. This helps remove excess moisture. It prevents your dish from getting watery. Next, we’ll make the creamy avocado pesto that gives this dish its flavor. - Blending Ingredients in a Food Processor In a food processor, add the ripe avocado, fresh basil, toasted pine nuts, and minced garlic. Pour in the lemon juice and olive oil. Blend everything until smooth and creamy. - Adjusting Consistency and Seasoning Taste the pesto. If it needs more flavor, add salt and pepper. If the pesto is too thick, add a tablespoon of water. Blend again until you reach your desired texture. Now it’s time to mix the zoodles with your tasty pesto. - Gentle Tossing for Even Coating In a large mixing bowl, combine the zoodles and pesto. Use tongs or a spatula to gently toss them together. Make sure every strand is coated well. - Optional Warming Method If you like warm zoodles, heat a non-stick skillet over medium heat. Add the pesto-coated zoodles. Sauté for 2-3 minutes. Toss gently to keep them crunchy. Enjoy this fresh and healthy meal right away! Don't forget to check out the Full Recipe for more details. To ensure your zoodles shine, start with salting them. Lightly sprinkle salt over the spiralized zucchini. Let them sit in a colander for about 10 minutes. This process helps draw out excess water. When you skip this step, your dish may turn watery. A dry zoodle means a better meal. For cooking time, keep it short. If you want warm zoodles, heat them for just 2-3 minutes. Toss them gently in a skillet over medium heat. You want them to stay crunchy. Overcooking will ruin their texture. To make your pesto even better, think about adding extra ingredients. Consider adding a squeeze of fresh lime juice for a zesty kick. You can also mix in some spinach for added nutrients. If you love spice, a pinch of red pepper flakes can wake up the flavors. When using a blender, remember a few tips. Make sure to chop your ingredients before blending. This helps ensure a smooth texture. If your pesto is too thick, add water a tablespoon at a time. Blend until it reaches your desired creaminess. For a stunning plate, think about how you arrange the zoodles. Layer them in a small mound in the center of the plate. It gives your dish height and draws the eye. Scatter cherry tomatoes around the edges for color. For garnishing, fresh herbs work wonders. A sprinkle of chopped basil or parsley adds a nice touch. You might even drizzle a bit of olive oil on top for extra richness. This simple step makes your meal look gourmet and inviting. {{image_4}} If you want to change things up, consider using different noodles. Spaghetti squash is a great choice. It has a mild flavor that pairs well with pesto. You just need to roast it until tender. Then, scrape out the strands with a fork. You can also try other veggies like carrots or sweet potatoes. For a vegan pesto, swap the cheese with nutritional yeast. It gives a cheesy taste without dairy. You can also use sunflower seeds instead of pine nuts. They add a nice crunch and flavor. Adding spices or other veggies can boost the flavor. Try red pepper flakes for a kick. You could also mix in sautéed bell peppers or spinach. These add color and nutrients. For protein, consider adding chickpeas or grilled chicken. Tofu is a good choice too. It makes the dish more filling. Pair your zucchini noodles with crusty bread or a fresh salad. A simple side salad can balance the meal. You can also meal prep by making extra zoodles and pesto. Store them separately in the fridge. They last for a few days. This way, you can enjoy a quick meal later in the week. For the full recipe, check out the recipe section above. To keep leftover zoodles fresh, place them in an airtight container. Always refrigerate them right away. This helps preserve their taste and texture. They will last for about 2 to 3 days in the fridge. If you want to save zoodles for later, freezing is a great option. First, blanch them in boiling water for about 1 minute. This step helps stop the enzyme activity that can change their taste. After blanching, cool them in ice water. Drain and pack them in freezer bags. They can last up to 3 months in the freezer. For pesto, store it in a jar or container. It can last about a week in the fridge. For longer storage, freeze it in ice cube trays. Once frozen, pop the cubes into a bag. When reheating zoodles, use a skillet over low heat. Add a splash of water or olive oil to keep them moist. Stir gently until heated through, about 2 to 3 minutes. Avoid using a microwave, as it can make them soggy. If you want, serve them with fresh toppings to boost their flavor. You can use a vegetable peeler. Slice the zucchini into thin ribbons. This gives you a similar texture to traditional noodles. After peeling, place the ribbons in a colander and sprinkle with salt. Let them sit for a few minutes. This helps remove excess moisture. Yes, you can make the pesto ahead of time. Store it in an airtight container in the fridge. To keep it fresh, drizzle a thin layer of olive oil on top. This helps prevent oxidation and keeps the color bright. Absolutely! Zucchini noodles are naturally gluten-free. They are a perfect choice for anyone avoiding gluten. You can enjoy them without worry. If you want to swap out pine nuts, try walnuts or sunflower seeds. These options add a different flavor but still taste great. You can also use cashews for a creamy texture. To make your zucchini noodles more filling, add protein. Grilled chicken, shrimp, or chickpeas work well. You can also toss in some cooked quinoa or beans for extra fiber and nutrients. Adding these ingredients makes your meal heartier and more satisfying. Making zoodles and avocado pesto is simple and fun. We covered the essential ingredients, like zucchini and avocado, and how to prepare them. You learned step-by-step instructions to create the perfect dish. Tips helped you avoid wateriness and enhance flavor. We also shared variations and storage techniques for leftovers. Enjoy this dish, and feel free to get creative in the kitchen! Experiment with flavors and ingredients to make it your own. You now have all the tools to impress your family and friends.

Zucchini Noodles with Pesto Healthy and Fresh Meal

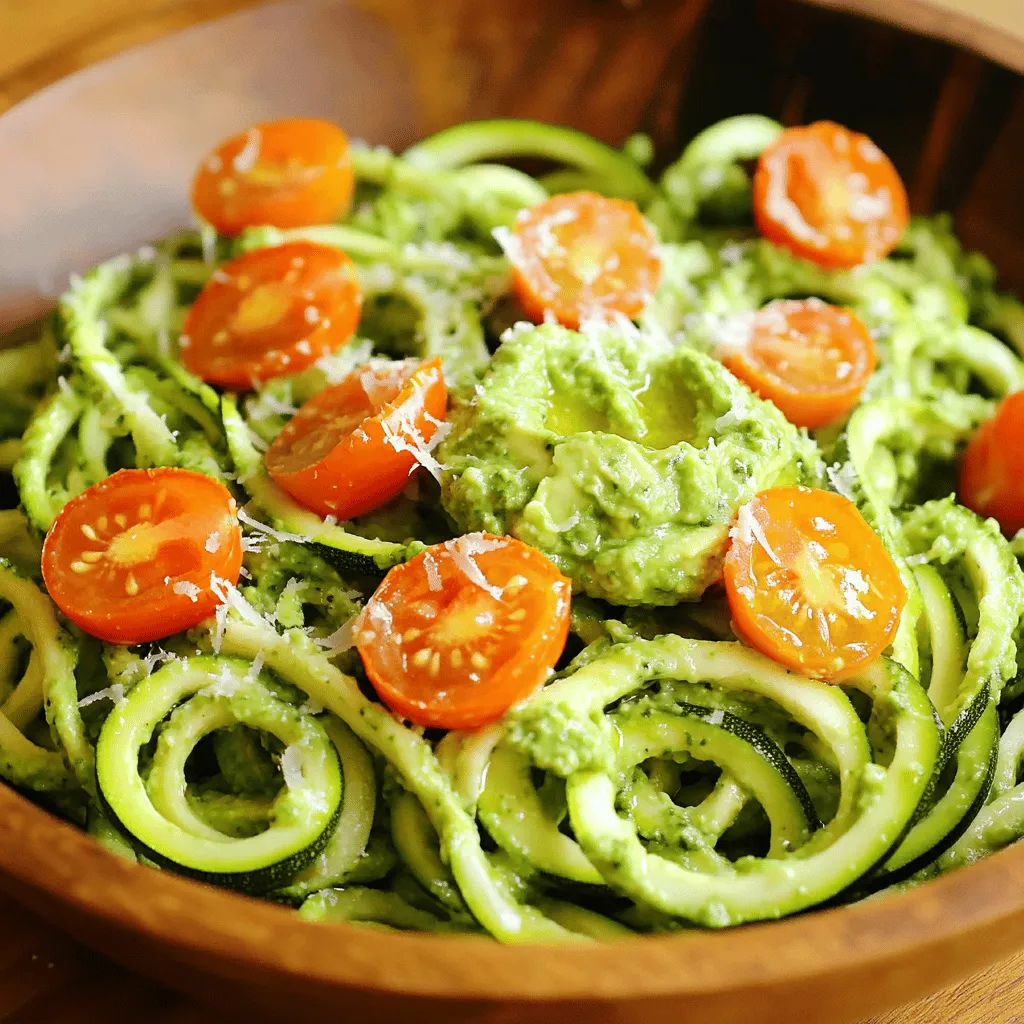
Are you looking for a fresh and healthy meal? Zucchini noodles with pesto are a perfect choice! This dish combines

- 1 large head of cauliflower - 1 cup all-purpose flour (or gluten-free flour) - 1 cup buffalo sauce - Garlic powder - Onion powder - Smoked paprika - Salt and pepper - Celery sticks - Blue cheese or ranch dressing - Fresh parsley or chopped green onions Cauliflower Buffalo Wings are a fun and tasty snack. They are perfect for game day or a movie night. You can make them spicy or mild, depending on your taste. The main ingredient is cauliflower. I love using a large head because it yields many wings. You can cut it into bite-sized florets. This size makes them easy to coat and eat. For the batter, I use all-purpose flour. If you prefer gluten-free, simply swap it out. The flour gives the wings a nice crunch. Adding water creates a smooth batter. It should stick well to the cauliflower. Now, let’s talk about seasoning. Garlic powder, onion powder, and smoked paprika add depth and flavor. Salt and pepper enhance the taste, making each bite savory. When it comes to serving, don’t skip the celery sticks. They add a refreshing crunch. Pair them with blue cheese or ranch dressing for dipping. You can also sprinkle fresh parsley or chopped green onions on top for a pop of color. For the full recipe, check out the detailed instructions. Enjoy making these cauliflower wings! - Preheat to 450°F (230°C) - Line the baking sheet with parchment paper Start by preheating your oven to 450°F (230°C). This high heat helps the wings get crispy. Next, grab a baking sheet and line it with parchment paper. This makes for easy cleanup and prevents sticking. - Combine dry ingredients with water - Whisk until smooth In a large bowl, mix together the all-purpose flour, garlic powder, onion powder, smoked paprika, salt, and black pepper. Gradually add in water while whisking. You want the batter to be smooth and thick enough to coat the cauliflower well. Adjust the water as needed. - Dip cauliflower in batter - Bake for 20 minutes Take your cauliflower florets and dip each one into the batter. Make sure they are fully coated. Let any excess batter drip off. Place the coated florets in a single layer on your baking sheet. Bake for 20 minutes or until they turn golden and crispy. - Mix buffalo sauce with melted butter While the cauliflower is baking, it’s time to make the buffalo sauce. In a bowl, combine the buffalo sauce with melted butter. Stir until it's well mixed and ready for that spicy kick! - Toss baked cauliflower in buffalo sauce - Bake for an additional 10-15 minutes After the first bake, take the cauliflower out of the oven. Carefully toss each piece in the buffalo sauce. Make sure each floret is coated well. Put them back on the baking sheet and bake for another 10-15 minutes. This makes them extra crispy and flavorful. For the full recipe, check out the detailed steps! To make your cauliflower buffalo wings extra crispy, start by baking them at a high temperature. I recommend 450°F (230°C). This helps them get that perfect crunch. Line your baking sheet with parchment paper to avoid sticking and make cleanup easy. If you want milder wings, use less buffalo sauce. You can also mix in some honey or ranch dressing to tone down the heat. For those who love spice, try adding cayenne pepper to your buffalo sauce. You can even use a spicier sauce if you enjoy a kick! If you need a gluten-free option, swap the all-purpose flour for gluten-free flour. You can also try using breadcrumbs for a different texture. This can add a nice crunch and flavor to your wings. Experiment to find what you love most! For the full recipe, check out the Spicy Cauliflower Buffalo Wings. {{image_4}} You can create fun twists on cauliflower buffalo wings. Here are two great ideas: - Honey garlic buffalo: Mix honey with your buffalo sauce for a sweet touch. The honey balances the heat and adds a tasty glaze. - BBQ cauliflower wings: Swap the buffalo sauce for your favorite BBQ sauce. This gives a smoky and tangy flavor. It’s a great option for those who prefer milder tastes. To keep your wings 100% vegan, use these tips: - Components: Use plant-based butter instead of regular butter. Replace any sauces with vegan options. Make sure your buffalo sauce is dairy-free. - Recommended dairy-free dressings: Try a coconut yogurt ranch or a cashew-based dip. These will pair well with the spicy wings and keep everything vegan. Get creative with how you serve your buffalo cauliflower wings: - Buffalo cauliflower tacos: Use small corn tortillas as a base. Add the wings, some slaw, and a drizzle of sauce for a fun meal. - Salad topping ideas: Toss the wings on a bed of greens. Add cherry tomatoes, cucumbers, and your favorite dressing. This makes for a hearty and healthy dish. Try these variations to make your cauliflower buffalo wings exciting and new! You can find the Full Recipe to get started. To keep your cauliflower buffalo wings fresh, store them in the fridge. Use an airtight container to prevent moisture loss. This way, they stay crispy for a longer time. Make sure to let them cool first before sealing the container. You can also place a paper towel inside to absorb extra moisture. Reheating cauliflower wings can be tricky. You want them crispy, not soggy. The best method is to use an oven or an air fryer. Preheat your oven to 400°F (200°C). Spread the wings in a single layer on a baking sheet. Bake for about 10-15 minutes, checking to ensure they crisp up again. If using an air fryer, set it to 375°F (190°C) and cook for 5-7 minutes. Freezing cauliflower wings is a great way to save some for later. To do this, let them cool completely after baking. Place the cooled wings in a single layer on a baking sheet and freeze until solid. Then, transfer them to a freezer-safe bag or container. This helps to prevent freezer burn. When you’re ready to eat, thaw them in the fridge overnight. Reheat using the oven or air fryer as mentioned above. This way, they will taste almost as good as fresh. For the best flavor, try to eat them within three months. For the full recipe, check out the Spicy Cauliflower Buffalo Wings. Yes, you can use frozen cauliflower. Just keep a few things in mind. First, thaw the florets before using them. This helps the batter stick better. Second, make sure to pat them dry. Excess water can make the wings soggy. Frozen cauliflower may not be as crispy as fresh, but it still tastes great. The spice level varies based on the sauce you choose. Traditional buffalo sauce is quite spicy. If you prefer less heat, look for milder sauces. You can also mix sauces to find a balance that suits your taste. Adding honey or butter can also tone down the spice. Many options exist for sauces. Store-bought buffalo sauce is a quick choice. You can also make your own by mixing hot sauce with butter. For a twist, try honey garlic sauce or BBQ sauce. Each offers a unique flavor that pairs well with cauliflower. Yes, you can prep these wings ahead of time. Cook them fully, then store in the fridge. Place them in an airtight container to keep them fresh. When you're ready to eat, just reheat in the oven. This helps keep them crispy and tasty. For more details, check the Full Recipe. This article shared how to make delicious buffalo cauliflower wings. You learned about the main ingredients, seasoning, and handy tips for crispiness. I explained how to prepare and bake the wings, plus how to adjust spice levels. You also discovered fun variations and storage tips for leftovers. Buffalo cauliflower wings are tasty and versatile. They fit into many diets. Try them out and enjoy!

Cauliflower Buffalo Wings Bold and Flavorful Snack

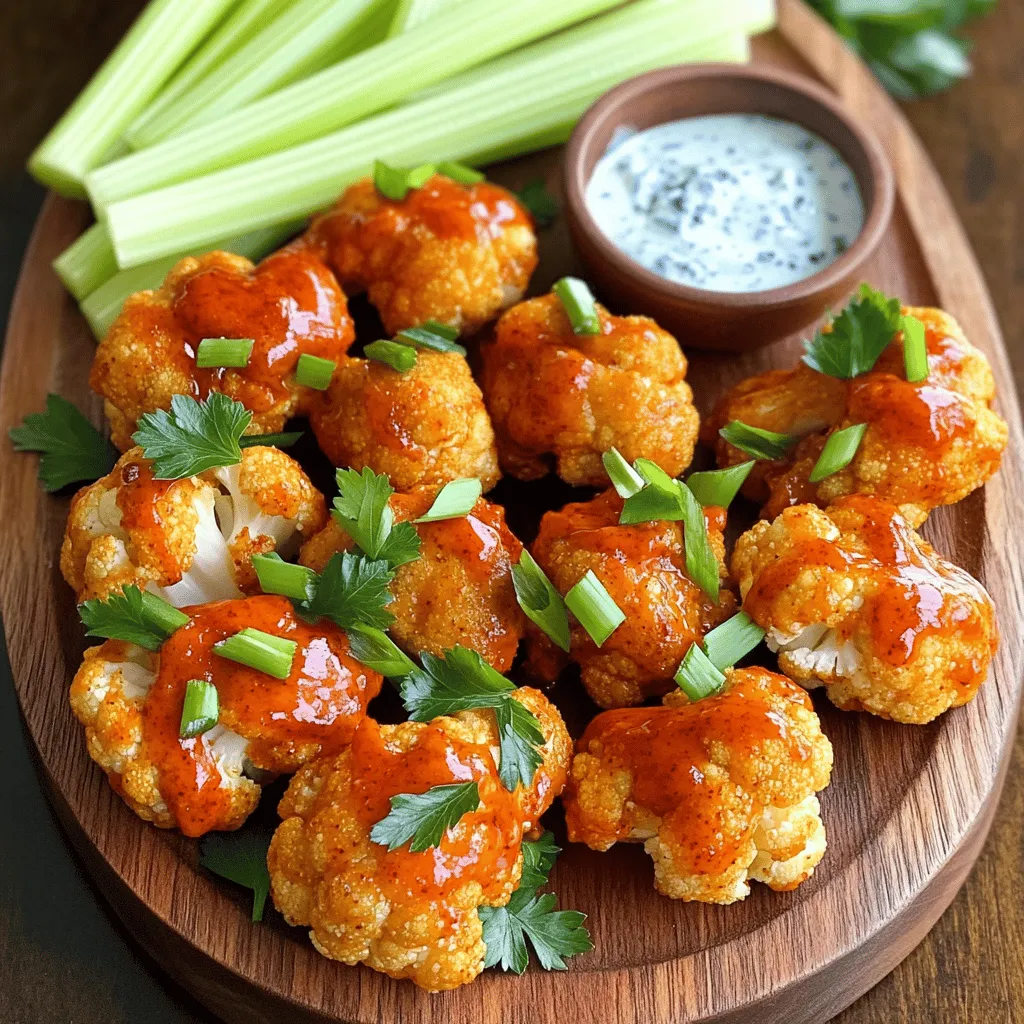
Are you ready for a snack that’s bold, delicious, and packed with flavor? Cauliflower Buffalo Wings bring all the fun

To make the Sheet Pan Lemon Herb Chicken and Veggies, you need quality ingredients. Fresh items enhance flavor and nutrition. Here’s what you’ll need: - 4 bone-in, skin-on chicken thighs - 2 tablespoons extra virgin olive oil - 2 lemons (1 for juicing, 1 for slicing) - 3 cloves garlic, finely minced - 1 teaspoon dried oregano - 1 teaspoon dried thyme - 1 teaspoon smoked paprika - Salt and freshly cracked black pepper to taste - 1 bell pepper (red or yellow), chopped into bite-sized pieces - 1 medium zucchini, sliced into half-moons - 1 cup cherry tomatoes, halved - Fresh parsley leaves for garnish Ingredient Quality and Substitutes: - Chicken Thighs: Bone-in, skin-on thighs bring juiciness. You can use boneless thighs or chicken breasts, but adjust cooking time. - Olive Oil: Extra virgin adds richness. Avocado oil works well too. - Lemons: Fresh lemons are best for juicing. Bottled lemon juice lacks flavor. - Garlic: Fresh garlic gives a stronger taste than powdered. - Herbs: Use fresh herbs if available. Double the amount for a bright flavor. - Vegetables: Feel free to change the bell pepper or zucchini. Carrots or broccoli are great substitutes. Measurement References: - 1 tablespoon = 15 ml - 1 cup = 240 ml Using precise measures helps ensure great results. The balance of flavors is key in this dish, making every bite delightful. For the full recipe, check the details provided earlier. First, set your oven to preheat at 400°F (200°C). This step makes sure your chicken cooks evenly. Next, let’s prepare the chicken. In a bowl, mix olive oil, lemon juice, garlic, oregano, thyme, smoked paprika, salt, and pepper. Whisk it well until combined. Now, place your chicken thighs in a large bowl or a ziplock bag. Pour the marinade over the chicken and coat each piece well. Massage the marinade into the chicken for 1-2 minutes. For the best flavor, let it sit for at least 30 minutes at room temperature. If you have time, marinate it in the fridge for up to 4 hours. This will enhance the taste. Next, let’s chop our veggies. You’ll need a bell pepper, a zucchini, and cherry tomatoes. Cut the bell pepper into bite-sized pieces. Slice the zucchini into half-moons and halve the cherry tomatoes. In a bowl, drizzle a little olive oil over the veggies. Season them with salt and pepper. Toss gently to coat each piece. Choose vegetables that you love. You can use carrots, broccoli, or asparagus, too. Just remember to cut them to a uniform size. This helps them cook evenly, giving you a perfect texture. Now, we’ll arrange the chicken and veggies on a baking sheet. Position the marinated chicken thighs in the center of the sheet. Scatter the seasoned vegetables around the chicken. Top each chicken thigh with lemon slices for extra flavor. Transfer the baking sheet to your preheated oven. Bake for 30-35 minutes until the chicken reaches an internal temperature of 165°F. The veggies should be tender and slightly caramelized. To check for doneness, use a meat thermometer in the thickest part of the chicken. Let the dish rest for 5 minutes after removing it from the oven. This helps the juices settle. Before serving, add fresh parsley on top for color and freshness. Enjoy your vibrant meal! For a detailed breakdown of the recipe, check the Full Recipe. To boost flavor, consider adding fresh herbs like rosemary or basil. They brighten the dish. You can also try spices such as cumin or coriander for a unique twist. Marinate the chicken for at least 30 minutes, but for best results, aim for 4 hours. This time allows the flavors to soak in. You can add optional ingredients like olives or artichokes, enhancing the dish's profile with different textures and tastes. To avoid undercooked chicken, use a meat thermometer. The chicken should reach 165°F for safety. For veggies, make sure they are cut evenly to cook at the same rate. If you have a convection oven, use it. The hot air cooks food evenly and quickly. Also, let the dish rest for 5 minutes after baking. This step allows juices to redistribute, making your meal more flavorful. {{image_4}} You can easily change up the protein in this dish. Try chicken breast for a leaner option. If you want a plant-based meal, tofu works great too. Simply press the tofu to remove extra moisture before marinating. For vegetables, think about what’s in season. In summer, use fresh corn or eggplant. In fall, sweet potatoes or Brussels sprouts add a nice touch. The key is to keep the colors bright and the flavors fresh. You can also play with the marinade. Swap lemon juice for lime juice for a zesty twist. Adding a splash of soy sauce gives it an Asian flair. A bit of honey can add sweetness, while mustard adds a tangy kick. Don't be afraid to get creative! You can grill or air fry this dish for a different taste. For grilling, use a grill pan or an outdoor grill. Cook the chicken and veggies on medium heat. This adds a nice char and smoky flavor. If you choose air frying, reduce the cooking time to about 20-25 minutes. Keep an eye on the food to avoid overcooking. Combining methods is also fun. Start by grilling the chicken for a smoky flavor, then finish it in the oven. This gives a crispy skin and juicy meat. You can serve it with the veggies right from the grill or oven for a beautiful presentation. For the full recipe, check out the details above and enjoy your cooking adventure! After enjoying your sheet pan lemon herb chicken and veggies, you might have leftovers. Store them safely in the fridge. Use an airtight container to keep them fresh. Make sure to cool the dish to room temperature before sealing it. This helps avoid moisture build-up inside the container. You can keep the leftovers in the fridge for up to three days. If you want to enjoy them later, freezing is a great option. If you want to freeze the dish, let it cool completely first. Portion it into smaller servings. This makes reheating easier and faster. Use freezer-safe containers or heavy-duty freezer bags. Be sure to squeeze out any excess air from the bags before sealing. Label each container with the date. Your chicken and veggies can stay fresh in the freezer for up to three months. When it’s time to enjoy your frozen meal, thaw it overnight in the fridge. Reheat it gently in the oven at 350°F (175°C) until hot. You can also use a microwave, but watch closely to avoid overcooking. Enjoy your delicious meal as if it were fresh from the oven! Can I use boneless chicken for this recipe? Yes, you can. Boneless chicken cooks faster. Just check the internal temperature to ensure it reaches 165°F. How can I make this recipe lower in calories? To lower calories, use skinless chicken. You can also reduce the olive oil and add more veggies. What side dishes pair well with this sheet pan meal? I love serving this meal with a fresh salad. Quinoa or brown rice also works great. Can I prepare this dish ahead of time? Yes, you can marinate the chicken a day before. Just store it in the fridge until you're ready to cook. What can I do with leftover vegetables? Leftover veggies are great in stir-fries or soups. You can also toss them into an omelet for a tasty breakfast. How do I adjust the recipe for larger servings? To serve more people, simply double the ingredients. Use a larger baking sheet to fit everything. This blog post covered a simple, tasty recipe using sheet pan cooking. We looked at the ingredients, steps, and storage tips. Cooking doesn’t have to be hard. You can swap ingredients and try new methods, like grilling or air frying. Enjoy your newfound skills in the kitchen! With practice, you can make any dish shine. So grab your ingredients and start cooking today!

Sheet Pan Lemon Herb Chicken and Veggies Delight

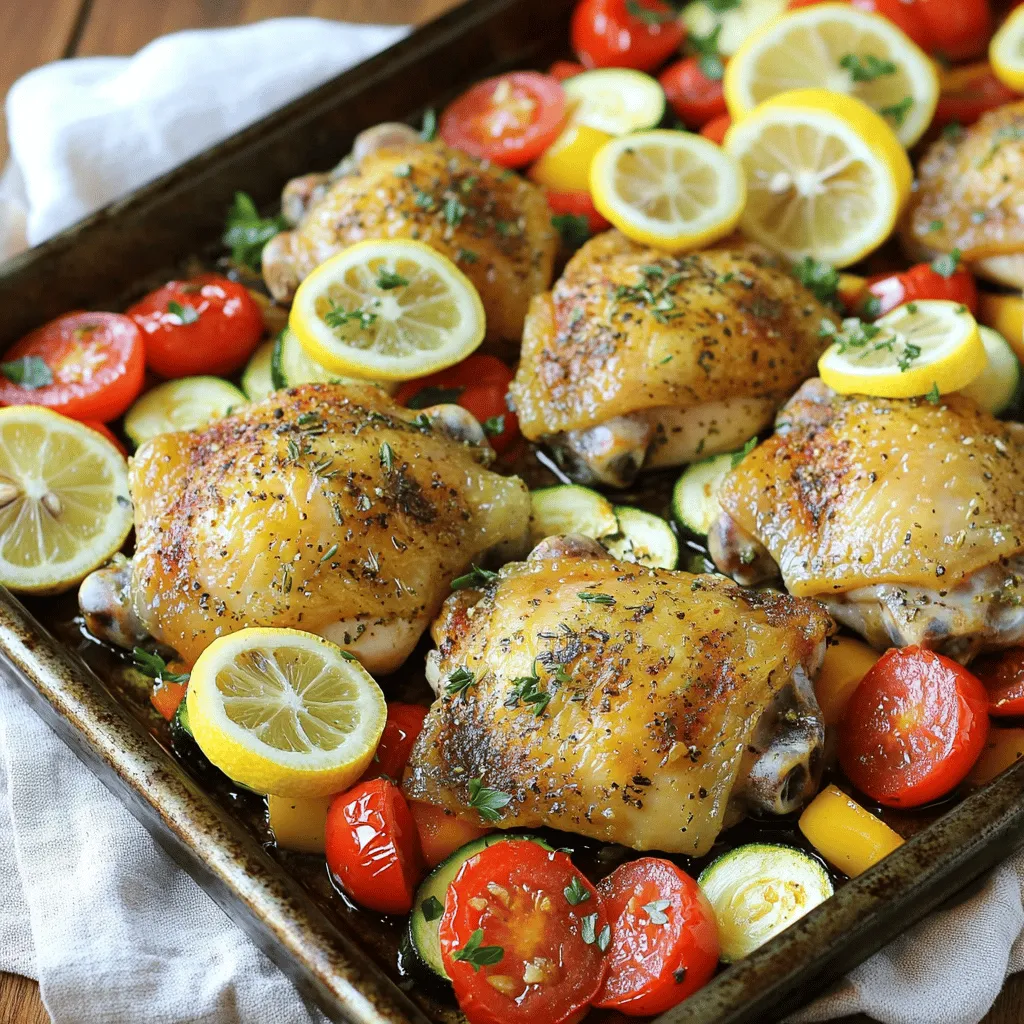
Looking for a simple yet delicious meal? My Sheet Pan Lemon Herb Chicken and Veggies Delight will make your taste

To make a fresh and tasty quinoa tabbouleh, you need a mix of simple ingredients. Here’s what you will need: - 1 cup uncooked quinoa - 2 cups water or vegetable broth - 1 cup fresh parsley, finely chopped - 1/2 cup fresh mint, finely chopped - 1 medium cucumber, diced - 2 medium ripe tomatoes, diced - 1/4 red onion, finely chopped - 1/4 cup freshly squeezed lemon juice (about 2 lemons) - 2 tablespoons extra virgin olive oil - Salt and freshly ground black pepper, to taste Using these fresh ingredients will give your tabbouleh a bright and vibrant flavor. Quinoa is a great base, as it is packed with protein. Fresh herbs like parsley and mint add a refreshing zing. The veggies bring crunch, while the lemon juice and olive oil dress everything beautifully. For the full recipe, make sure to follow the steps closely. Enjoy crafting this healthful dish! First, rinse the quinoa well under cold running water. This helps to wash away any bitterness. Next, combine one cup of rinsed quinoa with two cups of water or vegetable broth in a medium saucepan. Bring this mixture to a rolling boil over high heat. Once boiling, lower the heat to a simmer. Cover the pan and let it cook for about 15 minutes. The quinoa will become fluffy, and all the liquid should be absorbed. After cooking, remove it from heat and let it cool slightly. While the quinoa cools, chop your fresh vegetables. Start with one medium cucumber. Dice it into small pieces. Next, take two ripe tomatoes and cut them into cubes. Finally, finely chop a quarter of a red onion. Place all these chopped veggies into a large mixing bowl. Toss them gently to mix. Now, add the fresh herbs to your vegetable bowl. Finely chop one cup of parsley and half a cup of mint. Stir these herbs in carefully with the vegetables. In a separate small bowl, whisk together a quarter cup of fresh lemon juice, two tablespoons of extra virgin olive oil, salt, and black pepper. This will be your bright dressing. Once the quinoa is cool, fluff it with a fork. Add it to the bowl with the vegetables and herbs. Drizzle the dressing over the mixture. Gently toss everything together until well combined. Taste the tabbouleh and adjust the seasoning if needed. For the full recipe, check out Quinoa Tabbouleh Delight. Enjoy your fresh and flavorful salad! - Avoiding bitterness: Always rinse quinoa well before cooking. This step removes the bitter coating called saponin. Just place the quinoa in a fine mesh strainer and rinse it under cold water for a minute or two. You’ll notice a big difference. - Achieving the right texture: Cook quinoa in a 2:1 ratio of water or broth to quinoa. Bring it to a boil, then reduce to low heat. Cover and simmer for about 15 minutes. When done, fluff it with a fork. This makes it light and airy. - Garnish ideas: I love to add extra chopped herbs on top. You can use mint or parsley for a fresh touch. A few lemon wedges on the side look nice too. - Serving the salad chilled or at room temperature: Both options work well. If you chill it, the flavors meld beautifully. If you prefer it warm, serve it right after mixing. You can adjust based on your mood or the season. - Adjusting seasoning based on taste: Always taste your tabbouleh before serving. You might want more salt or lemon juice. Little tweaks can make a big impact on flavor. - Ingredient substitutions for different palates: If you like a bit of spice, add diced jalapeño or bell pepper. You can also swap out the lemon for lime for a different zing. This salad is super flexible! For a complete guide on making this delicious dish, check out the Full Recipe. {{image_4}} You can easily change up your quinoa tabbouleh. Adding chickpeas or any beans boosts protein. This makes the salad heartier and more filling. You can also toss in feta cheese for creaminess. The salty flavor of feta pairs well with fresh herbs. This addition creates a delightful taste in every bite. If you follow a vegan diet, you can skip the feta and still enjoy a tasty salad. You can replace it with avocado for healthy fats. This keeps the dish creamy without dairy. Quinoa is already gluten-free, so you don't need to worry there. It’s perfect for those who need gluten-free meals. Just be sure to check any added ingredients for gluten. To enhance the flavor, try adding spices. A pinch of cumin or smoked paprika livens up the salad. You can also mix in different dressings. A tahini dressing adds a nutty twist. Or, try a balsamic vinegar for a sweet touch. The options are endless, allowing you to make it your own. Store any leftover quinoa tabbouleh in an airtight container. This keeps it fresh and prevents odors from mixing. Place it in the fridge right after serving. You can safely eat it within 3 to 5 days. If you see any signs of spoilage, like off-smells or mold, throw it away. You might wonder if you can heat quinoa tabbouleh. It’s best enjoyed cold, but you can warm it slightly. If you want to refresh it after storing, add a splash of lemon juice or a drizzle of olive oil. This will perk up the flavors and texture. Can you freeze quinoa tabbouleh? Yes, but it may change the texture. If you freeze it, place it in a freezer-safe container. It can last up to 2 months in the freezer. To thaw, move it to the fridge overnight. Serve it cold or let it sit at room temperature for 30 minutes before eating. Quinoa is a superfood packed with protein, fiber, and vitamins. One cup of cooked quinoa has about 8 grams of protein and 5 grams of fiber. It contains essential amino acids, making it a complete protein. Quinoa is also rich in magnesium, iron, and B vitamins. These nutrients help with muscle function, energy, and overall wellbeing. Eating quinoa can support heart health and aid digestion. It is gluten-free, so it’s a great choice for those with gluten sensitivities. You can easily prepare quinoa tabbouleh in advance. Cook the quinoa and let it cool. Chop your vegetables and herbs. Combine them in a bowl, but keep the dressing separate. Mix the dressing when you are ready to serve. This keeps the salad fresh and crunchy. You can store the salad in the fridge for up to three days. Meal prepping this dish saves time on busy days. Yes, you can use other grains in tabbouleh. Bulgur is a common choice, as it is traditional in many recipes. Farro is another great option; it adds a nutty flavor. Both grains provide similar nutrients. However, they may change the texture of your salad. If you want a gluten-free option, stick with quinoa or try rice. Each grain brings its own flair to the dish. Quinoa tabbouleh can last in your fridge for about three days. Store it in a sealed container to keep it fresh. After that, the vegetables may start to lose their crunch. If you notice any off smells or changes in texture, it’s best to toss it. Always check your food before eating to stay safe. No, traditional tabbouleh is usually made with bulgur wheat. This Middle Eastern salad uses parsley, tomatoes, and lemon juice. In recent years, quinoa has become popular as a base. It offers a gluten-free alternative while keeping the salad healthy. The shift to using quinoa adds unique flavor and texture. You can enjoy both styles depending on your preference. For a full recipe, check out the Quinoa Tabbouleh Delight. Quinoa tabbouleh is a healthy, easy dish packed with flavor and nutrition. We learned how to cook quinoa, prepare fresh veggies, and mix them for a delicious salad. Tips for storage and variations show how to make it your own. Remember, you can enjoy this dish chilled or at room temperature. With simple swaps and additions, you can tailor it to your taste. Now, you have all the tools to make a tasty and healthy quinoa tabbouleh. Enjoy the journey of flavors!

Healthy Quinoa Tabbouleh Fresh and Flavorful Salad

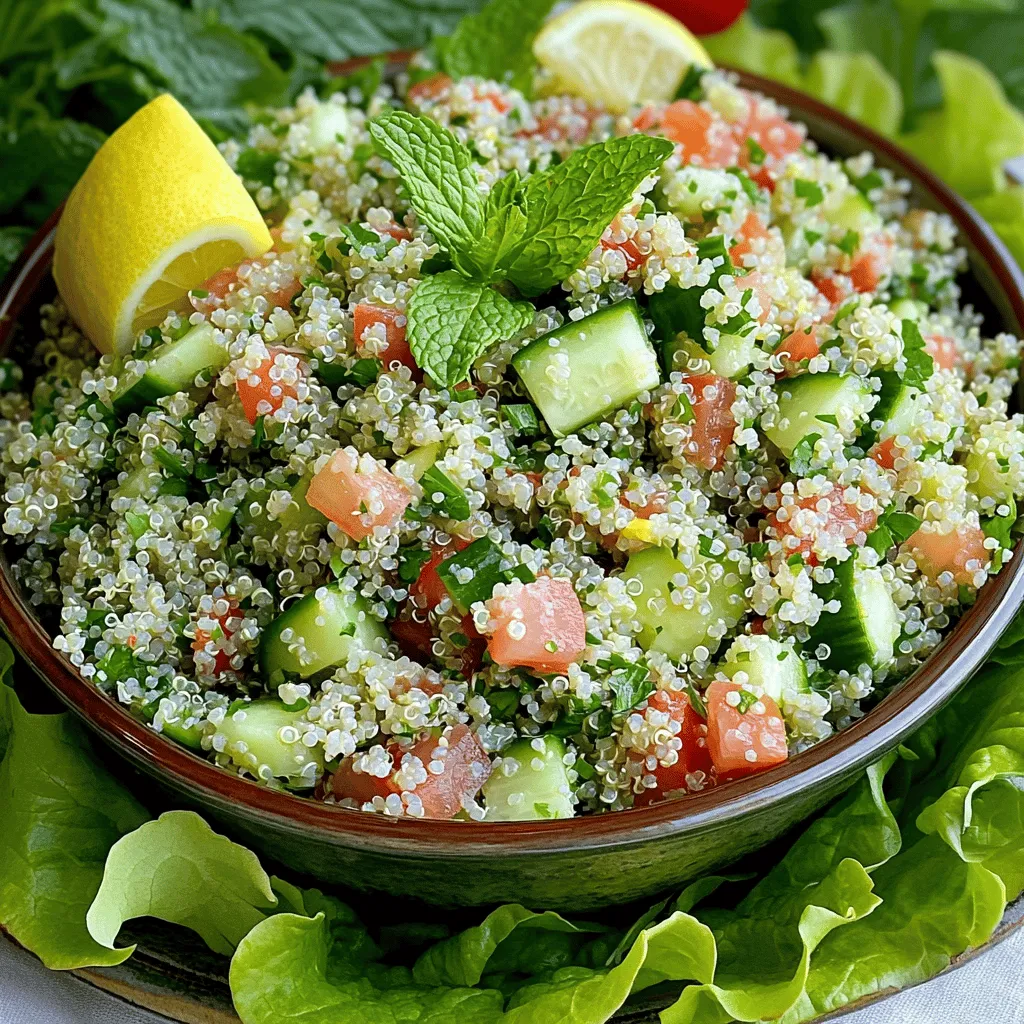
Looking for a fresh, healthy salad that’s packed with flavor? Let me introduce you to my Healthy Quinoa Tabbouleh! This

Older posts
Newer posts
← Previous Page1 … Page63 Page64 Page65 … Page71 Next →

dsad

© 2025 tastyhatch • Built with GeneratePress

Our Policies

  • Copyright Policy
  • Cookie Policy
  • GDPR Policy
  • Privacy Policy
  • Disclaimer
  • Terms Of Use

More Information

  • Home
  • About
  • Contact
  • Appetizers
  • Dessert
  • Dinner
  • Drinks
©2025, tastyhatch About Back To Top