Skip to content
DisclaimerTerms Of UseGDPR PolicyCookie Policy

tastyhatch

  • Home
  • Drinks
  • Appetizers
  • Dinner
  • Dessert
  • About
  • Contact
  • Privacy Policy
DisclaimerTerms Of UseGDPR PolicyCookie Policy

Olivia

For the Garlic Butter Steak and Potato Skillet, you will need these key ingredients: - 1 lb sirloin steak, cut into 1-inch cubes - 3 medium Yukon gold potatoes, diced - 4 tablespoons unsalted butter, divided - 4 cloves garlic, minced - 1 teaspoon dried rosemary - 1 teaspoon dried thyme - Salt and pepper to taste - 1 tablespoon olive oil - Fresh parsley, chopped (for garnish) You can add more flavor to your dish with optional seasonings like: - Paprika for a smoky touch - Red pepper flakes for heat - A splash of Worcestershire sauce for depth - Lemon juice for brightness This dish pairs well with: - A fresh green salad for crunch - Crusty bread to soak up the juices - Steamed veggies for added nutrition - A nice glass of red wine to elevate your meal These ingredients and accompaniments will help create a meal that is not just tasty but also satisfying. For the full recipe, be sure to check the steps to make this delightful dish shine. To start, we need to prep the potatoes. Grab a large skillet and warm 1 tablespoon of olive oil over medium heat. Once it’s hot, add 3 diced Yukon gold potatoes. Season them well with salt and pepper. Sauté the potatoes for about 10-12 minutes. Stir them often. This helps them cook evenly and prevents sticking. You want them soft with a nice golden color. After the potatoes are ready, take them out and set them aside in a bowl. In the same skillet, add 2 tablespoons of unsalted butter. Turn the heat up to medium-high. Now, add your 1 pound of cubed sirloin steak. Season it with salt, pepper, dried rosemary, and thyme. Sear the steak for about 4-5 minutes. Make sure to turn it often. You want it browned and cooked to your taste. Aim for an internal temperature of 135°F for medium-rare. Next, lower the heat back to medium. Add 4 minced garlic cloves to the skillet. Toss in the last 2 tablespoons of butter. Stir everything for about a minute. This lets the garlic get fragrant without burning. The smell will be amazing! Now, it’s time to bring it all together. Return the sautéed potatoes to the skillet. Gently stir to mix everything. This lets the potatoes soak up the tasty garlic butter from the steak. Cook for an extra 2-3 minutes. This ensures everything is heated through and well-combined. Before serving, sprinkle some chopped fresh parsley on top. This adds a burst of color and flavor. Serve the skillet dish hot, right from the pan. It looks rustic and inviting, perfect for sharing. For the full recipe, check back for more details! To cook steak just right, start with a good cut. I love sirloin for its flavor and texture. Cut the steak into 1-inch cubes for even cooking. Season it with salt and pepper before it hits the pan. When you add it to the hot skillet, let it sear. This locks in the juices. Cook for about 4-5 minutes, turning the cubes often. Use a meat thermometer to check the doneness. Aim for 135°F for medium-rare. For fluffy potatoes, choose Yukon gold. They are creamy and cook well. Dice them into even pieces for smooth cooking. Start by sautéing them in olive oil. This gives them a nice golden color. Don't rush the process; let them cook for 10-12 minutes. Stir them gently to avoid sticking. Season with salt and pepper. This simple step adds great flavor. Fluffy potatoes are key to a great dish. Aromatics make your dish pop. Garlic is a must in this recipe. Mince fresh garlic and add it in the last cooking stage. This keeps it fragrant and tasty. Don't let it burn; just cook for about a minute. Fresh herbs like rosemary and thyme add depth. They blend well with butter and steak juices. Add these to the steak to boost flavor. When combined, these elements create a rich taste that elevates your meal. For the full recipe, check out the complete guide. {{image_4}} You can make this dish even better by adding vegetables. Try bell peppers, onions, or green beans. They will add color and taste. Chop them into small pieces. Sauté them with the potatoes for extra flavor. You can also use spinach or kale. Just add them at the end to keep them fresh. If you want to switch things up, try using chicken or shrimp. Chicken thighs work well and stay juicy. Cut them into bite-sized pieces and cook them like the steak. Shrimp cooks fast, so add it last. Just sauté until it turns pink. This way, you can enjoy different flavors with the same great dish. Experimenting with spices can change the whole dish. Try using Cajun seasoning for a kick. Or, mix in some smoked paprika for a rich taste. Italian herbs like basil and oregano can give it a fresh twist. You can even go Asian with soy sauce and sesame oil. Each blend offers a new way to enjoy your garlic butter steak and potato skillet. For the full recipe, check out the main article. After enjoying your Garlic Butter Steak and Potato Skillet, let it cool down. Place the leftovers in an airtight container. This dish stays fresh for about three days in the fridge. If you want to keep it longer, consider freezing it. When you're ready to enjoy your leftovers, you can reheat them easily. Use a skillet over medium heat. Add a splash of water or broth to keep it moist. Stir occasionally until heated through, which should take about 5-7 minutes. You can also use a microwave. Heat in short bursts, stirring in between, until warm. If you want to freeze your Garlic Butter Steak and Potato Skillet, first cool it completely. Use freezer-safe containers or bags. Make sure to remove as much air as possible. Label each container with the date. This meal can last up to three months in the freezer. When ready to eat, thaw it in the fridge overnight before reheating. For the full recipe, check the previous sections. Yes, you can make this dish ahead of time. Cook the steak and potatoes and let them cool. Store them in the fridge in a sealed container. When ready to eat, reheat in a skillet over medium heat. Add a little butter for flavor. This keeps the taste fresh and delicious. You can use various cuts of steak for this recipe. Ribeye, flank, or tenderloin work well too. Just make sure to cut them into small cubes. This ensures even cooking and good flavor. Each cut will give a unique taste and texture. To make this dish healthier, use leaner cuts of steak. You can also add more veggies like bell peppers or spinach. Reducing butter helps cut down on fat. Using olive oil instead of butter when cooking the potatoes is another great option. Yes, you can cook this dish in the oven. Start by roasting the potatoes in a baking dish at 400°F for about 20 minutes. Then, add the seasoned steak and roast for another 15 minutes. This method allows the flavors to blend nicely, but the texture may be different. Be careful not to overcook the steak. It can turn tough if cooked too long. Also, make sure to season your potatoes well. They need flavor to match the steak. Lastly, don’t skip the garlic. It adds a special touch to the dish. For the full recipe, check out Garlic Butter Steak and Potato Skillet. When I think of comfort food, garlic butter steak and potato skillet comes to mind. This dish has tender steak and soft potatoes, all drenched in rich garlic butter. It’s a quick meal that fills your home with a warm, inviting aroma. To start, you need the right ingredients. Here’s what you’ll need for the full recipe: - 1 lb sirloin steak, cut into 1-inch cubes - 3 medium Yukon gold potatoes, diced - 4 tablespoons unsalted butter, divided - 4 cloves garlic, minced - 1 teaspoon dried rosemary - 1 teaspoon dried thyme - Salt and pepper to taste - 1 tablespoon olive oil - Fresh parsley, chopped (for garnish) This is a simple list, but each item plays a key role. The sirloin steak gives you that rich, meaty flavor. Yukon gold potatoes add creaminess and texture. Garlic and butter bring depth and richness to the dish. You can also tweak the recipe. Try adding veggies like green beans or bell peppers for a pop of color. Use different cuts of steak if you prefer. You can even switch seasonings based on what you like best. The great thing about this dish is its flexibility. You can serve it with a simple side salad or some crusty bread. You’ll have a full meal that satisfies everyone at the table. For the full recipe, you can follow the detailed steps to create this delicious skillet meal. Enjoy! This blog post covers how to make a delicious Garlic Butter Steak and Potato Skillet. We looked at ingredients, cooking methods, and tips for perfect results. You learned about variations and how to store leftovers. Remember, good cooking mixes flavor and fun. You can change recipes to fit your taste. Use fresh ingredients and enjoy the process. Happy cooking!

Garlic Butter Steak and Potato Skillet Delight

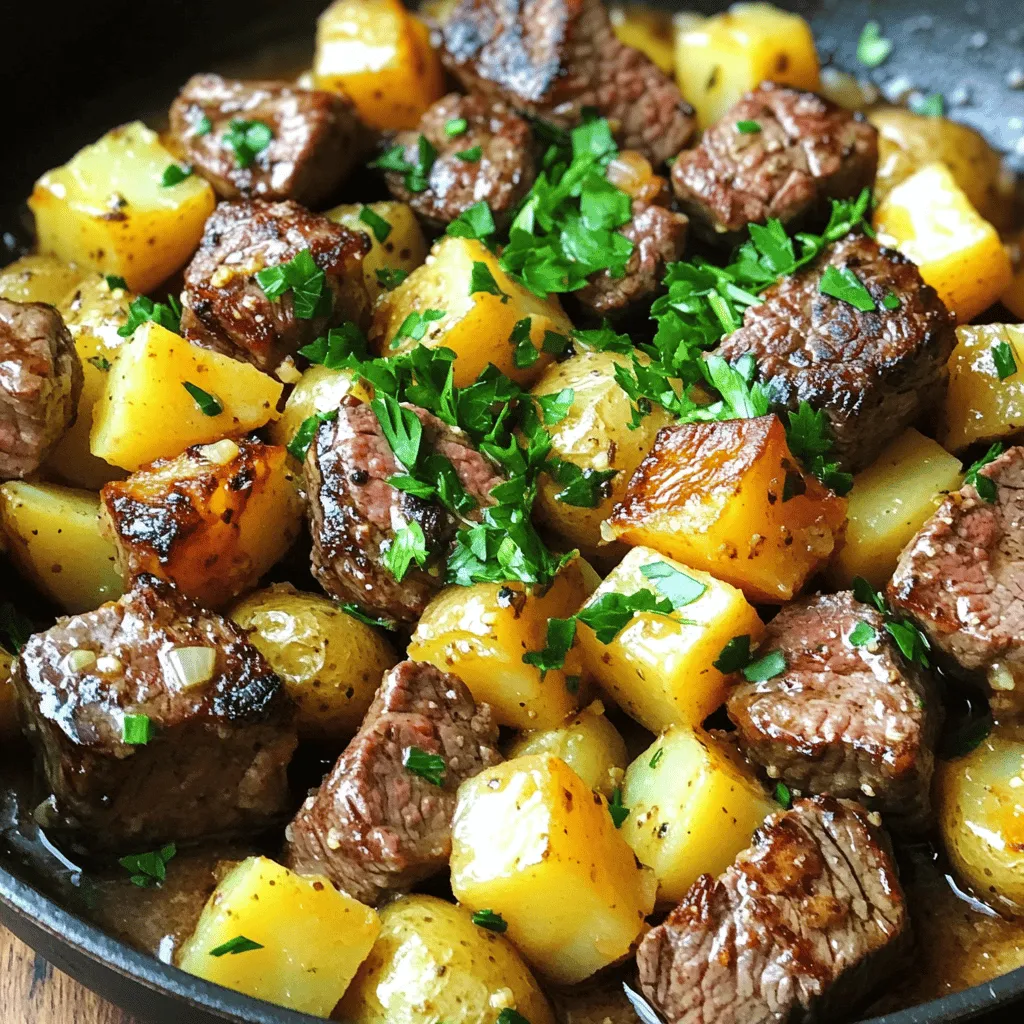
Are you ready for an easy and tasty dinner? The Garlic Butter Steak and Potato Skillet Delight brings you juicy

For the Vegan Creamy Butternut Squash Soup, you will need the following main ingredients: - 1 medium butternut squash, peeled and cut into 1-inch cubes - 1 tablespoon extra virgin olive oil - 1 onion, finely diced - 3 cloves garlic, minced - 1 teaspoon ground cumin - 1 teaspoon ground coriander - 4 cups vegetable broth (low sodium recommended) - 1 cup full-fat coconut milk (for optimal creaminess) - Sea salt and freshly cracked black pepper, to taste Optional garnishes and toppings can enhance your soup: - Fresh thyme leaves, for garnish (optional) - Crusty whole-grain bread, for serving - A light side salad, for a complete meal These ingredients come together to create a rich, creamy, and hearty soup that warms the soul. Using coconut milk adds a smooth texture, while spices bring depth and flavor. Follow the [Full Recipe] for step-by-step instructions to make this delicious dish. To make this vegan creamy butternut squash soup, start with the basics. First, heat one tablespoon of extra virgin olive oil in a large pot over medium heat. Add one finely diced onion and sauté it for about five minutes. You want the onions to turn translucent and smell sweet. Next, stir in three minced garlic cloves, one teaspoon of ground cumin, and one teaspoon of ground coriander. Cook this for one to two minutes. This step helps the spices bloom and adds great flavor. Now, it’s time to add the butternut squash. Use one medium squash, peeled and cut into one-inch cubes. Stir the squash well, coating it with the onion and spices. Let it cook for about five minutes. This helps the squash soften a bit. For blending, you have two choices. An immersion blender works well. It lets you blend right in the pot. If you use a countertop blender, pour the soup in batches. Fill it only halfway to avoid spills. Both methods create a smooth texture. After adding the cubed squash, pour in four cups of vegetable broth. Make sure the broth covers the squash completely. Bring the mixture to a boil. Then, lower the heat and let it simmer for about 20 minutes. Your squash should be fork-tender by then. Once the squash is soft, take the pot off the heat. If you used a countertop blender, return the pureed soup to the pot. Now, add one cup of full-fat coconut milk for that creamy finish. Mix it well until fully combined. Season with sea salt and freshly cracked black pepper to taste. If you want, you can gently heat the soup again before serving. Ladle it into bowls and garnish with fresh thyme leaves for a lovely touch. For the full recipe, check out the details above, and enjoy making this warm and hearty dish! To make your soup creamy, I love using full-fat coconut milk. It adds a rich texture and a hint of sweetness. If you have a nut allergy, try oat milk or soy milk. These options can also create a nice creaminess without using dairy. For a deeper flavor, I suggest adding spices like ground cumin and coriander. They bring warmth and depth to the soup. Fresh herbs like thyme or sage can also add a bright taste. Just sprinkle them in before serving for extra aroma. One common mistake is overcooking the squash. You want it tender but not mushy. Keep an eye on it while it simmers. Also, taste your soup while seasoning. Adding too much salt at once can overpower the flavors. Adjust little by little until it’s just right. {{image_4}} If you can't find butternut squash, don't worry! You can use sweet potatoes or carrots instead. Both options add a lovely sweetness. You can also mix in pumpkin for a different flavor. Each swap brings its own twist, making it fun to experiment. To enhance the creaminess, consider using nut creams like cashew or almond. These options add rich flavors while keeping it dairy-free. You might also try adding a splash of lemon juice for brightness. It balances the sweetness and gives a fresh taste. Serving this soup can be as fun as making it. Try topping it with crispy croutons for crunch. Roasted seeds, like pumpkin or sunflower, add extra texture and nutrition. Pair it with crusty bread for a comforting meal. Each bite brings warmth and satisfaction. After you finish your Vegan Creamy Butternut Squash Soup, let it cool. Pour the leftover soup into an airtight container. This helps keep it fresh. Store it in the fridge. For best taste, eat it within 3 to 5 days. Always reheat it gently on the stove or in the microwave. Stir often to keep it smooth and creamy. Want to save some soup for later? Freezing is a great option! First, cool the soup completely. Then, pour it into freezer-safe bags or containers. Leave some space at the top, as soup expands when frozen. Seal tightly and label with the date. When you’re ready to eat, thaw it overnight in the fridge. Reheat on the stove or microwave, stirring to keep it creamy. When stored properly, your soup lasts well. In the fridge, it stays fresh for about 3 to 5 days. In the freezer, it can last up to 3 months. After that, the flavor may fade. I recommend marking the date on your container. This way, you know when to enjoy every delicious drop! Yes, you can make this soup ahead of time. To prepare, follow all the steps in the recipe. Allow the soup to cool completely before storing. Use an airtight container for best results. You can keep it in the fridge for up to three days. If you want to store it longer, freeze it. Just make sure to leave some space in the container for expansion. When you're ready to eat, thaw it in the fridge overnight. Reheat on the stove over low heat, stirring often. Absolutely! If you want to skip coconut milk, you can use other options. Try using cashew cream for a creamy texture. Blend soaked cashews with water until smooth. Almond milk or soy milk can also work. Just be sure to pick unsweetened versions. This will keep the flavor balanced. You can also add a bit of silken tofu for creaminess. You can make this soup even healthier by adding some extras. Spinach or kale is a great choice. Just toss it in at the end and let it wilt. You can also add cooked lentils or chickpeas for protein. They blend well and add texture. If you want more fiber, consider adding diced carrots or sweet potatoes. These will enhance the flavor and nutrients. If you like heat, there are easy ways to spice it up. You can add a pinch of cayenne pepper or red pepper flakes. Mix them in when you add the garlic and spices. For more flavor, try adding chopped jalapeños. If you want a smoky taste, use smoked paprika. Just remember to start with a little and taste as you go. This way, you can control the heat level. This blog covers the key steps to make Vegan Creamy Butternut Squash Soup. You learned about ingredients, cooking steps, and tips for a creamy texture. I shared common mistakes to avoid and variations to try. Remember to store leftovers properly and consider flavor boosts. You can create a delicious meal that meets your taste and diet needs. Enjoy your cooking journey and feel free to experiment with this soup!

Vegan Creamy Butternut Squash Soup Hearty and Simple

Looking for a warm and cozy dish that fits your plant-based diet? My Vegan Creamy Butternut Squash Soup is both

- 1 pound boneless, skinless chicken breast - 1 tablespoon olive oil - 1 small onion - 2 cloves garlic - 1 bell pepper - 1 can diced tomatoes with green chilies - 1 can enchilada sauce - 1 cup corn - 1 cup black beans - 2 cups shredded cheddar cheese - 1 teaspoon ground cumin - 1 teaspoon chili powder - Salt and black pepper - Fresh cilantro - Sour cream (optional) To make my Easy Cheesy Chicken Enchilada Skillet, you need some simple yet tasty ingredients. First, get your chicken. I like using boneless, skinless chicken breast. It cooks fast and stays juicy. Next, grab some fresh vegetables. You’ll want a small onion and two cloves of garlic for flavor. A bell pepper also adds a nice crunch and color. Choose any color you like! You can’t forget the canned goods. A can of diced tomatoes with green chilies gives a zesty kick. You’ll also need enchilada sauce to tie everything together. For extra texture, add corn and black beans. They bring great flavor and make the dish more filling. Finally, you’ll need cheese. I use two cups of shredded cheddar. It melts beautifully and adds a rich creaminess. Don’t forget to season your dish! Ground cumin and chili powder give warmth. Salt and black pepper enhance everything. For a fresh touch, top with chopped cilantro. If you like a creamy finish, add a dollop of sour cream. This Easy Cheesy Chicken Enchilada Skillet is not just quick to make but also a crowd-pleaser. Check the Full Recipe for more details! - Heat olive oil in a skillet. - Add and cook chicken until golden brown. Start by heating a tablespoon of olive oil in a large skillet over medium heat. I love using a non-stick skillet for this recipe, as it makes clean-up easier. Once the oil is hot, add one pound of diced chicken breast. Season the chicken with salt and pepper. Cook for about 5 to 7 minutes, stirring occasionally. You want the chicken to be golden brown and fully cooked. Once done, transfer the chicken to a separate plate and set it aside. - Add chopped onion, garlic, and bell pepper. - Sauté until translucent and fragrant. In the same skillet, do not clean it out. This is where all the flavor lives! Add one small finely chopped onion, two minced garlic cloves, and one diced bell pepper. I often choose a red or yellow bell pepper for a pop of color. Sauté these for about 3 to 4 minutes. The onion should turn translucent, and the bell pepper will soften. The smell will make your mouth water! - Stir in diced tomatoes, enchilada sauce, corn, black beans, cumin, and chili powder. - Let the mixture simmer. Next, stir in one can of undrained diced tomatoes with green chilies, one can of enchilada sauce, one cup of corn, and one cup of rinsed black beans. To spice things up, add one teaspoon of ground cumin and one teaspoon of chili powder. Mix everything well and let the mixture simmer. This helps the flavors blend beautifully together. - Return chicken to the skillet and mix. - Top with cheese, cover, and cook until melted. Now, return your cooked chicken to the skillet and mix everything together. Let it simmer for an additional 5 minutes. This step is key, as it allows the chicken to soak up all the rich flavors. Finally, sprinkle two cups of shredded cheddar cheese over the top. Cover the skillet with a lid and cook for 2 to 3 minutes. This melts the cheese perfectly, making it ooey and gooey. Enjoy your delicious creation! For the complete recipe, check out the Full Recipe. To save time, I always use pre-diced chicken. It cuts down on prep work. Also, I recommend pre-measuring and prepping your ingredients. This way, everything is ready to go when you start cooking. Want more heat? Add extra spices like cayenne or paprika. They pack a punch! For something special, try using smoked cheese. It gives a unique twist that elevates the dish. Serve the enchiladas right in the skillet. This gives a rustic look that impresses guests. To make it pop, use bright garnishes like fresh cilantro or lime wedges. An eye-catching dish tastes even better! You can find the Full Recipe linked above for all the details. {{image_4}} You can change the protein in this dish. If you want a different flavor, substitute chicken with ground turkey or beef. Both options are tasty and add a nice twist. For a vegetarian choice, use tofu instead of chicken. It soaks up the sauce and adds protein. Adjust the flavor to your liking! Experiment with different types of cheese. Cheddar is great, but Monterey Jack or pepper jack adds a nice kick. If you like spice, add jalapeños for some heat. You can also mix in more vegetables like zucchini or spinach for extra nutrients. This dish pairs well with rice or warm tortillas. You can scoop the enchilada skillet into tortillas for a fun meal. For a complete meal, serve it with a fresh side salad. A simple green salad with lime dressing works perfectly! To store leftovers, let the skillet cool first. Then, transfer the chicken enchilada to an airtight container. This keeps it fresh for 3 to 4 days. You can use glass or plastic containers. Make sure they are safe for the fridge. For reheating, the best method is using the stove. Heat it over low to medium heat. Stir often to warm it evenly. You can also use the microwave. Place it in a microwave-safe dish. Use a cover to keep moisture in. This helps maintain texture and flavor. To freeze, let the dish cool completely. Then, transfer it to a freezer-safe container. Label the container with the date. It will last for up to 3 months. When you’re ready to eat, thaw it overnight in the fridge. Reheat it on the stove or in the microwave for best results. Yes, you can prepare this dish ahead. Cook the chicken and veggies, then store them in the fridge. You can mix in the sauce and cheese just before serving. This keeps everything fresh. You can use salsa or taco sauce as a substitute. Another option is to mix tomato sauce with spices like cumin and chili powder. Homemade enchilada sauce is also easy to make if you have the time. To add more heat, include diced jalapeños or a dash of hot sauce. You can also use spicy enchilada sauce or add crushed red pepper flakes. Adjust the spice level to fit your taste. Yes, you can use frozen chicken. Cook it in the skillet until fully done. Just make sure to thaw it first for even cooking. Keep in mind that it may take a bit longer to cook through. This dish pairs well with rice or warm tortillas. A fresh salad or guacamole also complements the flavors nicely. For a crunch, serve with tortilla chips on the side. This blog post covered a tasty chicken dish. We discussed the main ingredients, cooking steps, and tips. You can also try variations for flavor and protein. Remember to store leftovers properly for later meals. Experimenting with spices can make your dish even better. I hope you feel ready to make this delicious recipe at home and enjoy it with friends or family. Happy cooking, and don't forget to share your experience!

Easy Cheesy Chicken Enchilada Skillet Recipe Delight

Craving a quick and tasty meal? You’ll love this Easy Cheesy Chicken Enchilada Skillet! This one-pan dish combines juicy chicken,

This crispy chickpea Caesar salad is tasty and healthy. It combines crunchy chickpeas with fresh greens. You get protein, fiber, and flavor all in one bowl. Plus, it’s easy to make! - 1 can (15 oz) chickpeas, drained and rinsed - 2 tablespoons extra virgin olive oil - 1 teaspoon garlic powder - 1 teaspoon smoked paprika - Salt and freshly ground black pepper to taste - 4 cups romaine lettuce, chopped into bite-sized pieces - 1/4 cup freshly grated Parmesan cheese (or nutritional yeast for a vegan alternative) - 1/4 cup creamy Caesar dressing, homemade or store-bought - 1/2 cup croutons, preferably homemade for extra crunch - Fresh lemon wedges, for an invigorating squeeze when serving You might want to add some extras. Some ideas include: - Cherry tomatoes for a pop of color - Avocado for creaminess - Grilled chicken for more protein - Capers for a briny kick These optional ingredients can make your salad even more delightful! Start by preheating your oven to 400°F (200°C). This step is key for crispiness. In a medium bowl, mix the drained chickpeas with olive oil, garlic powder, smoked paprika, salt, and pepper. Stir well to coat each chickpea. Spread them on a baking sheet in a single layer. Roast for 25-30 minutes, shaking the sheet halfway through. The goal is golden brown and crispy chickpeas. While the chickpeas roast, wash and chop the romaine lettuce. Place it in a large salad bowl. Once the chickpeas are done, drizzle Caesar dressing over the lettuce. Toss gently to coat every leaf. Then, add the crispy chickpeas on top. Sprinkle freshly grated Parmesan cheese or nutritional yeast. Finish with homemade croutons for that perfect crunch. Squeeze fresh lemon juice over the salad for a burst of flavor. This adds brightness and zest. Serve your salad right away to enjoy that warm, crispy goodness. This dish combines textures and flavors in a delightful way. You can find the full recipe for a complete guide. To get the best crispy chickpeas, start with dry chickpeas. If you use canned ones, make sure to rinse and drain them well. Pat them dry with a clean towel. This helps remove extra moisture. If you want extra crunch, toss the chickpeas with a bit more oil and seasonings. Roast them at 400°F for 25-30 minutes. Shake the pan halfway for even cooking. Keep an eye on them; you want golden brown, not burnt! A creamy Caesar dressing makes this salad shine. You can use store-bought or homemade. If you want a lighter option, try yogurt-based dressings. For a vegan choice, use tahini or cashew cream. Add a squeeze of lemon juice to brighten the flavor. If you love garlic, mix in minced garlic for a punch. Always taste the dressing before adding it to the salad. Adjust the seasoning to your liking! Serve the salad in a big bowl for sharing. This lets everyone help themselves. For a fun twist, layer the ingredients in a mason jar for a portable meal. Top with extra croutons and cheese. Add lemon wedges on the side for an extra zing. This salad is best enjoyed fresh, so serve it right away. For a complete meal, pair it with grilled chicken or shrimp. You can find the full recipe for more details! {{image_4}} To make a vegan version of this salad, swap the Parmesan cheese for nutritional yeast. Nutritional yeast gives a cheesy flavor without any dairy. You can also choose a vegan Caesar dressing. Many stores sell tasty vegan options. You can also make your own with blended cashews, lemon juice, and garlic. This way, your salad stays creamy while being completely plant-based. If you want to add more protein, consider including grilled chicken or shrimp. They both pair well with the Caesar flavors. For a vegetarian option, add quinoa or edamame. These options boost the salad's protein content. Plus, they add a nice texture. Chickpeas already provide protein, but these additions make it even heartier. To keep the salad fresh and exciting, use seasonal ingredients. In the spring, try adding fresh asparagus or peas. In the fall, roasted butternut squash can bring warmth to the dish. You can also swap romaine for kale in winter. Kale adds a robust texture and pairs well with the dressing. These swaps keep the salad vibrant and fun all year round. For the complete recipe, check the [Full Recipe]. To store leftovers, place the salad in an airtight container. Keep the crispy chickpeas separate. This helps them stay crunchy. You can store the salad in the fridge for up to three days. The dressing may wilt the lettuce, so eat it soon. You can reheat the chickpeas if you want. Spread them on a baking sheet. Warm them in a preheated oven at 350°F (175°C) for about 10 minutes. This helps restore their crispiness. Avoid reheating the salad itself, as it will get soggy. You can make parts of this salad ahead of time. Roast the chickpeas a day in advance. Store them in an airtight container at room temperature. You can also wash and chop the romaine lettuce ahead of time. Just keep it in the fridge. Mix everything together just before serving. For the full recipe, check out the Crispy Chickpea Caesar Salad details. Yes, you can use canned chickpeas. They save time and still taste great. Just drain and rinse them well. This helps remove extra salt and improves the flavor. Canned chickpeas are soft, so roasting them makes them crispy. Follow the full recipe for the best results. To make Caesar dressing, blend these simple ingredients: - 1/2 cup mayonnaise - 2 tablespoons lemon juice - 1 teaspoon Dijon mustard - 1 teaspoon Worcestershire sauce - 1 garlic clove, minced - Salt and pepper to taste Mix well until smooth. Adjust the taste to your liking. This dressing pairs perfectly with the crispy chickpeas and fresh lettuce. If you want a dairy-free option, try using nutritional yeast. It gives a cheesy flavor without the dairy. Grated cashews also work well as a substitute. You can even use vegan Parmesan cheese if you prefer. Each option adds a unique twist to your salad. In this blog post, we explored a simple salad recipe with chickpeas. We highlighted key ingredients, tips for prep, and tasty variations to try. Remember, you can make this dish your own with seasonal ingredients or extra protein. Proper storage can keep your salad fresh for days, making it a great meal prep option. Use canned chickpeas for speed or create a homemade dressing. This dish is easy and fun to customize. Enjoy your chickpea salad adventure!

Crispy Chickpea Caesar Salad Tasty and Healthy Dish

Looking for a tasty, healthy meal? Dive into my Crispy Chickpea Caesar Salad! This dish packs flavor and crunch while

- 2 cups all-purpose flour - 1 teaspoon baking soda - 1 teaspoon baking powder - 1 teaspoon ground cinnamon - ½ teaspoon ground nutmeg - ¼ teaspoon ground cloves - ½ teaspoon salt - 1 cup granulated sugar - ½ cup light brown sugar, packed - ½ cup vegetable oil - 1 cup canned pumpkin puree - 2 large eggs - 1 teaspoon vanilla extract - 8 oz cream cheese, softened - 2 tablespoons powdered sugar - 1 teaspoon vanilla extract (for the cream cheese filling) I love using simple ingredients that pack a lot of flavor. For these muffins, I focus on fresh spices. Ground cinnamon, nutmeg, and cloves give a cozy taste. The pumpkin puree adds moisture and a rich color. You can find most of these staples in your kitchen. The cream cheese filling creates a sweet surprise inside each muffin. When you gather your ingredients, ensure your cream cheese is soft. This helps it blend smoothly with the sugar. The light brown sugar adds a hint of caramel flavor. The mix of granulated and brown sugar gives the muffins the right sweetness. I recommend using canned pumpkin puree for ease. It’s smooth and ready to use. If you want a twist, try making your own from fresh pumpkins. Just remember to cook and puree it well. Using these ingredients, you can create a delightful treat. The muffins are perfect for breakfast or a snack. They also make great gifts for friends and family. Follow the Full Recipe to create these tasty delights! - Preheat oven to 350°F (175°C) - Prepare muffin tin with liners or grease - Mix dry ingredients in a medium bowl First, preheat your oven to 350°F (175°C). This helps the muffins rise nicely. Next, grab your muffin tin. You can either use paper liners or grease the tin with cooking spray. This keeps the muffins from sticking. Now, in a medium bowl, combine the dry ingredients. Mix together the flour, baking soda, baking powder, cinnamon, nutmeg, cloves, and salt. Whisk it all until it's well combined. Set this dry mix aside for later. - Blend sugars and oil in a large bowl - Add pumpkin puree, eggs, and vanilla to the mixture - Gradually incorporate the dry mix into the wet ingredients In a large bowl, blend the granulated sugar, brown sugar, and vegetable oil. Use a whisk to mix it well. Once it looks smooth, add in the pumpkin puree, eggs, and vanilla extract. Mix everything until it’s creamy. Now, take the dry mix you set aside. Gradually add it to the wet ingredients. Stir gently until just combined. It’s okay if there are a few lumps. - Beat cream cheese with powdered sugar and vanilla until creamy - Assemble muffins with pumpkin batter and cream cheese filling Next, we make the cream cheese filling. In a separate bowl, beat the softened cream cheese with powdered sugar and vanilla extract. Keep mixing until it’s nice and creamy. Now it’s time to assemble the muffins. Fill each muffin cup halfway with pumpkin batter. Then, drop a spoonful of cream cheese into the center. Top it off with more pumpkin batter until the cup is about ¾ full. - Fill muffin cups and bake for 18-22 minutes - Cool muffins in the pan briefly before transferring them Now, it’s time to bake! Place the muffin tin in the oven and bake for 18-22 minutes. To check if they are done, insert a toothpick into the pumpkin part. If it comes out clean, your muffins are ready. Allow them to cool in the pan for a few minutes. Then, carefully transfer them to a wire rack to cool completely. For the best taste, enjoy your muffins warm! - Avoid over-mixing the batter. When you mix the batter, stop as soon as it comes together. A few lumps are okay. Over-mixing can make the muffins tough. You want them soft and tender. - Check doneness with a toothpick. Insert a toothpick into the center of a muffin. If it comes out clean, your muffins are ready. This quick check helps avoid undercooked or dry muffins. - Dust with powdered sugar for serving. Once the muffins cool, sprinkle a little powdered sugar on top. This adds a lovely touch and makes them look fancy. It’s simple yet effective! - Use cinnamon sticks for garnish. Place a cinnamon stick beside each muffin on the platter. It gives a warm, inviting feel. Plus, it hints at the cozy flavors inside. You might even find it fun to stir your coffee with them! For the full recipe, you can refer to the earlier section. Follow these tips, and your Pumpkin Cream Cheese Stuffed Muffins will turn out perfectly delicious! {{image_4}} You can easily change the flavor of your muffins. - Incorporate chocolate chips: Adding chocolate chips gives a rich taste. I love using dark chocolate chips for a nice contrast with pumpkin. It adds a sweet touch that many enjoy. Just fold in about a cup of chips into the batter before you fill the muffin cups. - Add nuts like walnuts or pecans: Chopped nuts add a nice crunch. They also bring a warm flavor. I recommend using about half a cup. Just mix them into the batter with the chocolate chips or on their own. You can adapt this recipe to fit your needs. - Substitute gluten-free flour: If you need a gluten-free option, use a gluten-free flour blend. This swap keeps the muffins tasty while meeting dietary needs. Just measure it in the same way as regular flour. - Use low-fat cream cheese for a lighter option: For a lighter treat, swap regular cream cheese with low-fat cream cheese. This change keeps the creaminess while cutting calories. Don't worry; the flavor will still be delicious! For the complete recipe, refer to the [Full Recipe]. Store your pumpkin cream cheese stuffed muffins at room temperature for up to three days. Keep them in an airtight container to maintain their softness. If you want to keep them fresh longer, refrigerate them. This will help prevent them from drying out. Freezing muffins is easy and keeps them tasty. First, let the muffins cool completely. Wrap each muffin in plastic wrap. Then place them in a freezer bag. Make sure to squeeze out the air to avoid freezer burn. For best results, use the muffins within three months. To thaw, simply take a muffin out of the freezer. Leave it at room temperature for a few hours. You can also microwave it for a few seconds if you're in a hurry. This way, you can enjoy your delicious pumpkin cream cheese stuffed muffins anytime! For the full recipe, check out the full recipe section. Yes, you can use fresh pumpkin. Start with a small pumpkin. Cut it, remove the seeds, and cook it until soft. You can roast or steam it. Once soft, mash it or blend it until smooth. Measure out one cup of this fresh pumpkin puree. This method gives a fresh taste. To check for doneness, use a toothpick. Insert it into the center of a muffin. If it comes out clean, the muffins are ready. If it has wet batter on it, bake a few more minutes. The tops should be golden brown and spring back when touched. Yes! You can use dairy-free cream cheese. Brands like Tofutti or Kite Hill work well. Also, replace the butter with coconut oil or a similar product. You can still enjoy these muffins without dairy. These pumpkin muffins are easy to make and very tasty. We covered the ingredients, step-by-step instructions, and helpful tips to ensure success. You can personalize them with your favorite add-ins or adapt them for dietary needs. When stored properly, these muffins stay fresh and delicious for days. Enjoy your baking adventure and treat your family to a warm, spiced delight. You will be proud of your homemade muffins!

Pumpkin Cream Cheese Stuffed Muffins Perfectly Delicious

Are you ready to dive into fall with a tasty twist? These Pumpkin Cream Cheese Stuffed Muffins are not just

- 2 cups cooked chicken, shredded - 1 cup BBQ sauce - 1 bag (10 oz) tortilla chips - 2 cups shredded cheddar cheese - 1 cup black beans, rinsed and drained - 1 cup cherry tomatoes, halved - 1/2 cup jalapeños, sliced - 1/4 cup red onion, finely chopped - 1/4 cup fresh cilantro, chopped - Optional: Sour cream and guacamole When I make my Sheet Pan BBQ Chicken Nachos, I love using fresh ingredients. You want to ensure your chicken is well-cooked and shredded evenly. It helps create a better texture once topped on the nachos. BBQ sauce comes next, and I suggest using your favorite. Some like it smoky, while others prefer tangy. Tortilla chips are key. I prefer thick-cut chips for a good crunch. They hold all the toppings without getting soggy. The cheese? Go for a good-quality cheddar. You can even mix in other cheeses for fun flavors. Black beans add protein and fiber. Rinsing and draining them makes sure they stay fresh. Cherry tomatoes add sweetness and color. I like to use a mix of red and yellow ones for a pop. Jalapeños can be spicy or mild, depending on your taste. Red onions give a nice bite, but soaking them in water can tone it down. Cilantro adds a bright finish. For serving, I suggest sour cream and guacamole. They balance the flavors and add creaminess to each bite. This full recipe is a fantastic guide for creating your delicious nachos. - If you want a different BBQ sauce, try honey mustard or spicy ketchup. - Instead of cheddar cheese, use Monterey Jack or pepper jack for a kick. - For extra toppings, consider avocado, olives, or even pineapple for sweetness. 1. Preheating the oven: Start by preheating your oven to 400°F (200°C). This helps the nachos cook evenly and get crispy. 2. Mixing chicken with BBQ sauce: In a medium bowl, take your cooked shredded chicken. Pour in your favorite BBQ sauce. Use a fork to mix them well. Make sure every piece of chicken gets covered in sauce. This will add great flavor. 1. Arranging tortilla chips: Grab a large, rimmed baking sheet. Spread the tortilla chips out in a single layer. This helps each chip hold toppings without getting soggy. 2. Adding toppings in the right order: First, sprinkle the BBQ chicken over the chips. Next, add the black beans, cherry tomatoes, jalapeños, and red onion. Make sure to spread these evenly. This way, every chip has a taste of each topping. 1. Baking time and temperature: Carefully slide the baking sheet into the preheated oven. Bake for 10-15 minutes. Keep an eye on them. Once the cheese is melted and bubbly, they are ready. 2. Final garnishing before serving: When you take the nachos out, sprinkle fresh cilantro on top. This adds color and a burst of flavor. Serve them hot with small bowls of sour cream and guacamole on the side. A squeeze of lime juice makes them even better. For the full recipe, check out the details above. Layering nachos is key to great taste. Start by spreading the tortilla chips in a single layer. This helps each chip stay crisp. Next, avoid the sogginess by adding wet toppings like beans and chicken on top of the cheese. This keeps the chips dry. For cheese melting, use a mix of cheddar and Monterey Jack. These melt well and create that gooey texture we love. Spread cheese evenly over the toppings. Bake until bubbly and golden, about 10-15 minutes. Keep an eye on it so the cheese doesn’t burn. Making nachos fun is easy! Use seasonal toppings based on the time of year. For fall, add roasted pumpkin or butternut squash. In summer, fresh corn or avocado works great. You can also choose a theme. For a taco night, try salsa and sour cream on top. Want more flavor? Add spices like cumin or smoked paprika to the chicken. Fresh herbs like basil or oregano can also make a big difference. Experiment with different flavors to find your favorite mix! Presentation matters when serving nachos. You can leave them on the baking sheet for a casual look. Just sprinkle fresh cilantro on top for color. Serve with lime wedges for a zesty touch. Pair your nachos with sides like a simple salad or slaw for crunch. A fresh drink, like lemonade or iced tea, complements the flavors well. Enjoy your nachos with friends and family for a fun meal. For the full recipe, check out the details above! {{image_4}} You can switch up the protein in your nachos. Pulled pork or shredded beef can add a rich flavor. Both pair well with BBQ sauce, giving a different taste. For vegetarian options, try using black beans or lentils. These options keep the dish hearty while being meat-free. You can also use tofu for a protein boost that soaks up flavor well. BBQ sauces come in many styles. A spicy sauce adds a kick, while a smoky sauce gives a warm depth. You can also mix in non-traditional ingredients. Try adding some mango salsa for sweetness or a dash of sriracha for heat. These can elevate the flavor and keep things exciting. Toppings make your nachos unique. You can mix sweet and savory toppings for balance. Consider adding pineapple, corn, or even avocado for creaminess. For crunch, use crispy fried onions or nuts. Combining textures makes each bite more enjoyable. Don't forget to add fresh herbs like cilantro for a fresh taste. For a full recipe, check the details shared above. To store leftover nachos, first, let them cool. Place them in an airtight container. This helps keep them fresh. Store them in the fridge for up to three days. If you think they won’t be eaten soon, consider freezing them. But keep in mind, freezing can change their texture. To avoid sogginess, use an oven to reheat nachos. Preheat your oven to 350°F (175°C). Spread the nachos on a baking sheet. Heat for about 10 minutes. This helps them regain some crunch. You can also use a toaster oven for the same effect. Before serving, add fresh toppings. A sprinkle of cilantro or a drizzle of BBQ sauce can bring them back to life. Enjoy your nachos just like they were fresh out of the oven! For the full recipe, check out the earlier section. For nachos, I suggest a smoky or tangy BBQ sauce. Smoky sauces add depth, while tangy ones give a nice kick. Brands like Sweet Baby Ray’s or Stubbs work well. You can also try homemade sauces for unique flavors. Adjust the sweetness to suit your taste. A hint of spice can also enhance the nachos. Yes, you can prep these nachos ahead of time. Cook and shred your chicken, then mix it with BBQ sauce. Store it in the fridge for up to two days. You can also layer the chips and toppings in advance. Just keep the cheese separate until you are ready to bake. This way, your nachos stay fresh and crunchy. When ready, add cheese and bake as directed in the Full Recipe. Absolutely! Use gluten-free tortilla chips instead of regular ones. Many brands offer tasty options that hold up well. For the BBQ sauce, check labels to ensure no gluten is present. You can also use fresh veggies instead of canned black beans. This keeps your nachos light and fresh. Always read ingredient labels to be safe. This blog post covered all you need to make tasty BBQ chicken nachos. You learned about the key ingredients, step-by-step instructions, and ways to customize your dish. We also discussed storage tips and how to reheat nachos without sogginess. With these insights, you can create nachos that are perfect for any event. Enjoy your cooking and remember, the best nachos are the ones you make your own!

Savory Sheet Pan BBQ Chicken Nachos Easy Recipe

Do you crave a quick, tasty dish that everyone loves? Try my savory Sheet Pan BBQ Chicken Nachos! This easy

To make No Bake Chocolate Chip Cookie Dough Bars, gather these simple ingredients. Each one plays a key role in creating a tasty treat. - 1 cup almond flour - 1 cup gluten-free rolled oats (certified gluten-free if necessary) - 1/2 cup pure maple syrup - 1/4 cup coconut oil, melted - 1 teaspoon pure vanilla extract - 1/2 teaspoon sea salt - 1/2 cup chocolate chips (choose dark or semi-sweet depending on preference) - 1/4 cup walnuts, chopped (optional) These ingredients come together to form a delicious and satisfying snack. Almond flour gives the bars a soft texture, while rolled oats add fiber. Pure maple syrup adds natural sweetness. Coconut oil keeps the bars moist, and vanilla extract enhances the flavor. Sea salt balances the sweetness, and chocolate chips add a delightful chocolatey bite. If you choose to add walnuts, they bring a nice crunch. Using these ingredients will ensure your bars taste great. For the full recipe, check out the instructions later in this article. 1. Start by mixing your dry ingredients. In a large bowl, combine the almond flour, gluten-free rolled oats, and sea salt. Stir well until they blend together. This step is key for a nice texture. 2. Next, mix your wet ingredients in a separate bowl. Whisk the melted coconut oil, pure maple syrup, and pure vanilla extract until smooth. You want this mixture to be uniform. 3. Now, pour the wet mixture into the dry ingredients. Mix thoroughly until they come together. The dough should feel thick and a bit sticky. This is normal, and it means you’re on the right track. 1. It’s time to fold in the fun stuff! Add the chocolate chips and chopped walnuts to the dough. Gently mix until they are evenly spread throughout. This adds great flavor and crunch to your bars. 2. Prepare an 8x8-inch baking dish by lining it with parchment paper. Make sure the paper hangs over the edges. This makes it easy to lift the bars out later. 1. Spoon the cookie dough mixture into the prepared dish. Use your hands or a spatula to press it down firmly. Create a smooth, even layer for the best results. 2. Now, chill the bars in the fridge for at least 1 hour. This helps them firm up nicely. After chilling, lift the bars out using the parchment paper. Cut them into squares or rectangles, and they’re ready to enjoy! For the full recipe, check out the instructions provided earlier. To get the best texture in your no bake chocolate chip cookie dough bars, moisture is key. If your mixture feels too dry, add a tiny splash of maple syrup or melted coconut oil. This small change helps bind the ingredients well. On the flip side, too much moisture can make the bars too soft. Aim for a thick, slightly sticky dough. Mixing is also important. Make sure to blend your dry ingredients first. This step ensures a nice, even consistency. When you combine the wet and dry mixtures, mix just until they come together. Overmixing can make the bars dense and less enjoyable. Want to spice things up? Adding spices like cinnamon or nutmeg brings warmth to the flavors. Just a pinch can boost the taste without overpowering it. Try different types of chocolate, too. Dark chocolate adds richness, while semi-sweet offers a classic flavor. You could even use white chocolate for a sweeter twist. For a beautiful presentation, arrange the chilled bars on a nice cutting board. Drizzle them with extra melted chocolate for a touch of luxury. Just a sprinkle of sea salt on top enhances the sweet taste. Pair your bars with a glass of cold milk or a warm cup of coffee. The balance of flavors will delight your taste buds. Enjoy your creation, and feel free to share it with friends! {{image_4}} When you want to switch things up, there are many fun ways to change these no-bake cookie dough bars. Here are some great ideas to try. You can use different nuts to change the flavor and texture. Here are some options: - Almonds add a nice crunch. - Pecans give a rich taste. - Hazelnuts offer a unique flavor. If you need nut-free options, seeds work well too. Try sunflower seeds or pumpkin seeds. They give a good crunch and keep the bars tasty. Adding new flavors can make your bars special. Here are two easy ways: - Incorporate dried fruits like raisins or cranberries. They add sweetness and chewiness. - Use flavored extracts for a twist. Almond or coconut extracts can change the whole taste. The type of chocolate you choose can change the bars a lot. Here are some choices: - Dark chocolate chips make a rich treat. - Semi-sweet chocolate chips are a classic choice. - Dairy-free chocolate chips work well for vegan options. Feel free to mix and match these ideas to create your perfect no-bake chocolate chip cookie dough bars. For the full recipe, check out the [Full Recipe]. Store your no-bake chocolate chip cookie dough bars in an airtight container. This keeps them fresh and prevents them from drying out. You can put them in the fridge for up to one week. If you want to enjoy them later, freezing is a great option. To freeze your bars, cut them into squares first. Then, wrap each piece in plastic wrap. Place the wrapped bars in a freezer bag or container. This helps to keep them fresh for about three months. When you're ready to enjoy them, take out a bar and let it thaw at room temperature for about 30 minutes. You can also microwave them for a few seconds to warm them up. This way, you can enjoy a tasty treat anytime! Yes, you can easily make these bars vegan! To do this, replace the honey or maple syrup with agave syrup. Use coconut oil for butter, and choose dairy-free chocolate chips. These swaps maintain taste and keep the bars creamy and rich. These bars last about one week in the fridge when stored in an airtight container. If you want them to stay fresh longer, you can freeze them. Frozen bars keep well for up to three months. Just allow them to thaw before eating. You sure can! Alternatives like agave nectar or brown rice syrup work well. Keep in mind that these may change the flavor a bit. Just ensure to use a sweetener with a similar consistency for the best results in your no bake chocolate chip cookie dough bars. You now know how to make tasty, healthy bars with simple ingredients. Start with almond flour and oats, and mix your wet and dry items. Don’t forget the chocolate chips and nuts for added flavor! Adjust moisture for the best texture, and try different nuts or spices for unique twists. Remember to store your bars in airtight containers or freeze them for later. These tasty treats can even be vegan with smart swaps. Enjoy experimenting and sharing your delicious creations. Happy cooking!

No Bake Chocolate Chip Cookie Dough Bars Delight

Looking for a sweet treat that’s easy and fun to make? Try my No Bake Chocolate Chip Cookie Dough Bars!

To make Cherry Almond Oat Muffins, gather these ingredients: - 1 cup rolled oats - 1 cup almond milk (or any milk alternative of your choice) - 1 cup all-purpose flour - 1/2 cup brown sugar - 1/2 cup almond flour - 1/2 teaspoon baking soda - 1 teaspoon baking powder - 1/4 teaspoon salt - 1/2 cup cherries, pitted and chopped (fresh or frozen) - 1/4 cup slivered almonds (plus extra for topping) - 1/2 teaspoon vanilla extract - 1/4 cup coconut oil, melted - 1 large egg (or flax egg for a vegan option) You can add some optional ingredients to enhance flavor or texture: - 1/2 teaspoon cinnamon for warmth - 1/4 cup chocolate chips for a sweet twist - Zest of 1 lemon for freshness If you have dietary needs, here are some substitutions: - For a dairy-free option, use almond milk or oat milk. - Swap the all-purpose flour for a gluten-free blend. - Use a flax egg instead of a regular egg for vegan muffins. - Replace brown sugar with coconut sugar for a healthier choice. For the complete recipe and instructions, refer to the Full Recipe. Start by gathering all your ingredients. This helps you stay organized. Preheat your oven to 350°F (175°C). Prepare a muffin tin with liners or oil. Soak the rolled oats in almond milk for about 10 minutes. This softens them for the muffins. 1. Mix Dry Ingredients: In a large bowl, whisk together the all-purpose flour, brown sugar, almond flour, baking soda, baking powder, and salt. This mix gives muffins their structure. 2. Combine Wet Ingredients: In another bowl, mix melted coconut oil, vanilla extract, and the egg (or flax egg). Add this to your soaked oats. Stir gently until mixed. 3. Combine Ingredients: Slowly add the dry mix to the wet mix. Stir just until blended. Overmixing can make muffins tough. 4. Add Cherries and Almonds: Carefully fold in the chopped cherries and slivered almonds. Save some slivered almonds for topping. 5. Fill Muffin Cups: Spoon the batter into the muffin tin. Fill each cup about three-quarters full. Sprinkle the reserved almonds on top. 6. Bake: Place the muffin tin in the oven. Bake for 18-20 minutes. Check with a toothpick. It should come out clean when done. Let the muffins cool in the tin for about 5 minutes. Then transfer them to a wire rack to cool completely. For a tasty treat, serve warm with yogurt or a drizzle of honey. Garnish with extra slivered almonds for that special touch. Enjoy your Cherry Almond Oat Muffins! For the full recipe, check the details above. To make the best cherry almond oat muffins, use fresh ingredients. Start with room temperature eggs. This helps them mix better. Soak the oats in almond milk for about ten minutes. This step softens the oats and keeps muffins light. When mixing, fold gently. Overmixing can lead to tough muffins. One common mistake is not measuring flour correctly. Use a spoon to scoop flour into the measuring cup. Then level it off with a knife. Also, don’t skip the baking powder and soda. These help the muffins rise. Finally, let the muffins cool slightly before removing them from the tin. This avoids sticking. These muffins taste great with yogurt or honey. Add a dollop of Greek yogurt on top. It adds creaminess and tang. You can also try them with a sprinkle of cinnamon or nutmeg for a warm spice. A cup of tea or coffee pairs well too. Enjoy your muffins warm for the best taste. For a complete guide, check the Full Recipe. {{image_4}} You can switch up the fruit in these muffins. For spring and summer, use fresh berries like blueberries or raspberries. Peach chunks work great in the warmer months. In fall, try diced apples or pears. Each fruit adds a different flavor and texture. You can also mix fruits for a fun twist. If you want to change the nuts, use walnuts or pecans instead of almonds. You can also add seeds like pumpkin or sunflower for extra crunch. This gives a new taste and boosts nutrition. Remember, choose what you love best to make it your own. To make these muffins gluten-free, swap the all-purpose flour for a gluten-free blend. Many blends work well and keep the muffins soft. You can also use almond flour for a nutty flavor. Just remember to check the labels for any hidden gluten. Enjoy your gluten-free treats without worry! To keep your Cherry Almond Oat Muffins fresh, store them in an airtight container. This will help them stay soft and moist. Place a paper towel inside the container to absorb any extra moisture. You can store them at room temperature for up to three days. Freezing muffins is easy and keeps them fresh longer. Allow the muffins to cool completely first. Wrap each muffin in plastic wrap or aluminum foil. Then, place them in a freezer-safe bag or container. They can last up to three months in the freezer. Label the bag with the date for easy tracking. To enjoy your muffins warm, simply remove them from the fridge or freezer. If frozen, let them thaw in the fridge overnight. For quick reheating, microwave a muffin for about 15-30 seconds. You can also warm them in the oven at 350°F for about 5-10 minutes. This will bring back their fresh-baked taste. For the full recipe, refer to the earlier section. Enjoy making and storing your Cherry Almond Oat Muffins! Yes, you can make these muffins vegan. Simply swap the egg for a flax egg. To create a flax egg, mix one tablespoon of ground flaxseed with three tablespoons of water. Let this sit for a few minutes until it thickens. This substitution works well to bind the ingredients. You can also use almond milk or any other milk alternative for a dairy-free option. To check if your muffins are done, insert a toothpick into the center of one muffin. If the toothpick comes out clean or with a few crumbs, they are ready. If it has wet batter on it, they need more time. Usually, the baking time is about 18 to 20 minutes. Keep an eye on them as ovens can vary. If you don’t have almond flour, you can use all-purpose flour instead. Another option is to use oat flour, which you can make by grinding rolled oats in a blender. This keeps the flavor profile similar and adds a nice texture. Just remember that the muffins may taste slightly different based on your choice. In this blog post, we covered ingredients, step-by-step instructions, and tips for baking muffins. I shared how to make fluffy muffins, avoid mistakes, and chose the right flavor pairings. You learned about substitutions and seasonal variations to fit your taste. Finally, we discussed storage and answered common questions. Enjoy your baking journey and experiment with your muffin creations. Each bite can be uniquely yours!

Cherry Almond Oat Muffins Tasty and Easy Recipe

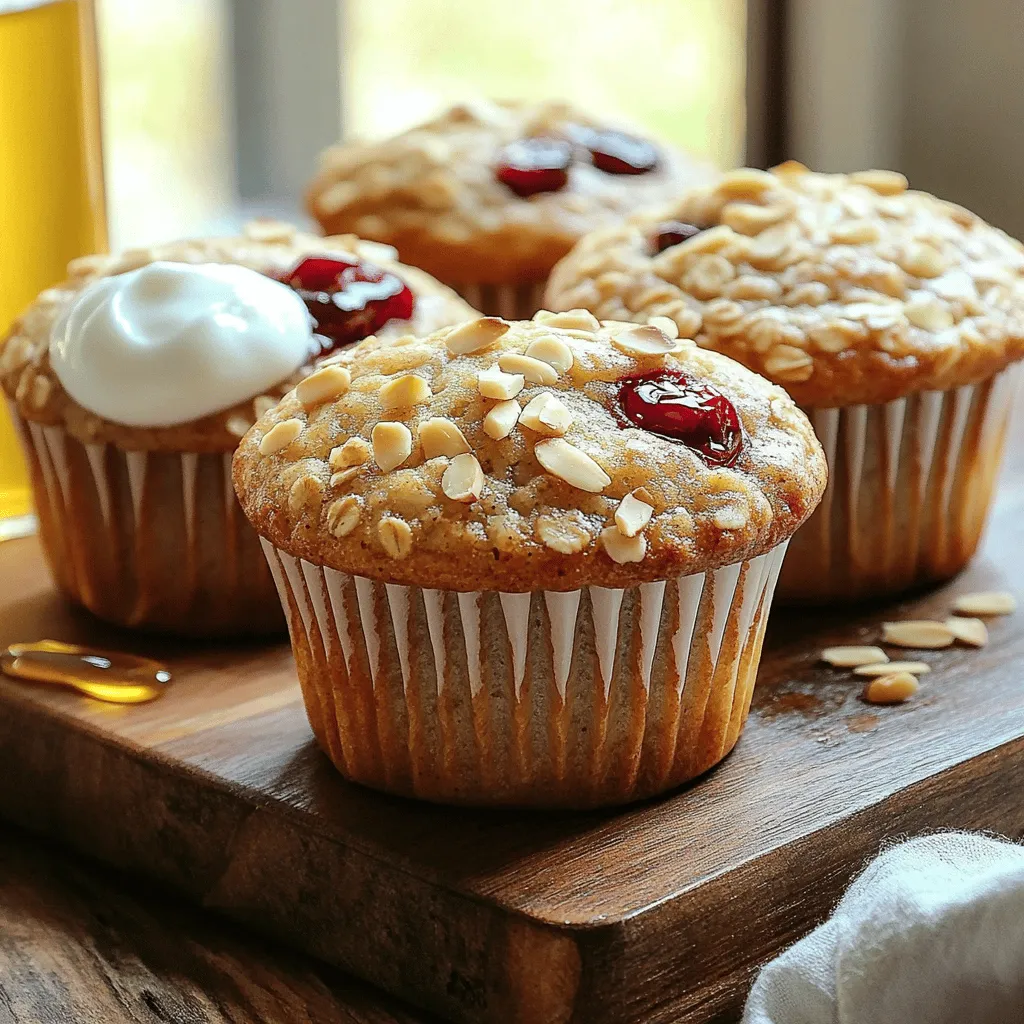
Are you ready to whip up a treat that’s both tasty and healthy? My Cherry Almond Oat Muffins are the

- 1 lb boneless, skinless chicken breasts - 1 cup dill pickle juice - 1 packet ranch seasoning mix - 1 bell pepper (red, yellow, or green) - 1 medium red onion - 1 medium zucchini - 8 oz cherry tomatoes - 2 tablespoons olive oil - Salt and black pepper to taste - Skewers (wooden or metal) For these Pickle Ranch Chicken and Veggie Skewers, I use simple, fresh ingredients. The chicken is the star, and the pickle juice brings a tangy flavor that makes it unique. I love how the ranch seasoning adds a tasty twist. For the veggies, I like to mix colors and textures. You can use any bell pepper you like. I often go for red for sweetness. The red onion adds a nice bite, while zucchini provides a lovely crunch. Cherry tomatoes add juiciness and sweetness. Do not forget the olive oil! It helps the veggies roast nicely. Season with salt and black pepper to enhance the flavors. Use wooden or metal skewers; if you choose wooden, remember to soak them in water first to avoid burning. This recipe makes a great meal for any gathering. Check the [Full Recipe] for more details on how to prepare these delightful skewers! To start, take your chicken cubes and place them in a bowl. Pour in the dill pickle juice, ensuring every piece is covered. This juice adds a nice zing to the chicken. Cover the bowl with plastic wrap and refrigerate for at least 2 hours, or overnight if you can wait. The longer it sits, the more flavor it gets. While the chicken is marinating, it's time to get your veggies ready. Wash and chop a bell pepper, a medium red onion, and a zucchini into bite-sized pieces. Don’t forget the cherry tomatoes; just leave them whole. In a separate bowl, toss the veggies with olive oil, salt, and pepper. This simple mix enhances their taste and helps them cook nicely on the grill. Now, let's get grilling! Preheat your grill to medium-high heat. If you are using wooden skewers, soak them in water for about 30 minutes. This helps prevent them from burning. Next, thread the marinated chicken and prepared veggies onto the skewers. Alternate the chicken with the veggies for a colorful look. After they are all assembled, lightly sprinkle ranch seasoning over the skewers. Place the skewers on the hot grill. Cook them for about 12-15 minutes. Turn them every few minutes to ensure even cooking. You want the chicken to reach an internal temperature of 165°F (75°C) and the veggies to be tender and slightly charred. Once cooked, carefully take the skewers off the grill. Let them rest for a few minutes before serving. This step makes sure the juices stay in the chicken. For the full recipe, check out the complete details on how to make these delicious skewers. Longer marination makes the chicken juicy and full of flavor. I suggest marinating overnight if you can. This allows the pickle juice to soak deep into the chicken. If you want to change things up, try using yogurt or lemon juice. Both add a tangy taste that goes well with the chicken. For perfect grill marks, preheat your grill well. Place the skewers on the grill and don’t touch them for a few minutes. This helps create those nice lines. To avoid charred veggies, keep an eye on the grill. If you notice they are browning too fast, move them to a cooler part of the grill. Serve the skewers with a fresh salad or rice. Both pair well and add color to your plate. For dipping sauces, ranch dressing is a great choice. You can also try barbecue sauce or a spicy mayo. These add fun flavors to each bite. Check the Full Recipe for more ideas on sides and dips! {{image_4}} You can swap chicken for other proteins. Shrimp works great and cooks fast. Tofu is a tasty option for a plant-based choice. If using shrimp, grill for about 5-7 minutes. For tofu, cook for 10-12 minutes. Check doneness by looking for a nice golden color. You can use many vegetables for skewers. Great options include mushrooms, asparagus, and bell peppers. Consider seasonal choices like summer squash or eggplant. These add fun flavors and colors to your dish. Just remember, cut all veggies to similar sizes for even cooking. You can play with flavors easily. Try adding garlic powder, chili flakes, or lemon zest to the mix. For marinades, use yogurt or spicy sauces for a twist. These small changes can make your skewers unique and exciting. You’ll find new tastes that delight your palate! For the full recipe, check out the Pickle Ranch Chicken and Veggie Skewers. To keep leftover skewers fresh, place them in an airtight container. This prevents moisture loss and keeps flavors intact. You can also wrap them tightly in plastic wrap if you don't have a container. Store them in the fridge for up to three days. If you want to enjoy them later, make sure to cool them before storing. Freezing cooked skewers is an option if you want to save them longer. First, let the skewers cool completely. Then, wrap them in foil or freezer-safe bags. This helps avoid freezer burn. You can freeze them for up to three months. When ready to eat, thaw the skewers overnight in the fridge. Reheat them in the oven at 350°F for about 10-15 minutes until warm. You can use leftover ingredients in various ways. Toss extra veggies into salads or omelets. You can also chop leftover chicken for a tasty wrap or sandwich. If you have extra ranch seasoning, sprinkle it on popcorn for a fun snack. You can even incorporate skewers into pasta dishes for added flavor and texture. Explore these ideas to minimize waste and enjoy more meals! To check if the chicken is done, you should measure its internal temperature. The safe temperature for cooked chicken is 165°F (75°C). Use a meat thermometer for the best results. Look for some visual cues as well. The chicken should no longer be pink inside. The juices should run clear when you cut into it. The edges may also look slightly browned. Yes, you can make these skewers ahead of time. Marinate the chicken for at least 2 hours, or even overnight, to build flavor. This makes meal prep easier and faster. You can also chop the veggies in advance. Just store them in the fridge in a sealed container. This way, you save time when it's time to grill. For the best results, heat your grill to medium-high. This means around 375°F to 450°F (190°C to 232°C). This heat level helps cook the chicken evenly while giving veggies a nice char. Keep an eye on the skewers as they cook. Adjust the heat if needed to prevent burning. Yes, you can bake these skewers if you prefer. Preheat your oven to 400°F (200°C). Line a baking sheet with foil for easy cleanup. Place the assembled skewers on the sheet. Bake for about 20-25 minutes. Flip them halfway through to cook evenly. Check the chicken's internal temperature to ensure it’s 165°F (75°C). In this article, we explored a tasty chicken skewer recipe. We covered the main ingredients, step-by-step instructions for marinating and grilling, and tips for perfect results. I shared creative variations and helpful storage advice. With these easy steps, you can make great skewers at home. Enjoy trying new flavors and share your creations with friends and family. Simple meals can be fun!

Pickle Ranch Chicken and Veggie Skewers Delight

Get ready to fire up your grill with my Pickle Ranch Chicken and Veggie Skewers Delight! This flavorful dish blends

- 1 cup all-purpose flour - 2 tablespoons granulated sugar - 2 teaspoons baking powder - 1/2 teaspoon fine sea salt - 1 cup whole milk - 1 large egg - 2 tablespoons unsalted butter, melted - 1/2 cup fresh cherries, pitted and roughly chopped - 1/2 cup semi-sweet chocolate chips - Optional: whipped cream and extra cherries for a delightful garnish To make these cherry chocolate chip pancakes, you need simple but key ingredients. The all-purpose flour gives the pancakes their structure. Granulated sugar adds just the right amount of sweetness. Baking powder helps the pancakes rise, making them fluffy and light. The fine sea salt balances the sweetness. Use whole milk in this recipe for a rich texture. One large egg adds moisture and helps bind everything together. Unsalted butter, when melted, enriches the flavor of the batter. Fresh cherries are the star, providing a burst of juicy flavor. Semi-sweet chocolate chips add a sweet touch that pairs perfectly with the cherries. For a fun twist, consider garnishing with whipped cream and extra cherries. This adds a lovely finish to your pancakes. So, gather these ingredients and get ready for a flavorful pancake experience! You can find the Full Recipe at the end of this article. Start by mixing the dry ingredients. In a large bowl, whisk together: - 1 cup all-purpose flour - 2 tablespoons granulated sugar - 2 teaspoons baking powder - 1/2 teaspoon fine sea salt Ensure these ingredients are well combined. This step builds a light base for your pancakes that is key to their fluffiness. In another bowl, combine the wet ingredients. Whisk together: - 1 cup whole milk - 1 large egg - 2 tablespoons unsalted butter, melted You want this mixture smooth and clump-free. Mixing these well helps your pancakes rise and stay soft. Now it’s time to combine the wet and dry mixtures. Pour the wet mixture into the bowl of dry ingredients. Use a spatula to stir gently until just combined. It’s okay if some lumps remain; avoid overmixing to keep your pancakes light and airy. Next, carefully fold in: - 1/2 cup fresh cherries, pitted and roughly chopped - 1/2 cup semi-sweet chocolate chips Make sure these goodies are evenly spread in the batter for delicious bites. Preheat a non-stick skillet or griddle over medium heat. Lightly grease it with a small pat of butter or a quick spray. This helps the pancakes cook evenly and prevents sticking. Pour about 1/4 cup of batter for each pancake onto the skillet. Cook until bubbles form on the surface, which takes around 2-3 minutes. Once you see the bubbles, flip the pancakes gently. Cook the other side for another 2-3 minutes until golden brown. After each batch, transfer pancakes to a warm plate. Cover them loosely with aluminum foil to keep them warm while you finish cooking the rest. Now, stack those pancakes high and top them with whipped cream and extra cherries for a sweet touch. For the full recipe, check the earlier sections! To make the best cherry chocolate chip pancakes, focus on the batter. First, avoid overmixing. When you combine wet and dry ingredients, mix just enough to blend them. Some lumps are okay. Overmixing makes the pancakes tough and chewy. Next, achieve fluffiness by using fresh baking powder. If it's old, your pancakes won’t rise. Also, let the batter rest for about five minutes before cooking. This helps the gluten relax, making your pancakes lighter and fluffier. For a beautiful presentation, stack your pancakes high on a plate. Drizzle pure maple syrup or rich chocolate sauce on top. Add a sprinkle of powdered sugar for a touch of elegance. Fresh cherries on top add color and a burst of flavor. If you want to go beyond whipped cream, try yogurt or crème fraîche. You can also add nuts or a dusting of cinnamon for extra flavor. These little touches can make your meal feel special and gourmet! The right tools make a big difference. Use a non-stick skillet or griddle for even cooking. A cast-iron skillet holds heat well and gives a nice golden color. Make sure it’s preheated to medium heat before adding batter. Have a spatula handy for flipping pancakes. A large one works best for easy handling. If you have a pancake ring, it can help shape your pancakes perfectly. These tools make cooking fun and your pancakes look great! {{image_4}} For those who need gluten-free options, use gluten-free flour. This works well in pancakes. You can find many brands in stores. Just make sure to check they are certified gluten-free. If you prefer vegan alternatives, replace the milk with almond or oat milk. Use a flaxseed egg instead of a regular egg. Mix one tablespoon of ground flaxseed with three tablespoons of water. Let it sit for five minutes to thicken. This makes a great egg substitute for your pancakes. You can explore fun fruit or nut variations. Try adding blueberries, raspberries, or sliced bananas. Chopped nuts like walnuts or pecans can also bring a nice crunch. Different chocolate types can change the flavor, too. Use dark chocolate for a richer taste or white chocolate for sweetness. Experimenting with flavors adds excitement to your breakfast. You can create new favorites every time you make these pancakes! Holiday-themed variations can make your pancakes festive. For Halloween, add pumpkin spice to the batter. Around Christmas, mix in crushed candy canes for a minty twist. Using seasonal fruits makes the dish even better. In summer, fresh peaches or strawberries work great. In fall, think about using apples or pears. This keeps your pancakes fresh and fun all year long. For more details on the cherry chocolate chip pancakes, check out the Full Recipe. To keep your cherry chocolate chip pancakes fresh, follow these tips: - Refrigerating: Allow pancakes to cool completely before storing. Place them in an airtight container. They will stay good for about 3 days in the fridge. - Freezing: For longer storage, stack pancakes with parchment paper between them. Use a freezer bag or an airtight container. They can last up to 2 months in the freezer. To enjoy your pancakes warm and fluffy again: - If using the microwave, place a damp paper towel over the pancakes. Heat for 15-30 seconds until warm. - For the stovetop, heat a non-stick skillet over low heat. Add a splash of milk to help keep them moist. Heat for 1-2 minutes on each side. These tips will help you enjoy your cherry chocolate chip pancakes even after the first meal! If you want to make them again, check out the Full Recipe. To make Cherry Chocolate Chip Pancakes fluffier, use fresh baking powder. Check the date on the package. Also, avoid mixing too much. Stir the batter until just combined. This keeps air in the batter. You can also separate the egg. Whip the egg white until it’s fluffy, then fold it into the batter. This technique adds more lift. Yes, you can use frozen cherries. However, thaw them first before adding them to the batter. Drain any extra juice to avoid soggy pancakes. Frozen cherries may not be as firm as fresh ones, but they still taste great. They will add a nice, sweet burst in each bite. You can serve Cherry Chocolate Chip Pancakes with whipped cream and fresh cherries on top. Pure maple syrup is a classic choice. For a twist, try chocolate sauce or yogurt. Nuts, like chopped almonds or walnuts, also add a nice crunch. Get creative with your toppings to make each stack unique. Yes, you can double the recipe easily. Just make sure to keep the same ratios. Use a larger mixing bowl and a bigger skillet if needed. This way, you can cook more pancakes at once. Keep the cooked pancakes warm in the oven while you finish the batch. If you need a substitute for chocolate chips, try using white chocolate or butterscotch chips. You can also use chopped nuts for a different texture. Dried fruit, like raisins or cranberries, adds sweetness too. Feel free to mix and match flavors to find what you love best. You can find the Full Recipe in the earlier section of this article. It includes all the details you need to make these delicious pancakes. Just follow the steps, and you’ll have a delightful breakfast in no time! This blog post covered a delicious Cherry Chocolate Chip Pancake recipe. We detailed the ingredients, from flour to cherries, and walked through clear steps for perfect pancakes. I shared tips for texture and serving, plus tasty variations to try. Finally, we discussed storage and reheating methods. Enjoying these pancakes can be fun and easy. Experiment with flavors and share them with friends. Happy cooking!

Cherry Chocolate Chip Pancakes Fluffy and Flavorful Dish

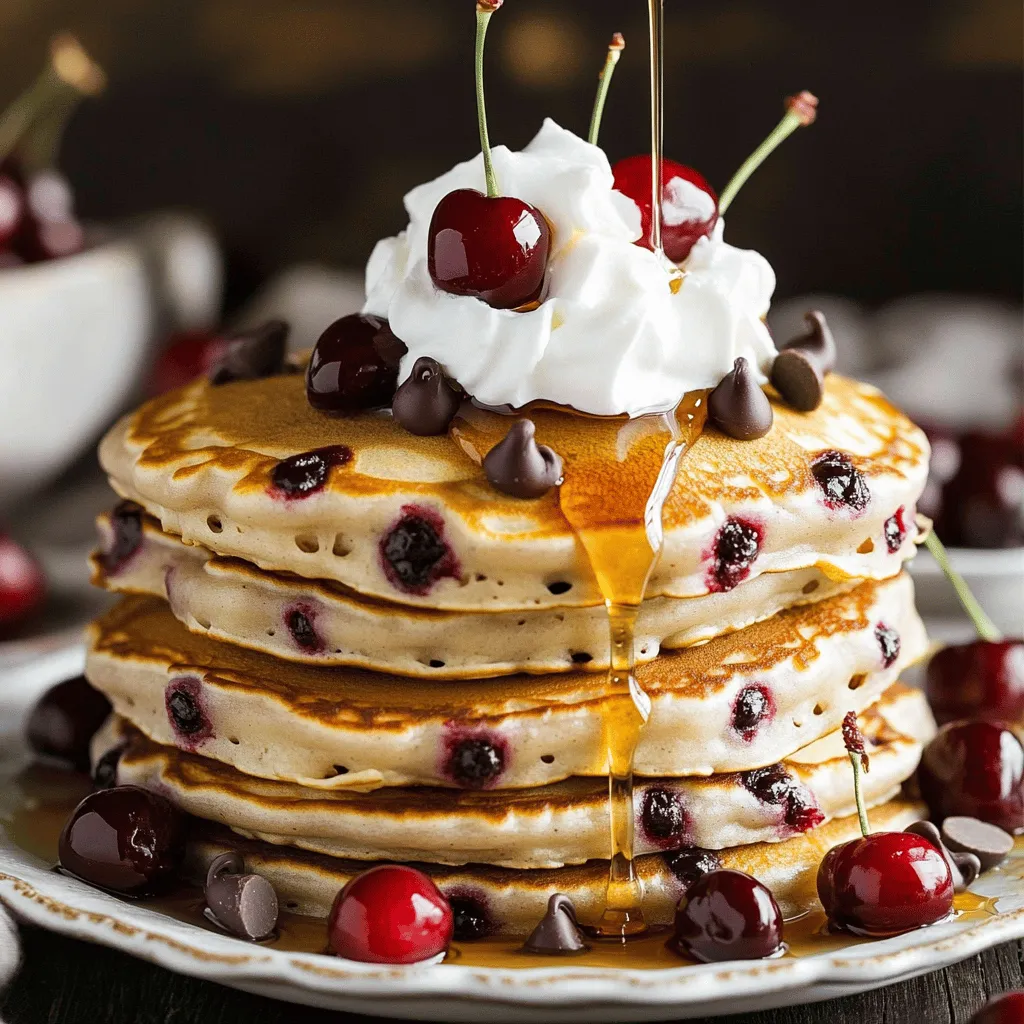
Are you ready to step up your breakfast game? Cherry Chocolate Chip Pancakes are fluffy, flavorful, and easy to make!

Older posts
Newer posts
← Previous Page1 … Page6 Page7 Page8 … Page71 Next →

dsad

© 2025 tastyhatch • Built with GeneratePress

Our Policies

  • Copyright Policy
  • Cookie Policy
  • GDPR Policy
  • Privacy Policy
  • Disclaimer
  • Terms Of Use

More Information

  • Home
  • About
  • Contact
  • Appetizers
  • Dessert
  • Dinner
  • Drinks
©2025, tastyhatch About Back To Top