
Brown Sugar Glazed Carrots Delicious Side Dish Recipe
Looking for a quick and tasty side dish? Brown Sugar Glazed Carrots are your answer! This simple recipe combines sweet,
Looking for a quick and tasty side dish? Brown Sugar Glazed Carrots are your answer! This simple recipe combines sweet,
![- 2 cups all-purpose flour - 1/3 cup granulated sugar - 1 tablespoon baking powder - 1/2 teaspoon salt - 1/4 cup unsalted cold butter, chilled and cubed - 1/2 cup dried cranberries, roughly chopped - Zest of 1 large orange - 1/2 cup heavy cream, plus extra for brushing - 1 large egg, beaten - 1 teaspoon vanilla extract - Extra granulated sugar for sprinkling on top When I make cranberry orange scones, I gather simple yet delicious ingredients. Each item plays a big role in flavor and texture. The flour gives the scones structure. The sugar adds sweetness. Baking powder helps them rise. Salt balances the flavors. The cold butter creates a flaky texture. It’s key to cut it in well. The dried cranberries bring a tart burst. The orange zest adds a bright, fresh flavor. For moisture, I use heavy cream and an egg. They bind everything together. A touch of vanilla extract adds warmth. Finally, a sprinkle of sugar on top gives that nice crunch. You’ll also need some equipment. Mix the dry ingredients in a bowl. Use a pastry cutter to mix in the butter. A baking sheet lined with parchment paper helps the scones bake evenly. With the right ingredients, you can make these scones at home. Check the Full Recipe for more details. - Preheat the oven to 400°F (200°C). - Prepare the mixing bowls and baking sheet. - Combine dry ingredients and mix thoroughly. - Incorporate cold butter until crumbly. - Fold in cranberries and orange zest. - Combine wet ingredients, adding to dry mixture. - Turn dough onto a floured surface. - Cut into wedges and place on the baking sheet. - Brush with cream and sprinkle sugar before baking. - Bake for 15-18 minutes until golden brown. Making these cranberry orange scones is simple and fun. Start with the prep steps. Set your oven to 400°F (200°C). This heat helps the scones rise nicely. Line your baking sheet with parchment paper to prevent sticking. Next, mix the dry ingredients. In a bowl, whisk the flour, sugar, baking powder, and salt. This mix needs to be even for the best texture. Add the cold butter. You can use a pastry cutter or your fingers. Mix until the mix looks like coarse crumbs. You want small pieces of butter to remain for a flaky texture. Now, fold in the cranberries and orange zest. This adds a nice burst of flavor. Make sure they are spread out in the mix. In another bowl, whisk together the cream, egg, and vanilla. It should be well mixed. Slowly pour this into your dry mix. Use a spatula to blend until the dough just comes together. Don’t overmix! A little stickiness is fine. Next, turn the dough onto a floured surface. Pat it into a circle about 1 inch thick. Use a sharp knife or pizza cutter to slice it into 8 wedges. Transfer them to your baking sheet, leaving space between each. For a nice finish, brush the tops of the scones with cream. Sprinkle sugar on top for extra sweetness and crunch. Finally, bake the scones. Put them in the oven for 15-18 minutes. They should turn golden brown. A toothpick should come out clean when done. Enjoy the process and the delightful aroma! - Avoid overmixing the dough. This keeps the scones light and fluffy. - Use a light touch when shaping scones. Gentle hands help them rise well. - Try adding orange juice for extra zest. This brings a bright, fresh taste. - Experiment with different dried fruits. You can use cherries or apricots for fun twists. - Serve with clotted cream or butter. This adds richness and complements the scones. - Garnish with cranberries or a mint sprig. This makes your dish look fresh and inviting. For more detailed steps, check out the Full Recipe. {{image_4}} You can easily change the flavor of your scones. Here are two tasty options: - Lemon Cranberry Scones: Replace the orange zest with lemon zest. This gives a bright, tangy twist. The tartness of the lemon pairs well with cranberries. - Almond and Cranberry Scones: Add 1/4 cup of chopped almonds to the dough. This adds a nice crunch and a nutty flavor. You can also use almond extract to boost that flavor. If you have special dietary needs, I have some great options for you: - Gluten-free option: You can use almond flour or a gluten-free blend. The texture will be different but still tasty. Just make sure to add a little more liquid to keep the dough moist. - Vegan scones: Swap butter for coconut oil or vegan butter. Use almond milk or soy milk instead of heavy cream. This keeps the scones light and fluffy without dairy. You can adjust the sweetness to fit your taste: - Reduce sugar: If you want a less sweet scone, cut the sugar in half. This makes the scones more savory. They will still taste great with the cranberries. - Add more sugar: If you prefer sweeter scones, increase the sugar to 1/2 cup. This makes for a delightful treat that pairs well with tea or coffee. For the full recipe, check out the [Full Recipe]. You can store leftover scones in an airtight container. Keep them at room temperature. For the best flavor and texture, eat them within 2-3 days. If you want to keep scones longer, freeze them. They last for up to 3 months in the freezer. This is a great option for meal prep or future snacks. To enjoy frozen scones, first, thaw them. Place them in the fridge overnight. When ready to eat, reheat the scones at 350°F (175°C) for about 10 minutes. This restores their soft texture and warmth. For a great treat, enjoy them fresh from the oven. For the full recipe, check the instructions above. To make your scones light and airy, keep these tips in mind: - Use cold ingredients, especially butter and cream. - Handle the dough gently and avoid overmixing. - Make sure your baking powder is fresh. These steps help create pockets of air in the scones. Yes, you can use fresh cranberries. They will add a tart flavor. Dried cranberries are sweeter and easier to work with. If you use fresh, consider adding a bit more sugar to balance the taste. Look for these signs: - The scones will be golden brown on top. - A toothpick inserted in the center comes out clean. - They should feel firm but springy when touched. These cues show that your scones are perfectly baked. Cranberry orange scones pair well with: - Clotted cream or soft butter. - A warm cup of tea or coffee. - Fresh fruit or a light salad. These options enhance the scones' bright flavors. Yes, you can make the dough ahead. Wrap it tightly in plastic wrap. Store it in the fridge for up to 24 hours. When ready to bake, just roll it out and cut it into wedges. Absolutely! To make gluten-free cranberry orange scones, use a gluten-free flour blend. You may need to adjust the liquid slightly. This ensures the dough has the right texture. Enjoy the same great taste without the gluten! In this post, I covered how to make delicious cranberry orange scones. I shared ingredients and simple steps for making the dough. You learned tips for perfect texture and ways to add flavor. Variations and storage tips help you keep scones fresh. Whether you prefer a sweet treat or a gluten-free option, there’s a scone for you. Enjoy baking and experiment with flavors. You’ll love the results and share them with others. Happy baking!](https://tastyhatch.com/wp-content/uploads/2025/07/d557b90e-cd81-49af-937d-e5180185a183.webp)
Get ready to brighten your mornings with my refreshing Cranberry Orange Scones! This delightful recipe combines tangy cranberries and zesty
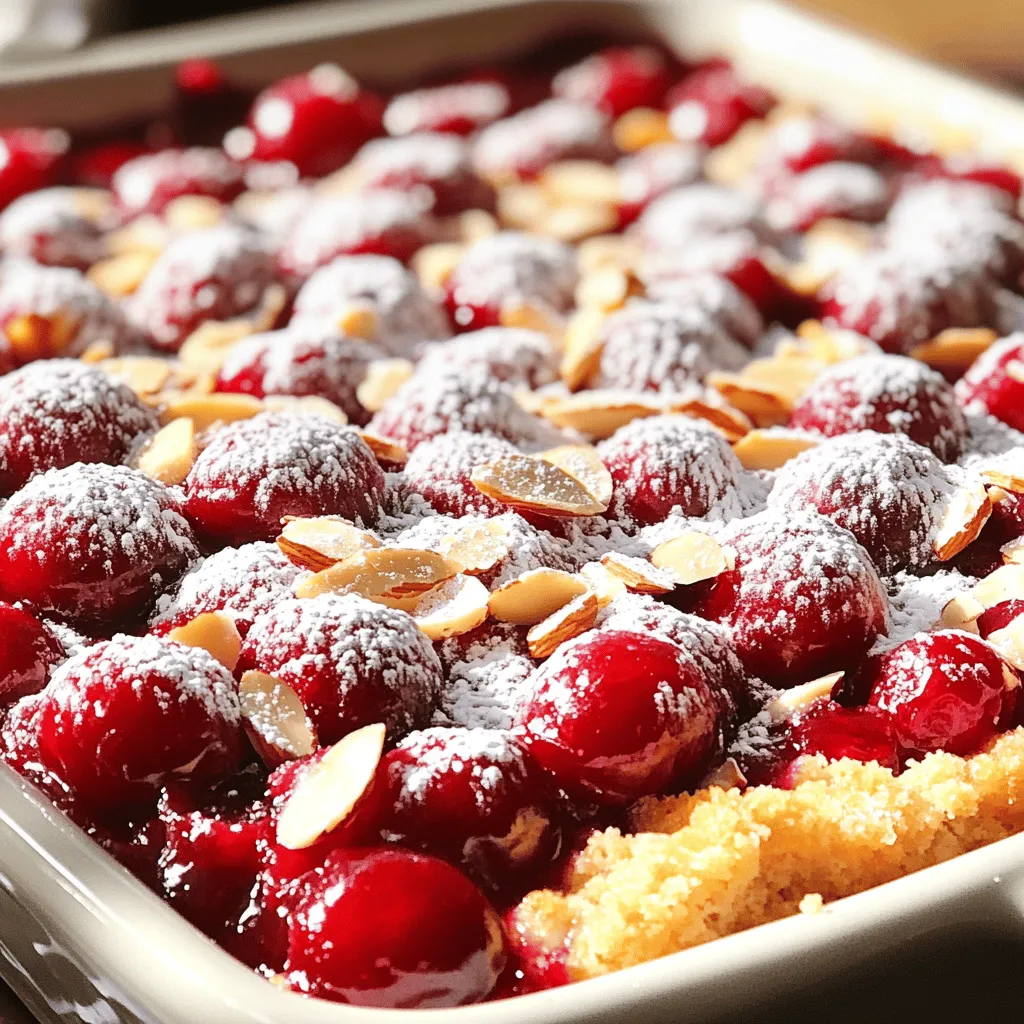
If you’re craving a dessert that’s both easy and delicious, you’ve found it! This Cherry Almond Dump Cake combines sweet
![- Puff pastry details - 1 sheet of puff pastry, thawed - Cream cheese preparation - 4 oz cream cheese, softened to room temperature - 1/4 cup powdered sugar - 1/2 teaspoon pure vanilla extract - Optional garnish ingredients - 1 cup fresh blueberries, rinsed and dried - 1 tablespoon freshly squeezed lemon juice - 1 egg, beaten (for egg wash) - Raw sugar, for sprinkling These ingredients bring rich flavor and a lovely texture to your danish. The puff pastry makes it flaky, while the cream cheese adds creaminess. The fresh blueberries give a burst of sweetness. This combination makes each bite a delight. You can find the full recipe above to guide you through the process. 1. Prepping the oven and baking sheet Start by preheating your oven to 400°F (200°C). This step is key for a nice rise. While the oven heats, line a baking sheet with parchment paper. This helps keep the danishes from sticking. 2. Preparing the puff pastry Next, take the thawed puff pastry. Roll it out gently on a lightly floured surface. Aim for a smooth, even sheet. Use a sharp knife or pizza cutter to cut the pastry into a 12-inch square. Then cut that square into four equal 6-inch squares. 3. Making the cream cheese filling In a medium bowl, mix the softened cream cheese, powdered sugar, and vanilla extract. Beat the mix until smooth and creamy. This filling is both tangy and sweet, perfect for balancing the blueberries. 1. Step-by-step assembly instructions Take one of the pastry squares. Spoon about a tablespoon of the cream cheese mixture into the center. Top it with a few blueberries. Make sure the blueberries are centered for even baking. 2. Tips for sealing the corners To form a pocket, fold each corner of the pastry square to the center. Press down lightly on the edges to seal them well. This keeps the filling inside while baking. 1. Recommended baking temperature Place your assembled danishes on the prepared baking sheet. Bake them in the preheated oven at 400°F (200°C). 2. Ideal baking time and tips for checking doneness Bake for about 15-20 minutes. Watch them closely as they puff and turn golden brown. When they look perfect, they are ready to come out. Enjoy the delicious smell as they cool slightly! For the full recipe, refer to the Blueberry Bliss Cream Cheese Danish 🫐🥐 recipe above. To avoid soggy bottoms, make sure your baking sheet is lined with parchment paper. This will help the danishes crisp up nicely. Also, do not skip the egg wash. It creates a barrier that helps keep moisture in check. Achieving the right flaky pastry texture is key. Roll out your puff pastry gently; do not press too hard. Use cold ingredients for the cream cheese filling. This keeps the pastry from getting too warm. A warm pastry does not puff well, so keep it chilled until baking. When serving your danishes, pair them with a refreshing drink. A cup of coffee or tea complements the sweetness of blueberries well. You might also try a light lemonade for a bright flavor. The best serving temperature for these danishes is warm or at room temperature. They taste best shortly after baking. If serving later, gently reheat them to bring back their flaky texture. One common mistake is overfilling the danishes. A tablespoon of cream cheese filling and a few blueberries are enough. Too much filling can cause them to burst while baking. Another mistake is ignoring the chilling time for pastry. After rolling out the dough, chill it for at least 15 minutes. This helps maintain the pastry’s flakiness and makes it easier to shape. For the full recipe, check out [Full Recipe]. {{image_4}} You can boost the taste of your Blueberry Cream Cheese Danish in fun ways. Try adding different fruits, like raspberries or cherries. These fruits bring a new flavor and color to your danish. They pair nicely with the cream cheese and blueberries. You can even mix fruits for a unique twist. Spices can also add depth to your danish. A pinch of cinnamon or nutmeg can enhance the sweetness. Just sprinkle a little on the cream cheese mixture before you fill the pastries. This small change can make a big impact on taste. Switching up the cream cheese can change the game. Using flavored cream cheese, like strawberry or vanilla, can add a new layer of flavor. This simple swap can make your danish feel fresh and exciting. If you're looking for vegan options, try a plant-based cream cheese. Many brands offer tasty substitutes that work well. These options let you enjoy the danish without dairy. They still provide that creamy goodness you crave. Making mini danishes is easy and fun. To do this, start with smaller squares of puff pastry. Cut your sheet into smaller pieces, about 3 inches each. This way, you can create bite-sized treats perfect for sharing. Adjust your baking time if you go mini. Bake these smaller danishes for about 12 to 15 minutes. Keep an eye on them to make sure they turn golden brown. They’ll look adorable and be perfect for any gathering. For the full recipe, check out the detailed instructions above to enjoy these delightful variations! To keep your Blueberry Cream Cheese Danish fresh, store it in the fridge. Place them in an airtight container. This helps lock in moisture and flavor. It’s best to eat them within 1-2 days. If you want to save them longer, you can freeze the danishes. Wrap each one in plastic wrap, then place them in a freezer-safe bag. They can last up to 2 months in the freezer. To reheat the danishes, use an oven for the best texture. Preheat your oven to 350°F (175°C). Place the danishes on a baking sheet and heat for about 10 minutes. This keeps the pastry crisp. If you’re in a hurry, you can use a microwave. Heat them for 15-20 seconds. This method is quick but may make the pastry soft. Enjoy your warm, delicious danishes! For the full recipe, check out the Blueberry Bliss Cream Cheese Danish. Can I use canned blueberries? Yes, you can use canned blueberries. Just drain and rinse them well. Fresh blueberries taste best, but canned ones work in a pinch. They may be softer, so handle them gently to avoid mush. How can I make the danishes ahead of time? You can prepare the filling up to two days ahead. Store it in the fridge. For the pastry, you can cut and shape the danishes, then freeze them. Bake them straight from the freezer. Add a few extra minutes to the baking time. What can I substitute for puff pastry? If you need a substitute, you can use phyllo dough or crescent roll dough. Phyllo creates a lighter texture, while crescent roll dough gives a different flavor. Both options will still taste great. Caloric content per serving Each Blueberry Cream Cheese Danish has about 200 calories. This can vary based on how you fill and bake them. Common allergens included These danishes contain dairy (cream cheese) and gluten (puff pastry). Be mindful of these allergens when serving. Where to find pre-made options You can find pre-made danishes in most grocery stores. Look in the bakery section. Many bakeries also offer them fresh. What to look for in store-bought danishes When buying store-bought danishes, check for fresh ingredients. Look for a flaky crust and a good ratio of filling to pastry. Avoid those with long ingredient lists or preservatives. For the [Full Recipe], follow the steps to create your own delicious danishes at home! Making a Blueberry Cream Cheese Danish is simple and fun. You learned about the key ingredients, the step-by-step baking process, and useful tips to get it just right. Don't forget to explore variations to match your taste. As you bake, keep common mistakes in mind, like overfilling your danishes. By following proper storage and reheating tips, you can enjoy your treat longer. Now it’s time to bake and enjoy this delicious pastry!](https://tastyhatch.com/wp-content/uploads/2025/07/79918451-c88d-45ec-88a1-1ebd5998cd15.webp)
Do you crave a sweet treat that’s both simple and delightful? This Blueberry Cream Cheese Danish will satisfy your taste
![Here’s what you need to make Southwest quinoa stuffed peppers. Gather your ingredients for a tasty meal. - 4 large bell peppers (variety of colors) - 1 cup quinoa (thoroughly rinsed) - 2 cups vegetable broth - 1 can black beans (rinsed and drained) - 1 cup corn (frozen or fresh) - 1 small red onion (finely diced) - 1 red bell pepper (finely diced) - 2 cloves garlic (minced) - 1 teaspoon ground cumin - 1 teaspoon smoked paprika - ½ teaspoon chili powder - Salt and pepper (to taste) - 1 cup cherry tomatoes (halved) - ½ cup fresh cilantro (chopped) - 1 cup shredded cheese (cheddar or Mexican blend) - 1 avocado (sliced; for serving) - Lime wedges (for serving) Each ingredient adds flavor and nutrition. Quinoa is packed with protein. Black beans provide fiber, while bell peppers bring vitamins. You can mix and match colors for a fun look. Using fresh ingredients will make your dish shine. For the full recipe, check out the detailed instructions. You'll love how easy it is to prepare! - Preheat oven to 375°F (190°C). - Prepare bell peppers by cutting off the tops and removing seeds. - Lightly brush the exterior of each pepper with olive oil. - Bring vegetable broth to a boil in a medium saucepan. - Add rinsed quinoa, reduce heat, and let it simmer for 15 minutes. - Heat olive oil in a large skillet over medium heat. - Sauté red onion and garlic until they smell good. - Add red bell pepper, black beans, corn, and spices; cook until tender. - Mix the cooked quinoa with the vegetable mixture. - Spoon the mixture into each prepared bell pepper, packing it down. - Top each stuffed pepper with shredded cheese, cover with foil, and bake for 25 minutes. - Remove the foil and bake for another 10 minutes until golden. For the detailed cooking process, check the Full Recipe. - Use fresh herbs for enhanced taste. Fresh cilantro brightens the dish. - Adjust spices to your heat preference. More chili powder adds warmth. - Monitor baking time for desired tenderness. You want them soft but not mushy. - Experiment with different cheese blends for variety. Try Monterey Jack or pepper jack. - Serve on a colorful platter. This makes the dish more inviting. - Garnish with lime wedges and extra cilantro. This adds a lovely touch and flavor. For the complete recipe, you can refer to the [Full Recipe] of Southwest Quinoa Stuffed Peppers. Enjoy your cooking! {{image_4}} You can easily make this dish fit your diet. If you want a vegan option, substitute cheese with a vegan alternative. You can use cashew cheese or nutritional yeast for a cheesy flavor. Adding more vegetables can also enhance the dish. Consider mixing in zucchini or spinach for extra nutrition and color. For those who want a heartier meal, try adding cooked chicken or turkey to the filling. This adds protein and makes it more filling. You can also use quinoa as a base for other proteins. Tofu is a great choice and works well with the spices in the dish. If you love heat, add diced jalapeños to the mix. They give a nice kick and enhance the flavors. You can also experiment with different spice blends. Try adding smoked chipotle or cayenne for a unique twist. Each change can create a new flavor profile for your meal. For the full recipe, be sure to check out the main article. To keep your leftover Southwest Quinoa Stuffed Peppers fresh, place them in an airtight container. They will last in the refrigerator for up to 4 days. When you're ready to enjoy them again, reheat the peppers in the oven or microwave. This way, they'll taste just as good as when they were first made. If you want to save some stuffed peppers for later, freezing is a great option. Freeze them in individual portions for easy meals. When you're ready to eat, thaw them overnight in the refrigerator. Once thawed, reheat them before serving. Meal prep can save you time during busy weeks. You can prepare and stuff the peppers ahead of time. Just bake them when you're ready to eat. This makes them perfect for quick weeknight meals or healthy lunches. Enjoy the ease of having a delicious meal ready at a moment's notice! Yes, brown rice or couscous can be substituted. Both work well in this dish. Quinoa is great, but you can swap it if you want. Brown rice adds a nice chewy texture. Couscous cooks quickly and offers a different flavor. Serve with a side salad or tortilla chips for crunch. A simple green salad pairs nicely. The fresh veggies add brightness. Tortilla chips give a fun crunch and a nice dip for extra flavor. Add hotter chili powder or diced fresh chilies to the filling. You can use jalapeños for a kick. Just chop them small so they mix well. Adjust the spice to your taste for a fun twist. Total cooking time is approximately 35-40 minutes in the oven. Bake them at 375°F (190°C). Keep an eye on them to get the right softness. You want them tender but not mushy. Yes, prepare the filling and stuff the peppers a day in advance; bake when ready. This makes meal prep easy. Just cover them in the fridge. When you’re ready, pop them in the oven. Each serving is rich in protein, fiber, and essential vitamins; specific values can vary based on ingredients used. Quinoa and black beans bring lots of nutrients. These peppers are not only tasty but also good for you. For the exact numbers, check the recipe details in the Full Recipe. In this post, we explored the ingredients and steps to create delicious Southwest Quinoa Stuffed Peppers. We covered tips for flavor, variations for dietary needs, and easy storage options. Remember, you can adjust spices to fit your taste, experiment with fillings, and serve these peppers hot or cold. They make a perfect meal for any day. Enjoy the process of cooking and the joy these peppers bring to your table!](https://tastyhatch.com/wp-content/uploads/2025/07/f2557497-1a23-4f9a-8e15-3cc39f0701d1.webp)
Are you ready to spice up your dinner routine? These Southwest Quinoa Stuffed Peppers are not just tasty; they are

Looking for an easy dessert that wows? A Strawberry Shortcake Trifle is the answer! This delightful treat combines fresh strawberries,

Looking for a simple yet delicious meal? Oven Baked Teriyaki Tofu ticks all the boxes. This dish is easy to
![- 4 cups fresh broccoli florets - 1 medium onion, finely chopped - 2 cloves garlic, minced - 3 cups quality vegetable broth - 1 cup heavy cream - 1 ½ cups sharp cheddar cheese, grated - 2 tablespoons olive oil - 1 teaspoon sea salt - ½ teaspoon freshly ground black pepper - ¼ teaspoon ground nutmeg (optional) - 2 tablespoons cornstarch (optional, for a richer texture) - Fresh parsley, chopped, for garnish Choosing fresh ingredients matters. Fresh broccoli gives your soup a bright taste and color. Look for florets that are firm and vibrant green. Avoid any that are yellow or wilted. When it comes to cheese, sharp cheddar works best. It melts nicely and adds a rich flavor. You can also try other cheeses like Gruyère for a unique twist. For the best soup, use quality vegetable broth. Homemade broth is tasty, but store-bought can save time. Heavy cream adds creaminess and richness. If you want a lighter version, you can use half-and-half. But remember, it may not be as rich. You can find the full recipe at the end of this article. Enjoy cooking! 1. Start by warming olive oil in a large pot over medium heat. 2. Once hot, add the finely chopped onion. Sauté it for about 5 minutes. 3. The goal is to make the onion soft and clear. 4. Next, add the minced garlic. Stir for one minute. 5. The garlic should smell great but not brown. 6. Now, it's time to add the broccoli florets. 7. Pour in the vegetable broth and raise the heat. 8. Bring this mix to a boil, then lower the heat to simmer. 9. Cook until the broccoli is tender, which should take 8 to 10 minutes. 1. For a smooth soup, use an immersion blender. 2. Carefully puree the soup right in the pot. 3. If you prefer, use a traditional blender instead. 4. Just blend the soup in small batches. 5. Return the blended soup to the pot after each batch. 1. Keep the soup on low heat after blending. 2. Gradually whisk in the heavy cream for richness. 3. Add sea salt, black pepper, and nutmeg if you like. 4. Next, mix in the grated cheddar cheese. 5. Stir until the cheese fully melts, creating a creamy texture. 6. If you want the soup thicker, mix cornstarch with cold water. 7. Stir this slurry into the soup and let it simmer. 8. Cook for an extra 3 to 5 minutes until it thickens. 9. Taste and adjust the seasoning if needed. 10. Serve hot and garnish with parsley for a nice touch. For the full recipe, check out the full recipe section. To make your creamy broccoli cheddar soup truly velvety, you can use cornstarch. This thickener works great if you want a richer texture. Mix cornstarch with cold water to form a slurry before adding it to the soup. Once you stir it in, let the soup simmer for a few minutes. This method will give your soup that perfect thickness. For that smooth feel, blending is key. I prefer an immersion blender for ease. It’s quick and you can blend right in the pot. If you use a regular blender, be careful. Always blend in batches to avoid spills. Blend until no chunks remain. Adding spices and herbs can take your soup to the next level. A pinch of nutmeg adds warmth and depth. Fresh herbs like parsley or thyme can brighten the flavors. Experiment to find what you love best. When it comes to cheese, you can switch it up for different tastes. Sharp cheddar gives a bold flavor, while mild cheddar is creamier. For a fun twist, try adding a bit of Gruyère or pepper jack cheese. This will give your soup a unique kick. For the full recipe, you can refer to the earlier section. Enjoy your cooking! {{image_4}} You can make this soup vegan by swapping out some ingredients. Use non-dairy cream instead of heavy cream. Cashew cream or coconut cream works well. For cheese, choose a vegan cheese that melts nicely. Many brands offer tasty options that mimic real cheese. This change keeps the soup creamy while being plant-based. You can boost the nutrition of your soup by adding more veggies. Try adding carrots, spinach, or peas for extra color and vitamins. Grains like quinoa or brown rice add fiber and protein. For a protein boost, toss in some cooked lentils or chickpeas. These add-ins make the soup heartier and more filling. You can mix and match to find your favorite combo. To keep your creamy broccoli cheddar soup fresh, follow these steps: - Refrigeration guidelines: Store the soup in an airtight container. It stays good for up to 4 days in the fridge. Make sure it cools before sealing. This helps maintain its texture and flavor. - Freezing for later use: For longer storage, freeze the soup. Use a freezer-safe container or bags. Leave some space for expansion. It can last up to 3 months. When ready to eat, thaw it in the fridge overnight. To enjoy your soup again, reheating it properly is key. Here are the best methods: - Stovetop: Pour the soup into a pot over medium heat. Stir often to prevent sticking. Heat until warm, but don’t boil to keep the cream from separating. - Microwave: Use a microwave-safe bowl. Heat in short bursts, about 1 to 2 minutes. Stir in between to ensure even heating. This method works well if you're in a hurry. Following these steps helps keep your creamy broccoli cheddar soup delicious and smooth. Don't forget to check the [Full Recipe] for more tips! You can make your soup thicker with easy options. One great method is a cornstarch slurry. To do this, mix two tablespoons of cornstarch with a few tablespoons of cold water. Stir this mixture into your soup while it simmers. It will help achieve a rich texture. You can also use less broth or add more cheese. Each option makes the soup heartier. Yes, you can prepare this soup in advance. Cook the soup, then let it cool. Store it in an airtight container in the fridge for up to three days. For longer storage, freeze it. Just remember to leave some room in the container for expansion. When you’re ready, thaw it overnight in the fridge before reheating. This soup pairs well with many sides. Consider serving it with crusty bread or a fresh salad. A grilled cheese sandwich is another classic choice. You might also enjoy it with some roasted vegetables or a light pasta. These options make for a complete meal and elevate your dining experience. For more delicious ideas, check the Full Recipe. This blog post showed you how to make a tasty broccoli cheddar soup. We discussed key ingredients, like fresh broccoli and cheddar cheese. I shared tips on selecting quality items to enhance flavor. You learned step-by-step instructions for preparing and blending. Plus, we explored variations and how to store leftovers. Remember, the right ingredients and techniques create a delicious meal. Enjoy experimenting with this comforting soup!](https://tastyhatch.com/wp-content/uploads/2025/07/6809dc08-79d7-460e-8406-9c06eb05ac01.webp)
If you’re searching for a warm, hearty meal, look no further than creamy broccoli cheddar soup. This easy recipe bursts

Start your morning right with a Strawberry Mango Smoothie Bowl! This bright and tasty treat is perfect for breakfast or
![When making Pumpkin Spice Energy Balls, the right ingredients matter. You want a mix that provides energy and taste. Here’s what you need: - 1 cup rolled oats - ½ cup almond butter - ½ cup pumpkin puree - 1/4 cup honey or maple syrup - 2 teaspoons pumpkin spice blend - 1 tablespoon chia seeds - 1/4 cup unsweetened shredded coconut - Pinch of salt - Optional: 1/4 cup dark chocolate chips or raisins Each ingredient adds something special. Rolled oats provide fiber and help fill you up. Almond butter adds healthy fat and protein. Pumpkin puree brings moisture and a hint of sweetness. Honey or maple syrup sweetens the mix naturally. The pumpkin spice blend gives that classic fall flavor. Chia seeds are great for extra nutrition. Shredded coconut adds texture and a tropical touch. You can also add dark chocolate chips or raisins for a sweet surprise. These ingredients come together to create a fun and tasty snack. The full recipe shows you how to mix and shape them into delightful energy balls. Enjoy making your snack! Preparation Steps - Combine rolled oats, almond butter, pumpkin puree, and honey in a bowl. - Mix until smooth and fully blended. - Add pumpkin spice blend, chia seeds, shredded coconut, and salt. - Stir until well combined. Making these energy balls is simple. Start with your rolled oats and almond butter. I love using creamy almond butter for its nutty flavor. Then add in the pumpkin puree and honey. This mix gives a great taste and texture. Blend all these until smooth. You want everything mixed well. Next, sprinkle in your pumpkin spice blend. The aroma will make you excited! Then add chia seeds, shredded coconut, and a pinch of salt. This mix adds a nice crunch and flavor. Stir until everything is mixed evenly. Forming the Energy Balls - Scoop out portions of the mixture and roll into 1-inch balls. - Place on a parchment-lined baking sheet. Now it’s time to shape the energy balls! Take small scoops of the mixture. Roll each into a ball about 1 inch wide. They will be fun to make! Place these on a parchment-lined baking sheet. Spacing them out helps when they firm up. Chilling and Storing - Refrigerate for at least 30 minutes to firm up. - Store in an airtight container in the refrigerator for up to a week or freeze for longer storage. After shaping, chill the balls in the fridge. Let them sit for at least 30 minutes. This helps them become firmer. Once they are chilled, store them in an airtight container. They last up to a week in the fridge. For longer storage, freeze them. They will be great for a quick snack later! For the full recipe, you can check the details above. You can swap nut butters for different flavors. Try using peanut or cashew butter instead of almond butter. These options will change the taste but keep it yummy. For sweeteners, consider agave nectar or brown rice syrup. They add unique flavors and can make your energy balls even more delightful. Want to add some crunch? Toss in some chopped nuts or seeds. Almonds, walnuts, or pumpkin seeds work great. They will give your energy balls a nice bite. You can also use dried fruit like cranberries or apricots. Dried fruit adds natural sweetness and makes each ball chewy and fun to eat. When serving your energy balls, presentation matters. Place them in a pretty jar or on a wooden board. For a festive touch, sprinkle a bit of pumpkin spice on top before serving. These little treats pair well with drinks too. Try them with apple cider, coffee, or even a smoothie for a tasty snack combo. {{image_4}} You can easily switch up the flavors of your pumpkin spice energy balls. Try using chai spice instead of pumpkin spice for a warm twist. Apple pie spice also works well and adds a sweet, fruity note. If you're a chocolate lover, mix in cocoa powder. This will give the energy balls a rich chocolate taste that is hard to resist. Feel free to experiment with different nut butters. Almond butter is great, but peanut or cashew butter can change the flavor. You can also use honey or maple syrup as sweeteners. For a health boost, add superfoods like spirulina or protein powder. These ingredients can enhance the nutritional profile of your energy balls without changing the taste too much. You can adapt this recipe for different holidays. For Christmas, add a bit of peppermint extract or crushed candy canes. For Halloween, why not add some chopped nuts for texture? If you want a tropical vibe, mix in coconut flakes and pineapple. This twist gives your energy balls a fun and sunny taste, perfect for warm days. For the complete recipe, check out the [Full Recipe]. To keep your Pumpkin Spice Energy Balls fresh, store them in the fridge. Use an airtight container to seal in moisture. This way, they stay tasty and safe to eat. I recommend using glass containers or high-quality plastic ones. These options prevent any odors from affecting your snacks. Freezing energy balls is simple and great for long-term storage. First, place the energy balls on a baking sheet. Make sure they are spaced apart. Freeze them for about an hour until they are firm. Then, transfer them to an airtight container or a freezer bag. They can last up to three months in the freezer without losing their flavor. In the fridge, these energy balls stay fresh for about a week. If you freeze them, they can last for three months. Always check for signs of spoilage before eating. Look for any mold or an off smell. If you see any changes, it's best to throw them away. For more details on making these snacks, check the Full Recipe. These energy balls last about one week in the fridge. Store them in an airtight container. For longer storage, freeze them. They can last up to three months in the freezer. Just remember to label your container with the date. Yes, you can easily make these energy balls vegan. Use maple syrup instead of honey. For nut butter, you can choose sunflower seed butter or any other vegan option. Both will work well. If you need a substitute for almond butter, try these options: - Peanut butter - Cashew butter - Sunflower seed butter - Tahini Each of these will add its own unique flavor, so pick what you like best. Yes, these energy balls can be gluten-free. Use certified gluten-free oats. This ensures no cross-contamination with gluten grains. Check your nut butter and sweeteners too, as some may contain gluten. To adjust the sweetness, try these tips: - Add more honey or maple syrup for extra sweetness. - Use less if you prefer a less sweet snack. - You can also mix in dried fruits like dates or raisins to boost sweetness naturally. This way, you can match the flavor to your taste. For the full recipe, check the earlier sections. These Pumpkin Spice Energy Balls are simple to make and customize. We covered the easy steps for preparation, forming, and storing them. You can swap ingredients to suit your tastes and even try seasonal flavors. These snacks are great for gatherings or on-the-go. Enjoy them fresh from the fridge or store them for later. Remember to check for freshness and adjust sweetness as needed. I hope you enjoy making and sharing these tasty treats!](https://tastyhatch.com/wp-content/uploads/2025/07/4987fb7e-747e-465d-a1f1-43aac74602fb.webp)
Are you craving a healthy snack that’s both simple to make and packed with flavor? Look no further! These Pumpkin
