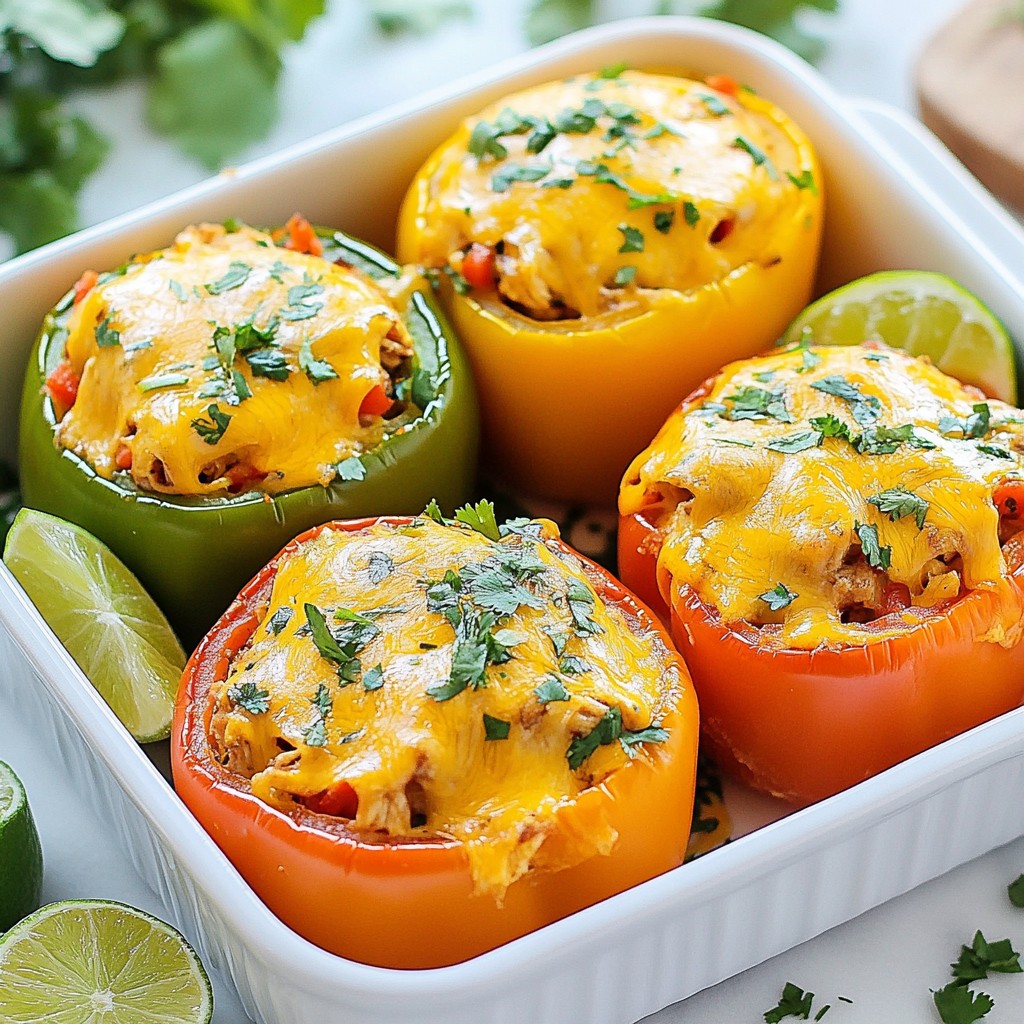
Looking for a tasty, easy meal? Chicken Fajita Stuffed Peppers might just be your next favorite dish! With vibrant bell peppers filled with juicy chicken and topped with melted cheese, this recipe is simple and bursting with flavor. It’s healthy, too! In just a few easy steps, you can create a dinner that impresses everyone. Ready to dive in? Let's make dinner exciting!
Why I Love This Recipe
- Flavor Explosion: This recipe combines spices, juicy chicken, and fresh veggies for a delightful culinary experience that excites the palate.
- Healthy and Colorful: Stuffed peppers are not only nutritious but also visually appealing, making them a perfect dish for any occasion.
- Customizable: You can easily adapt the filling ingredients to suit your taste, whether it's adding more veggies or switching up the protein.
- Easy Cleanup: With everything baked in one dish, cleanup is a breeze, allowing you to enjoy your meal without the hassle.
Ingredients
List of Ingredients
- 4 large bell peppers (any color)
- 1 pound boneless, skinless chicken breast, diced
- 1 tablespoon olive oil
- 1 medium onion, thinly sliced
- 2 cloves garlic, minced
- 1 teaspoon chili powder
- 1 teaspoon ground cumin
- 1 teaspoon smoked paprika
- Salt and pepper to taste
- 1 cup corn kernels
- 1 cup black beans
- 1 cup diced tomatoes
- 1 cup shredded cheese
- Fresh cilantro and lime wedges for garnish
The ingredients for Chicken Fajita Stuffed Peppers are simple but full of flavor. You start with bell peppers, which can be any color you like. I often choose bright red or green for a colorful plate. The chicken breast is the main protein, and I recommend dicing it into small pieces for even cooking.
Olive oil adds a nice touch when sautéing. The onion and garlic are key flavors; they make everything smell amazing. The spices—chili powder, cumin, and smoked paprika—bring a warm, smoky taste that lifts the dish.
Next, you have corn and black beans. They add texture and nutrition, plus a hint of sweetness from the corn. Diced tomatoes give moisture and freshness. Lastly, cheese is a must for that gooey topping.
For garnishing, fresh cilantro and lime wedges brighten each bite. This mix of colors and flavors creates a dish that is as pleasing to the eye as it is to the palate. Each ingredient works together to make a satisfying and tasty meal.

Step-by-Step Instructions
Prepping the Oven and Peppers
- Preheat the oven to 375°F (190°C).
- Cut the tops off the bell peppers and take out the seeds. Stand them up in a baking dish for later.
Cooking the Filling
- In a large skillet, add olive oil and heat it on medium.
- Add the sliced onions. Cook until they are soft, about 3-4 minutes.
- Next, add the diced chicken. Cook for 5-7 minutes until it's no longer pink.
Combining and Stuffing
- Once the chicken is cooked, mix in minced garlic, chili powder, ground cumin, smoked paprika, salt, and pepper.
- Stir for 2 minutes so the spices can blend well.
- Take the skillet off the heat. Add corn, black beans, diced tomatoes, and half the cheese. Mix it all together.
- Use a spoon to fill each bell pepper with the chicken mixture. Pack it in gently.
Baking the Stuffed Peppers
- Sprinkle the remaining cheese over the tops of the peppers.
- Cover the baking dish with foil to keep moisture in. Bake for 25 minutes.
- After that, take off the foil and bake for another 10-15 minutes. Look for tender peppers and melted cheese on top.
Tips & Tricks
Perfecting Your Stuffed Peppers
To make your stuffed peppers look tasty, use bell peppers of different colors. Red, yellow, and green peppers add a nice pop to your dish. Each color has its own sweet flavor, which makes every bite better.
Cook the chicken well to keep your dish safe and tasty. Use a meat thermometer to check that the chicken reaches 165°F (74°C). This helps you avoid any risk of undercooked meat. Cut the chicken into small pieces for even cooking.
Serving Suggestions
When it’s time to serve, add some garnishes for a fresh touch. A sprinkle of chopped cilantro adds color and flavor. Place a lime wedge on the side for a zesty kick. Your guests will appreciate this little detail.
Pair your stuffed peppers with a side of rice or a fresh salad. These options balance the meal well. You can also serve them with a side of salsa or sour cream for dipping. This adds extra flavor to each bite and makes it even more enjoyable.
Pro Tips
- Choose Colorful Peppers: Using a mix of red, yellow, and green bell peppers not only enhances the visual appeal but also adds a variety of flavors to your dish.
- Marinate the Chicken: For extra flavor, marinate the diced chicken in lime juice, chili powder, and cumin for at least 30 minutes before cooking.
- Cheese Variations: Experiment with different types of cheese, such as pepper jack for a spicy kick or goat cheese for a tangy flavor.
- Make Ahead: Prepare the filling a day in advance and stuff the peppers just before baking to save time on busy nights.
Variations
Ingredient Swaps
You can easily change the protein in this dish. Try turkey or tofu instead of chicken. Both options work well with the spices. They add unique flavors and their own textures. You can also switch up the beans. Use pinto beans or kidney beans for a different taste. Consider adding more veggies, like zucchini or spinach. These additions boost nutrition and make it colorful.
Flavor Enhancements
To add some heat, mix in more spices. Try cayenne pepper or red pepper flakes. These will spice up your stuffed peppers. Different cheese types can also change the flavor. Use pepper jack for a kick or mozzarella for a milder taste. Mixing cheeses can give an interesting twist to this dish. Remember, a little change can make a big difference.
Storage Info
Refrigeration Tips
You can store leftover Chicken Fajita Stuffed Peppers in the fridge for up to four days. Make sure to put them in an airtight container. This keeps them fresh and tasty. When you want to eat them, just take one out and heat it up in the microwave or oven. If you want to keep them from drying out, add a little water to the dish before reheating.
Freezing Instructions
To freeze stuffed peppers, let them cool first. Once cooled, wrap each pepper tightly in plastic wrap. Then put them in a freezer-safe bag or container. They can last up to three months in the freezer. When you’re ready to eat them, thaw them in the fridge overnight. You can reheat them in the oven at 375°F (190°C) for about 20-25 minutes. This way, they stay warm and delicious.
FAQs
How long do Chicken Fajita Stuffed Peppers take to cook?
Chicken Fajita Stuffed Peppers take about 55 minutes to cook. First, you prep the oven and peppers. This takes around 15 minutes. Next, bake them for 25 minutes covered, then 10-15 minutes uncovered. The peppers should be tender and the cheese melted and golden.
Can I make these stuffed peppers ahead of time?
Yes, you can make these stuffed peppers ahead of time. You can prepare the filling and stuff the peppers. Then, cover and refrigerate them for up to 24 hours. When ready, just bake them directly from the fridge, adding a few extra minutes to the cooking time.
What should I serve with stuffed peppers?
Stuffed peppers go great with many side dishes. Consider serving them with a fresh salad or rice. You can also add some tortilla chips or guacamole for extra flavor. A dollop of sour cream or a side of salsa can enhance the meal too.
Are stuffed peppers healthy?
Yes, stuffed peppers are a healthy choice. They are full of protein from chicken and fiber from beans and vegetables. You can control the ingredients and make them as healthy as you want. Using fresh veggies and lean meat keeps the dish light and nutritious.
Can I use frozen vegetables in the recipe?
Absolutely! Frozen vegetables work well in this recipe. They save time and are often just as healthy as fresh ones. Just make sure to thaw and drain them before adding to the filling. This helps keep the flavors balanced and the texture right.
In this blog post, I covered how to make Chicken Fajita Stuffed Peppers. We started with the ingredients needed, then moved to step-by-step instructions. I shared tips for perfecting your dish and ideas for variations to suit your taste. Lastly, I provided storage info and frequently asked questions.
I hope you feel ready to try this fun recipe. Enjoy cooking and make it your own!