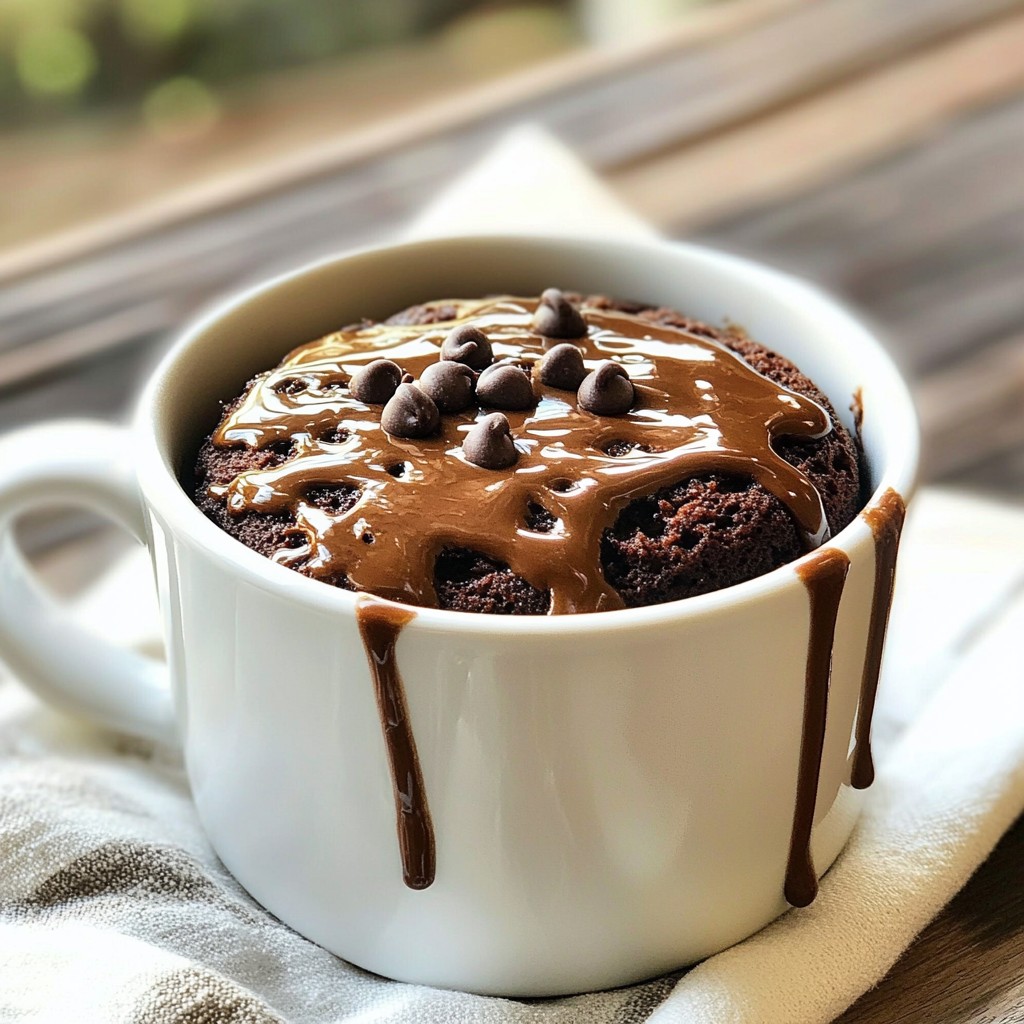
Craving a quick and delicious dessert? My Chocolate Espresso Mug Cake is the answer! This simple treat combines rich cocoa with a coffee kick, made right in your microwave. In just a few minutes, you'll enjoy a warm, decadent cake that’s perfect for any sweet tooth. Join me as I guide you through the easy steps, key ingredients, and some fun tips for the best mug cake experience. Let’s dive in!
Why I Love This Recipe
- Quick and Easy: This mug cake takes only 5 minutes to prepare and 1.5 minutes to cook, making it a perfect last-minute dessert.
- Rich Flavor: The combination of chocolate and espresso creates a decadent flavor profile that coffee and chocolate lovers will adore.
- Customizable: You can easily adjust the recipe by adding your favorite ingredients like nuts or chocolate chips for an extra treat.
- Single Serving Delight: This mug cake is perfect for satisfying your sweet tooth without the guilt of making an entire cake.
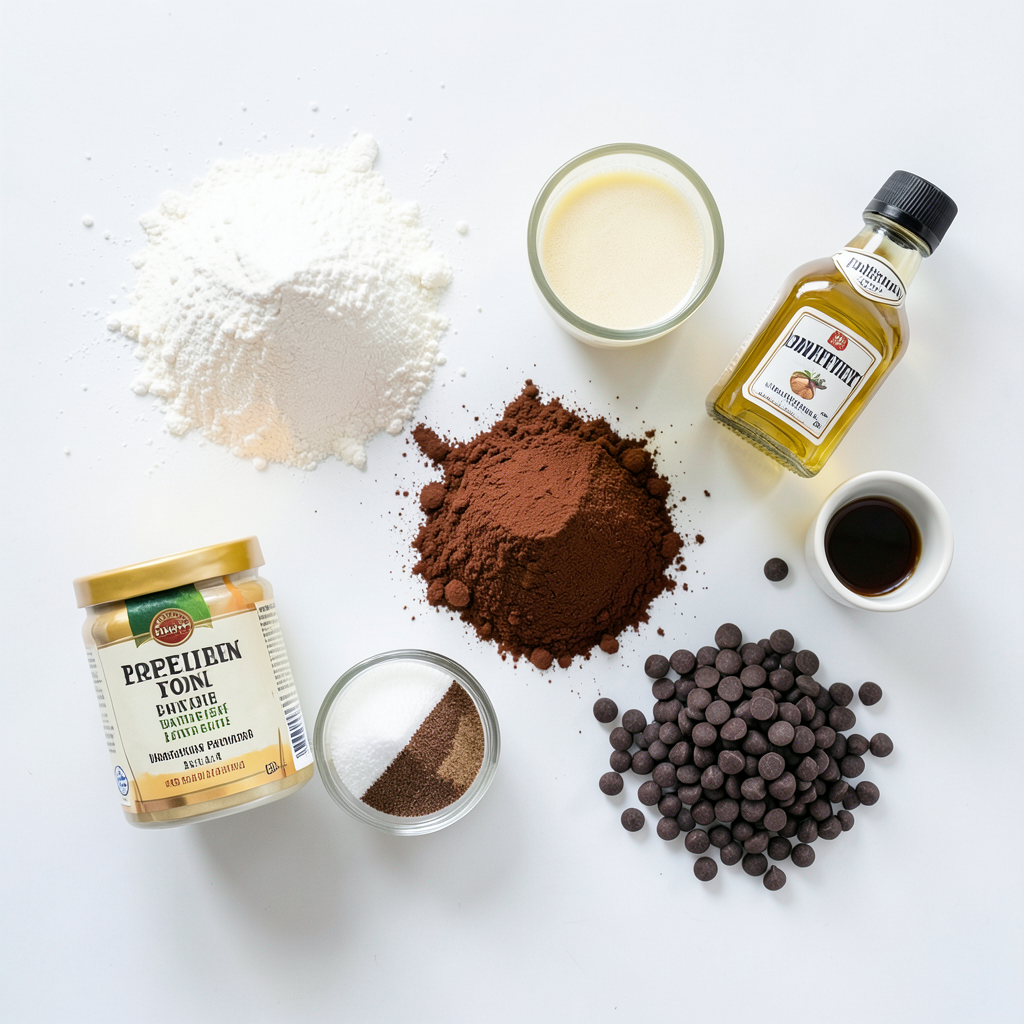
Ingredients
Dry Ingredients
- 4 tablespoons all-purpose flour
- 4 tablespoons granulated sugar
- 2 tablespoons unsweetened cocoa powder
- ¼ teaspoon baking powder
- 1 pinch of salt
Wet Ingredients
- 3 tablespoons milk (dairy or plant-based)
- 2 tablespoons vegetable oil (or melted coconut oil)
- 1 teaspoon espresso powder (or instant coffee)
- ¼ teaspoon vanilla extract
Optional Enhancements
- A handful of chocolate chips
- Chopped nuts (walnuts, pecans)
The ingredients create a rich flavor. Each part plays a role. The flour gives the cake structure. Sugar adds sweetness and helps it rise. Cocoa powder brings that deep chocolate taste. Baking powder helps it puff up. A pinch of salt balances the sweetness.
The wet ingredients bring it all together. Milk gives moisture. Oil keeps the cake soft. Espresso powder adds a coffee kick. Vanilla extract enhances all the flavors.
Optional enhancements make it even better. Chocolate chips provide gooey spots of chocolate. Nuts add crunch and depth. You can mix and match based on what you have.
Gather these ingredients, and you’re ready to create a delicious treat!
Step-by-Step Instructions
Mixing the Dry Ingredients
Start by grabbing a microwave-safe mug. Combine these dry ingredients in the mug:
- 4 tablespoons all-purpose flour
- 4 tablespoons granulated sugar
- 2 tablespoons unsweetened cocoa powder
- ¼ teaspoon baking powder
- 1 pinch of salt
Mix them well. Make sure no clumps remain. A smooth mix helps the cake rise better.
Adding the Wet Ingredients
Next, pour in the wet ingredients:
- 3 tablespoons milk (dairy or plant-based)
- 2 tablespoons vegetable oil (or melted coconut oil)
- 1 teaspoon espresso powder (or instant coffee)
- ¼ teaspoon vanilla extract
Use a spoon or small whisk to mix. Stir until you achieve a smooth batter. Scrape the bottom to mix all ingredients evenly.
Enhancing with Optional Add-Ins
Now comes the fun part! If you like, fold in a handful of chocolate chips or chopped nuts. This adds texture and flavor.
Cooking the Mug Cake
Place your mug in the microwave. Cook on high for about 1 minute and 15 seconds. Check the cake as it cooks. You want it soft and slightly gooey in the center. Cooking time may vary based on your microwave’s wattage.
Cooling the Cake
Once the mug cake is done, let it cool for a minute. This keeps you from burning yourself. It also lets the flavors blend nicely. A warm mug cake is a treat, but cooling helps with texture. Enjoy your delicious creation!
Tips & Tricks
Best Practices for Mug Cake Perfection
To make your mug cake great, first mix well. You want the dry ingredients blended without lumps. Use a fork if needed. This ensures a smooth batter. Next, don't overcook your cake. Start with 1 minute and 15 seconds in the microwave. Check it closely. The center should be soft, not hard. If it needs more time, add just a few seconds. Remember, a little gooeyness is perfect!
Ingredient Substitutions
If you want to switch things up, there are easy swaps. Use almond or oat milk instead of regular milk. This makes it dairy-free. For oil, try melted coconut oil for a unique taste. You can also add flavored extracts like almond or hazelnut. These will give your cake a fun twist.
Serving Suggestions
When serving your mug cake, think toppings! A dollop of whipped cream adds creaminess. Ice cream is another sweet option. For a richer taste, drizzle chocolate sauce on top. You can also sprinkle more cocoa powder or nuts for crunch. Serve it warm in the mug for a cozy feel. Enjoy your delicious treat!
Pro Tips
- Mix Thoroughly: Ensure that the dry ingredients are well combined without clumps. This will lead to a smoother cake texture.
- Watch Cooking Time: Microwave wattages vary, so check your cake at 1 minute to avoid overcooking. A slightly gooey center is perfect!
- Experiment with Flavors: Try different nut butters or flavored extracts like almond or hazelnut to elevate the taste of your cake.
- Serve Warm: For the best experience, serve the mug cake immediately while it's still warm, enhancing the rich chocolate flavor.
Variations
Flavor Variations
- Mocha Mug Cake: Want to add a coffee twist? Mix in some chocolate syrup with the wet ingredients. This gives the cake a rich, mocha flavor. You can also sprinkle some cocoa powder on top for extra chocolatey goodness.
- Nutty Chocolate Espresso: If you like nuts, add some chopped walnuts or pecans to the batter. This gives a nice crunch and a different texture. You can also use nut butter instead of oil for a unique taste.
Dietary Adjustments
- Gluten-free versions: To make this cake gluten-free, swap the all-purpose flour with a gluten-free flour blend. You can find these blends in most stores. This keeps the cake moist and tasty.
- Vegan alternatives: For a vegan treat, use plant-based milk and oil. You can also try using a flax egg instead of regular eggs. Just mix one tablespoon of flaxseed meal with three tablespoons of water and let it sit for a few minutes.
Seasonal Twists
- Holiday-inspired additions: During the holidays, add spices like cinnamon or nutmeg to the batter. You can also mix in candy canes or dried fruit for a festive touch.
- Special occasion variations: For birthdays, top your mug cake with colorful sprinkles or a scoop of your favorite ice cream. This makes it feel extra special and fun to eat.
These variations make the Chocolate Espresso Mug Cake perfect for any time of year!
Storage Info
Refrigeration Tips
To store leftovers, let your mug cake cool completely before covering it. Use plastic wrap or a small container. This keeps it moist for later. You can store it in the fridge for up to two days. When you’re ready to eat it, simply reheat it in the microwave for about 30 seconds. Check it to avoid overcooking.
Freezing Mug Cake
You can freeze leftover mug cake for later. First, let it cool completely. Then, wrap it tightly in plastic wrap and place it in a freezer-safe bag. This keeps the cake fresh. To thaw, move it to the fridge overnight. You can also reheat it from frozen. Just add a few extra seconds when microwaving.
Shelf Life
The shelf life of your mug cake depends on the ingredients. Typically, it lasts two days in the fridge. If you freeze it, it can stay good for about one month. After cooking, the freshness of the ingredients matters. For best taste, enjoy your mug cake soon after making it.
FAQs
Can I use a regular coffee instead of espresso powder?
Yes, you can use regular coffee. Instant coffee works well. Just keep the amount the same. The flavor will be different, but it will still taste great. The espresso powder gives a rich taste and deepens the chocolate flavor.
How can I make this recipe gluten-free?
To make this mug cake gluten-free, use gluten-free all-purpose flour. Look for blends that swap easily. These blends often work well in recipes. You might need to adjust the liquid a bit. Just check the texture of the batter.
What other toppings can I use on my mug cake?
You can use many toppings! Try whipped cream, ice cream, or chocolate sauce. Fresh berries add a nice touch too. Nuts or sprinkles can add crunch. Be creative with your toppings to make it special!
How do I know when the mug cake is done?
Check the texture of the cake. It should be soft but not wet in the center. A toothpick inserted should come out with some moist crumbs. If it’s too runny, cook for a few more seconds. Start with 15-second intervals to avoid overcooking.
Can I double the recipe for a larger serving?
Yes, you can double the recipe! Use a larger mug. You may need to increase the cooking time. Start with two minutes and check for doneness. Keep an eye on it to ensure it cooks evenly. Enjoy sharing this treat with a friend!
You now have all you need to make a delicious mug cake. We covered the key ingredients, from dry to wet, and even some enhancements. You learned how to mix, cook, and store your cake perfectly. Remember, get creative with flavors and toppings to make it your own. This simple recipe suits any occasion, whether it's a treat for yourself or a sweet gift. Enjoy your mug cake experience and impress your friends with your skills!