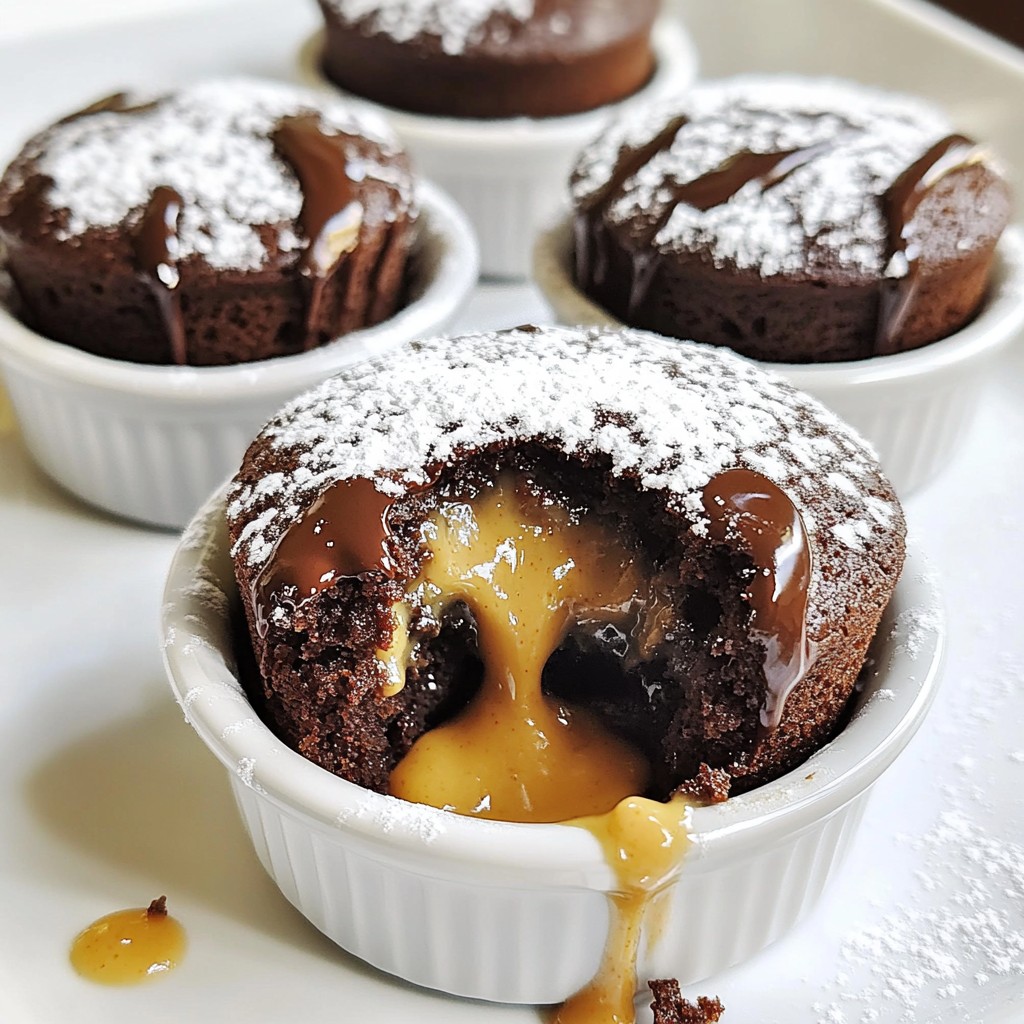
Indulge in a Chocolate Peanut Butter Lava Cake, where rich chocolate meets creamy peanut butter. This dessert melts in your mouth, delivering the perfect gooey center you crave. I’ll guide you through easy steps, from mixing the batter to baking your cakes. Whether you’re a baking pro or a kitchen newbie, get ready to impress with this decadent treat. Let’s dive in and create something delicious together!
Why I Love This Recipe
- Decadent Flavor Combination: This lava cake perfectly marries rich chocolate and creamy peanut butter for an indulgent dessert experience.
- Impressive Presentation: The gooey center oozes out when cut, making for a stunning dessert that will wow your guests.
- Quick and Easy: With just 15 minutes of prep time, you can have a restaurant-quality dessert ready to serve in under 30 minutes.
- Customizable Indulgence: Add a scoop of ice cream or whipped cream for a delightful contrast to the warm, molten cake.
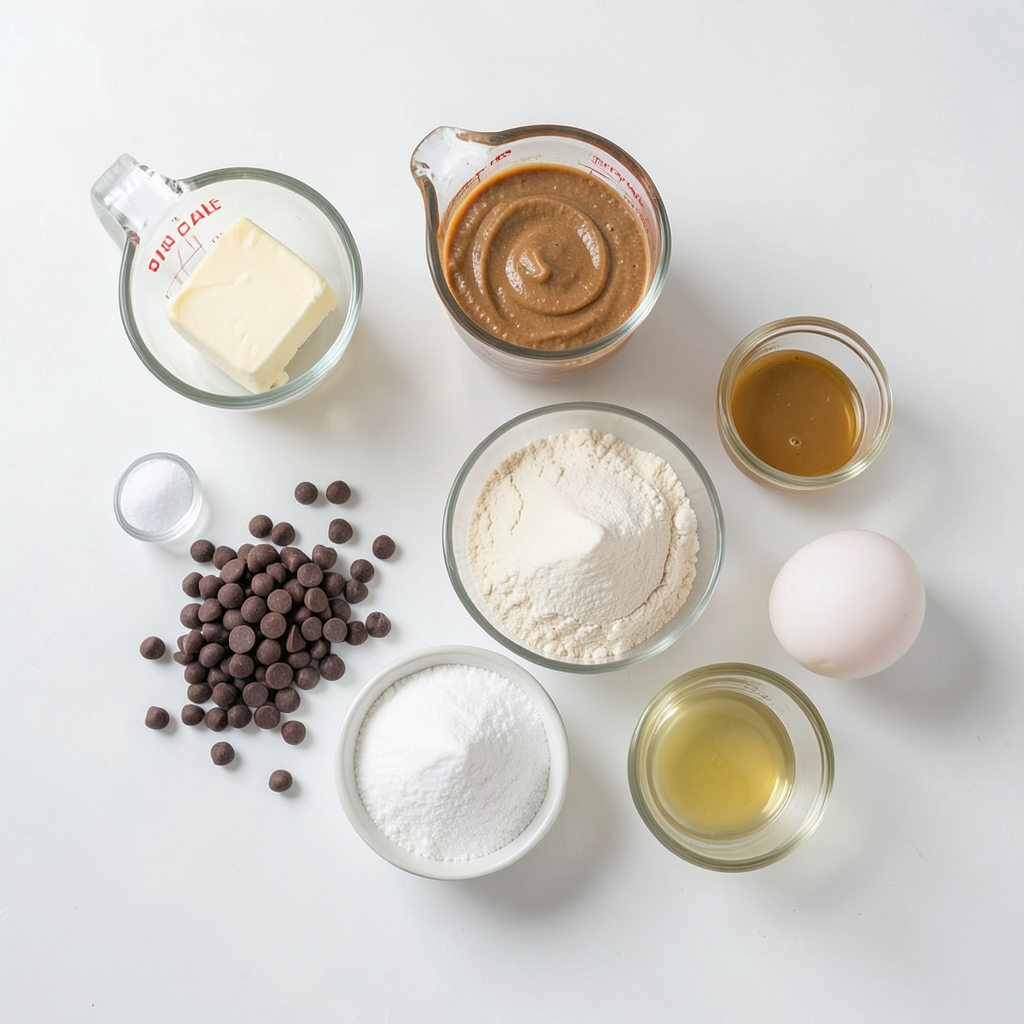
Ingredients
List of Ingredients
- 1/2 cup unsalted butter
- 1 cup semi-sweet chocolate chips
- 1/2 cup creamy peanut butter
- 1/4 cup all-purpose flour
- 1/4 cup granulated sugar
- 2 large eggs
- 1 teaspoon vanilla extract
- 1/4 teaspoon salt
- Extra peanut butter for filling (1 tablespoon per cake)
- Powdered sugar for dusting (optional)
Optional Ingredients for Garnish
- A scoop of vanilla ice cream
- A dollop of whipped cream
- Chopped nuts for crunch
Substitutions for Key Ingredients
- Use coconut oil instead of butter for a dairy-free option.
- Swap semi-sweet chocolate chips for dark chocolate for a richer taste.
- Replace granulated sugar with coconut sugar for a healthier choice.
- If you're out of eggs, use flaxseed meal or applesauce as a binder.
These ingredients create a rich, gooey dessert that melts in your mouth. The combination of chocolate and peanut butter is a classic favorite. When you pick your ingredients, choose high-quality chocolate and peanut butter for the best flavor. Don’t skimp on the butter; it adds richness and moisture. If you want to impress, consider the optional garnishes. They not only look great but also balance the cake's richness. Enjoy crafting this treat with your favorite ingredients!
Step-by-Step Instructions
Preparing the Ramekins
First, preheat your oven to 425°F (220°C). Take four ramekins and grease them with unsalted butter. This step helps the cakes come out easily. After greasing, dust the ramekins with cocoa powder or flour. This will further prevent sticking.
Melting the Chocolate and Peanut Butter
Next, grab a microwave-safe bowl. Combine 1/2 cup of unsalted butter and 1 cup of semi-sweet chocolate chips. Heat this mixture in the microwave. Use 30-second intervals and stir after each one. Keep going until it is melted and smooth. Once melted, stir in 1/2 cup of creamy peanut butter. Mix until it is well combined.
Mixing the Batter
In a separate bowl, whisk together 1/4 cup of all-purpose flour, 1/4 cup of granulated sugar, 2 large eggs, 1 teaspoon of vanilla extract, and 1/4 teaspoon of salt. Keep whisking until you have a smooth mixture. Gradually pour the warm chocolate-peanut butter mix into the flour mixture. Stir gently until the batter is smooth and well mixed.
Filling the Ramekins
Now, carefully fill each greased ramekin halfway with the batter. In the center of each ramekin, add a tablespoon of extra peanut butter. It adds a delightful surprise! Top each ramekin with more batter until they are about three-quarters full.
Baking the Cakes
Arrange the ramekins on a baking sheet. Place them in your preheated oven. Bake for 12-14 minutes. The edges should be firm, but the centers must stay soft and a bit jiggly. This is key for that lava effect!
Serving Techniques
After baking, remove the ramekins from the oven. Let them cool for about 1 minute. To release the cakes, run a small knife around the edges of each ramekin. Carefully invert each ramekin onto a serving plate. If you want, dust the tops with powdered sugar for a lovely touch. Serve warm to enjoy the gooey center. For an extra treat, pair it with vanilla ice cream or whipped cream!
Tips & Tricks
Ensuring the Perfect Molten Center
To get that gooey center, you need to bake just right. Bake your cakes for 12-14 minutes. Keep an eye on the edges; they should be firm but not too hard. The center should be soft and jiggle a bit. If you bake too long, the center will not be molten. You want that warm chocolate-peanut butter flow when you cut into them.
Common Mistakes to Avoid
Avoid overmixing the batter. Mixing too much can lead to tough cakes instead of soft ones. Also, do not skip greasing the ramekins. This step ensures the cakes slide out easily. Lastly, be careful not to open the oven door too soon. This can cause the cakes to sink.
How to Choose the Right Ramekins
Pick ramekins that hold about 6 ounces. This size helps the cakes rise properly. Make sure they are oven-safe. You can use glass, ceramic, or metal. Just ensure they are all the same size for even baking. If you use different sizes, the baking times will vary. This will impact the gooey center you want.
Pro Tips
- Use Quality Chocolate: For the best flavor, opt for high-quality semi-sweet chocolate chips. The chocolate taste is the star of this dessert, so it’s worth investing in good chocolate.
- Prevent Overbaking: Keep a close eye on the baking time. The cakes are ready when the edges are set but the centers are still slightly jiggly. Overbaking will result in a less gooey center.
- Let Them Rest: After baking, allow the cakes to rest for about 1 minute before inverting them. This helps the lava center stay intact and prevents it from spilling out.
- Experiment with Fillings: While peanut butter is delightful, try adding other fillings like Nutella or caramel for a different twist. Just make sure they are thick enough to stay in the center!
Variations
Swapping Chocolate for Dark Chocolate
You can swap semi-sweet chocolate chips for dark chocolate. Dark chocolate adds a richer taste. The contrast between dark chocolate and peanut butter makes each bite special. Choose a dark chocolate with at least 60% cocoa for a bold flavor. Melt it just like you would with semi-sweet chocolate. Your lava cake will be deeper and more complex in taste.
Adding Nuts or Other Fillings
Try adding chopped nuts, like walnuts or pecans. They add a crunchy texture that contrasts nicely with the soft cake. You can also fill the center with caramel or hazelnut spread for a fun twist. Just make sure to keep your peanut butter filling too. The layers of flavor will impress anyone who tries it!
Making it Gluten-Free
You can easily make this lava cake gluten-free. Replace all-purpose flour with a gluten-free flour blend. Look for blends that work well in baking, like almond or coconut flour. The texture might change a bit, but the taste will still be amazing. Your gluten-free friends will love this dessert just as much!
Storage Info
How to Store Leftover Lava Cakes
To keep your leftover lava cakes fresh, let them cool first. Once cooled, cover each ramekin tightly with plastic wrap. You can also use a food storage container. Your cakes will last in the fridge for up to three days.
Reheating Instructions
To reheat your lava cakes, preheat your oven to 350°F (175°C). Remove the plastic wrap and place the ramekins on a baking sheet. Heat for about 10-12 minutes. This ensures the center stays gooey. You can also microwave them for about 30-40 seconds if you're in a hurry. Just be careful not to overheat.
Freezing Lava Cakes
You can freeze lava cakes for later enjoyment. After they cool, wrap each ramekin well in plastic wrap and then in foil. They can stay in the freezer for up to three months. When you're ready to eat, thaw in the fridge overnight. Reheat as directed above for a delicious treat anytime.
FAQs
How do I know when the lava cake is done?
You can tell when the lava cake is done by looking at the edges. The edges should be firm and set, while the center should still jiggle slightly. This means the middle will stay gooey. Bake it for 12 to 14 minutes at 425°F (220°C). If you bake it too long, the center will cook through.
Can I make the batter ahead of time?
Yes, you can make the batter ahead of time. Prepare the batter and store it in the fridge. Just remember to bring it back to room temperature before filling the ramekins. This will help it bake evenly. You can keep it in the fridge for up to 24 hours.
What toppings pair well with chocolate peanut butter lava cake?
Several toppings enhance the flavor of your lava cake. Here are some great options:
- Vanilla ice cream
- Whipped cream
- Chopped peanuts
- Caramel sauce
- Extra peanut butter drizzle
These toppings add flavor and texture. Plus, they look great on the plate!
Is it possible to make this recipe without eggs?
Yes, you can make this recipe without eggs. Use a substitute like unsweetened applesauce or mashed bananas. For each egg, use about 1/4 cup of applesauce or 1/2 of a mashed banana. The texture may change a bit, but the cake will still taste good.
In this post, we explored the essential steps to bake chocolate peanut butter lava cakes. We covered all the ingredients, mixing methods, and baking techniques. I also shared tips to avoid common mistakes and even suggested tasty variations. Remember, the right ramekins are key for a perfect bake. Enjoy the process, adapt the recipe, and impress your friends. Baking can be easy and fun. With practice, you will master this treat and serve a sweet surprise. Your lava cake journey starts now!