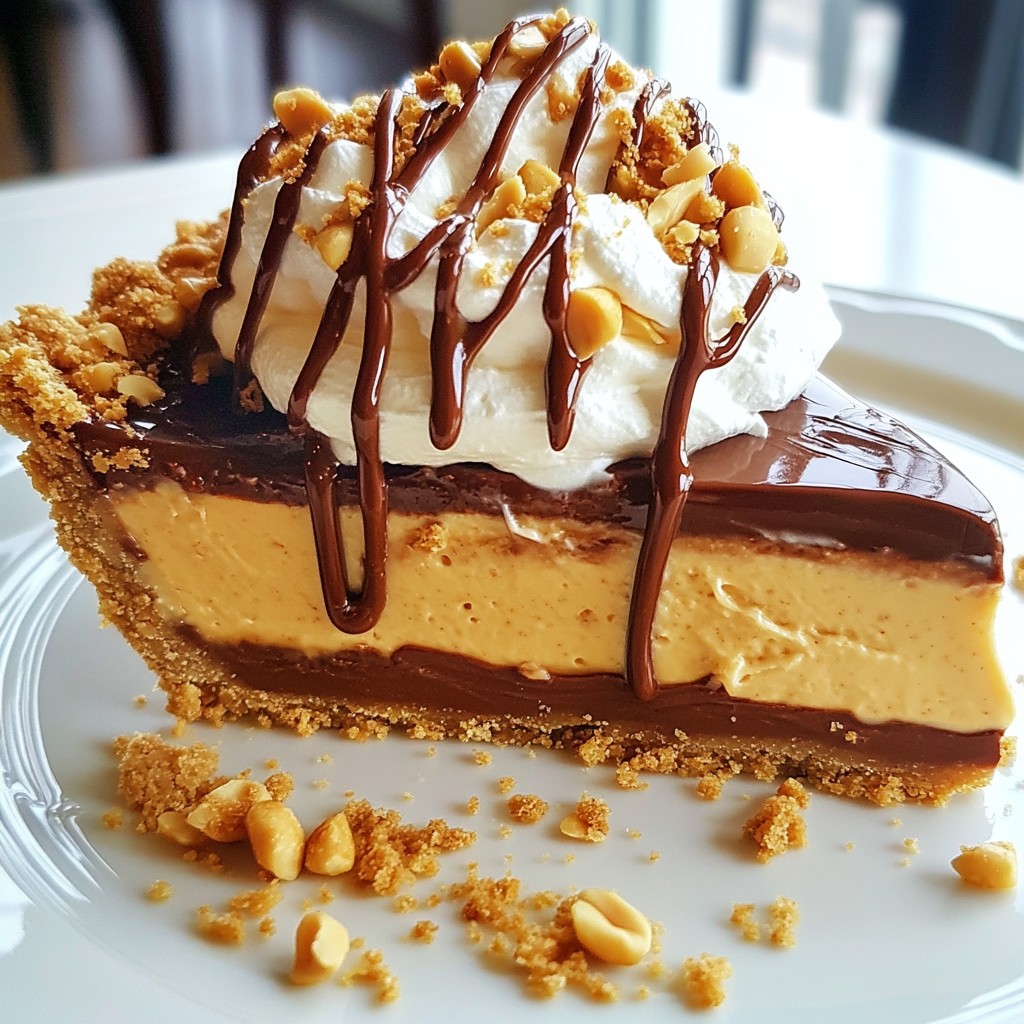
Craving a sweet treat that’s easy and delicious? Let me introduce you to the perfect Chocolate Peanut Butter Pie! This delightful no-bake dessert combines rich chocolate and creamy peanut butter for a taste that will have you coming back for more. I’ll guide you through every step, from mixing the filling to chilling the pie. Ready to impress your friends and satisfy your sweet tooth? Let’s dive into this amazing recipe!
Why I Love This Recipe
- Decadent Flavor Combination: This pie perfectly balances rich chocolate and creamy peanut butter, making it an irresistible treat for dessert lovers.
- Easy to Make: With simple ingredients and straightforward steps, this pie can be whipped up in no time, even by novice bakers.
- Impressive Presentation: The drizzled chocolate and garnished peanuts create a visually stunning dessert that will impress your guests.
- Versatile for Any Occasion: This pie is perfect for parties, holidays, or just a sweet indulgence at home, making it a go-to recipe for any gathering.
Ingredients
Essential Ingredients for Chocolate Peanut Butter Pie
To create this tasty pie, gather these key ingredients:
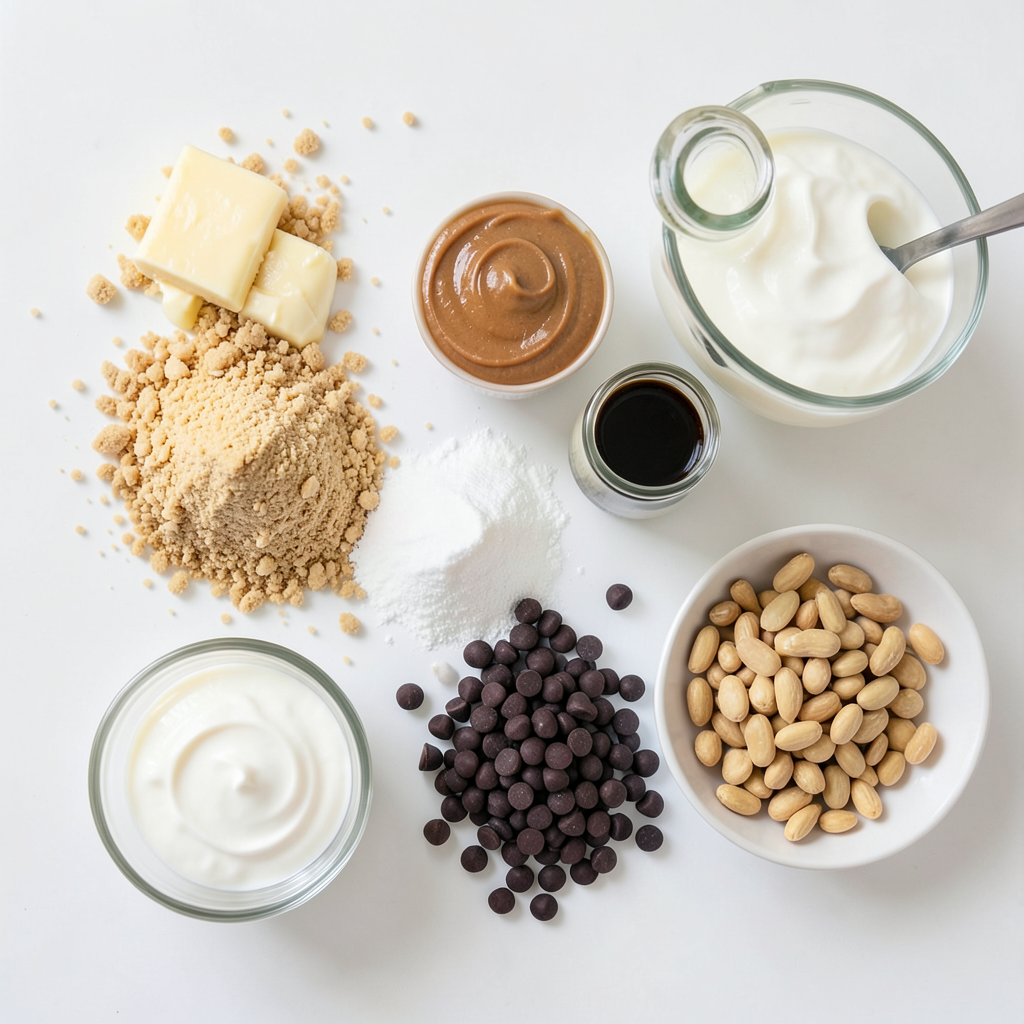
- 1 ½ cups graham cracker crumbs
- ¾ cup unsalted butter, melted
- 1 cup creamy peanut butter
- 1 cup powdered sugar
- 1 (8 oz) package cream cheese, softened
- 1 teaspoon vanilla extract
- 1 cup heavy whipping cream
- ½ cup chocolate chips (semi-sweet or dark)
- 2 tablespoons milk (for melting chocolate)
These ingredients work together to create the smooth filling and crunchy crust you crave. The graham cracker crumbs give a nice texture, while the peanut butter and cream cheese blend into a rich filling.
Optional Toppings and Garnishes
Feel free to add these fun toppings to enhance your pie:
- Whipped cream (for a fluffy layer)
- Chopped peanuts (for crunch)
- Extra melted chocolate (for a shiny finish)
These toppings make your pie look great and add extra flavor. You can also use fresh berries for a pop of color.
Substitutions for Dietary Preferences
If you have dietary needs, here are some easy swaps:
- Use dairy-free butter and cream cheese for a vegan option.
- Swap out graham crackers for gluten-free cookies if you're gluten-free.
- Natural peanut butter can replace creamy peanut butter for a healthier choice.
These substitutions keep the pie tasty while fitting your needs. Just remember to check all labels for ingredients.
Step-by-Step Instructions
Preparing the Pie Crust
First, gather your ingredients for the crust. You need:
- 1 ½ cups graham cracker crumbs
- ¾ cup unsalted butter, melted
In a medium bowl, mix the graham cracker crumbs and melted butter. Stir until the crumbs are fully coated. Next, press this mixture into a 9-inch pie pan. Make sure it covers the bottom and sides evenly. Bake it in a preheated oven at 350°F (175°C) for 10 minutes. Once baked, let the crust cool completely before adding the filling.
Making the Creamy Peanut Butter Filling
Now, let's make the filling! For this, you will need:
- 1 cup creamy peanut butter
- 1 cup powdered sugar
- 1 (8 oz) package cream cheese, softened
- 1 teaspoon vanilla extract
In a large bowl, beat together the peanut butter, powdered sugar, cream cheese, and vanilla using an electric mixer. Mix until smooth and creamy. Make sure there are no lumps. This filling should be rich and delicious.
Whipping the Cream and Assembling the Pie
Next, we need to whip the cream. Gather:
- 1 cup heavy whipping cream
In a separate bowl, pour in the heavy cream. Use a mixer to whip the cream until stiff peaks form. This means it holds its shape well. Gently fold this whipped cream into the peanut butter mixture using a spatula. Be careful; you don't want to deflate the whipped cream. Once mixed, pour this creamy filling into the cooled pie crust. Use a spatula to smooth the top.
Melting and Drizzling the Chocolate
Now, let’s make the chocolate drizzle. You’ll need:
- ½ cup chocolate chips
- 2 tablespoons milk
In a small microwave-safe bowl, combine the chocolate chips and milk. Microwave in 30-second intervals, stirring in between. Keep doing this until the chocolate is melted and smooth. Let it cool for a moment. Then, drizzle it over the pie filling in a fun pattern. This adds a nice touch and makes the pie look fancy.
Chilling and Serving the Pie
Cover the pie with plastic wrap and place it in the fridge. Chill for at least 4 hours, or even overnight. This helps the pie set properly. When you’re ready to serve, top it with whipped cream and sprinkle chopped peanuts on top. This adds texture and makes it look great! Enjoy your delicious pie with friends or family.
Tips & Tricks
Best Practices for a Flaky Crust
To get a great crust, use fresh graham cracker crumbs. I suggest crushing them finely for the best texture. Mix the crumbs with melted butter until each crumb is coated. Pack the crumbs tightly in the pie pan. Bake it until golden brown, about 10 minutes. Let it cool completely to avoid a soggy crust.
How to Get the Filling Extra Creamy
To make your filling super creamy, use softened cream cheese. Beat it well with peanut butter and powdered sugar. This breaks up lumps and blends them smoothly. Mixing in the vanilla extract adds flavor. Finally, fold whipped cream in gently. This keeps the filling light and airy.
Techniques for Perfect Whipped Cream
Use very cold heavy whipping cream for the best results. Beat it in a chilled bowl to help it whip up faster. Start mixing on low speed and increase it as it thickens. Stop when stiff peaks form. Avoid over-whipping, as it can turn grainy.
Serving Suggestions for Presentation
For a beautiful pie, serve slices on chilled plates. Drizzle extra melted chocolate on the plates for a fancy touch. Add fresh berries for color and flavor. Top each slice with a generous dollop of whipped cream and sprinkle chopped peanuts for a crunchy finish.
Pro Tips
- Chill Your Tools: Before whipping the cream, chill your mixing bowl and beaters in the freezer for about 10 minutes. This helps the cream whip up faster and achieve better volume.
- Use Quality Chocolate: For the best flavor, opt for high-quality chocolate chips or bars. The richness of the chocolate can elevate the overall taste of the pie.
- Let It Set: Allow the pie to chill overnight if possible. This extra time helps the flavors meld and the filling to firm up, making for cleaner slices.
- Creative Variations: Experiment with different nut butters or flavored chocolate chips for unique twists on this classic recipe. Almond butter or hazelnut spread can provide exciting flavor changes!
Variations
Different Chocolate Options (Dark, Milk, or White Chocolate)
You can change the chocolate flavor to fit your taste. Dark chocolate makes a rich pie. Milk chocolate adds sweetness, perfect for kids. White chocolate gives a creamy touch. Choose your favorite chocolate type for the drizzle. Each option brings a unique flavor twist.
Nutty Variations (Almond Butter or Nutella)
Switching to almond butter makes this pie nutty and delicious. It pairs well with chocolate. You can also try Nutella for a hazelnut kick. Nutella adds sweetness and a different texture. These options make the pie even more fun and tasty.
Alternative Crust Recipes
While graham cracker crust is great, you can try others. For a gluten-free option, use almond flour. Mix almond flour with melted butter for a tasty crust. If you love chocolate, use crushed Oreos for a chocolate crust. Each crust gives a new flavor and texture to your pie.
Storage Info
How to Store Leftover Pie
To keep your pie fresh, cover it tightly with plastic wrap. You can also use an airtight container. This helps keep it safe from air and moisture. Store the pie in the fridge for up to five days. The flavors will stay rich and tasty.
Freezing the Pie for Later
You can freeze the pie if you want to save it longer. First, slice the pie into pieces. Wrap each slice in plastic wrap. Then, place the slices in a freezer bag or container. This way, you can enjoy a slice anytime! It can stay frozen for up to three months. Thaw it in the fridge overnight before serving.
Reheating or Refreshing Leftovers
Reheating this pie isn’t necessary since it is best served chilled. If you want to refresh the pie, add more whipped cream on top. You can also drizzle some melted chocolate again for extra flavor. This small touch can make the pie feel new and exciting!
FAQs
Can I use natural peanut butter?
Yes, you can use natural peanut butter. It gives a nice flavor. However, natural peanut butter may make the filling a bit more oily. You might need to adjust the amount of powdered sugar for sweetness.
How long can I keep the pie in the refrigerator?
You can keep the pie in the refrigerator for up to five days. Just make sure to cover it well with plastic wrap. This helps to keep it fresh and prevent it from drying out.
What to do if my pie is too soft?
If your pie is too soft, don’t worry. You can place it in the freezer for a short time. Freezing it for 30 minutes can help it firm up. You can also try adding more whipped cream or powdered sugar to thicken the filling.
Can I make this pie ahead of time?
Absolutely! This pie is great to make a day or two ahead of time. It needs time to chill in the fridge to set. Making it early allows the flavors to mix well and gives you more time to enjoy your day.
This blog post covered all you need to know for a great chocolate peanut butter pie. We explored the key ingredients and tasty toppings. I shared steps for making the pie, along with tips for perfect results. We also looked at fun ways to mix the recipe. Finally, I gave storage tips and answered common questions.
Now, you can enjoy making this delicious pie with ease!