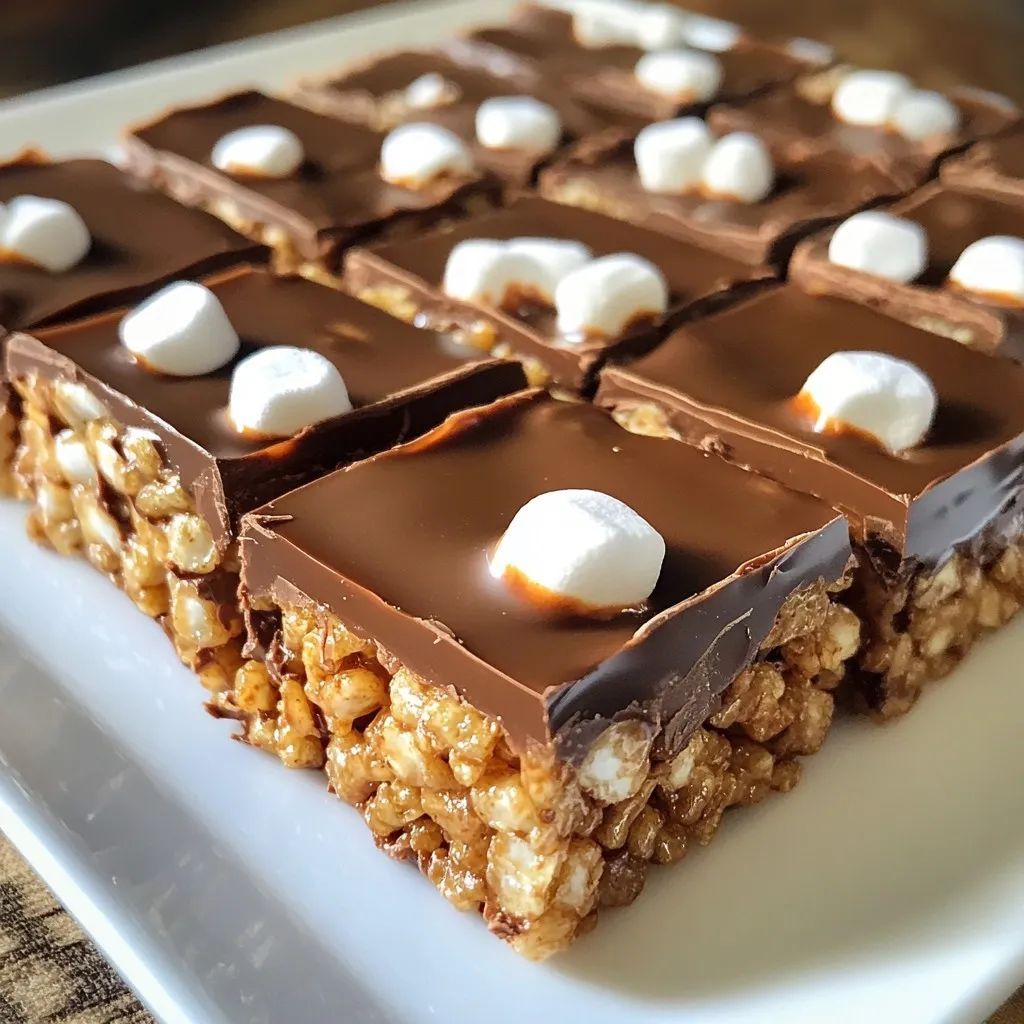
Indulging in the perfect snack is easy with Chocolate Peanut Butter Rice Krispie Treats! These sweet bites combine crunchy, gooey, and creamy flavors for a delight you can’t resist. I’ll guide you through simple steps, essential ingredients, and creative twists to make the best treats ever. Whether you’re a baking pro or a beginner, prepare to impress your friends and family with this easy recipe. Let’s dive into the fun!
Why I Love This Recipe
- Decadent Flavor Profile: The combination of chocolate and peanut butter creates an indulgent taste that is hard to resist.
- Quick and Easy: This recipe can be prepared in just 15 minutes, making it perfect for a last-minute treat.
- Kid-Friendly: Kids love these treats, and they are a great way to get them involved in the kitchen.
- Versatile Presentation: They can be served in various ways, allowing for creative and beautiful displays.
Ingredients
Complete List of Ingredients
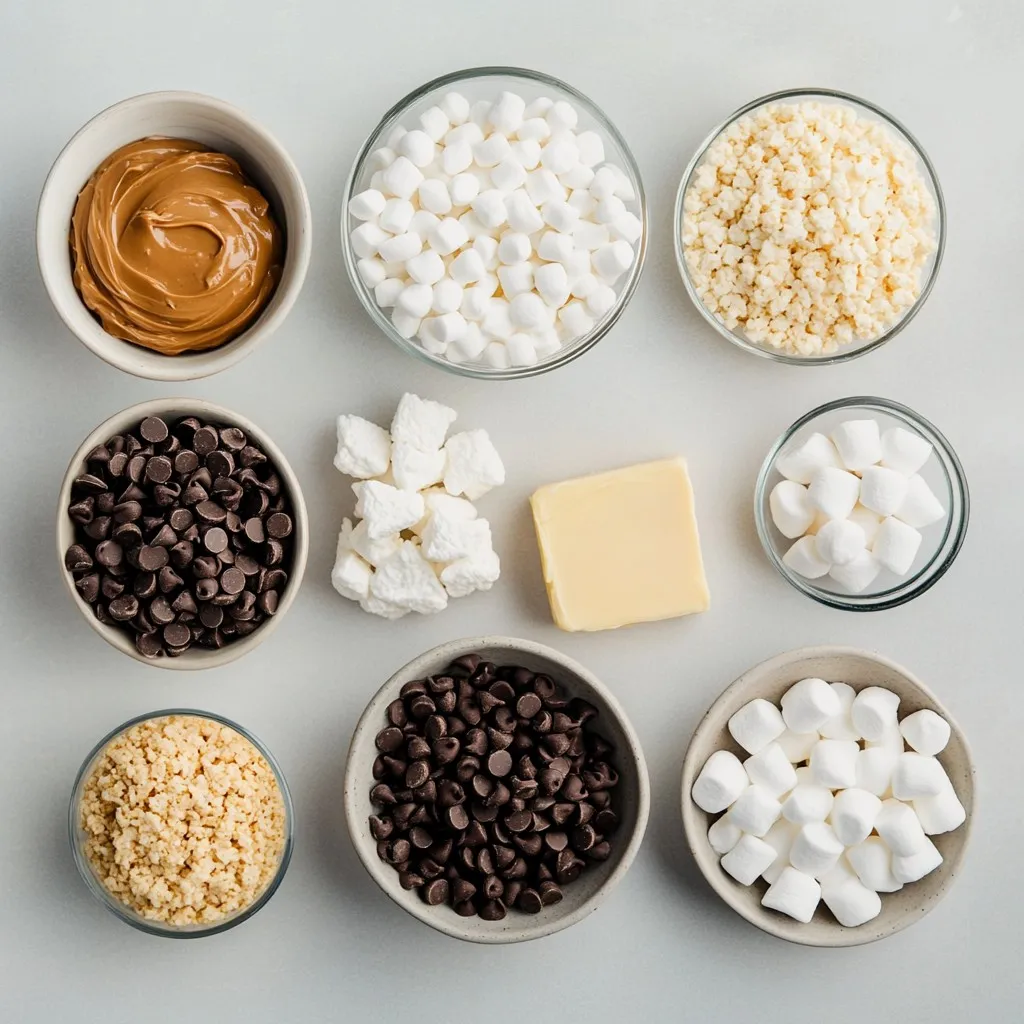
To make Chocolate Peanut Butter Rice Krispie Treats, gather these simple ingredients:
– 4 cups Rice Krispies cereal
– 1 cup creamy peanut butter
– 1 cup semi-sweet chocolate chips
– 1/2 cup unsalted butter
– 1 cup mini marshmallows
– 1 teaspoon vanilla extract
– Pinch of salt
Ingredient Substitutions and Options
If you need to change some ingredients, here are a few options:
– Peanut Butter: You can use almond butter or sun butter for nut-free treats.
– Chocolate Chips: Swap semi-sweet with dark chocolate or milk chocolate chips.
– Marshmallows: Use vegan marshmallows for a dairy-free option.
– Rice Krispies: Try gluten-free rice cereal if needed.
Equipment Needed for Preparation
You will need these tools to prepare the treats:
– Large saucepan
– Wooden spoon or spatula
– 9×13-inch baking pan
– Parchment paper (optional for easy removal)
Step-by-Step Instructions
Detailed Cooking Instructions
1. Melt the Butter: Place a large saucepan on low heat. Add the unsalted butter. Stir until it melts completely.
2. Add Peanut Butter: Once the butter melts, add the creamy peanut butter. Stir until it is smooth and mixed well.
3. Melt Chocolate Chips: Pour in the semi-sweet chocolate chips. Keep stirring until they melt into a creamy mix.
4. Mix in Marshmallows: Remove the pan from heat. Add mini marshmallows, vanilla extract, and a pinch of salt. Stir gently until the marshmallows soften.
5. Fold in Rice Krispies: Carefully add the Rice Krispies cereal. Fold them in gently to coat each piece evenly.
6. Transfer to Pan: Pour the mixture into a greased 9×13-inch baking pan. Use a spatula or your hands to press it down firmly.
7. Cool the Treats: Let the treats cool at room temperature for about 30 minutes. This helps them set properly.
8. Slice and Enjoy: Once cool, slice the treats into squares or rectangles. They are now ready to eat!
Tips for Each Step
– For step one, keep the heat low. This helps prevent burning the butter.
– In step two, stir continuously for a smooth mix. Stop stirring too early, and it may clump.
– For step three, be patient. The chocolate chips take time to melt completely.
– In step four, be gentle when mixing in marshmallows. You want them to coat well without breaking apart.
– For step five, fold slowly. This keeps the Rice Krispies light and crispy.
– In step six, use a greased spatula to help press down the mixture evenly.
– For step seven, let them cool completely. This ensures they hold their shape when cut.
– In step eight, use a sharp knife for clean cuts. This will make the treats look neat.
Common Mistakes to Avoid
– Burning the Butter: Always use low heat to melt the butter.
– Skipping the Cooling Step: Don’t rush to cut them. They need time to set.
– Overmixing the Cereal: Mixing too hard can crush the Rice Krispies.
– Not Greasing the Pan: Always grease your pan to avoid sticking.
– Using Cold Ingredients: Make sure your peanut butter is at room temperature for easy mixing.
– Not Measuring Ingredients: Accurate measurements are key for the best flavor and texture.
Tips & Tricks
How to Achieve the Perfect Texture
To get the best texture, follow these steps. Melt the butter over low heat. This keeps it from burning. When you add peanut butter, stir until it’s smooth. Then, mix in the chocolate chips until they melt. This creates a creamy base.
Gently mix in the mini marshmallows. This keeps them soft and fluffy. Finally, fold in the Rice Krispies carefully. This step is key. You want them crunchy, not soggy. Press the mixture into the pan firmly for even cutting.
Key Flavor Enhancements
To boost the flavor, consider these additions. A pinch of salt enhances the sweetness. You can also add a splash of vanilla extract. This gives a nice depth.
For an extra kick, try a little cinnamon or espresso powder. Both add warmth and richness. You can also mix in chopped nuts or your favorite candy pieces. These add crunch and fun flavors.
Presentation Tips for Serving
How you present the treats matters too. Cut them into neat squares or rectangles. This makes them easy to grab.
Serve them on a colorful platter or in a clear container. Add a sprinkle of extra chocolate chips or crushed peanuts on top for flair. This makes them look even more tempting. Enjoy sharing these tasty treats!
Pro Tips
- Use Fresh Ingredients: Always check the freshness of your marshmallows, chocolate chips, and peanut butter for the best flavor and texture.
- Don’t Overheat: When melting the chocolate and peanut butter, keep the heat low to prevent burning and achieve a smooth consistency.
- Press Firmly: When transferring the mixture to the baking pan, make sure to press it down firmly to prevent the treats from falling apart.
- Add Mix-Ins: Feel free to customize your treats by adding in extras like chopped nuts, pretzels, or even a swirl of caramel for added texture and flavor.
Variations
Creative Add-Ins
You can make your Chocolate Peanut Butter Rice Krispie Treats even more fun. Try adding nuts like chopped peanuts or almonds for crunch. You can also mix in mini M&M’s or chocolate-covered pretzels for extra sweetness. Just toss in about a cup of your favorite add-ins after mixing the Rice Krispies. This makes each bite more exciting and different.
Dietary Adjustments
If you need a gluten-free option, use gluten-free Rice Krispies. You can also switch to vegan butter and a dairy-free chocolate option. These swaps keep the taste great while meeting dietary needs. For nut allergies, sunflower seed butter works well instead of peanut butter. This way, everyone can enjoy them without worry.
Seasonal Flavors or Themed Variations
Seasonal flavors can make these treats stand out. In fall, add pumpkin spice or cinnamon. For winter, mix in peppermint extract or crushed candy canes. You can even shape them into fun holiday-themed shapes using cookie cutters. These variations add joy and fun to any celebration, making your treats special all year round.
Storage Info
Best Practices for Storing Treats
To keep your Chocolate Peanut Butter Rice Krispie Treats fresh, store them in an airtight container. Line the container with parchment paper to prevent sticking. Place a layer of treats in the container. Then, add a sheet of parchment paper between layers if stacking. This will help them stay nice and crisp.
Shelf Life and Freezing Instructions
These treats can last about a week at room temperature. If you want them to last longer, you can freeze them. Wrap each treat in plastic wrap and place them in a freezer bag. They can stay in the freezer for up to three months. When you’re ready to enjoy them, let them thaw at room temperature for about 30 minutes.
Reheating Tips for Enjoying Leftovers
If the treats lose some of their crispness, you can easily revive them. Place a treat on a microwave-safe plate. Heat it on low for about 10 seconds. This will soften the chocolate and peanut butter again. Enjoy the warm treat with a cup of milk or your favorite drink!
FAQs
Can I use crunchy peanut butter instead?
Yes, you can use crunchy peanut butter. It adds a fun texture. The bits of peanut will give each bite a nice crunch. Just remember, it will change the smoothness of the treat. You might not get the same creamy feel, but the taste will still be fantastic.
How do I know when the treats are set?
You will know the treats are set when they feel firm to the touch. After cooling for about 30 minutes, press gently on the top. If it holds its shape, they are ready. If they still feel soft, let them cool a bit more. The longer you let them sit, the firmer they will become.
What should I serve with Chocolate Peanut Butter Rice Krispie Treats?
These treats pair well with a glass of milk or a scoop of vanilla ice cream. You can also serve them with fresh fruit, like strawberries or bananas. The sweetness of the treats balances well with the fruit’s tartness. For a fun twist, try pairing them with hot cocoa for a cozy treat!
You learned about the essential ingredients, cooking steps, and helpful tips for making treats. We discussed ingredient swaps, equipment needs, and how to avoid common mistakes. I shared ways to enhance flavors and perfect the texture. There are many fun variations to please everyone. Lastly, I covered storage tips and answered common questions.
With these insights, you can create delicious treats with ease and confidence. Enjoy the process and share your creation