
Are you ready to indulge in the ultimate comfort food? A crispy fried chicken sandwich is not just a meal; it’s a flavor-packed experience that satisfies any craving. In this post, I’ll guide you step-by-step through creating a sandwich that’s golden, crunchy, and bursting with flavor. Let’s transform simple ingredients into a mouthwatering dish that’s perfect for lunch, dinner, or any time you need a tasty treat!
Ingredients
Chicken Marinade Ingredients
– 2 boneless chicken thighs
– 1 cup buttermilk
Coating Ingredients
– 1 cup all-purpose flour
– 1 teaspoon paprika
– 1 teaspoon garlic powder
– 1 teaspoon onion powder
– 1 teaspoon cayenne pepper
– Salt and pepper, to taste
Assembling Ingredients
– 2 brioche buns
– Fresh lettuce leaves
– Sliced ripe tomatoes
– Dill pickles
– Sauce: 2 tablespoons mayonnaise combined with 1 teaspoon mustard and a dab of hot sauce
The key to a great crispy fried chicken sandwich starts with the right ingredients. For the chicken marinade, I use boneless chicken thighs. They stay juicy and have great flavor. Soak them in buttermilk for at least one hour. This step helps the chicken become tender and flavorful.
Next, we focus on the coating. I mix flour with paprika, garlic powder, onion powder, cayenne pepper, salt, and pepper. This blend gives a nice kick and depth of flavor. Make sure the dry mix is even. This ensures a uniform coating that crisps up beautifully.
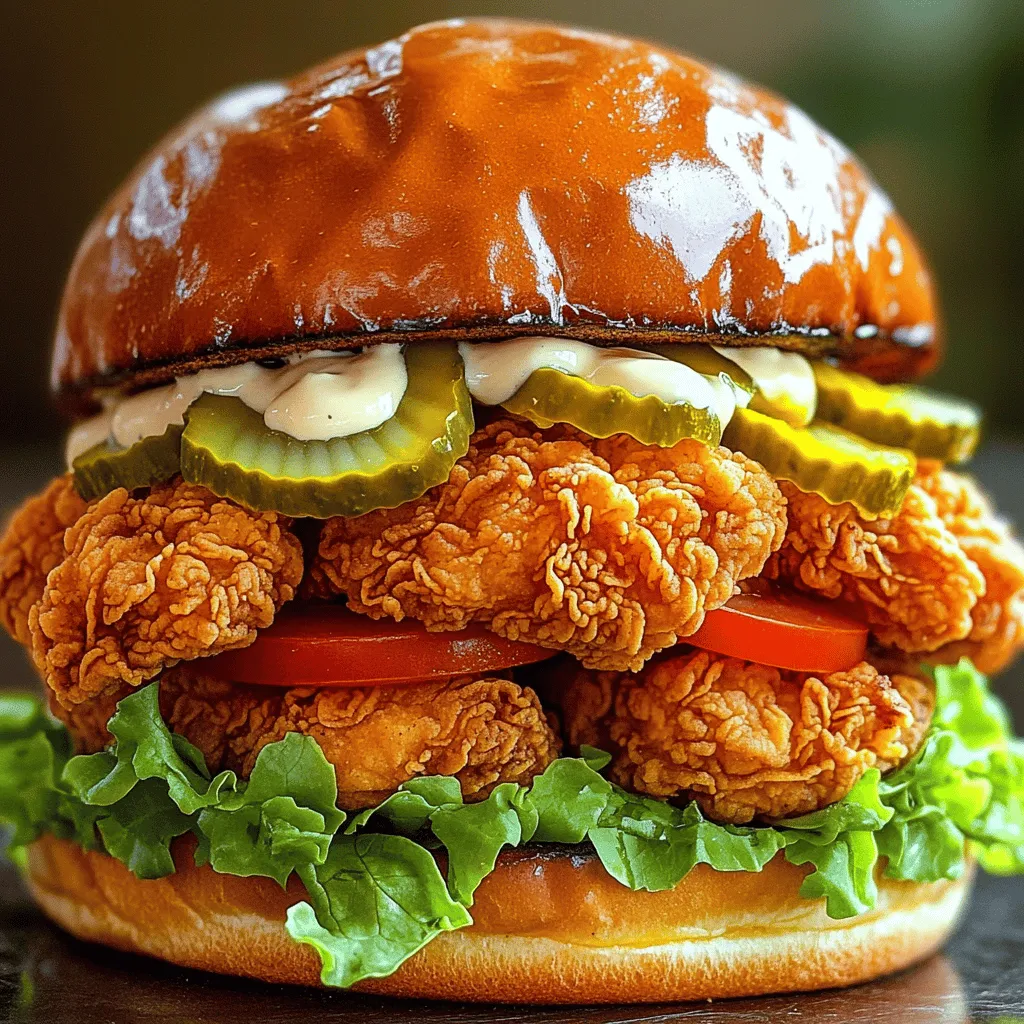
Now, for the assembly, you need fresh brioche buns. They are soft, yet sturdy enough to hold the chicken. Add fresh lettuce, ripe tomatoes, and crunchy dill pickles for texture and taste. For the sauce, I like a simple mix of mayonnaise, mustard, and a dab of hot sauce. It adds creaminess and a little heat.
With these ingredients ready, you can create a sandwich that truly satisfies.
Step-by-Step Instructions
Marinating the Chicken
First, gather your buttermilk and chicken thighs. Pour the buttermilk into a medium bowl. Add the boneless chicken thighs, making sure they are fully submerged. Cover the bowl and refrigerate for at least one hour. If you have time, marinate overnight. This gives a nice flavor infusion that makes the chicken taste great.
Preparing the Coating
Next, take a shallow dish and mix the dry ingredients. You will need all-purpose flour, paprika, garlic powder, onion powder, cayenne pepper, salt, and pepper. Stir the mixture well. This ensures even distribution for coating the chicken. A good coat helps create a crispy texture when frying.
Frying the Chicken
Now it’s time to fry! Pour enough vegetable oil into a deep frying pan to cover the bottom by about one inch. Heat the oil over medium-high heat until it reaches 350°F (175°C). Use a thermometer to check the temperature. Once hot, take the marinated chicken out of the buttermilk. Let any excess liquid drip off, then dredge each thigh in the seasoned flour mixture. Press down firmly so the coating sticks well.
Carefully place the coated chicken into the hot oil. Fry for about 6-8 minutes on each side. Look for a golden brown color. The internal temperature should reach 165°F (74°C). Once cooked, transfer the chicken to a wire rack or paper towels to drain any excess oil.
Assembling the Sandwich
While the chicken cools, toast your brioche buns. Heat a skillet and toast them until they are golden brown. On the bottom bun, spread the sauce mixture. The sauce is made with mayonnaise, mustard, and a dab of hot sauce. Next, place the freshly fried chicken on top. Add crisp lettuce, juicy tomato slices, and crunchy dill pickles. Finally, cap it with the top bun.This process gives you a delicious crispy fried chicken sandwich that is both flavorful and satisfying!
Tips & Tricks
Achieving the Perfect Fry
To get that crispy texture, keep the oil hot. Heat the oil to 350°F (175°C). Use a thermometer to check. If the oil is too cool, the chicken will soak up oil and get soggy. If it’s too hot, the outside will burn before cooking the inside.
Avoid overcrowding the pan. Fry two or three pieces at a time. If you add too many, they will lower the oil temperature. This makes it hard to get a crispy crust. Fry in batches to keep the heat steady.
Sauce Variations
You can customize the sauce to fit your taste. Start with the basic mix of mayonnaise, mustard, and hot sauce. For more flavor, add honey for sweetness. If you want heat, toss in some sriracha or chili sauce. For creaminess, mix in a bit of ranch or blue cheese.
Chicken Thigh vs. Breast
I often prefer chicken thighs for this sandwich. They have more fat, making them juicy and flavorful. Chicken breasts are leaner, but they can dry out if overcooked. Thighs offer a tender bite, while breasts give a firmer texture. Try both and see which you enjoy more!
Variations
Spicy Fried Chicken Sandwich
To spice up your crispy fried chicken sandwich, add more heat. You can mix in extra cayenne pepper or chili powder for a kick. Try different hot sauces too. Options like sriracha or buffalo sauce can add flavor and heat. Just adjust the amount based on how spicy you want it.
Southern Style
For a Southern twist, add some slaw or pickled vegetables. These toppings give a nice crunch and tang. You can also switch the bread. Instead of brioche, try cornbread for a unique flavor. This combination makes the sandwich even more satisfying.
Vegetarian Version
If you prefer a vegetarian option, use plant-based chicken alternatives. Brands like Beyond Meat or Gardein work well. Top it with fresh lettuce, tomatoes, and your favorite sauces. You can add avocado or spicy mayo for an extra layer of flavor. This version is just as tasty!
Feel free to explore these variations to find your perfect crispy fried chicken sandwich.
Storage Info
Storing Leftovers
To keep your crispy fried chicken sandwich fresh, wrap it in foil or place it in an airtight container. This helps keep moisture in while stopping the bread from getting soggy. Store the sandwich in the fridge for up to three days. However, for the best taste, eat it within two days.
The fried chicken itself lasts for about three to four days in the fridge. If you only have leftover chicken, store it in a separate container. This keeps the chicken crispy for the next meal.
Reheating Suggestions
Reheating your crispy fried chicken sandwich can be tricky. You want to keep that crunchy texture. I recommend using an oven or an air fryer for the best results.
1. Oven Method: Preheat your oven to 375°F (190°C). Place the sandwich on a baking sheet and heat it for about 10-15 minutes. This helps regain that crispy crust.
2. Air Fryer Method: Preheat your air fryer to 350°F (175°C). Place the sandwich inside and heat for about 5-7 minutes. This method works wonders for keeping things crispy!
Avoid using the microwave. It can make the bread chewy and the chicken soggy. Following these steps ensures you enjoy your sandwich just as much as the first time!
FAQs
How to make a Crispy Fried Chicken Sandwich at home?
To make a crispy fried chicken sandwich, follow these key steps:
1. Marinate the Chicken: Soak the chicken thighs in buttermilk. This step keeps the meat juicy and flavorful.
2. Prepare the Coating: Mix flour with spices like paprika, garlic powder, and cayenne. This mix adds great flavor and crunch.
3. Heat the Oil: Heat vegetable oil to 350°F (175°C). This temperature is key for a crispy outside.
4. Coat the Chicken: Take the chicken out of the buttermilk. Dredge it in the flour mix, pressing firmly for a good coat.
5. Fry the Chicken: Fry the chicken for 6-8 minutes on each side. Look for a golden brown color.
6. Assemble the Sandwich: Toast brioche buns, layer sauce, chicken, lettuce, tomato, and pickles. Top with the other bun.
This process gives you a tasty sandwich full of flavor.
What type of chicken is best for frying?
For frying, I prefer using boneless chicken thighs. They stay juicy and have more flavor than chicken breasts. Thighs also have a nice fat content, which helps keep them moist when cooked. If you want to use breast, choose skin-on pieces for added flavor.
Can I make this sandwich gluten-free?
Yes, you can make this sandwich gluten-free! Use gluten-free flour blends instead of all-purpose flour. Almond flour or rice flour works well too. These options will give you a crispy coating, just like regular flour. You can still enjoy that crunchy bite without the gluten!
This blog post covered how to make a tasty fried chicken sandwich. We looked at the key ingredients, like chicken, buttermilk, and spices. I also shared step-by-step instructions for marinating, frying, and assembling your sandwich. To ensure a perfect fry, we discussed tips like keeping the oil hot. Remember, you can create variations for spice or even choose a vegetarian option. Enjoy your homemade sandwich and get ready to impress! Making this dish is simple and adds great flavor to your meals.