Dairy-Free Chocolate Avocado Mousse Rich and Creamy Treat

Indulging in a rich and creamy treat doesn’t have to mean dairy. I’m excited to share my recipe for Dairy-Free Chocolate Avocado Mousse that’s both delicious and easy to make. Using simple ingredients like ripe avocados, cocoa, and a touch of sweetness, this mousse is a guilt-free delight. Follow along for step-by-step instructions, tips, and variations that will make your dessert shine. Let’s dive right in!

Ingredients

List of Ingredients

– 2 ripe avocados

– 1/2 cup unsweetened cocoa powder

– 1/4 cup maple syrup (adjust for desired sweetness)

– 1/4 cup almond milk (or any preferred dairy-free milk)

– 1 teaspoon vanilla extract

– A pinch of fine sea salt

– Fresh berries (such as raspberries or strawberries) and mint leaves, for garnish

Quantity and Measurement Tips

When measuring ingredients, use dry measuring cups for cocoa powder. This helps get the right amount. For liquid ingredients like almond milk, use a liquid measuring cup. It shows you the volume more clearly. If you want a sweeter mousse, taste as you add maple syrup. Start with less, then adjust.

Suggested Substitutions

You can swap almond milk for coconut or oat milk if you prefer. If you want to change the sweetener, use agave syrup or honey. For a different flavor, try adding a tablespoon of instant coffee. This adds depth to the chocolate taste.

Step-by-Step Instructions

Preparation of Avocados

To start, grab two ripe avocados. Slice them in half and remove the pit. This step is crucial; be careful not to cut yourself. Use a spoon to scoop out the green flesh into a food processor or blender. Make sure you get every bit. The avocados give the mousse its creamy texture and rich taste.

Mixing Ingredients for the Mousse

Now, it’s time to mix in the other ingredients. Add 1/2 cup of unsweetened cocoa powder to the avocados. Then pour in 1/4 cup of maple syrup. You can adjust this amount later if you want it sweeter. Next, add 1/4 cup of almond milk, which helps blend everything smoothly. Include 1 teaspoon of vanilla extract for extra flavor and a pinch of fine sea salt to balance the sweetness. Blend everything on high speed until it’s smooth and creamy. Stop to scrape down the sides if needed. Taste your mousse; if you want it sweeter, add more maple syrup and blend again.

Chilling and Serving the Mousse

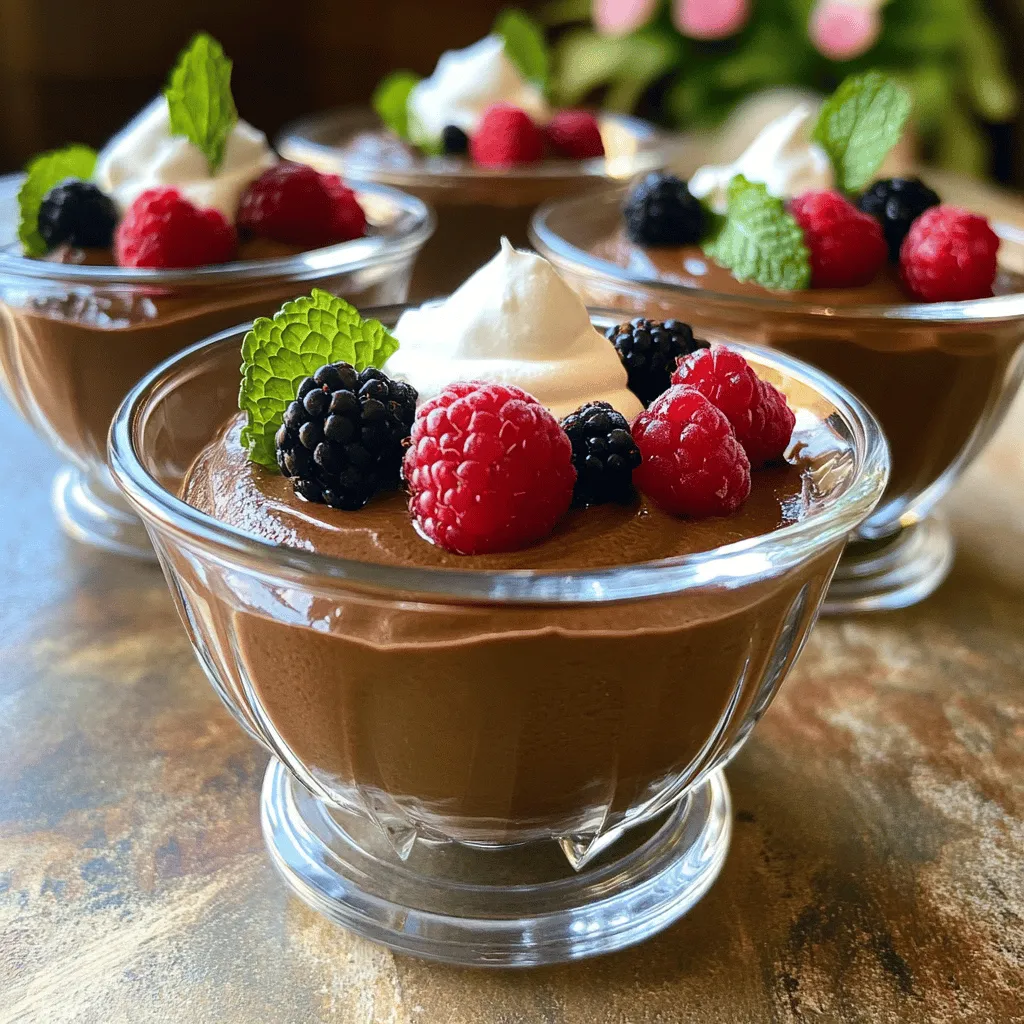
Once your mousse is the perfect texture, it’s time to serve. Spoon the mousse into individual serving dishes or ramekins. Fill them generously; this dessert is meant to be enjoyed! Cover each dish with plastic wrap or a lid. Place them in the refrigerator for at least 1 hour. This chilling step helps the mousse set and enhances the flavors. Before serving, garnish with fresh berries and mint leaves for a lovely touch. It makes your dessert look beautiful and adds a pop of color. Enjoy your rich and creamy treat! For the full recipe, check the details above.

Tips & Tricks

Achieving the Perfect Consistency

To get the smoothest mousse, blend your ingredients well. Start with ripe avocados. They should feel soft when you press them. If your mousse seems too thick, add a little more almond milk. Blend again until it’s creamy and smooth. A few small lumps are okay, but aim for a silky texture.

Sweetness Adjustments

Taste your mousse before serving. If it needs more sweetness, add maple syrup. Start with a tablespoon, blend, and taste again. You can always add more, but you can’t take it out. This way, you can find the right level of sweetness for your taste buds.

Presentation Ideas

Serve your mousse in clear cups or bowls. This shows off the rich, dark color. Add fresh berries or mint leaves on top for a pop of color. You can also sprinkle some cocoa powder for a nice touch. For extra creaminess, a dollop of coconut whipped cream makes a great finish. These little details make your dessert look fancy and fun! For the complete experience, check out the Full Recipe.

Variations

Flavor Additions

You can easily change the flavor of your mousse. Adding a splash of mint extract gives it a fresh taste. Try mixing in a little brewed coffee for a deep, rich flavor. You can also add spices like cinnamon or chili for a twist. Each addition brings a new layer of taste. Experiment to find your favorite!

Alternative Sweeteners

Maple syrup is a great sweetener, but it’s not the only one. You can use agave syrup or honey if you prefer. For a low-calorie option, try stevia or erythritol. Each sweetener has a unique flavor, so choose what suits your taste. Adjust the amount to your liking for the perfect sweetness.

Dietary Considerations

This mousse is already dairy-free, making it safe for many diets. If you need a nut-free option, substitute almond milk with oat or coconut milk. Always check labels to ensure there are no hidden allergens. This dessert can fit various dietary needs while still being delicious. You can enjoy the mousse with confidence, knowing it’s adaptable for all!

For the full recipe, refer to the section above.

Storage Info

Best Practices for Refrigeration

To keep your mousse fresh, store it in the fridge. Place the mousse in airtight containers. Cover each container with a lid or plastic wrap. This prevents the mousse from absorbing strong odors. It also keeps it moist. Enjoy the mousse within three days for the best taste.

Freezing Options

You can freeze this mousse for longer storage. Use freezer-safe containers to avoid freezer burn. Scoop the mousse into individual portions for easy thawing. To enjoy, thaw the mousse in the fridge overnight. It may change texture slightly, but the flavor will remain delightful.

Shelf Life and Usage Tips

This mousse stays fresh in the fridge for up to three days. If you see any changes in color or smell, it’s best to discard it. Use leftover mousse as a topping for pancakes or waffles. You can also mix it into smoothies for a creamy boost. For the full recipe, click here.

FAQs

Can I make this mousse vegan?

Yes, this mousse is already vegan! I use ripe avocados and almond milk, which are plant-based. The cocoa powder and maple syrup are also vegan-friendly. You can enjoy this rich dessert without any dairy.

Is the mousse healthy?

I believe this mousse is a great choice for a treat. It uses avocados, which are full of healthy fats. The cocoa powder adds antioxidants, and maple syrup provides natural sweetness. It’s a dessert that feels indulgent but offers nutrition too.

How can I make it sweeter or less sweet?

You can adjust the sweetness easily! Start with 1/4 cup of maple syrup. If you want it sweeter, add more syrup, one tablespoon at a time. Blend the mousse after each addition. If it’s too sweet, add a bit more cocoa powder to balance it out.

What are good garnishes for this dessert?

Garnishes can make your mousse look fancy! I like to use fresh berries like raspberries or strawberries. Mint leaves add a nice pop of color. You could also try a sprinkle of cocoa powder or a dollop of coconut whipped cream for extra flair.

For the full recipe, check out the details above. Enjoy making this creamy treat!

In this post, we explored making a delicious avocado mousse. We covered key ingredients, including tips for measurement and substitutions. The step-by-step guide helped you prepare, mix, and chill the mousse perfectly. We shared tips for the best consistency and sweetness adjustments. You also learned about fun variations and important storage tips.

Overall, this mousse is easy to make and great for any occasion. Try it out and enjoy this tasty treat!

- 2 ripe avocados - 1/2 cup unsweetened cocoa powder - 1/4 cup maple syrup (adjust for desired sweetness) - 1/4 cup almond milk (or any preferred dairy-free milk) - 1 teaspoon vanilla extract - A pinch of fine sea salt - Fresh berries (such as raspberries or strawberries) and mint leaves, for garnish When measuring ingredients, use dry measuring cups for cocoa powder. This helps get the right amount. For liquid ingredients like almond milk, use a liquid measuring cup. It shows you the volume more clearly. If you want a sweeter mousse, taste as you add maple syrup. Start with less, then adjust. You can swap almond milk for coconut or oat milk if you prefer. If you want to change the sweetener, use agave syrup or honey. For a different flavor, try adding a tablespoon of instant coffee. This adds depth to the chocolate taste. To start, grab two ripe avocados. Slice them in half and remove the pit. This step is crucial; be careful not to cut yourself. Use a spoon to scoop out the green flesh into a food processor or blender. Make sure you get every bit. The avocados give the mousse its creamy texture and rich taste. Now, it's time to mix in the other ingredients. Add 1/2 cup of unsweetened cocoa powder to the avocados. Then pour in 1/4 cup of maple syrup. You can adjust this amount later if you want it sweeter. Next, add 1/4 cup of almond milk, which helps blend everything smoothly. Include 1 teaspoon of vanilla extract for extra flavor and a pinch of fine sea salt to balance the sweetness. Blend everything on high speed until it's smooth and creamy. Stop to scrape down the sides if needed. Taste your mousse; if you want it sweeter, add more maple syrup and blend again. Once your mousse is the perfect texture, it's time to serve. Spoon the mousse into individual serving dishes or ramekins. Fill them generously; this dessert is meant to be enjoyed! Cover each dish with plastic wrap or a lid. Place them in the refrigerator for at least 1 hour. This chilling step helps the mousse set and enhances the flavors. Before serving, garnish with fresh berries and mint leaves for a lovely touch. It makes your dessert look beautiful and adds a pop of color. Enjoy your rich and creamy treat! For the full recipe, check the details above. To get the smoothest mousse, blend your ingredients well. Start with ripe avocados. They should feel soft when you press them. If your mousse seems too thick, add a little more almond milk. Blend again until it’s creamy and smooth. A few small lumps are okay, but aim for a silky texture. Taste your mousse before serving. If it needs more sweetness, add maple syrup. Start with a tablespoon, blend, and taste again. You can always add more, but you can’t take it out. This way, you can find the right level of sweetness for your taste buds. Serve your mousse in clear cups or bowls. This shows off the rich, dark color. Add fresh berries or mint leaves on top for a pop of color. You can also sprinkle some cocoa powder for a nice touch. For extra creaminess, a dollop of coconut whipped cream makes a great finish. These little details make your dessert look fancy and fun! For the complete experience, check out the Full Recipe. {{image_4}} You can easily change the flavor of your mousse. Adding a splash of mint extract gives it a fresh taste. Try mixing in a little brewed coffee for a deep, rich flavor. You can also add spices like cinnamon or chili for a twist. Each addition brings a new layer of taste. Experiment to find your favorite! Maple syrup is a great sweetener, but it’s not the only one. You can use agave syrup or honey if you prefer. For a low-calorie option, try stevia or erythritol. Each sweetener has a unique flavor, so choose what suits your taste. Adjust the amount to your liking for the perfect sweetness. This mousse is already dairy-free, making it safe for many diets. If you need a nut-free option, substitute almond milk with oat or coconut milk. Always check labels to ensure there are no hidden allergens. This dessert can fit various dietary needs while still being delicious. You can enjoy the mousse with confidence, knowing it’s adaptable for all! For the full recipe, refer to the section above. To keep your mousse fresh, store it in the fridge. Place the mousse in airtight containers. Cover each container with a lid or plastic wrap. This prevents the mousse from absorbing strong odors. It also keeps it moist. Enjoy the mousse within three days for the best taste. You can freeze this mousse for longer storage. Use freezer-safe containers to avoid freezer burn. Scoop the mousse into individual portions for easy thawing. To enjoy, thaw the mousse in the fridge overnight. It may change texture slightly, but the flavor will remain delightful. This mousse stays fresh in the fridge for up to three days. If you see any changes in color or smell, it’s best to discard it. Use leftover mousse as a topping for pancakes or waffles. You can also mix it into smoothies for a creamy boost. For the full recipe, click here. Yes, this mousse is already vegan! I use ripe avocados and almond milk, which are plant-based. The cocoa powder and maple syrup are also vegan-friendly. You can enjoy this rich dessert without any dairy. I believe this mousse is a great choice for a treat. It uses avocados, which are full of healthy fats. The cocoa powder adds antioxidants, and maple syrup provides natural sweetness. It’s a dessert that feels indulgent but offers nutrition too. You can adjust the sweetness easily! Start with 1/4 cup of maple syrup. If you want it sweeter, add more syrup, one tablespoon at a time. Blend the mousse after each addition. If it’s too sweet, add a bit more cocoa powder to balance it out. Garnishes can make your mousse look fancy! I like to use fresh berries like raspberries or strawberries. Mint leaves add a nice pop of color. You could also try a sprinkle of cocoa powder or a dollop of coconut whipped cream for extra flair. For the full recipe, check out the details above. Enjoy making this creamy treat! In this post, we explored making a delicious avocado mousse. We covered key ingredients, including tips for measurement and substitutions. The step-by-step guide helped you prepare, mix, and chill the mousse perfectly. We shared tips for the best consistency and sweetness adjustments. You also learned about fun variations and important storage tips. Overall, this mousse is easy to make and great for any occasion. Try it out and enjoy this tasty treat!

Dairy-Free Chocolate Avocado Mousse

Indulge in a deliciously creamy Dairy-Free Chocolate Avocado Mousse that's sure to please! Made with ripe avocados, cocoa powder, and sweetened with maple syrup, this enchanting dessert is not only easy to whip up but also healthy. Perfect for any occasion, this mousse will satisfy your chocolate cravings guilt-free. Click through to explore the full recipe, tips, and presentation ideas for a show-stopping treat!

Ingredients
  

2 ripe avocados

1/2 cup unsweetened cocoa powder

1/4 cup maple syrup (adjust for desired sweetness)

1/4 cup almond milk (or any preferred dairy-free milk)

1 teaspoon vanilla extract

A pinch of fine sea salt

Fresh berries (such as raspberries or strawberries) and mint leaves, for garnish

Instructions
 

Start by slicing the ripe avocados in half, removing the pit carefully. Use a spoon to scoop the creamy flesh into a food processor or blender, ensuring no bits are left behind.

    To the processor, add the unsweetened cocoa powder, maple syrup, almond milk, vanilla extract, and a pinch of fine sea salt.

      Blend the ingredients on high speed until you obtain a smooth and creamy mixture. If needed, pause to scrape down the sides of the bowl to ensure everything is well combined.

        Taste the mousse and, if you prefer it sweeter, add additional maple syrup to suit your liking. Blend again briefly to incorporate the extra sweetness evenly.

          Once you achieve a luxuriously silky texture, carefully spoon the mousse into individual serving dishes or stylish ramekins, filling each one generously.

            Cover the dishes with plastic wrap or a lid, and place them in the refrigerator for at least 1 hour. This chilling step allows the flavors to deepen and the mousse to set nicely.

              Just before serving, add a vibrant touch by garnishing with a handful of fresh berries and a few mint leaves atop each mousse cup, creating a delightful contrast.

                Prep Time: 10 minutes | Total Time: 1 hour 10 minutes | Servings: 4

                  - Presentation Tips: Serve the mousse in clear glass bowls or dessert cups to highlight its rich, dark color. For an extra indulgence, top each serving with a dollop of coconut whipped cream for a creamy finish that elevates this dessert to new heights.

                    Leave a Comment

                    Recipe Rating