Indulging in a rich, creamy dessert doesn’t have to mean dairy! In my guide to Dairy-Free Chocolate Mousse, I’ll show you how to whip up a decadent treat using simple ingredients. With easy steps and helpful tips, you’ll impress your friends and family with a dessert that’s both delicious and suitable for various diets. Are you ready to create a chocolate mousse that everyone can enjoy? Let’s dive in!
Ingredients
List of Ingredients
To make a rich and creamy dairy-free chocolate mousse, gather these key items:
– 1 cup full-fat coconut milk (chilled overnight)
– 1 cup dark dairy-free chocolate chips (or finely chopped dairy-free chocolate)
– 2 tablespoons maple syrup (adjust according to your desired sweetness)
– 1 teaspoon pure vanilla extract
– A pinch of fine sea salt
– Fresh berries (such as raspberries, strawberries, or blueberries) for garnish
– Fresh mint leaves for garnish
Substitutions for Key Ingredients
You can swap some ingredients if needed. For coconut milk, you might use almond milk for a lighter mousse. Almond milk gives a different flavor but still works well. If you want a sweeter mousse, use agave syrup instead of maple syrup. You can also try different dairy-free chocolate brands. Just ensure they are high-quality to keep the taste rich.
Dietary Considerations
This mousse is vegan and gluten-free. It fits well in many diets. However, check the chocolate for any hidden dairy. If you have nut allergies, be careful with almond milk. You can always choose oat milk or soy milk as alternatives. This dessert allows everyone to enjoy a creamy treat without dairy.
Step-by-Step Instructions
Preparation of Coconut Cream
Open the chilled can of coconut milk. Use a spoon to scoop the thick cream into a mixing bowl. Discard the watery liquid left in the can. This cream gives the mousse its rich texture. Make sure to use full-fat coconut milk for the best results.
Melting the Chocolate
In a microwave-safe bowl, add the dark dairy-free chocolate chips. Heat in the microwave for 20 seconds at a time. Stir the chocolate between intervals. This helps it melt evenly and avoids burning. You want the chocolate to be silky and smooth.
Combining and Folding Ingredients
Once the chocolate melts, remove it from heat. Mix in the maple syrup, vanilla extract, and a pinch of sea salt. Stir until everything is well combined. Next, gently fold in the coconut cream using a rubber spatula. Be careful not to deflate the cream. Keep folding until the mixture is smooth and creamy.
Chilling the Mousse
Spoon the mousse into individual serving dishes. Distribute it evenly among the cups. Cover each dish with plastic wrap. Place the dishes in the refrigerator to chill. Let the mousse set for at least two hours to develop its flavors.
Serving Suggestions
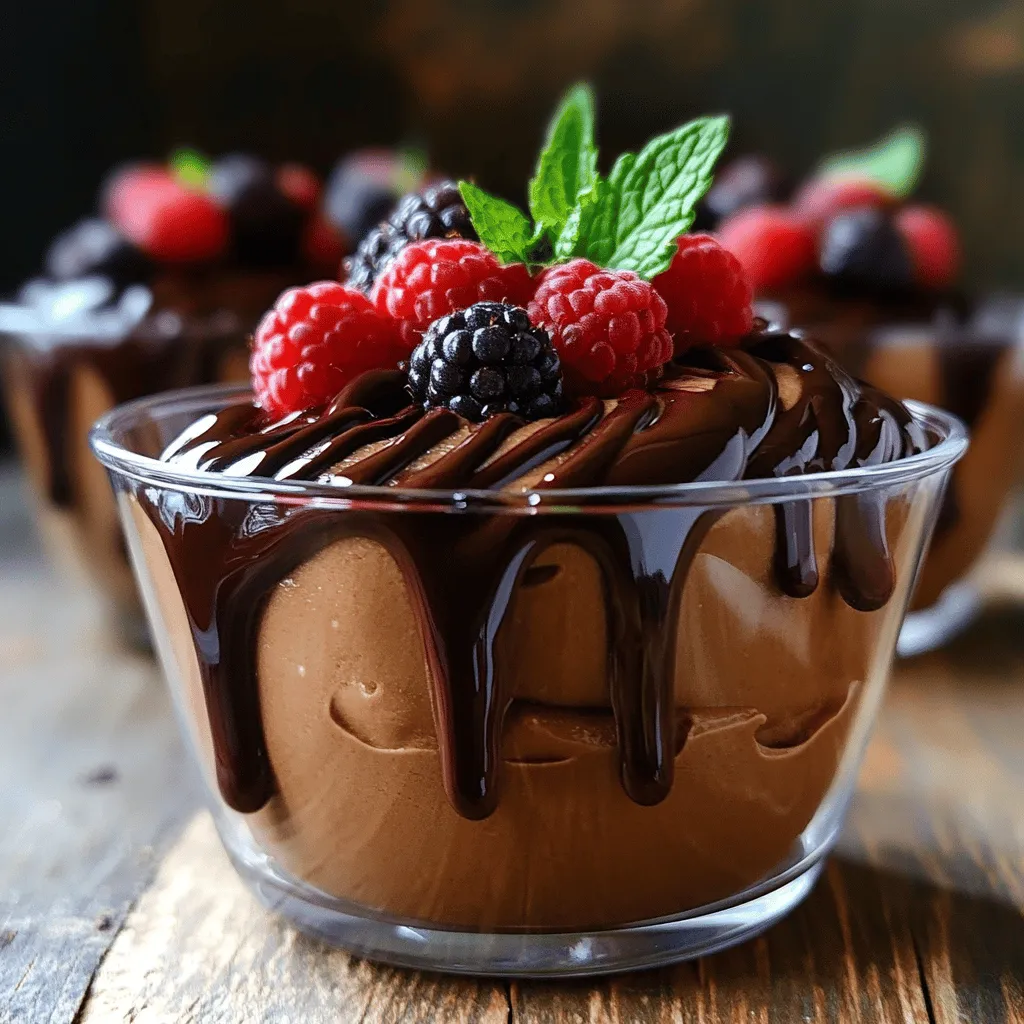
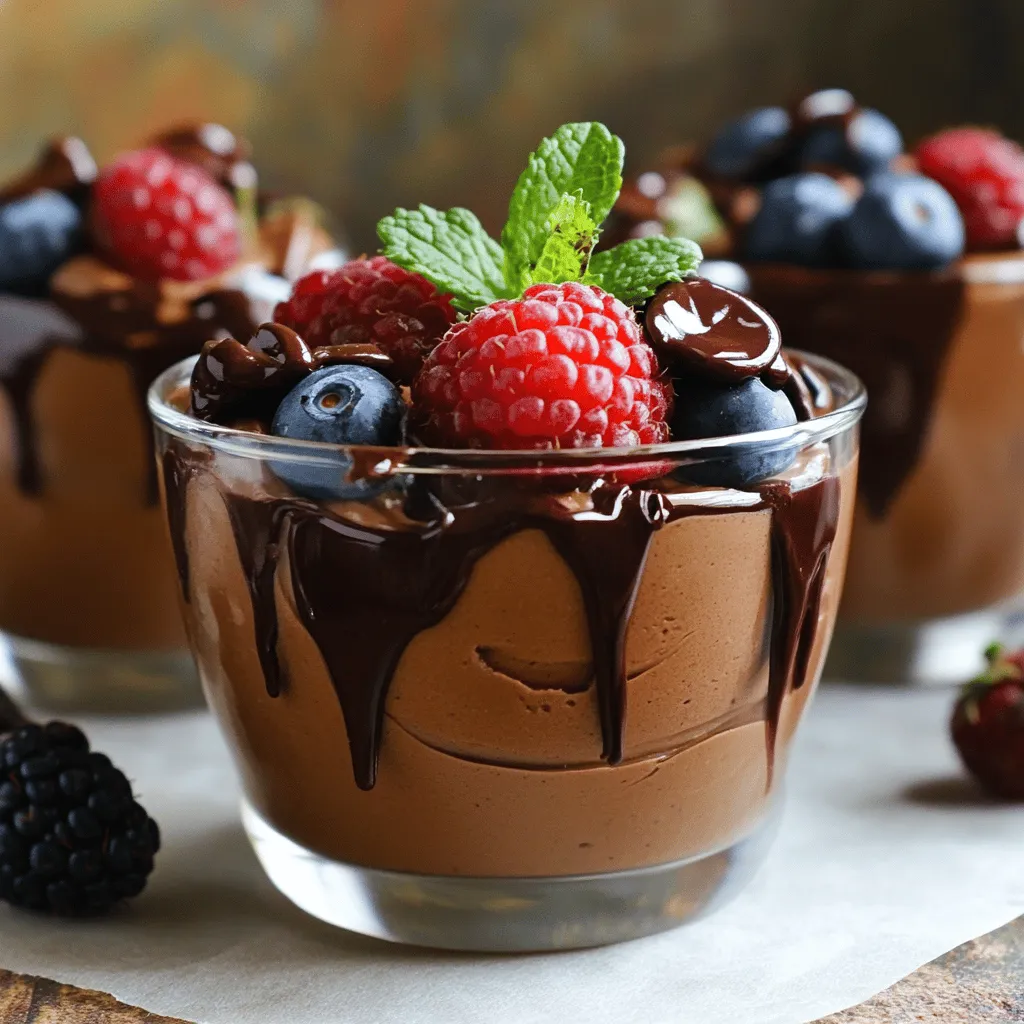
When ready to serve, remove the mousse from the fridge. Garnish it with fresh berries and mint leaves. This adds a pop of color and freshness. For a fun twist, use clear dessert cups to show off the mousse’s rich texture. Enjoy your delicious dairy-free chocolate mousse!
Tips & Tricks
Achieving the Right Texture
To get the perfect mousse texture, start with chilled coconut milk. This makes the cream thick and fluffy. When you scoop out the cream, avoid the watery part. Fold the coconut cream into the chocolate gently. This helps keep air in the mix. If you stir too hard, the mousse will lose its lightness.
Flavor Enhancements
You can boost the flavor of your mousse easily. Add a splash of espresso for a rich taste. A little orange zest gives it a fresh twist. If you want a sweeter mousse, adjust the maple syrup. Remember, the chocolate type matters too. Dark chocolate brings a deep flavor.
Presentation and Garnishing Ideas
Presentation adds fun to your dessert. Use clear cups to show off the mousse’s rich color. Consider drizzling melted chocolate on top. Fresh berries like strawberries or raspberries make it look bright. A mint leaf on top adds a pop of green. These small touches make your mousse shine.
Variations
Flavor Variations
You can change the taste of your mousse easily. Adding orange zest gives it a fresh, bright kick. A dash of espresso brings out the richness of the chocolate. You could also mix in a pinch of cinnamon for warmth. Each of these options adds fun layers of flavor.
Ingredient Variants
To make this mousse even more fun, you can swap out the coconut milk. Almond milk or oat milk can work well too. Each milk gives a different taste and texture. Almond milk adds a nutty twist, while oat milk makes it creamier. Choose what you like best for your dessert.
Serving Options
You can serve the mousse in many ways. Try layering it in parfait glasses with berries for a fancy touch. You can also spread it between layers of chocolate cake for a rich dessert. Each serving method makes this mousse unique and exciting to enjoy.
Storage Info
Best Way to Store Leftovers
To keep your mousse fresh, cover it tightly with plastic wrap. You can also use airtight containers. Make sure to place the mousse in the fridge right away. This helps maintain its rich texture and flavor.
Shelf Life in the Refrigerator
When stored properly, the mousse lasts about three to four days in the fridge. After this time, it may lose its creamy texture. If you notice any change in color or smell, it’s best to toss it out.
Freezing Options
You can freeze leftover mousse if needed. Use an airtight container and leave a bit of space at the top for expansion. It will keep well for about one month. When you’re ready to enjoy it, let it thaw in the fridge overnight. This keeps it smooth and creamy.
FAQs
Is this chocolate mousse vegan-friendly?
Yes, this chocolate mousse is vegan-friendly. It uses coconut milk and dairy-free chocolate. Both ingredients are plant-based and safe for those following a vegan diet.
Can I use other sweeteners instead of maple syrup?
Absolutely! You can use other sweeteners, like agave nectar or coconut sugar. Each sweetener will change the flavor slightly, so choose what you like best.
How can I make this mousse sugar-free?
To make this mousse sugar-free, use a sugar-free sweetener, like stevia or erythritol. Adjust the amount to taste since these sweeteners can be much sweeter than sugar.
What type of chocolate works best for dairy-free mousse?
Dark chocolate works best for this mousse. Look for brands that are labeled dairy-free and have a high cocoa content. This ensures a rich and deep chocolate flavor.
This blog post covered how to make a vegan chocolate mousse. We explored key ingredients, including substitutions for different diets. I shared step-by-step instructions to combine and chill your mousse. You learned tips for texture and flavor, and how to present your dish beautifully. Variations like adding orange zest offer unique twists. Lastly, I provided storage info, so your leftovers stay fresh.
Enjoy your delicious mousse and impress your friends!