Spring is here, and it’s time for fun and festive treats! In this guide, I’ll show you how to make adorable Easter Chicks Cupcakes that everyone will love. With simple ingredients and easy steps, you’ll have a batch of cute cupcakes ready in no time. They’re perfect for celebrations, gatherings, or just a delightful family treat. Let’s dive into this sweet adventure and bring some joy to your Easter festivities!
Ingredients
To make delightful Easter Chicks Cupcakes, you’ll need to gather your ingredients. Here’s what you will need:
– 1 ¾ cups all-purpose flour
– 1 cup granulated sugar
– ½ cup unsalted butter, softened
– ½ cup whole milk
– 3 large eggs, at room temperature
– 2 teaspoons baking powder
– 1 teaspoon pure vanilla extract
– ½ teaspoon salt
– Yellow food coloring
– For the Buttercream Frosting:
– 1 cup unsalted butter, softened
– 4 cups powdered sugar
– 2 tablespoons milk
– 1 teaspoon pure vanilla extract
– Orange candy melts (for making beaks)
– Mini chocolate chips (for eyes)
– Optional: Green coconut flakes (for grass decoration)
These ingredients are simple, but they come together to create something magical. The yellow food coloring is key for that cute chick look. The butter in both the cake and frosting adds richness. The candy melts and mini chocolate chips create fun features that bring these cupcakes to life.Each element is important, so gather everything before you start. Happy baking!
Step-by-Step Instructions
Preheat and Prepare
– Preheat the oven to 350°F (175°C).
– Line your cupcake tin with yellow liners for a cheerful look.
Mix Dry and Wet Ingredients
– In a bowl, whisk together flour, baking powder, and salt.
– In another bowl, cream the butter and sugar until fluffy.
– Add eggs, milk, and vanilla, mixing until smooth.
Combine Mixtures
– Gradually mix the dry ingredients into the wet mixture.
– Add yellow food coloring to brighten the batter.
Fill and Bake
– Fill each liner with batter about two-thirds full.
– Bake for 18-20 minutes, checking with a toothpick for doneness.
Cool and Frost
– Transfer cupcakes to a wire rack to cool completely.
– While they cool, prepare the buttercream frosting.
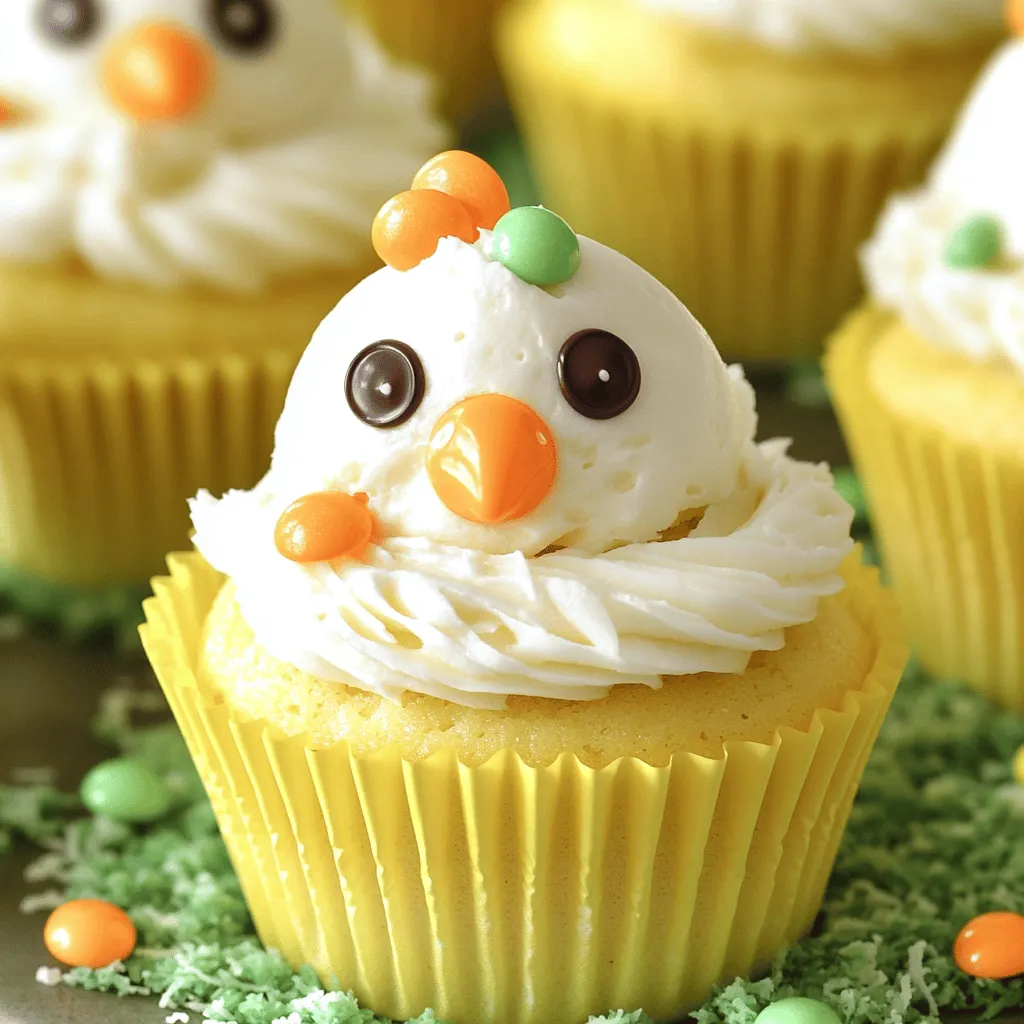
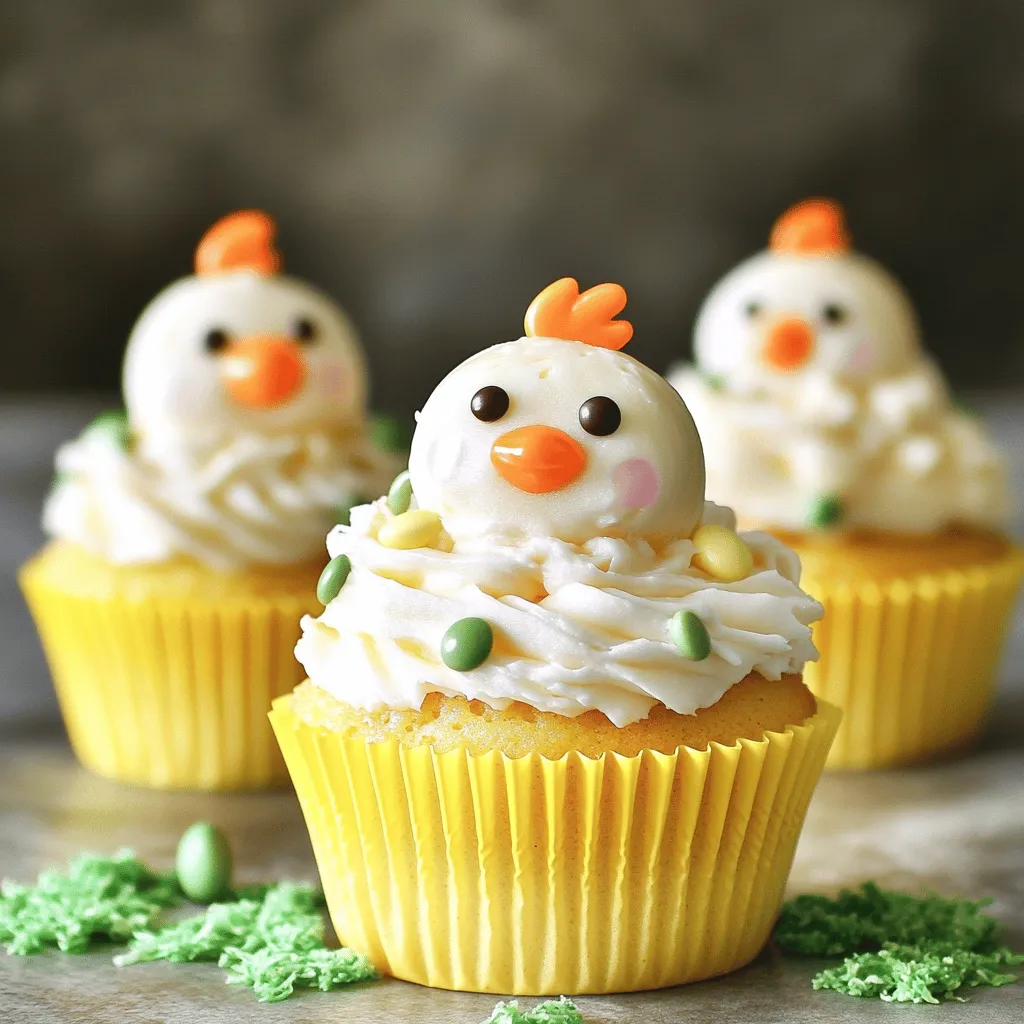
Decorate Easter Chicks
– Cut orange candy melts into small triangles for beaks.
– Press the candy melts into the frosting for beaks.
– Use mini chocolate chips for eyes by gently pressing them in.
– Optionally, add coconut flakes around the base for grass.
These steps guide you through making delightful Easter Chicks Cupcakes.Enjoy your baking adventure!
Tips & Tricks
Perfect Your Cupcakes
To make great cupcakes, start with the right mix. Avoid overmixing the batter. This keeps the cupcakes light and fluffy. To achieve this, mix until just combined. The batter should be a little lumpy, and that’s okay!
For a perfect cupcake texture, use room temperature ingredients. Eggs and milk blend better when they are not cold. This helps your cupcakes rise evenly.
Once baked, cooling is key. Transfer the cupcakes to a wire rack after five minutes. Let them cool completely before frosting. This ensures the frosting stays smooth and does not melt.
Frosting Techniques
To get a smooth buttercream, beat the softened butter first. Ensure it is creamy with no lumps. Gradually add powdered sugar, mixing well. Alternate adding milk for a fluffy texture.
Use a piping bag for decoration. A large round tip works best for a swirl effect. This gives your cupcakes a lovely and fun look.
Decorating Ideas
Get creative with the chick features! Use orange candy melts for beaks. Cut small triangles and press them into the frosting. For eyes, use mini chocolate chips. They fit perfectly and look cute.
Try different toppings! You can add colored sprinkles or edible glitter for fun. Use green coconut flakes to mimic grass around the base. This adds a festive touch.
Variations
Flavor Variations
You can make Easter Chicks Cupcakes in different flavors. Here are two fun ideas:
– Chocolate Easter Chicks Cupcakes: Swap the all-purpose flour for cocoa powder. This gives the cupcake a rich chocolate flavor. Use the same steps from the vanilla recipe. You can still decorate them like chicks!
– Lemon-flavored cupcakes: Add lemon zest and lemon juice to the batter. This gives a fresh, tangy taste. It pairs well with the buttercream frosting. Just imagine the bright yellow chicks with a zesty twist!
Dietary Adjustments
Want to make these cupcakes for special diets? Here are some ideas:
– Gluten-free alternatives: Use a gluten-free flour blend instead of all-purpose flour. This will keep the cupcakes soft and tasty.
– Dairy-free options: Replace the butter with coconut oil or a dairy-free butter substitute. Use almond milk or oat milk in place of regular milk. This way, everyone can enjoy these treats!
Alternate Decorations
You can get creative with how you decorate your cupcakes. Here are some fun options:
– Different animal themes: Instead of chicks, try bunnies or other animals. Use different colors and shapes for their features.
– Seasonal variations: Change the theme based on the season. For Halloween, make spooky cupcakes with ghostly decorations. For spring, use pastel colors and flowers.
These variations make every cupcake unique and fun!
Storage Info
Storing Cupcakes
To keep your Easter Chicks Cupcakes fresh, store them in an airtight container. This helps prevent them from drying out. The best temperature for storing is at room temperature. Avoid placing them in direct sunlight or heat, as this can ruin the frosting.
Freezing Instructions
If you want to save some cupcakes for later, freezing works well. First, let the cupcakes cool completely. Then, wrap each cupcake in plastic wrap. Place them in a freezer-safe bag or container. When you want to enjoy one, thaw it in the fridge overnight. For the best taste, eat them within three months.
Shelf Life
Easter Chicks Cupcakes last about three days at room temperature. If stored in the fridge, they can last up to a week. Signs of spoilage include a dry texture or off smell. If you see mold, it’s time to toss them out. Enjoy your treats while they are fresh for the best taste!
FAQs
How to Make Easter Chicks Cupcakes?
To make Easter Chicks Cupcakes, start by preheating your oven to 350°F (175°C). Line a cupcake tin with yellow liners for a fun touch. Mix flour, baking powder, and salt in a bowl. In another bowl, cream butter and sugar until light. Add eggs, milk, and vanilla. Slowly mix the dry ingredients into the wet ones, adding yellow food coloring until you like the shade. Fill the liners two-thirds full with batter, then bake for 18-20 minutes. Cool the cupcakes on a wire rack. Frost them with buttercream and add decorations for cute chicks.
Can I Use Store-Bought Decoration?
Yes, you can use store-bought decorations if you’re short on time. Look for yellow frosting or cute edible eyes. You can find candy melts, sprinkles, and cupcake toppers at most stores. Using these saves time and still makes your cupcakes look great. Feel free to mix and match store-bought items with your homemade touches.
What Can I Substitute for Butter in the Frosting?
If you need a butter substitute for frosting, try using vegetable shortening or coconut oil. You can also use vegan butter for a dairy-free option. These alternatives will still give you a creamy texture. Just keep in mind that they may change the taste slightly. Adjust the sugar and vanilla to suit your flavor needs.
How Long Do Cupcakes Last?
Cupcakes last about 2-3 days at room temperature. Store them in an airtight container. If you keep them in the fridge, they can last up to a week. Just remember to let them come to room temperature before serving. Always check for signs of spoilage, like a change in smell or texture.
Can I Customize the Chick Colors?
Absolutely! You can customize chick colors using different food coloring. Instead of yellow, try using pink, blue, or green hues for a unique look. You can even mix colors to create fun patterns. Just add a few drops of food coloring to your batter and frosting until you get the desired shade. Let your creativity shine!
In this blog post, I shared how to make fun Easter Chicks Cupcakes using simple ingredients. You learned the steps for mixing, baking, and decorating these treats. I also covered tips for achieving great texture and various flavor options. Remember, creativity makes your cupcakes unique. Have fun customizing colors and designs. Enjoy making these cupcakes and sharing them with family and friends! Happy baking!