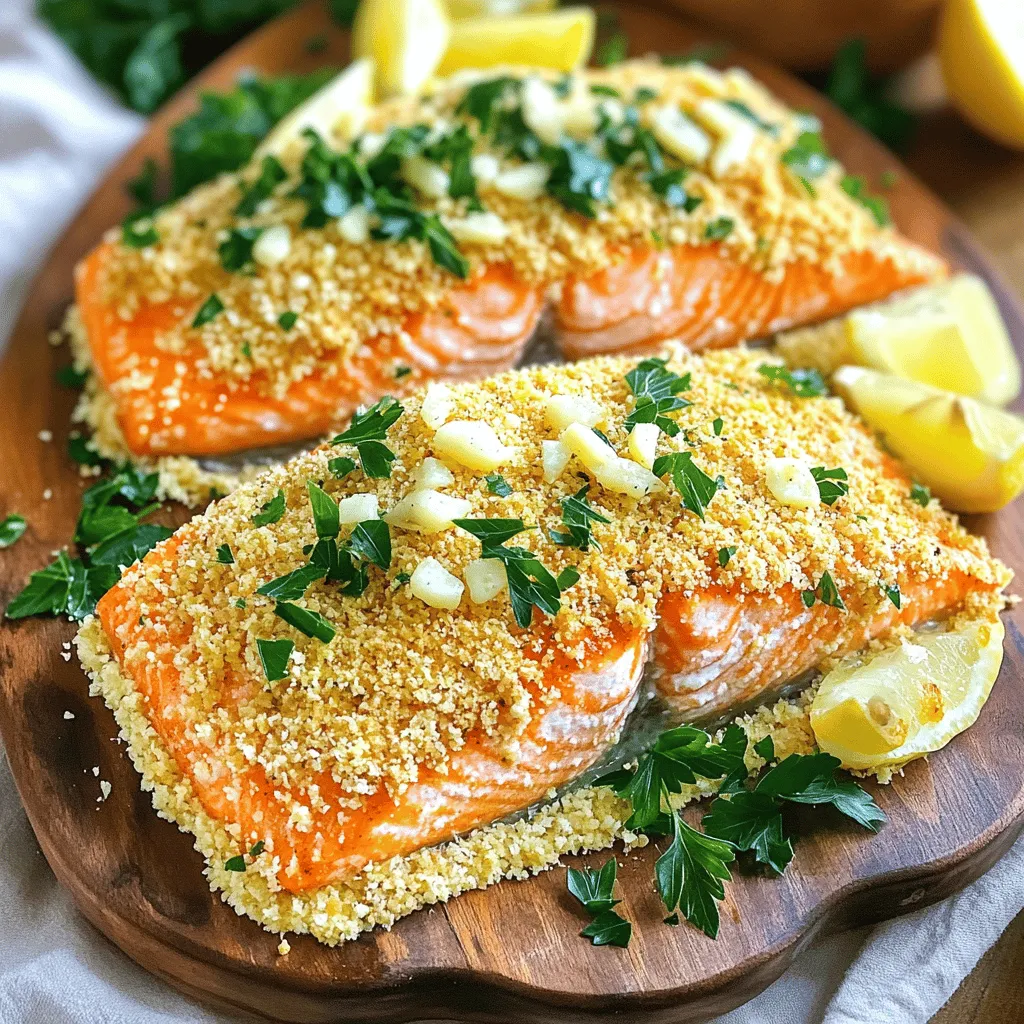
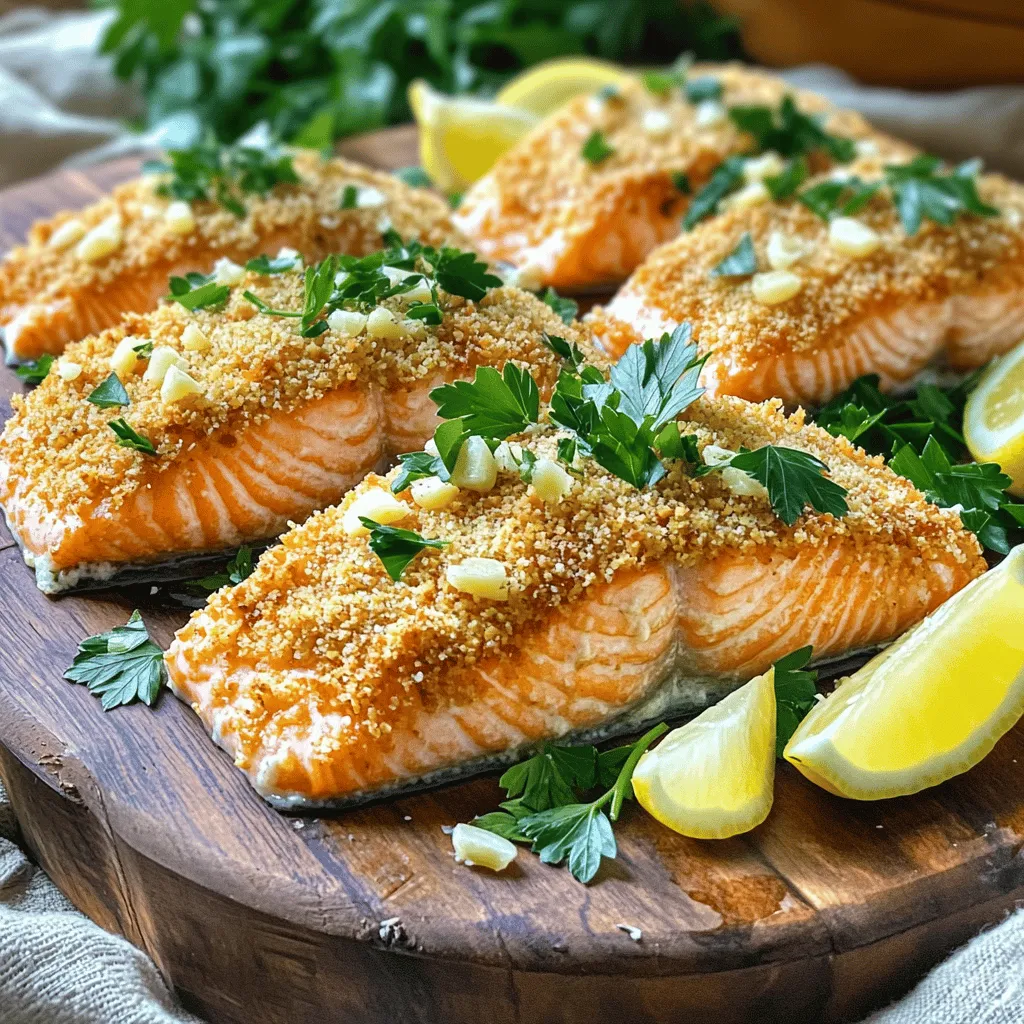
Are you ready for a dinner that will impress everyone at the table? My Garlic Parmesan Crusted Salmon is the perfect blend of flavors and textures. With a crispy topping of Parmesan and panko, this dish is not only delicious but also easy to make. In this article, I’ll walk you through the simple steps, tips, and variations to create this flavorful delight. Let’s dive in!
Ingredients
Main Ingredients
– 4 salmon fillets (about 6 ounces each)
– 1/2 cup freshly grated Parmesan cheese
– 1/4 cup panko breadcrumbs
Seasonings and Additives
– 4 cloves garlic, finely minced
– 2 tablespoons fresh parsley, finely chopped
– 1 tablespoon freshly squeezed lemon juice
– 2 tablespoons extra virgin olive oil
Optional Garnishes
– Sea salt and freshly ground black pepper, to taste
– Lemon wedges, for serving
When I cook Garlic Parmesan Crusted Salmon, I focus on fresh, high-quality ingredients. The salmon fillets are the star, and I choose ones that are about 6 ounces each. This size cooks perfectly without drying out. Freshly grated Parmesan cheese is key; it melts and forms a wonderful crust. I love using panko breadcrumbs for that extra crunch.
Garlic adds a rich flavor, so I use four cloves, finely minced. Fresh parsley brightens the dish, and I chop two tablespoons to mix in. A splash of lemon juice adds a zesty note, while two tablespoons of extra virgin olive oil help bind everything together.
For garnishes, I keep it simple. A sprinkle of sea salt and freshly ground black pepper enhances the taste. I love serving the salmon with lemon wedges on the side. They add a fresh burst of flavor when squeezed on the warm fish.
Step-by-Step Instructions
Preparation Steps
– Preheat the oven to 400°F (200°C).
– In a bowl, mix Parmesan, panko, garlic, parsley, lemon juice, and olive oil.
This step sets the stage for a delicious meal. Preheating the oven ensures that the salmon cooks evenly. The mixture of cheese, breadcrumbs, and garlic gives the salmon a tasty crust. Stir it well until everything blends together.
Assembly Steps
– Line a baking sheet with parchment paper and place salmon fillets skin-side down.
– Spread and press the garlic Parmesan mixture on top of each salmon fillet.
Lining the baking sheet helps with cleanup later. Placing the salmon skin-side down keeps the fish moist. Pressing the topping firmly helps it stick during baking.
Cooking Steps
– Bake the salmon for 12-15 minutes until it is opaque and the topping is crispy.
– Let the salmon rest for a couple of minutes before serving.
Baking time is key. The salmon should look opaque and flake easily with a fork. Resting for a few minutes keeps the fish juicy. Enjoy the lovely aroma filling your kitchen!
Tips & Tricks
Achieving a Crispy Crust
– Use panko breadcrumbs for extra crunch. They create a light and crispy layer on top.
– Ensure even distribution of the topping on the salmon. This helps every bite be full of flavor.
Flavor Enhancement
– Experiment with additional herbs such as thyme or dill. These herbs add depth to the dish.
– Adjust lemon juice for brightness according to taste. If you like it tangy, add more juice.
Common Mistakes to Avoid
– Overbaking leads to dry salmon. Keep an eye on the time, aiming for 12-15 minutes.
– Neglecting to press the topping firmly onto the fish can cause it to fall off. Press it down with your fingers or the back of a spoon to help it stick.
Variations
Different Fish Options
You can switch the salmon with other fish. Trout and tilapia work well. They both have mild flavors that pair nicely with garlic and cheese. If fresh fish isn’t available, consider frozen fish fillets. They still taste great and save you time.
Alternative Flavor Profiles
Want a bit of heat? Add crushed red pepper to the topping. It gives the dish a spicy kick that many will love. You can also try different cheeses. Feta adds a tangy twist, while mozzarella brings a creamy texture. Each option changes the flavor and keeps your meals exciting.
Dietary Adjustments
If you need a gluten-free option, use almond flour instead of panko. It gives a nice crunch without the gluten. For a dairy-free version, swap in vegan parmesan cheese. This way, everyone can enjoy this tasty dish without worries.
Storage Info
Refrigeration
Store leftover garlic Parmesan crusted salmon in an airtight container. This keeps the salmon fresh for up to 3 days. Make sure to cover it well to avoid any odors from other foods.
Freezing
You can freeze cooked salmon fillets if you want to keep them longer. They stay good for up to 2 months in the freezer. When you’re ready to eat, thaw the salmon in the refrigerator. This helps maintain its texture and flavor.
Reheating Instructions
To reheat, place the salmon in the oven at 350°F (175°C). This method helps keep the crust crispy and delicious. Avoid using a microwave, as it can make the crust soggy. Instead, an oven provides even heat and preserves the dish’s tasty topping.
FAQs
How do I know when the salmon is fully cooked?
You can tell the salmon is done when it looks opaque. Use a fork to check if it flakes easily. This means the fish is ready to eat. Cooking it just right keeps it moist and tasty.
Can I make this recipe ahead of time?
Yes, you can prepare the topping ahead of time. Just mix all the topping ingredients and put them in the fridge. When you are ready to cook, just spread the topping on the salmon and bake it. This way, you save time when you want to enjoy a nice dinner.
What sides pair well with Garlic Parmesan Crusted Salmon?
I love to serve this salmon with steamed vegetables. You can also have it with rice or a fresh salad. These sides make a complete meal that everyone will enjoy. They balance the rich flavor of the salmon wonderfully.
This blog post provided a clear path to making Garlic Parmesan Crusted Salmon. We reviewed key ingredients like salmon, Parmesan, and garlic. You learned step-by-step instructions for preparation, assembly, and cooking. Helpful tips showed how to get a crispy crust and avoid common mistakes. Variations offered choices for different fish and dietary needs. Lastly, we covered storage and reheating.
By following these steps, you can enjoy a tasty and healthy dish that stands out on any table.