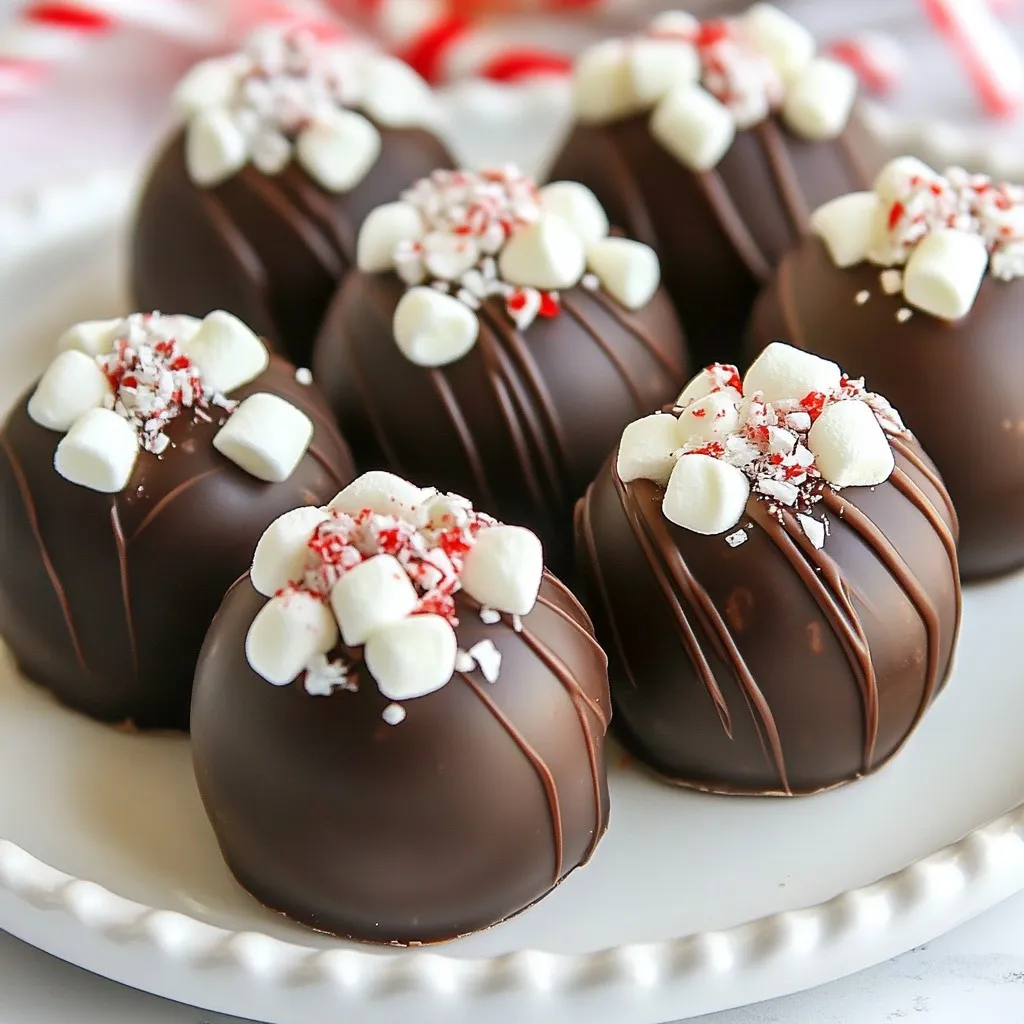
Hot chocolate bombs are fun, tasty treats that anyone can make at home! With just a few ingredients and simple steps, you can create delightful bombs that explode with flavor when added to hot milk. Whether you enjoy classic cocoa or want to try new flavors, these homemade delights are perfect for cozy evenings. Ready to dive in and impress your friends? Let’s start making some hot chocolate magic!
Why I Love This Recipe
- Deliciously Decadent: These hot chocolate bombs are made with high-quality chocolate, making every sip an indulgent treat.
- Customizable Flavors: You can easily personalize these bombs with different toppings and flavors to suit your taste.
- Fun to Make: The process of creating these charming bombs is enjoyable and perfect for family activities or gatherings.
- Impressive Presentation: Watching the bomb dissolve in hot milk is a delightful experience that impresses everyone!
Ingredients
Main Components
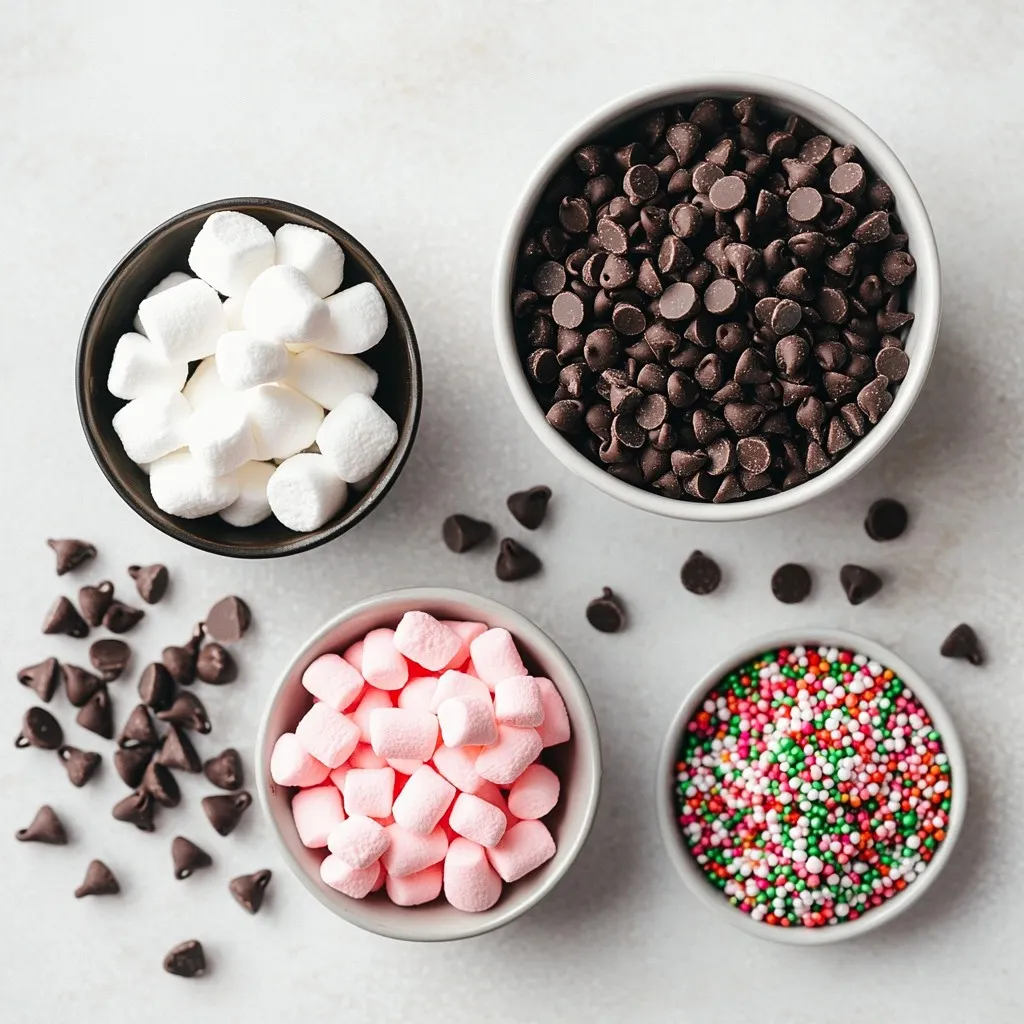
– 1 cup high-quality dark chocolate chips
– 1/2 cup hot cocoa mix
– 1/2 cup mini marshmallows
– 1/4 cup crushed peppermint candies
The main ingredients create rich flavors. Dark chocolate chips give a deep taste. The hot cocoa mix adds sweetness. Mini marshmallows offer a fluffy texture. Crushed peppermint candies bring a festive crunch.
Optional Additions
– Decorative sprinkles
– Alternative chocolate types (e.g., milk chocolate)
You can make your hot chocolate bombs extra fun with sprinkles. They add color and excitement. If you prefer, use milk chocolate instead of dark. This choice will change the flavor and sweetness.
Equipment Needed
– Silicone mold for shaping hot chocolate bombs
– Microwave-safe bowl or double boiler
To make these delightful treats, you need a silicone mold. This mold helps shape the bombs easily. A microwave-safe bowl works well for melting chocolate. Alternatively, a double boiler gently warms the chocolate.
Step-by-Step Instructions
Melting the Chocolate
To start, you need to melt the chocolate. You can use two methods.
– Microwave method: Place dark chocolate chips in a microwave-safe bowl. Heat in 30-second bursts, stirring each time. This keeps the chocolate smooth and shiny.
– Double boiler method: Fill a pot with water and simmer it. Set a heatproof bowl on top without touching the water. Add chocolate chips to the bowl and stir until melted.
Coating the Molds
Next, you coat the molds with melted chocolate. Here are some tips:
– Techniques for even coating: Use a spoon or pastry brush to apply the chocolate. Make sure to coat the inside well.
– Importance of thickness: The chocolate layer should be thick enough to hold its shape. A thin layer may break apart.
Filling the Molds
Now, it’s time to fill the molds with tasty treats.
– Layering technique for ingredients: After the chocolate sets, add 1-2 tablespoons of hot cocoa mix to each mold. Then, add mini marshmallows and crushed peppermint candies.
– Customizing with toppings: Feel free to mix in your favorite toppings. You can use nuts, caramel bits, or even flavored cocoa mix.
Sealing the Bombs
Sealing the hot chocolate bombs is next.
– Using a warm plate technique: Heat a plate in the microwave for about 30 seconds. This plate will help melt the edges of the chocolate shells.
– Proper alignment for sealing: Press the open sides of the chocolate shells against the warm plate. Then, align the filled halves and press them together. Hold for a few seconds to seal.
Decorating
Once sealed, you can add some fun decorations.
– Drizzling chocolate: Use leftover melted chocolate to drizzle over the tops. This adds a nice touch.
– Adding sprinkles for visual appeal: Sprinkle decorative sprinkles on top. It makes them look festive and fun.
Finishing Up
Finally, let’s finish your hot chocolate bombs.
– Allowing to set at room temperature: Let the bombs sit at room temperature until set. This could take about 30 minutes.
– Storage recommendations: Store the bombs in an airtight container. They will stay fresh until you are ready to enjoy them.
Tips & Tricks
Achieving Perfect Chocolate Shells
To get a perfect chocolate shell, start with quality chocolate. Use high-quality dark chocolate chips or milk chocolate. Melt it carefully to avoid burning.
– Ensuring even thickness: Coat the molds well. Use a spoon or brush. Make sure to cover every spot evenly. Aim for a thickness of about 1/8 inch. A thick shell holds better. If it’s too thin, it might break.
– Avoiding chocolate cracking: Let the chocolate cool slowly. If you rush it, the shells may crack. Cool them at room temperature before putting them in the fridge. This prevents stress on the chocolate.
Flavor Variations
Hot chocolate bombs are fun to customize! You can switch up the fillings to suit your taste.
– Alternative fillings: Try flavored cocoa mix. You can also use different types of chocolate. Check for caramel or peanut butter options for extra flavor.
– Seasonal toppings: Change toppings based on the season. Use crushed peppermint for winter. In fall, add cinnamon or nutmeg. For holidays, use colorful sprinkles or themed decorations.
Presentation Ideas
How you present your hot chocolate bombs makes a difference.
– Serving with different mugs: Use fun mugs to match the season or occasion. A cozy mug adds to the joy of the drink.
– Adding whipped cream or extra toppings: Top your drink with whipped cream. You can also add more sprinkles or chocolate shavings. This makes it look fancy and inviting. Enjoy every sip of your delightful treat!
Pro Tips
- Use Quality Chocolate: The better the chocolate you use, the richer and more luxurious your hot chocolate bombs will taste. Aim for high-quality dark or milk chocolate that has a high cocoa content.
- Experiment with Fillings: While hot cocoa mix and marshmallows are classic, feel free to get creative with your fillings! Try adding flavored syrups, crushed cookies, or different types of chocolates for a unique twist.
- Check the Temperature: When sealing the chocolate shells, ensure the plate is warm but not too hot; this prevents the chocolate from becoming too soft and melting excessively.
- Storage Matters: Keep your hot chocolate bombs in a cool, dry place to maintain their shape and quality. Avoid refrigerating them unless necessary, as moisture can affect the chocolate.
Variations
Themed Hot Chocolate Bombs
You can make hot chocolate bombs for any season! For winter, think about adding festive flavors. Try peppermint or gingerbread. For spring, use flavors like lavender or matcha. With Halloween, add pumpkin spice! You can also mix in different flavors. Caramel and peanut butter bring a delightful twist.
Dietary Considerations
Want to make these bombs vegan? Switch the chocolate for dark chocolate that is dairy-free. Use almond or oat milk in your hot cocoa mix. You can still enjoy mini marshmallows made from plant-based ingredients. For gluten-free options, check that your hot cocoa mix is free from gluten.
Unique Serving Suggestions
Pair your hot chocolate bombs with flavored milk. Almond or hazelnut milk can add a new layer of taste. Serve them in fun mugs for added charm. You can also add whipped cream, sprinkles, or crushed cookies on top to make them look fancy. Let your creativity flow and surprise your guests!
Storage Information
Best Practices for Storing
Store your hot chocolate bombs in an airtight container. This keeps moisture out and helps them stay fresh. You can keep them at room temperature. However, if you live in a very warm place, store them in the fridge. This prevents melting and keeps your treats intact.
Shelf Life
Hot chocolate bombs can last up to two weeks. Look for signs of spoilage, like a dull or dry surface. If they smell off or the chocolate looks whitish, it’s best to toss them. Freshness is key for that rich taste!
Preparing for Gifting
To gift hot chocolate bombs, consider fun packaging ideas. Use clear bags tied with ribbons or cute boxes. For a special touch, add a handwritten note. Presentation makes them even more delightful for any occasion.
FAQs
What are hot chocolate bombs made of?
Hot chocolate bombs are made of a few simple ingredients. Here’s a breakdown:
– 1 cup high-quality dark chocolate chips (or milk chocolate)
– 1/2 cup hot cocoa mix
– 1/2 cup mini marshmallows
– 1/4 cup crushed peppermint candies
– Optional: Decorative sprinkles for a fun touch
These ingredients come together to create a delightful treat.
How do you use hot chocolate bombs?
Using hot chocolate bombs is easy and fun! Follow these simple steps:
1. Place the bomb in a mug. Choose a cozy mug to enjoy your drink.
2. Heat milk. Pour hot, steamed milk over the bomb in the mug.
3. Watch it dissolve. Enjoy the magic as the bomb melts, releasing marshmallows and cocoa.
4. Stir it up. Mix well to combine flavors. You can top with whipped cream if you want!
This method makes a warm, tasty drink.
Can I make hot chocolate bombs ahead of time?
Yes, you can make hot chocolate bombs ahead of time! Here are some tips for storage:
– Use an airtight container. This keeps them fresh.
– Store at room temperature. Avoid moisture to prevent melting.
– Lasts for about two weeks. Enjoy them within this time for the best taste.
Making them in advance saves time later.
What are some alternative fillings for hot chocolate bombs?
You can get creative with your fillings! Here are some fun ideas:
– Use flavored hot cocoa mixes, like caramel or mint.
– Add different candies, such as chocolate chips or toffee bits.
– Experiment with spices like cinnamon or nutmeg for warmth.
These options let you personalize each bomb to your taste.
Where can I buy hot chocolate bombs?
You can find hot chocolate bombs at many places:
– Local stores: Check specialty shops or bakeries.
– Online: Many brands sell them on websites like Amazon or Etsy.
– Make your own: It’s easy and fun to create at home!
Buying or making your own means you can enjoy this sweet treat any time!
You now have all the tools to create delightful hot chocolate bombs. We covered ingredients like dark chocolate, cocoa mix, and marshmallows. You learned how to melt chocolate, coat molds, and fill them with tasty treats. Tips helped you make perfect shells and explore fun flavors. With storage advice and creative serving ideas, your bombs will impress everyone. Try making these treats for yourself or as gifts. Have fun, and enjoy each warm si