No-Bake Cheesecake Cups Creamy Delight Recipe

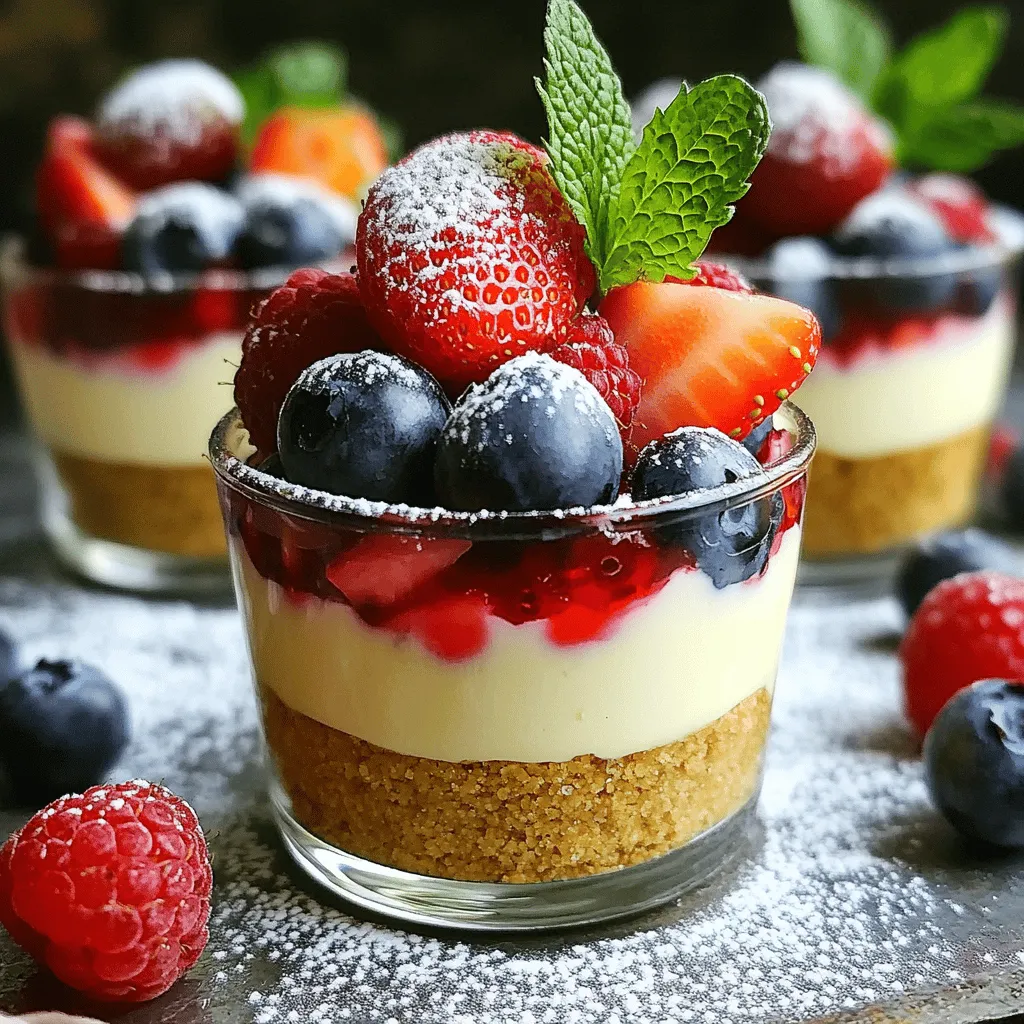
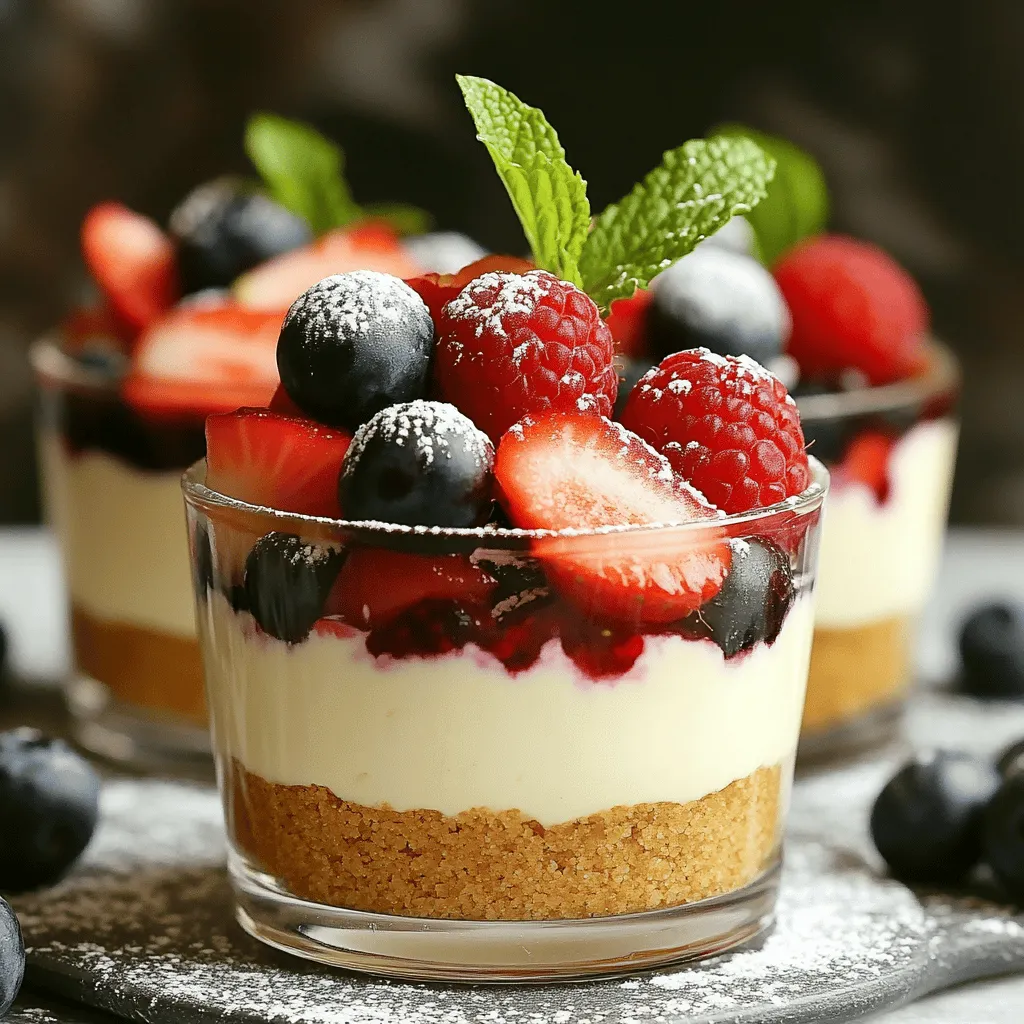
If you crave a sweet treat without the fuss of baking, you’ll love my No-Bake Cheesecake Cups! This creamy delight comes together easily, using simple ingredients like cream cheese and Greek yogurt. Perfect for any occasion, these cups are topped with fresh berries for a burst of flavor. In this article, I’ll guide you step-by-step, share tips to avoid common mistakes, and even explore delicious variations. Let’s dive in and make dessert magic!

Ingredients

To make these delightful no-bake cheesecake cups, you need to gather a few key ingredients. Each adds its own charm to the dish. Here’s what you will need:

– 1 cup cream cheese, softened to room temperature

– 1 cup creamy Greek yogurt

– 1/2 cup powdered sugar

– 1 teaspoon pure vanilla extract

– 1/4 cup heavy cream

– 1 cup mixed fresh berries (strawberries, blueberries, and raspberries work well)

– 1/2 cup crushed graham crackers

– 2 tablespoons melted unsalted butter

– Fresh mint leaves for an eye-catching garnish

The cream cheese and Greek yogurt create a rich and creamy texture. The berries provide a burst of flavor and color. The graham crackers and butter form a crumbly crust that holds everything together.

Feel free to explore the Full Recipe for detailed instructions on how to combine these ingredients into a delicious treat!

Step-by-Step Instructions

Detailed Preparation Steps

1. Mixing the cheesecake base

Start by taking a large bowl. Add softened cream cheese, Greek yogurt, powdered sugar, and vanilla extract. Beat these items together with an electric mixer on medium speed. Mix until the blend is smooth and creamy. Make sure there are no lumps. This step is key for a creamy texture.

2. Whipping the cream

In another bowl, pour in your heavy cream. Use a hand mixer or whisk to whip it. Keep whisking until you see stiff peaks form. This tells you the cream is fluffy enough. It adds air to your cheesecake, making it light.

3. Assembling the cups with crust and filling

In a separate bowl, combine crushed graham crackers and melted butter. Stir until the crumbs feel like wet sand. Next, prepare your serving cups. Divide the graham cracker mixture equally among them. Press it down lightly with the back of a spoon. This forms a nice crust. Now, spoon in your cheesecake mixture on top of the crust. Fill each cup generously to the rim.

4. Chilling for optimal texture

Top each cheesecake cup with a handful of mixed berries. This adds color and flavor. Place the cups in the refrigerator. Chill them for at least 2 hours. This step helps the cheesecake to set and flavors to develop. If you want to get fancy, add a mint leaf on top just before serving.

You can find the Full Recipe for these delicious No-Bake Cheesecake Cups in the recipe section above.

Tips & Tricks

Common Mistakes to Avoid

Overmixing the cream cheese mixture: When you mix the cream cheese too much, it can become too soft. This makes your cheesecake cups less fluffy. Aim for a smooth blend, but stop once it’s creamy.

Not chilling the cups long enough: Chilling is key! If you don’t chill the cups for at least two hours, they won’t set properly. This can lead to a messy serve. Patience is a virtue here!

Using stale graham crackers: Freshness matters! Old graham crackers can ruin the crust’s taste and texture. Be sure to check the date before using them.

Presentation Tips

Serving suggestions for a colorful display: Use a bright platter to serve your cheesecake cups. This adds color to your table. You can also arrange them in a circle or line. It makes a fun centerpiece!

Garnishing ideas to enhance visual appeal: Fresh mint leaves add a pop of green. You can also sprinkle some extra berries on top. This not only looks good but also tastes great! For a final touch, drizzle some berry sauce around the cups for extra flair.

Follow these tips, and your No-Bake Cheesecake Cups will be a hit! For the full recipe, check the section above.

Variations

Flavor Variations

You can change up the flavors in your no-bake cheesecake cups. Here are some fun ideas:

Chocolate cheesecake option: Mix in melted chocolate or cocoa powder into the cream cheese mix. It adds a rich and sweet flavor that chocolate lovers will adore.

Lemon or citrus-infused cheesecake: Use fresh lemon juice and zest. This gives your cheesecake a bright and zesty taste that wakes up your palate.

Seasonal fruit variations: Swap the mixed berries for seasonal fruits. Think peaches in summer or apples in fall. Each fruit brings its own unique flavor.

Alternative Topping Ideas

Toppings can add color and texture to your cheesecake cups. Consider these options:

Different berries or fruit compotes: Use strawberries, blueberries, or even mango puree. These toppings not only look great but also bring extra taste.

Whipped cream or chocolate shavings: A dollop of whipped cream adds lightness, while chocolate shavings give a touch of luxury.

Nut toppings for crunch: Sprinkle crushed nuts like almonds or walnuts on top. They add a nice crunch and a nutty flavor that pairs well with the creamy cheesecake.

Feel free to mix and match these variations to create your perfect no-bake cheesecake cups. For the full recipe, check out the No-Bake Berry Delight Cheesecake Cups.

Storage Info

Best Storage Methods

To keep your No-Bake Cheesecake Cups fresh, store them in the fridge. Place the cups in an airtight container. This stops air from drying them out.

If you want to save some for later, freezing is an option. Wrap each cup tightly in plastic wrap and then place them in a freezer-safe bag. This way, they stay fresh for longer.

Shelf Life

In the fridge, your cheesecake cups will stay fresh for about 3 to 5 days. After this time, they may not taste as good.

Watch for signs of spoilage. If you see any mold or if they smell off, it’s best to toss them. Enjoy your treats while they are at their best!

FAQs

Can I make No-Bake Cheesecake Cups ahead of time?

Yes, you can make these cheesecake cups a day in advance. This helps the flavors blend well. Just keep them in the fridge until you are ready to serve. The longer they chill, the better they taste.

What can I substitute for cream cheese?

If you want a lighter option, use ricotta cheese. It gives a nice texture and taste. Another option is mascarpone cheese, which is also creamy and rich.

How do I know when the cheesecake is set?

The cheesecake cups are set when they feel firm to the touch. You can also check by gently shaking the cup. If the filling jiggles slightly, it needs more time in the fridge.

Can I use dairy-free ingredients for this recipe?

Yes, you can! Use dairy-free cream cheese or cashew cream. Greek yogurt can be swapped for a dairy-free yogurt. This way, you can enjoy a tasty dessert that fits your diet.

In this post, we explored how to make no-bake cheesecake cups. We covered the key ingredients, like cream cheese, fresh berries, and graham crackers. You learned step-by-step instructions to mix, whip, and chill your dessert. I also shared tips to avoid common mistakes, plus ideas for toppings and flavors. Remember, these treats are easy to store and adapt. Whether you stick to classic flavors or try new ones, enjoy the process. No-bake cheesecake cups are fun and tasty for everyone!

To make these delightful no-bake cheesecake cups, you need to gather a few key ingredients. Each adds its own charm to the dish. Here’s what you will need: - 1 cup cream cheese, softened to room temperature - 1 cup creamy Greek yogurt - 1/2 cup powdered sugar - 1 teaspoon pure vanilla extract - 1/4 cup heavy cream - 1 cup mixed fresh berries (strawberries, blueberries, and raspberries work well) - 1/2 cup crushed graham crackers - 2 tablespoons melted unsalted butter - Fresh mint leaves for an eye-catching garnish The cream cheese and Greek yogurt create a rich and creamy texture. The berries provide a burst of flavor and color. The graham crackers and butter form a crumbly crust that holds everything together. Feel free to explore the Full Recipe for detailed instructions on how to combine these ingredients into a delicious treat! 1. Mixing the cheesecake base Start by taking a large bowl. Add softened cream cheese, Greek yogurt, powdered sugar, and vanilla extract. Beat these items together with an electric mixer on medium speed. Mix until the blend is smooth and creamy. Make sure there are no lumps. This step is key for a creamy texture. 2. Whipping the cream In another bowl, pour in your heavy cream. Use a hand mixer or whisk to whip it. Keep whisking until you see stiff peaks form. This tells you the cream is fluffy enough. It adds air to your cheesecake, making it light. 3. Assembling the cups with crust and filling In a separate bowl, combine crushed graham crackers and melted butter. Stir until the crumbs feel like wet sand. Next, prepare your serving cups. Divide the graham cracker mixture equally among them. Press it down lightly with the back of a spoon. This forms a nice crust. Now, spoon in your cheesecake mixture on top of the crust. Fill each cup generously to the rim. 4. Chilling for optimal texture Top each cheesecake cup with a handful of mixed berries. This adds color and flavor. Place the cups in the refrigerator. Chill them for at least 2 hours. This step helps the cheesecake to set and flavors to develop. If you want to get fancy, add a mint leaf on top just before serving. You can find the Full Recipe for these delicious No-Bake Cheesecake Cups in the recipe section above. - Overmixing the cream cheese mixture: When you mix the cream cheese too much, it can become too soft. This makes your cheesecake cups less fluffy. Aim for a smooth blend, but stop once it’s creamy. - Not chilling the cups long enough: Chilling is key! If you don’t chill the cups for at least two hours, they won’t set properly. This can lead to a messy serve. Patience is a virtue here! - Using stale graham crackers: Freshness matters! Old graham crackers can ruin the crust's taste and texture. Be sure to check the date before using them. - Serving suggestions for a colorful display: Use a bright platter to serve your cheesecake cups. This adds color to your table. You can also arrange them in a circle or line. It makes a fun centerpiece! - Garnishing ideas to enhance visual appeal: Fresh mint leaves add a pop of green. You can also sprinkle some extra berries on top. This not only looks good but also tastes great! For a final touch, drizzle some berry sauce around the cups for extra flair. Follow these tips, and your No-Bake Cheesecake Cups will be a hit! For the full recipe, check the section above. {{image_4}} You can change up the flavors in your no-bake cheesecake cups. Here are some fun ideas: - Chocolate cheesecake option: Mix in melted chocolate or cocoa powder into the cream cheese mix. It adds a rich and sweet flavor that chocolate lovers will adore. - Lemon or citrus-infused cheesecake: Use fresh lemon juice and zest. This gives your cheesecake a bright and zesty taste that wakes up your palate. - Seasonal fruit variations: Swap the mixed berries for seasonal fruits. Think peaches in summer or apples in fall. Each fruit brings its own unique flavor. Toppings can add color and texture to your cheesecake cups. Consider these options: - Different berries or fruit compotes: Use strawberries, blueberries, or even mango puree. These toppings not only look great but also bring extra taste. - Whipped cream or chocolate shavings: A dollop of whipped cream adds lightness, while chocolate shavings give a touch of luxury. - Nut toppings for crunch: Sprinkle crushed nuts like almonds or walnuts on top. They add a nice crunch and a nutty flavor that pairs well with the creamy cheesecake. Feel free to mix and match these variations to create your perfect no-bake cheesecake cups. For the full recipe, check out the No-Bake Berry Delight Cheesecake Cups. To keep your No-Bake Cheesecake Cups fresh, store them in the fridge. Place the cups in an airtight container. This stops air from drying them out. If you want to save some for later, freezing is an option. Wrap each cup tightly in plastic wrap and then place them in a freezer-safe bag. This way, they stay fresh for longer. In the fridge, your cheesecake cups will stay fresh for about 3 to 5 days. After this time, they may not taste as good. Watch for signs of spoilage. If you see any mold or if they smell off, it’s best to toss them. Enjoy your treats while they are at their best! Yes, you can make these cheesecake cups a day in advance. This helps the flavors blend well. Just keep them in the fridge until you are ready to serve. The longer they chill, the better they taste. If you want a lighter option, use ricotta cheese. It gives a nice texture and taste. Another option is mascarpone cheese, which is also creamy and rich. The cheesecake cups are set when they feel firm to the touch. You can also check by gently shaking the cup. If the filling jiggles slightly, it needs more time in the fridge. Yes, you can! Use dairy-free cream cheese or cashew cream. Greek yogurt can be swapped for a dairy-free yogurt. This way, you can enjoy a tasty dessert that fits your diet. In this post, we explored how to make no-bake cheesecake cups. We covered the key ingredients, like cream cheese, fresh berries, and graham crackers. You learned step-by-step instructions to mix, whip, and chill your dessert. I also shared tips to avoid common mistakes, plus ideas for toppings and flavors. Remember, these treats are easy to store and adapt. Whether you stick to classic flavors or try new ones, enjoy the process. No-bake cheesecake cups are fun and tasty for everyone!

No-Bake Cheesecake Cups

Indulge in a sweet treat with these No-Bake Berry Delight Cheesecake Cups! Made with creamy Greek yogurt, smooth cream cheese, and a mix of fresh berries, these easy-to-make desserts are perfect for any occasion. With a delightful graham cracker base and a fresh mint garnish, they're as beautiful as they are delicious. Ready in just 20 minutes (plus chill time), click to discover the full recipe and impress your guests!

Ingredients
  

1 cup cream cheese, softened to room temperature

1 cup creamy Greek yogurt

1/2 cup powdered sugar

1 teaspoon pure vanilla extract

1/4 cup heavy cream

1 cup mixed fresh berries (choose strawberries, blueberries, and raspberries)

1/2 cup crushed graham crackers

2 tablespoons melted unsalted butter

Fresh mint leaves for an eye-catching garnish

Instructions
 

In a large mixing bowl, combine the softened cream cheese, Greek yogurt, powdered sugar, and vanilla extract. Using an electric mixer, beat the ingredients together on medium speed until the mixture becomes smooth and creamy, ensuring there are no lumps.

    In a separate bowl, pour in the heavy cream and whip it using a hand mixer or a whisk until stiff peaks form, indicating it has reached a fluffy consistency.

      Carefully fold the whipped cream into the cream cheese mixture using a spatula, stirring gently until fully combined and there are no streaks of whipped cream left. This will create a light and airy cheesecake filling.

        In another bowl, mix the crushed graham crackers with the melted butter, stirring until the crumbs are evenly moistened and resemble wet sand.

          Prepare serving cups or small bowls and equally divide the graham cracker mixture among them, pressing down slightly with the back of a spoon to form a compact crust at the bottom.

            Spoon the rich cheesecake mixture over the graham cracker base, filling each cup generously all the way to the rim.

              Scatter a vibrant handful of mixed berries on top of each cheesecake cup, adding a pop of color and freshness to each serving.

                Place the filled cups in the refrigerator and chill for at least 2 hours to allow the cheesecake to set properly and develop its flavors.

                  Just before serving, finish with a sprig of fresh mint leaves atop each cup to enhance the presentation and add an aromatic touch.

                    Prep Time: 20 mins | Total Time: 2 hrs 20 mins | Servings: 4

                      Presentation Tips: Consider serving the cheesecake cups on a colorful platter for an attractive display, and provide small spoons for an extra touch of elegance.

                        Leave a Comment

                        Recipe Rating