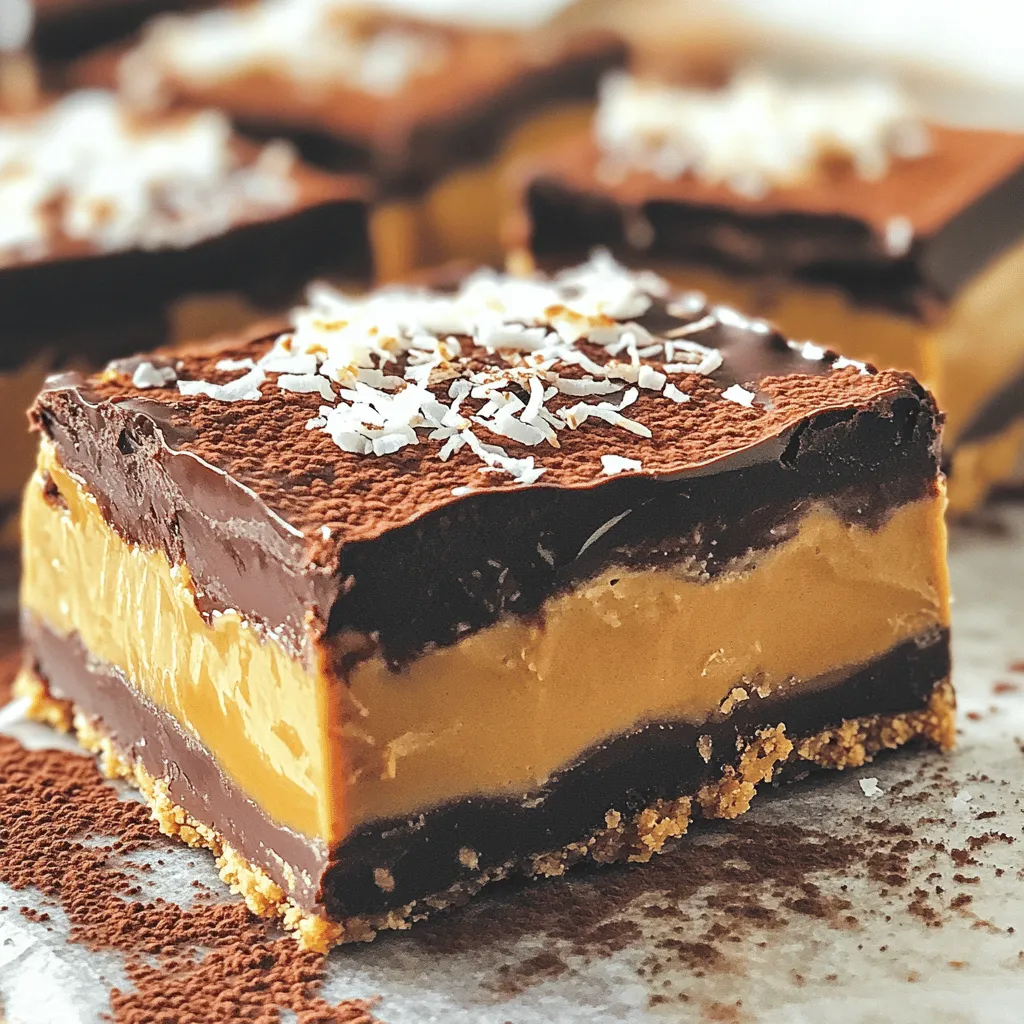
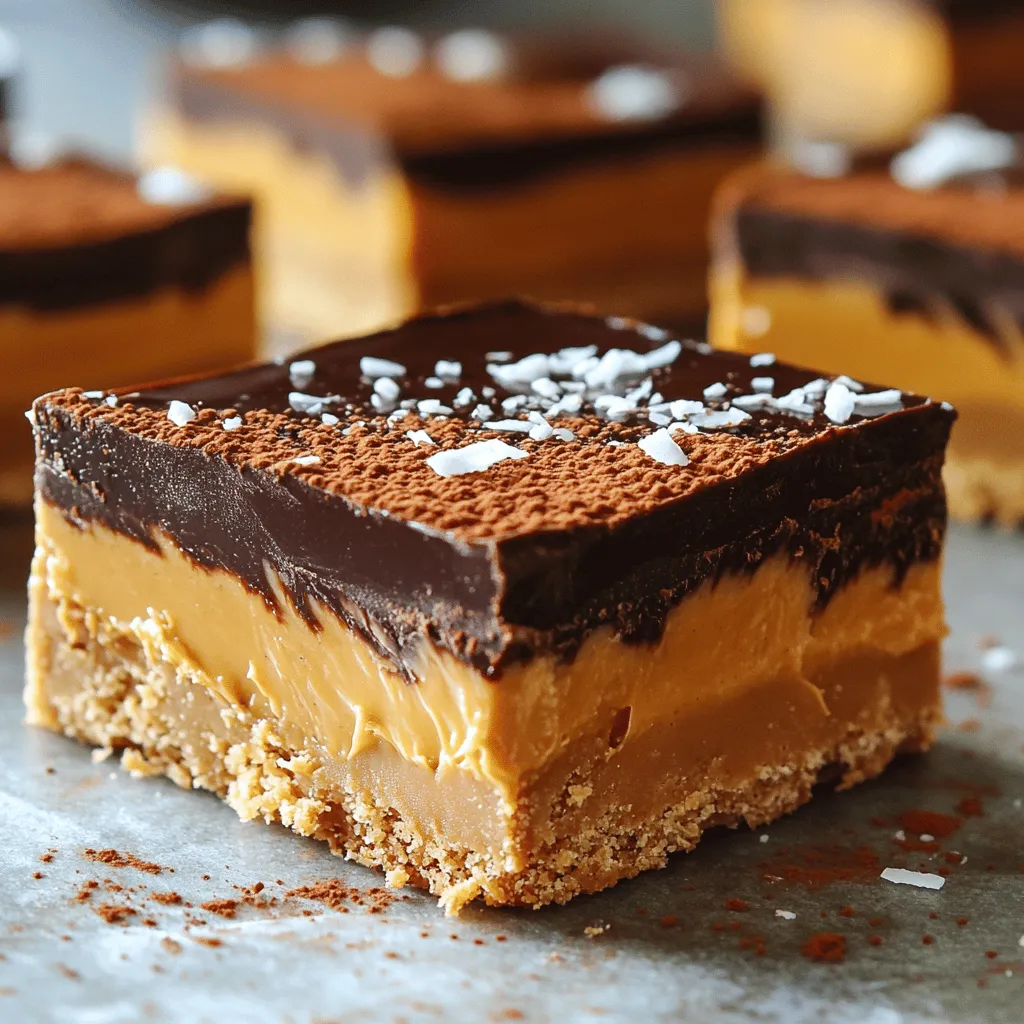
If you’re craving a sweet treat but don’t want to bake, I’ve got you covered! These No-Bake Chocolate Peanut Butter Bars are quick, easy, and oh-so-delicious. With just a handful of ingredients, you can whip up a batch that satisfies your chocolate craving. Perfect for kids and adults alike, they’re a go-to snack for any occasion. Let’s dive into how to make this delightful treat!
Ingredients
Main Ingredients List
– 1 cup creamy peanut butter
– 1 cup rolled oats
– 1/2 cup honey or maple syrup
– 1/2 cup unsweetened cocoa powder
– 1/2 cup dark chocolate chips
– 1/4 cup unsweetened shredded coconut (optional)
– 1/4 teaspoon fine sea salt
– 1 teaspoon pure vanilla extract
When I set out to make no-bake chocolate peanut butter bars, I always gather my favorite ingredients first. The creamy peanut butter is rich and adds great flavor. Rolled oats give a nice texture and make the bars hearty. You can choose honey or maple syrup for sweetness—both work well.
Cocoa powder is key for that rich chocolate taste. Dark chocolate chips melt beautifully on top, adding a smooth finish. Shredded coconut gives a fun twist, but it’s optional. A sprinkle of sea salt balances all the sweet flavors. Finally, vanilla extract enhances everything, making it truly special.
Tools Required
– Mixing bowls
– Baking dish (8-inch by 8-inch)
– Parchment paper
– Spatula
– Microwave-safe bowl
Having the right tools makes cooking easier. I love using mixing bowls for combining my ingredients. An 8-inch by 8-inch baking dish works perfectly for this recipe. Lining it with parchment paper helps with easy removal later. A spatula is great for mixing and spreading the mixture evenly. Lastly, a microwave-safe bowl is a must for melting chocolate smoothly.
Step-by-Step Instructions
Preparation Steps
– In a medium bowl, combine 1 cup of creamy peanut butter, 1/2 cup of honey (or maple syrup), and 1 teaspoon of pure vanilla extract. Mix well until smooth.
– In another bowl, mix 1 cup of rolled oats, 1/2 cup of unsweetened cocoa powder, and 1/4 teaspoon of fine sea salt. Stir until blended.
Assembling the Bars
– Slowly add the dry mixture to the peanut butter mixture. Stir until well combined. If you want coconut, fold in 1/4 cup of unsweetened shredded coconut.
– Prepare an 8-inch by 8-inch baking dish by lining it with parchment paper. Leave some paper hanging over the sides.
Melting the Chocolate
– Place 1/2 cup of dark chocolate chips in a microwave-safe bowl. Heat in 30-second increments, stirring after each time, until melted and smooth.
– Pour the melted chocolate over the peanut butter mixture in the baking dish. Use a spatula to spread it evenly.
Refrigeration Process
– Cover the dish with plastic wrap or foil. Place it in the fridge for at least 2 hours, or until the bars are firm.
– Once set, lift the bars out using the parchment paper. Place them on a cutting board and cut into squares.
Tips & Tricks
Perfecting the Recipe
– Ensure room temperature for smooth mixing. Cold peanut butter does not blend well.
– Press mixture firmly for even bars. A good press helps the bars hold together.
Garnishing Ideas
– Dust with cocoa powder for a rich look. It adds a nice touch.
– Add a sprinkle of shredded coconut. This gives a tropical twist to your bars.
Common Mistakes to Avoid
– Not properly measuring ingredients can ruin the taste. Use measuring cups for accuracy.
– Overheating the chocolate makes it grainy. Heat in short bursts for the best results.
Variations
Flavor Alternatives
You can switch things up by using almond butter instead of peanut butter. Almond butter adds a nice nutty taste. For a nutrition boost, consider adding protein powder. This makes the bars filling and extra healthy.
Topping Ideas
Drizzling caramel or white chocolate on top gives a sweet touch. You can also sprinkle nuts or seeds for a satisfying crunch. These toppings make each bite fun and tasty.
Dietary Substitutions
If you want a different sweetener, use agave syrup in place of honey. This gives you a vegan option. For a gluten-free version, simply use gluten-free oats. These swaps help everyone enjoy the bars.
Storage Info
Best Storage Practices
To keep your no-bake chocolate peanut butter bars fresh, follow these simple steps:
– Store in an airtight container.
– Keep refrigerated for up to one week.
This helps maintain their flavor and texture. I find that using a glass container works best. It seals tight and prevents moisture.
Freezing Tips
Want to keep your bars longer? You can freeze them! Here’s how:
– They can be frozen for longer shelf life.
– Thaw before serving.
Cut the bars into pieces first. Then, wrap them in plastic wrap. Place them in a freezer-safe bag. When you’re ready to enjoy, just remove the desired amount and let them sit at room temperature. Enjoy your treat anytime!
FAQs
How do I make the bars vegan?
To make these bars vegan, substitute honey with maple syrup. This swap keeps the sweetness. Ensure you use dairy-free chocolate for the topping. Many brands offer great options that taste just as good.
Can I make these bars without cocoa?
Yes, you can omit cocoa. Instead, add more rolled oats or peanuts. This change will keep the bars tasty and satisfying. You can play around with flavors while sticking to the base recipe.
How long do they last?
These bars stay fresh for up to one week in the fridge. If you want to keep them longer, freeze them. They can last several months when frozen. Just thaw them before you eat.
What can I use instead of chocolate chips?
If you need an alternative to chocolate chips, try using carob chips. Chopped dried fruits work too. Both options add a nice twist to your bars and keep them delicious.
You now know how to make delicious no-bake peanut butter bars. We covered the ingredients, tools, and step-by-step instructions. I shared tips to perfect your bars and variations to fit your taste. Always remember to store them properly for freshness. These bars are quick, easy, and packed with flavor. Enjoy making them your own while keeping it simple and fun!