Looking for a quick and tasty meal? This Sesame Garlic Instant Pot Ramen is perfect for you. With just a handful of ingredients like broth, ramen noodles, soy sauce, and sesame paste, you can whip up a dinner that’s both satisfying and full of flavor. Trust me, your taste buds will thank you! Let’s dive into this simple recipe that takes just minutes to make.
Why I Love This Recipe
- Quick and Easy: This recipe comes together in just 25 minutes, making it perfect for a weeknight dinner.
- Flavorful Base: The combination of tahini, soy sauce, and sautéed garlic and ginger creates a rich, savory broth that elevates instant ramen.
- Customizable: You can easily add your favorite vegetables or proteins to make this ramen your own.
- Healthy Option: With fresh vegetables like bok choy and mushrooms, this ramen is a nutritious twist on a classic comfort food.
Ingredients
Main Ingredients
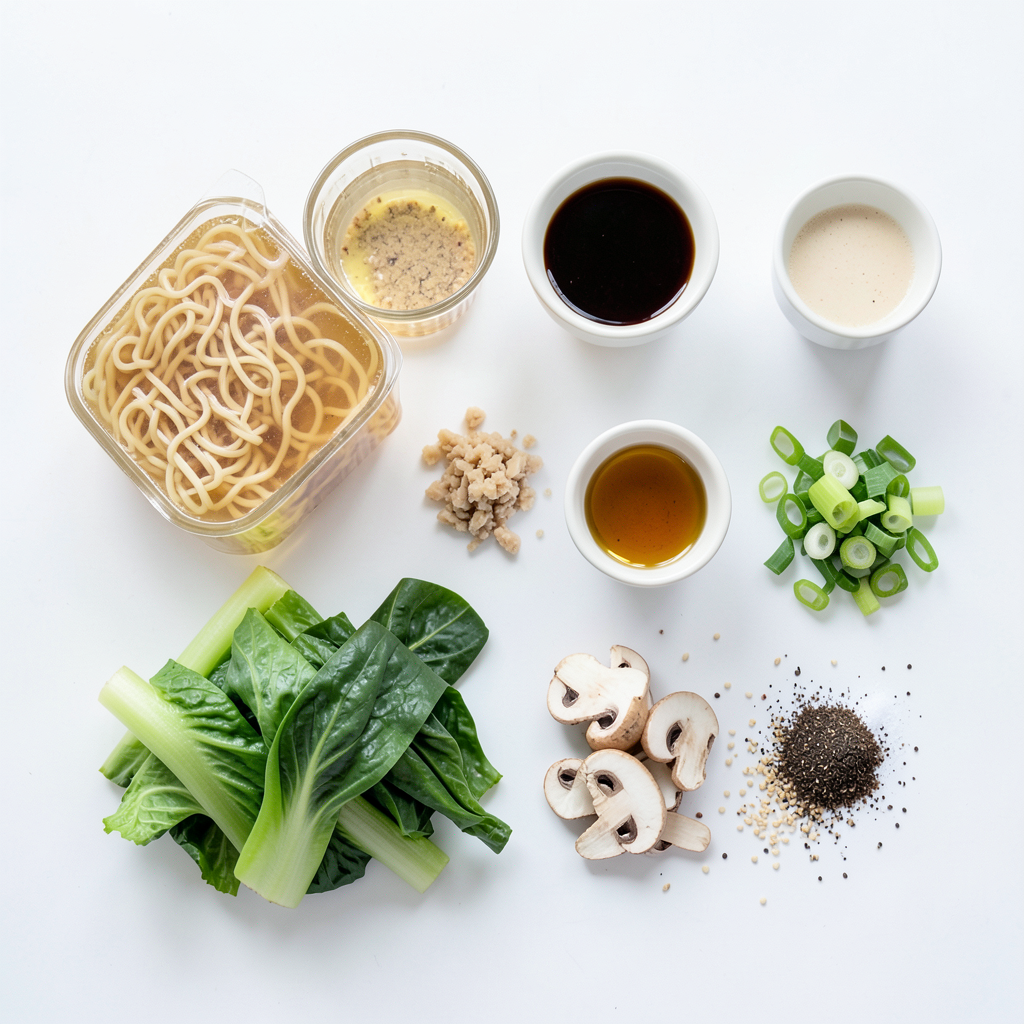
- 4 cups chicken or vegetable broth
- 2 packs of instant ramen noodles (discard the seasoning packets)
- 3 tablespoons soy sauce
- 2 tablespoons tahini (sesame paste)
- 3 cloves garlic, minced
- 1 tablespoon ginger, minced
Vegetable Additions
- 1 cup bok choy, chopped
- 1 cup mushrooms, sliced (shiitake or button)
- 2 green onions, chopped (for garnish)
Garnishes
- Sesame seeds (for garnish)
- Salt and pepper to taste
Gather these simple ingredients for a quick and tasty meal. Broth adds depth to the ramen. Instant ramen noodles make this dish fast and easy. Soy sauce gives a rich flavor. Tahini provides creaminess and a nutty taste. Fresh garlic and ginger add brightness.
For veggies, bok choy brings crunch and color. Mushrooms add umami and heartiness. Green onions give a fresh touch on top. Sesame seeds add a nice textural crunch. Don’t forget salt and pepper to enhance flavors. Keep this list handy for a smooth cooking experience.
Step-by-Step Instructions
Preparing Aromatics
Start by turning on the Instant Pot. Set it to the Sauté function. Pour in the sesame oil once the pot is hot. Add the minced garlic and ginger. Sauté for about 1-2 minutes. You want it to smell great, but don’t let the garlic burn. If it starts to brown, lower the heat.
Mixing Ingredients
Now, pour in your chicken or vegetable broth. Then, add the soy sauce and tahini. Stir well to mix everything. Make sure the tahini blends in smoothly. This creates a rich base for your ramen.
Cooking Ramen
Next, take the instant ramen noodles. Break them gently in half and add them to the broth. Then, toss in the chopped bok choy and sliced mushrooms. Spread them evenly in the pot. This adds color and nutrition to your meal.
Pressure Cooking
Secure the lid on the Instant Pot. Make sure the pressure valve is set to sealing. Select the Manual or Pressure Cook function. Set the timer for high pressure at 5 minutes. This will cook the noodles and veggies perfectly.
Releasing Pressure
When the timer goes off, it’s time for a quick release. Carefully turn the valve to venting. Wait until the steam escapes completely. Once it’s safe, open the lid gently. Watch out for any hot steam.
Final Touches
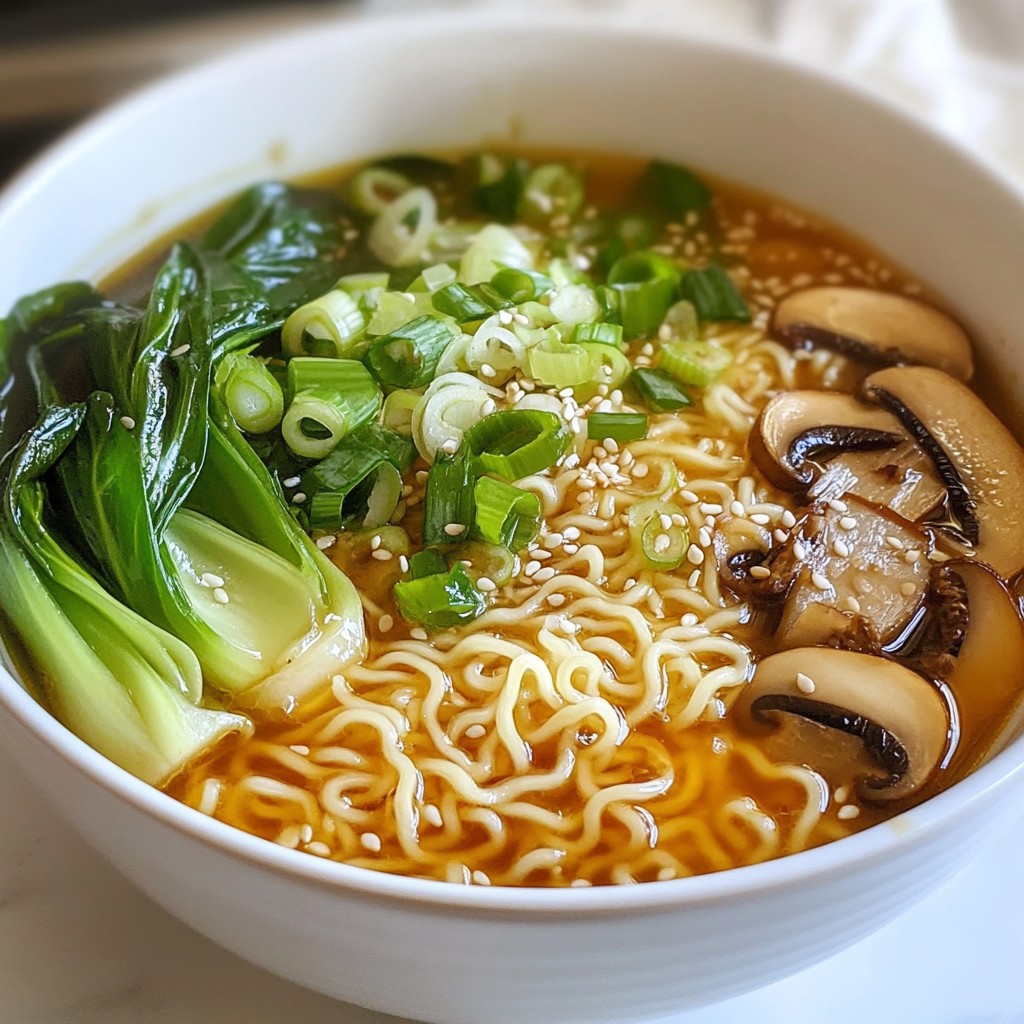
Taste the broth and adjust the seasoning. Add salt and pepper as needed. If you want more flavor, mix in some extra soy sauce. Serve the ramen in bowls. Top each bowl with chopped green onions and a sprinkle of sesame seeds. This adds a nice crunch and looks pretty too.
Tips & Tricks
Achieving Flavor
Fresh garlic and ginger make a big difference. They add a strong and vibrant taste. Use three cloves of garlic and one tablespoon of ginger. You can adjust the soy sauce to your liking. Start with three tablespoons and add more if needed. This lets you control the saltiness.
Instant Pot Settings
Different Instant Pot models may have slight changes. Always check your model’s manual for specific settings. If your ramen isn’t cooking well, ensure the lid seals properly. If you see “burn” on the display, add more broth next time.
Serving Suggestions
You can pair this ramen with protein for a heartier meal. Chicken or tofu works well. For extra flavor, try adding toppings. Green onions, sesame seeds, or even a soft-boiled egg add great taste and texture. Enjoy your meal with a side of pickled veggies!
Pro Tips
- Adjust the Broth: Feel free to experiment with the broth by adding miso paste or a splash of rice vinegar for an extra depth of flavor.
- Vegetable Variations: Try different vegetables like spinach, carrots, or bell peppers to customize your ramen and enhance the nutritional value.
- Perfect Noodle Texture: To avoid mushy noodles, make sure not to overcook them; they should be just tender when the pressure cooking time is up.
- Garnish Smartly: In addition to green onions and sesame seeds, consider adding a soft-boiled egg or chili oil to elevate the dish further.
Variations
Different Broth Options
You can choose any broth for your ramen. Vegetable, chicken, or beef broth all work well. Homemade broth adds a special touch, but store-bought is quick and easy. Both options will give great flavor to your dish. Mix and match based on what you have at home.
Noodle Substitutes
If you need gluten-free noodles, try rice noodles or gluten-free ramen. They cook quickly and taste great. You can also use soba or udon noodles for a different twist. Each type offers its own unique flavor and texture.
Adding Proteins
Adding protein makes your ramen heartier. Tofu is a great option for a vegetarian meal. If you prefer meat, chicken or shrimp also work well. Cook tofu for about 3-4 minutes, chicken for 6-8 minutes, and shrimp only need 2-3 minutes in the Instant Pot. Adjust your cooking times so everything cooks perfectly.
Storage Info
Storing Leftovers
To keep your ramen fresh, store leftovers right after eating. Place the ramen in airtight containers. This helps prevent drying out. Use glass or plastic containers with tight lids. Always let the ramen cool before sealing. Store it in the fridge for up to 3 days.
Reheating Instructions
You can reheat ramen in the microwave or on the stovetop. If using the microwave, place it in a bowl. Add a splash of broth or water to keep it moist. Heat for 1-2 minutes, stirring halfway through. For stovetop reheating, place ramen in a pan over low heat. Stir gently for a few minutes until warmed. This method helps keep the noodles from getting mushy.
Freezing Options
You can freeze ramen for later use. First, cool the ramen completely. Then, transfer it to freezer-safe bags. Remove as much air as possible to avoid freezer burn. Ramen can be frozen for up to 2 months. To thaw, place it in the fridge overnight. For a quick thaw, put the bag in warm water for about 30 minutes.
FAQs
Can I use whole wheat ramen noodles?
Yes, you can use whole wheat ramen noodles. They add a nutty flavor and a bit more fiber. Just follow the same cooking steps.
How long does this recipe take in total?
This recipe takes about 25 minutes from start to finish. It includes 10 minutes of prep time and 15 minutes of cooking time.
Can I make this recipe vegetarian?
Absolutely! Just use vegetable broth instead of chicken broth. The other ingredients remain the same for a tasty vegetarian dish.
What can I substitute for tahini?
If you don't have tahini, you can use peanut butter or sunflower seed butter. These options provide a similar creaminess and flavor.
Is it possible to make this recipe ahead of time?
Yes, you can make this ramen ahead of time. Store it in the fridge for up to three days. Just reheat it gently before serving.
This blog post covered how to make a tasty ramen dish using fresh ingredients. We explored the main components like broth, noodles, and seasonings. I shared step-by-step cooking instructions, tips for flavor, and variations to personalize your ramen. Remember, you can adjust ingredients for your taste or dietary needs. Take these ideas to your kitchen and enjoy a warm bowl of ramen made just for you. Start cooking and savor the delicious flavors yourself!