S’mores No-Bake Cheesecake Irresistible Dessert Delight

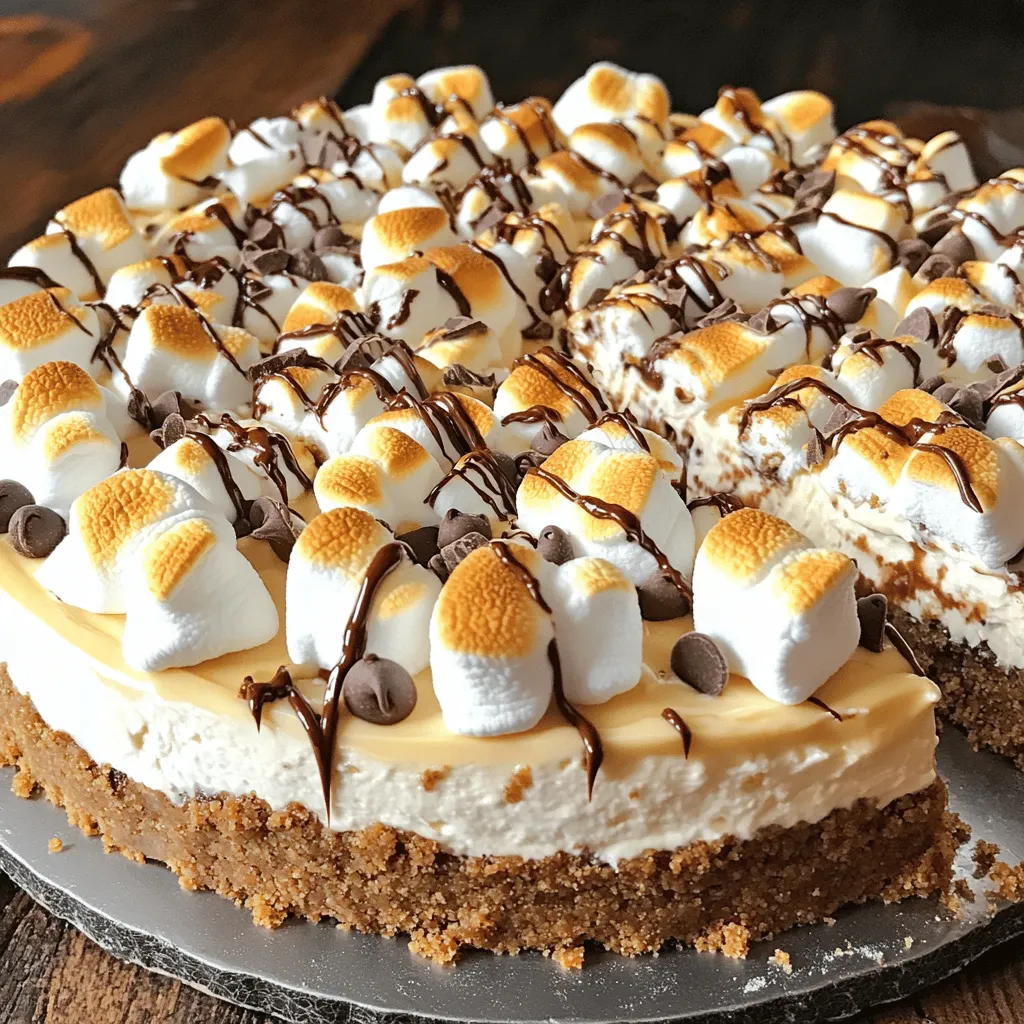
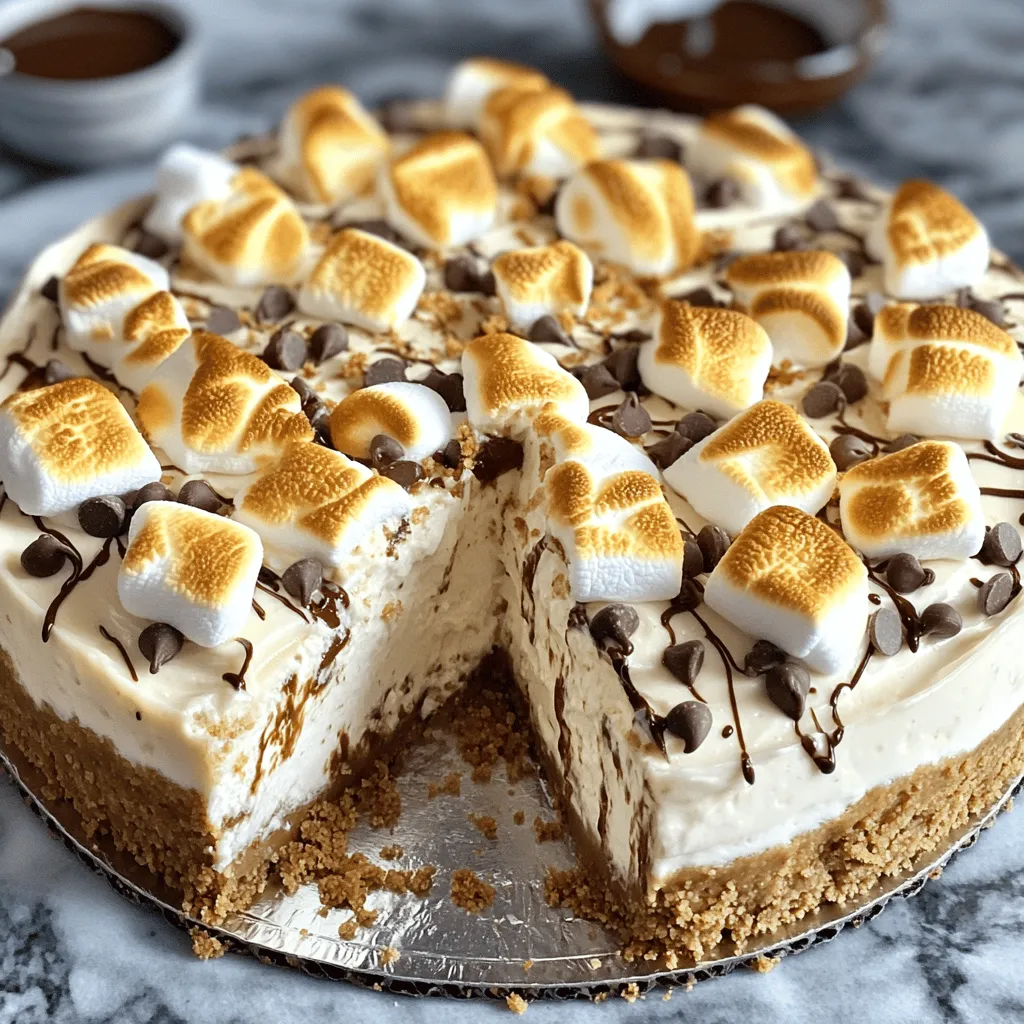
Imagine indulging in a creamy, dreamy dessert that captures all the flavors of s’mores without any baking. My S’mores No-Bake Cheesecake is a simple, no-fuss treat that delivers rich chocolate and sweet marshmallows in every bite. Whether you’re hosting a party or just treating yourself, this dessert will wow your taste buds. Ready to impress your friends and family? Let’s dive into this delightful recipe and make your dessert dreams come true!

Ingredients

List of Ingredients

For the crust:

– 1 ½ cups graham cracker crumbs

– ½ cup unsalted butter, melted

– 2 tablespoons brown sugar

For the filling:

– 16 oz cream cheese, softened to room temperature

– 1 cup powdered sugar

– 1 teaspoon pure vanilla extract

– 1 cup heavy whipping cream

– 1 cup mini marshmallows

– ½ cup chocolate chips (you can use semi-sweet or milk chocolate)

Optional toppings:

– Additional mini marshmallows

– Chocolate shavings for garnish

Suggested tools for measuring and mixing

– Medium mixing bowl for the crust

– Large mixing bowl for the filling

– Electric mixer for beating cream cheese

– Spatula for folding ingredients

– 9-inch springform pan to hold your cheesecake

Gather all these items before you start. This will make your cooking smooth and fun. Each ingredient plays its part in making this dessert creamy and sweet. Enjoy the process and let your creativity shine!

Step-by-Step Instructions

Preparing the Crust

1. Start by mixing 1 ½ cups of graham cracker crumbs, ½ cup of melted butter, and 2 tablespoons of brown sugar in a medium bowl. Stir until it looks like wet sand.

2. Next, press this mixture into a 9-inch springform pan. Make sure it is even and firm.

3. Place the crust in the refrigerator to chill for about 30 minutes. This helps it set and hold together.

Making the Cheesecake Filling

1. In a large bowl, beat 16 oz of softened cream cheese with an electric mixer on medium speed. Do this for about 3 minutes until it is smooth.

2. Gradually add 1 cup of powdered sugar and 1 teaspoon of pure vanilla extract. Keep mixing until everything blends well.

3. In another clean bowl, whip 1 cup of heavy whipping cream on high speed. Beat until stiff peaks form. This gives your cheesecake a light, fluffy texture.

Combining All Elements

1. Gently fold the whipped cream into the cream cheese mixture using a spatula. Be careful not to deflate the whipped cream.

2. Now, fold in 1 cup of mini marshmallows and ½ cup of chocolate chips. Make sure they are evenly spread throughout the mixture.

3. Pour the cheesecake filling over the chilled crust. Use a spatula to smooth the top.

Chilling and Serving

1. Cover the cheesecake with plastic wrap or aluminum foil. Place it in the refrigerator for at least 4-6 hours or overnight. This helps it set properly.

2. Before serving, toast additional mini marshmallows. You can use a kitchen torch or broil them in the oven for a few seconds. Keep an eye on them to avoid burning.

3. Once toasted, garnish the cheesecake with the marshmallows. Sprinkle chocolate shavings on top for a lovely finish. Release the sides of the springform pan and slice into generous pieces to serve.

Tips & Tricks

Achieving the Perfect Texture

Whipping cream techniques: Start with a cold bowl and beaters. This helps the cream whip better. Whip the cream on high speed until you see stiff peaks. Stiff peaks mean the cream holds its shape well.

Importance of room temperature ingredients: Make sure your cream cheese is soft. This makes it easy to mix and helps create a smooth filling. Leave it out for about 30 minutes before you start.

Avoiding overmixing during the folding process: When you fold the whipped cream into the cream cheese, be gentle. Use a spatula to lift and fold the mixture. This keeps the air in the whipped cream, giving you a light texture.

Flavor Enhancements

Adding different chocolate types: Try using dark, milk, or even white chocolate chips. Each type gives a unique taste. You can mix them for a fun flavor twist.

Using flavored extracts for a twist: Besides vanilla, add a splash of almond or hazelnut extract. This adds a new layer of flavor that makes your cheesecake stand out.

Mixing in additional s’mores elements like peanut butter: Fold in some creamy peanut butter for a rich taste. It pairs well with chocolate and marshmallows, making every bite exciting.

Variations

Different Cheesecake Flavors

You can switch up the flavors of your s’mores cheesecake. Here are some fun ideas:

Chocolate chip cookie dough s’mores cheesecake: Mix in bits of cookie dough for a chewy surprise. The cookie dough pairs delightfully with marshmallows and chocolate.

Pumpkin spice s’mores cheesecake: Add pumpkin puree and spices like cinnamon and nutmeg. This twist brings a cozy fall flavor to your dessert.

Berry s’mores cheesecake for a fruity twist: Fold in fresh berries such as strawberries or raspberries. They add a refreshing taste and a beautiful color.

Crust Alternatives

You can customize your crust to fit your taste or dietary needs:

Using Oreos or other cookie crumbs: Crush Oreos for a rich, chocolatey crust. This adds a new layer of flavor to your cheesecake.

Gluten-free alternatives using almond flour or gluten-free crackers: Use almond flour or gluten-free cookies for a tasty gluten-free option. This allows more people to enjoy your dessert.

Nut-based crust for a different texture: Blend nuts like walnuts or pecans to create a crunchy crust. This adds a nutty flavor that complements the creamy cheesecake.

Storage Info

Refrigeration Guidelines

To keep your s’mores no-bake cheesecake fresh, store any leftovers in the fridge. Place it in an airtight container to prevent it from drying out. You can also use plastic wrap to cover the cheesecake directly. This keeps the flavors intact. The cheesecake stays good for about 3 to 5 days in the fridge.

Freezing Instructions

Freezing your s’mores cheesecake is a great way to save some for later. First, let the cheesecake chill in the fridge for at least 4 hours. Then, remove it from the springform pan. Wrap it tightly in plastic wrap, followed by aluminum foil. This extra layer protects it from freezer burn. It can last for up to 2 months in the freezer.

When you’re ready to enjoy it, thaw the cheesecake in the fridge overnight. This keeps its creamy texture. To serve, slice it while it’s still cool. If you like, add fresh toppings like toasted marshmallows or chocolate shavings for a fun finish. Enjoy your delicious dessert again!

FAQs

How long does the s’mores no-bake cheesecake last?

The s’mores no-bake cheesecake lasts about 5 days in the fridge. To keep it fresh, store it in an airtight container. This helps seal in moisture and flavors.

Can I make this cheesecake ahead of time?

Yes, you can make this cheesecake a day or two ahead. This gives flavors time to meld together. Just remember to cover it well in the fridge.

What can I substitute for cream cheese?

You can use Greek yogurt or silken tofu for a lighter option. These alternatives provide creaminess without all the fat. They maintain a good texture and flavor.

How can I make this recipe more chocolatey?

Add extra chocolate chips or a layer of chocolate ganache. You can also use chocolate graham crackers for the crust. This will boost the chocolate flavor in every bite.

You learned how to make a delicious s’mores no-bake cheesecake. We covered ingredients, tools, and step-by-step instructions for a perfect dessert. You can customize it with different flavors and crusts. Remember to follow the tips to get the best texture and taste. Store any leftovers properly to enjoy later. Whether you want a classic treat or an exciting twist, this cheesecake is sure to impress! Enjoy your sweet creation!

- For the crust: - 1 ½ cups graham cracker crumbs - ½ cup unsalted butter, melted - 2 tablespoons brown sugar - For the filling: - 16 oz cream cheese, softened to room temperature - 1 cup powdered sugar - 1 teaspoon pure vanilla extract - 1 cup heavy whipping cream - 1 cup mini marshmallows - ½ cup chocolate chips (you can use semi-sweet or milk chocolate) - Optional toppings: - Additional mini marshmallows - Chocolate shavings for garnish - Medium mixing bowl for the crust - Large mixing bowl for the filling - Electric mixer for beating cream cheese - Spatula for folding ingredients - 9-inch springform pan to hold your cheesecake Gather all these items before you start. This will make your cooking smooth and fun. Each ingredient plays its part in making this dessert creamy and sweet. Enjoy the process and let your creativity shine! 1. Start by mixing 1 ½ cups of graham cracker crumbs, ½ cup of melted butter, and 2 tablespoons of brown sugar in a medium bowl. Stir until it looks like wet sand. 2. Next, press this mixture into a 9-inch springform pan. Make sure it is even and firm. 3. Place the crust in the refrigerator to chill for about 30 minutes. This helps it set and hold together. 1. In a large bowl, beat 16 oz of softened cream cheese with an electric mixer on medium speed. Do this for about 3 minutes until it is smooth. 2. Gradually add 1 cup of powdered sugar and 1 teaspoon of pure vanilla extract. Keep mixing until everything blends well. 3. In another clean bowl, whip 1 cup of heavy whipping cream on high speed. Beat until stiff peaks form. This gives your cheesecake a light, fluffy texture. 1. Gently fold the whipped cream into the cream cheese mixture using a spatula. Be careful not to deflate the whipped cream. 2. Now, fold in 1 cup of mini marshmallows and ½ cup of chocolate chips. Make sure they are evenly spread throughout the mixture. 3. Pour the cheesecake filling over the chilled crust. Use a spatula to smooth the top. 1. Cover the cheesecake with plastic wrap or aluminum foil. Place it in the refrigerator for at least 4-6 hours or overnight. This helps it set properly. 2. Before serving, toast additional mini marshmallows. You can use a kitchen torch or broil them in the oven for a few seconds. Keep an eye on them to avoid burning. 3. Once toasted, garnish the cheesecake with the marshmallows. Sprinkle chocolate shavings on top for a lovely finish. Release the sides of the springform pan and slice into generous pieces to serve. - Whipping cream techniques: Start with a cold bowl and beaters. This helps the cream whip better. Whip the cream on high speed until you see stiff peaks. Stiff peaks mean the cream holds its shape well. - Importance of room temperature ingredients: Make sure your cream cheese is soft. This makes it easy to mix and helps create a smooth filling. Leave it out for about 30 minutes before you start. - Avoiding overmixing during the folding process: When you fold the whipped cream into the cream cheese, be gentle. Use a spatula to lift and fold the mixture. This keeps the air in the whipped cream, giving you a light texture. - Adding different chocolate types: Try using dark, milk, or even white chocolate chips. Each type gives a unique taste. You can mix them for a fun flavor twist. - Using flavored extracts for a twist: Besides vanilla, add a splash of almond or hazelnut extract. This adds a new layer of flavor that makes your cheesecake stand out. - Mixing in additional s'mores elements like peanut butter: Fold in some creamy peanut butter for a rich taste. It pairs well with chocolate and marshmallows, making every bite exciting. {{image_4}} You can switch up the flavors of your s'mores cheesecake. Here are some fun ideas: - Chocolate chip cookie dough s'mores cheesecake: Mix in bits of cookie dough for a chewy surprise. The cookie dough pairs delightfully with marshmallows and chocolate. - Pumpkin spice s'mores cheesecake: Add pumpkin puree and spices like cinnamon and nutmeg. This twist brings a cozy fall flavor to your dessert. - Berry s'mores cheesecake for a fruity twist: Fold in fresh berries such as strawberries or raspberries. They add a refreshing taste and a beautiful color. You can customize your crust to fit your taste or dietary needs: - Using Oreos or other cookie crumbs: Crush Oreos for a rich, chocolatey crust. This adds a new layer of flavor to your cheesecake. - Gluten-free alternatives using almond flour or gluten-free crackers: Use almond flour or gluten-free cookies for a tasty gluten-free option. This allows more people to enjoy your dessert. - Nut-based crust for a different texture: Blend nuts like walnuts or pecans to create a crunchy crust. This adds a nutty flavor that complements the creamy cheesecake. To keep your s'mores no-bake cheesecake fresh, store any leftovers in the fridge. Place it in an airtight container to prevent it from drying out. You can also use plastic wrap to cover the cheesecake directly. This keeps the flavors intact. The cheesecake stays good for about 3 to 5 days in the fridge. Freezing your s'mores cheesecake is a great way to save some for later. First, let the cheesecake chill in the fridge for at least 4 hours. Then, remove it from the springform pan. Wrap it tightly in plastic wrap, followed by aluminum foil. This extra layer protects it from freezer burn. It can last for up to 2 months in the freezer. When you're ready to enjoy it, thaw the cheesecake in the fridge overnight. This keeps its creamy texture. To serve, slice it while it’s still cool. If you like, add fresh toppings like toasted marshmallows or chocolate shavings for a fun finish. Enjoy your delicious dessert again! The s’mores no-bake cheesecake lasts about 5 days in the fridge. To keep it fresh, store it in an airtight container. This helps seal in moisture and flavors. Yes, you can make this cheesecake a day or two ahead. This gives flavors time to meld together. Just remember to cover it well in the fridge. You can use Greek yogurt or silken tofu for a lighter option. These alternatives provide creaminess without all the fat. They maintain a good texture and flavor. Add extra chocolate chips or a layer of chocolate ganache. You can also use chocolate graham crackers for the crust. This will boost the chocolate flavor in every bite. You learned how to make a delicious s'mores no-bake cheesecake. We covered ingredients, tools, and step-by-step instructions for a perfect dessert. You can customize it with different flavors and crusts. Remember to follow the tips to get the best texture and taste. Store any leftovers properly to enjoy later. Whether you want a classic treat or an exciting twist, this cheesecake is sure to impress! Enjoy your sweet creation!

S’mores No-Bake Cheesecake

Indulge in the ultimate treat with this S'mores No-Bake Cheesecake! Combining creamy cheesecake with crunchy graham cracker crust and gooey marshmallows, this dessert is a game changer. Perfect for summer gatherings or cozy nights at home, it’s easy to make and sure to impress. Get the full recipe and step-by-step instructions to create this delightful cheesecake. Click through to satisfy your sweet tooth!

Ingredients
  

1 ½ cups graham cracker crumbs

½ cup unsalted butter, melted

2 tablespoons brown sugar

16 oz cream cheese, softened to room temperature

1 cup powdered sugar

1 teaspoon pure vanilla extract

1 cup heavy whipping cream

1 cup mini marshmallows

½ cup chocolate chips (semi-sweet or milk chocolate)

Additional mini marshmallows and chocolate shavings for topping

Instructions
 

Prepare the Crust: In a medium mixing bowl, combine the graham cracker crumbs, melted butter, and brown sugar. Mix thoroughly until the mixture resembles wet sand and is well combined.

    Form the Crust: Press the crumb mixture firmly and evenly into the bottom of a 9-inch springform pan, creating a solid crust. Place the crust in the refrigerator to chill and set while you prepare the cheesecake filling.

      Beat the Cream Cheese: In a large mixing bowl, use an electric mixer to beat the softened cream cheese on medium speed for about 3 minutes, or until it becomes smooth and creamy.

        Incorporate Sweetness: Gradually add the powdered sugar and pure vanilla extract to the cream cheese, continuing to beat until the mixture is fully combined and creamy.

          Whip the Cream: In a separate clean bowl, whip the heavy cream using a hand mixer or stand mixer on high speed until stiff peaks form. This will give your cheesecake a light and airy texture.

            Combine Mixtures: Gently fold the whipped cream into the cream cheese mixture using a spatula. Be careful not to deflate the whipped cream to maintain that airy consistency.

              Add Fun Ingredients: Fold in the mini marshmallows and chocolate chips, ensuring they are evenly distributed throughout the mixture while keeping the fluffiness intact.

                Fill the Crust: Pour the cheesecake filling over the chilled crust, smoothing the top with a spatula to create an even surface.

                  Chill to Set: Cover the cheesecake with plastic wrap or aluminum foil and refrigerate for a minimum of 4-6 hours, or preferably overnight, until it has fully set.

                    Toast the Marshmallows: Just before serving, take the additional mini marshmallows and either torch them with a kitchen torch for a perfect golden toast or broil them in the oven for a few seconds—keep a close eye to prevent burning!

                      Garnish and Serve: Once toasted, garnish the top of the cheesecake with the toasted marshmallows and sprinkle with chocolate shavings. Carefully release and remove the sides of the springform pan before slicing into generous pieces.

                        Prep Time: 30 minutes | Total Time: 6 hours | Servings: 8-10

                          - Presentation Tips: Serve individual slices on plates drizzled with chocolate sauce, and sprinkle additional chocolate chips on top for an extra touch of indulgence! Enjoy your delightful creation!

                            Leave a Comment

                            Recipe Rating