Skip to content
DisclaimerTerms Of UseGDPR PolicyCookie Policy

tastyhatch

  • Home
  • Drinks
  • Appetizers
  • Dinner
  • Dessert
  • About
  • Contact
  • Privacy Policy
DisclaimerTerms Of UseGDPR PolicyCookie Policy

NO-ING-IMG

- 1 package of store-bought flatbread or naan - 2 large onions, thinly sliced - 2 tablespoons olive oil - 6 oz goat cheese, crumbled - 1/2 cup shredded mozzarella cheese - 1 teaspoon balsamic vinegar - 1 tablespoon fresh thyme leaves (or 1 teaspoon dried thyme) - 1/4 cup honey (optional, for drizzling) - 1-2 tablespoons fresh arugula (for garnish) - Prep Time: 15 min - Cook Time: 25 min - Total Servings: 4 You need just a few main ingredients for this flatbread. The flatbread or naan serves as the base. You can use any kind you like. Onions add sweet, rich flavor. Olive oil helps cook the onions. Goat cheese gives a creamy texture, and mozzarella adds a cheesy stretch. For seasonings, balsamic vinegar adds a touch of sweetness. Fresh thyme brings a lovely herbal note. I often drizzle honey on top for extra sweetness. Fresh arugula adds a nice peppery bite at the end. The prep and cook times make this dish fast and easy. In just 40 minutes, you can have a delicious meal for four. This flatbread is perfect for sharing or as a main dish. {{ingredient_image_2}} - Heating Oil: First, grab a large skillet. Pour in 2 tablespoons of olive oil and heat it over medium heat. Wait until the oil starts to shimmer before adding your onions. - Cooking Time and Tips: Add 2 thinly sliced onions to the hot oil with a pinch of salt. Stir them often. Cook for about 20 to 25 minutes. You want them soft and golden-brown. Once they reach that color, stir in 1 teaspoon of balsamic vinegar. Cook for 2 more minutes to mix the flavors. Set the onions aside when finished. - Preheating the Oven: Turn your oven to 400°F (200°C). This step is key for a crispy flatbread. - Layering with Goat Cheese: Line a baking sheet with parchment paper. Place your flatbread or naan on it. Crumble 6 oz of goat cheese evenly over the flatbread. Cover as much surface as you can. This will give you creamy bites in every slice. - Baking Instructions: Spread the caramelized onions over the goat cheese. Then add 1/2 cup of shredded mozzarella cheese on top. Sprinkle fresh thyme leaves or dried thyme evenly across the flatbread. Add salt and freshly cracked black pepper to taste. Place the flatbread in the oven and bake for 12 to 15 minutes. You want the cheese to melt and bubble nicely. - Garnishing Tips: Once it's baked, take it out and let it cool a bit. Drizzle honey over the top if you like sweetness. Add fresh arugula to finish. Slice the flatbread into squares and serve it warm. Enjoy this delightful treat! - Techniques for Best Results: To get sweet, soft onions, use medium heat. Stir them often to avoid sticking. Patience is key. Let them cook for about 20-25 minutes. This slow method helps bring out their natural sugars. - Avoiding Burnt Onions: Watch the heat closely. If the onions start to darken too quickly, lower the heat. A pinch of salt helps draw out moisture, speeding up the process without burning. - Choosing the Best Goat Cheese: Look for a soft, creamy goat cheese. Fresh cheese will melt well and add that tangy flavor. Check for quality; it should be bright white with a mild scent. - Alternatives to Goat Cheese: If you’re not a goat cheese fan, try feta or ricotta. They offer different flavors but still pair well with caramelized onions. - Store-Bought vs. Homemade: Store-bought flatbread is quick and easy, perfect for busy days. If you have time, try making your own. Homemade flatbread can be fresher and more flavorful. - Enhancing Flavor with Toppings: Get creative! Add sun-dried tomatoes, spinach, or olives. These toppings can add a burst of flavor and color to your flatbread. Pro Tips Perfectly Caramelized Onions: Low and slow is the key! Keep the heat at medium to avoid burning and stir occasionally for even caramelization. Cheese Combinations: Feel free to mix different cheeses like feta or Parmesan for added depth of flavor and a unique twist. Fresh Herbs: Adding fresh herbs right before serving elevates the dish. Consider fresh basil or dill for a refreshing touch. Serving Suggestions: Pair your flatbread with a light salad or a selection of dips to create a beautiful and balanced meal. {{image_4}} You can boost this flatbread with extra ingredients. Try adding sun-dried tomatoes for a tangy kick. Fresh spinach also works well, offering green goodness. For the cheese, mix in feta or fontina. These cheeses add unique flavors and textures. Blend goat cheese with ricotta for a creamier taste. If you need gluten-free options, look for gluten-free flatbread or naan. Many stores sell these. You can also use cauliflower crust as an alternative. For vegan choices, swap goat cheese with a nut-based cheese. There are great vegan cream cheeses now available. Use plant-based mozzarella to keep it dairy-free. Feel free to play with herbs. Basil or oregano adds a fresh twist. For a sweet touch, mix in some cinnamon with your thyme. You can also try rosemary for a savory flavor. Sweet vs. savory is all about balance in your flatbread. Consider adding a splash of maple syrup instead of honey for an interesting flavor. - Place leftover flatbread in an airtight container. - Use plastic wrap or a zip-top bag for best results. - Store in the fridge for up to three days. - For best taste, reheat in the oven at 350°F for about 10 minutes. - If using a microwave, heat in short bursts of 30 seconds. - To keep it crispy, avoid the microwave if possible. - You can freeze the baked flatbread for up to a month. - Wrap it tightly in plastic wrap and then in foil. - To thaw, place in the fridge overnight before reheating. Yes, you can use other breads. Here are some great options: - Pita bread - Ciabatta - Tortillas - English muffins These breads can hold the toppings well. Make sure to adjust the baking time if needed. Each type offers a unique taste and texture. This flatbread is already vegetarian. You can skip any meat products. You could add more veggies for extra flavor. Here are some ideas: - Spinach - Mushrooms - Bell peppers - Zucchini These add color and taste without meat. Use any you like to make it your own. Pair this flatbread with tasty sides. Here are some great ideas: - A light salad with vinaigrette - A bowl of olives - Roasted vegetables - Fresh fruit These sides go well with the flatbread's rich flavors. They also help balance the meal. This post explored a tasty flatbread topped with caramelized onions and cheese. We discussed key ingredients, from flatbread to goat cheese, and included easy steps to prepare it. I shared tips to perfect your dish and offered flavor variations for everyone. Remember, cooking is fun—get creative with your toppings! Whether you make it gluten-free or vegan, adjustments can delight any palate. Enjoy your cooking journey and keep experimenting with flavors for the perfect flatbread.

Caramelized Onion Goat Cheese Flatbread Delight

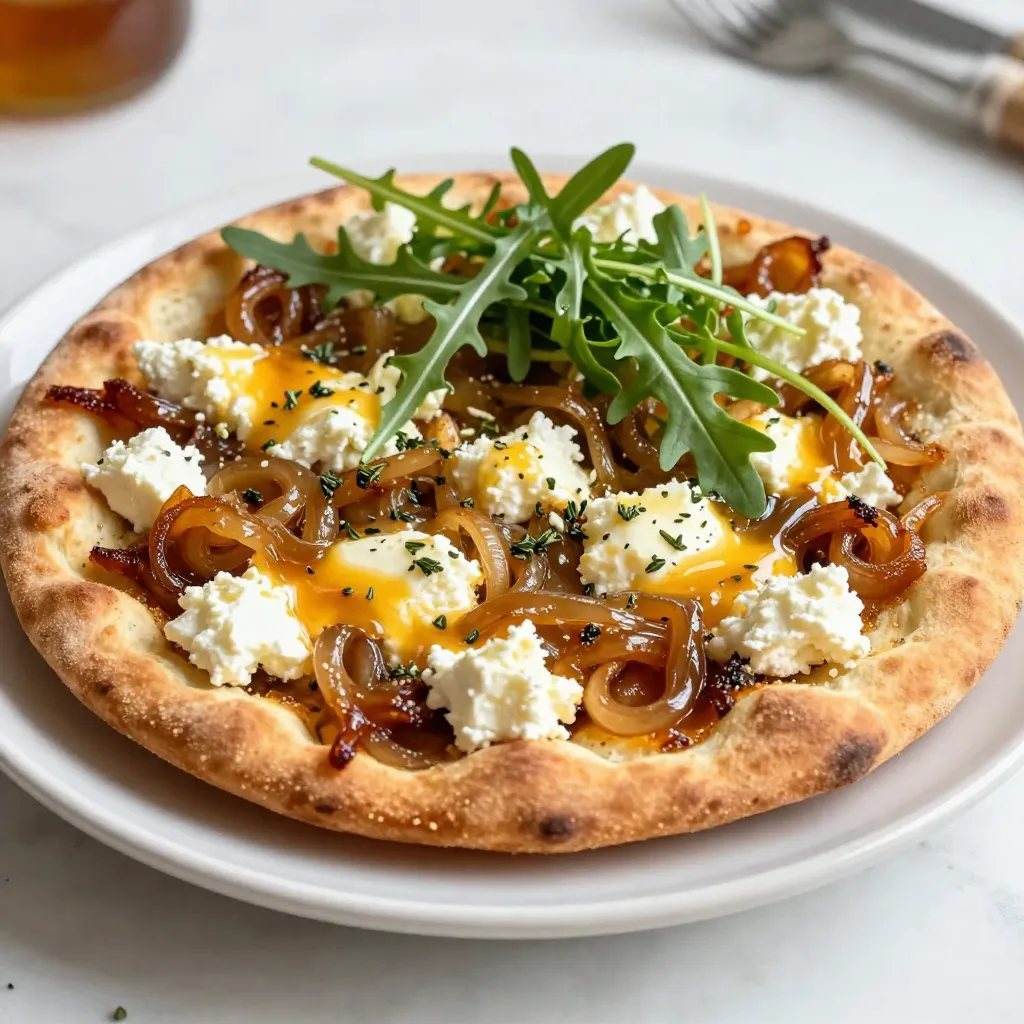
If you love simple, tasty snacks, this Caramelized Onion Goat Cheese Flatbread Delight is for you! Imagine a soft flatbread

- 2 pounds baby potatoes (red or yellow), halved - 3 tablespoons extra virgin olive oil - 1 tablespoon freshly squeezed lemon juice - Zest of 1 medium lemon - 2 teaspoons fresh rosemary, finely chopped (or 1 teaspoon dried rosemary) - 4 cloves of garlic, minced - Salt and freshly cracked pepper to taste - Fresh rosemary sprigs for garnish (optional) If you don't have baby potatoes, you can use regular potatoes. Just cut them into smaller pieces. For olive oil, canola oil works too. If you want a burst of flavor, try using flavored olive oil. Fresh rosemary can be swapped with dried rosemary. Use less, as dried herbs are stronger. You can even add other herbs, like thyme or oregano, if you like. Each serving of Lemon Rosemary Roasted Potatoes has about: - Calories: 200 - Total Fat: 8g - Saturated Fat: 1g - Carbohydrates: 32g - Fiber: 4g - Protein: 4g - Sodium: 200mg This dish is a tasty side filled with flavor and good nutrients. Enjoy it guilt-free! {{ingredient_image_2}} Start by preheating your oven to 425°F (220°C). This heat is key to crispy potatoes. While the oven warms up, grab your baby potatoes. Halve them so they cook evenly. In a large bowl, add the halved potatoes. Pour in three tablespoons of extra virgin olive oil. Then, add one tablespoon of freshly squeezed lemon juice. Zest one lemon for extra flavor. Toss in two teaspoons of finely chopped rosemary and four minced garlic cloves. Add salt and pepper to taste. Use your hands or a spoon to mix well. Make sure every potato piece is covered with the tasty mix. Prepare a baking sheet by lining it with parchment paper or greasing it lightly. Spread the potatoes out in a single layer. Make sure they have space between them. This helps them roast nicely. Place the baking sheet in the hot oven. Roast for 30 to 35 minutes. Flip the potatoes halfway through to get an even golden-brown color. When done, they should be tender when pierced with a fork. Take them out and let them cool for a few minutes. Adjust the seasoning if needed, then serve hot. Enjoy! To get crispy potatoes, start with dry potatoes. After washing them, pat them dry with a towel. Use baby potatoes, as they roast better. Cut them in half for even cooking. Make sure to coat them well with olive oil. This helps them crisp up in the oven. Spread them out on the baking sheet. Give them space to breathe. Flip them halfway through cooking for even browning. Want to spice things up? Add a pinch of red pepper flakes for heat. You can also mix in some fresh thyme or parsley for more herbs. For a twist, try adding a bit of smoked paprika. This will give your potatoes a nice smoky flavor. A squeeze of fresh lime juice can add a fun zing too. Experiment with your favorite spices to find your perfect blend. Season your potatoes before roasting. Use salt and pepper to enhance their natural flavor. Toss them well to ensure every piece gets coated. After roasting, taste your potatoes. Adjust the salt if needed. For garnish, fresh rosemary sprigs add a nice touch. Drizzle a bit of extra olive oil before serving for shine. This not only looks pretty but adds extra flavor too. Pro Tips Use Fresh Herbs: Fresh rosemary enhances the flavor significantly compared to dried. If possible, opt for fresh herbs for a more vibrant taste. Don’t Overcrowd the Pan: Ensure the potatoes are spread out in a single layer on the baking sheet. This allows them to roast evenly and develop a crispy exterior. Adjust Seasoning After Roasting: Taste the potatoes after they come out of the oven. A sprinkle of salt or a dash of lemon juice can elevate the flavors beautifully. Store Leftovers Properly: If you have any leftovers, store them in an airtight container in the fridge. Reheat in the oven for best results to maintain crispiness. {{image_4}} For a sweet twist, try using sweet potatoes. Sweet potatoes add a rich flavor. Follow the same recipe. Just swap in about two pounds of peeled, cubed sweet potatoes. The roasting time may be a bit shorter, around 25 to 30 minutes. The sweet taste pairs perfectly with the lemon and rosemary. You can switch up the herbs for more flavor. Try adding thyme or oregano. Use the same amount as the rosemary. Fresh herbs bring a wonderful aroma. Dried herbs work too if fresh ones aren’t available. This simple change can bring new life to your dish. This recipe is already vegan and gluten-free! The ingredients are safe for those diets. Ensure your olive oil and seasonings are pure. You can make this side dish for any meal. It's perfect for gatherings or a cozy family dinner. To store leftover roasted potatoes, first let them cool down. Place them in an airtight container. Make sure to keep them in the fridge. They will stay fresh for about three to five days. If you add any toppings, like cheese, it’s best to eat them soon. Reheating roasted potatoes can be tricky. You want them hot and crispy. The oven works best. Preheat it to 400°F (200°C). Spread the potatoes on a baking sheet. Heat for about 10 to 15 minutes. This keeps them crispy. You can also use a skillet. Heat a little oil over medium heat. Add the potatoes and stir until hot. If you want to keep roasted potatoes longer, freezing is a good option. First, let them cool completely. Then, spread them on a baking sheet in a single layer. Freeze them for about 1 to 2 hours. Once frozen, transfer them to a freezer bag. Seal tightly, and they will last for up to three months. When you're ready to eat, bake them straight from the freezer. I love using baby red or yellow potatoes for roasting. Their small size cooks evenly. They also have a creamy texture and a nice flavor. If you want a crispier bite, try Yukon Gold potatoes. They hold their shape well and become golden brown when roasted. Yes, you can prepare them in advance. Toss the potatoes with olive oil, lemon juice, and spices. Then, cover and store them in the fridge for up to a day. When you're ready to cook, just spread them on a baking sheet and roast. This saves time and makes serving easy. Check the potatoes after about 30 minutes of roasting. They should be golden brown and tender. Use a fork to pierce them. If the fork goes in easily, they're done! Flip them halfway through for even cooking. Let them cool slightly before serving for the best taste. In this post, we covered how to make delicious lemon rosemary roasted potatoes. We explored the key ingredients, tasty substitutions, and shared the nutritional facts. You learned the step-by-step process to prepare and roast the potatoes perfectly. Tips for achieving crispiness and flavor boosts added even more value. Variations and storage methods ensured you can enjoy these potatoes anytime. Now, you are ready to impress with your cooking skills and enjoy these tasty dishes at home. Happy cooking!

Lemon Rosemary Roasted Potatoes Flavorful Side Dish

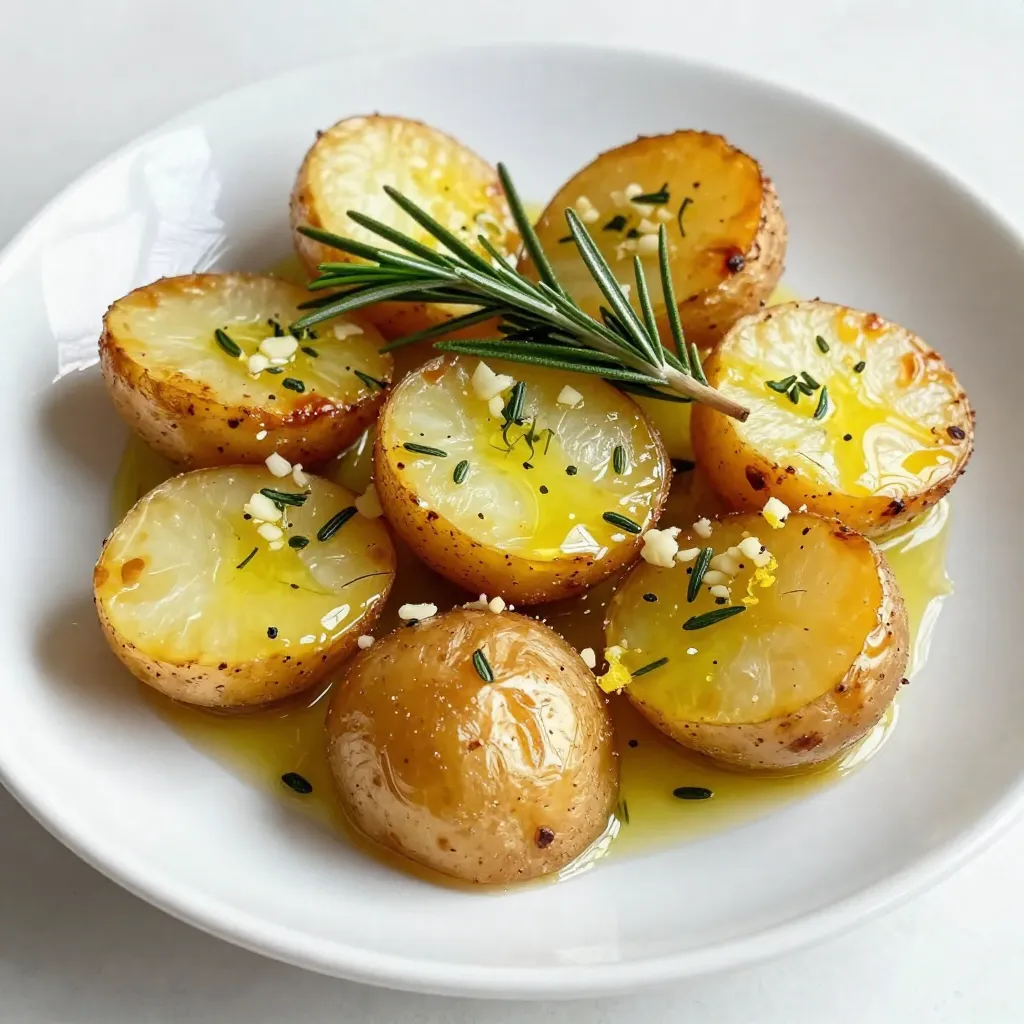
Looking for a side dish that packs a punch? Lemon Rosemary Roasted Potatoes are your answer! These crispy, flavorful bites

When making Nutella Banana Swirl Muffins, gather these simple ingredients: - 2 ripe bananas, thoroughly mashed - 1/2 cup granulated sugar for sweetness - 1/4 cup brown sugar, firmly packed for depth of flavor - 1/2 cup unsalted butter, melted until warm - 2 large eggs, at room temperature - 1 teaspoon pure vanilla extract for aroma - 1 teaspoon baking soda for leavening - 1/4 teaspoon salt to enhance flavors - 1 1/2 cups all-purpose flour, sifted for lightness - 1/2 cup Nutella for the delicious swirl - Optional: Chopped hazelnuts for topping and added texture These ingredients create a perfect blend of flavors. The bananas add natural sweetness and moisture. The sugars provide a rich taste and nice texture. The butter makes the muffins tender. Eggs help bind everything together. Vanilla adds a warm aroma that enhances the overall flavor. Baking soda helps the muffins rise, while salt brings out the sweetness. The all-purpose flour creates a light and fluffy structure. Nutella gives a wonderful chocolatey swirl. If you want a little crunch, sprinkle chopped hazelnuts on top. Make sure your bananas are ripe. Ripe bananas are sweeter and easier to mash. This will help your muffins taste even better. Enjoy gathering these ingredients; they are key to making your muffins a hit! {{ingredient_image_2}} - Preheat oven to 350°F (175°C). - Prepare muffin tin with liners or greasing. First, set your oven. Preheating helps the muffins rise well. While it warms, get your muffin tin ready. You can use paper liners or grease each cup with butter. This keeps the muffins from sticking. - Combine mashed bananas, sugars, and melted butter. - Add eggs and vanilla extract. In a big bowl, mash the ripe bananas. You want them smooth. Then, mix in granulated sugar, brown sugar, and melted butter. Stir well until it looks nice and blended. Next, add the eggs and vanilla extract. Whisk this mixture until it’s creamy and smooth. - Whisk together baking soda, salt, and flour. - Gradually mix dry into wet ingredients. In another bowl, whisk the baking soda, salt, and flour. This step is key for fluffy muffins. Slowly add the dry mix to the wet mixture. Stir gently. Don’t overmix! A few lumps are okay. - Layer muffin batter and Nutella. - Swirl Nutella into batter. Grab a spoon or ice cream scoop. Fill each muffin cup with about 1 tablespoon of batter. Add about 1 teaspoon of Nutella on top. Use a toothpick or knife to swirl the Nutella into the batter. Don’t mix too much! You want to see that beautiful swirl. Fill each cup about three-quarters full. - Bake for 18-22 minutes. - Cooling process after baking. Now, place the muffin tin in the oven. Bake for 18 to 22 minutes. Check for doneness with a toothpick. It should come out clean. After baking, let the muffins cool in the pan for 5 minutes. Then move them to a wire rack to cool completely. - Avoid overmixing the batter. Mix until just combined. This keeps muffins soft. - Check for doneness by inserting a toothpick. If it comes out clean, they are ready. - Use a toothpick or small knife to create the swirl. Do this gently. - A small ice cream scoop works well for layering batter and Nutella. - Serve muffins on a nice plate. It makes them look even better. - Dust the tops with powdered sugar for a sweet touch. Add banana slices around for color and flavor. Pro Tips Use Ripe Bananas: The riper the bananas, the sweeter and more flavorful your muffins will be. Look for bananas that are heavily speckled or even mostly brown for the best results. Don't Overmix: When combining the wet and dry ingredients, mix just until combined. Overmixing can lead to dense muffins, so a few lumps are perfectly fine. Swirl Technique: For a beautiful Nutella swirl, use a toothpick or small knife to gently swirl the Nutella into the batter. Be careful not to mix it completely; you want distinct swirls for visual appeal. Storage Tips: Store any leftover muffins in an airtight container at room temperature for up to 3 days. For longer storage, freeze the muffins and reheat them in the microwave or oven as needed. {{image_4}} You can add spices to change the taste. A bit of cinnamon adds warmth. Nutmeg gives a nice twist too. If you want a different flavor, try other chocolate spreads. Brands like hazelnut chocolate or almond chocolate are great options. If you need to swap bananas, you can use applesauce. It keeps the muffins moist. For gluten-free muffins, use a gluten-free flour blend. This way, everyone can enjoy the muffins! Chopped nuts make great toppings. Walnuts and pecans add crunch and flavor. You could also mix in chocolate chips. They melt and create gooey pockets of joy in every bite! Store your Nutella banana swirl muffins at room temperature. Use an airtight container. This keeps them soft. They last about two days. Keep them away from direct sunlight. If your kitchen is warm, check for freshness daily. You can refrigerate muffins if you want them to last longer. Wrap them well in plastic wrap. They stay fresh for about a week in the fridge. Just remember, refrigeration may change their texture slightly. To freeze muffins, let them cool completely first. Place them in a freezer-safe bag. Try to remove all the air from the bag. They can last up to three months in the freezer. When you want to eat them, take them out and thaw overnight in the fridge. You can also reheat them in the microwave for about 20 seconds. Enjoy warm muffins that taste fresh! To ripen bananas fast, place them in a brown paper bag. The bag traps ethylene gas, speeding up the ripening. You can also bake them at 300°F (150°C) for about 15-20 minutes. This softens them quickly. Use ripe bananas for the best flavor in your muffins. Yes, you can use frozen bananas. Thaw the bananas first and drain excess liquid. Frozen bananas may make the muffins moister, so adjust the flour slightly if needed. They still give great flavor and sweetness. If you want alternatives to Nutella, try chocolate hazelnut spread, almond butter, or peanut butter. You can even swirl in melted chocolate or a mix of cocoa and sugar for a similar taste. These options add unique flavors to your muffins. To check if the muffins are done, insert a toothpick into the center. If it comes out clean or with a few crumbs, they're ready. If the toothpick is wet, bake them a little longer. Keep an eye on them to avoid overbaking. Yes, you can prepare these muffins ahead. Store them in an airtight container at room temperature for up to three days. For longer storage, freeze them. They can last for about three months in the freezer. Just thaw them at room temperature when you're ready to enjoy. These muffins blend ripe bananas and Nutella for a tasty treat. We covered ingredients, prep steps, and baking tips. You can even make variations to suit your taste. Remember, proper storage keeps your muffins fresh longer. Baking can be fun and creative. So, enjoy making these delicious muffins for you and your loved ones!

Nutella Banana Swirl Muffins Irresistible and Easy Recipe

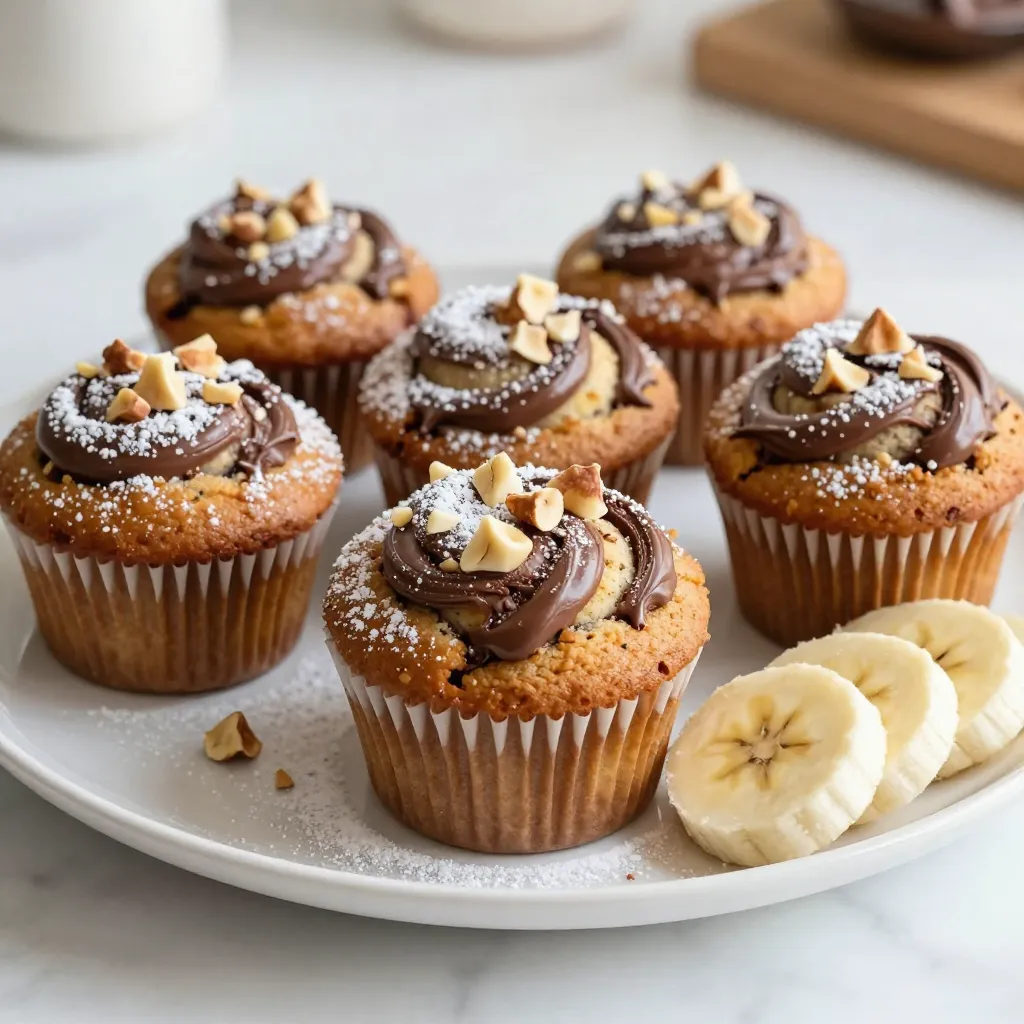
Indulge your taste buds with my easy Nutella Banana Swirl Muffins! This recipe combines ripe bananas and creamy Nutella in

- 1 cup rolled oats - 1 cup unsweetened almond milk - 1/2 cup Greek yogurt - 1/4 cup cream cheese, softened - 2 tablespoons maple syrup - 1 teaspoon pure vanilla extract - 1/2 cup fresh blueberries (plus extra for garnish) - 1 tablespoon chia seeds - 1 teaspoon freshly grated lemon zest - A pinch of sea salt Each ingredient in these oats brings its own perks. - Rolled oats provide fiber, which helps digestion. - Almond milk is low in calories and good for heart health. - Greek yogurt adds protein for energy and keeps you full. - Cream cheese gives a rich taste and smooth texture. - Maple syrup is a natural sweetener, packed with minerals. - Vanilla extract can boost mood and flavor. - Blueberries are full of antioxidants and good for your brain. - Chia seeds offer omega-3s, which are great for heart health. - Lemon zest adds Vitamin C, which helps your immune system. - Sea salt enhances flavor and balances sweetness. You can change some ingredients to fit your taste. - Use oat milk or soy milk instead of almond milk. - Swap Greek yogurt with coconut yogurt for a dairy-free option. - Try ricotta cheese in place of cream cheese for a lighter texture. - Use honey or agave syrup if you don’t have maple syrup. - Change fresh blueberries to other berries like strawberries or raspberries. - If you want a nut-free option, skip the nuts entirely or use seeds. {{ingredient_image_2}} Start by gathering your ingredients. You need rolled oats, chia seeds, almond milk, Greek yogurt, cream cheese, maple syrup, vanilla extract, lemon zest, sea salt, and fresh blueberries. In a large bowl, add the rolled oats and chia seeds. Mix them well. In another bowl, whisk together almond milk, Greek yogurt, cream cheese, maple syrup, vanilla, lemon zest, and sea salt. Whisk until smooth. Pour this creamy mix over the oats and chia seeds. Stir until all the oats are coated. Gently fold in fresh blueberries, being careful not to mash them. Mixing is key for great overnight oats. Make sure your cream cheese is soft. This helps it blend better. If you find lumps, whisk a bit more. The oats need to soak up the wet mix. Stir until everything is well combined. You want each oat to be covered. This helps them soak up flavors overnight. Divide the mixture into two jars or containers. Seal them tightly to keep them fresh. Place the jars in the fridge overnight. This lets the oats soak and soften. In the morning, stir the oats before serving. Top with extra blueberries and a drizzle of maple syrup. For a nice look, add a dollop of Greek yogurt and some chia seeds on top. Enjoy your blueberry cheesecake overnight oats! To get creamy oats, use rolled oats. They absorb liquid well. Mix oats with chia seeds before adding wet ingredients. Chia seeds help thicken the mixture. Always use a good creamy base like Greek yogurt and cream cheese. This combination gives a rich taste. Whisk the wet ingredients until smooth. This step helps avoid lumps in your oats. To keep your oats from getting soggy, don’t add fresh fruit until serving. Blueberries can release water and make the oats mushy. Also, use the right amount of liquid. A cup of almond milk is perfect for one cup of oats. If you like thicker oats, use less milk. Letting the oats soak overnight gives them time to soften without turning too wet. You can change the recipe to fit your taste. Try using different fruits like strawberries or raspberries. You can also switch up the sweetener. Honey or agave syrup work great too. For a zestier taste, add more lemon zest. If you want to make it vegan, swap Greek yogurt for a plant-based yogurt. Adjusting flavors keeps your breakfast exciting. Pro Tips Use Fresh Blueberries: For the best flavor and texture, opt for fresh blueberries instead of frozen. They add a burst of juiciness and a vibrant color to your oats. Adjust Sweetness to Taste: Feel free to modify the amount of maple syrup based on your personal preference. You can also substitute with honey or agave syrup for a different flavor profile. Experiment with Toppings: Get creative with your toppings! Consider adding nuts, seeds, or a sprinkle of granola for added crunch and nutrition. Make it Ahead: These overnight oats are perfect for meal prep. You can make several jars at once and enjoy them throughout the week for a quick and healthy breakfast. {{image_4}} You can switch up the blueberries for other fruits. Strawberries, raspberries, or blackberries work great. Each fruit adds a new flavor. You can even mix fruits for a fun twist. Just remember to adjust the amount if needed. The oats will still taste amazing! Want to spice it up? You can add some cocoa powder or cinnamon. A dash of nutmeg can also bring warmth. If you like a sweeter taste, try a bit more maple syrup. You might even add a splash of orange juice for brightness. These flavors will make your oats even more delightful. To make this recipe vegan, swap Greek yogurt with coconut yogurt. Use a vegan cream cheese too. For gluten-free oats, just pick certified gluten-free rolled oats. This way, everyone can enjoy this treat. It’s easy to adapt and still tastes great. To keep your blueberry cheesecake overnight oats fresh, store them in airtight containers. I recommend using glass jars or plastic containers with tight lids. Always divide the oats into portions, so you can grab one easily in the morning. This way, you also avoid opening the entire batch, which can let air in and dry them out. Your overnight oats can last up to five days in the fridge. For the best flavor, eat them within three days. If you notice any off smells or changes in texture, it’s best to toss them out. To keep them fresh, avoid adding toppings like blueberries or syrup until you’re ready to eat. If you want to store your oats for a longer time, you can freeze them. Just pour the oats into freezer-safe containers or bags. Make sure to leave some space at the top for expansion. They can last for up to three months in the freezer. When you’re ready to enjoy them, let them thaw in the fridge overnight, or warm them in the microwave. Just remember to stir well after thawing. Yes, you can use quick oats. They will absorb liquid faster. This makes the oats softer. Keep in mind, the texture will change. Rolled oats offer a chewier bite. Quick oats work well if you're in a hurry. I recommend soaking the oats for at least six hours. This lets them absorb the liquid fully. Overnight soaking is best for soft, creamy oats. You can prepare them in the evening for breakfast. If you need a substitute for Greek yogurt, use dairy-free yogurt. You can try almond, coconut, or soy yogurt. They provide a similar texture. If you want more protein, use regular yogurt. Absolutely! You can make these oats up to three days in advance. Just store them in the fridge. This makes for a quick and easy breakfast during busy mornings. Just stir and enjoy! You learned about crafting tasty overnight oats in this guide. We covered key ingredients, their health perks, and fun swaps. You now know how to prepare your oats step-by-step and avoid common mistakes. Remember to get creative with different flavors and dietary needs. Finally, storage tips will help keep your oats fresh. Enjoy making your own delicious and healthy oats!

Blueberry Cheesecake Overnight Oats Delightful Treat

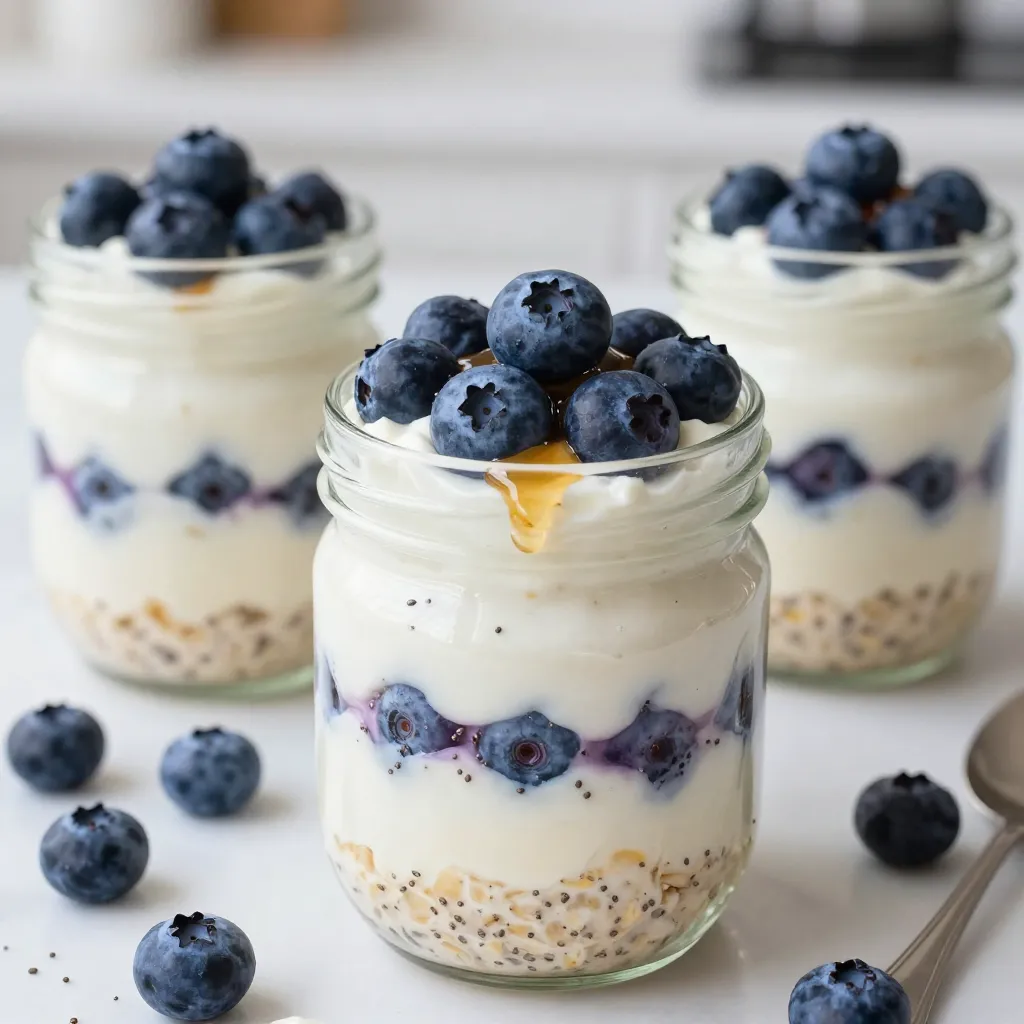
Are you craving a sweet treat that’s both healthy and easy to make? Let me introduce you to Blueberry Cheesecake

- 1 cup long-grain white rice - 2 cups vegetable broth (or water) - 1 tablespoon olive oil - 1/2 teaspoon salt - Zest of 1 lime - Juice of 2 limes - 1/4 cup fresh cilantro, finely chopped - 1 clove garlic, minced (optional) - 1/4 teaspoon black pepper - 1/4 teaspoon cumin (optional) For cilantro lime rice, you need simple yet bright flavors. The key base is long-grain white rice. It cooks up fluffy and pairs well with the lime. The vegetable broth adds depth, making it rich. If you want a lighter dish, you can use water. Olive oil is essential for toasting the rice. It adds a nice flavor and helps the grains separate. Salt enhances all the flavors in the dish. Lime zest and juice give that fresh, zesty kick you crave. Fresh cilantro brightens the dish with color and flavor. If you like garlic, add some minced for richness. Black pepper and cumin add warmth and a little spice. You can adjust these to suit your taste. Gather all these ingredients before you start. This ensures a smooth cooking process and delicious results. This dish is versatile and can be served with many meals. {{ingredient_image_2}} - Rinse the rice thoroughly. - This step helps remove excess starch. Clean rice cooks fluffy and light. - In a medium pot, warm 1 tablespoon of olive oil. - If you like, add 1 clove of minced garlic. Stir for 30 seconds. - Now, add the rinsed rice. Toast it for 1-2 minutes. - This adds a nice flavor and texture. - Carefully pour in 2 cups of vegetable broth or water. - Sprinkle in 1/2 teaspoon of salt. - Bring the mixture to a rolling boil over high heat. - Once boiling, reduce the heat to low. - Cover the pot with a lid and let it simmer for 18-20 minutes. - The rice should be tender and all liquid absorbed. - After cooking, remove the pot from heat but keep it covered. - Let it rest for 5 more minutes. This makes the rice fluffier. - Use a fork to fluff the rice gently. - This separates the grains and makes it light. - Add the zest of 1 lime and juice of 2 limes. - Stir in 1/4 cup of chopped cilantro. - Season with 1/4 teaspoon of black pepper and cumin if you want. - Mix everything well. Taste the rice. Adjust seasoning to your liking. To make fluffy rice, start by rinsing it. Rinsing removes excess starch. This helps the rice not stick together. Use a fine-mesh strainer and cold water. Rinse until the water runs clear. Next, follow the cooking and resting steps. Warm olive oil in a saucepan. Add minced garlic if you like. Sauté for about 30 seconds. This adds great flavor. Then, add the rinsed rice. Stir for 1-2 minutes. Toasting the rice helps enhance its taste. Once you add broth or water, bring it to a boil. After boiling, cover and reduce heat. Let it simmer for 18-20 minutes. After cooking, keep it covered for 5 more minutes. This resting time makes the rice even fluffier. Finally, fluff it with a fork. This separates the grains nicely. To boost the flavor, consider adding garlic and cumin. Garlic gives a nice depth. Cumin adds warmth and earthiness. You can also adjust the lime flavor. Using lime zest and juice balances the taste. Make sure to taste and adjust as needed. You may want more lime for a zesty kick. Start with smaller amounts, then add more. This way, you control the flavor to fit your taste. For a stunning presentation, garnish the rice. Add extra cilantro on top. Place lime wedges on the side. This adds color and flavor. Serve the rice in a large bowl. It looks great and invites everyone in. Pair it with grilled chicken or fish for a full meal. Cilantro lime rice also goes well with tacos or burritos. This makes your meal fun and festive! Pro Tips Rinsing the Rice: Always rinse your rice thoroughly before cooking to remove excess starch. This helps achieve a fluffy texture rather than sticky rice. Toasting the Rice: Toasting the rice in olive oil enhances its flavor and adds a delightful nuttiness. Don't skip this step! Resting Time: Allowing the rice to sit covered after cooking lets it steam further, resulting in a fluffier final dish. Taste and Adjust: Always taste your rice before serving. Add extra lime juice or cilantro to enhance the flavors according to your preference. {{image_4}} You can change the rice for this dish. Jasmine or Basmati rice gives a nice taste. Both are fragrant and fluffy. If you prefer brown rice, use it too. Brown rice takes longer to cook, about 40-45 minutes. Use 2 ½ cups of broth for brown rice. This keeps the texture nice and soft. Want to spice it up? Add jalapeños for heat. They bring a fresh kick. You could also use other herbs like parsley or mint. Each herb adds its own twist. For a fruity touch, try other citrus like oranges or lemons. This will brighten the dish and give it a new flavor. If you follow a vegan diet, this recipe is great for you. It’s vegan and gluten-free! Just use vegetable broth, and you’re set. For low-sodium diets, replace the broth with water. Use only a pinch of salt. This keeps the taste nice without the extra sodium. Adjust to your needs! To keep your cilantro lime rice fresh, store it in the fridge. Place the rice in an airtight container. It will stay good for about 4 days. If you want to reheat it, sprinkle a bit of water on top. This helps the rice stay fluffy. Microwave it on low power for a few minutes. Stir halfway through for even heating. You can freeze cilantro lime rice for longer storage. Use a freezer-safe bag or container. Make sure to squeeze out as much air as possible. Rice can last up to 3 months in the freezer. To thaw, place it in the fridge overnight or use the microwave. Heat it gently to avoid drying it out. There are many ways to use leftover rice. You can make a tasty burrito or a rice bowl. Mix it with beans, veggies, or proteins. You can also turn it into a salad. Just add some fresh greens and a dressing. Another fun idea is to make fried rice. It’s a great way to enjoy your meal again! You can pair cilantro lime rice with many dishes. Here are some tasty options: - Grilled chicken or fish - Tacos or burritos - Black beans or refried beans - Stir-fried veggies - Shrimp or pork dishes - Fresh salads with lime dressing These options add great flavors and textures to any meal. They make a complete dining experience. Cilantro lime rice can last in the fridge for about 4 to 5 days. To keep it fresh, store it in an airtight container. This helps to prevent it from drying out or absorbing other odors. Yes, you can make cilantro lime rice ahead of time. Here are some tips: - Prepare the rice and let it cool. - Store it in the fridge for up to 5 days. - When ready to serve, reheat it in a pan with a splash of water. This helps to bring back the fluffiness. Making it in advance saves time and is perfect for busy days! Cilantro lime rice is a simple dish that bursts with flavor. We covered the key ingredients, step-by-step instructions, and storage tips to ensure your rice comes out perfect every time. Remember to rinse the rice and let it rest for fluffiness. Feel free to try variations to match your taste. This rice pairs well with many meals, making it a versatile addition to your kitchen. Enjoy playing with flavors and using leftovers creatively. Your culinary journey with cilantro lime rice is just beginning!

Cilantro Lime Rice Simple Fluffy Side Dish Recipe

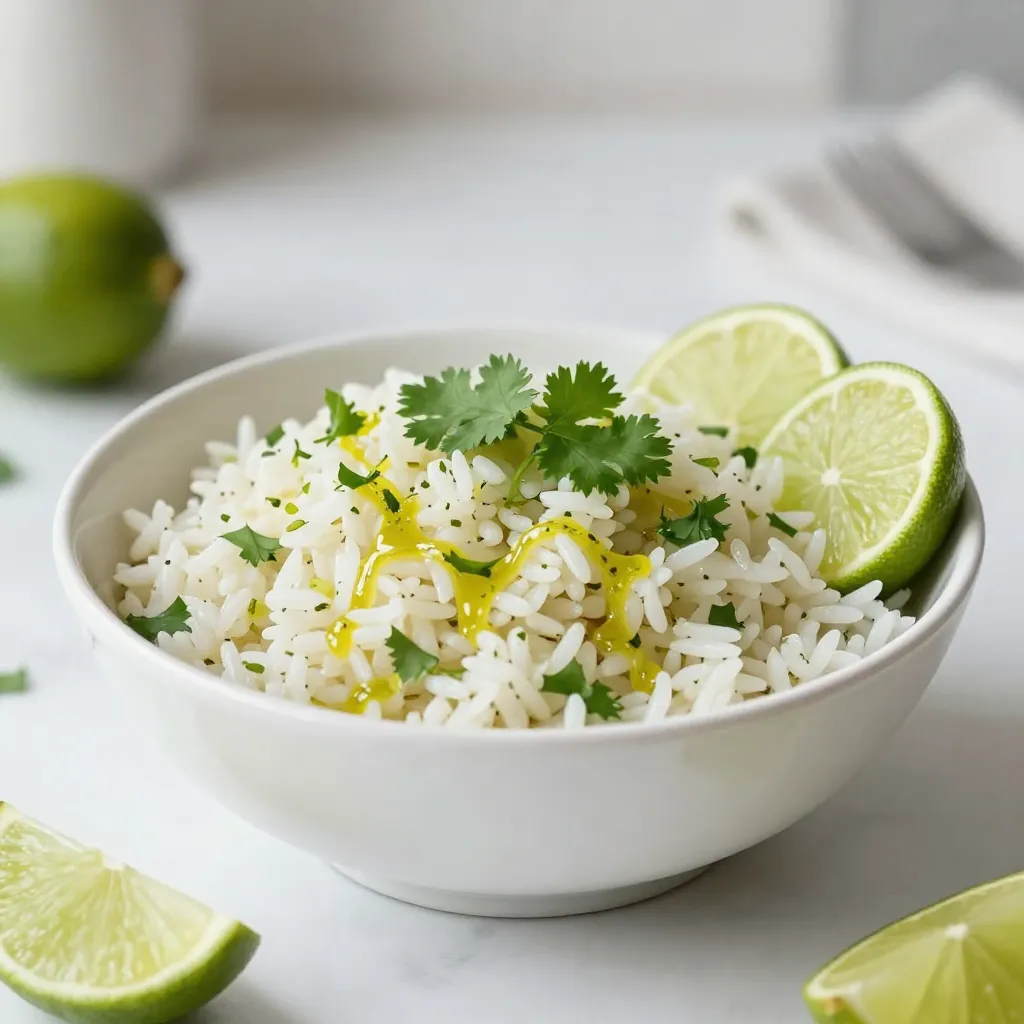
Are you ready to elevate your meal game with a simple yet flavorful side dish? Cilantro lime rice offers a

- 1 cup dried mango, chopped into small pieces - 1 cup unsweetened shredded coconut - 1 cup rolled oats - 1/2 cup almond butter (or your favorite nut butter) - 1/4 cup honey (or maple syrup for a vegan alternative) - 1/4 teaspoon salt - 1/2 teaspoon pure vanilla extract - 1/4 cup chia seeds (optional, for an extra nutritional boost) These ingredients come together to create a simple yet tasty snack. Dried mango gives a sweet and fruity flavor. Unsweetened shredded coconut adds a nice texture. Rolled oats bring heartiness and fiber. Almond butter binds everything while adding healthy fats. Honey or maple syrup sweetens the mix. A pinch of salt balances the flavors, and vanilla extract enhances the aroma. Chia seeds offer a boost of nutrition if you choose to add them. Gather these ingredients, and you are ready to make delicious mango coconut energy bars. They are not only energizing but also easy to prepare. Enjoy your time in the kitchen! {{ingredient_image_2}} 1. Preparing the baking pan Start by lining an 8x8 inch baking pan with parchment paper. Leave some extra paper on the sides. This helps lift the bars out easily later. 2. Mixing the dry ingredients In a large bowl, combine 1 cup of chopped dried mango, 1 cup of unsweetened shredded coconut, and 1 cup of rolled oats. If you want, add 1/4 cup of chia seeds for more nutrients. Sprinkle in 1/4 teaspoon of salt, and mix well until everything is blended. 3. Melting the almond butter and sweetener Grab a small saucepan. Add 1/2 cup of almond butter and 1/4 cup of honey (or maple syrup) into it. Heat over low. Stir constantly until the mix is melted and smooth. 4. Combining wet and dry ingredients Remove the pan from heat. Stir in 1/2 teaspoon of pure vanilla extract for flavor. Pour the warm almond butter mix over the dry ingredients. Stir until every piece is coated well. 5. Transferring and pressing mixture into the pan Move the mixture into your prepared baking pan. Use a spatula or damp hands to press it down firmly. Make sure it is even and compact. 6. Chilling the bars Place the pan in the fridge for at least 1 hour. This helps the bars firm up. Once they are set, lift them out using the parchment paper. Cut into squares or rectangles for easy snacking. Enjoy your delicious Mango Coconut Energy Bars! - Store your bars in an airtight container. This keeps them fresh and tasty. - In the fridge, these bars last up to two weeks. - You can freeze them for longer storage. Wrap each bar in plastic wrap and place them in a freezer bag. They will stay good for up to three months. - To ensure the bars hold together, press the mixture down firmly. This makes them compact. - When pressing the mixture, dampen your hands. This helps to prevent sticking, making it easier to work. - Enjoy these bars any time of day. They are perfect for breakfast, a snack, or after workouts. - Pair them with smoothies or fresh fruits for a tasty treat. Pro Tips Choose the Right Nut Butter: Experiment with different nut butters like cashew or peanut for varied flavor profiles in your energy bars. Customize Your Sweetness: Adjust the amount of honey or maple syrup based on your sweetness preference; you can also add dried fruits for extra natural sweetness. Chill for Better Texture: Don’t skip the chilling step; it helps the bars firm up and makes them easier to cut into perfect squares. Storage Tips: For longer shelf life, consider wrapping individual bars in wax paper before storing them in an airtight container. {{image_4}} You can switch out the nut butter. Try peanut butter or cashew butter for a twist. For sweeteners, use maple syrup if you want a vegan option. Coconut nectar is another great choice. Want to boost nutrition? Add protein powder or nuts to the mix. They will give your bars more crunch and protein. To change the flavor, add spices like cinnamon or nutmeg. They add warmth and depth. You can also use different dried fruits. Dried apricots or cranberries work well. Feel free to experiment with what you like best. These bars can be made vegan. Just replace honey with maple syrup. To make them gluten-free, use certified gluten-free oats. This way, everyone can enjoy them without worry. Making small changes can keep the recipe fun and fresh! Each serving of Mango Coconut Energy Bars has about 150 calories. This is a perfect snack for energy. The macronutrients break down as follows: - Protein: 4 grams - Fats: 7 grams - Carbohydrates: 20 grams These bars pack a lot of nutritional power. Dried mango is rich in vitamins A and C. It supports your immune system. Unsweetened shredded coconut adds fiber and healthy fats. This can help you feel full longer. Rolled oats provide complex carbs for steady energy. Almond butter adds protein and healthy fats. It also helps your heart. Chia seeds are optional but boost fiber and omega-3s. They give an extra health kick. These bars contain common allergens. They include nuts and possibly gluten, depending on the oats. For nut allergies, substitute with sunbutter or soy nut butter. You can also use pumpkin seed butter. If you need gluten-free options, choose certified gluten-free oats. Always check labels to avoid allergens. To store your Mango Coconut Energy Bars, place them in an airtight container. Keep them in the refrigerator. This way, they stay fresh and tasty for up to two weeks. You can also wrap each bar in plastic wrap for easy grab-and-go snacks. You can use fresh mango, but the bars may be too moist. Dried mango has less water, making the bars hold together better. If you choose fresh, add more oats to absorb extra moisture. This will help keep the right texture. These energy bars will last in the fridge for about two weeks. If you want longer storage, consider freezing them. They can stay fresh in the freezer for up to three months. Just thaw them overnight in the fridge before eating. Yes, these bars are great for kids! They are full of healthy ingredients and taste delicious. They make a perfect snack for school or after playtime. Just make sure to cut them into smaller pieces for little hands. You can easily make these bars nut-free. Substitute almond butter with sunflower seed butter. This keeps the recipe safe for those with nut allergies. Just double-check all ingredients to ensure they are nut-free. The best way to cut the bars is to use a sharp knife. First, let them sit for a bit after chilling. Lift them out of the pan using the parchment paper. Place them on a cutting board and slice them into rectangles or squares. You can now make delicious Mango Coconut Energy Bars. We outlined all the key ingredients and provided clear steps for preparation. With handy tips on storage and serving, these bars are easy to enjoy anytime. You can even switch up the flavors or adapt them for different diets. In the end, these energy bars are simple and yummy. You’ll love making them and sharing them with others. Enjoy the energy boost they bring to your day!

Mango Coconut Energy Bars for an Energizing Snack

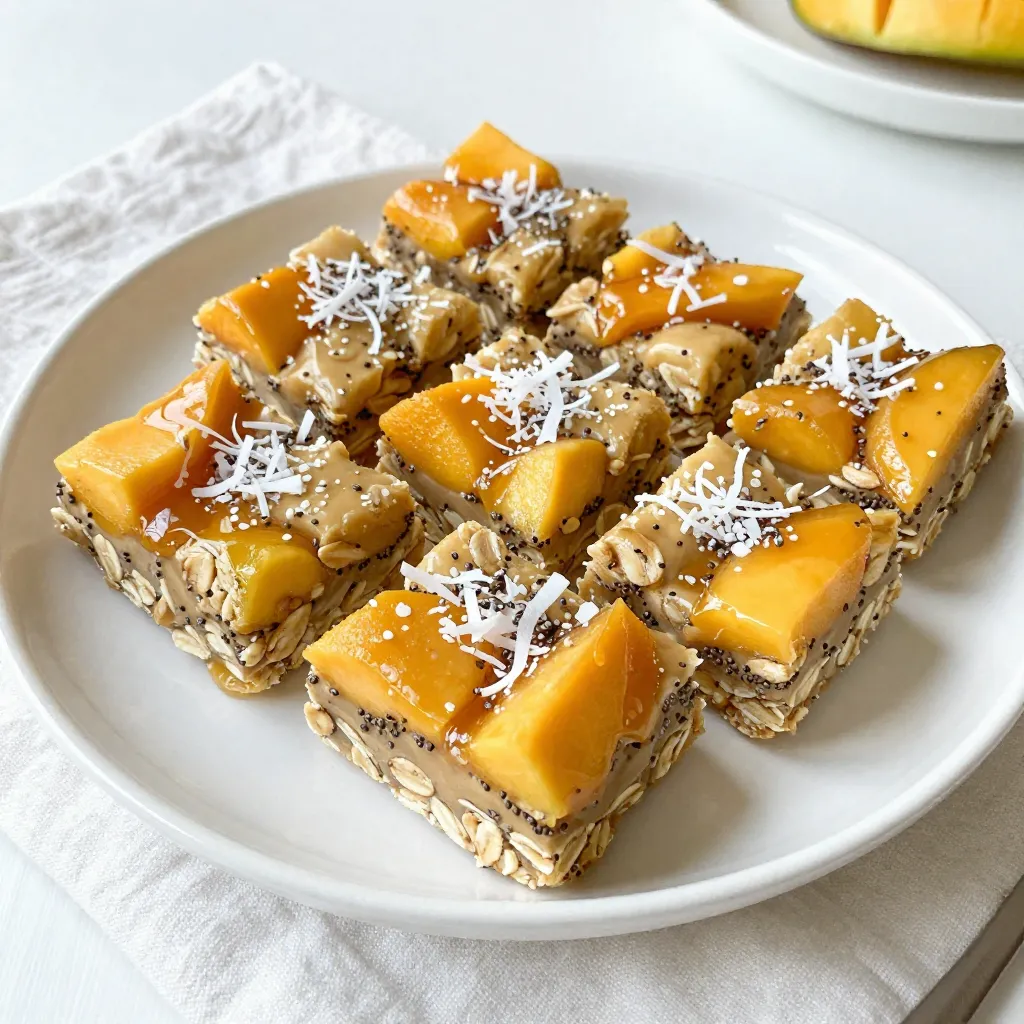
Need a quick energy boost? Dive into the world of Mango Coconut Energy Bars! With vibrant flavors and wholesome ingredients,

- 1 cup canned pumpkin purée - ½ cup unsalted butter, softened - ½ cup packed brown sugar - ½ cup granulated sugar - 1 large egg, at room temperature - 1 teaspoon pure vanilla extract These ingredients form the base of your cookies. The pumpkin purée brings moisture and flavor. Butter adds richness, while sugars give sweetness. The egg helps bind everything together. Vanilla adds a lovely aroma. - 2 cups all-purpose flour - 1 teaspoon baking soda - 1 teaspoon pumpkin pie spice - ½ teaspoon salt These dry ingredients balance the wet ones. Flour gives structure to the cookies. Baking soda helps them rise. Pumpkin pie spice adds warmth and depth. Salt enhances all the flavors. - 1 cup semi-sweet chocolate chips - ½ cup chopped pecans These add-ins are fun! Chocolate chips bring sweetness and richness. Pecans add crunch and texture. You can mix and match based on your taste, or leave them out if you prefer a simpler cookie. {{ingredient_image_2}} - Preheat your oven to 350°F (175°C). This is important to ensure even baking. - Prepare your baking sheet by lining it with parchment paper. This helps cookies not stick and makes cleanup easy. - In a large bowl, cream the softened butter with brown sugar and granulated sugar. Mix until it’s light and fluffy. This should take around 2-3 minutes. - Now, add the pumpkin purée, a large egg, and pure vanilla extract. Mix well until everything is smooth and blended. - In another bowl, whisk together the all-purpose flour, baking soda, pumpkin pie spice, and salt. Make sure there are no lumps. - Gradually fold the dry mixture into the wet ingredients. Use a spatula or wooden spoon. Be careful not to overmix; this helps keep the cookies soft. - Finally, gently fold in the semi-sweet chocolate chips and chopped pecans if you’re using them. Make sure they are evenly distributed in the dough. To get the perfect cookie texture, watch the bake time closely. Start checking at 12 minutes. The edges should be golden, and the center should look set but soft. This means your cookies will be chewy and not dry. Avoid overbaking by keeping an eye on the color. If your cookies look too dark, they are likely overdone. Trust your instincts, and remove them from the oven once they look just right. To keep your cookies tender, mix gently. When you combine the dry and wet mixtures, fold the dough. This way, you avoid overmixing. Overmixing can make cookies tough. Use a sturdy spatula or a wooden spoon to mix. An electric mixer can be too harsh, so it's best to avoid it for the final mix. Make your cookie presentation fun! Serve them on a rustic wooden platter or in a colorful bowl. You can sprinkle some extra chocolate chips or pecans on top for a beautiful touch. For drinks, pair your cookies with warm beverages. Hot chocolate, coffee, or even a spiced chai work well. The flavors of pumpkin and chocolate blend nicely with these drinks, creating a cozy vibe. Pro Tips Use Fresh Pumpkin: For an even richer flavor, consider using fresh pumpkin instead of canned. Roast and puree your own pumpkin for the best results. Chill the Dough: If time allows, chill the dough for 30 minutes before baking. This helps the cookies hold their shape and enhances the flavors. Experiment with Spices: Feel free to adjust the spices to your taste. Adding a pinch of nutmeg or ginger can give an extra depth to the flavor. Storage Tips: Store the cookies in an airtight container at room temperature for up to a week. For longer storage, freeze them and thaw as needed. {{image_4}} You can add more flavor to your cookies. Try mixing in spices like cinnamon or nutmeg. These spices bring warmth and depth. You can also use different types of chocolate. Dark chocolate or white chocolate can change the taste. Each type adds a unique twist. If you need a gluten-free option, use almond flour or oat flour instead of all-purpose flour. This will keep the cookies soft and tasty. For vegan adjustments, replace the butter with coconut oil. You can use flaxseed meal mixed with water instead of the egg. This works great and keeps cookies moist. Make your cookies festive! Add colorful sprinkles for a fun touch. You can also adjust flavors for the seasons. Try adding peppermint extract for winter or orange zest for summer. These small changes can make your cookies special for any occasion. To keep your chocolate chip pumpkin cookies fresh, store them in an airtight container. This helps retain their moisture and flavor. You can also layer the cookies with parchment paper to prevent sticking. A cookie jar works well too, as long as it seals tightly. If you want to save some cookies for later, freezing is a great option. First, let the cookies cool completely. Then, place them in a freezer-safe bag or container. Make sure to remove as much air as possible before sealing. When you're ready to enjoy them, let the cookies thaw in the fridge overnight. For a quick fix, you can also microwave them for a few seconds. At room temperature, your cookies will stay fresh for about five days. Keep them in a cool, dry place. If the cookies start to feel hard or dry, they may be past their prime. Look out for any off smells or visible mold, as these are clear signs of spoilage. Always trust your senses to determine if they are still good to eat! You can tell your cookies are done when the edges turn a light golden brown. The centers should not jiggle when you gently shake the pan. If the top looks set, that's a good sign too. Remember, cookies will continue to cook a bit after you take them out. Let them cool a few minutes on the baking sheet before moving them. Yes, you can make these cookies ahead of time! You can prepare the dough and store it in the fridge for up to three days. Just scoop the dough onto your baking sheet, cover it, and chill. When you’re ready to bake, just pop them in the oven. This way, you can enjoy fresh cookies whenever you want! If you don't have pumpkin purée, you can use applesauce or mashed bananas. Both add moisture and a hint of sweetness. However, the flavor will be different, so keep that in mind. Another option is butternut squash purée, which works well too. Just ensure it’s smooth for the best results. You now have a complete guide to making chocolate chip pumpkin cookies. We covered essential ingredients, step-by-step instructions, tips to perfect your bake, variations to try, and storage advice. This recipe is perfect for any season and offers room for creativity. Experiment with flavors or dietary adjustments to fit your needs. With these tips, you’ll bake delicious cookies everyone will enjoy. Keep practicing, and soon you’ll be a cookie expert!

Chocolate Chip Pumpkin Cookies Delightful and Easy Recipe

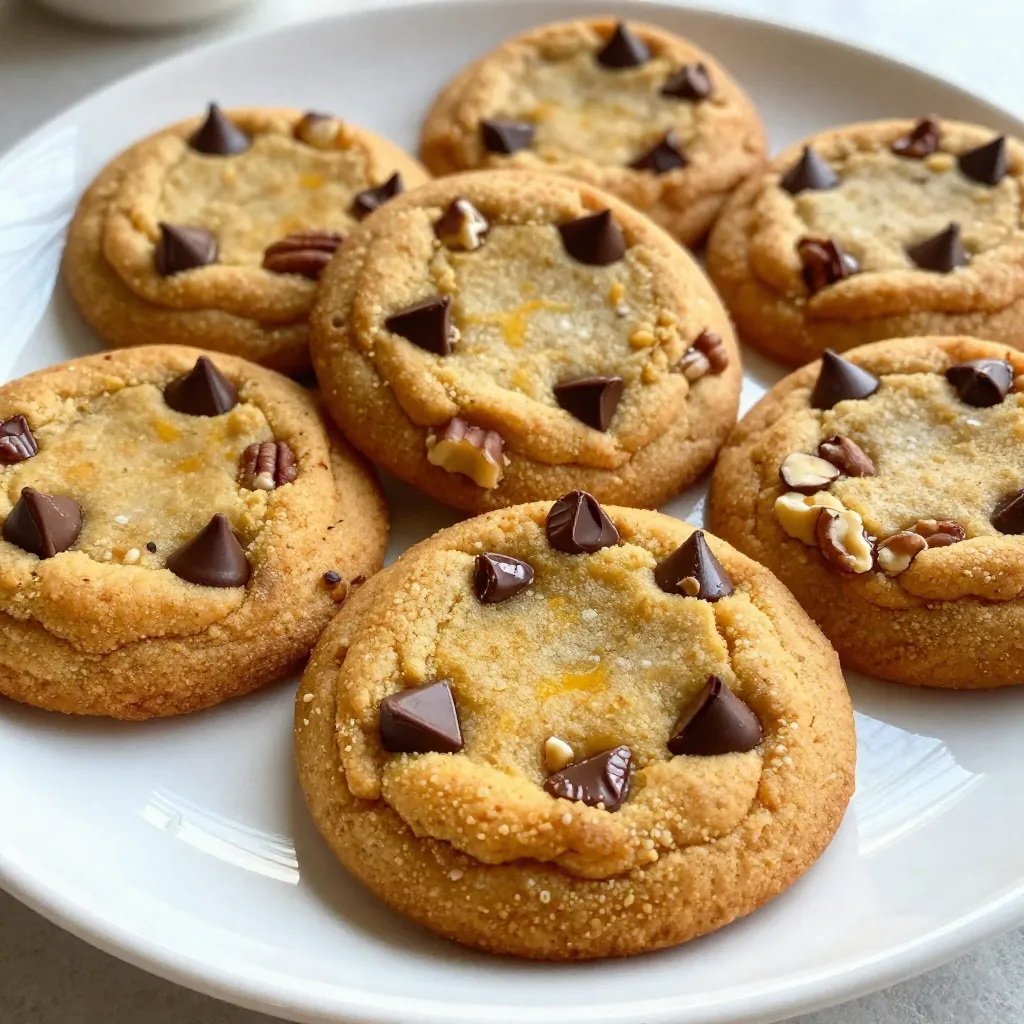
Looking for a cozy treat that captures fall flavors? You’ve found it! My Chocolate Chip Pumpkin Cookies are easy to

For your Coconut Pineapple Smoothie Bowl, gather these tasty ingredients: - 1 cup frozen pineapple chunks - 1 medium ripe banana - 1/2 cup coconut milk (or your favorite plant-based milk) - 1/4 cup Greek yogurt (or plant-based yogurt for a dairy-free option) - 1 tablespoon honey or agave syrup (optional for sweetness) - 1/4 cup granola (for added crunch on top) - 1 tablespoon shredded coconut (toasted, for a nutty flavor) - Fresh pineapple slices and coconut flakes for garnish - Fresh mint leaves for a refreshing finish (optional) You can swap some ingredients if needed: - Use any frozen fruit instead of pineapple, like mango or berries. - For a vegan option, choose plant-based yogurt and milk. - If you don’t have honey, maple syrup works well for sweetness. Toppings add fun and flavor to your smoothie bowl: - Try different types of granola for a new crunch. - Use toasted nuts like almonds or cashews for extra texture. - Add chia seeds or hemp seeds for a healthy boost. - Fresh berries or banana slices can make it colorful and tasty. - Don’t forget mint leaves for a fresh touch! {{ingredient_image_2}} To make your Coconut Pineapple Smoothie Bowl, start by gathering all your ingredients. This ensures you have everything ready. Here’s what you need: - 1 cup frozen pineapple chunks - 1 medium ripe banana - 1/2 cup coconut milk (or your favorite plant-based milk) - 1/4 cup Greek yogurt (or plant-based yogurt for a dairy-free option) - 1 tablespoon honey or agave syrup (optional for sweetness) - 1/4 cup granola (for added crunch on top) - 1 tablespoon shredded coconut (toasted, for a nutty flavor) - Fresh pineapple slices and coconut flakes for garnish - Fresh mint leaves for a refreshing finish (optional) First, place the frozen pineapple chunks, banana, coconut milk, Greek yogurt, and honey in your blender. Blend everything on high until smooth. Stop to scrape down the sides. If the mix is too thick, add more coconut milk. Once blended, pour the mixture into a bowl. To get a perfect blend, use a high-speed blender. This helps to break down the frozen pineapple easily. If your blender struggles, add a splash more coconut milk. This adds creaminess and helps blend smoothly. Remember, blending too long can warm your mix, so keep an eye on your time. Presentation is key for a smoothie bowl. After pouring your mix into a bowl, it’s time to add toppings. Start with a generous sprinkle of granola for crunch. Then, add your toasted shredded coconut. For a pop of color, place fresh pineapple slices on top. You can also add extra coconut flakes for flair. Finally, finish your bowl with fresh mint leaves. This not only adds color but also a burst of freshness. Grab a spoon, and enjoy your tropical treat! You can make your smoothie bowl unique. Try using different fruits like mango or berries. Add spinach or kale for a green twist. You can swap Greek yogurt for plant-based yogurt. This helps if you want a dairy-free option. For extra sweetness, use agave syrup or maple syrup. Experiment with flavors and find what you love. The right thickness makes a smoothie bowl so enjoyable. Use frozen pineapple chunks; they help create a thick base. If it feels too thick, add more coconut milk. Blend in short bursts to mix well. Stop and scrape the sides of your blender often. This ensures everything is blended evenly. The goal is a creamy and smooth texture. Pairing flavors can take your smoothie bowl to the next level. The sweet taste of pineapple works well with banana. Coconut milk adds a creamy richness. You can add a pinch of salt for a nice contrast. Top with granola for crunch and toasted coconut for nutty flavor. Fresh mint leaves bring a refreshing touch to each bite. Pro Tips Use Frozen Fruit: Frozen pineapple chunks not only chill your smoothie bowl but also create a thick and creamy texture, perfect for a satisfying treat. Adjust Sweetness: Depending on your taste and the ripeness of your banana, you may want to adjust the sweetness by adding more or less honey or agave syrup. Toast Your Coconut: Toasting the shredded coconut enhances its flavor and adds a delightful crunch to your smoothie bowl topping. Experiment with Toppings: Feel free to get creative with your toppings! Fresh berries, nuts, or seeds can add different flavors and textures to your smoothie bowl. {{image_4}} You can play with different fruits in your smoothie bowl. Mango, kiwi, or berries add fun flavors. For a tropical twist, try adding papaya or passion fruit. Each fruit brings its unique taste and vitamins. You can mix and match to find your favorite combo. Just remember, keep the base of frozen pineapple and banana for the best texture. If you want a dairy-free option, use plant-based yogurt. Coconut yogurt works well and adds more coconut flavor. Almond or soy milk can also replace cow’s milk. These options keep the smoothie creamy without the dairy. Check the labels to avoid added sugars. Adjust the sweetness to your taste. If you like it sweeter, add a bit more honey or agave. You can also use ripe fruits, as they are naturally sweet. Try adding dates or maple syrup for a different sweetness. Always start with less and add more if needed. This way, you control the sweetness level perfectly. If you have leftover smoothie bowl, store it in an airtight container. This helps keep it fresh. You can place it in the fridge for up to two days. The bowl may thicken in the fridge. If it does, just add a splash of coconut milk before eating. You can freeze your smoothie bowl ingredients for meal prep. Place the pineapple, banana, and yogurt in a freezer-safe bag. Remove extra air before sealing it. You can freeze this mix for up to three months. When ready to enjoy, blend it straight from the freezer. To thaw your frozen smoothie mix, leave it in the fridge overnight. If you are in a hurry, place it in a bowl with cold water for quicker thawing. Once thawed, blend it again to get that creamy texture back. This ensures every bite remains delicious and refreshing. You can use plant-based yogurt if you want a dairy-free option. Almond, coconut, or soy yogurt work well. These yogurts add creaminess and flavor. You could also try silken tofu for a protein boost. It blends smoothly and has a mild taste. Yes, you can prepare the smoothie bowl in advance. Blend the smoothie mix and store it in the fridge for up to 24 hours. Just keep it in an airtight container. When ready to eat, stir well and add toppings. If it thickens, add a splash of coconut milk to loosen it. Absolutely! This smoothie bowl is great for kids. It has sweet fruit and a fun texture. The toppings, like granola and coconut, make it exciting. You can adjust the sweetness by adding less honey or agave. Kids can even help make it, making it a fun family activity. This blog post covered everything you need for a great smoothie bowl. We explored ingredients, substitutions, and toppings to tailor your bowl just right. You learned tips for a smooth blend and creative serving ideas. We shared tricks for customizing flavors and achieving perfect consistency. We also discussed storage methods to keep your creations fresh. Experiment with your smoothie bowls. Enjoy each flavor and texture. You’ll make something special every time.

Coconut Pineapple Smoothie Bowl Refreshing Delight

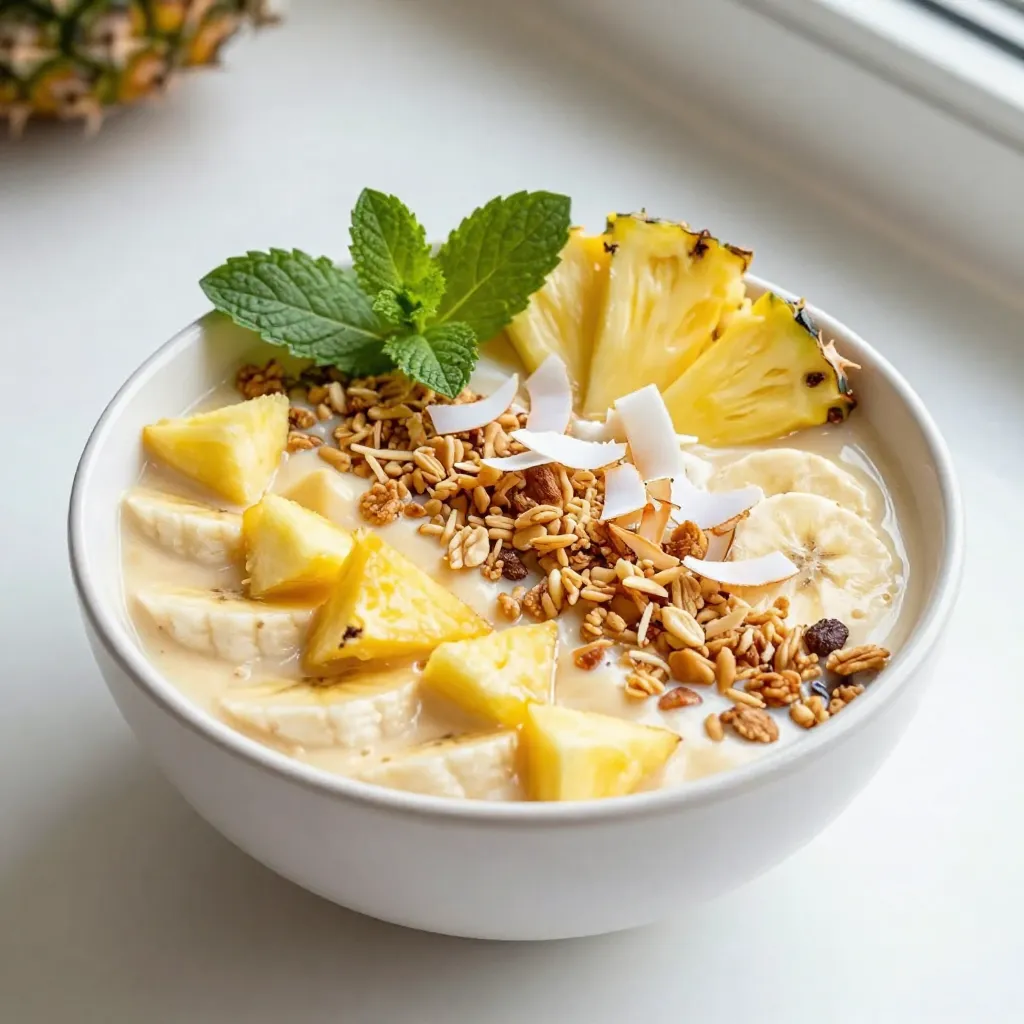
Are you ready to dive into a tropical escape right in your kitchen? This Coconut Pineapple Smoothie Bowl is not

To make classic vanilla sugar cookies, you need a few key ingredients: - 2 ¾ cups all-purpose flour - 1 teaspoon baking soda - ½ teaspoon baking powder - 1 cup unsalted butter, softened - 1 ½ cups granulated sugar - 1 large egg - 1 teaspoon pure vanilla extract - ½ teaspoon pure almond extract - A pinch of fine salt These ingredients create a great base for the cookies. Each one plays a vital role in flavor and texture. You can add some optional ingredients to boost the flavor: - ½ teaspoon of cinnamon for a warm spice - Zest of one lemon for a bright note - ½ cup of chopped nuts for crunch These additions can make your cookies unique. Feel free to experiment! If you lack certain ingredients, don't worry. Here are some easy swaps: - Use whole wheat flour in place of all-purpose flour for a nutty taste. - Replace unsalted butter with coconut oil or margarine if needed. - For the egg, use a flaxseed meal mix (1 tablespoon of flaxseed meal + 3 tablespoons of water) as a vegan option. These substitutions will still yield tasty cookies. Just remember, each change may slightly affect the final results. {{ingredient_image_2}} To make these classic vanilla sugar cookies, gather your ingredients first. You will need: - 2 ¾ cups all-purpose flour - 1 teaspoon baking soda - ½ teaspoon baking powder - 1 cup unsalted butter, softened - 1 ½ cups granulated sugar - 1 large egg - 1 teaspoon pure vanilla extract - ½ teaspoon pure almond extract - 3 tablespoons granulated sugar (for rolling) - A pinch of fine salt Next, preheat your oven to 375°F (190°C). Line your baking sheet with parchment paper for easy cleanup. 1. In a mixing bowl, whisk together the flour, baking soda, baking powder, and salt. 2. In a large bowl, cream the softened butter with granulated sugar. Mix on medium speed until light and fluffy for about 2-3 minutes. 3. Add the egg, vanilla extract, and almond extract. Mix well until smooth. 4. Gradually add your dry mixture to the wet mixture. Stir gently with a spatula until combined. Avoid overmixing to keep cookies tender. 5. Scoop out about 1 tablespoon of dough and roll it into a ball. Make sure they are even in size. 6. Roll each dough ball in granulated sugar. Place them on the prepared baking sheet, spaced about 2 inches apart. 7. Flatten each ball slightly to about ½ inch thick using the bottom of a glass or your palm. 8. Bake for 8-10 minutes. Look for golden edges. The centers can be soft; they will firm up as they cool. 9. Remove from the oven and let the cookies sit for about 5 minutes. Transfer them to a cooling rack to cool completely. For soft cookies, use room temperature butter. This helps the dough stay light. Avoid overmixing at every stage. This keeps the cookies fluffy. Make sure to space the cookies well on the sheet. If they are too close, they will bake into each other. Lastly, let them cool on a rack. This keeps them from getting soggy. Enjoy your baking! Many bakers face issues when making sugar cookies. Here are key mistakes to avoid: - Overmixing the dough: This can lead to tough cookies. Mix just until combined. - Not chilling the dough: Chilling helps the cookies hold their shape. Skip this step, and they might spread too much. - Skipping the parchment paper: It keeps cookies from sticking. Always line your baking sheet. - Ignoring baking time: Keep an eye on your cookies. They should be golden on the edges but soft in the center. Accurate measurements matter in baking. Here’s how to measure correctly: - For flour: Use a spoon to fluff it up in the bag. Then scoop it into a measuring cup. Finally, level it with a knife. - For brown sugar: Pack it firmly into the cup and level it off. - For liquids: Use a clear measuring cup. Check the measurement at eye level for accuracy. These simple tips help ensure your cookies turn out great every time. Storing cookie dough properly keeps it fresh. Here are some best practices: - Wrap the dough: Use plastic wrap to cover the dough tightly. This keeps air out. - Use an airtight container: If you prefer, place the wrapped dough in a container. - Chill in the fridge: Dough can last up to three days in the fridge. - Freeze for longer storage: If you want to save dough, freeze it. It can last up to three months. When ready to bake, thaw it in the fridge overnight. Following these tips helps you enjoy freshly baked cookies whenever you want! Pro Tips Chill the Dough: For thicker cookies, chill the dough for at least 30 minutes before baking. This helps prevent spreading and creates a chewier texture. Measure Flour Accurately: Use the spoon and level method to measure flour. Spoon flour into your measuring cup and level it off with a knife to avoid dense cookies. Customize Flavor: Experiment with different extracts like lemon or coconut to give your cookies a unique twist. Just remember to keep the total amount of liquid the same. Don’t Overbake: Keep an eye on your cookies as they bake. They should be lightly golden at the edges while the centers look slightly underbaked for a soft texture. {{image_4}} You can easily change the flavor of your sugar cookies. For chocolate chip cookies, add 1 cup of semi-sweet chocolate chips to the dough. Mix them in after the dry ingredients. For lemon zest cookies, add the zest of one lemon to the butter-sugar mix. This gives a bright, fresh taste. You can try other flavors too, like cinnamon or nutmeg for a warm twist. Decorating your cookies makes them special. For Christmas, use red and green sprinkles before baking. For Halloween, try orange and black sprinkles. You can also use royal icing to create fun designs. Use small cookie cutters for shapes like stars or hearts. This adds a personal touch to your treats. You can make these cookies gluten-free by using a gluten-free flour blend. Look for one that works well for baking. To make them vegan, swap the butter for coconut oil. Use a flax egg instead of the regular egg. Mix 1 tablespoon of ground flaxseed with 2.5 tablespoons of water. Let it sit for five minutes to thicken. This way, everyone can enjoy these delicious cookies! To keep your baked cookies fresh, store them in an airtight container. This helps retain their softness and flavor. You can layer them with parchment paper to prevent sticking. If you want to keep them for longer, you can also wrap them in plastic wrap. Cookies stay good at room temperature for about one week. Freezing cookie dough is a smart way to enjoy fresh cookies anytime. First, scoop and roll the dough into balls. Place them on a baking sheet lined with parchment paper. Freeze the balls until solid, then transfer them to a freezer bag. This way, you can bake just a few cookies whenever you want. When ready, bake them straight from the freezer. Just add a minute or two to the baking time. Cookies last longer in the fridge, but they can dry out. At room temperature, they stay soft and tasty for a week. In the fridge, cookies can last up to two weeks. If you choose to refrigerate, make sure to seal them tightly. This keeps them fresh and prevents them from absorbing other odors from the fridge. If your dough is too dry, don't worry! You can fix it easily. Add one tablespoon of milk or water at a time. Mix well after each addition. Keep adding until the dough feels soft and holds together. This will help your cookies bake perfectly. To make your cookies softer, use more butter. Butter adds moisture and richness. You can also chill your dough before baking. Chilling helps keep the shape and gives a softer bite. Bake them just until the edges are golden, leaving the centers soft. Yes, you can use margarine instead of butter. However, the flavor may change a bit. Margarine can make cookies taste less rich. Use a stick-style margarine for the best results. Measure it the same as butter in your recipe. Your cookies will still turn out tasty! This article covered key points for successful cookie baking. We discussed essential and optional ingredients, as well as smart substitutions. I shared detailed steps for preparing and baking, plus tips for the best texture. We explored common mistakes and proper measuring techniques, along with storing cookie dough. Finally, you can vary your flavors and even make gluten-free or vegan cookies. Remember these tips, and your baking will shine! Enjoy creating delicious cookies that your friends and family will love.

Classic Vanilla Sugar Cookies Delightful and Easy Recipe

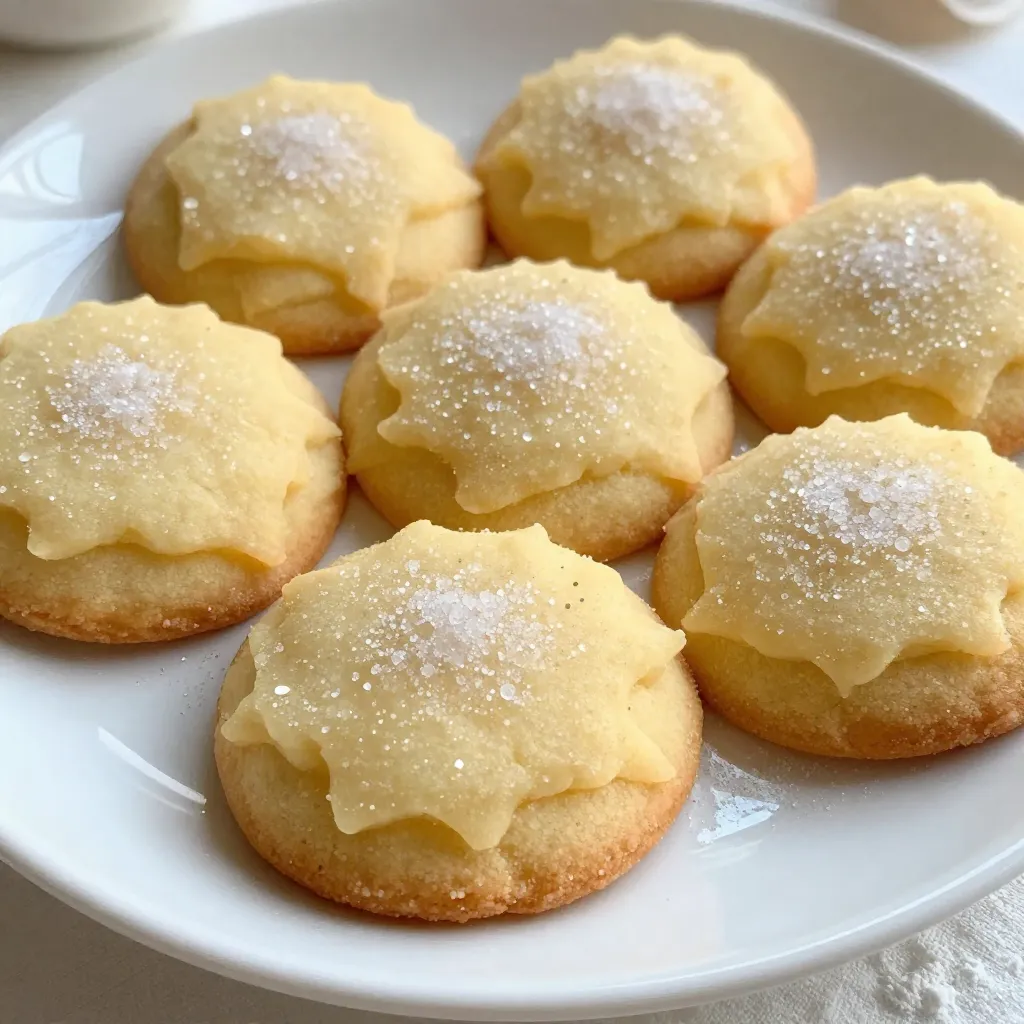
Looking for a sweet treat that’s simple to make? You’ve landed in the right place! My Classic Vanilla Sugar Cookies

- 2 ripe avocados, pitted and peeled - 2 cloves garlic, minced - 1/4 cup fresh basil leaves, plus extra for garnish - 2 tablespoons freshly squeezed lemon juice - 1/4 cup high-quality extra virgin olive oil - 1/2 teaspoon fine sea salt - 1/4 teaspoon freshly ground black pepper - 300g spaghetti or your choice of pasta - 1/4 cup freshly grated Parmesan cheese (optional) - Handful of cherry tomatoes, halved (for garnish) Using fresh ingredients makes a big difference. Fresh basil gives a bright taste that dried herbs can’t match. For pasta, I suggest spaghetti, but you can use any type you prefer. Just keep an eye on cooking times. Parmesan cheese adds a nice salty flavor, but it's not a must. If you like, sprinkle some on top before serving. Cherry tomatoes bring a pop of color and fresh taste. They also add a little sweetness to balance the creamy sauce. {{ingredient_image_2}} First, grab a large pot. Fill it with water and add a good amount of salt. Bring the water to a boil. Once it's bubbling, add your spaghetti. Cook it until it is al dente, which means it should still have a bit of bite. This usually takes about 8 to 10 minutes. After it cooks, drain the pasta. Save about one cup of the pasta water. You'll need this later to adjust your sauce. Now, it’s time to make the creamy sauce. Take a high-speed food processor. Add two ripe avocados that are pitted and peeled. Next, add two minced garlic cloves. Toss in a quarter cup of fresh basil leaves and two tablespoons of lemon juice. Then, pour in a quarter cup of extra virgin olive oil. Don’t forget to add half a teaspoon of sea salt and a quarter teaspoon of black pepper. Blend everything until it's smooth and creamy. If the sauce is too thick, add a little of the reserved pasta water. Blend again until it's just right. In a large mixing bowl, combine the cooked spaghetti with the avocado sauce. Use tongs or a spoon to gently toss the pasta. Make sure every strand is covered in that lovely, creamy sauce. If you find it’s still too thick, add a bit more reserved pasta water. This helps the sauce stick to the pasta. Now, the dish is ready to serve! To get that ideal creamy texture, start with ripe avocados. They should feel soft when you press them. Next, blend the avocados with garlic, basil, lemon juice, and olive oil. Use a high-speed food processor for the best results. If the sauce is thick, add a little pasta water. This will help the sauce blend smoothly with the pasta. When cooking pasta, always use a large pot with plenty of water. Add salt to the water; this enhances the pasta's flavor. Cook the spaghetti until it is al dente. This means it should have a slight bite. Reserve some pasta water before draining. This water is key for adjusting sauce thickness later. Serve creamy avocado pasta warm on individual plates. For extra flavor, sprinkle grated Parmesan cheese on top. Halved cherry tomatoes add a nice pop of color and taste. Finish with fresh basil leaves for a fresh touch. These garnishes will make your dish look and taste even better! Pro Tips Choose Ripe Avocados: Make sure your avocados are ripe for the best flavor and creaminess. They should yield slightly to gentle pressure when squeezed. Fresh Basil is Key: Use fresh basil leaves to elevate the flavor of the sauce. If you love basil, feel free to add more for a bolder taste! Adjust Sauce Consistency: If your sauce is too thick, gradually add the reserved pasta water until you reach the desired creamy consistency. Serve Immediately: This dish is best served fresh. The avocado sauce can brown quickly, so enjoy your creamy avocado pasta right after preparation! {{image_4}} If you need gluten-free pasta, many types are available. Look for pasta made from rice, quinoa, or lentils. These options cook well and pair nicely with the creamy avocado sauce. You can enjoy the same great taste without gluten. To make this dish vegan, skip the Parmesan cheese. The avocado sauce is rich and creamy on its own. You can also add nutritional yeast for a cheesy flavor. This keeps your dish plant-based and just as tasty. You can easily spice up your creamy avocado pasta. Try adding some red pepper flakes for heat. You can also mix in sautéed vegetables like spinach or zucchini. Fresh herbs like cilantro or thyme can add a burst of flavor. Each twist brings new life to this simple meal. To store your creamy avocado pasta, let it cool first. Place it in an airtight container. This helps keep the flavors fresh. You can store it in the fridge for up to three days. When you are ready to eat, check for any changes in color. If the sauce turns brown, it’s still safe to eat, but the look may not be as nice. When reheating, I recommend using the stove. This keeps the pasta creamy. Add a splash of reserved pasta water to help with the texture. Heat it on low to avoid burning. Stir it often until warmed through. You can also microwave it in short bursts, stirring between each burst. This method works well too. If you want to freeze the pasta, do so right after cooking. Place the pasta in a freezer-safe container. You can freeze it for up to two months. When you're ready to eat, let it thaw overnight in the fridge. Reheat it gently on the stove. Add a bit of olive oil or pasta water to restore its creaminess. Enjoy the flavors just like when it was fresh! Yes, you can make creamy avocado pasta ahead of time. However, the sauce may darken due to oxidation. To keep it fresh, store the sauce in an airtight container. You can add a bit of lemon juice to help slow down the browning. Cook the pasta and mix it with the sauce just before serving for the best taste. To make creamy avocado pasta healthier, consider these tips: - Use whole wheat or legume-based pasta for added fiber. - Add more veggies like spinach, zucchini, or peas to boost nutrients. - Use less olive oil and skip Parmesan to lower calories. - Add protein by mixing in grilled chicken or chickpeas. If you are allergic to avocados, try these substitutes: - Use blended silken tofu for a creamy texture. - Cashew cream is another good option; just soak cashews in water and blend. - You can even try pureed cooked squash for a unique twist. Each option gives a different flavor, so feel free to experiment! This blog post covered how to make creamy avocado pasta. We explored ingredients, cooking steps, and tips for a great dish. Remember to choose fresh ingredients and adjust flavors to your taste. You can try gluten-free options or add more veggies for variety. Store leftovers properly to maintain that creamy texture. With these insights, you'll create a delicious meal that satisfies everyone. Enjoy your cooking journey and make this dish your own!

Creamy Avocado Pasta Perfect for Quick Meals

Looking for a quick and tasty meal? Creamy avocado pasta is your answer! This dish is easy to make and

Older posts
Page1 Page2 … Page85 Next →

dsad

© 2026 tastyhatch • Built with GeneratePress

Our Policies

  • Copyright Policy
  • Cookie Policy
  • GDPR Policy
  • Privacy Policy
  • Disclaimer
  • Terms Of Use

More Information

  • Home
  • About
  • Contact
  • Appetizers
  • Dessert
  • Dinner
  • Drinks
©2026, tastyhatch About Back To Top