Skip to content
DisclaimerTerms Of UseGDPR PolicyCookie Policy

tastyhatch

  • Home
  • Drinks
  • Appetizers
  • Dinner
  • Dessert
  • About
  • Contact
  • Privacy Policy
DisclaimerTerms Of UseGDPR PolicyCookie Policy

NO-ING-IMG

- 1 cup rolled oats - 1 cup almond milk (or any milk of your choice) - 1/2 cup plain Greek yogurt - 1/2 cup fresh blueberries (plus extra for topping) - 1 tablespoon honey (or maple syrup, for a vegan option) - Zest of 1 lemon - 1 tablespoon freshly squeezed lemon juice - 1/2 teaspoon pure vanilla extract - Pinch of salt You can swap rolled oats for quick oats if you prefer. Just note that quick oats soak up liquid faster. Almond milk is flexible; use any milk you like, such as cow's milk or oat milk. If you want a vegan option, replace Greek yogurt with coconut yogurt. Maple syrup can replace honey for a sweet touch. Adjust the lemon juice and zest to taste if you like a stronger lemon flavor. - Rolled oats: High in fiber, they help keep you full and support digestion. - Almond milk: Low in calories and dairy-free, it’s great for lactose intolerant folks. - Greek yogurt: Packed with protein, it helps with muscle repair and keeps you satisfied. - Fresh blueberries: Rich in antioxidants, they support heart health and lower inflammation. - Honey: A natural sweetener, it offers quick energy and has antibacterial properties. - Lemon zest and juice: They add vitamin C, boost your immune system, and add a bright flavor. - Vanilla extract: It enhances taste and has calming effects. - Salt: A pinch helps balance flavors and brings out the sweetness in other ingredients. These ingredients work together to make a tasty and healthy breakfast that fuels your day! Start by gathering your rolled oats, almond milk, Greek yogurt, and honey. In a bowl or jar, mix these ingredients. Stir gently to blend them well. This forms the base of your overnight oats. The oats will soak up the liquid, becoming soft and creamy overnight. Next, add the fresh blueberries, lemon zest, lemon juice, vanilla extract, and a pinch of salt. Gently fold these items into the oat mixture. This step brings bright flavors to your dish. The blueberries give sweetness, while the lemon adds a fresh zing. Cover the bowl with a lid or wrap the jar with plastic. Place it in the fridge overnight, or at least for 4 hours. This time allows the oats to absorb the flavors and liquid. You’ll wake up to a tasty breakfast ready to eat. When morning arrives, take the oats out of the fridge. Give the mixture a good stir to combine everything again. If it seems too thick, add a splash of almond milk. This will help reach your desired texture for a creamy breakfast. Spoon your overnight oats into bowls or jars for serving. Add extra fresh blueberries on top for color. A light sprinkle of lemon zest gives a lovely finish. Enjoy this healthy breakfast that is both delicious and refreshing! To get the right texture, start with rolled oats. They soak up the milk well. If your oats feel too thick in the morning, add a splash of almond milk. Stir until smooth. This makes every bite creamy and enjoyable. You can add fun flavors to your oats. Try seeds like chia or flax for added nutrition. Nuts like almonds or walnuts give a nice crunch. For a sweeter taste, add more honey or maple syrup. Experiment until you find what you love! Make your oats look great for serving. Use clear jars to show off the layers. Add extra blueberries on top for color. A sprinkle of lemon zest brightens the dish. You can even add fresh mint leaves for a pop of green. This not only looks good but tastes fresh too! {{image_4}} To make this recipe vegan, swap the Greek yogurt for a plant-based yogurt. Coconut yogurt works well. Use maple syrup instead of honey for sweetness. This keeps the oats creamy and delicious. You can enjoy all the great flavors while staying vegan. Feel free to mix in other fruits. Strawberries, raspberries, or bananas can add a fun twist. You can also try using frozen fruit. Just remember to let it thaw a bit before mixing. The fruity options add new tastes and colors to your breakfast. If you want to cut calories, use unsweetened almond milk. You can skip the honey or use a sugar substitute. Reducing the yogurt amount also helps lower calories. These small changes keep the dish light while still tasting great. Blueberry lemon overnight oats need to be stored in the fridge. Use a jar or a bowl with a lid. This keeps them fresh and tasty. Make sure to seal it tightly. You can enjoy your oats for breakfast or a snack. You can freeze blueberry lemon overnight oats if you want to save some for later. Just put them in a freezer-safe container. Leave some space at the top, as they will expand when frozen. When you're ready to eat, let them thaw overnight in the fridge. In the fridge, blueberry lemon overnight oats last about 3 to 5 days. If you freeze them, they can last up to 3 months. Always check for any off smells or changes in texture before eating. Enjoying them fresh is always best! Yes, you can use quick oats if you want. Quick oats cook faster and absorb liquid quickly. This makes the texture softer. However, rolled oats give a chewier bite and better flavor. I prefer rolled oats for a heartier breakfast. To make gluten-free blueberry lemon overnight oats, just use certified gluten-free oats. Most oats are naturally gluten-free. However, some may be processed in facilities with gluten. Check the label to be sure. Absolutely! You can make a batch for the whole week. Just store them in jars with tight lids. They will last in the fridge for up to five days. This makes breakfast super easy on busy mornings. If you don’t have Greek yogurt, you can use regular yogurt or dairy-free yogurt. For a dairy-free option, try coconut yogurt or almond yogurt. They add a nice flavor and keep the oats creamy. Yes, overnight oats are safe to eat for up to five days. Just make sure to store them in a sealed container in the fridge. If you see any signs of spoilage, like a funny smell or mold, it's best to toss them out. Enjoy your oats while they're fresh! In this post, we explored the key ingredients for delicious overnight oats. We covered step-by-step instructions to make them perfect. I shared handy tips to improve taste and presentation. You also learned about healthy variations and how to store your oats. Overnight oats are simple and flexible. You can easily tailor them to your taste. Enjoy the benefits of a wholesome meal that fits your busy life. Start making your own today!

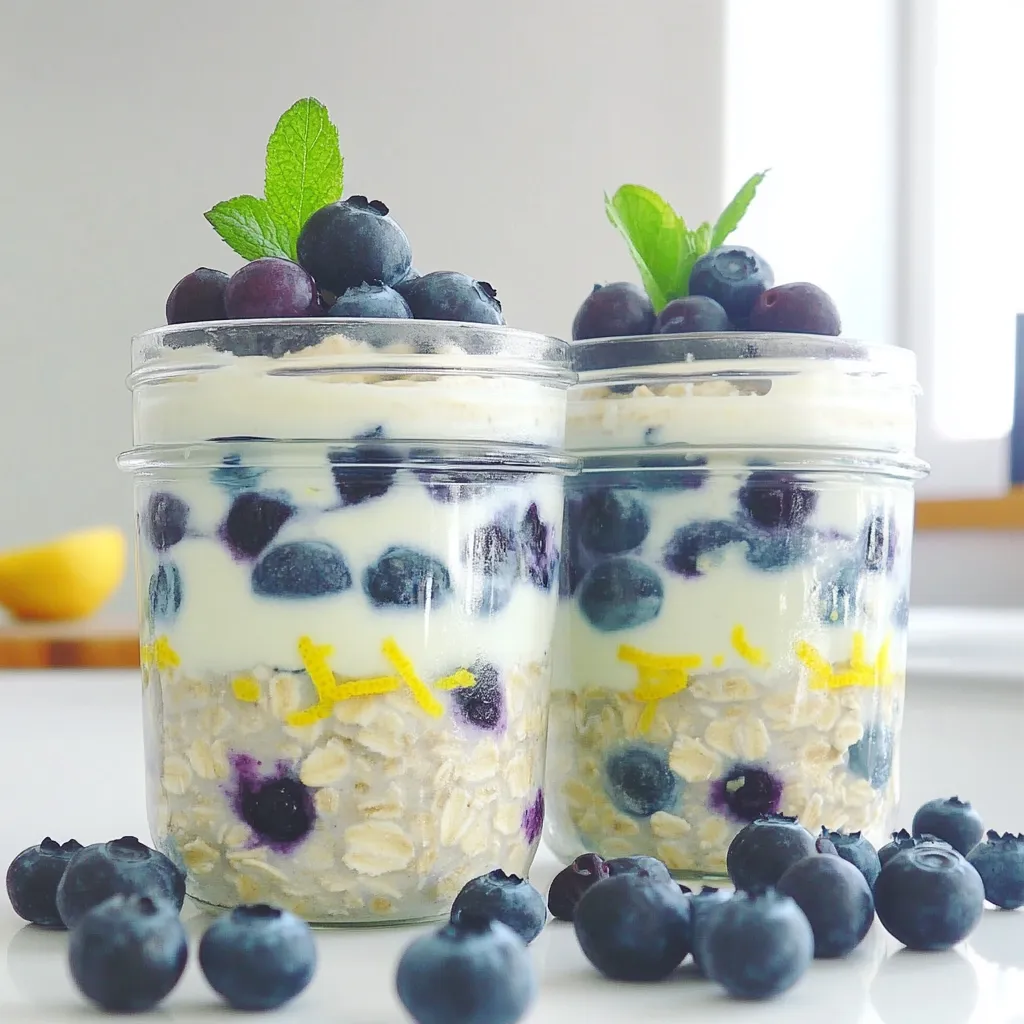
Blueberry Lemon Overnight Oats Healthy Breakfast Idea

Looking for a quick, healthy breakfast? Blueberry Lemon Overnight Oats are your answer! This delicious meal combines fresh blueberries with

To make a great chicken noodle soup, you need some key ingredients. Here’s what you will need: - 1 tablespoon olive oil - 1 medium onion, diced - 2 cloves garlic, minced - 2 medium carrots, sliced into rounds - 2 celery stalks, sliced - 1 teaspoon dried thyme - 1 teaspoon dried rosemary - 6 cups chicken broth (preferably low-sodium) - 2 cups cooked chicken, shredded (rotisserie chicken works great) - 1 cup egg noodles - Salt and pepper, to taste - Fresh parsley, finely chopped, for garnish Each ingredient plays a part in making the soup flavorful. Fresh vegetables bring sweetness. The herbs add depth. Chicken broth gives it that warm, comforting base. Choosing quality ingredients makes a difference. For chicken broth, I suggest low-sodium brands. They allow you to control the salt level better. For the chicken, rotisserie chicken saves time. It’s tender and packed with flavor. When it comes to herbs, fresh is best if you have them. If not, dried versions work well too. I find that organic options often taste better. They keep that rich flavor. You can tweak the recipe based on what you have. If you lack egg noodles, try rice or whole grain pasta. They will cook differently, but they work. Swap in any cooked protein, like turkey, if needed. You can skip the celery if you’re not a fan. Add more carrots instead for sweetness. If you want a vegan version, use vegetable broth and skip the chicken. You can add extra veggies like peas or spinach for freshness. {{ingredient_image_2}} First, gather all your ingredients. You will need olive oil, onion, garlic, carrots, celery, thyme, rosemary, chicken broth, cooked chicken, egg noodles, salt, pepper, and parsley. 1. Warm a large pot over medium heat. 2. Add one tablespoon of olive oil. 3. Dice one medium onion and add it to the pot. 4. Sauté the onion for about 3 to 4 minutes. 5. When the onion is soft, add two minced garlic cloves. 6. Slice two medium carrots into rounds and two celery stalks. 7. Add the carrots and celery to the pot. 8. Cook the mix for 5 to 6 minutes until tender. Next, add flavor with herbs. Add one teaspoon of dried thyme and one teaspoon of dried rosemary. Stir for about one minute. This helps release the herbs' oils and adds depth. Now, pour in six cups of chicken broth. Stir everything together. Bring your soup to a boil over high heat. Once boiling, reduce the heat to a gentle simmer. Add two cups of shredded chicken, preferably rotisserie, and one cup of egg noodles. Let this simmer for 10 to 12 minutes. This time allows the noodles to cook and absorb flavors. To keep egg noodles just right, watch the cooking time. Overcooked noodles can turn mushy. Stir the noodles gently during cooking. This helps them cook evenly. Taste your soup before serving. Add salt and pepper to suit your taste. Don't forget to garnish with fresh parsley! This adds a nice pop of color and flavor. Enjoy your classic chicken noodle soup! To make your chicken noodle soup unique, try adding different veggies. You can use peas, corn, or even spinach. Fresh herbs, like dill or basil, can give your soup a fresh taste. If you like spice, add a pinch of red pepper flakes. Swap the egg noodles for whole wheat or gluten-free noodles for a healthier choice. One big mistake is overcooking the noodles. They can become mushy and lose their bite. Always add noodles towards the end of cooking. Another mistake is not seasoning well. Taste your soup as you cook and adjust the salt and pepper. Also, don’t skip the fresh parsley at the end. It adds nice flavor and color! For a deeper flavor, use homemade chicken broth if you can. If not, a good quality low-sodium broth works well. Sauté the onions and garlic until they are golden. This step builds a rich base. Adding a splash of lemon juice before serving brightens the flavors. Try these tips, and your soup will shine! Pro Tips Use Homemade Broth: For the best flavor, consider making your own chicken broth. It enhances the soup's richness and depth. Veggie Variations: Feel free to add other vegetables like peas, corn, or green beans for extra nutrition and color. Herb Freshness: If possible, use fresh herbs instead of dried for a brighter flavor. Add them towards the end of cooking to preserve their aroma. Texture Control: To prevent overcooking the noodles, consider cooking them separately and adding them to each bowl just before serving. {{image_4}} Want to make your chicken noodle soup healthier? You can use low-sodium broth. It cuts down on salt but keeps the rich flavor. Also, swap out regular noodles for whole grain or gluten-free options. You can add more veggies too! Try adding spinach, zucchini, or kale. These choices boost the nutrition and flavor. If you want a meatless soup, it's easy! For a vegetarian version, replace chicken with chickpeas or lentils. Use vegetable broth instead of chicken broth. You can still enjoy the classic taste by adding herbs and spices. For a vegan option, just skip the chicken and add tofu for protein. Want to spice things up? Try adding a squeeze of lemon for brightness. You can also toss in some fresh herbs like dill or basil for a new flavor. Another fun idea is to mix in some diced tomatoes or peas. These add color and a fresh taste. Don't be afraid to experiment and make it your own! To keep your chicken noodle soup fresh, store it in an airtight container. Let the soup cool down first. This helps prevent condensation, which can make your soup watery. Place the container in the fridge if you plan to eat it within a few days. When ready to eat, reheat your soup gently. Pour it into a pot and warm it on low heat. Stir often to avoid burning. You can add a splash of broth if the soup seems thick. For microwave use, heat it in short bursts. Stir between each burst to heat evenly. If you want to save soup for later, freezing is a great option. Use freezer-safe containers or bags. Leave some space at the top, as the soup will expand. It can last up to three months in the freezer. To thaw, place it in the fridge overnight before reheating. You can keep chicken noodle soup in the fridge for about 3 to 4 days. Store it in a tight container to keep it fresh. If you want to enjoy it later, consider freezing it. That way, you can save it for up to 3 months. Yes, you can use uncooked chicken in the soup. Just be sure to cook it fully before adding the noodles. Start by browning the chicken in the pot first. Then, add your veggies and broth. Cook until the chicken is tender. Then, shred it and stir it back into the soup. If you need a substitute for egg noodles, try using rice or whole grain pasta. You can also use gluten-free pasta if needed. Just remember to adjust the cooking time based on what you choose. Each option adds a different texture but still gives you that comforting feel. You’ve learned how to make classic chicken noodle soup from scratch. We covered essential ingredients, step-by-step instructions, and expert tips. You now have ideas for variations and how to store your soup. Keep these tips in mind to avoid common mistakes. Remember, cooking is fun and allows for creativity. Enjoy your homemade soup, and don’t hesitate to mix things up.

Classic Chicken Noodle Soup Simple and Comforting Meal

There’s nothing quite like a warm bowl of Classic Chicken Noodle Soup to brighten your day. In this post, I’ll

This Strawberry Coconut Chia Jam uses simple, fresh ingredients. Here’s what you need: - 2 cups fresh strawberries, hulled and roughly chopped - 1/4 cup honey or maple syrup - 1/4 cup creamy coconut milk - 3 tablespoons chia seeds - 1 teaspoon pure vanilla extract - A pinch of sea salt These ingredients work together to create a sweet and tasty spread. Fresh strawberries bring natural sweetness and bright flavor. You can adjust the sweetness with honey or maple syrup to suit your taste. Coconut milk adds creaminess and a tropical twist. Chia seeds help thicken the jam while adding texture and nutrition. The vanilla extract and sea salt enhance all the flavors. With these ingredients in hand, you’re ready to make a delicious jam. Each bite will be a burst of strawberry and coconut goodness! {{ingredient_image_2}} Start by placing your chopped strawberries in a medium saucepan. Add the honey or maple syrup. Cook over medium heat. Stir occasionally. You want the mixture to reach a gentle simmer. Cook for about 5-7 minutes. The strawberries will soften and break down into a juicy compote. This step is key for flavor. After cooking, take the saucepan off the heat. Let the strawberry mixture cool for about 5 minutes. This cooling time helps the flavors blend well. Once cooled slightly, grab a fork or a potato masher. Mash the strawberries to your preferred texture. You can make it chunky or smooth, depending on what you like. Now, it’s time to add more flavor. Mix in the creamy coconut milk and chia seeds. Don’t forget the vanilla extract and a pinch of sea salt. Stir everything together really well. Make sure the chia seeds spread evenly throughout the mixture. This will help the jam set nicely. To let your jam set, you have two options. First, you can leave it at room temperature for 1-2 hours. This allows the chia seeds to absorb moisture. Alternatively, place it in the refrigerator for about 30 minutes. Both methods work well. After the setting time, give the jam a good stir. Taste it and adjust sweetness if needed. Enjoy your tasty spread! To adjust sweetness, taste your jam before it sets. If it needs more sweetness, add honey or maple syrup. Start with a little, then mix and taste again. You can use agave syrup or stevia as alternatives if you want to try something different. Do you like chunky or smooth jam? For a chunky jam, mash the strawberries less. If you prefer it smooth, mash them more. You can also use a blender for a finer texture. Just be careful not to over-blend. For serving, use a small glass jar. It's cute and keeps the jam fresh. Top it with a sprig of mint or a whole strawberry for color. This makes it pop on your table. Enjoy it on toast, pancakes, or yogurt for a tasty treat! Pro Tips Use Ripe Strawberries: The riper your strawberries are, the sweeter and more flavorful your jam will be. Look for berries that are deep red and fragrant for the best results. Customize Your Sweetness: Adjust the amount of honey or maple syrup based on your preference. Taste the mixture before it cools to find the perfect balance of sweetness for your palate. Experiment with Flavors: Feel free to add other fruits or spices like cinnamon or lemon zest to create unique flavor combinations that suit your taste. Storage Tips: Store the jam in the refrigerator in an airtight container. It should keep well for about a week, making it a perfect make-ahead option for busy mornings. {{image_4}} Chia seeds are tiny but packed with nutrition. They contain protein, fiber, and omega-3 fatty acids. Just two tablespoons give you: - 140 calories - 4 grams of protein - 10 grams of fiber - 5 grams of omega-3s These seeds help you feel full and support heart health. They also boost digestion due to their high fiber content. When you eat them, they absorb water and expand, which can help keep you hydrated. Coconut brings rich taste and health perks. It contains medium-chain triglycerides (MCTs), which can give you energy. Here’s what you get from coconut: - Good fats for your heart - Antioxidants that fight free radicals - Fiber that aids digestion Coconut can also help improve your mood. Eating coconut may help keep your skin healthy, too. Strawberry Coconut Chia Jam is a great snack choice. It has fewer calories than many spreads. This jam is also rich in fiber and natural sweetness. Each scoop offers: - A low-calorie option - A boost of nutrients from strawberries and coconut - A fun way to enjoy fruit You can spread it on toast or mix it into yogurt. This jam makes a tasty addition to breakfast or snacks. You can change up the fruit in this jam. Try using different berries. Raspberries and blueberries work well. They add unique flavors and colors. You can also mix in tropical fruits. Pineapple and mango add a sweet twist. These fruits make the jam exciting and fresh. Add some herbs or spices for extra flavor. Fresh mint or basil can brighten the taste. Small amounts of these herbs give a nice touch. You can also use spices. Cinnamon or nutmeg adds warmth. These flavors change the jam’s profile and keep things interesting. If you want a vegan option, use maple syrup instead of honey. This keeps the sweetness while staying plant-based. You can also adjust for allergies. Use nut-free milk if needed. For a gluten-free option, check all ingredients. These simple swaps make the jam safe and tasty for everyone. Strawberry Coconut Chia Jam can last up to two weeks in the fridge. To store it, place the jam in a clean glass jar with a tight lid. It's best to use a jar that is not too large. This way, you can eat it before it spoils. Always check for any signs of mold or off smells before use. Yes, you can can this jam! To do this, you need to follow safe canning guidelines. Start by sterilizing your jars in hot water. Fill the jars with the jam, leaving some space at the top. Seal the lids tightly. Then, process the jars in a boiling water bath for about 10 minutes. This method helps keep the jam fresh for months. Yes, it is best to refrigerate homemade jam for safety. Refrigeration slows down spoilage. If you have canned the jam properly, it can stay at room temperature until opened. Once opened, keep it in the fridge. This keeps your jam tasty and safe to eat for longer. You learned how to make Strawberry Coconut Chia Jam. From selecting fresh ingredients to blending and setting, each step is key. Remember, you can tweak sweetness and texture to fit your taste. This jam is more than tasty; it's packed with health benefits from chia seeds and coconut. You can even explore fruit variations and flavor additions for fun twists. Enjoy your homemade jam, and make it your own!

Strawberry Coconut Chia Jam Simple and Tasty Spread

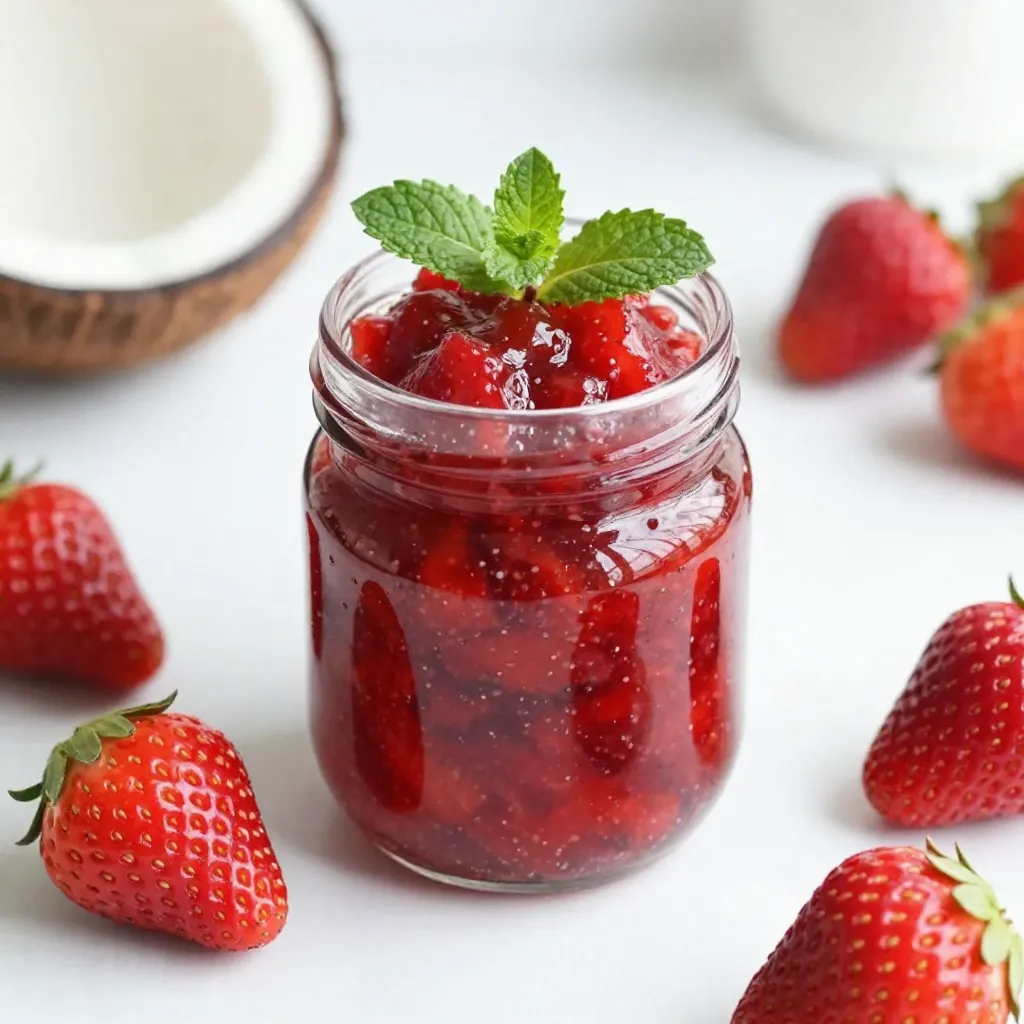
Are you looking for a tasty, healthy spread? This Strawberry Coconut Chia Jam is simple to make and bursting with

For this salad, you need two fresh ahi tuna steaks. Each steak should weigh about six ounces. Choose bright, deep red tuna for the best flavor. Freshness is key to a great dish. You will also need 1/4 cup of sesame seeds. A mix of black and white seeds adds beauty and crunch. For the marinade, gather two tablespoons of soy sauce and one tablespoon of sesame oil. These give the tuna a rich flavor. You may also add one tablespoon of olive oil for cooking. For the salad, use four cups of mixed greens. A blend of arugula, spinach, and watercress works great. You will also need one cucumber, sliced into rounds, and one ripe avocado, cut into wedges. Add 1/4 cup of julienned carrots for crunch and two thinly sliced radishes for a peppery kick. For the dressing, you will need two tablespoons of rice vinegar, one tablespoon of honey, and salt and pepper to taste. Optional: extra toasted sesame seeds make a nice garnish. {{ingredient_image_2}} Start with fresh ahi tuna steaks. Use paper towels to pat them dry. This step helps create a good sear. If the fish is wet, it won't brown well. In a shallow dish, mix soy sauce and sesame oil. This blend gives the tuna a rich flavor. Place the tuna steaks in the marinade. Make sure they are fully coated. Let them soak for about 10 minutes. This step adds depth to the taste. Next, spread sesame seeds on a plate. Press each tuna steak into the seeds firmly. Ensure both sides are covered. This creates a crunchy outer layer. Heat olive oil in a non-stick skillet over medium-high heat. Wait until the oil shimmers. Carefully place the tuna in the skillet. Sear it for 1-2 minutes on each side. Adjust the time if you want it cooked differently. When done, take the tuna out and let it rest for a few minutes. While the tuna rests, prepare the salad. In a large bowl, combine salad greens, cucumber, avocado, carrot, and radishes. Gently toss these ingredients together. This mix adds color and texture to your dish. In a small bowl, whisk rice vinegar, honey, and a pinch of salt and pepper. This dressing offers a nice tang. Drizzle it over the salad, then toss everything together. Make sure the veggies are well-coated. Once the tuna has rested, slice it into thin strips. Arrange the slices on top of the salad. This adds elegance to your dish. Finally, sprinkle extra sesame seeds on top for garnish. You can also add a few radish slices for color. Serving the salad in shallow bowls makes it look more appealing. To cook ahi tuna perfectly, aim for medium-rare. This keeps the fish tender and juicy. Sear the tuna for 1-2 minutes on each side. Adjust the time based on your taste. For a thicker steak, you may need extra time. Use a timer for accuracy. After cooking, let the tuna rest for a few minutes. This helps the juices stay inside. Flavor matters in this dish. The marinade of soy sauce and sesame oil adds depth. Allow the tuna to soak up these flavors for 10 minutes. Also, use fresh veggies to bring brightness. The crisp cucumber and creamy avocado balance the rich tuna. Add rice vinegar and honey for a sweet-tangy dressing. This combination makes every bite exciting. Presentation is key for any dish. Serve the salad in shallow bowls for a beautiful display. Slice the tuna thinly to show off the sesame crust. Arrange the slices atop the salad for a colorful look. Sprinkle extra sesame seeds for crunch. A few radish slices add color and charm. This makes the dish not only tasty but also eye-catching. Pro Tips Freshness is Key: Always choose the freshest ahi tuna steaks available. Look for bright red color and a firm texture for the best flavor and quality. Marinade Time: While 10 minutes is sufficient for flavor, you can marinate the tuna for up to 30 minutes if you prefer a stronger taste. Just be cautious not to over-marinate, as this can change the texture. Perfect Sear: For a perfect sear, ensure your skillet is hot enough before adding the tuna. This will help create a nice crust while keeping the inside tender and rare. Garnish Wisely: Consider adding microgreens or edible flowers alongside the sesame seeds for an elevated presentation and extra flavor dimensions. {{image_4}} You can switch up the salad greens to match your taste. Try romaine for a crunchier bite. Add kale for more nutrients. Spinach gives a soft texture, while arugula adds a peppery flavor. Mixing greens makes the salad more colorful and fun. You can also use baby greens for a delicate touch. If you can't find ahi tuna, don't worry! You can use salmon for a similar taste. Grilled chicken works well too. For a vegetarian option, try marinated tofu. It will soak up the flavors and add protein. Each alternative adds its own flair to the dish. Feel free to mix it up with the dressing. Instead of rice vinegar, try balsamic for a sweeter taste. A splash of lime juice adds zest. You can also use a yogurt-based dressing for creaminess. Adding fresh herbs, like cilantro or basil, gives a fresh twist. Experiment with what you like best! You can store leftover sesame crusted ahi tuna salad in the fridge. Use an airtight container. It stays fresh for up to two days. Keep the tuna and salad separate to prevent sogginess. If you have extra dressing, store that in a separate container too. If you want to reheat the tuna, do it gently. Place it in a skillet over low heat. Heat for about one minute on each side. Avoid cooking it too long, or it will dry out. You can also enjoy it cold right from the fridge. It tastes great either way! To save time, prep the salad ingredients ahead. Wash and slice your veggies a day or two in advance. Store them in the fridge in airtight bags. You can also marinate the tuna a few hours before cooking. That way, you can make a quick meal on busy days. Yes, you can use frozen ahi tuna. Just make sure to thaw it completely before cooking. Thaw it in the fridge overnight. This keeps it safe and tasty. Fresh tuna has the best flavor. But frozen can work well if fresh isn’t available. If you don't have sesame oil, use olive oil instead. Olive oil is a great choice for cooking. It adds a nice flavor too. You can also try avocado oil or peanut oil for a different taste. Each oil will give a unique twist to your dish. Yes, this salad is great for meal prep! You can store the salad and dressing separately. Keep the tuna in the fridge for a few days. This way, it stays fresh. Just add the dressing when you are ready to eat. To make this salad gluten-free, substitute soy sauce with tamari. Tamari is a gluten-free soy sauce. Check labels to ensure all ingredients are gluten-free. Using fresh, whole ingredients also helps keep it healthy and safe. Enjoy your gluten-free meal! This blog post covers making a fresh ahi tuna salad, from ingredients to presentation. You learned how to prepare and cook the tuna, including tips for perfect doneness. I shared ways to mix flavors and enhance your dish. You also discovered storage tips and variations for your salad. Remember, you can customize this recipe to suit your taste. Enjoy trying new greens or dressing options. Happy cooking and enjoy your healthy meal!

Sesame Crusted Ahi Tuna Salad Fresh and Flavorful Dish

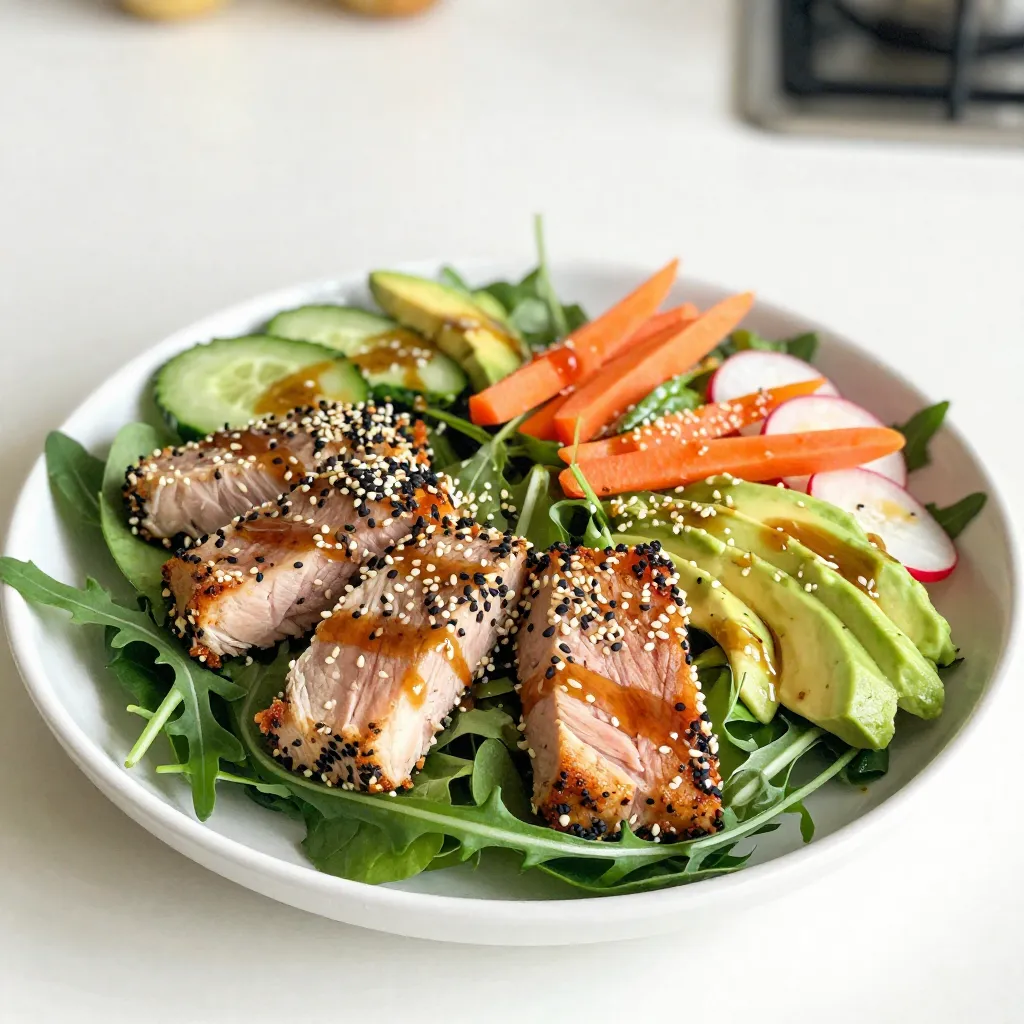
If you’re looking for a fresh and tasty meal, you’ve come to the right place! This Sesame Crusted Ahi Tuna

- 2 cups pecan halves - 1/2 cup packed brown sugar - 1 teaspoon ground cinnamon - 1/4 teaspoon sea salt - 1/4 cup unsalted butter, melted - 1 teaspoon pure vanilla extract - 1/4 teaspoon cayenne pepper (optional) When measuring the brown sugar, pack it tightly in your cup. This step ensures you get the right sweetness. For the pecans, use whole halves for the best texture and crunch. The sea salt balances the sweetness well. If you crave a spicy kick, add cayenne pepper. This touch enhances the flavor without overwhelming it. You can also consider adding a splash of maple syrup for a unique sweetness. {{ingredient_image_2}} First, set your oven to 350°F (175°C). This heat will roast the pecans perfectly. Next, line a baking sheet with parchment paper. This helps with easy cleanup later. In a large bowl, add 1/2 cup of packed brown sugar. Then sprinkle in 1 teaspoon of ground cinnamon and 1/4 teaspoon of sea salt. If you like heat, add 1/4 teaspoon of cayenne pepper. Stir everything well. This mix will give your pecans a sweet and spicy kick. In a small bowl, melt 1/4 cup of unsalted butter. Add 1 teaspoon of pure vanilla extract. Whisk until well mixed. Now, pour this buttery mix over 2 cups of pecan halves in the large bowl. Toss the pecans to coat them well. Every pecan should be covered in the buttery goodness. Transfer the coated pecans to your lined baking sheet. Spread them out in a single layer. This ensures they roast evenly. Place them in the oven and bake for 15-20 minutes. Stir the pecans halfway through. Watch closely; you want them golden brown, not burnt. Once the pecans are golden and smell amazing, take them out of the oven. Let them cool on the baking sheet. They will harden as they cool, becoming crunchy. After they cool, break apart any clusters. Store the pecans in an airtight container. This keeps them fresh and tasty for your next snack! To get perfectly roasted pecans, start with fresh nuts. Old pecans can taste stale. Use a simple mix of brown sugar and cinnamon. This blend gives the nuts a sweet and warm flavor. Always spread the pecans in a single layer on your baking sheet. This helps them roast evenly. Stir them halfway during baking. This step ensures all sides get heat. Keep a close watch while your pecans bake. They can burn quickly. Set a timer for 10 minutes. Check them often after that. If they start to darken too much, pull them out early. Also, make sure your oven temperature is correct. An oven thermometer can help with this. A few degrees too high can lead to burnt nuts. For even coating, mix the sugar and spices well before adding them to the pecans. Toss the pecans in butter first. This helps the sugar stick better. Use your hands or a spatula to mix thoroughly. You want every pecan to be covered in that sweet blend. After mixing, let the coated pecans sit for a few minutes. This allows the flavors to soak in before roasting. Pro Tips Use Fresh Spices: Ensure your ground cinnamon and cayenne pepper are fresh for maximum flavor impact. Cool Completely: Allow the pecans to cool completely on the baking sheet to achieve the best crunch. Experiment with Flavors: Feel free to add other spices like nutmeg or ginger for a unique twist on the classic recipe. Storage Tips: Store the cooled pecans in an airtight container to maintain their freshness for up to two weeks. {{image_4}} For a spicy twist, add cayenne pepper to the mix. Use 1/4 teaspoon for a kick. This heat pairs well with the sweetness of brown sugar. Adjust the spice level to fit your taste. More cayenne means more heat. If you love bold flavors, this option is for you! You can mix in other nuts or seeds for variety. Walnuts, almonds, or cashews work great. Use a mix of 2 cups total for a fun texture. This blend adds depth to each bite. You can also add sunflower or pumpkin seeds for a crunch. Each nut has its own flavor, making every handful different. Try new flavors to excite your taste buds. A touch of cocoa powder gives a chocolatey flavor. Maple syrup can replace some brown sugar for a unique twist. Adding a hint of nutmeg or cardamom can also elevate your mix. Be bold and test different spices. The possibilities are endless, and you might find your new favorite snack! To keep your cinnamon brown sugar roasted pecans fresh, let them cool completely. Once cooled, you can store them in a cool, dry place. Avoid direct sunlight, as it can make them stale. These pecans can last for about two weeks when stored properly. If you want to keep them longer, freezing is a good option. Place them in an airtight container and store them in the freezer. They will stay fresh for about three months this way. Use an airtight container to store your pecans. Glass jars or plastic containers with tight lids work well. Avoid paper bags or loose containers, as they let air in and can make your pecans soft. Yes, you can use other nuts. Almonds, walnuts, or cashews work well. Each nut has its own flavor. Adjust the roasting time based on the nut you choose. Nuts like almonds may take longer to roast. If you lack brown sugar, you can make your own. Mix white sugar with molasses. Use one cup of white sugar and add one tablespoon of molasses. You can also use honey or maple syrup, but this may change the texture. To make the nuts sweeter, add more brown sugar. Start with an extra tablespoon. If you want less sweetness, cut back on the sugar. Try adding more spices like cinnamon for flavor without the sugar. Roasted pecans are tasty on their own. You can sprinkle them on salads for a crunch. They also make a great topping for yogurt or ice cream. Use them in trail mixes or as a snack during movie night. Roasting pecans is simple and rewarding. We covered ingredients, step-by-step instructions, and helpful tips to guide you. You learned how to make different flavors, like spicy cinnamon or mixed nuts. Remember to store your roasted pecans properly to keep them fresh. Try new mixes and share with friends. Enjoy your crunchy treats and experiment with flavors that excite you!

Cinnamon Brown Sugar Roasted Pecans Simple Snack Delight

Looking for a quick and tasty snack idea? You’ve landed in the right place! My Cinnamon Brown Sugar Roasted Pecans

- 1 cup all-purpose flour - 1/2 teaspoon baking powder - 1/4 teaspoon baking soda - 1/4 teaspoon salt - 1/2 teaspoon ground cinnamon - 1/4 teaspoon ground nutmeg - 1/4 teaspoon ground ginger - 2 large eggs - 1/2 cup granulated sugar - 1/2 cup pumpkin puree - 1/4 cup unsalted butter, melted - 1 teaspoon vanilla extract - 1 cup semi-sweet chocolate chips - 1 teaspoon coconut oil To make Chocolate Dipped Pumpkin Madeleines, you need simple ingredients. Each one plays a key role in flavor and texture. The all-purpose flour gives the madeleines their structure. Combine it with baking powder and baking soda for a light lift. Salt enhances all the flavors, while the spices—cinnamon, nutmeg, and ginger—bring warmth and richness, making these treats perfect for fall. Next, we have the eggs and granulated sugar. They add sweetness and help create a fluffy batter. The pumpkin puree is the star, giving moisture and a lovely autumn flavor. The melted butter adds richness, and vanilla extract rounds out the taste. Lastly, we melt semi-sweet chocolate chips with a bit of coconut oil. This blend gives a shiny, smooth finish that makes each madeleine even more tempting. Gather these ingredients, and you're ready to create something delicious! - Preheat the oven to 375°F (190°C). - Grease and flour the madeleine pan. Start by preheating your oven. This step helps the madeleines rise and bake evenly. Grease the madeleine pan well to avoid sticking. A thin layer of butter or cooking spray works wonders. Then, add a sprinkle of flour to coat the pan. This will help the madeleines pop out easily later. - Whisk together flour, baking powder, baking soda, salt, and spices. In a medium bowl, measure one cup of flour. Add half a teaspoon of baking powder, a quarter teaspoon of baking soda, and a quarter teaspoon of salt. These ingredients are key to making the madeleines light. Next, add half a teaspoon of cinnamon, a quarter teaspoon of nutmeg, and a quarter teaspoon of ginger. Whisk them all together until mixed well. Set this bowl aside for now. - Beat eggs and sugar until pale and fluffy. - Fold in pumpkin puree, melted butter, and vanilla. In a large mixing bowl, crack two large eggs. Add half a cup of granulated sugar. Using an electric mixer, beat this mixture for about five minutes. You want it to look pale and fluffy. Next, fold in half a cup of pumpkin puree, a quarter cup of melted butter, and one teaspoon of vanilla extract. Mix gently until just combined. This creates a smooth batter that smells amazing. - Gradually incorporate dry ingredients into the wet mixture. Now, it's time to bring it all together. Gradually add the dry ingredients to the wet mixture. Use a spatula to fold the mixtures together gently. Be careful not to overmix; a few lumps are okay. This helps keep the madeleines light and airy. - Fill molds and bake for 10-12 minutes. - Cool and transfer to a wire rack. Using a spoon or cookie scoop, fill each mold about three-quarters full with batter. This ensures they have room to rise. Place the pan in the preheated oven and bake for 10 to 12 minutes. You’ll know they’re done when the edges turn golden and the centers spring back when lightly touched. Let them cool for about two to three minutes before transferring them to a wire rack. - Melt chocolate chips and coconut oil in the microwave. - Dip madeleines in chocolate and cool to set. For the chocolate dip, combine one cup of semi-sweet chocolate chips and one teaspoon of coconut oil in a microwave-safe bowl. Heat it in the microwave in 20-second bursts, stirring in between. Once smooth, dip the tops of each madeleine into the chocolate. Let any excess drip off back into the bowl. Place the dipped madeleines on the wire rack to cool. If you want to speed things up, refrigerate them for about 15 minutes until the chocolate hardens. To make great madeleines, avoid overmixing the batter. This step is key. If you mix too much, the madeleines can become tough. You want a light and fluffy texture. When folding in the dry ingredients, stir gently with a spatula. A few lumps in the batter are fine. Cooling your madeleines is also important. After baking, let them cool in the pan for 2-3 minutes. Then, move them to a wire rack. This helps them set and develop that lovely shape. Wait until they cool completely before dipping them in chocolate. This way, the chocolate won't melt or run off. Melting chocolate can be tricky. To avoid clumps, use a microwave-safe bowl. Mix chocolate chips with coconut oil for a smooth dip. Heat in 20-second intervals. Stir between each interval until smooth. If the chocolate is too thick, add a bit more coconut oil. For even chocolate coverage, dip the tops of each madeleine. Let excess chocolate drip back into the bowl. This will prevent a mess and keep your treats looking nice. If you want the chocolate to set quickly, pop the dipped madeleines in the fridge for about 15 minutes. A beautiful presentation makes your madeleines more tempting. Use a decorative platter to showcase them. Arrange them in a neat row or a circle for appeal. For an extra touch, dust the tops with powdered sugar. This adds a nice contrast and makes them look fancy. You can also pair them with a pumpkin spice latte for a cozy fall vibe. Enjoy these tasty treats with friends or family. {{image_4}} You can make your madeleines even more special. Try adding spices like cloves or allspice for extra warmth. A little citrus zest, like orange or lemon, adds a fresh twist. It brightens the flavor and pairs well with pumpkin. You can also mix in chocolate chunks for a richer taste. They melt into the batter and create gooey surprises in each bite. If you need gluten-free madeleines, you can swap the all-purpose flour for a gluten-free blend. Many blends work well, so you can choose your favorite. For vegan options, use flax eggs instead of real eggs. Simply mix one tablespoon of ground flaxseed with three tablespoons of water for each egg. You can replace butter with coconut oil or vegan margarine. These changes keep the taste delightful while meeting dietary needs. Madeleines are great for seasonal flavors. In fall, try adding diced apples or crushed pecans. They give a nice crunch and enhance the pumpkin flavor. Around the holidays, you can use spices like cardamom or allspice to create a festive vibe. These spices warm up the taste and make your treats perfect for celebrations. To keep your chocolate dipped pumpkin madeleines fresh, store them in an airtight container. Place a piece of parchment paper between layers to prevent sticking. This helps maintain their soft texture. You can store them at room temperature for up to three days. If you want them to last longer, refrigerate them for up to a week. If your madeleines lose some softness, you can refresh them. Preheat your oven to 300°F (150°C). Place the madeleines on a baking sheet for about 5 minutes. This will bring back their warm, soft texture. For serving, try pairing them with a hot drink. A pumpkin spice latte or hot chocolate works well. You can also dust them with powdered sugar for a sweet touch. Enjoy these delightful treats on a cozy fall afternoon! Look for a golden-brown edge. Press gently on the center; it should spring back. A toothpick inserted should come out clean. These signs mean your madeleines are ready. Yes, you can freeze them. First, let them cool fully. Place the madeleines in an airtight bag. Remove as much air as you can. They last up to three months in the freezer. To thaw, just leave them at room temperature for a few hours. Serve madeleines with tea or coffee. A pumpkin spice latte pairs perfectly. You can also enjoy them with whipped cream or fresh fruit. They look great on a decorative platter too. Homemade madeleines last about three days. Store them in an airtight container. Keep them at room temperature to maintain freshness. You can also refrigerate them to extend shelf life slightly. Yes, you can use a muffin tin or silicone molds. Just adjust the baking time. Keep an eye on them to avoid overbaking. You can try different shapes for fun treats! In this post, we explored how to make delicious Chocolate Dipped Pumpkin Madeleines. You learned about the ingredients and followed a simple step-by-step guide. I shared tips to ensure the right texture and chocolate dip. Additionally, we discussed fun variations and storage tips. These madeleines are a treat you can enjoy anytime. Try them out, and make your baking moments special!

Chocolate Dipped Pumpkin Madeleines Irresistible Treat

Indulge your taste buds with these Chocolate Dipped Pumpkin Madeleines, the perfect fall treat! Soft, moist, and full of pumpkin

To make a tasty butternut squash mac and cheese, you need a few simple ingredients: - 2 cups elbow macaroni - 2 cups butternut squash, peeled and diced - 2 tablespoons olive oil - 1 small onion, finely chopped - 2 cloves garlic, minced - 1 teaspoon dried sage - 1 teaspoon paprika - 1 ½ cups shredded sharp cheddar cheese - ½ cup grated Parmesan cheese - 2 cups milk (whole or plant-based) - 2 tablespoons all-purpose flour - Salt and pepper to taste - Fresh parsley, chopped (for garnish) Each of these ingredients plays a key role in creating a creamy and flavorful dish. The elbow macaroni provides a perfect base. The butternut squash adds natural sweetness and creaminess. Olive oil helps sauté the aromatics, while onion and garlic give depth of flavor. Spices like sage and paprika enhance the taste, making it more complex. The sharp cheddar cheese and Parmesan bring richness and a cheesy pull. Milk makes the sauce smooth, and flour helps thicken it. Finally, seasoning with salt and pepper balances the flavors, while parsley adds a fresh touch. Gather these ingredients, and you’re ready to create a delicious meal that warms the heart! {{ingredient_image_2}} Set your oven to 350°F (175°C). This heat is perfect for baking the mac and cheese. In a big pot, boil salted water. Add 2 cups of elbow macaroni. Cook for 7-9 minutes until it's al dente. Drain the pasta and set it aside. While the pasta cooks, fill a medium saucepan with water. Bring it to a gentle boil. Add 2 cups of diced butternut squash. Cook for 10-12 minutes. The squash should be tender when you pierce it with a fork. Drain and mash or blend until smooth. In a large skillet, drizzle 2 tablespoons of olive oil. Heat it over medium. Add 1 small chopped onion. Sauté for 4-5 minutes until it’s soft. Next, add 2 minced garlic cloves, 1 teaspoon of dried sage, and 1 teaspoon of paprika. Stir for 1 minute to release the aromas. Sprinkle 2 tablespoons of all-purpose flour over the sautéed onions. Stir and cook for 1-2 minutes. This helps get rid of the raw flour taste. Slowly whisk in 2 cups of milk, stirring until it thickens and bubbles gently, about 3-4 minutes. Add the butternut squash puree to the cheese sauce. Fold in 1 ½ cups of shredded sharp cheddar cheese and ½ cup of grated Parmesan cheese. Stir until the cheese melts and the sauce is creamy. Season with salt and pepper to taste. Add the drained macaroni to the cheese sauce. Stir until every piece is coated in the cheesy goodness. Pour the mac and cheese into a greased baking dish. Smooth the top with a spatula. Place it in the preheated oven. Bake for 20-25 minutes until bubbly and golden brown. After baking, allow it to cool for a few minutes. Top with freshly chopped parsley for color and freshness. Enjoy your butternut squash mac and cheese! To get a creamy butternut squash mac and cheese, start by mashing the squash well. You want it smooth with no lumps. A blender or food processor works great here. Use whole milk for richness, or try plant-based milk for a lighter feel. When adding cheese, do it slowly. This helps it melt evenly and keeps the sauce silky. Clumping can ruin your dish. To avoid this, keep the heat low when you mix in the cheese. Stir constantly for a smooth texture. If you notice lumps, whisk vigorously. Also, make sure your pasta is hot before mixing it into the cheese sauce. This helps everything blend better. For rich flavor, I love using sharp cheddar and Parmesan. Sharp cheddar gives a nice tang, while Parmesan adds depth. You can also try Gruyère for a nutty taste. Mixing different cheeses can make your dish unique. Just remember to balance flavors so none overpower the others. Pro Tips Choose the Right Squash: For the best flavor and texture, opt for fresh butternut squash. If using canned, ensure it's pure pumpkin without added sugars or spices. Make It Creamier: For an extra creamy mac and cheese, add a splash of cream or extra cheese to the sauce just before mixing in the pasta. Customize Your Cheese: Feel free to mix in different cheeses such as Gruyère or mozzarella for a unique flavor twist. Leftovers Storage: Store any leftovers in an airtight container in the fridge for up to 3 days. Reheat gently in the oven or microwave, adding a splash of milk to restore creaminess. {{image_4}} You can enhance your butternut squash mac and cheese with some fun add-ins. Here are a few ideas: - Bacon: Cook crispy bacon and crumble it on top. It adds a nice crunch. - Spinach: Stir in fresh spinach for color and nutrition. It wilts nicely in the warm dish. - Mushrooms: Sauté sliced mushrooms and mix them in for an earthy touch. - Peas: Add green peas for a pop of sweetness and color. These add-ins make the dish even more exciting and tasty. You can play with cheese to change the flavor. While sharp cheddar is great, try these options: - Gruyère: This cheese melts well and adds a nutty flavor. - Mozzarella: Use mozzarella for a stretchy, creamy texture. - Fontina: This cheese is rich and creamy, making the sauce even smoother. - Goat Cheese: For a tangy twist, mix in crumbled goat cheese. Mixing different cheeses can give you a unique taste each time. If you want a vegan version, it's easy to swap out ingredients. Here’s how: - Pasta: Make sure to use egg-free pasta. - Cheese: Use vegan cheese shreds or nutritional yeast for a cheesy flavor. - Milk: Substitute with almond, soy, or oat milk for a creamy base. - Butter: Replace with coconut oil or vegan butter in the sauce. These swaps let you enjoy a delicious dish while keeping it plant-based. To keep your butternut squash mac and cheese fresh, store it in the fridge. Use an airtight container to prevent moisture. It will stay good for about 3 to 5 days. Make sure to let it cool down before sealing it. This keeps the pasta from getting soggy. You can freeze butternut squash mac and cheese for longer storage. Use a freezer-safe container or a heavy-duty freezer bag. It will last up to 2 months in the freezer. Before freezing, divide it into smaller portions. This makes it easier to thaw and reheat later. To reheat, thaw it in the fridge overnight if frozen. Warm it in the oven at 350°F (175°C) for about 20-30 minutes. Cover it with foil to keep it from drying out. You can also reheat in the microwave. Just heat in short bursts, stirring in between. Adding a splash of milk can help make it creamy again. Yes, you can use frozen butternut squash. It saves time and is easy to find. Just thaw it before cooking. If you have a blender, blend it into a smooth puree after thawing. This will keep your dish creamy and delicious. You can use several options instead of elbow macaroni. Try penne, fusilli, or even gluten-free pasta. Each type will bring a different shape and texture but will still taste great. To make this dish gluten-free, choose gluten-free pasta. You can also use cornstarch instead of regular flour. This will help thicken your cheese sauce. Always check the labels to ensure all other ingredients are gluten-free. Yes, you can prepare this mac and cheese ahead of time. Cook it completely, then store it in the fridge. When ready to serve, just reheat it in the oven. This makes it a perfect dish for gatherings or busy weeks. Serve this mac and cheese with a green salad or steamed veggies. A light soup also pairs well. If you want more flavor, try garlic bread or roasted Brussels sprouts. These sides balance the richness of the mac and cheese. This blog post covered how to make a tasty butternut squash mac and cheese. We looked at all the main ingredients, including pasta, cheeses, and spices. I shared step-by-step instructions for cooking and baking. You also learned helpful tips for creaminess and ways to change the recipe. I explained how to store and reheat leftovers. Finally, the FAQs answered common questions. I hope you feel ready to try this dish yourself! Enjoy making it your own with flavors you love.

Butternut Squash Mac and Cheese Creamy Delight Recipe

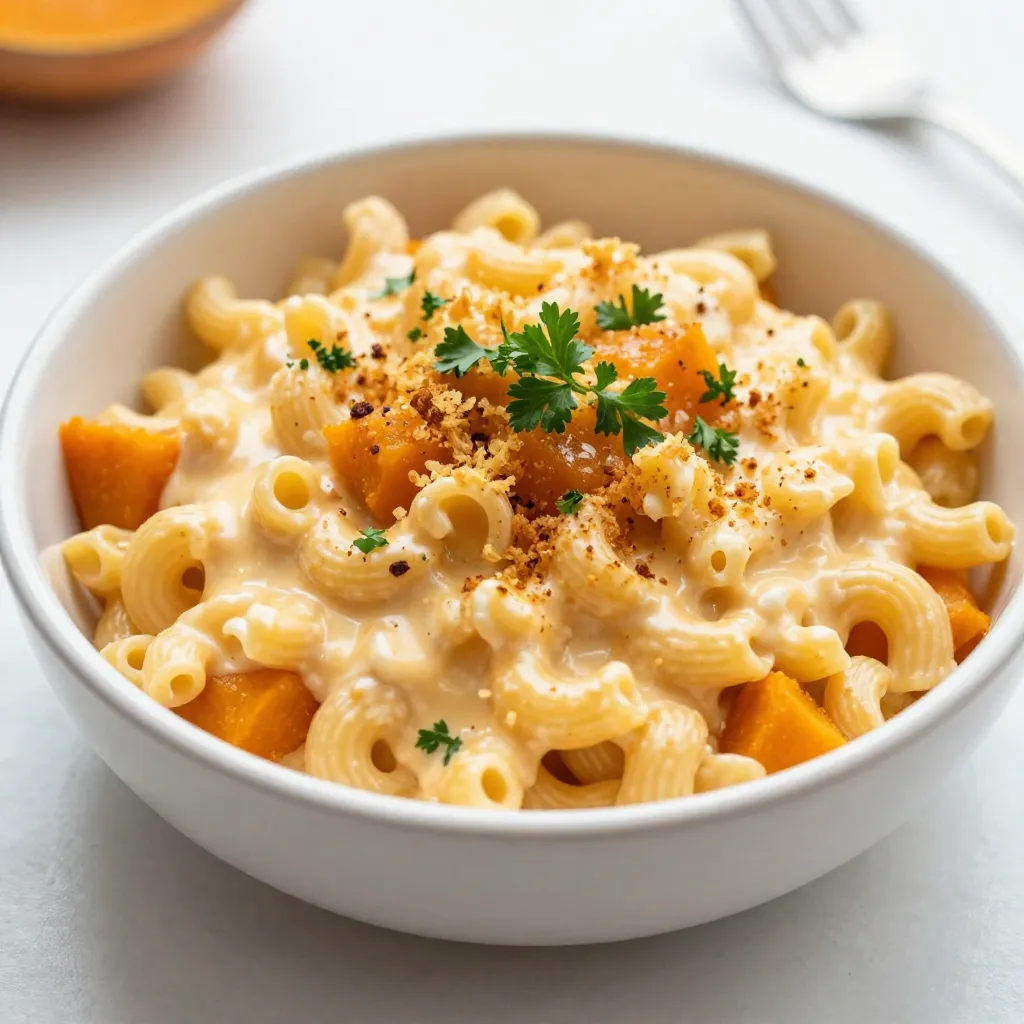
Looking for a twist on classic mac and cheese? This Butternut Squash Mac and Cheese Creamy Delight Recipe is the

- 4 salmon fillets (approximately 6 oz each) - 2 cups bok choy, chopped (or 2 baby bok choy, halved lengthwise) - 3 tablespoons soy sauce (or tamari for a gluten-free option) - 2 tablespoons sesame oil - 1 tablespoon fresh ginger, finely minced - 1 tablespoon honey - 1 teaspoon garlic, finely minced The star of this dish is the salmon. Salmon fillets provide rich flavor and healthy fats. I love using fresh bok choy for its crisp texture and mild taste. The sesame ginger marinade adds a punch of flavor, making each bite special. - Salt and black pepper to taste - 2 tablespoons sesame seeds, toasted - 2 green onions, chopped (for garnish) Seasoning is key. I use salt and black pepper to enhance the taste of both the salmon and bok choy. Toasted sesame seeds give a crunchy finish. Green onions add a fresh pop of color and flavor. - Gluten-free substitutions: Use tamari instead of soy sauce. - Additional garnishing options: Consider adding sliced radishes or cilantro for a fresh touch. Feel free to adapt the recipe. If you need a gluten-free version, tamari works great. You can also play with garnishes. Each option adds its own unique twist to the dish. First, preheat your oven to 400°F (200°C). This heat will help cook the salmon and bok choy evenly. Next, line a large baking sheet with parchment paper. This step makes cleanup easier and helps prevent sticking. In a small bowl, combine the following ingredients for the marinade: - 3 tablespoons soy sauce - 2 tablespoons sesame oil - 1 tablespoon fresh ginger (minced) - 1 tablespoon honey - 1 teaspoon garlic (minced) - Salt and black pepper to taste Whisk these ingredients together until well blended. This mixture gives the dish a rich flavor. Make sure to taste it. Adjust the salt or honey if needed. You want it to be just right! Now, place the salmon fillets skin-side down on one side of the baking sheet. Brush the marinade generously over each fillet. This ensures maximum flavor in every bite. In another bowl, drizzle 2 cups of chopped bok choy with a small amount of olive oil. Season it with salt and pepper. Toss well to coat. Then, place the bok choy on the other side of the baking sheet. Slide the baking sheet into your preheated oven. Bake for about 15 to 20 minutes. You’ll know it’s done when the salmon is opaque and flakes easily. The bok choy should be tender with crispy edges. After cooking, remove the baking sheet from the oven. Sprinkle 2 tablespoons of toasted sesame seeds over both the salmon and bok choy. This adds a nice crunch and extra flavor. Finally, garnish with chopped green onions for a fresh touch. Enjoy your meal! To cook salmon just right, check the color. It should be opaque and flake easily. Use a fork to test. If it falls apart, it's done. Avoid overcooking, as it can dry out. Aim for an internal temperature of about 145°F. Cook for 15-20 minutes, depending on thickness. Remember, salmon continues to cook slightly after you take it out of the oven. Bok choy should be tender yet still crisp. To achieve this, toss it with olive oil and seasoning before baking. Lay it out evenly on the baking sheet. This allows it to roast properly. Bake for about 15-20 minutes alongside the salmon. Keep an eye on it; you want those edges to be slightly crispy but not burnt. This technique enhances the flavor and keeps the texture just right. To boost flavor, use fresh ingredients. Fresh ginger and garlic make a big difference. Try adding chili flakes for a little heat. For presentation, arrange the salmon and bok choy on a large platter. Drizzle any leftover marinade over the top. Finish with sesame seeds and chopped green onions. This not only adds crunch but also makes the dish look beautiful. Enjoy your meal! {{image_4}} You can switch out salmon for other fish. Try using trout or cod for a change. Both fish have a mild flavor that works well with the sesame ginger sauce. If you prefer meat, chicken thighs are a great option. They stay juicy and absorb flavors nicely. For a plant-based choice, use tofu. Press it to remove water, then marinate and bake it like the salmon. Feel free to add more veggies to your dish. Carrots sliced thinly add color and sweetness. Snap peas bring a nice crunch and fresh taste. Broccoli florets are also a good choice. They cook quickly and taste great with the marinade. Mix and match your favorites to keep it exciting. You can play with the marinade for new flavors. Add lime juice for a zesty kick. A dash of sriracha gives a spicy twist. If you like sweetness, try maple syrup instead of honey. For a different flavor, use miso paste in the mix. Each change can create a unique dish that keeps you coming back for more. To store leftovers, let the dish cool first. Place the salmon and bok choy in an airtight container. Make sure to separate the salmon from the bok choy to keep them fresh. You can refrigerate the leftovers for up to three days. If you want to keep them longer, freeze them for up to three months. Wrap them tightly in plastic wrap or aluminum foil before freezing. This will help prevent freezer burn. To reheat your leftovers, use the oven for the best results. Preheat the oven to 350°F (175°C). Place the salmon and bok choy on a baking sheet. Cover them with foil to keep moisture in. Heat for about 10-15 minutes or until warmed through. You can also use the microwave, but this may make the salmon a bit dry. If using the microwave, heat in short bursts of 30 seconds. Check often to avoid overcooking. The dish stays fresh in the fridge for three days. After that, it's best to freeze it. When frozen, the dish remains safe to eat for up to three months. Always check for any signs of spoilage before eating leftovers. If the salmon smells off or looks discolored, it's best to throw it away. Eating fresh food is always safer and tastier! Yes, you can make this recipe gluten-free. Simply use tamari instead of soy sauce. Tamari is a gluten-free soy sauce alternative that has a rich flavor. It works well in the marinade for the salmon. You can also ensure that all other ingredients are gluten-free. This way, you can enjoy the same great taste without the gluten. I love serving jasmine rice or quinoa with this dish. Both pair well with the salmon and bok choy. You can also add a simple cucumber salad for a fresh touch. Steamed broccoli or snap peas make great sides too. These choices will balance the meal and add more color to your plate. To check if the salmon is done, look for color changes. The salmon should turn from bright pink to opaque. Use a fork to test it; it should flake easily. If you have a meat thermometer, aim for 145°F (63°C) in the thickest part. This ensures it is safe to eat and still moist. Always check a few pieces to be sure. In this article, we discussed how to make a tasty salmon and bok choy dish. You learned about essential ingredients, easy steps, and tips for perfect cooking. Remember to be creative with flavors and try different proteins or veggies. Store leftovers safely for future meals. Cooking can be fun and healthy! Dive in and enjoy your dish, knowing you have the tools for great success.

Sheet-Pan Sesame Ginger Salmon and Bok Choy Delight

Ready for a quick, tasty dinner? My Sheet-Pan Sesame Ginger Salmon and Bok Choy will wow your taste buds! This

To make a creamy roasted garlic pumpkin soup, you need a few simple ingredients. Here’s what you will need: - 2 cups pumpkin puree (canned or homemade) - 1 whole head of garlic - 1 medium onion, finely chopped - 2 tablespoons olive oil (divided) - 4 cups vegetable broth - 1 cup coconut milk - 1 teaspoon ground ginger - 1 teaspoon ground nutmeg - Salt and freshly cracked pepper, to taste - Fresh parsley, chopped, or pumpkin seeds for garnish Each ingredient plays a key role in creating a rich and warm flavor. The pumpkin puree is the star, giving the soup its creamy texture and sweet taste. The roasted garlic adds a deep, savory note that rounds out the dish. Onion brings sweetness and depth of flavor when sautéed. Olive oil helps to cook the onion and brings a rich flavor to the soup. Vegetable broth serves as the base, providing liquid and enhancing the taste. Coconut milk adds creaminess without dairy, making this soup comforting and rich. Ground ginger and nutmeg give warmth and spice. Finally, salt and pepper balance all the flavors. For garnishing, you can use parsley for freshness or pumpkin seeds for a crunchy texture. Each addition makes the soup not just tasty, but also visually appealing. First, preheat your oven to 400°F (200°C). This step warms up the oven for roasting. Next, take a whole head of garlic. Slice off the top to expose each clove. Drizzle about 1 teaspoon of olive oil over the garlic. Wrap it tightly in aluminum foil. Place the wrapped garlic in the hot oven. Roast it for about 30 minutes. The garlic should be soft and fragrant when done. While the garlic roasts, heat 1 tablespoon of olive oil in a large pot over medium heat. Add the finely chopped onion. Sauté it for about 5-7 minutes. You want the onion to turn translucent and slightly golden. When the garlic is ready, take it out and let it cool a bit. Squeeze the soft cloves into the pot with the onions. Then, add the 2 cups of pumpkin puree. Stir everything together until it is well mixed. Now, gradually pour in the vegetable broth while stirring. Aim for a gentle simmer. Add 1 teaspoon of ground ginger and 1 teaspoon of nutmeg. Let the soup simmer for about 15 minutes. This step helps all the flavors blend nicely. After simmering, remove the pot from heat. Stir in 1 cup of coconut milk. Use an immersion blender to puree the soup until it is smooth. If you don’t have an immersion blender, carefully transfer the soup to a regular blender. Make sure to let it cool a bit to avoid splattering. If the soup feels too thick, add a bit more vegetable broth. To serve, ladle the soup into bowls. For a nice touch, garnish with freshly chopped parsley or sprinkle some pumpkin seeds on top. This adds flavor and a bit of crunch. Enjoy your warm and healthy soup! To roast garlic evenly, cut off the top of the head. This exposes the cloves for better heat. Drizzle a bit of olive oil on top. Wrap the garlic in aluminum foil to keep it moist. If you don’t want to use foil, try a small baking dish with a lid. This keeps the garlic from drying out. If your soup seems too thick, add more vegetable broth. Start with half a cup and stir well. You can blend the soup in batches if you use a regular blender. Always let the soup cool a bit before blending. This helps prevent splatters, which can be messy. For extra flavor, consider adding spices like cayenne pepper or cinnamon. These spices can give the soup a nice kick. You can also add proteins like cooked chicken or beans for a heartier meal. This not only boosts flavor but also makes the soup more filling. {{image_4}} You can switch out the coconut milk in this recipe. Use heavy cream for a richer taste. Almond milk or cashew cream works well for a lighter option. Each choice changes the soup's flavor and texture. If you want to keep it light, go for almond milk. When making this soup, you can use fresh pumpkin instead of canned puree. If you choose fresh, roast the pumpkin pieces until soft. Then, blend them into a puree. This gives the soup a fresh, vibrant taste. Canned pumpkin is quick and convenient, but fresh adds a nice touch. If you want a dairy-free or vegan soup, stick with coconut milk. This soup is already a vegan delight. Check that your vegetable broth is vegan too. You can enjoy this soup without any animal products. For gluten-free options, this soup is a great choice. All the ingredients are naturally gluten-free. Just make sure your broth is also gluten-free. This way, everyone can enjoy a warm bowl of soup! Serve this soup with crusty bread or a fresh salad. A slice of sourdough pairs well and adds a nice crunch. You can also serve it with a side of roasted veggies for a wholesome meal. When it comes to drinks, consider pairing this soup with a light white wine. A crisp Sauvignon Blanc complements the flavors. For a non-alcoholic option, try sparkling water with a squeeze of lemon. This adds a refreshing touch to your meal. To keep your creamy roasted garlic pumpkin soup fresh, store it in airtight containers. This helps to lock in flavor and prevent spills. Place the soup in the fridge after it cools down. Properly stored, this soup lasts for about 3 to 5 days. If you want to make this soup last longer, freezing is a great option. Pour the soup into freezer-safe containers or bags. Leave some space at the top, as the soup expands when frozen. For best results, freeze the soup in single servings. This makes reheating quick and easy. When ready to enjoy your soup, thaw it safely. The best method is to move the soup from the freezer to the fridge a day before. This allows it to thaw slowly. If you're in a hurry, you can use the microwave on the defrost setting. Once thawed, reheat the soup on the stove over low heat. Stir often to keep it smooth and tasty. You should store leftover pumpkin soup in an airtight container. Let it cool before sealing. Place it in the fridge for up to 5 days. To keep it fresh, label the container with the date. If you want to save it for longer, freeze it. Yes, you can make this soup ahead of time. Cook it and let it cool. Once cooled, store it in the fridge. This soup tastes even better after resting. The flavors blend and deepen when stored. To add spice, you can use cayenne pepper or red pepper flakes. Start with a small amount and taste as you go. You can also add fresh jalapeños for a kick. Just be careful not to overpower the soup. Yes! You can use fresh pumpkin instead of puree. Cut the pumpkin into pieces and roast until soft. Scoop out the flesh and blend it smooth. This gives a fresh taste and can enhance the soup's flavor. If you don’t have an immersion blender, use a regular blender. Carefully transfer the soup in batches. Let it cool slightly to avoid splattering. Blend until smooth and then return it to the pot. You can create a delicious pumpkin soup with simple steps. We discussed key ingredients like pumpkin puree, garlic, and spices. You learned how to roast garlic, sauté onions, and blend your soup. Remember the tips for storage and serving to keep your soup fresh and tasty. Making this soup can warm your kitchen and delight your taste buds. Enjoy experimenting with flavors and make it your own!

Creamy Roasted Garlic Pumpkin Soup Warm and Healthy Dish

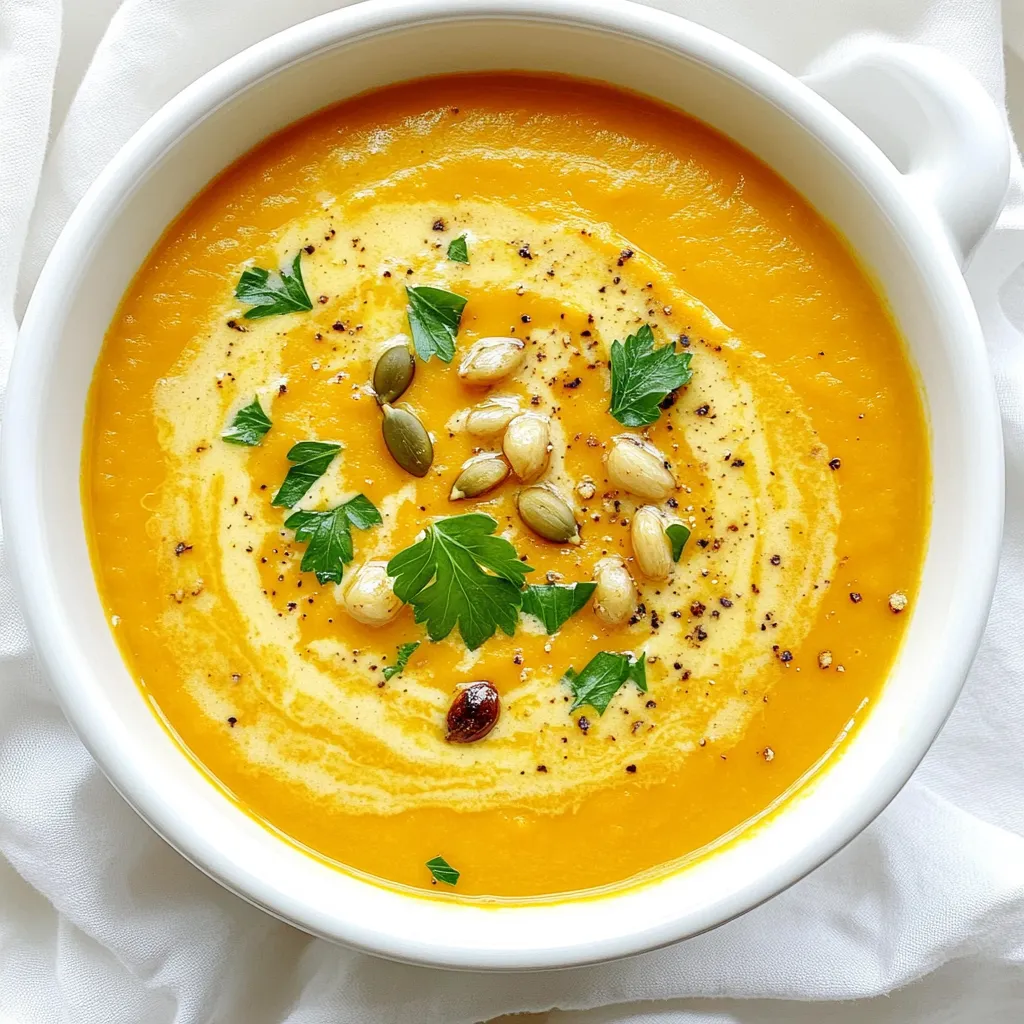
Looking for a warm and healthy dish to cozy up with? This Creamy Roasted Garlic Pumpkin Soup hits the spot!

- 1 ½ cups graham cracker crumbs - ½ cup unsweetened cocoa powder - ½ cup unsalted butter, melted - 2 cups cream cheese, softened to room temperature - 1 cup pure pumpkin puree - ¾ cup powdered sugar - ½ teaspoon pure vanilla extract - 1 teaspoon pumpkin pie spice - ½ cup semi-sweet chocolate chips, melted - ½ cup whipped cream, for topping - Cocoa powder for dusting (optional) Use fresh cream cheese for a smooth filling. Softening it to room temp helps. The pumpkin puree should be pure, not pie filling. It adds rich flavor and moisture. Cocoa powder must be unsweetened for the best taste. Choose high-quality chocolate chips for a richer flavor. If you want a gluten-free option, use gluten-free graham crackers. For a vegan twist, substitute cream cheese with vegan cream cheese. You can use coconut cream for a dairy-free topping. If you lack pumpkin pie spice, mix equal parts cinnamon and nutmeg for a similar flavor. To start, grab a medium bowl. In it, mix 1 ½ cups of graham cracker crumbs with ½ cup of unsweetened cocoa powder. This mix gives the crust a rich, chocolatey taste. Next, add ½ cup of melted unsalted butter. Stir until the mixture looks like wet sand. It should hold together when squeezed. Now, take an 8x8 inch baking dish and transfer the crumb mix into it. Press the mixture down firmly to form a solid crust. This step is key for a sturdy base. Place the dish in the fridge for about 15-20 minutes. This helps the crust firm up nicely. While the crust chills, it’s time to make the filling. In a large mixing bowl, beat 2 cups of softened cream cheese with an electric mixer. Make sure it becomes smooth and creamy. You don’t want any lumps here! Next, add 1 cup of pure pumpkin puree, ¾ cup of powdered sugar, ½ teaspoon of pure vanilla extract, and 1 teaspoon of pumpkin pie spice. Beat again on medium speed until everything is well mixed. The filling should be silky and smooth. Now, gently fold in ½ cup of melted semi-sweet chocolate chips using a spatula. This adds a wonderful flavor twist. Once your crust is set, it’s time to pour the filling on top. Carefully spread the pumpkin cheesecake mixture evenly over the chilled crust. Use a spatula to ensure it fills all corners. This step is crucial for even slices later. After that, cover the baking dish tightly with plastic wrap. Place it back in the fridge for at least 4 hours. This allows the cheesecake to set and become firm. After the waiting period, it’s time to serve! Lift the cheesecake out using the edges of the plastic wrap. Place it on a cutting board and slice it into 16 squares. For a finishing touch, add a generous dollop of whipped cream on each square. If you like, dust them lightly with cocoa powder. This makes for a pretty presentation. Serve the cheesecake bars on a decorative platter for a festive look. Enjoy your delicious treat! To get the right texture, make sure your cream cheese is soft. Let it sit out for a while before mixing. This helps it blend smoothly with the other ingredients. When you mix the pumpkin puree and cream cheese, beat until it's creamy and free of lumps. This step is key for a perfect filling. To boost the taste, consider adding a pinch of salt. Salt can enhance the sweetness and flavors. You can also mix in some extra spices, like nutmeg or cinnamon. They can add warmth and depth. If you love chocolate, try adding more melted chocolate chips for a richer flavor. For a stunning look, serve your bars on a decorative platter. You can garnish each square with a dollop of whipped cream. A light dusting of cocoa powder adds elegance too. If you want more flair, sprinkle some chocolate shavings on top. This makes each bar look even more tempting! {{image_4}} You can easily switch up the flavors in these cheesecake bars. Here are a few ideas: - Caramel Swirl: Add a swirl of caramel sauce before chilling for a rich, sweet touch. - Peanut Butter: Mix in some creamy peanut butter to the filling for a nutty twist. - Mint Chocolate: Use mint extract instead of vanilla for a refreshing flavor. These variations keep your dessert fun and exciting! To make these bars gluten-free, use gluten-free graham crackers. For a vegan option, swap cream cheese with dairy-free cream cheese. Here’s how: - Gluten-Free: Ensure all ingredients are certified gluten-free. - Vegan: Use coconut cream and a vegan butter substitute for the crust. Replace powdered sugar with a plant-based sweetener. These changes let everyone enjoy this treat! Change the flavors to match the seasons. Here are some ideas: - Winter: Add a hint of peppermint extract to the filling for a festive vibe. - Spring: Mix in fresh lemon zest for a bright and zesty flavor. - Summer: Top with fresh berries for a refreshing and fruity touch. These seasonal twists make your chocolate pumpkin cheesecake bars shine all year! To keep your chocolate pumpkin cheesecake bars fresh, store them in the fridge. Use an airtight container or cover the dish tightly with plastic wrap. This helps prevent any unwanted smells or flavors from getting in. Make sure the bars are completely cool before storing them. This will help maintain their texture and flavor. You can freeze these cheesecake bars if you want to save them for later. First, slice the bars into squares. Wrap each square tightly in plastic wrap, then place them in a freezer-safe bag or container. This prevents freezer burn. They can last up to three months in the freezer. When ready to eat, thaw them in the fridge overnight. These cheesecake bars last about 4 to 5 days in the fridge. Keep an eye on them for any signs of spoilage. If they start to smell off or look different, it’s best to toss them. If frozen, they can stay good for three months, but for the best taste, enjoy them within the first month. Yes, you can use other types of chocolate. Dark chocolate adds a rich flavor. Milk chocolate gives a sweeter taste. Each choice changes the bars' sweetness and depth. Just make sure to melt it properly for a smooth mix. The chocolate pumpkin cheesecake bars need at least 4 hours to set. This time allows the filling to firm up nicely. I recommend leaving them in the fridge overnight. This way, they are even better the next day. Absolutely! Making these bars a day ahead is a great idea. It gives the flavors time to blend. Plus, it saves you time on the day you want to serve them. Just keep them covered in the fridge until you're ready to enjoy. These bars pair well with many treats. Try serving them with fresh fruit like strawberries or raspberries. A scoop of vanilla ice cream is also a nice touch. You can even add extra whipped cream for more fun. This article covered how to make delicious chocolate pumpkin cheesecake bars. We looked at the key ingredients, step-by-step instructions, and ways to make your bars extra special. I shared tips on texture and flavor, plus fun variations and storage advice. Enjoy creating these tasty treats! Remember, you can adapt recipes to fit your needs. Have fun experimenting with flavors and sharing your bars with friends. You’ll impress everyone with your skills.

Chocolate Pumpkin Cheesecake Bars No Bake Delight

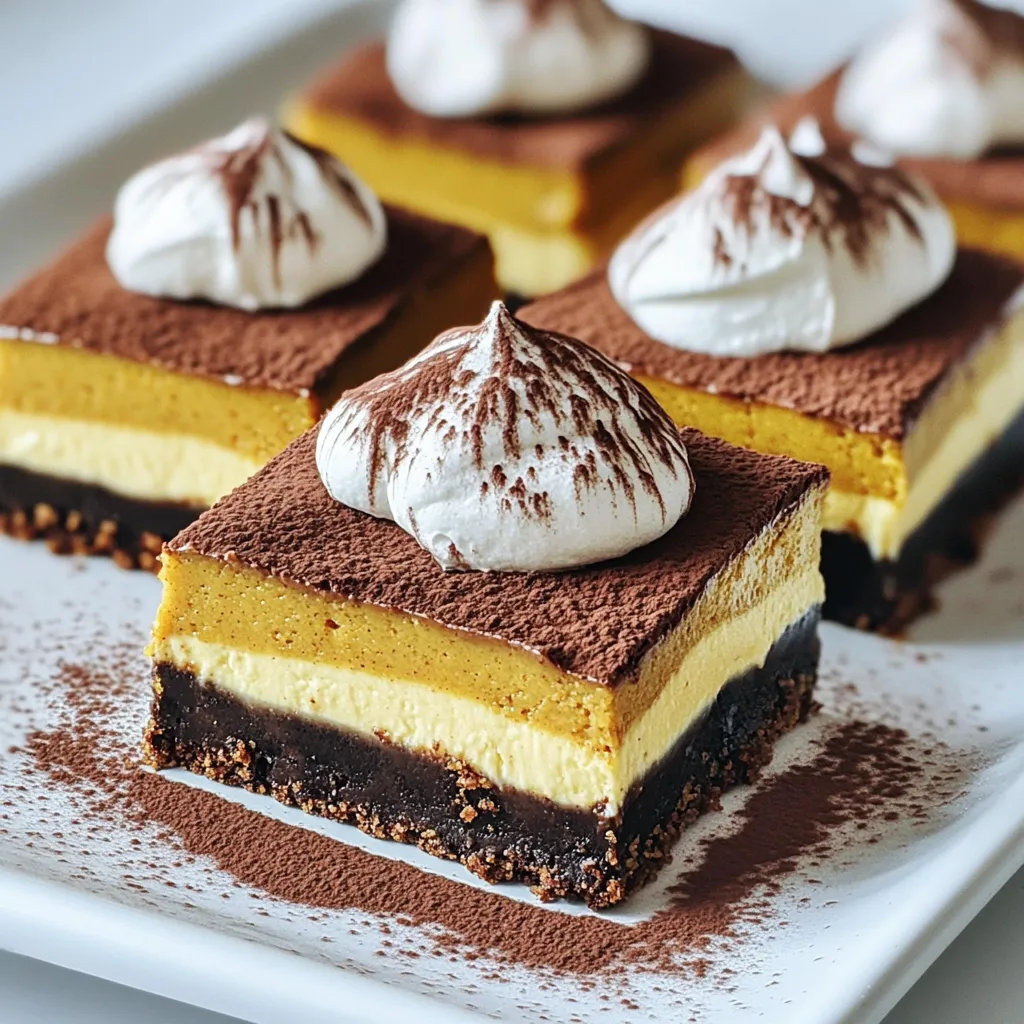
Indulge in a sweet, no-bake treat that combines the rich flavors of chocolate and pumpkin! My Chocolate Pumpkin Cheesecake Bars

Older posts
Newer posts
← Previous Page1 Page2 Page3 … Page85 Next →

dsad

© 2026 tastyhatch • Built with GeneratePress

Our Policies

  • Copyright Policy
  • Cookie Policy
  • GDPR Policy
  • Privacy Policy
  • Disclaimer
  • Terms Of Use

More Information

  • Home
  • About
  • Contact
  • Appetizers
  • Dessert
  • Dinner
  • Drinks
©2026, tastyhatch About Back To Top