Skip to content
DisclaimerTerms Of UseGDPR PolicyCookie Policy

tastyhatch

  • Home
  • Drinks
  • Appetizers
  • Dinner
  • Dessert
  • About
  • Contact
  • Privacy Policy
DisclaimerTerms Of UseGDPR PolicyCookie Policy

NO-ING-IMG

To make teriyaki glazed turkey meatballs, you need these fresh and tasty items: - 1 lb ground turkey - 1/4 cup panko breadcrumbs - 1/4 cup green onions, finely chopped - 2 cloves garlic, minced - 1 tablespoon fresh ginger, minced - 1 tablespoon low-sodium soy sauce - 1 teaspoon sesame oil - 1/2 cup teriyaki sauce - Sesame seeds for garnish - Salt and black pepper to taste These ingredients work together to create a meal that is both flavorful and satisfying. Ground turkey keeps the meatballs lean, while panko breadcrumbs add a nice crunch. Green onions bring freshness, and garlic and ginger pack a punch of flavor. The low-sodium soy sauce and sesame oil round out the taste profile perfectly. Don't forget the teriyaki sauce to glaze the meatballs for that sweet and savory finish. Using these ingredients, you can easily impress your family or friends with a delicious meal. {{ingredient_image_2}} - Preheat the oven to 400°F (200°C). - Line a baking sheet with parchment paper or grease it lightly. - In a large bowl, combine 1 pound of ground turkey with 1/4 cup of panko breadcrumbs. - Add 1/4 cup of finely chopped green onions, 1 beaten egg, and 2 minced garlic cloves. - Stir in 1 tablespoon of minced ginger, 1 tablespoon of low-sodium soy sauce, and 1 teaspoon of sesame oil. - Season with a pinch of salt and black pepper. Mix gently, but do not overmix. - Use your hands to form the meat mixture into meatballs. Aim for about 1 inch in diameter. - Place each meatball on the prepared baking sheet, leaving space between each one. - Bake in the oven for 15-20 minutes. Check that the internal temperature reaches 165°F (75°C). - While the meatballs bake, pour 1/2 cup of teriyaki sauce into a small saucepan. - Heat over medium heat until it simmers, stirring often. - For a thicker sauce, mix 1 teaspoon of cornstarch with 1 tablespoon of water. Stir this mix into the sauce and cook for an extra 3-5 minutes. - Once the meatballs are cooked, transfer them to a large bowl. - Drizzle the warm teriyaki sauce over the meatballs. - Gently toss to coat each meatball evenly in the sauce. - Serve the teriyaki glazed turkey meatballs warm. - Garnish with sesame seeds and more chopped green onions for a nice finish. - Avoiding overmixing: When you mix the ground turkey, do it gently. Overmixing makes meatballs tough. Just blend until everything is combined. Keep it soft and tender. - Ensuring even cooking: Shape your meatballs to the same size. This helps them cook evenly. Aim for about 1 inch in diameter. Space them out on the baking sheet too. - Tips for homemade teriyaki sauce: You can make your own teriyaki sauce for better taste. Mix soy sauce, honey, ginger, and garlic. Simmer until thick. It adds a fresh flavor to your meatballs. - Adding spice and heat: Want some heat? Add a pinch of red pepper flakes. A dash of sriracha works well too. This gives your meatballs a nice kick. - Recommended mixing bowls and utensils: Use a large mixing bowl for the turkey and a sturdy spoon or spatula. This keeps things easy when mixing. - Importance of a meat thermometer: A meat thermometer is key for safe cooking. It should read 165°F (75°C). This ensures your turkey meatballs are done and safe to eat. Pro Tips Use Fresh Ingredients: Fresh garlic and ginger will enhance the flavor of your meatballs, making them more aromatic and delicious. Don’t Overmix: When combining the ingredients, mix gently to keep the meatballs tender and prevent them from becoming tough during baking. Adjust Sauce Thickness: If you prefer a thicker teriyaki sauce, add cornstarch mixed with water to achieve your desired consistency. Experiment with Spices: Feel free to add spices like red pepper flakes or ground black pepper to the mixture for an extra kick of flavor. {{image_4}} You can switch the ground turkey for ground chicken. Chicken gives a similar taste and texture. If you prefer beef, use lean ground beef. It will add a richer flavor. For a vegetarian option, try using lentils or chickpeas. They provide a great base and are full of protein. To spice things up, add chili flakes or five-spice powder. These will give your meatballs a nice kick. You can also swap soy sauce for coconut aminos. This option is great for those who want a soy-free recipe. Coconut aminos have a slightly sweeter taste, making it a delicious choice. Pair your meatballs with steamed vegetables or fluffy rice. Noodles also make a great side. If you want to impress guests, make meatball skewers. Just thread the meatballs onto skewers for easy serving. This makes them perfect for parties or as appetizers. Store your turkey meatballs in the fridge right after they cool down. Keep them in a sealed container. They stay fresh for about three to four days. Set your fridge to 40°F (4°C) or lower for best results. To freeze the meatballs, let them cool completely. Place them on a baking sheet in a single layer. Once they are frozen, transfer them to a freezer bag. Try to remove as much air as you can. They can last up to three months in the freezer. To thaw, move them to the fridge overnight. Reheat them in the oven at 350°F (175°C) for about 15 minutes. You can use leftover meatballs in many ways. Make a meatball sub with crusty bread and cheese. Toss them in pasta with marinara sauce for a quick meal. You can also add them to soups for extra protein. For meal prep, store them with rice and veggies for easy lunches throughout the week. Can I use low-fat ground turkey? Yes, you can use low-fat ground turkey. It will still taste great. Just remember, low-fat options may be drier. You might need to add a bit more sauce to keep it moist. How long do these meatballs take to cook? These meatballs take about 15-20 minutes to cook in the oven. Make sure they reach 165°F (75°C) inside. This ensures they are safe and ready to eat. What can I substitute for panko breadcrumbs? You can use regular breadcrumbs as a substitute. Crushed crackers or oats work too. Each option will change the texture slightly, but they will still be tasty. Alternatives to teriyaki sauce If you don't have teriyaki sauce, you can use soy sauce mixed with honey. This gives a similar sweet and salty flavor. You can also try a homemade blend of soy sauce, sugar, and ginger. Other gluten-free or low-sodium options For gluten-free, use tamari instead of soy sauce. Look for low-sodium soy sauce if you want to cut down on salt. Coconut aminos is another great option that is lower in sodium. Caloric information and serving sizes One serving of these meatballs has about 250 calories. This makes it a filling meal without too many calories. The recipe serves four, so it's perfect for family dinners. Nutritional benefits of ingredients used These meatballs are high in protein from the turkey. Green onions add vitamins and fiber. Garlic and ginger offer health benefits too, like boosting your immune system. The sesame oil gives healthy fats and flavor. These turkey meatballs are a healthy and tasty choice. We've covered every step, from gathering ingredients to serving suggestions. You learned how to mix, bake, and coat meatballs with delicious teriyaki sauce. I shared tips to enhance flavor and keep the texture just right. Don't forget to explore variations and storage options. With leftovers, you can create exciting new meals. Now, it’s time for you to try these meatballs and enjoy each bite!

Teriyaki Glazed Turkey Meatballs Flavorful Dinner Idea

Looking for a tasty twist on dinner? Teriyaki Glazed Turkey Meatballs are a delicious, quick meal that’s perfect for busy

- 4 salmon fillets (6 oz each) - 1/4 cup low-sodium soy sauce - 2 tablespoons freshly grated ginger - 2 tablespoons honey - 1 tablespoon sesame oil - 2 cloves garlic, finely minced - 1 tablespoon rice vinegar - 1 teaspoon sesame seeds - 2 green onions, finely chopped (for garnish) - Salt and pepper to taste Choose fresh salmon for the best taste. Look for fillets with bright color and no strong fishy smell. Fresh ginger adds a vibrant kick, while low-sodium soy sauce keeps the dish balanced. Opt for organic honey if possible. It brings out the sweetness without overpowering the other flavors. If you can't find low-sodium soy sauce, use regular soy sauce but cut back on added salt. You can replace honey with maple syrup for a vegan version. If sesame oil is unavailable, olive oil works in a pinch but will change the flavor slightly. For a different twist, try using lime juice instead of rice vinegar for a tangy kick. {{ingredient_image_2}} To start, gather your ingredients for the marinade. You need: - 1/4 cup low-sodium soy sauce - 2 tablespoons freshly grated ginger - 2 tablespoons honey - 1 tablespoon sesame oil - 2 cloves garlic, finely minced - 1 tablespoon rice vinegar In a medium mixing bowl, combine the soy sauce, ginger, honey, sesame oil, garlic, and rice vinegar. Whisk these together until smooth. This marinade packs a big flavor punch. The ginger adds warmth, while honey gives sweetness. Now it’s time to marinate the salmon. Take four salmon fillets, each about 6 ounces. Place the fillets in a shallow dish. Pour the marinade over the salmon, covering it well. Make sure each piece is coated on all sides. Cover the dish and let it sit in the fridge for 30 minutes. This allows the salmon to soak up all the tasty flavors. The longer you marinate, the more flavor you’ll get. Just don’t go overboard, or the fish might get too salty. You can cook the marinated salmon in two ways: grilling or baking. Grilling: Preheat your grill to medium-high heat, about 375°F (190°C). Remove the salmon from the marinade, but keep the leftover marinade for later. Lightly season the fillets with salt and pepper. Place them skin-side down on the grill. Grill for 4-5 minutes on each side, or until the salmon flakes easily with a fork. Baking: If you prefer baking, line a baking sheet with parchment paper. Place the salmon skin-side down on the sheet. Bake for 12-15 minutes. Baste the salmon with the reserved marinade halfway through cooking. This keeps it juicy and adds even more flavor. Whichever method you choose, the salmon will turn out deliciously glazed and flavorful. Enjoy every bite! To check if your salmon is done, use a fork. Gently press the salmon with the fork. If it flakes easily, it is cooked. The color should change from bright pink to a soft, opaque hue. You can also use a thermometer. Insert it into the thickest part of the fillet. Aim for an internal temperature of 145°F (63°C). This ensures it is safe to eat and still juicy. Marinating salmon helps boost flavor. Always use a non-reactive dish. Glass or ceramic works well. Coat the salmon evenly with the marinade. Let it sit for at least 30 minutes. For deeper flavor, marinate for up to 2 hours in the fridge. Avoid marinating too long, as the acid can break down the fish. This may change the texture and make it mushy. To enhance the flavor of your ginger soy glazed salmon, add extra ingredients. Consider using citrus zest, like lemon or lime. This adds bright notes to the dish. Fresh herbs like cilantro or basil can also bring freshness. If you enjoy a bit of heat, add chili flakes or sriracha. Experiment with different toppings too. Chopped nuts or seeds can give a delightful crunch. Pro Tips Marination Time: For the best flavor, consider marinating the salmon for at least 1 hour or even overnight in the refrigerator. This allows the ginger and soy sauce to deeply penetrate the fish. Grill Marks: To achieve perfect grill marks, make sure your grill is preheated and do not move the salmon once it’s placed on the grill for the first 4-5 minutes. Fresh Ingredients: Use fresh ginger and garlic for a more vibrant flavor. If possible, try to avoid pre-grated or jarred versions. Serving Suggestions: Pair your salmon with a side of quinoa or steamed vegetables to create a balanced and colorful meal. {{image_4}} You can easily change the flavor of this dish. Try using orange juice instead of honey. This adds a bright sweetness. You might also enjoy adding sriracha or chili paste for heat. A splash of lime juice can give a nice tang. Adding fresh herbs like cilantro or basil can also boost the taste. Ginger soy glazed salmon pairs well with many sides. Serve it on a bed of steamed rice for a classic touch. Sautéed bok choy or asparagus adds great color and texture. A simple salad with cucumber and avocado makes a fresh side. For a quick meal, serve salmon with quinoa or couscous. You can also add lime wedges for a zesty finish on your plate. Seasonal ingredients can elevate your dish. In spring, add fresh peas or snap peas for crunch. In summer, try grilled corn as a side. Autumn brings great options like roasted sweet potatoes. Winter is perfect for adding kale or Brussels sprouts. Adjusting your ingredients to the seasons keeps your meals fresh and exciting. After you enjoy your Ginger Soy Glazed Salmon, store leftovers properly. First, let the salmon cool to room temperature. Then, wrap the fillets in plastic wrap or foil. You can also place them in an airtight container. This helps keep the salmon fresh for up to three days in the fridge. If you have extra marinade, store it separately in a small jar. When it's time to enjoy your leftovers, reheat them gently. The best way is to use an oven. Preheat the oven to 275°F (135°C). Place the salmon on a baking sheet and cover it with foil. Heat for about 10 minutes or until warm. You can also use a microwave. Place the salmon on a microwave-safe plate and cover it with a damp paper towel. Heat in short bursts of 30 seconds until warm. This keeps the salmon moist. If you want to save salmon for later, freezing works well. Wrap the cooled fillets tightly in plastic wrap. Then, place them in a freezer bag, removing as much air as possible. You can freeze the salmon for up to three months. When you're ready to eat, thaw the salmon in the fridge overnight. Avoid thawing at room temperature, as this can affect the texture. Once thawed, reheat using the methods above to enjoy a tasty meal again. Yes, you can use frozen salmon. Just make sure to thaw it first. Place the salmon in the fridge overnight or submerge it in cold water for quicker thawing. Once thawed, you can follow the recipe as usual. The marinade will still work well with frozen salmon. The best way to check salmon doneness is by using a fork. Gently press the salmon with a fork. If it flakes easily, it’s done. The internal temperature should reach 145°F (63°C). You can also look for a change in color. The salmon should be opaque and slightly pink in the center. Serve Ginger Soy Glazed Salmon on a vibrant plate. A bed of steamed rice or sautéed bok choy works well. Top with sesame seeds and green onions for a pop of color. Drizzle some reserved marinade over the salmon for extra flavor. Lime wedges add a fresh, zesty touch. To sum up, we explored the key ingredients for a delicious salmon dish, including substitution options. I shared easy steps for marinating and cooking your salmon, whether you grill or bake. We also covered tips for checking doneness and flavoring. You learned about tasty variations, how to store leftovers, and answered common questions. Salmon can transform your meals, so enjoy experimenting with flavors. Your kitchen can be the place for great dishes. Keep these tips in mind for perfect salmon every time!

Ginger Soy Glazed Salmon Flavorful and Simple Recipe

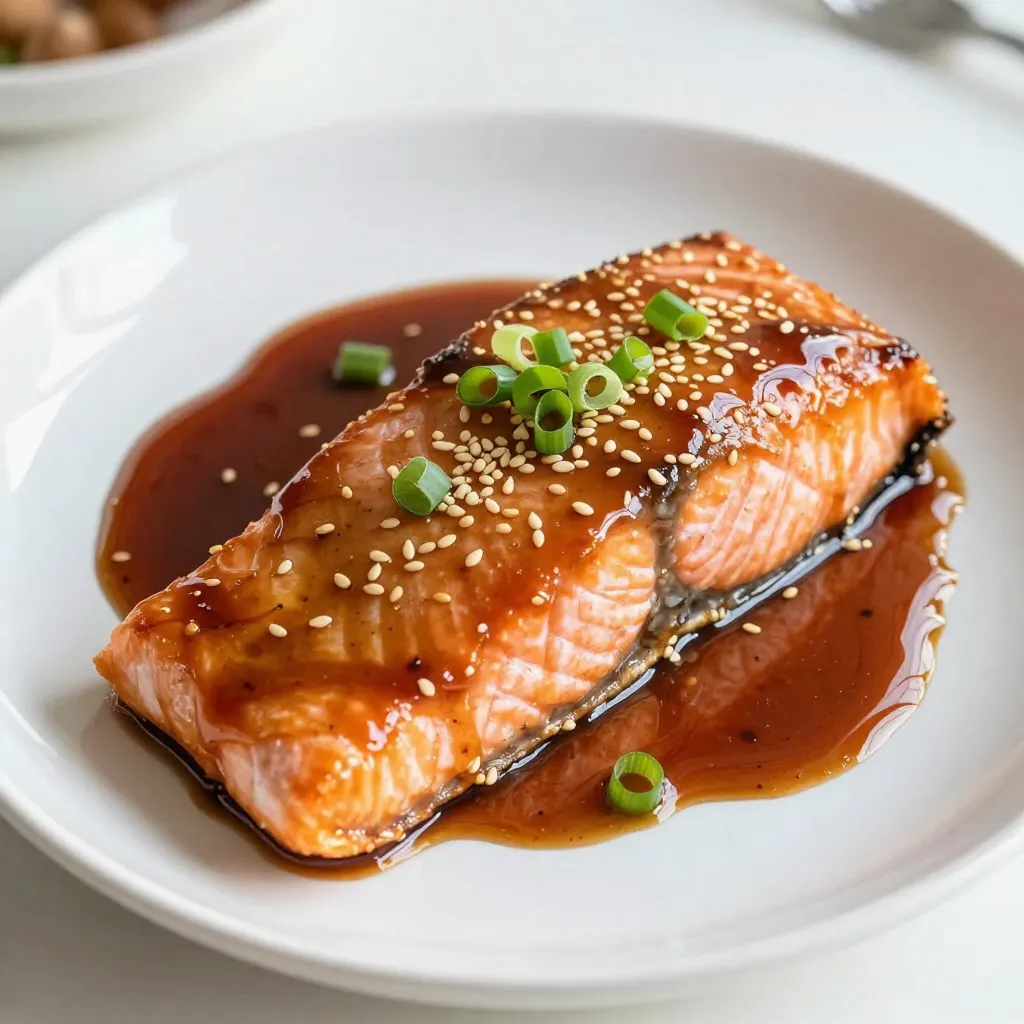
Are you ready to impress your taste buds? In this blog post, I’ll show you how to make Ginger Soy

To make these tasty croutons, gather these items: - 4 slices of day-old bread (preferably French or Italian) - ¼ cup extra virgin olive oil - 4 cloves of garlic, finely minced - 2 teaspoons of a dried Italian herb blend (including oregano, basil, and thyme) - 1 teaspoon sea salt - ½ teaspoon freshly cracked black pepper - ¼ cup freshly grated Parmesan cheese (optional but recommended) I love using day-old bread for croutons. French or Italian bread works best. The crust gives them a nice crunch. You can also use sourdough for a tangy flavor. Just make sure your bread is a bit stale. Fresh bread can get too soft. Want to amp up the taste? Try adding some crushed red pepper for heat. You can also mix in herbs like rosemary or parsley for extra freshness. If you love cheese, use a mix of Parmesan and cheddar for a rich flavor. A sprinkle of lemon zest can add a nice zing, too! First, take your day-old bread and cut it into 1-inch cubes. I like to use French or Italian bread for their great texture. Make sure the cubes are even. This helps them cook well and stay crispy. In a small bowl, mix together ¼ cup of extra virgin olive oil, 4 finely minced garlic cloves, 2 teaspoons of dried Italian herbs, 1 teaspoon of sea salt, and ½ teaspoon of black pepper. Whisk it all together until it smells amazing. The garlic and herbs will give the croutons a burst of flavor. Pour your garlic herb oil over the bread cubes. With a spatula or your hands, toss the bread well. Make sure every piece is coated. If you want to add some cheese, sprinkle ¼ cup of grated Parmesan on top. Toss again gently, so you don’t break the cubes. Now, preheat your air fryer to 350°F (175°C). Let it heat for about 5 minutes. This step is key for getting that perfect crunch on the croutons. Carefully add the bread mixture to the air fryer basket. Spread the cubes in a single layer. If you have a lot, cook them in batches. This way, they get nice and crispy. Air fry for 8 to 10 minutes. Remember to shake the basket halfway through. This helps them cook evenly. When your croutons turn golden brown, take them out. Place them on a wire rack to cool. This cooling helps keep them crunchy. Once they are cool, store them in an airtight container. Enjoy them in soups, salads, or as a tasty snack! To get the best crunch, use day-old bread. Fresh bread can get soggy. Cut the bread into even 1-inch cubes. This size helps them cook evenly. Make sure to toss them well in the garlic herb oil. This coating is key for great taste and texture. Keep an eye on them in the air fryer. Shake the basket halfway through cooking to help them crisp up all around. If you want to switch up the flavors, try using different herbs. Rosemary or parsley can give a nice twist. You can also add a pinch of red pepper flakes for some heat. Parmesan cheese? It adds a rich flavor, but you can skip it if you prefer. Don’t hesitate to adjust the salt and pepper too. Taste is personal, and you should make it your own. Preheat your air fryer for about 5 minutes. This step helps your croutons cook faster and more evenly. Avoid overcrowding the basket. If the croutons are packed too tight, they won’t crisp up well. Cook them in batches if needed. Lastly, let them cool on a wire rack after frying. This keeps them crunchy and ready to enjoy! {{image_4}} You can change the cheese to fit your taste. Try using cheddar, gouda, or feta. Each cheese gives a unique flavor. For a stronger taste, add more cheese. Just remember, the cheese can make croutons rich and tasty. Feel free to swap the dried herbs for fresh ones. Use fresh oregano, basil, or thyme for a bright flavor. You can also try rosemary or parsley for a different twist. Just chop them finely before mixing in. Fresh herbs can give a nice pop to your croutons. Different spices can add fun new flavors. Try adding paprika for some heat. A pinch of cayenne pepper can spice things up too. You can also mix in garlic powder or onion powder for extra zest. Just adjust the amounts to match your taste. Once your croutons cool, place them in an airtight container. This keeps them fresh and crunchy. Make sure to store them away from heat and moisture. Avoid using paper bags, as they can trap moisture and make croutons soggy. Use glass jars, plastic containers, or resealable bags. Choose a container that seals tightly. Glass jars work best if you want to see your croutons. Plastic containers are lightweight and easy to stack in your pantry. Homemade croutons last about one to two weeks when stored properly. Keep an eye on them for any signs of moisture. If they feel soft, you can re-crisp them in the air fryer for a few minutes. Use these croutons in salads, soups, or enjoy them as a snack. They add a delightful crunch and flavor to any dish! You can make croutons in the oven. Preheat your oven to 375°F (190°C). Cut day-old bread into cubes. Toss the cubes with olive oil, garlic, herbs, salt, and pepper. Spread them on a baking sheet in one layer. Bake for 10 to 15 minutes, stirring halfway through, until golden brown. Yes, you can use fresh herbs. Fresh herbs add bright flavor. Use three times the amount of fresh herbs compared to dried. Chop them finely before mixing with the bread. Basil, thyme, and oregano work great. Homemade croutons are great on salads, soups, or as snacks. They add crunch and flavor to Caesar salads or creamy tomato soup. You can also top baked dishes with croutons for added texture. Store croutons in an airtight container. Keep them in a cool, dry place. Avoid humidity, which can make them soft. If they do become stale, you can crisp them up in the air fryer for a few minutes. Yes, you can freeze croutons. Allow them to cool completely before freezing. Place them in a freezer-safe bag or container. They last up to three months. To use, just reheat them in the air fryer or oven for a few minutes. You learned how to make croutons at home using simple steps. With the right ingredients, tips, and variations, you can create tasty croutons. Remember to adjust flavors and store them well for the best taste. Whether using herbs or cheese, you can customize these bites to fit your meals. Enjoy your crunchy treats on salads or soups. Get creative and make croutons your way!

Air Fryer Garlic Herb Croutons Crispy and Flavorful Treat

Crunchy, golden croutons can elevate any salad or soup! With an air fryer, you can whip up flavorful garlic herb

- 1 pound baby carrots (or 4 medium regular carrots, peeled and sliced into ½ inch thick pieces) - 2 tablespoons unsalted butter - 3 tablespoons pure maple syrup - 1 tablespoon packed brown sugar - ½ teaspoon ground cinnamon - ¼ teaspoon salt - ¼ teaspoon freshly cracked black pepper - Fresh parsley, finely chopped, for garnish (optional) You can swap baby carrots for regular carrots. Just peel and slice them. If you want a dairy-free option, use coconut oil instead of butter. Maple syrup can be replaced with honey or agave syrup, but the flavor will change slightly. For those who avoid sugar, try a sugar substitute that measures like brown sugar. Ground cinnamon can also be omitted or replaced with nutmeg for a different taste. Use a kitchen scale for precise measurements. One pound of carrots is about four medium ones. When measuring sticky ingredients like maple syrup and brown sugar, use a liquid measuring cup for maple syrup. For brown sugar, pack it tightly into a dry measuring cup to get an accurate amount. If you don't have a scale, remember that 1 tablespoon equals 3 teaspoons, which helps when measuring smaller amounts. First, choose your carrots. You can use baby carrots or regular ones. If you pick regular carrots, peel them first. Then, cut them into even pieces about ½ inch thick. This helps them cook well and stay tender. Next, fill a medium saucepan with water. Bring the water to a rolling boil. Once it boils, add the carrots. Cook them for 5 to 7 minutes. You want them tender but still a bit crunchy. When done, drain the carrots and set them aside. Now, let’s make the glaze. Use the same saucepan over medium heat. Add 2 tablespoons of unsalted butter. Let it melt fully, then mix in 3 tablespoons of pure maple syrup, 1 tablespoon of brown sugar, ½ teaspoon of ground cinnamon, ¼ teaspoon of salt, and ¼ teaspoon of black pepper. Stir this mixture for about 2 to 3 minutes. You want it to thicken a little and become syrupy. Return the cooked carrots to the saucepan. Pour the warm maple glaze over them. Gently toss the carrots in the glaze until they are all coated. Cook for an additional 3 to 5 minutes. Stir them often until they heat through and soak up the sweet syrup. When the carrots are ready, take the saucepan off the heat. For a nice touch, sprinkle fresh parsley on top. This adds color and a fresh taste. You can serve the glazed carrots in a shallow bowl. Drizzle a bit more maple syrup over them for extra sweetness if you like. To cook perfect carrots, use baby carrots for ease. If you choose regular carrots, peel them and cut them into ½ inch pieces. This size helps them cook evenly. Boil them just until tender but still crisp. Aim for 5-7 minutes of boiling time. Drain them well to avoid a watery glaze. The right glaze makes all the difference. Start with unsalted butter in a warm pan. Let it melt before adding the maple syrup and brown sugar. Stir in ground cinnamon, salt, and black pepper. Simmer this mixture for 2-3 minutes. You want it thick and syrupy. Remember to taste as you go; adjust the sweetness if needed. Presentation matters when serving maple glazed carrots. Use a shallow bowl or platter to show off their color. For a pop of freshness, sprinkle finely chopped parsley on top. If you want more sweetness, drizzle extra maple syrup over the carrots. They pair well with roasted meats or as a vibrant side to any meal. {{image_4}} You can easily change the taste of maple glazed carrots. Try adding a splash of orange juice for a citrus kick. A pinch of nutmeg can add warmth and depth. For a spicy twist, add a dash of cayenne pepper. You can also mix in crushed garlic for a savory note. These additions can make your dish unique and exciting. If you want a vegan option, swap the butter for coconut oil or vegan butter. You can also use agave syrup instead of maple syrup for a lighter sweetness. For a lower sugar option, reduce the brown sugar or use a sugar substitute. These changes keep the dish delicious while meeting dietary needs. Serving maple glazed carrots can be fun! Try using a shallow bowl to show off their bright color. For a festive touch, add chopped nuts like walnuts on top for crunch. You can also serve them with a drizzle of extra maple syrup for sweetness. Pair them with roasted meats or grilled veggies for a complete meal. After you enjoy your maple glazed carrots, store leftovers in an airtight container. Keep them in the fridge for up to three days. Make sure to let the carrots cool before sealing them. This helps keep the glaze fresh and tasty. To reheat your carrots, use the microwave or a pan on the stove. If using the microwave, place them in a bowl and cover it. Heat in short bursts, stirring in between, until warm. On the stove, add a little butter or water to a pan. Heat gently over low heat, stirring often. You can freeze maple glazed carrots for longer storage. Place cooled carrots in a freezer-safe bag or container. Remove as much air as possible before sealing. They can last for up to three months in the freezer. To use them, thaw in the fridge overnight, then reheat as described above. Yes, you can use frozen carrots. They are convenient and save time. Just remember to thaw them first. Drain any excess water before you glaze them. This helps the glaze stick better. Frozen carrots may cook faster, so check them often. To thicken the glaze, simmer it longer. This lets extra liquid cook off. You can also add a bit of cornstarch mixed with water. Stir this mix into the glaze until it thickens. Just remember to keep stirring to avoid lumps. Maple glazed carrots pair well with many dishes. They are great alongside roasted meats, like chicken or pork. You can also serve them with grains, like rice or quinoa. For a vegetarian meal, try them with a hearty salad or lentil dish. Yes, you can prep them ahead of time. Cook the carrots and make the glaze. Store them separately in the fridge. When you are ready to serve, reheat the carrots and glaze together. This way, you keep the flavors fresh and vibrant. In this post, we covered how to make maple glazed carrots. We shared the key ingredients, how to prep and cook them, and tips for the perfect glaze. You learned about ingredient swaps and storage tips. Remember, these carrots shine with flavor, and you can try fun variations too. Maple glazed carrots will impress at any meal. Enjoy making them your own!

Maple Glazed Carrots Flavorful and Easy Side Dish

Looking for a quick and tasty side dish? Maple glazed carrots are your answer! They are sweet, simple, and perfect

- 1 block (14 oz) firm tofu, pressed and cubed - 2 tablespoons cornstarch - 2 tablespoons vegetable oil (e.g., canola or sunflower) - 1 bell pepper, sliced - 1 cup broccoli florets - 1 cup sugar snap peas - 3 cloves garlic, minced - 3 tablespoons honey - 2 tablespoons soy sauce - 1 tablespoon rice vinegar - Salt and pepper to taste - Sesame seeds and green onions for garnish Gathering the right ingredients makes this dish shine. Start with firm tofu, as it holds its shape well. Press the tofu to remove moisture. This helps it get crispy. Cornstarch gives the tofu a nice crunch. For veggies, bell peppers add color and sweetness. Broccoli and sugar snap peas bring texture and nutrients. Fresh garlic gives a bold flavor to the dish. Honey balances the savory notes. Low-sodium soy sauce keeps it tasty without being too salty. Rice vinegar adds a tangy kick. Finally, use salt and pepper to enhance all the flavors. Garnishing with sesame seeds and green onions adds a nice touch. They give your dish a fresh look and extra flavor. Enjoy the vibrant mix of colors and tastes! Pressing the tofu for better texture Tofu has a lot of water. Pressing it helps make it firmer. Wrap it in a clean towel. Place a heavy item on top. Let it rest for about 15-20 minutes. This step is key for the best texture. Cutting tofu into cubes After you press the tofu, cut it into cubes. Aim for bite-sized pieces. This helps the tofu cook evenly and absorb flavor well. Coating the tofu with cornstarch Next, place the tofu cubes in a bowl. Add two tablespoons of cornstarch. Gently toss the tofu to coat it evenly. This coating gives the tofu a nice crispy finish when cooked. Frying the tofu until crispy Heat two tablespoons of vegetable oil in your skillet. When the oil is hot, add the tofu in a single layer. Fry it for about 8-10 minutes. Turn the cubes often. You want them golden brown and crispy on all sides. Stir-frying the vegetables until tender Once the tofu is crispy, take it out and set it aside. In the same skillet, add sliced bell pepper, broccoli florets, and sugar snap peas. Stir-fry these for 5-7 minutes. The veggies should be bright and tender but still crisp. Incorporating garlic for aroma Now, add three cloves of minced garlic to the skillet. Stir it for about 30 seconds. This will fill your kitchen with a lovely smell. Be sure not to burn the garlic. Mixing the sauce ingredients In a small bowl, whisk together honey, soy sauce, and rice vinegar. Pour this sauce over the vegetables and tofu. Stir well to mix everything. Cook for an extra 2-3 minutes until the sauce thickens a bit. Combining everything in the skillet Once the sauce is ready, combine all the ingredients in the skillet. Make sure everything is well mixed and heated through. Adjusting seasoning and garnishing Taste your stir fry. Add salt and pepper as needed. For a finishing touch, sprinkle sesame seeds and chopped green onions on top. This adds a nice crunch and color. Pressing tofu is key for great texture. It removes moisture, which helps it crisp up. For best results, wrap the tofu in a clean towel. Place a heavy object on top, like a cast iron pan. Let it sit for 15-20 minutes. After pressing, cut the tofu into cubes. Coat each piece with cornstarch for a crunchy finish. When cooking, use medium-high heat. Fry the tofu until it's golden brown, about 8-10 minutes. Turn it often so it cooks evenly. You can swap out vegetables based on what you like. Try snap peas, bell peppers, and broccoli for a vibrant mix. If you want to change it up, use carrots, bok choy, or zucchini. To keep veggies crisp, don’t overcook them. Stir-fry until they are bright and tender, about 5-7 minutes. This way, they stay colorful and crunchy. Adjust the sweetness of the sauce to fit your taste. If you like it sweeter, add more honey. For a spicy kick, try adding red pepper flakes or sriracha. Mix honey, soy sauce, and rice vinegar in a bowl to create the sauce. Pour it over the cooked tofu and veggies. Stir well and let it cook for a few more minutes to thicken. Enjoy your flavorful stir fry! {{image_4}} You can switch the tofu for tempeh or seitan. Both options add unique flavors and textures. Tempeh has a nutty taste, while seitan mimics the texture of meat. If you want a protein boost, try adding edamame or chickpeas. Edamame brings a fresh crunch, and chickpeas add creaminess. To make this dish vegan, replace honey with maple syrup. Maple syrup gives a similar sweet taste. You can also explore different regional flavors by using sauces like teriyaki or hoisin. Each sauce adds its own twist to the dish. Pair your stir fry with grains like rice or quinoa. Both options soak up the sauce well. If you're into meal prep, this dish is perfect. You can store it in the fridge for quick lunches or dinners later. To store your Honey Garlic Tofu Stir Fry, let it cool first. Place the stir fry in an airtight container. This step keeps it fresh. You can store it in the fridge for about 3 to 4 days. If you want to keep it longer, consider freezing. In the freezer, it can last up to 2 months. When you're ready to eat, you can reheat the stir fry easily. The best method is to use a skillet. Heat it on medium. Add a splash of water or oil, then add the stir fry. Stir it well until it's heated through. This keeps the tofu crispy and the veggies bright. You can also use a microwave. Place the stir fry in a microwave-safe dish. Cover it with a lid or a damp towel. Heat it in short bursts, stirring in between. This helps keep the flavor and texture intact. Yes, you can use different types of tofu. I recommend using firm or extra-firm tofu. Firm tofu holds its shape well in stir-frying. Extra-firm tofu offers even more texture and crunch. Avoid silken tofu, as it can break apart too easily. Yes, this recipe can be gluten-free. Use gluten-free soy sauce, like tamari, instead of regular soy sauce. This swap keeps the dish tasty while being safe for those with gluten intolerance. Always check labels to ensure they meet your needs. You can add spice in a few ways. Try adding crushed red pepper flakes or sriracha to the sauce. You can also stir in sliced jalapeños for extra heat. Adjust the amount based on your spice level. Yes, you can use frozen vegetables. They are a great option for convenience. However, fresh vegetables usually have a better texture. If using frozen, cook them a bit longer to ensure they are heated through. Make this dish meal prep friendly by portioning it out. After cooking, cool the stir fry and divide it into containers. Store in the fridge for up to four days. Reheat in the microwave or on the stove when you're ready to eat. This recipe gives you the tools to make a tasty tofu stir fry. You learned about the right ingredients, step-by-step cooking, and important tips. You can customize it with different veggies and sauces. Remember, pressing the tofu helps it stay crispy. Proper storage will keep your leftovers fresh. Enjoy your stir fry as a fun meal or great meal prep option. Dive in and enjoy your delicious creation!

Honey Garlic Tofu Stir Fry Delicious and Simple Meal

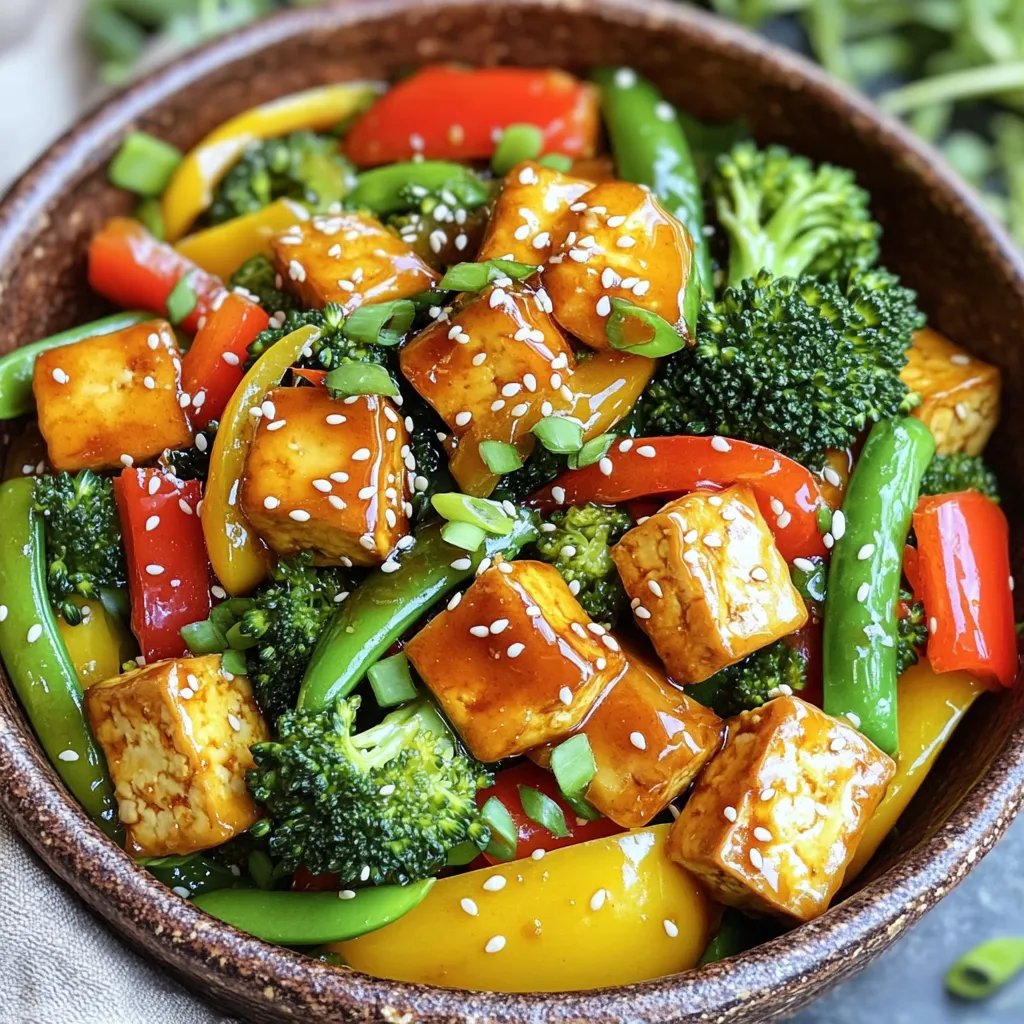
Looking for a quick meal that packs a punch? My Honey Garlic Tofu Stir Fry is just the dish for

- 1 cup all-purpose flour - 1 tablespoon baking powder - 1/2 teaspoon salt - 1/2 teaspoon ground cinnamon - 1 tablespoon granulated sugar The main ingredients form the base of our churro waffles. All-purpose flour gives the waffles their structure. Baking powder helps them rise, while salt enhances the flavor. Ground cinnamon adds warmth and sweetness. Granulated sugar balances all the flavors. - 1 cup milk - 1 large egg - 2 tablespoons unsalted butter, melted The wet ingredients bring moisture and richness to the batter. Milk adds creaminess, while the egg helps bind everything together. Unsalted butter, when melted, adds a lovely flavor and texture. - 1/2 cup granulated sugar (for coating) - 2 tablespoons ground cinnamon (for coating) - 1 cup chocolate sauce (for drizzling, optional) The coating turns our waffles into a true treat. Mixing granulated sugar with ground cinnamon creates that classic churro flavor. Drizzling chocolate sauce on top adds indulgence, making every bite even more special. Preheat your waffle maker according to the manufacturer’s instructions. This step is key for crispy and fluffy waffles. A hot waffle maker cooks the batter evenly. In a large bowl, combine the following dry ingredients: - 1 cup all-purpose flour - 1 tablespoon baking powder - 1/2 teaspoon salt - 1/2 teaspoon ground cinnamon - 1 tablespoon granulated sugar Whisk these ingredients together well. This helps distribute the baking powder and cinnamon evenly. In a separate bowl, whisk together: - 1 cup milk - 1 large egg - 2 tablespoons unsalted butter, melted Make sure the mixture is smooth. This will ensure your batter is creamy and delicious. Pour the wet ingredients into the bowl with the dry mixture. Gently stir until just combined. It’s fine if the batter is a bit lumpy. Avoid overmixing; it can make the waffles tough. Lightly grease the waffle maker with non-stick spray. Pour enough batter into the maker to cover the bottom completely. Close the lid and cook until the waffles are golden-brown, usually about five minutes. Prepare your cinnamon-sugar mixture in a small bowl. Combine: - 1/2 cup granulated sugar - 2 tablespoons ground cinnamon Once the waffles are cooked, dip them in the cinnamon-sugar mixture. Make sure to coat both sides evenly for that sweet, churro-like flavor. Enjoy your warm, cinnamon sugar churro waffles! To make light and fluffy churro waffles, you must avoid overmixing. Mix the wet and dry ingredients until they just come together. It’s okay if the batter is a bit lumpy. Overmixing can lead to tough waffles that lose their charm. Trust me, a few lumps are just fine! For a fun and tasty presentation, stack two or three waffles on a plate. Drizzle them with chocolate sauce for a rich touch. You can also sprinkle extra cinnamon sugar on top for added sweetness. Fresh fruit, like strawberries or bananas, adds color and balances the sweetness. This makes your dessert not only delicious but also pretty to look at! When picking a waffle maker, look for a few key features. A non-stick surface helps with easy removal. Adjustable temperature settings let you control the crispiness. Also, consider a model that indicates when the waffles are done cooking. This way, you can avoid overcooking and enjoy perfectly golden-brown churro waffles every time! {{image_4}} You can make your churro waffles even better! Try adding a splash of vanilla extract. It gives a sweet, warm flavor that pairs well with cinnamon. You can also mix in some cocoa powder for a chocolate twist. This will add depth and a rich taste to your waffles, making them extra special. If you need a gluten-free option, you can easily swap out the all-purpose flour. Use a gluten-free flour blend instead. Look for blends that have a mix of rice flour, potato starch, and tapioca flour. This will keep your waffles light and fluffy while being safe for gluten-free diets. Want to take your churro waffles to the next level? Think about stuffing them! You can fill them with chocolate or cream cheese. For chocolate, just add some chocolate chips to the batter before cooking. For cream cheese, mix it with a bit of sugar and cinnamon, then spoon it into the batter. This will create a delightful surprise inside each waffle! To keep your churro waffles fresh, store them in the fridge. Place them in an airtight container. They will stay good for about 2 to 3 days. If you want to keep them longer, consider freezing them. To reheat your churro waffles, use your toaster or oven. This method helps maintain their crispy texture. Heat them at 350°F (175°C) for about 5-7 minutes. You can also use a microwave, but they may become soft. You can freeze your churro waffles. If they are cooked, let them cool first. Wrap each waffle in plastic wrap or foil. Then, place them in a freezer bag. They can last for up to 2 months. If you freeze uncooked batter, store it in a sealed container. Use it within a month for best results. Yes, you can use other flours. Here are some options: - Whole Wheat Flour: This adds fiber. The flavor is nutty and rich. The texture may be denser. - Almond Flour: This is gluten-free. It gives a unique taste. Waffles may be more crumbly. - Oat Flour: This is also gluten-free. It will add a mild flavor. The waffles may be softer. Experiment with these flours. Adjust the liquid in the batter if needed. Making the batter ahead is simple. Follow these tips: - Mix Dry and Wet Separately: Whisk together dry ingredients first. In another bowl, mix the wet ones. - Combine Before Cooking: When ready to cook, mix them together. This helps keep waffles fluffy. - Store in the Fridge: Keep the mixed batter in a sealed container. Use it within 24 hours for best results. This way, you can enjoy churro waffles any time! Pair churro waffles with these delicious options: - Fresh Fruit: Berries, bananas, or apples add color and freshness. - Ice Cream: A scoop of vanilla or chocolate ice cream makes it a dessert. - Coffee or Hot Chocolate: These drinks complement the sweetness well. - Whipped Cream: A dollop adds creaminess and fun! Try these pairings for a delightful experience. Enjoy your churro waffles! This guide covers everything you need for churro waffles. You learned about key ingredients, step-by-step cooking, and helpful tips. I shared ways to add flavors and suggested easy storage methods. With these tips, your waffles will be delicious and fun. Whether you enjoy them simple or stuffed, churro waffles can impress everyone. Try them for breakfast or dessert, and enjoy tasty moments with friends and family. Happy cooking!

Cinnamon Sugar Churro Waffles Irresistible Treat Recipe

Get ready for a sweet twist on brunch with my Cinnamon Sugar Churro Waffles! These fluffy waffles combine the warm,

- 4 large russet potatoes, peeled and diced - 1 medium onion, finely chopped - 3 cloves garlic, minced - 4 cups vegetable broth - 1 cup heavy cream (or coconut milk for a dairy-free option) - 1 cup sharp cheddar cheese, shredded - 1 cup cooked bacon bits (or crispy chickpeas as a vegetarian alternative) - 1/2 cup sour cream (or Greek yogurt for a lighter touch) - 1 teaspoon dried thyme - Salt and freshly cracked black pepper to taste - Chopped green onions for garnish - Additional freshly ground black pepper for serving You can change some ingredients to fit your taste. If you need a dairy-free option, use coconut milk instead of heavy cream. Greek yogurt works great if you want a lighter sour cream. If you don’t eat meat, swap bacon bits for crispy chickpeas. You can also use any cheese you like, but cheddar gives a nice sharp taste. Adding garnishes can take your soup up a notch. Chopped green onions add freshness and color. You can also sprinkle more cheese on top for extra creaminess. A dash of black pepper gives a hint of spice. If you want a crunchy touch, add croutons or fried onions. Start by peeling and dicing the russet potatoes into small pieces. Place them in the slow cooker. Next, chop the onion and mince the garlic. Add these to the slow cooker, spreading them over the potatoes. Sprinkle the dried thyme on top for flavor. Pour in the vegetable broth to cover the potatoes fully. Season with salt and freshly cracked black pepper to your taste. Cover the slow cooker with its lid. Set it to cook on low for 6 to 8 hours. If you are in a hurry, set it to high for about 4 hours. The potatoes should be tender and easy to mash when done. After cooking, use a potato masher or immersion blender to blend the soup. You can choose to make it chunky or smooth. Stir in the heavy cream or coconut milk. Add the shredded cheddar cheese and mix until melted. Taste the soup and adjust the seasoning as needed. Fold in the sour cream to add tanginess. Then, mix in the cooked bacon bits or crispy chickpeas. Cover the slow cooker again and let it cook on low for 30 more minutes. Finally, serve the soup in bowls, garnishing with chopped green onions and a dash of black pepper. To get the best texture for your loaded potato soup, choose the right potatoes. I recommend using russet potatoes. They become soft and creamy. When you cook them, make sure to dice them into even pieces. This helps them cook at the same rate. After cooking, you can use a potato masher. This gives you control over how chunky or smooth the soup is. For a creamier texture, try an immersion blender. Blend until you reach your desired smoothness. To boost the flavor of your soup, use fresh ingredients. Start with fresh garlic and onion. These add a great base flavor. Adding dried thyme gives a lovely herbal note. Don’t forget to adjust the seasoning. Always taste your soup before serving. You may want to add more salt or pepper. For extra depth, consider adding a splash of Worcestershire sauce. It can add a savory kick that elevates the soup. For perfect results, use the right slow cooker settings. Cook the soup on low for 6 to 8 hours. This allows the flavors to meld. If you’re short on time, cooking on high for 4 hours works too. Always check the potatoes for tenderness. They should be soft enough to mash easily. After blending, let the soup cook for an extra 30 minutes on low. This step helps all the flavors combine beautifully. {{image_4}} You can easily make this soup vegetarian or vegan. For a vegetarian version, skip the bacon bits and add crispy chickpeas instead. They give a nice crunch and flavor. For a vegan option, replace the heavy cream with coconut milk. It adds creaminess and a hint of sweetness. Use a vegan cheese substitute to keep the dish dairy-free. This way, everyone can enjoy a warm bowl of comfort. Cheese adds a rich flavor to the soup. While sharp cheddar is a classic choice, you can mix it up. Try using smoked gouda for a smoky taste. You can also use pepper jack for a spicy kick. If you want something lighter, go for mozzarella. Each cheese gives the soup a unique twist, so feel free to experiment until you find your favorite. Add-ins can take this soup to the next level. For a bit of heat, toss in some diced jalapeños. If you love herbs, add fresh parsley or chives before serving. You can stir in some roasted garlic for deeper flavor. For a touch of acidity, a squeeze of lemon juice can brighten the dish. All these options let you customize your soup based on your mood and taste. Store your loaded potato soup in an airtight container. Let it cool to room temperature first. Then, place it in the fridge. It will last for about 3 to 4 days. If you want to keep it longer, consider freezing it. To reheat, pour the soup into a pot. Heat it over medium-low heat. Stir often to avoid sticking. You can also use the microwave. Place the soup in a microwave-safe bowl. Heat in short bursts, stirring in between, until warm. If you freeze the soup, use a sturdy freezer bag. Leave some space at the top for expansion. Label the bag with the date. The soup will stay good for about 2 to 3 months. When ready to eat, thaw it in the fridge overnight before reheating. Yes, you can make this soup ahead. Prepare it in the slow cooker and let it cool. Store it in an airtight container in the fridge for up to three days. When you're ready to eat, simply heat it on the stove or in the microwave. This soup tastes even better after sitting for a day! To make this soup gluten-free, use gluten-free vegetable broth. Most vegetable broths are naturally gluten-free, but always check the label. The other ingredients in the recipe are also gluten-free, so you don’t need to make any other changes. This soup pairs well with many sides. You can serve it with crusty bread or a fresh salad. For a fun twist, try it with a grilled cheese sandwich. The options are endless, so feel free to get creative! This blog post covered everything needed to make loaded potato soup. We discussed ingredients, steps to cook, and tips to enhance flavor. You learned about variations and how to store leftovers safely. In closing, this soup is easy to make and perfect for any meal. Experiment with your favorite flavors and enjoy! A warm bowl of soup awaits you.

Slow Cooker Loaded Potato Soup Creamy and Comforting

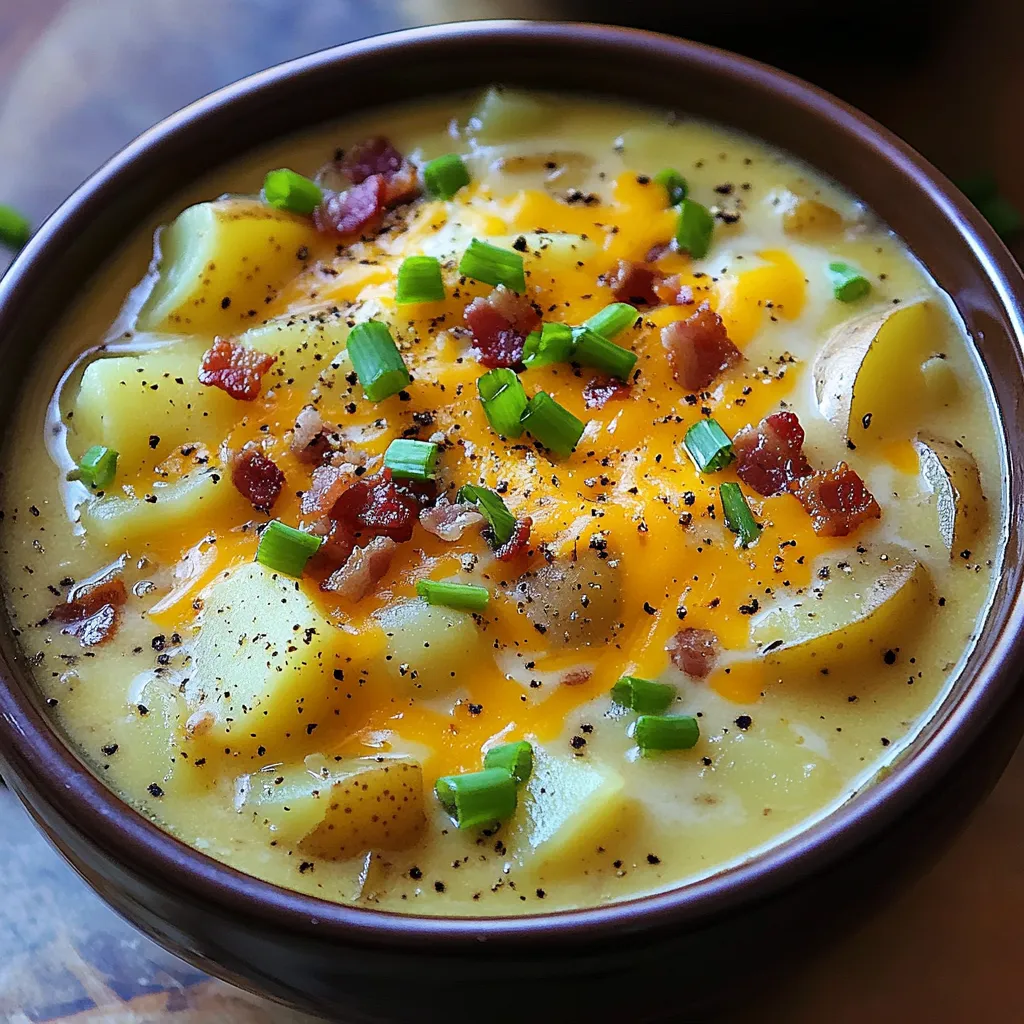
Are you craving a warm bowl of comfort? This Slow Cooker Loaded Potato Soup is a crowd pleaser. It’s creamy,

To make this dish, gather these items: - 1 pound large shrimp, peeled and deveined - 1 medium zucchini, sliced into half-moons - 1 bell pepper (red or yellow), diced into bite-sized pieces - 1 red onion, chopped into large chunks - 1 cup cherry tomatoes, halved - 4 cloves fresh garlic, minced - 3 tablespoons extra virgin olive oil - 1 teaspoon dried oregano - 1 teaspoon smoked paprika - Salt and freshly ground black pepper, to taste - Fresh parsley, chopped (for garnish) - Lemon wedges, for serving You can use either fresh or frozen shrimp. Fresh shrimp has a lovely taste and texture. It cooks quickly and absorbs flavors well. If you use frozen shrimp, make sure to thaw it first. To thaw, place shrimp in cold water for 15-20 minutes. This helps keep its juicy texture. Both options work great in this recipe. Choose based on what you have on hand. To make this dish even better, consider adding olives or artichokes. These add a salty and tangy twist. You could also add spinach for extra color and nutrients. Feel free to mix and match based on your taste. The fun part of cooking is making the dish your own! First, gather all your fresh veggies and shrimp. For this recipe, you need: - 1 pound large shrimp, peeled and deveined - 1 medium zucchini, sliced into half-moons - 1 bell pepper, diced into bite-sized pieces - 1 red onion, chopped into large chunks - 1 cup cherry tomatoes, halved - 4 cloves fresh garlic, minced Make sure to wash everything well. Cut the zucchini and bell pepper into even pieces. This helps them cook evenly. Chop the onion into large chunks. Halving the cherry tomatoes gives them a nice burst when cooked. Now, let’s create a tasty marinade. In a small bowl, mix: - 3 tablespoons extra virgin olive oil - 1 teaspoon dried oregano - 1 teaspoon smoked paprika - Salt and freshly ground black pepper to taste Whisk these ingredients together. The oil helps the flavors stick to the shrimp and veggies. Oregano adds a nice earthy taste. Smoked paprika gives a slight smokiness that makes this dish pop. Preheat your oven to 400°F (200°C). Line a large baking sheet with parchment paper. This makes cleanup easy. In a large mixing bowl, combine the shrimp and all your veggies. Pour the marinade over the top. Toss everything together so each piece gets coated. Spread the mixture out on the baking sheet in a single layer. This helps everything cook evenly. Bake for 15-20 minutes. The shrimp should turn pink and the veggies should be tender yet crisp. After baking, let it cool for a few minutes. Garnish with fresh parsley and serve with lemon wedges. Enjoy your colorful Mediterranean feast! To get shrimp just right, watch the color closely. When they turn pink, they are done. Overcooking makes shrimp tough. Aim for about 15-20 minutes in the oven. If your shrimp are large, they may need a bit more time. Always check if they are opaque inside. This shows they are ready to eat. A quick tip: marinate the shrimp for 15 minutes before cooking for extra flavor. For great veggies, cut them into similar sizes. This helps them cook evenly. Zucchini and bell pepper cook fast, while onions and tomatoes need a little more time. Spread the veggies out on the pan. This gives them room to brown nicely. If you like a bit of crunch, check them at 15 minutes. You can always cook them a bit longer if needed. Serve this dish with lemon wedges for a fresh kick. A side of warm crusty bread complements the meal well. You can also add a green salad for more crunch. For a hearty touch, serve over rice or couscous. Pair this dish with a light white wine for a lovely experience. Enjoy the mix of flavors and colors on your plate! {{image_4}} You can switch out the veggies in this dish. Here are some great options: - Asparagus, cut into bite-sized pieces - Broccoli florets - Cauliflower, chopped into small bits - Carrots, sliced thinly - Yellow squash, sliced into half-moons Each of these adds a unique taste and texture. Mixing and matching keeps your meal fresh and fun. Want a kick? Add some heat to your dish! Try this: - Use 1 teaspoon of red pepper flakes in the marinade. - Chop fresh jalapeños and toss them in with the shrimp and veggies. This spicy twist will wake up your taste buds and bring excitement to your plate. You can make a vegetarian option too! Here’s how: - Omit the shrimp entirely. - Replace it with chickpeas or lentils for protein. - Add extra veggies like spinach or kale for more nutrients. This version is just as colorful and tasty, making it perfect for everyone at your table! After your meal, let the shrimp and veggies cool. Transfer them into an airtight container. You can store leftovers in the fridge for up to three days. Be sure to keep them sealed to stay fresh. To reheat, use the oven for best results. Preheat your oven to 350°F (175°C). Place the shrimp and veggies on a baking sheet. Heat for about 10-15 minutes. You want them warm but not overcooked. You can also use a microwave, but it might make the shrimp a bit rubbery. If you want to freeze your leftovers, place them in a freezer-safe bag. Remove as much air as possible before sealing. This dish can last up to three months in the freezer. To enjoy later, thaw in the fridge overnight. Reheat as mentioned above for best flavor and texture. Yes, you can use frozen shrimp. Just make sure to thaw them first. Place the shrimp in the refrigerator overnight or run them under cold water for about 10 minutes. This will help the shrimp cook evenly. Frozen shrimp may release extra water, so pat them dry before mixing. To boost flavor, add fresh herbs like basil or thyme. You can also include capers or olives for a salty touch. A splash of lemon juice before serving adds brightness. You could try different spices like cumin or red pepper flakes for heat. Experiment with your favorite Mediterranean flavors. If you need a substitute, you can use avocado oil or grapeseed oil. Both oils have a mild taste and work well for cooking. For a different twist, try using melted butter or a flavored oil, like garlic-infused oil. These alternatives will still let the dish shine. Yes, this recipe is gluten-free. The ingredients used, like shrimp and veggies, do not contain gluten. Always check for gluten in any additional items you use, like sauces or seasonings. Stick to pure, whole ingredients to keep the meal safe for gluten-free diets. This blog post covered all you need for a great shrimp dish. We explored fresh and frozen shrimp, essential ingredients, and tasty add-ins. You learned how to prep, marinate, and bake shrimp with perfect results. I shared tips for cooking shrimp and keeping veggies crisp. You also discovered variations, storage methods, and answers to common questions. Cooking shrimp can be simple and fun. Use these steps, and enjoy your meals!

Sheet Pan Mediterranean Shrimp Veggies Flavor Fusion

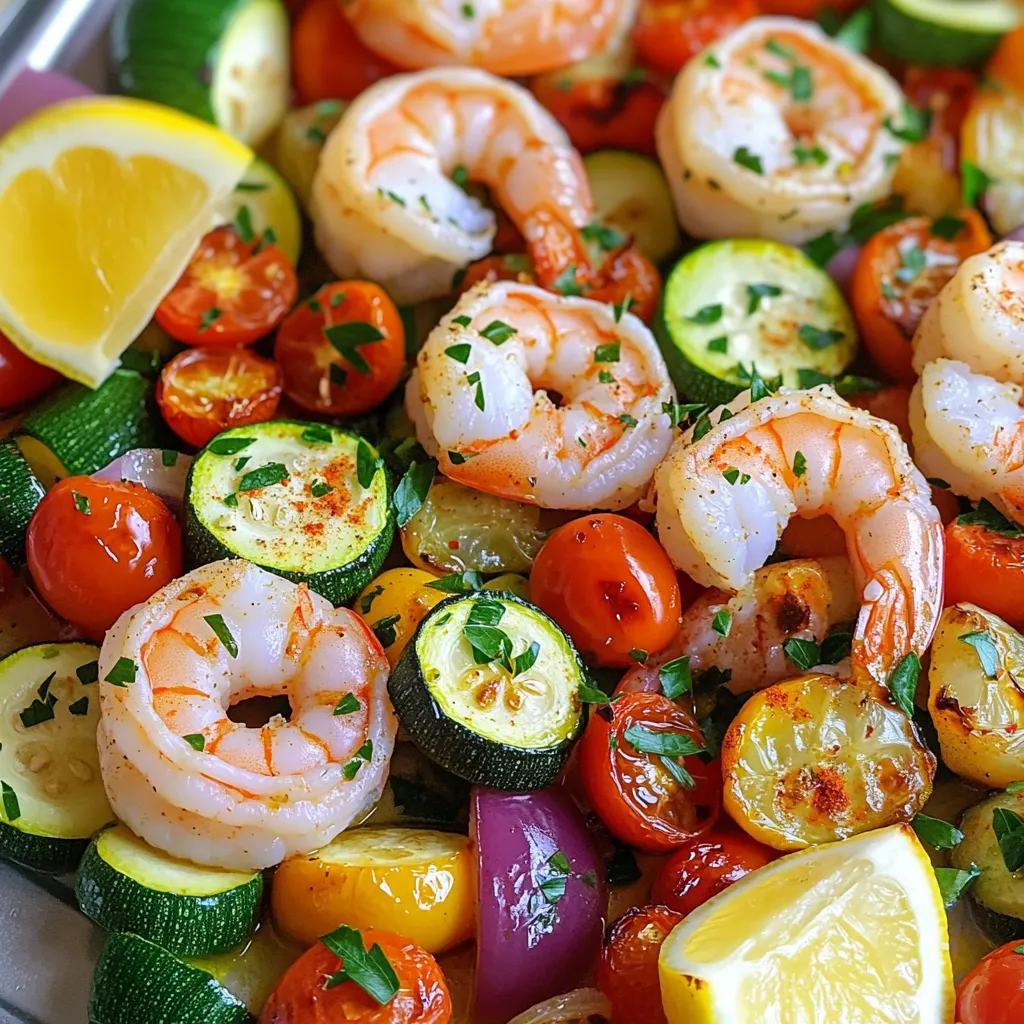
Welcome to Sheet Pan Mediterranean Shrimp Veggies Flavor Fusion! If you love easy, delicious meals packed with flavor, you’re in

To make Air Fryer Garlic Parmesan Brussels Sprouts, gather these items: - 1 pound Brussels sprouts, trimmed and halved - 3 tablespoons extra virgin olive oil - 4 cloves fresh garlic, finely minced - 1 teaspoon smoked paprika - 1/2 teaspoon fine sea salt - 1/4 teaspoon freshly ground black pepper - 1/4 cup freshly grated Parmesan cheese - 2 tablespoons balsamic glaze, for drizzling (optional) You can swap items if needed. For the Brussels sprouts, consider using broccoli or cauliflower. Olive oil works well, but you can use avocado oil too. If fresh garlic is not on hand, garlic powder is a good substitute. Instead of smoked paprika, regular paprika will work. No Parmesan? Try nutritional yeast for a similar flavor. To up the flavor, add red pepper flakes for a kick. Lemon zest can brighten the dish. For extra crunch, toss in some chopped nuts like almonds or walnuts. Garnish with more grated Parmesan or fresh herbs like parsley for a pop of color. {{ingredient_image_2}} Start with 1 pound of Brussels sprouts. Trim off the ends and cut them in half. This step helps them cook evenly. Make sure to wash them under cold water to remove any dirt. After washing, dry them well with a towel. This helps them crisp up in the air fryer. In a large bowl, add the halved Brussels sprouts. Pour in 3 tablespoons of extra virgin olive oil. Add 4 cloves of minced garlic, 1 teaspoon of smoked paprika, 1/2 teaspoon of fine sea salt, and 1/4 teaspoon of ground black pepper. Use your hands or a spoon to mix everything well. You want every sprout to be coated. This mix gives them a rich flavor. Preheat your air fryer to 375°F (190°C) for about 5 minutes. Once hot, arrange the seasoned Brussels sprouts in the basket. Make sure they are in a single layer. This helps them cook evenly. Air fry for 15 to 18 minutes. Shake the basket every 5 minutes to ensure they crisp up nicely. They should turn golden brown. When done, transfer them to a bowl. Sprinkle 1/4 cup of freshly grated Parmesan cheese on top while they are warm. For added flavor, drizzle 2 tablespoons of balsamic glaze over them. Enjoy your delicious and crispy Brussels sprouts! To get your Brussels sprouts crispy, start with dry sprouts. Pat them with a towel. Toss them well in olive oil and spices. This helps them crisp up nicely. Spread them out in a single layer in your air fryer. Overcrowding makes them steam instead of crisp. Sogginess often comes from too much moisture. Make sure to dry your Brussels sprouts well. Use just enough olive oil to coat them lightly. The smoked paprika and salt also help absorb excess moisture while cooking. Shake the basket every five minutes to keep air flowing around the sprouts. Preheat your air fryer for best results. Set it to 375°F (190°C) for this recipe. Keep an eye on the cooking time. Check for a golden brown color and a crispy texture. Use a meat thermometer if you want to ensure even cooking. Enjoy your perfectly cooked Brussels sprouts, and don’t forget to add cheese right after they come out! Pro Tips Use Fresh Garlic: Freshly minced garlic provides a robust flavor that enhances the overall taste of the dish compared to garlic powder. Do Not Overcrowd: For maximum crispiness, make sure the Brussels sprouts are arranged in a single layer in the air fryer basket without overcrowding. Check for Doneness: Since air fryers can vary in cooking time, start checking the Brussels sprouts at the 15-minute mark to prevent overcooking. Experiment with Seasonings: Feel free to customize the spices and herbs based on your preference; adding a pinch of cayenne can give it a spicy kick! {{image_4}} You can change the flavor of Brussels sprouts easily. Try adding lemon zest for brightness. A sprinkle of cayenne pepper will add heat. For an earthy taste, use ground cumin or coriander. Mix in some Italian herbs like oregano and thyme for a classic twist. Each seasoning can change the dish and surprise your taste buds. You can make this dish heartier by adding proteins. Cooked bacon bits or diced chicken make great additions. For a veggie boost, toss in some sliced bell peppers or carrots. Broccoli florets also work well and add color. Mixing in proteins or veggies makes this dish more filling and fun. To make this dish vegan, skip the Parmesan cheese. Use nutritional yeast instead for a cheesy taste. You can also add a splash of soy sauce for umami. Swap the olive oil with avocado oil if you prefer. These simple changes keep the dish tasty while fitting vegan diets. To keep your Brussels sprouts fresh, store them in an airtight container. Let them cool before placing them in the fridge. They will last for about 3 days. If you have a lot left, divide them into smaller portions. This makes it easy to grab when you want a quick snack. Reheating should keep your Brussels sprouts crispy. I recommend using the air fryer again. Preheat it to 350°F (175°C). Place the sprouts in the basket and heat for about 5 to 7 minutes. Shake the basket halfway through to ensure even warmth. This method helps restore their crispiness. You can freeze Brussels sprouts if you want to keep them longer. First, cook them fully, then let them cool completely. Spread them on a baking sheet and freeze for 1 to 2 hours. Once frozen, transfer them to a freezer bag. They will keep well for up to 3 months. When ready to eat, thaw them in the fridge overnight before reheating. Yes, you can make Air Fryer Garlic Parmesan Brussels sprouts ahead of time. Cook them as directed and let them cool. Store them in an airtight container in the fridge. They will keep fresh for 2 to 3 days. When you are ready to eat, reheat them in the air fryer for 5 to 7 minutes at 375°F (190°C). This will help restore their crispy texture. Air Fryer Garlic Parmesan Brussels sprouts pair well with many dishes. Here are some ideas: - Grilled chicken or fish - Quinoa or rice - A fresh salad with lemon vinaigrette - Pasta with olive oil and garlic - Roasted potatoes for a hearty side These options will add balance and variety to your meal. Brussels sprouts are done cooking when they turn golden brown and crispy. Check them around 15 minutes of cooking time. Shake the basket every 5 minutes for even cooking. You can also pierce them with a fork; they should be tender inside. If they are soft and crispy outside, they are ready to enjoy! In this blog post, we explored the steps to make Air Fryer Garlic Parmesan Brussels Sprouts. You learned about the key ingredients, helpful tips for crispiness, and fun variations to try. We also discussed storage and reheating tips to keep your dish fresh. Remember, the right preparation and seasoning make all the difference. Enjoy this tasty dish as a snack or side. Your kitchen adventures with Brussels sprouts are just beginning!

Air Fryer Garlic Parmesan Brussels Sprouts Delight

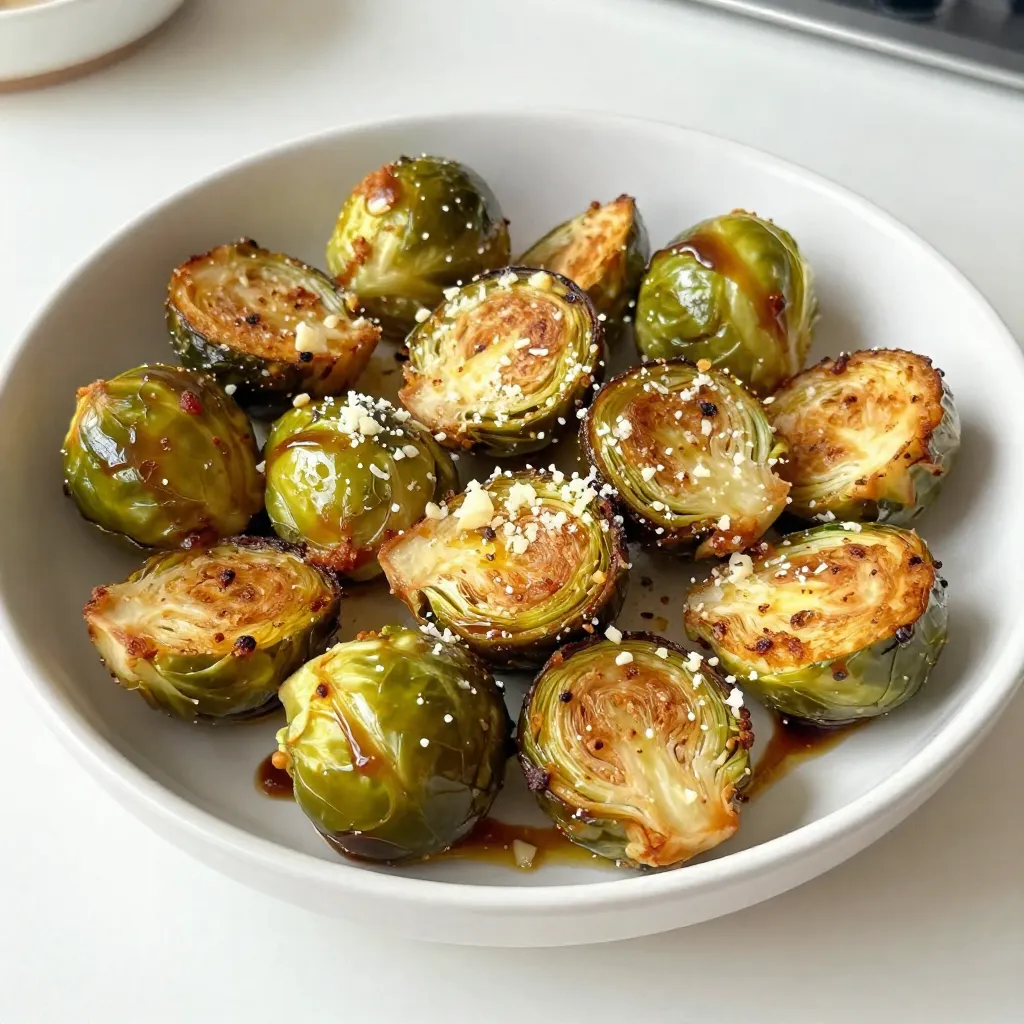
Welcome to the tasty world of Air Fryer Garlic Parmesan Brussels Sprouts Delight! In this post, I’ll share an easy

- 8 oz. flat iron steak, thinly sliced against the grain - 8 oz. rice noodles - 4 cloves garlic, minced - 1 tablespoon fresh ginger, finely grated The flat iron steak brings rich flavor and tender texture. Slice against the grain for the best bite. Rice noodles cook quickly and soak up all the tasty sauce. Garlic and ginger add a fragrant kick that makes each bite special. - 2 tablespoons vegetable oil, divided - 1 tablespoon chili paste (adjust according to your heat preference) - 3 tablespoons soy sauce - 1 tablespoon sesame oil Vegetable oil helps sear the steak and gives a nice crisp. Chili paste adds heat, so adjust it to your liking. Soy sauce gives a salty depth, while sesame oil adds a nutty finish. These flavors mix perfectly with the other ingredients. - 1 red bell pepper, sliced into thin strips - 2 green onions, chopped (separate white and green parts) - 1 tablespoon fresh lime juice - Fresh cilantro leaves for garnish Red bell pepper adds sweetness and crunch. Green onions bring fresh flavor and color. Lime juice brightens the dish, while cilantro adds a nice herbal note. These fresh additions complete the meal and make it vibrant. First, fill a pot with water and bring it to a boil. This step is key for cooking the noodles. Once the water bubbles, add the rice noodles. Cook them according to the package, which usually takes about 3 to 5 minutes. After they are soft, drain them in a colander. Set the noodles aside in a bowl while you prepare the other ingredients. While the noodles cook, it's time to season the steak. Take your thinly sliced flat iron steak and sprinkle it with salt and freshly ground black pepper. This will really boost the flavor. It’s also important to slice the steak against the grain. This technique helps make the meat tender and easy to chew. Now we are ready to cook! Heat a large skillet or wok over high heat and add 1 tablespoon of vegetable oil. When the oil shimmers, add the seasoned steak slices in a single layer. Sear the steak for about 2 minutes without moving them. This browning gives it a nice color and flavor. Once browned, take the steak out and place it on a plate. Next, lower the heat a bit and add the remaining tablespoon of vegetable oil to the same skillet. Toss in the minced garlic and grated ginger. Sauté them for about 30 seconds, stirring often so they don’t burn. The smell will start to fill your kitchen! Add the sliced red bell pepper to the skillet and stir-fry for about 2 minutes. You want the peppers to be tender but still crisp. This adds a nice texture to the dish. Now, it’s time to bring everything together. Return the cooked steak to the skillet with the vegetables, then add the drained rice noodles. Use tongs or chopsticks to mix everything well. Finally, we’ll add the flavor! Drizzle in the chili paste, soy sauce, sesame oil, and fresh lime juice. Toss everything again to coat all the ingredients. Keep stir-frying for another 2 to 3 minutes until everything is hot and fragrant. Your Minute Chili Garlic Steak Noodles are almost ready to serve! To make your steak tender, slice it against the grain. This helps break down tough fibers. Use high heat when searing. Heat your oil until it shimmers. Add the steak in a single layer. Don't move it for about two minutes. This will give you a nice brown crust. For doneness, cook it until it reaches 130°F for medium-rare. Use a meat thermometer for accuracy. To stop your noodles from sticking, rinse them with cold water after cooking. This removes excess starch. Choose rice noodles that are thin and flat. They cook quickly and soak up flavors well. Look for fresh noodles if you can find them. They offer better texture than dried ones. You can adjust the heat with chili paste. Start with one tablespoon for a mild kick. If you want more heat, add more chili paste slowly. You can also add other spices for flavor. Consider using crushed red pepper or black pepper. This will give your dish an extra layer of taste. {{image_4}} You can swap the flat iron steak for other proteins. Chicken is a great choice. It cooks quickly and stays juicy. For a plant-based option, use tofu. Tofu absorbs flavors well and adds a nice texture. Shrimp is another tasty alternative. Shrimp cooks fast and pairs well with the chili garlic sauce. Adding more vegetables can boost nutrition and flavor. Broccoli makes a crunchy addition. Just steam it for a few minutes before adding it to the dish. Snap peas add a sweet crunch and bright color. You can also use carrots, bell peppers, or even bok choy for variety. Mix and match to suit your taste! You can enhance the flavor with extra sauces. Teriyaki sauce gives a sweet and savory kick. Just add a tablespoon when you toss in the noodles. Oyster sauce adds a rich umami flavor. It pairs well with meat and veggies. A splash of fish sauce can also deepen the taste. Experiment and find your perfect blend! To store your leftover Minute Chili Garlic Steak Noodles, let them cool first. Place the noodles in an airtight container. This keeps them fresh and safe. You can store them in the fridge for up to three days. If you wait longer than that, the flavors may fade. When you reheat these noodles, you want to keep the flavors strong. The stovetop is best for this. Heat a pan over medium heat, add a splash of oil, and toss in the noodles. Stir them often until they are hot. The microwave can work too, but it may dry them out. If you use it, add a little water and cover the dish. Yes, you can freeze chili garlic steak noodles. To freeze, let them cool completely. Pack them in a freezer-safe container or bag, removing as much air as you can. They can stay in the freezer for about three months. When ready to eat, move them to the fridge overnight to thaw. Heat them on the stovetop for the best taste. You can use several cuts of beef as a substitute. Here are some options: - Sirloin steak - Flank steak - Ribeye steak - Skirt steak Each of these cuts has its own taste and texture. Sirloin is lean and tender, while flank offers a rich flavor. Ribeye is juicy and marbled, and skirt has a great beefy taste. You can easily make this dish vegetarian. Here are some substitutions: - Replace flat iron steak with tofu or tempeh. - Use vegetable broth instead of soy sauce for depth. - Add more vegetables like mushrooms, zucchini, or carrots. These changes keep the flavors strong while making the dish meat-free. Yes, you can prepare this dish in advance. Here are some tips: - Cook the noodles and store them in a sealed container. - Sear the beef or tofu ahead of time and refrigerate. - Chop vegetables a day before and keep them fresh. When you're ready to eat, just combine everything in a pan. Heat it up and enjoy! This blog post covered everything you need for chili garlic steak noodles. You learned about key ingredients like flat iron steak, rice noodles, garlic, and ginger. I shared step-by-step instructions for cooking and seasoning. We discussed tips to perfect your meal and offered variations to suit your taste. Finally, we went over storage and reheating methods to keep your dish fresh. Enjoy your cooking adventure and customize the flavors to make it your own!

Minute Chili Garlic Steak Noodles Flavorful Quick Meal

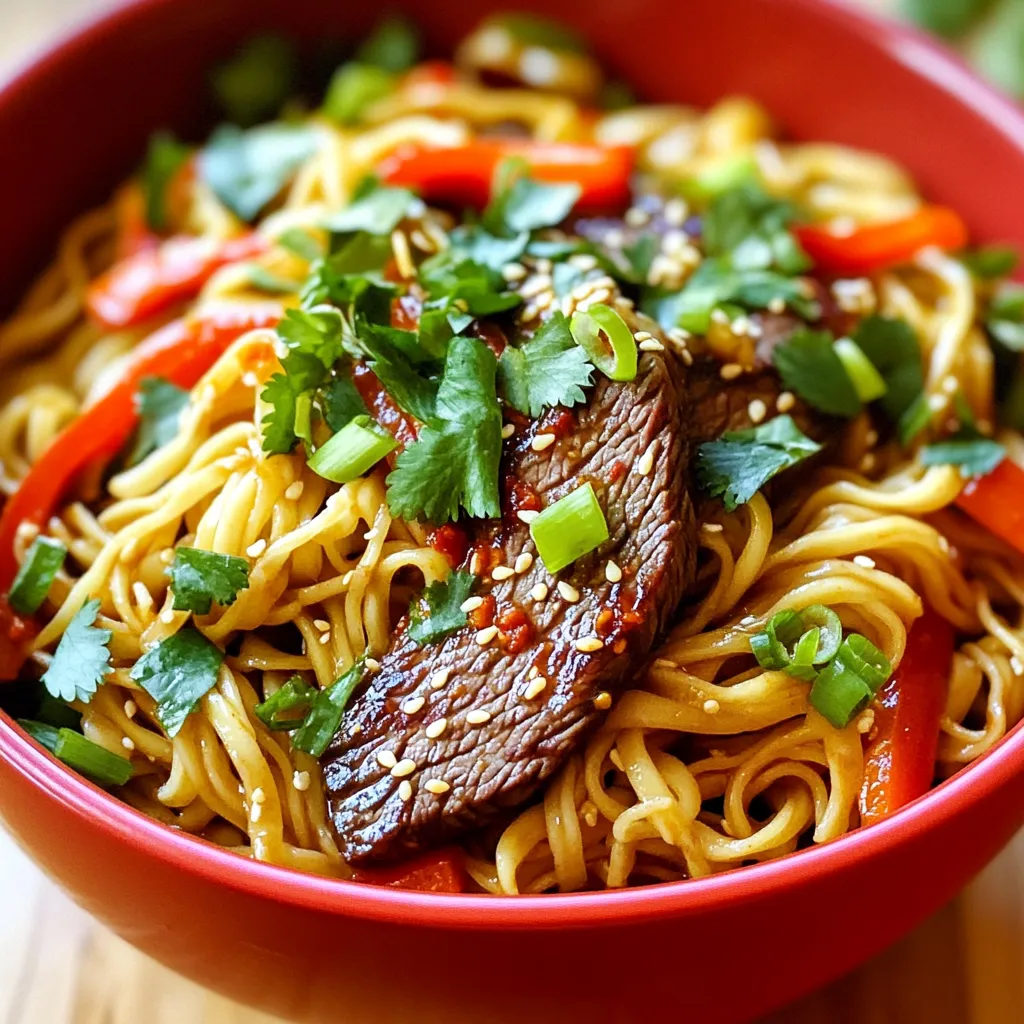
Craving a quick yet flavorful meal? My Minute Chili Garlic Steak Noodles deliver just that! With tender steak, zesty garlic,

Older posts
Newer posts
← Previous Page1 … Page3 Page4 Page5 … Page85 Next →

dsad

© 2026 tastyhatch • Built with GeneratePress

Our Policies

  • Copyright Policy
  • Cookie Policy
  • GDPR Policy
  • Privacy Policy
  • Disclaimer
  • Terms Of Use

More Information

  • Home
  • About
  • Contact
  • Appetizers
  • Dessert
  • Dinner
  • Drinks
©2026, tastyhatch About Back To Top