Skip to content
DisclaimerTerms Of UseGDPR PolicyCookie Policy

tastyhatch

  • Home
  • Drinks
  • Appetizers
  • Dinner
  • Dessert
  • About
  • Contact
  • Privacy Policy
DisclaimerTerms Of UseGDPR PolicyCookie Policy

NO-ING-IMG

The right ingredients make this chowder truly special. Here’s what you need: - 5 cups of fresh or frozen corn kernels - 1 medium onion, finely chopped - 2 cloves garlic, minced - 3 medium potatoes, peeled and cut into small cubes - 4 cups vegetable broth - 1 cup heavy cream or coconut cream - 1 teaspoon dried thyme - 1 teaspoon smoked paprika - Salt and pepper to taste - 2 tablespoons olive oil - Fresh chives or parsley, chopped, for garnish Each ingredient brings a unique flavor to the dish. Fresh corn adds sweetness. Onions and garlic give a savory base. Potatoes add heartiness, while the cream makes it rich and smooth. When choosing corn, fresh is best for flavor. Frozen corn works well too if fresh isn’t available. For the cream, both heavy cream and coconut cream are great options. Coconut cream adds a lovely tropical twist. Don't forget about the herbs and spices! Thyme gives an earthy note. Smoked paprika adds a slight warmth and depth. Adjust salt and pepper to your liking. Gather your ingredients, and let’s create a bowl of comfort! This chowder warms the soul and fills the belly. First, heat the olive oil in a skillet over medium heat. Add the finely chopped onion and minced garlic. Cook them for about 5 minutes. You want the onion to look translucent and smell great. Stir occasionally to avoid browning. Next, transfer your sautéed onion and garlic mixture to the slow cooker. Add in the corn, diced potatoes, vegetable broth, dried thyme, and smoked paprika. Don’t forget to season with salt and pepper. Mix everything well so that the flavors blend. After mixing, secure the lid on your slow cooker. Set the cooker to low heat. Let the chowder cook for 6 to 8 hours. It will be ready when the potatoes are tender and easy to pierce with a fork. Once cooking is done, it's time to add creaminess. Use an immersion blender to purée about half of the chowder right in the slow cooker. Blend until you reach your preferred creaminess. You can leave some whole kernels and potato chunks for texture. Now, stir in the heavy cream or coconut cream. Mix it all together until well blended. Taste your chowder and adjust the seasonings with more salt and pepper if needed. To bring out the best flavors in your chowder, start by sautéing your aromatics. Heat olive oil in a skillet over medium heat. Add chopped onion and minced garlic. Sauté for about five minutes. You want them to be soft and fragrant, not browned. This step adds depth to your dish. Adjust the seasoning to fit your taste. Start with salt and pepper, then add smoked paprika and thyme. Taste as you go. This way, you can make it just right for you. Using an immersion blender is my favorite way to get that creamy texture. You can blend part of the chowder right in the slow cooker. Just blend until you reach your desired creaminess. If you don’t have one, a traditional blender works too. Just be careful when transferring the hot soup. For thickness, if you want it creamier, add more heavy cream or coconut cream. If you’d like it thicker, blend a bit more of the chowder. If your chowder turns out too thick, simply add more vegetable broth. Stir well and let it heat up. This will help balance the texture. If you find your chowder is too thin, cook it a bit longer. The heat will help some of the liquid evaporate. You can also mix in a little cornstarch or flour slurry to thicken it up. Just make sure to stir well to avoid lumps. {{image_4}} You can change up the potatoes in this chowder. For a creamier taste, use Yukon gold potatoes. Sweet potatoes add a nice twist, too. You can also swap heavy cream with plant-based options. Coconut cream works well and keeps the chowder rich. Almond milk can lighten it up, but it won't be as thick. Adding spices can really kick up the flavor! Try a dash of cayenne pepper for heat or a sprinkle of fresh dill for brightness. You can also add protein. Cooked bacon adds a savory crunch, while shredded chicken makes it hearty. Both options bring a new layer of taste. This chowder pairs well with crusty bread or a fresh salad. Try serving it with grilled cheese for a warm meal. For a fun touch, you can add toppings. Crumbled bacon, diced avocado, or a swirl of cream can elevate the dish. Fresh herbs like chives or parsley add color and flavor. Store leftover chowder in an airtight container. This keeps it fresh and tasty. You can keep it in the fridge for up to five days. Make sure it cools down first before sealing. To freeze chowder, let it cool completely. Pour it into freezer-safe bags or containers. Leave some space at the top for expansion. You can freeze it for up to three months. When you want to eat it, take it out and thaw it in the fridge overnight. For a quick thaw, place the sealed bag in cold water for an hour. You can reheat chowder on the stovetop or in the microwave. For the stovetop, pour it into a pot and heat over low. Stir often to prevent sticking. If using the microwave, put it in a microwave-safe bowl. Heat in one-minute intervals, stirring in between, until warm. Enjoy your creamy corn chowder again! Slow Cooker Creamy Corn Chowder stays fresh for about 3 to 4 days in the fridge. Store it in an airtight container. If you want to keep it longer, you can freeze it. In the freezer, it lasts about 2 to 3 months. Just make sure to thaw it in the fridge overnight before reheating. Yes, you can make this chowder vegan! Simply replace the heavy cream with coconut cream or another plant-based cream. Use vegetable broth and skip any dairy. This way, you can enjoy a tasty vegan version that still has great flavor. If you don't have vegetable broth, you can use chicken broth or even water. For more flavor, add herbs or spices to the water. You can also make a quick broth using bouillon cubes dissolved in water. Absolutely! This chowder is flexible. You can add diced carrots, bell peppers, or even zucchini. Just make sure to cut them small so they cook well. Adding more veggies boosts the nutrients and flavor. Yes, you can make this chowder in advance. Prepare it up to the blending step. Then, cool it down and store it in the fridge. When you're ready to serve, just blend in the cream and heat it up. This makes it super easy for busy days! This blog covered a delicious Slow Cooker Creamy Corn Chowder. You learned about ingredients, cooking steps, and tips for perfect flavor. The recipe is flexible, allowing for variations like different potatoes or added proteins. Proper storage methods help keep your chowder fresh. Remember, cooking is about enjoying the process and sharing with others. Experiment with flavors and make this chowder your own. I hope you savor every spoonful!

Slow Cooker Creamy Corn Chowder Delightful Comfort Dish

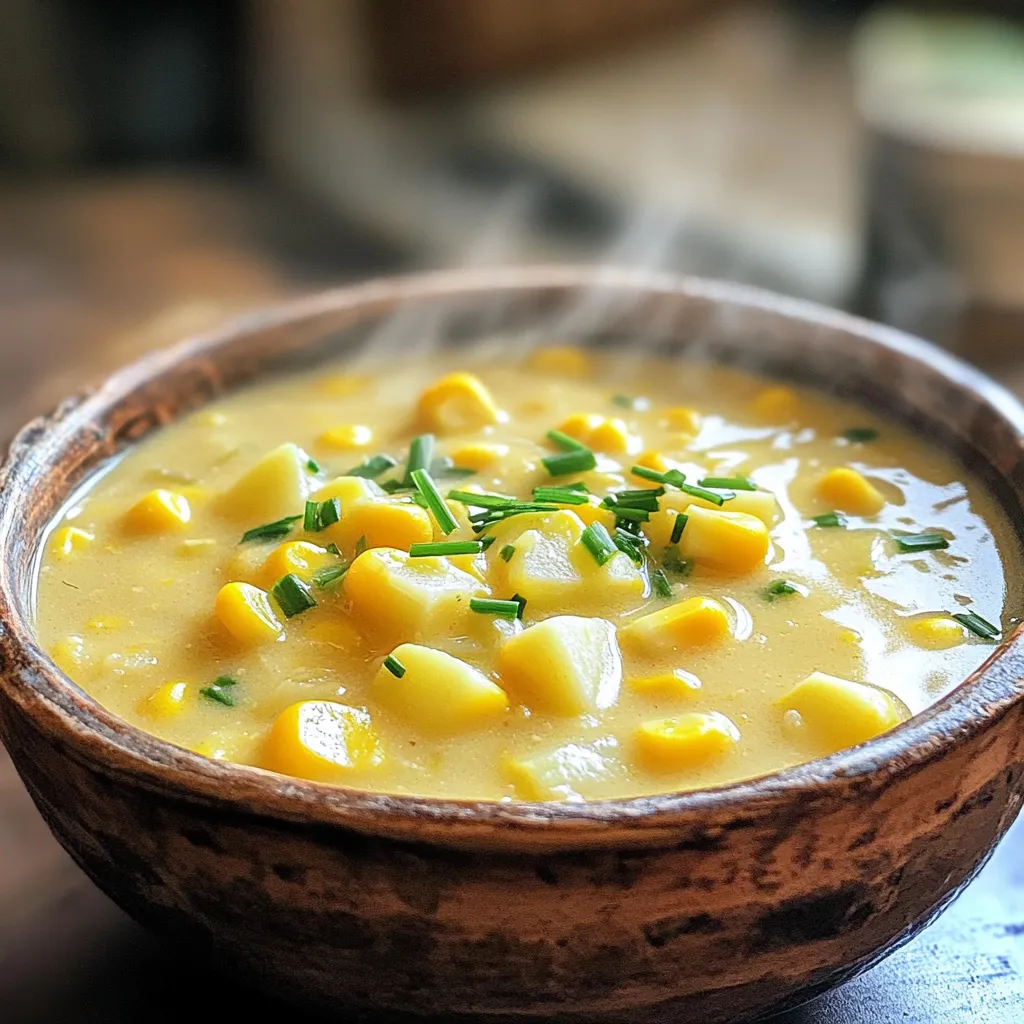
Looking for a warm and cozy dish? My Slow Cooker Creamy Corn Chowder is just the answer. Packed with fresh

To make Air Fryer Crispy Tofu Nuggets, gather these items: - 1 block (14 oz) firm tofu, well-pressed and drained - 1/2 cup cornstarch - 1/2 cup panko breadcrumbs - 1 tablespoon nutritional yeast - 1 teaspoon garlic powder - 1 teaspoon onion powder - 1/2 teaspoon smoked paprika - Salt and black pepper to taste - 2 tablespoons soy sauce - 1 tablespoon olive oil or sesame oil You can switch some ingredients if needed. Here are some options: - Firm Tofu: Use extra-firm tofu for more crunch. - Cornstarch: Arrowroot powder works well if you need a substitute. - Panko Breadcrumbs: Regular breadcrumbs can replace panko but may not be as crunchy. - Nutritional Yeast: Skip it if you want a simpler flavor. - Soy Sauce: Tamari is a good gluten-free option. - Olive Oil: Any vegetable oil is fine if you don't have olive oil. Each serving of these tofu nuggets offers a tasty and healthy snack. Here’s the breakdown per serving: - Calories: Approximately 150 - Protein: 8 grams - Carbohydrates: 16 grams - Fat: 6 grams - Fiber: 1 gram These nuggets are a great way to enjoy a plant-based snack that is both crunchy and satisfying. They fit well into many diets and are easy to make! Start with a block of firm tofu. Make sure to press it well. Pressing removes excess water. This step helps the tofu get crispy. Cut the tofu into bite-sized cubes. Aim for 1-inch pieces. This size ensures even cooking. Place the cubes on a clean towel. Let them sit for a few minutes to dry. In one bowl, mix cornstarch, garlic powder, onion powder, smoked paprika, salt, and pepper. This blend adds flavor and crunch. In another bowl, whisk soy sauce and olive oil. Dip each tofu cube into the soy sauce mix. Make sure every side gets coated. Then transfer the cubes to the cornstarch mix. Toss gently until coated evenly. Next, move the coated tofu to the panko breadcrumbs. Press lightly so the crumbs stick well. Preheat your air fryer to 400°F (200°C) for about 5 minutes. This ensures the nuggets cook evenly. Spray the air fryer basket with a bit of cooking spray. Place the tofu nuggets in a single layer. Avoid overcrowding the basket to allow air flow. Air fry them for 15 to 18 minutes. Flip the nuggets halfway through. They should be golden brown and crispy when done. Once finished, let them cool for a moment before serving. Enjoy your crunchy tofu nuggets! To get your tofu nuggets extra crispy, use panko breadcrumbs. They create a nice crunch. Press the tofu well to remove moisture. This helps the nuggets stay crispy inside the air fryer. After coating, let the nuggets sit for a few minutes before frying. This allows the coating to set up. I love pairing these nuggets with sweet chili sauce. It adds a nice kick. You can also try spicy sriracha for heat. For a creamier option, mix soy sauce with a bit of mayo and lime juice. This gives a cool contrast to the crunchy nuggets. Serve the crispy tofu nuggets on a fun plate. You can add sliced veggies for color. Carrot sticks or cucumber slices work great. Garnish with chopped scallions or sesame seeds for a nice touch. This makes your dish look fancy and appetizing. {{image_4}} To add some heat to your tofu nuggets, try making spicy tofu nuggets. Start with the basic recipe. Then, add cayenne pepper or chili powder to the dry mix. You can also mix sriracha into the soy sauce. This will give your nuggets a nice kick. Adjust the spice to your taste. If you love heat, don't hold back! For a fresh twist, make herb-infused nuggets. Use dried herbs like oregano, thyme, or basil in the cornstarch mixture. You can also add fresh herbs if you have them. Just chop them finely before mixing. This will give your tofu a lovely aroma and flavor. These nuggets pair well with a light dip. To make gluten-free tofu nuggets, swap regular breadcrumbs for gluten-free panko. You can find this at most grocery stores. Make sure your soy sauce is also gluten-free. Tamari is a great choice here. It has a similar taste but is safe for gluten-free diets. Enjoy your crispy nuggets without worry! You can store leftover tofu nuggets in the fridge. Place them in an airtight container. They stay fresh for about 3 to 4 days. Make sure they cool down before sealing. This helps keep them crispy. Avoid stacking them too high, so they don’t get soggy. To reheat tofu nuggets, use the air fryer for best results. Preheat it to 350°F (175°C). Air fry the nuggets for about 5 to 7 minutes. This will make them crispy again. You can also use an oven. Set it to 350°F (175°C) and bake for about 10 minutes. Check them often to avoid overcooking. If you want to freeze your tofu nuggets, let them cool completely first. Place them in a freezer-safe bag or container. They can last up to 2 months in the freezer. To cook from frozen, do not thaw. Just air fry them straight from the freezer at 400°F (200°C) for about 15-20 minutes. Enjoy the crunch! To make these tofu nuggets gluten-free, swap regular soy sauce for tamari. Tamari is a gluten-free soy sauce alternative. Always check the panko breadcrumbs. Some brands offer gluten-free options made from rice or corn. You can also skip the breadcrumbs entirely. Use crushed gluten-free snacks for a similar crunch. Using soft tofu is not ideal for this recipe. Firm tofu gives the best texture and holds its shape well. Soft tofu tends to break apart during cooking. If you want a softer nugget, you can try silken tofu. Just be prepared for a different texture and adjust cooking time. There are many tasty dipping sauces for your tofu nuggets. Here are a few favorites: - Sweet chili sauce - Spicy sriracha - Soy sauce mixed with rice vinegar - Peanut sauce - Tangy barbecue sauce These sauces add flavor and fun to your snack! Feel free to mix and match to find your perfect pair. This blog post covered everything you need to make tasty tofu nuggets. We explored the ingredients, how to prep and cook them, and tips for extra crispiness. I shared fun variations and how to store and reheat your nuggets. Tofu nuggets are not only easy to make but also very versatile. Enjoy experimenting with flavors and sharing them with friends and family. Have fun in the kitchen and savor every bite!

Air Fryer Crispy Tofu Nuggets Simple and Crunchy Snack

Looking for a tasty snack that’s easy to make? You’ll love these air fryer crispy tofu nuggets! They are simple

- 1 lb skinless and boneless salmon fillet - 2 tablespoons honey - 2 tablespoons soy sauce - 1 tablespoon fresh minced garlic - 1 teaspoon freshly grated ginger - 1 tablespoon olive oil - Sesame seeds for garnish - 2 green onions, finely chopped for garnish - Sea salt to taste - Freshly cracked black pepper to taste Let’s break this down. First, we need fresh salmon. The skinless and boneless fillet is perfect for our bites. This fish is rich in omega-3 fatty acids, making it a healthy choice. Next, honey and soy sauce combine for a sweet and salty flavor. Honey adds a nice glaze when air frying. Fresh garlic and ginger give the salmon a zesty kick. They also enhance the aroma while cooking. You might want to add olive oil. It helps to keep the salmon moist. For garnish, sesame seeds and green onions add color and crunch. The seeds give a nutty flavor, while green onions add freshness. Finally, season with sea salt and black pepper to taste. These simple seasonings elevate the dish without overpowering the main flavors. Gather these ingredients, and you're ready to make delicious air fryer honey garlic salmon bites! Start by gathering your ingredients. In a medium bowl, combine 2 tablespoons of honey, 2 tablespoons of soy sauce, 1 tablespoon of minced garlic, 1 teaspoon of freshly grated ginger, and 1 tablespoon of olive oil. Use a whisk to mix these well. You want a smooth and tasty marinade. Next, take 1 pound of skinless and boneless salmon fillet. Cut it into even bite-sized cubes. Coat each piece in your marinade. Make sure every cube gets a nice layer. Cover the bowl with plastic wrap and place it in the fridge. Allow it to marinate for 30 minutes to 1 hour. This helps the flavors soak in. Now, it’s time to cook! Preheat your air fryer to 400°F (200°C). While it heats, remove the salmon from the fridge. Let any extra marinade drip off. Arrange the salmon in a single layer in the air fryer basket. Avoid crowding the pieces to ensure they cook evenly. Cook the salmon bites for about 8 to 10 minutes. At the halfway mark, give the basket a gentle shake. This will help the salmon crisp up nicely. For extra crunch, sprinkle sesame seeds over the salmon bites during the last 2 minutes of cooking. Once done, carefully take them out. Garnish with finely chopped green onions for a fresh touch before serving. To get the best results, always arrange the salmon bites in a single layer. This way, the hot air can move around each piece. If they are stacked, some pieces may cook unevenly. Shaking the basket halfway through cooking helps, too. It lets each bite get crispy and brown all over. For the best taste, marinate the salmon for at least 30 minutes. If you have time, let it soak for up to an hour. This helps the flavors sink in deep. You can also add sesame seeds for a nice crunch. Sprinkle them on top during the last two minutes of cooking for added texture. When serving, place the salmon bites on a nice platter. Drizzle a little extra sauce over them for shine. Garnish with finely chopped green onions for color. Adding a slice of lime or lemon on the side brightens the dish and gives a fresh kick. {{image_4}} If you need a gluten-free choice, use tamari. Tamari is a great substitute for soy sauce. It has a similar taste but does not contain wheat. This change keeps the dish tasty and safe for those sensitive to gluten. Simply swap out the soy sauce for tamari in the marinade. Your air fryer honey garlic salmon bites will still shine with flavor. You can also try this recipe with chicken or tofu. Just cut chicken breast or firm tofu into bite-sized pieces. Follow the same marinating steps. Both proteins soak up the flavors well. Chicken gives a classic taste, while tofu adds a nice plant-based option. Both are delicious when air-fried. Feel free to mix in different spices or herbs. Adding a pinch of chili flakes will give it heat. Fresh herbs like cilantro or basil can add freshness. For a smoky flavor, try adding paprika. Experimenting with these flavors makes the dish your own. You can create a new favorite each time! To store your leftover honey garlic salmon bites, place them in an airtight container. This keeps them fresh and tasty. You can use glass or plastic containers with tight lids. Make sure to let them cool to room temperature before sealing. Store them in the fridge for up to three days. The best way to reheat salmon bites is in the air fryer. Preheat the air fryer to 350°F (175°C). Place the salmon bites in a single layer in the basket. Heat them for about 4-5 minutes, shaking halfway through. This keeps them crispy and warm. If you don't have an air fryer, you can also use a microwave. Heat them in short bursts of 30 seconds, checking each time to avoid overcooking. You can freeze honey garlic salmon bites for later. To do this, let them cool completely first. Then, arrange them in a single layer on a baking sheet. Freeze them for about an hour until solid. After that, transfer them to a freezer-safe bag. Remove as much air as you can. They can stay frozen for up to three months. When you want to cook them, thaw them overnight in the fridge. Cook them in the air fryer straight from frozen, adding a few extra minutes to the cooking time. Yes, you can use frozen salmon. Just remember to thaw it first. Place the salmon in your fridge overnight or use the quick method. For the quick method, seal the salmon in a bag and submerge it in cold water. This usually takes about 30 minutes. After thawing, dry the salmon well before cutting. This helps the marinade stick better. To check if the salmon is done, use a meat thermometer. The internal temperature should reach 145°F (63°C). If you don’t have a thermometer, look for these signs: the salmon should be opaque and flake easily with a fork. If it’s still shiny and raw in the middle, cook it a bit longer. Absolutely! If you want it less sweet, cut back on the honey. Start with one tablespoon instead of two. You can also add more soy sauce to balance the taste. For a sweeter flavor, add a bit more honey. Just taste the marinade before adding the salmon. This way, you can find the perfect balance for your taste buds. This blog covered how to make tasty air-fried salmon. You learned about the main and optional ingredients. I shared tips on marinating, cooking, and storing. You can even try variations for different flavors. In the end, this dish is easy and fun. It’s a great way to enjoy salmon, and you can customize it to fit your taste. Get cooking, and enjoy your meal!

Air Fryer Honey Garlic Salmon Bites Tasty and Simple

Looking for a quick and tasty dinner idea? These Air Fryer Honey Garlic Salmon Bites are perfect! You’ll love how

- 1 cup rolled oats - 1 cup all-purpose flour - 1/2 teaspoon baking soda - 1 teaspoon baking powder - 1 teaspoon ground cinnamon - 1/2 teaspoon ground nutmeg - 1/4 teaspoon ground ginger - 1/2 teaspoon salt - 1/2 cup unsalted butter, softened - 1/2 cup brown sugar - 1/2 cup granulated sugar - 1/2 cup pumpkin puree - 1 large egg - 1 teaspoon vanilla extract - 1/2 cup walnuts or pecans, chopped - 1/2 cup raisins or chocolate chips - 1 cup powdered sugar - 2 tablespoons pure maple syrup - 2-3 tablespoons milk When I bake pumpkin oatmeal cookies, I love the mix of flavors. First, gather your ingredients. The dry ingredients make a solid base. I recommend using rolled oats for texture. The flour gives the cookies their structure. Baking soda and baking powder help them rise. Spices like cinnamon, nutmeg, and ginger add warmth. Salt balances the sweetness. Next, focus on the wet ingredients. Softened butter creates a creamy mix. Brown sugar makes the cookies rich and adds depth. Granulated sugar gives sweetness. Pumpkin puree keeps them moist. Don’t forget the egg for binding. Vanilla extract adds a lovely aroma. You can make these cookies even better with add-ins. Chopped nuts give a nice crunch. Raisins or chocolate chips add sweetness and fun. Choose what you love! Finally, the maple glaze is the icing on the cake. Mix powdered sugar with maple syrup and milk. The glaze makes the cookies shine. Adjust the milk for the thickness you like. Now you have everything to create these delightful cookies! - Preheat the oven to 350°F (175°C). - In a bowl, mix rolled oats, flour, baking soda, baking powder, cinnamon, nutmeg, ginger, and salt. Make sure it is combined well. - In another bowl, cream the softened butter, brown sugar, and granulated sugar until fluffy. This takes about 2-3 minutes. - Add pumpkin puree, egg, and vanilla to the creamed mixture. Beat until smooth and blended. - Gradually mix in the dry ingredients. Stir until just combined to avoid overmixing. - If you want, fold in nuts and raisins or chocolate chips for extra flavor. - Use a tablespoon or cookie scoop to drop rounded dough onto a lined baking sheet. Space them about 2 inches apart. - Bake for 12-15 minutes. The cookies are done when the edges look golden. - Let them cool on a wire rack before glazing. - In a bowl, whisk powdered sugar, maple syrup, and milk until smooth. Adjust the milk for the thickness you like. - Wait until the cookies cool completely before adding the glaze. - Drizzle the glaze over the cookies using a spoon or piping bag. Let it set before serving. - Avoid overmixing dough for softer cookies. Overmixing can make cookies tough. - Ensure butter is at room temperature for better creaming. Soft butter blends well with sugars. - Use a piping bag for precise glaze application. This gives you control over the design. - Allow glaze to set to prevent smudging. This step keeps your cookies looking neat. - Serve cookies with warm drinks for a cozy treat. Hot cocoa or spiced tea pairs well. - Garnish with crushed nuts or a dusting of cinnamon. This adds flavor and a nice look. {{image_4}} You can change the flavor of these cookies easily. Instead of using individual spices, add pumpkin spice. It gives a warm and cozy taste. For a healthier twist, swap butter for applesauce. This makes the cookies moist and lower in fat. If you want a chewier cookie, use quick oats. They give a different bite than rolled oats. You can also play with the mix-ins. Try different nuts like almonds or hazelnuts. Dried fruits, such as cranberries or apricots, add a nice sweetness. The glaze is a fun way to add flavor. Try using almond extract instead of vanilla in the glaze. This gives a nice nutty twist. You can also replace maple syrup with honey or agave syrup. Each option adds its own special touch to the cookies. Store your pumpkin oatmeal cookies in an airtight container at room temperature. This keeps them fresh and tasty. If you want them to last longer, refrigerate them. The cool air helps maintain their flavor. You can freeze unglazed cookies for up to 3 months. This is a great way to save some for later. When you’re ready to eat them, thaw the cookies. After thawing, glaze them before serving for that fresh touch. If you want warm cookies, pop them in the microwave for a few seconds. This brings back that fresh-baked feel. For a crunchy texture, refresh them in the oven. Just a few minutes will do the trick! Yes, substitute butter with dairy-free alternatives. Options include coconut oil or vegan butter. These swaps work well and still keep the cookies delicious and moist. You can enjoy the same great taste while sticking to your dietary needs. Look for golden edges and set centers. This means your cookies are just right. If the edges are dark brown, they might be overbaked. Keep an eye on them during the last few minutes to ensure perfect results. Yes, ensure it is pureed and well-drained to avoid excess moisture. Fresh pumpkin adds a nice flavor. Just cook it until soft, then blend it until smooth. This way, your cookies stay moist and full of pumpkin goodness. Store in a single layer in an airtight container to preserve the glaze. This keeps your cookies fresh and the glaze intact. If you stack them, the glaze may stick to the cookies, ruining the look. Enjoy your cookies for days by storing them correctly! These pumpkin cookies mix tasty ingredients to create a treat you’ll love. With both dry and wet ingredients, plus a tasty glaze, each step counts. Remember to avoid overmixing for soft, chewy cookies. You can even switch up flavors and add different nuts. Store them safely or freeze for later. Enjoy these cookies with friends or cozy up with a drink. Baking should be fun and rewarding, and these cookies are a sweet way to do just that!

Pumpkin Oatmeal Cookies with Glaze Bakery Delight

Welcome to the delightful world of Pumpkin Oatmeal Cookies with Glaze! These cookies are soft, chewy, and perfect for fall.

To make this creamy spinach artichoke dip, gather these simple ingredients: - 1 (14-ounce) can artichoke hearts, thoroughly drained and coarsely chopped - 1 cup frozen spinach, fully thawed and excess moisture squeezed out - 1 cup cream cheese, brought to room temperature - 1 cup sour cream - 1 cup shredded mozzarella cheese - 1/2 cup grated Parmesan cheese - 2 cloves garlic, finely minced - 1 teaspoon onion powder - 1/2 teaspoon red pepper flakes (optional for added heat) - Salt and freshly ground black pepper to taste - Tortilla chips or freshly sliced baguette for serving You can swap some ingredients if needed. Use fresh spinach instead of frozen for a brighter taste. If you want a lighter dip, try Greek yogurt instead of sour cream. For a dairy-free option, use cashew cream or a vegan cream cheese. If you want more flavor, add a bit of lemon juice or zest. You can also use different cheeses, like cheddar or gouda, for unique flavors. Quality matters when it comes to taste. Choose artichoke hearts packed in water, not oil, for a fresher flavor. Fresh spinach should look bright green with no wilting. Cream cheese should be soft for easy mixing. For cheese, opt for freshly shredded mozzarella instead of pre-packaged. It melts better and tastes creamier. Always check for freshness dates on sour cream and cheese to ensure the best dip. First, gather your ingredients. You will need artichoke hearts, spinach, cream cheese, sour cream, mozzarella cheese, Parmesan cheese, garlic, onion powder, and red pepper flakes. Drain and chop the artichoke hearts. Thaw the spinach and squeeze out extra moisture. This step helps keep the dip from being watery. Make sure the cream cheese is at room temperature so it mixes well. Now, place the cream cheese, sour cream, and minced garlic in the slow cooker. Mix them until smooth and creamy. Next, fold in the chopped artichokes and spinach. Stir gently to combine everything nicely. Add the mozzarella cheese, Parmesan cheese, onion powder, and red pepper flakes if you like some heat. Season with salt and black pepper to taste. Secure the slow cooker lid. Cook on low for 2-3 hours or on high for 1-1.5 hours. Stir occasionally to keep the dip well-blended as it heats. It’s ready when it’s hot and bubbling. Once the cooking time is up, stir the dip one last time to mix everything evenly. For a nice touch, transfer the dip to a decorative bowl. You can garnish it with fresh parsley or basil for a pop of color. Serve it warm with tortilla chips or slices of baguette. Enjoy your creamy spinach artichoke dip! To get the best creamy texture, use room temperature cream cheese. This helps it mix well with other ingredients. You want a smooth base for the dip. Also, squeeze out as much water as you can from the spinach. Too much moisture will make the dip watery. Lastly, stir well after cooking to keep everything blended and creamy. For perfect results, cook on low for 2-3 hours. If you're in a hurry, you can cook on high for 1-1.5 hours. Check the dip often. Stir it every 30 minutes to spread the heat. When it’s hot and bubbly, you know it’s ready to serve. Serve the dip warm. It pairs great with tortilla chips or slices of baguette. You can also add a fun twist by garnishing with fresh herbs like parsley. This makes it look fancy and inviting. For a crowd, place the dip in a large bowl. Guests can dig in easily. {{image_4}} If you love heat, consider making a spicy version. Add 1/2 teaspoon of cayenne pepper for a nice kick. You can also increase the amount of red pepper flakes. This adds warmth without overpowering the dip. If you want more flavor, mix in some diced jalapeños. They will give a fresh taste and extra heat. Want a lighter dip? Swap out full-fat cream cheese for low-fat cream cheese. Use Greek yogurt instead of sour cream. For a vegan option, use plant-based cream cheese and yogurt. Make sure the cheeses are dairy-free. This keeps the dip creamy while reducing calories. You can customize the dip with fun add-ins. Try adding a handful of cooked, crumbled bacon for a savory touch. Chopped sun-dried tomatoes can add sweetness and depth. Fresh herbs like parsley or basil will brighten the flavor. You can also mix in artichoke hearts with a hint of lemon zest for a zesty twist. To keep your creamy spinach artichoke dip fresh, store it in an airtight container. Make sure it cools completely before sealing. This helps avoid moisture buildup. You can keep it in the fridge for up to three days. If you want to keep it longer, consider freezing. When you're ready to enjoy the dip again, gently reheat it. You can use a microwave or a stovetop. If using the microwave, heat in short bursts of 30 seconds. Stir in between to ensure even warming. On the stovetop, place it in a pan over low heat. Stir often until it’s hot and creamy again. Freezing is a great option if you have extra dip. To freeze, place it in a freezer-safe container. Make sure to leave some space at the top for expansion. The dip can stay fresh for up to two months. When you’re ready to eat it, thaw it in the fridge overnight before reheating. Yes, you can use fresh spinach! Start with about 10 ounces of fresh spinach. Cook it in a pan until it wilts. This will take just a few minutes. After that, squeeze out the extra water. This step is key to keep your dip from being too watery. Fresh spinach adds great taste and a nice texture too. You can store your dip in the fridge for up to four days. Make sure to place it in an airtight container. This will keep it fresh. When you are ready to eat, just reheat it in the microwave or on the stove. Stir it well to get an even heat. It will still taste delicious! Tortilla chips are a classic choice. They add a nice crunch. You can also serve it with slices of baguette. Fresh veggies like carrots and celery are great too. They add color and a healthy touch. You could even try pita chips for a fun twist! This blog post covered the key steps to make spinach artichoke dip. We explored the right ingredients and possible substitutions. I shared tips for ensuring quality and texture, as well as cooking instructions. You learned how to serve it perfectly and storage tips for leftovers. In closing, enjoy making this dish your own with variations. With these tips, your dip can impress any guest. Happy cooking!

Slow Cooker Creamy Spinach Artichoke Dip Delight

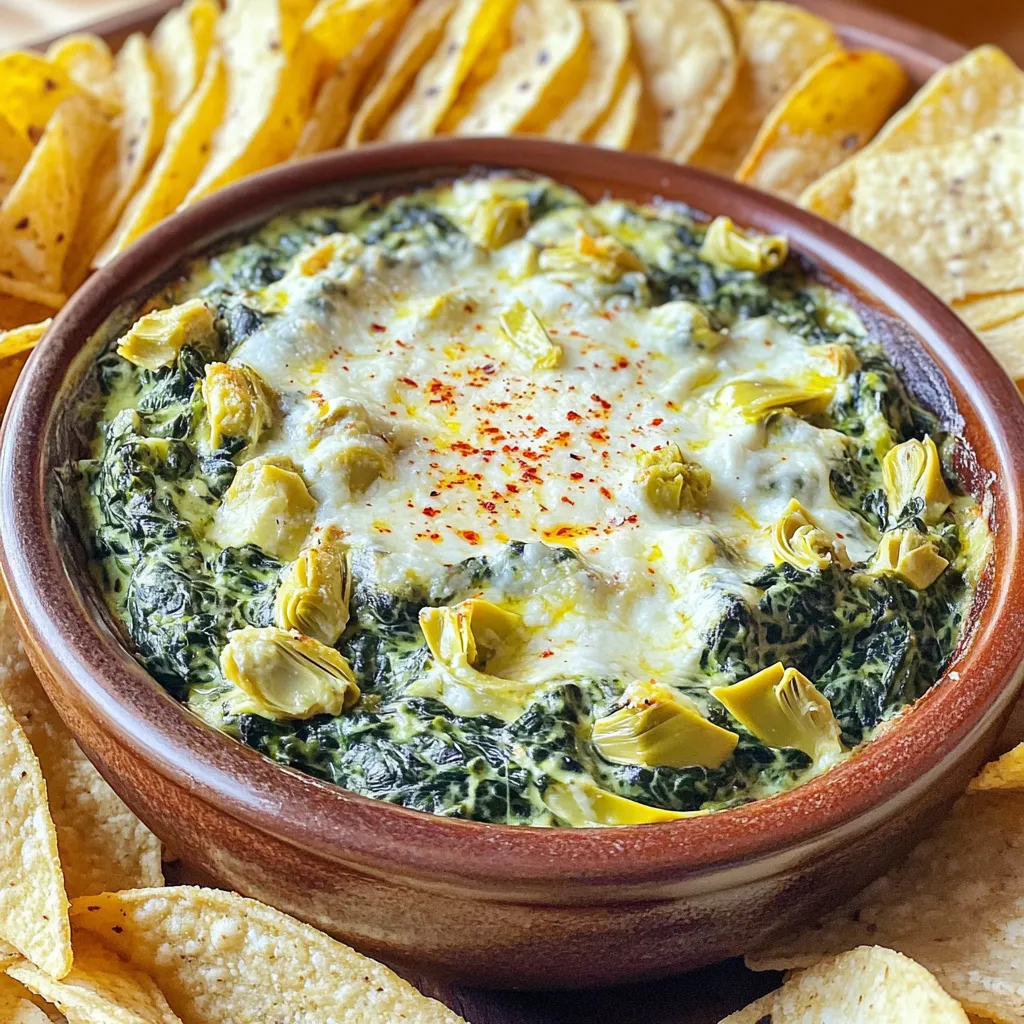
Looking for a warm, creamy dip that will wow your guests? You’ve hit the jackpot! This Slow Cooker Creamy Spinach

- 4 salmon fillets (about 6 ounces each) - 2 cups fresh green beans, trimmed and rinsed - 1/4 cup sweet chili sauce For this dish, I start with fresh salmon fillets. They give a nice flavor and texture. I also love using fresh green beans, as they add a lovely crunch. The sweet chili sauce ties it all together with its bold flavor. - 2 tablespoons low-sodium soy sauce - 1 tablespoon extra virgin olive oil - 2 cloves garlic, finely minced - 1 teaspoon fresh ginger, grated I use low-sodium soy sauce to keep the dish lighter. It gives a savory twist without being too salty. Extra virgin olive oil helps the green beans roast nicely. I always add minced garlic and grated ginger for that extra kick. - Toasted sesame seeds for garnish - 2 green onions, thinly sliced for garnish - Salt and freshly ground black pepper, to taste For garnishes, I sprinkle toasted sesame seeds and sliced green onions. They add a nice pop of color and flavor. Don't forget to season the salmon and green beans with salt and pepper for the best taste. 1. Preheating the oven: First, set your oven to 400°F (200°C). This step makes sure your salmon cooks evenly. To make cleanup easy, line a large baking sheet with parchment paper. 2. Preparing the sweet chili sauce: In a small bowl, mix together the sweet chili sauce, low-sodium soy sauce, minced garlic, and grated ginger. Stir well until all these flavors blend together nicely. 1. Placing salmon on the baking sheet: Take the salmon fillets and place them in the center of your prepared baking sheet. Make sure to season them with salt and freshly ground black pepper. This adds great flavor. 2. Adding and tossing green beans: Scatter the fresh green beans around the salmon. Drizzle the extra virgin olive oil over the green beans. Gently toss them to coat every piece with oil. This helps them roast perfectly. 1. Coating the salmon: Pour half of the sweet chili sauce mixture over the salmon. Ensure each fillet is covered well. Save the rest for later to add extra flavor. 2. Roasting in the oven: Place the baking sheet in your preheated oven. Roast for about 12 to 15 minutes. The salmon should flake easily with a fork. The green beans should be tender but still have a bit of crunch. 3. Adding final touches before serving: After cooking, take the baking sheet out of the oven. Drizzle the reserved sweet chili sauce over both the salmon and the green beans. This adds a delicious finishing touch. - Ensuring perfect salmon doneness: Cook salmon until it flakes easily with a fork. This usually takes 12-15 minutes at 400°F. Check it at the 12-minute mark. If it looks opaque and flakes nicely, it’s ready. - Achieving crispy green beans: To get those green beans crispy, spread them out on the pan. Make sure they are not overcrowded. Toss them in olive oil before roasting. This helps them get that nice crunch. - Customizing your sweet chili sauce: You can adjust the sweetness by adding more or less sweet chili sauce. For a bolder taste, mix in a splash of soy sauce. This adds depth to the flavor. - Adding heat with chili flakes: If you like heat, sprinkle chili flakes on your salmon and green beans. Just a pinch can elevate the dish. Start small and add more if you want extra spice. - Serving suggestions: Serve the dish right on the baking sheet for a fun look. If you want a fancy touch, plate each portion separately. This makes it feel special for guests. - Adding additional garnishes: Top with toasted sesame seeds and sliced green onions for color. A wedge of lime adds a fresh twist. These small touches make the dish pop visually and taste-wise. {{image_4}} You can easily swap salmon for chicken. Chicken thighs or breasts work well. Just adjust the cooking time. Cook chicken until it reaches 165°F for safety. If you want a vegetarian option, try tofu or tempeh. Marinate them in the sweet chili sauce. This brings great flavor to your dish. Feel free to add more vegetables! Bell peppers add a sweet crunch. Carrots or zucchini can also work nicely. Seasonal greens like asparagus or broccoli are great choices. They roast well and bring color to your dish. If you want a different taste, replace sweet chili sauce with teriyaki. It gives a nice, savory flavor. You can also add herbs like cilantro or basil for freshness. Spices like cumin or smoked paprika can add depth. Experiment to find your favorite flavors! To keep your sweet chili salmon and green beans fresh, store leftovers properly. First, let the dish cool to room temperature. Then, put it in an airtight container. This method helps seal in moisture and flavor. - Best practices for refrigeration: Place your container in the fridge. It stays good for up to three days. Make sure to label it with the date you stored it. - How to store in the freezer: For longer storage, freeze the leftovers. Use a freezer-safe container or a heavy-duty freezer bag. When stored this way, it can last for up to three months. Just remember to thaw it in the fridge overnight before reheating. Reheating is key for delicious leftovers. Follow these tips to keep the salmon moist and the green beans crisp. - Avoiding dry salmon when reheating: Preheat your oven to 350°F (175°C). Place the salmon on a baking sheet. Add a splash of water or broth to keep it moist. Cover with foil and heat for about 10-15 minutes. - Maintaining green bean texture: To keep the green beans crisp, add them to the oven for just 5 minutes. Check them often. You want them warm but not overcooked. Meal prep makes cooking easier on busy days. Here are my tips to prepare this dish in advance. - Preparing ingredients in advance: Chop the green beans and make the sauce a day ahead. Store the ingredients in separate containers in the fridge. This saves time when you're ready to cook. - Making this dish for meal prep: You can cook a larger batch and divide it into meal prep containers. This way, you have healthy lunches or dinners ready to go. Just reheat as needed, and enjoy a tasty meal! The best oven temperature for salmon is 400°F (200°C). This heat cooks the fish evenly and keeps it moist. The internal temperature of cooked salmon should reach 145°F (63°C). Use a food thermometer to check this easily. Cooking time for salmon on a sheet pan varies. For fillets that are about one inch thick, it takes about 12 to 15 minutes. Thicker fillets may need a few extra minutes. If your oven runs hot or cold, adjust the time slightly. Yes, you can use frozen green beans in this dish. Just remember to thaw them before cooking. This helps them cook evenly with the salmon. If you skip thawing, add a few extra minutes to the cooking time. This dish combines salmon, green beans, and sweet chili sauce for a tasty meal. I’ve shared easy steps, tips, and variations to help you cook confidently. Remember to store your leftovers properly and heat them without losing texture. With these tools, you can create a delicious dinner that fits your style. Enjoy experimenting with flavors and ingredients, and make this dish your own. Happy cooking!

Sheet-Pan Sweet Chili Salmon and Green Beans Delight

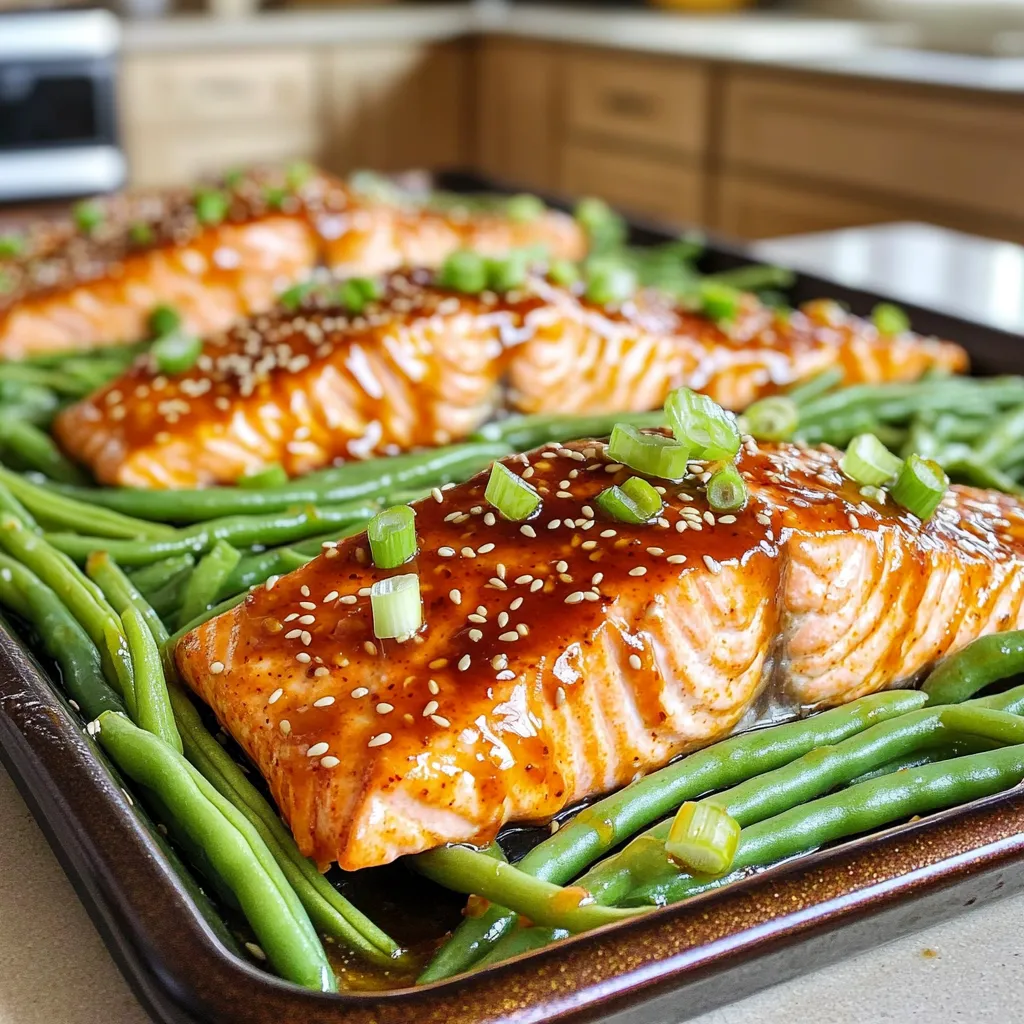
Craving a quick and tasty dinner? You’re in for a treat with my Sheet-Pan Sweet Chili Salmon and Green Beans

To make Pineapple Coconut Cupcakes, you will need the following ingredients: - 1 cup all-purpose flour - 1/2 cup granulated sugar - 1/2 cup unsweetened shredded coconut - 1/2 cup crushed pineapple, thoroughly drained - 1/2 cup sour cream - 1/4 cup vegetable oil - 2 large eggs - 1 teaspoon vanilla extract - 1 teaspoon baking powder - 1/2 teaspoon baking soda - 1/4 teaspoon salt - Cream cheese frosting (store-bought or homemade) - Additional shredded coconut and fresh pineapple slices for garnish Using fresh vs. canned pineapple can change the taste. Fresh pineapple adds bright flavors and natural sweetness, while canned pineapple is easy and convenient. If you choose canned, ensure it is well-drained to avoid soggy cupcakes. When selecting shredded coconut, look for high-quality options. Choose unsweetened coconut to keep the sugar level down. Make sure it has a fresh, nutty aroma. The right coconut adds texture and a rich flavor to your cupcakes. {{ingredient_image_2}} First, set your oven to 350°F (175°C). This temperature is perfect for baking. While the oven heats, grab a muffin tin and line it with cupcake liners. The liners help the cupcakes come out easily after baking. In a large bowl, mix the dry ingredients. Combine 1 cup of flour, 1/2 cup of sugar, 1/2 cup of shredded coconut, 1 teaspoon of baking powder, 1/2 teaspoon of baking soda, and 1/4 teaspoon of salt. Whisk them together well. This step ensures that all ingredients blend nicely, so your cupcakes will taste even. In another bowl, prepare the wet mixture. Mix 1/2 cup of sour cream, 1/4 cup of vegetable oil, 2 large eggs, 1/2 cup of crushed pineapple, and 1 teaspoon of vanilla extract. Whisk until smooth. Make sure the crushed pineapple is well drained. This will keep your batter from getting too wet. Now, it’s time to combine the wet and dry mixtures. Pour the wet ingredients into the bowl of dry ingredients. Stir gently with a spatula or spoon. Mix just until you see no dry flour. Overmixing can make your cupcakes dense, and we want them light and fluffy. Using a spoon or a cookie scoop, fill each cupcake liner about two-thirds full. This amount helps the cupcakes rise nicely. Place the muffin tin in the oven. Bake for 18-20 minutes. To check if they are done, insert a toothpick in the center. If it comes out clean, they are ready. After baking, take the tin out and let it cool for about 10 minutes. This helps the cupcakes set. Then, transfer them to a wire rack to cool completely. Once they are at room temperature, frost each cupcake with cream cheese frosting. Use a knife or spatula to create a nice swirl. For the final touch, sprinkle some shredded coconut on top and add a slice of fresh pineapple. Enjoy your tropical treat! To make light and fluffy cupcakes, focus on a few key factors: - Proper Mixing: Mix wet and dry ingredients gently. Overmixing can make them dense. - Room Temperature Ingredients: Use eggs and sour cream at room temperature. This helps create a better rise. - Correct Baking Time: Check cupcakes around 18 minutes. A toothpick should come out clean. Applying cream cheese frosting can be fun. Here are a few methods: - Spreading: Use a knife or spatula. Start from the center and swirl outward. - Piping: Fit a piping bag with a star tip. This gives a pretty finish and height. - Layering: Frost the top, then add a second layer for extra creaminess. Garnishing makes your cupcakes pop! Try these ideas: - Shredded Coconut: Sprinkle extra coconut on the frosting for texture. - Fresh Pineapple: Add a pineapple slice on top for a tropical touch. - Tropical Leaves: Place a few clean leaves around the base for flair. Each of these tips can help you elevate your pineapple coconut cupcakes, making them not just tasty but also visually stunning! Pro Tips Use Fresh Pineapple: For the best flavor, opt for fresh pineapple over canned. It adds a vibrant taste and moisture to the cupcakes. Measure Coconut Carefully: Ensure that your shredded coconut is packed gently while measuring. This helps achieve the right texture in your cupcakes. Don't Overmix: Mix the batter just until combined to keep the cupcakes light and fluffy. Overmixing can lead to dense cupcakes. Cool Completely Before Frosting: Allow the cupcakes to cool completely to room temperature before frosting to prevent the frosting from melting. {{image_4}} You can try different frostings to change the flavor of your cupcakes. Here are some fun ideas: - Lime Cream Cheese Frosting: Mix lime juice and zest into cream cheese frosting for a zesty twist. - Coconut Whipped Cream: Use coconut cream to make a light, fluffy topping. - Chocolate Ganache: For a rich flavor, pour chocolate ganache over cooled cupcakes. Each option adds a new layer of taste and fun! You can easily boost the flavor of your cupcakes with a few simple additions. Here are some ideas to consider: - Lime Zest: Add lime zest to the batter for a fresh, citrusy kick. - Macadamia Nuts: Stir in chopped macadamia nuts for a crunchy texture and nutty flavor. - Rum Extract: A splash of rum extract can give your cupcakes a tropical vibe. These small changes can make a big difference! If you need to make the cupcakes gluten-free or dairy-free, it's simple. Here’s how to adjust the recipe: - Gluten-Free: Use a gluten-free flour blend in place of all-purpose flour. - Dairy-Free: Substitute sour cream with coconut yogurt or a dairy-free alternative. These swaps help you enjoy the cupcakes while meeting your dietary needs! To keep your pineapple coconut cupcakes fresh, place them in an airtight container. This will stop air from drying them out. You can layer the cupcakes with parchment paper to avoid sticking. Store them at room temperature for up to three days. If you want to keep them longer, refrigeration is an option. Just remember that cold can dry out the cupcakes a bit. Freezing is a great way to save extras. First, let the cupcakes cool completely. Then, wrap each cupcake in plastic wrap tightly. After that, place them in a freezer-safe bag. They can stay in the freezer for up to three months. When ready to eat, take them out and let them thaw in the fridge overnight. You can frost them after they thaw, or enjoy them plain. Yes, you can use fresh pineapple! Fresh pineapple gives a bright taste. However, make sure to chop it finely. Drain it well to avoid too much moisture. Canned pineapple is easier to use, as it’s already prepared. Both options work well, but fresh gives a unique flavor. These cupcakes last about 3-4 days at room temperature. Store them in an airtight container. You can keep them in the fridge for up to a week. Just remember, the frosting might change texture in the fridge. For best taste, enjoy them fresh! Absolutely! You can bake the cupcakes a day in advance. Let them cool completely before frosting. Store the unfrosted cupcakes in an airtight container. Frost them just before serving for the best taste and look. This keeps them fresh and fluffy! You can use plain yogurt or buttermilk as a sour cream substitute. Both options add moisture and tang. If you want a dairy-free option, try coconut yogurt. It will enhance the coconut flavor in the cupcakes. Adjust the amount slightly for the best results. Yes, you can bake these cupcakes in different sizes! For mini cupcakes, reduce the baking time to about 10-12 minutes. For large cupcakes, bake for 22-25 minutes. Always check with a toothpick to see if they are done. Adjusting the size is easy and fun! In this blog post, we explored how to make delicious Pineapple Coconut Cupcakes, from selecting the best ingredients to baking and storing your treats. Each step, from mixing to frosting, is key for texture and flavor. Remember, using fresh pineapple can elevate your cupcakes. Whether you want to freeze some or try new flavors, these tips will enhance your baking. Now, it's time to enjoy your tasty cupcakes and share them with others! Happy baking!

Pineapple Coconut Cupcakes Delightful and Easy Recipe

If you crave a tropical treat, these Pineapple Coconut Cupcakes are for you! They are simple to make and bursting

- 1 (10 oz) package frozen chopped spinach, thawed and excess moisture squeezed out - 1 (14 oz) can of artichoke hearts, drained and coarsely chopped - 1 cup cream cheese, softened to room temperature - 1 cup sour cream - 1 cup shredded mozzarella cheese, plus extra for topping if desired - ½ cup grated Parmesan cheese - 2 cloves garlic, finely minced - 1 teaspoon onion powder - ½ teaspoon red pepper flakes (optional for a kick) - Salt and freshly cracked black pepper, to taste You can swap frozen spinach for fresh spinach. Just cook it down first. Canned artichokes can be replaced with frozen ones if needed. For a lighter dip, use Greek yogurt instead of sour cream. If you want a vegan option, try using cashew cream in place of dairy. Look for spinach that is bright green with no brown spots. The artichokes should smell fresh, not canned. When selecting cheese, choose blocks instead of pre-shredded. Block cheese melts better and tastes fresher. Always pick high-quality garlic for the best flavor. Start by taking a large bowl. In this bowl, mix one cup of softened cream cheese and one cup of sour cream. Use a spatula or an electric mixer to blend until smooth. Next, add one cup of shredded mozzarella cheese and half a cup of grated Parmesan cheese. Don’t forget the minced garlic and onion powder! If you like a little heat, sprinkle in half a teaspoon of red pepper flakes. Mix all of this well, so every bite is packed with flavor. Now, gently fold in the thawed spinach and chopped artichokes. Make sure they are mixed evenly into the creamy cheese blend. Finally, season with salt and freshly cracked black pepper to your liking. Now it's time to transfer the creamy mixture to your slow cooker. Spread it out evenly. Cover the slow cooker with its lid and set it to low heat. Cook for about 1.5 to 2 hours. You will know it’s done when the dip is heated through, and the cheeses are melted and bubbling. Stir it occasionally to ensure even cooking. This step is key for that perfect creamy texture! Once your dip is ready, remove the lid and serve it warm. You can top it with extra mozzarella cheese for a gooey finish. Pair this dip with tortilla chips, pita bread, or fresh veggies. Arrange them nicely on a platter for a stunning presentation. This creamy spinach artichoke dip is sure to be a hit at any gathering! Enjoy sharing this treat with friends and family. To boost the flavor of your spinach artichoke dip, use fresh garlic. Fresh garlic gives a stronger taste than powdered. You can also toss in a splash of lemon juice. This adds a bright zing that cuts through the creaminess. Adding a pinch of smoked paprika can bring warmth and depth. Try different cheeses, like cheddar or gouda, for unique flavors. When using a slow cooker, layer your ingredients wisely. Start with the cream cheese and sour cream. This helps them melt smoothly. Mix well before adding the spinach and artichokes. Stirring gently ensures even cooking. Keep the lid on while cooking to trap heat. This helps the dip to bubble and meld flavors nicely. One common mistake is not draining the artichokes enough. Excess water can make the dip too runny. Another mistake is cooking on high heat. This can cause the cheese to burn or separate. Stirring too often also disrupts the cooking process. Let it cook undisturbed for the best results. Finally, avoid over-seasoning. Always taste before adding more salt or spices. {{image_4}} You can make this dip a bit lighter. Use Greek yogurt instead of sour cream. It adds creaminess while cutting calories. Swap full-fat cream cheese for a low-fat version. You won’t lose any taste, just some fat. Try adding in some chopped red bell peppers for extra fiber and vitamins. Want to jazz it up? Add diced jalapeños for some heat. You could also mix in some cooked, crumbled bacon for a savory bite. Sun-dried tomatoes bring a nice twist, adding a touch of sweetness. Consider a sprinkle of fresh herbs like basil or parsley for added freshness. To make this dip vegan, use tofu in place of cream cheese. Blend it well for a smooth texture. Replace sour cream with cashew cream or coconut yogurt. Use vegan cheese for that melty goodness. This way, everyone can enjoy this dip without any dairy! After enjoying the dip, let it cool down. Transfer any leftovers to a container with a lid. Make sure to seal it well. Store it in the fridge for up to three days. When you need a tasty snack, it will be ready for you! To reheat the dip, scoop it into a small pot. Heat it on low. Stir it often to prevent it from sticking. You can also use the microwave. Place it in a safe dish and heat for 1-2 minutes. Stir, then heat again if needed. Make sure it's warm and creamy! If you want to save the dip for later, you can freeze it! Use a freezer-safe container. Leave some space at the top for expansion. It can last up to two months in the freezer. When you're ready to eat, thaw it in the fridge overnight. Reheat it as explained before. Enjoy your creamy spinach artichoke dip anytime! Yes, you can make this dip ahead of time. Prepare it, then store it in the fridge. You can keep it in a covered bowl for up to two days. When ready, place it in the slow cooker. Heat it on low until warm. You have many options for dipping! Try tortilla chips for a crunchy bite. Pita bread is soft and great for scooping. Fresh veggies like carrots and bell peppers add a healthy touch. You can even use crackers for an extra crunch. You will know the dip is done when it is hot and bubbly. The cheeses should melt together and become smooth. Stir it after one hour to check the heat. If it is warm throughout, it is ready to serve. Yes, you can use fresh spinach! Start with about 10 oz of fresh spinach. Cook it in a pan until it wilts. After that, squeeze out the excess water. Then, mix it into the dip just like you would with frozen spinach. This blog post covered essential tips for making a great dish. We explored ingredients, including how to choose the best ones and make substitutions. I shared step-by-step cooking instructions for your slow cooker and offered serving and presentation tips. You also learned tricks to enhance flavor and avoid common mistakes. Finally, we discussed storing leftovers and answered common questions. Now you are ready to create a delicious spinach artichoke dip. Enjoy the process and impress your friends!

Slow Cooker Creamy Spinach Artichoke Dip Delight

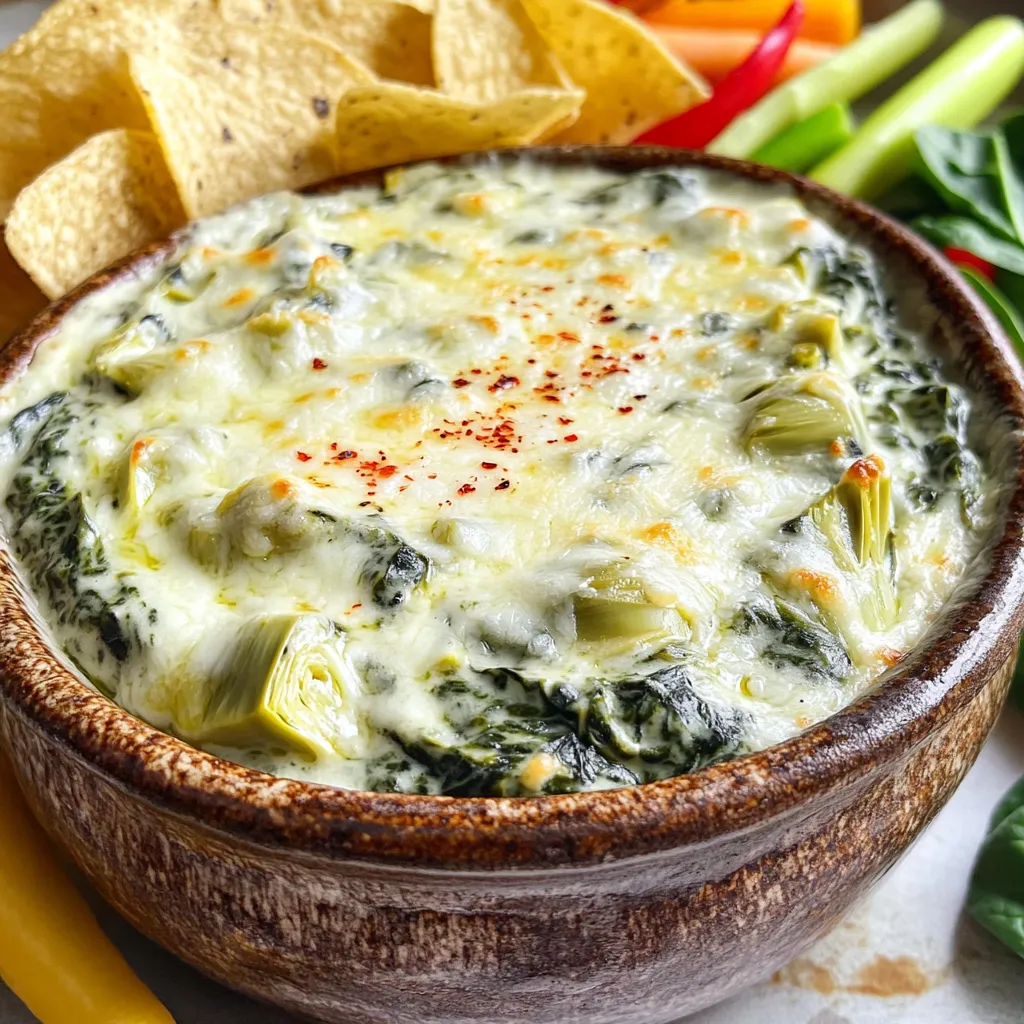
Want to impress your guests with a tasty dip? Try my Slow Cooker Creamy Spinach Artichoke Dip Delight! It’s easy

- 1 lb ground beef - 3 tablespoons soy sauce - 2 tablespoons gochujang (Korean red chili paste) - 1 tablespoon sesame oil - 1 tablespoon brown sugar - 3 cloves garlic, minced - 1 teaspoon fresh ginger, grated - 1 cup broccoli florets - 2 green onions, thinly sliced - Toasted sesame seeds - Sliced red chili pepper (optional) The main ingredients in this dish bring a rich, savory flavor. Ground beef is easy to cook and absorbs the marinade well. Soy sauce adds saltiness, while gochujang gives heat and depth. Sesame oil provides a nutty aroma and taste. Additional flavorings elevate the dish. Brown sugar balances the spice and adds sweetness. Fresh garlic and ginger bring brightness and warmth to the mix. For color and crunch, we need vegetables. Broccoli florets add a vibrant green touch and a healthy element. The green onions will add a fresh, sharp taste when sprinkled on top. Toasted sesame seeds give a nice crunch, while sliced red chili pepper can amplify the heat if you dare! To start, grab a medium mixing bowl. In this bowl, mix together 3 tablespoons of soy sauce, 2 tablespoons of gochujang, and 1 tablespoon of sesame oil. Next, add 1 tablespoon of brown sugar, 3 minced garlic cloves, and 1 teaspoon of grated ginger. Whisk until all the ingredients blend well. This marinade packs a punch of flavor and sets the stage for your beef. Now, heat a large skillet over medium-high heat. Add 1 pound of ground beef to the skillet. As it cooks, use a spatula to break the beef into smaller pieces. Cook for about 5-7 minutes or until it turns a nice brown color. Make sure to stir it often for even cooking. The beef should be fully cooked and juicy at this point. Once the beef is browned, carefully drain any extra fat from the skillet. Pour your prepared marinade over the beef. Stir well to coat the meat evenly. Continue cooking for another 2-3 minutes. This allows the flavors to meld and the beef to glaze beautifully. In the final 2 minutes, add 1 cup of broccoli florets to the skillet. Stir occasionally. This helps the broccoli steam and soak up some of that tasty sauce. Cook until the broccoli is tender but still bright and crisp. This adds a pop of color and crunch. To serve, take a bowl and spoon in a generous portion of cooked rice. You can use either white or brown rice. Then, add a hearty scoop of the spicy beef and broccoli mixture on top. For the final touch, sprinkle sliced green onions and toasted sesame seeds over each bowl. If you like more spice, add some sliced red chili pepper. Serve hot and enjoy! To get the best beef, brown it well. Use medium-high heat for even cooking. Break the beef into small pieces with a spatula as it cooks. This helps it brown better and keeps it juicy. Avoid cooking it too long, or it may become dry. Keep an eye on the color. You want it a nice brown, not gray. If you like it spicy, you can customize the heat. Start with two tablespoons of gochujang. If you want more heat, add a bit more. You can also slice red chili pepper and sprinkle it on top when serving. This lets everyone decide how spicy they want it. Remember, gochujang is bold, so taste as you go. To save time, use pre-cooked rice. You can find it in most stores. This cuts down on cooking time and helps you serve the meal faster. Just heat the rice in the microwave while you cook the beef. This way, everything is ready at the same time. Enjoy a warm, delicious meal in minutes! {{image_4}} You can swap ground beef for other proteins. Ground chicken or turkey works well. If you want a vegetarian option, try tofu. Tofu absorbs flavors nicely. It adds protein and keeps the dish light. This way, everyone can enjoy the meal. Adding more veggies makes this dish colorful and healthy. Bell peppers add sweetness and crunch. Snap peas bring a fresh snap, while carrots add bright color. You can mix and match your favorite vegetables. This not only boosts nutrition but also makes it fun! Want to kick up the flavor? Try adding sriracha for extra heat. Hoisin sauce gives a sweet, rich taste. You can even add a splash of lime juice for freshness. Don’t be afraid to get creative with flavors. Your taste buds will thank you! Store leftovers in an airtight container for up to 3 days. This keeps the beef fresh. Make sure to cool it down before sealing. It helps keep the flavors intact. If you want to enjoy it later, just remember to check for any off smells before eating. You can freeze the cooked beef mixture. Let it cool completely first. Then, transfer it to a freezer-safe bag. Squeeze out all the air before sealing. This will help prevent freezer burn. You can freeze it for up to three months. When you're ready to eat, thaw it in the fridge overnight. To reheat without losing flavor, use a skillet. Heat it on medium-low and add a splash of water. This keeps the beef moist and tasty. Stir occasionally until it’s warm throughout. You can also use a microwave. Place the beef in a bowl and cover it with a damp paper towel. Heat in short bursts to avoid overcooking. Enjoy your meal like it's fresh! Yes, you can prepare this dish ahead of time. To do this, cook the beef and broccoli as instructed. Then, let it cool before storing. Place the beef mixture in an airtight container in the fridge. This keeps well for up to three days. You can also pre-cook the rice. Store it separately to maintain its texture. When ready to eat, simply reheat both the rice and beef mixture together. Absolutely! To make a vegetarian version, swap out the ground beef with plant-based protein. Use options like crumbled tofu or tempeh. You can also try lentils or chickpeas for added flavor and nutrition. Just ensure you use the same marinade for a similar taste. This way, you keep the core flavors intact while making it suitable for everyone. To reduce the spice level, use less gochujang in the marinade. Start with one tablespoon instead of two. You can also add more brown sugar to balance the heat. Another tip is to add more broccoli and rice to dilute the spice. This keeps the meal tasty without overwhelming your palate. Many side dishes enhance Korean beef bowls. Try serving with kimchi for a tangy kick. A simple cucumber salad with sesame oil works well too. Steamed edamame or pickled vegetables also make great options. You can even add a light miso soup for a complete meal. These sides complement the flavors beautifully and add variety. This blog post explored making Korean beef bowls, from key ingredients to step-by-step cooking. You learned how to mix flavors using beef, soy sauce, gochujang, and fresh veggies. The tips help you perfect your dish and offer fun variations, like swapping proteins or tossing in extra vegetables. Embrace these ideas to elevate your cooking. Enjoy your delicious Korean beef bowl today!

Minute Spicy Korean Beef Bowls Quick and Flavorful Meal

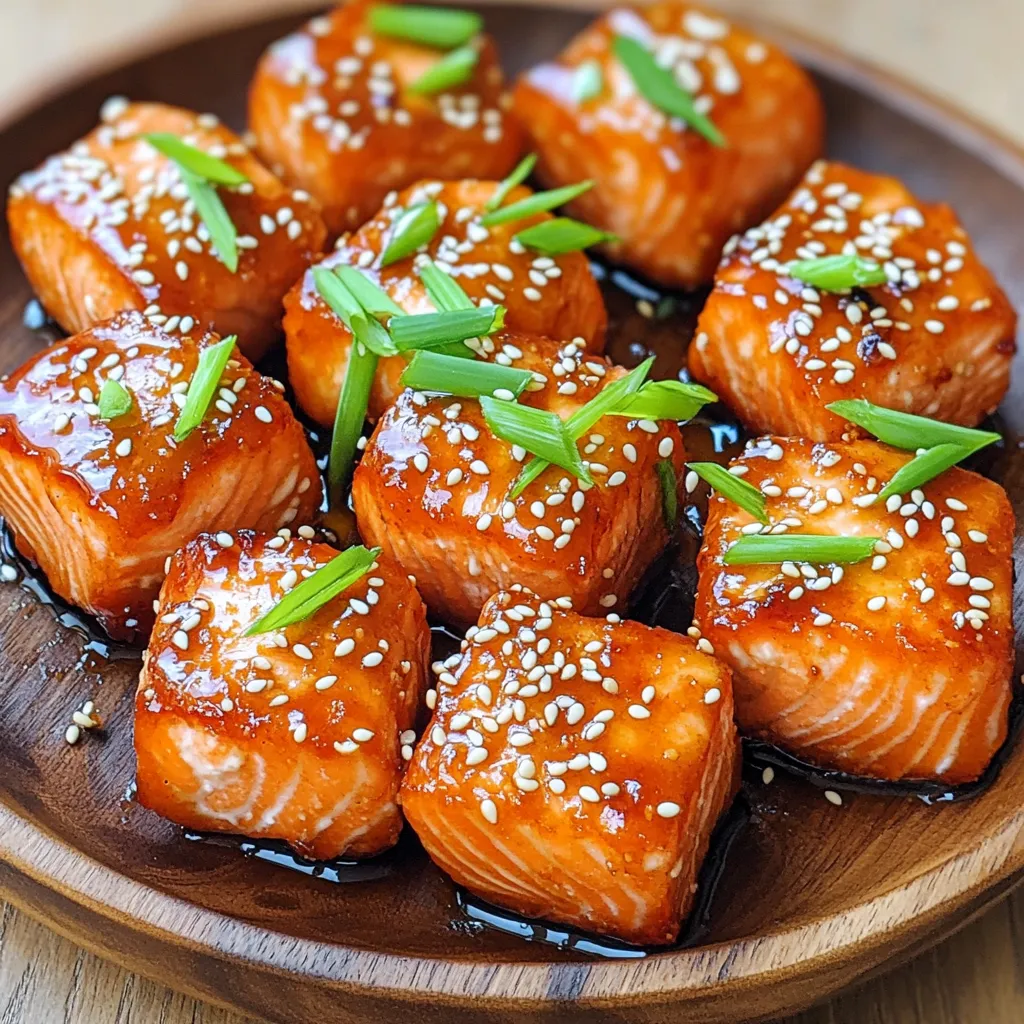
Are you craving a meal that’s quick, tasty, and packed with flavor? Look no further than these Minute Spicy Korean

- 1 pound rainbow carrots, thoroughly peeled and cut into uniform sticks - 4 cloves garlic, finely minced - 3 tablespoons high-quality olive oil - 1 teaspoon dried thyme - 1 teaspoon dried rosemary - 1 teaspoon sea salt - 1/2 teaspoon freshly cracked black pepper - Fresh parsley, finely chopped - Zest of 1 fresh lemon Garlic Herb Roasted Rainbow Carrots are vibrant and tasty. The rainbow carrots add a pop of color and a sweet flavor. You can find them at local markets or grocery stores. I love using fresh garlic in this dish. It gives a strong and rich taste that blends perfectly with the carrots. I use high-quality olive oil to help the herbs stick and add depth to the flavor. Dried thyme and rosemary bring earthiness and warmth. Sea salt and black pepper enhance all the flavors. For garnish, I sprinkle fresh parsley to add a bright touch. The lemon zest gives a zesty lift, making each bite refreshing. These simple ingredients work together to create a delicious side dish that everyone will love. {{ingredient_image_2}} Preheating your oven is a key step. It helps the carrots roast evenly and develop great flavor. Set the oven to 425°F (220°C) for the best results. A hot oven will caramelize the sugars in the carrots, making them sweet and tender. Start by peeling the rainbow carrots. Use a sharp peeler for a smooth finish. Cut the carrots into uniform sticks. This ensures they cook at the same rate. Aim for about 1-inch pieces. This size helps them roast perfectly. In a large mixing bowl, add the carrots. Next, toss in the minced garlic, olive oil, dried thyme, dried rosemary, sea salt, and black pepper. Use your hands or a spatula to mix. Make sure all the pieces are well coated. This step is vital for flavor. Line a baking sheet with parchment paper. This makes cleanup easy and prevents sticking. Spread the carrots in a single layer. Avoid overcrowding them, as this helps them roast evenly. Good spacing leads to better browning. Place the baking sheet in the oven. Roast the carrots for 20 to 25 minutes. Halfway through, give them a stir. This helps with even cooking and browning. You’ll know they’re done when they’re caramelized and fork-tender. When you take the carrots out, sprinkle them with chopped parsley and lemon zest. This adds a fresh and zesty flavor. Plate the vibrant carrots nicely. They make a fantastic side dish or a colorful addition to your meal. To get the best rainbow carrots, look for bright colors and firm texture. The carrots should feel heavy for their size. Avoid any that are soft or have brown spots. You can find rainbow carrots year-round, but they peak in the spring and fall. For great caramelization, cut the carrots into even sticks. This helps them cook evenly and brown better. Make sure to space them out on the baking sheet. Overcrowding can cause steaming, which leads to sogginess. Roasting at a high temperature, like 425°F (220°C), is key for that nice, caramel color. You can try adding fresh herbs like basil or dill for a twist. A pinch of smoked paprika can bring a warm depth. If you want some heat, consider adding a dash of cayenne pepper. These small changes can elevate the taste and make your dish unique. Pro Tips Uniform Sizing: Cutting the carrots into uniform sticks ensures they cook evenly and achieve the perfect tenderness. High-Quality Olive Oil: Using a high-quality olive oil enhances the flavor of the dish. Don’t skimp on this ingredient! Stir Halfway Through: Giving the carrots a stir halfway through roasting promotes even browning and caramelization, making them extra delicious. Garnish for Freshness: Adding fresh parsley and lemon zest right after roasting brightens up the dish and adds a burst of flavor. {{image_4}} If you want to change the herbs in this dish, you have great options. You can use oregano or basil in place of thyme and rosemary. Both add their own unique flavor. Fresh herbs are also a fantastic choice. Fresh thyme and rosemary provide a stronger taste than dried. If you have them, try fresh for a burst of flavor. Adding citrus or vinegar can make the carrots even more exciting. Fresh lemon juice brightens the dish. You can also sprinkle balsamic vinegar for a tangy kick. If you like sweet, consider honey or maple syrup. Both add a nice glaze and balance the savory garlic. You can grill the carrots instead of roasting them. This gives a smoky flavor and nice grill marks. If you want a quicker method, try an air fryer. It cooks the carrots fast and makes them crispy. Both methods work well, so choose what fits your time and taste! To keep your Garlic Herb Roasted Rainbow Carrots fresh, use airtight containers. Glass or plastic containers work great. Store them in the fridge. They last up to three days. After that, they may lose their taste and texture. To reheat, use the oven for the best results. Set it to 350°F (175°C). Place the carrots on a baking sheet and heat for about 10 minutes. This keeps them tender. You can also use a microwave but be careful. Microwaves can make them soggy. To maintain flavor, add a splash of olive oil before reheating. This helps keep the taste fresh and appealing. If you want to store them longer, freezing is a great option. Allow the carrots to cool completely. Then, place them in a freezer-safe bag. Remove as much air as possible before sealing. They can last up to three months in the freezer. When ready to eat, defrost them in the fridge overnight. Reheat in the oven to restore their original texture. Avoid using a microwave for defrosting; this can change the texture and flavor. You can use regular carrots. They will taste sweeter but lack the colorful look. Rainbow carrots add vibrant colors that make your dish pop. The mix of shades also brings fun to your plate. If you use regular carrots, the flavor will still be good, but the visual appeal will be less exciting. To make this recipe vegan, swap olive oil for a plant-based oil. You could use avocado oil or sunflower oil instead. Both options work well and keep the dish tasty. Just ensure all other ingredients are dairy-free. This way, you still get great flavor without using animal products. These carrots pair well with many dishes. Try serving them with grilled chicken, fish, or tofu for protein. They also go great with grains like quinoa or rice. For a complete meal, add a fresh salad or a simple soup. The carrots add a colorful touch to any plate. Roasting carrots usually takes about 20-25 minutes. Start by preheating your oven to 425°F (220°C). Toss the carrots, then spread them out on a baking sheet. Halfway through roasting, stir them for even cooking. You know they are done when they look caramelized and are fork-tender. You can prepare the carrots ahead of time. Peel and cut them, then store them in the fridge. Mix the garlic and herbs in advance too. When ready to cook, toss everything together and roast. This saves time and still gives you a tasty side dish. Roasting rainbow carrots is easy and fun. You learned how to prep, season, and cook them. I shared tips for perfect flavor and texture. Remember to choose fresh carrots and add your favorite herbs. Storing leftovers has simple methods too. You can enjoy this dish any time with just a little planning. By using the steps and tips shared, you’ll create a bright and tasty dish. Enjoy your delicious garlic herb roasted rainbow carrots!

Garlic Herb Roasted Rainbow Carrots Flavorful Delight

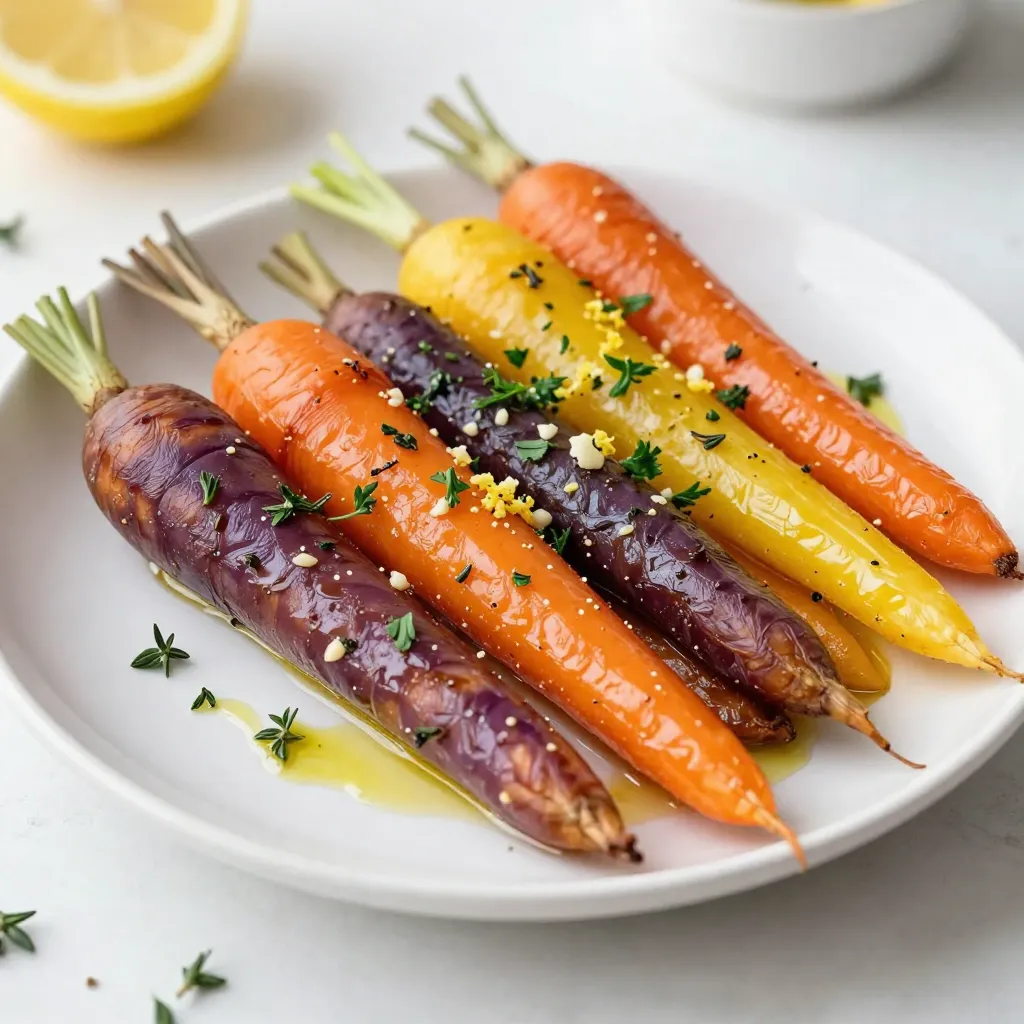
If you want a simple yet colorful side dish, look no further. Garlic Herb Roasted Rainbow Carrots are packed with

Older posts
Newer posts
← Previous Page1 … Page4 Page5 Page6 … Page85 Next →

dsad

© 2026 tastyhatch • Built with GeneratePress

Our Policies

  • Copyright Policy
  • Cookie Policy
  • GDPR Policy
  • Privacy Policy
  • Disclaimer
  • Terms Of Use

More Information

  • Home
  • About
  • Contact
  • Appetizers
  • Dessert
  • Dinner
  • Drinks
©2026, tastyhatch About Back To Top