Skip to content
DisclaimerTerms Of UseGDPR PolicyCookie Policy

tastyhatch

  • Home
  • Drinks
  • Appetizers
  • Dinner
  • Dessert
  • About
  • Contact
  • Privacy Policy
DisclaimerTerms Of UseGDPR PolicyCookie Policy

NO-ING-IMG

- Rice Noodles: 200g - Vegetables: broccoli florets, red bell pepper, snap peas - Flavorings: minced garlic, grated ginger, green onions - Sauces: creamy peanut butter, soy sauce, sriracha, lime juice, brown sugar - Garnishes: fresh cilantro leaves, crushed peanuts - Seasoning: sesame oil, salt, and freshly cracked pepper To make Spicy Peanut Chili Noodles, gather the right ingredients first. Start with 200 grams of rice noodles. Choose fresh vegetables like broccoli florets, a red bell pepper, and snap peas. These add color and crunch to your dish. For flavor, you will need minced garlic, grated ginger, and green onions. Next, let’s talk sauces. You need creamy peanut butter, soy sauce, sriracha, lime juice, and brown sugar. These create a rich and spicy sauce. Don’t forget the seasonings! Use sesame oil, salt, and freshly cracked pepper for taste. Finally, for garnishing, pick fresh cilantro leaves and crushed peanuts. These will add a nice touch and finish to your meal. Having all these ingredients ready will make cooking easy and fun. It's time to dive into cooking! Start by boiling water in a pot. Add the rice noodles and cook them as the package says. Once done, drain the noodles. Make sure they stay slightly sticky. This helps the sauce stick better later. Next, heat one tablespoon of sesame oil in a large skillet or wok. Wait until the oil shimmers. Then, throw in the broccoli florets. Sauté them for about three to four minutes. They should turn bright green and soften a bit. After that, add the sliced red bell pepper, snap peas, minced garlic, and grated ginger. Stir-fry everything for another three to four minutes. Your veggies should be tender but still crisp. While the veggies cook, make the peanut sauce. In a small bowl, whisk together the creamy peanut butter, soy sauce, sriracha, lime juice, and brown sugar. Keep mixing until you get a smooth sauce. If it feels thick, add a splash of warm water. This makes it easier to pour. Now, add the cooked noodles to the pan with the sautéed vegetables. Pour the peanut sauce over them. Gently toss everything together. Make sure the noodles and veggies are well coated in sauce. Continue to cook for about two minutes to heat the dish through. Season with salt and freshly cracked pepper to taste. Finally, stir in the finely chopped green onions. Serve your noodles hot, and don’t forget to add fresh cilantro leaves and crushed peanuts on top for an extra crunch! To keep your rice noodles perfectly sticky, cook them just right. I recommend boiling them according to the package instructions. Drain them but do not rinse. This helps the noodles hold onto the sauce later. Timing is key when adding the sauce. Add it while the noodles are hot. This ensures they soak up all the delicious flavors. You can adjust the sriracha to control the heat. Start with one tablespoon, then taste. If you want more spice, add extra sriracha a little at a time. You can also enhance flavor by adding other ingredients like lime zest or sesame seeds. These small tweaks can make your dish pop! You have options for cooking your noodles. You can stir-fry them with the veggies or boil them as usual. Stir-frying gives a nice texture and flavor. For meal prep, cook extra noodles and sauce on the weekend. This way, you can enjoy a quick and tasty meal during the week. Just reheat and enjoy! {{image_4}} You can easily make this dish vegetarian or vegan. Swap in your favorite veggies, like carrots or zucchini. You can also add tofu for more protein. Just make sure the sauces you use are plant-based. Instead of soy sauce, choose a vegan brand. If you want more protein, think about chicken, shrimp, or beef. For chicken, use diced breast or thighs. Cook them first in the pan before adding veggies. For shrimp, toss them in with the veggies until they turn pink. Beef can be sliced thin and added during the vegetable stir-fry. Adjust the cooking time based on the protein you choose. To make this dish gluten-free, use tamari instead of soy sauce. Tamari tastes great and is safe for those with gluten issues. When picking rice noodles, look for ones labeled gluten-free. They are often made from rice flour, making them a safe choice for everyone. To store your Spicy Peanut Chili Noodles, wait until they cool. Place the leftovers in an airtight container. This keeps the flavors fresh and helps maintain texture. I recommend using glass or BPA-free plastic containers for safe storage. If you want to freeze this dish, let it cool completely. Transfer the noodles and veggies into a freezer-safe bag or container. Remove as much air as possible to prevent freezer burn. To reheat, thaw in the fridge overnight. Then, warm in a skillet over low heat until heated through. You can add a splash of water to help revive the sauce. In the fridge, these noodles last about 3-4 days. If you freeze them, they can last up to 3 months. Always check for signs of spoilage, like off smells or discoloration. If you notice these, it’s best to toss the dish. To make this dish gluten-free, swap regular soy sauce for tamari. Tamari is a great choice that tastes similar but has no gluten. For noodles, use rice noodles, which are naturally gluten-free. Always check the labels to ensure your ingredients are safe. Yes, you can make this meal ahead. Cook the noodles and veggies, then cool them. Store them separately in airtight containers. Keep the sauce in another container. When ready to eat, just reheat everything and mix it with the sauce. If you need a nut-free version, use sunbutter or soy nut butter. These options work well and keep a creamy texture. You can also make a simple sauce with tahini, which adds a nice flavor without peanuts. Yes! This dish is perfect for meal prep. Cook a big batch and divide it into portions. Store each serving in a container. This way, you have quick meals ready for the week. Just reheat and enjoy! To lower the spice, reduce the sriracha in the sauce. You can also add more peanut butter for creaminess. Adding a bit of sugar helps balance the heat too. For more mild veggies, use bell peppers and carrots, which add sweetness. This blog post outlines a tasty recipe for Spicy Peanut Chili Noodles. You learned about crucial ingredients, step-by-step cooking methods, and ways to customize the dish. Remember, you can make it gluten-free or adjust the spice to your liking. Meal prep is easy, and leftovers can be stored with care. Enjoy exploring different variations to fit your tastes. Cooking should be fun and satisfying, so get creative!

Spicy Peanut Chili Noodles Quick and Flavorful Meal

Craving a delicious meal that’s quick and easy? You’re in the right place! Spicy Peanut Chili Noodles combine the perfect

- 1 lb skinless salmon fillets - 3 tablespoons unsalted butter, melted - 4 cloves garlic, finely minced - 8 small corn tortillas - 1 cup red cabbage, finely shredded - 1 ripe avocado, sliced - Fresh cilantro sprigs, for garnish - 1 teaspoon smoked paprika - 1 teaspoon chili powder - Zest and juice of 1 lime - Salt and freshly cracked black pepper to taste The main star of this dish is the salmon. I recommend using skinless fillets for a smooth bite. The garlic butter mixture adds richness and flavor. It’s made by mixing melted butter, minced garlic, spices, lime zest, and salt. This combo makes the salmon taste amazing. The tortillas are another key part. Corn tortillas work best for these tacos. They add a nice texture that holds the filling well. Now, let’s talk about fresh toppings. The red cabbage adds crunch and color. It balances the rich salmon. Avocado brings creaminess, making every bite delightful. Fresh cilantro adds a burst of flavor and freshness. For seasonings, smoked paprika gives a warm, smoky taste. Chili powder adds a bit of heat. Lime juice and zest brighten the dish. Don’t forget salt and pepper to enhance all the flavors. - Preheat the oven to 400°F (200°C). - Line a baking sheet with parchment paper for easy cleanup. - In a small mixing bowl, combine melted butter, minced garlic, smoked paprika, chili powder, lime zest, salt, and pepper. - Whisk the mixture until all ingredients blend well and smell great. - Place the skinless salmon fillets on the baking sheet. - Use a brush to coat each fillet with the garlic butter mixture. Make sure to cover all parts for flavor. - Bake the salmon for about 12-15 minutes. It should look opaque and flake easily when tested. - While the salmon bakes, warm each corn tortilla in a dry skillet over medium heat. Heat them for about 30 seconds on each side. This keeps them soft and easy to fill. - After cooking, let the salmon rest for a few minutes. - Use a fork to gently break the salmon into large chunks. - Take a warm tortilla and place a few pieces of salmon in the center. - Add a handful of shredded red cabbage and a few avocado slices on top. - Finish with fresh cilantro for a pop of color and flavor. - Squeeze fresh lime juice over each taco to bring out all the flavors. How can I adjust the cooking time? To get the best salmon, keep an eye on the time. Bake the salmon for 12-15 minutes. If your fillet is thicker or thinner, adjust the time. Check for doneness when it looks opaque. What are the best flaking tips? After baking, let the salmon rest for a few minutes. Use a fork to flake the salmon gently. Aim for large pieces to keep the texture nice in your tacos. How do I keep tortillas soft? To keep your tortillas soft, warm them in a dry skillet. Heat them for about 30 seconds on each side. This makes them pliable and easy to fold without breaking. What are some alternative tortilla options? If you want variety, try flour tortillas or whole wheat ones. You can even use lettuce wraps for a low-carb option. Each choice adds a unique twist to your meal. What are suggested add-ons? To boost flavor, add pickled onions or sliced jalapeños. You can also sprinkle some feta cheese for creaminess. These extras make your tacos even more delicious. How can I adjust the spice levels? If you like heat, add more chili powder or a dash of cayenne. For milder tacos, reduce the spices. Taste as you go to find your perfect balance. {{image_4}} You can swap out salmon for other proteins. Shrimp works well and cooks quickly. Just season the shrimp with the same garlic butter mixture. Bake it for about 8-10 minutes, watching closely. Chicken is another great option. Use skinless chicken breasts and adjust the cooking time to 20-25 minutes. Always ensure chicken is fully cooked. For a gluten-free option, use corn tortillas, just like in this recipe. Always check labels to ensure no gluten sneaks in. If you're looking for vegan ideas, try marinated tofu or chickpeas. Roast them with the garlic butter mix for added flavor. These swaps keep the meal tasty and satisfying. Adjust the heat level to suit your taste. If you like spice, add more chili powder or some cayenne. For milder flavors, reduce the spices. Try different seasoning blends, such as taco seasoning or lemon pepper, to switch things up. These options let you customize each taco to your liking. To store leftovers, place the salmon tacos in an airtight container. Keep them in the fridge for up to three days. This helps maintain their flavor and texture. After three days, the quality may drop. The best way to reheat these tacos is in the oven. Preheat the oven to 350°F (175°C). Place the tacos on a baking sheet and heat for about 10 minutes. This method keeps the tortillas from becoming soggy. You can also reheat the salmon in a skillet over low heat. You can freeze the salmon if you have leftovers. Wrap it tightly in plastic wrap and then in aluminum foil. This prevents freezer burn. The tortillas are best fresh and should not be frozen. To thaw, place the salmon in the fridge overnight. Reheat it following the tips above. Cooking salmon typically takes 12 to 15 minutes at 400°F (200°C). The exact time can vary based on the thickness of the fillet. For best results, check the salmon at the 12-minute mark. It should look opaque and flake easily with a fork. Remember, not to overcook it to keep it juicy and tender. Yes, you can prep some parts in advance. You can cook the salmon and store it in the fridge for up to two days. Just reheat it gently before serving. The tortillas can also be warmed ahead of time. For the toppings, chop the cabbage and slice the avocado but assemble the tacos just before eating for the best taste. These salmon tacos pair well with several sides. Try serving them with black beans or a fresh salsa to add some color. A crisp salad or corn on the cob also works great. For drinks, consider pairing with a light beer or a refreshing limeade. You can tell the salmon is cooked when it looks opaque and flakes easily. Insert a fork in the thickest part of the fillet. If it separates without much force, it’s done! A food thermometer can help too; it should read 145°F (63°C) for safe consumption. In this blog post, we explored how to create delicious salmon tacos. We covered the main ingredients like salmon, garlic butter, and fresh toppings. I shared step-by-step instructions, helpful tips, and variations for different diets. You now know about keeping tortillas soft and perfecting salmon's flavor. Remember that these tacos are easy and fun to make. Experiment with ingredients to find your favorite mix. Enjoy your cooking adventure!

Sheet Pan Garlic Butter Salmon Tacos Easy and Quick Meal

Looking for a quick meal that bursts with flavor? Try my Sheet Pan Garlic Butter Salmon Tacos! They’re fast to

- 1 can (15 ounces) black beans, rinsed thoroughly and drained - 1 ripe avocado, cut into neat cubes - 1 cup cherry tomatoes, sliced in half - 1 small red onion, finely diced - 1 jalapeño pepper, deseeded and minced (adjust according to your spice preference) - 1/4 cup fresh cilantro leaves, coarsely chopped - Juice from 2 fresh limes - 2 tablespoons premium olive oil - Sea salt and freshly cracked black pepper, to taste This Avocado Black Bean Salsa is fun to make and enjoy. The ingredients are fresh and bright. Each one adds flavor and texture. Black beans provide protein and fiber. They also bring a creamy texture. The ripe avocado adds richness and smoothness. Cherry tomatoes give a sweet burst. Red onion adds a nice crunch. The jalapeño pepper brings heat, but you can adjust it for your taste. Fresh cilantro adds a pop of color and a fresh flavor. You’ll need lime juice to balance all the tastes. Olive oil helps to bind the flavors together. Lastly, sea salt and black pepper enhance every bite. Make sure to use the best ingredients for the best taste. You can find them at local markets or grocery stores. This salsa is not only tasty but also healthy. It’s perfect for a snack or a party. Enjoy the vibrant colors and flavors as you prepare this dish! 1. Combine black beans and avocado Start by adding the rinsed black beans to a large bowl. Next, add the diced avocado. Be gentle so you don’t mash the avocado. 2. Add remaining ingredients Slowly mix in the halved cherry tomatoes, the finely diced red onion, and the minced jalapeño. This adds color, crunch, and spice to the salsa. 3. Prepare lime dressing In a small bowl, whisk the fresh lime juice with the olive oil. Season the dressing with sea salt and black pepper to taste. This dressing brightens the salsa. 1. Mix ingredients gently Drizzle the lime dressing over your salsa mixture. Use a spatula to fold everything together. Be careful not to break up the avocado too much. 2. Taste and adjust seasoning Grab a chip and taste your salsa. You may need more lime juice or a pinch of salt to boost the flavor. 3. Let it sit before serving For the best taste, let the salsa sit for at least 15 minutes. This time helps the flavors blend beautifully. Enjoy this Avocado Black Bean Salsa with tortilla chips or as a fresh topping on tacos! To keep your avocado fresh, store it in the fridge. If it's ripe, wrap it in plastic. This slows the browning process. If you have leftover avocado, squeeze some lime juice on it. This helps keep it green for longer. When cubing an avocado, start by cutting it in half. Remove the pit carefully with a knife. Use a spoon to scoop out the green flesh. Then, slice the flesh into cubes while it's still in the skin. Finally, use the spoon to scoop out the cubes. This keeps the pieces neat and avoids mushiness. You can adjust the spice level of your salsa easily. If you like it spicy, keep the seeds in the jalapeño. For less heat, remove more seeds before chopping. Taste as you go to find your perfect heat level. To add depth, mix in other ingredients. You can use corn for sweetness or bell peppers for crunch. Chopped mango also adds a lovely fruitiness that pairs well. Don't hesitate to experiment and find new flavors that you enjoy. {{image_4}} You can change the beans in your salsa. Try pinto or kidney beans for a new taste. Each bean adds a unique flavor. If you want a fruity twist, consider adding mango or pineapple. These fruits bring sweetness and freshness to the mix. Just chop them into small pieces and fold them in gently. You can adjust the spice level in this recipe. If you like it hot, add more jalapeño. For a milder taste, skip the jalapeño or use a bell pepper instead. This salsa works for everyone, whether you are vegan or vegetarian. Just use olive oil and fresh veggies for a vegan version. If you want, you can add cheese for a vegetarian twist. Both options keep the salsa delicious and satisfying. To keep your avocado black bean salsa fresh, store it in the fridge. Use a clean, airtight container. This helps prevent browning and keeps flavors intact. Salsa tastes best within 2-3 days. If you see brown spots on the avocado, scoop them out before serving. Stir the salsa well before each use. This redistributes flavors and keeps it vibrant. You can freeze avocado black bean salsa, but it’s best to leave out the avocado. Freezing can change its texture. Instead, freeze the black bean and veggie mix. Place it in a freezer-safe bag, removing as much air as possible. It can last up to three months in the freezer. When ready to use, thaw it in the fridge overnight. Once thawed, add fresh avocado and lime juice before serving for a delicious taste. How long does Avocado Black Bean Salsa last? Avocado Black Bean Salsa can last in the fridge for about 2 days. As time goes on, the avocado may brown. To slow this, add lime juice. This keeps the salsa fresh and bright. Can I make this salsa ahead of time? Yes, you can make the salsa a few hours ahead. Just mix all the ingredients and store it in the fridge. Letting it sit helps the flavors blend. However, if you want the avocado to stay green, add it right before serving. What are the best ways to serve Avocado Black Bean Salsa? Serve Avocado Black Bean Salsa in a colorful bowl. Garnish with extra cilantro and lime wedges for a fun touch. Pair it with crispy tortilla chips for great dipping. You can also use it as a topping for tacos, burritos, or grilled meats. In this post, we explored how to make Avocado Black Bean Salsa. We covered ingredients, step-by-step instructions, and helpful tips. You learned storage methods and variations for your salsa. Remember, you can adjust flavors and add fruits for a twist. With a few easy steps, you can create a fresh, tasty dish. Enjoy experimenting with salsa to suit your taste!

Avocado Black Bean Salsa for a Flavorful Snack

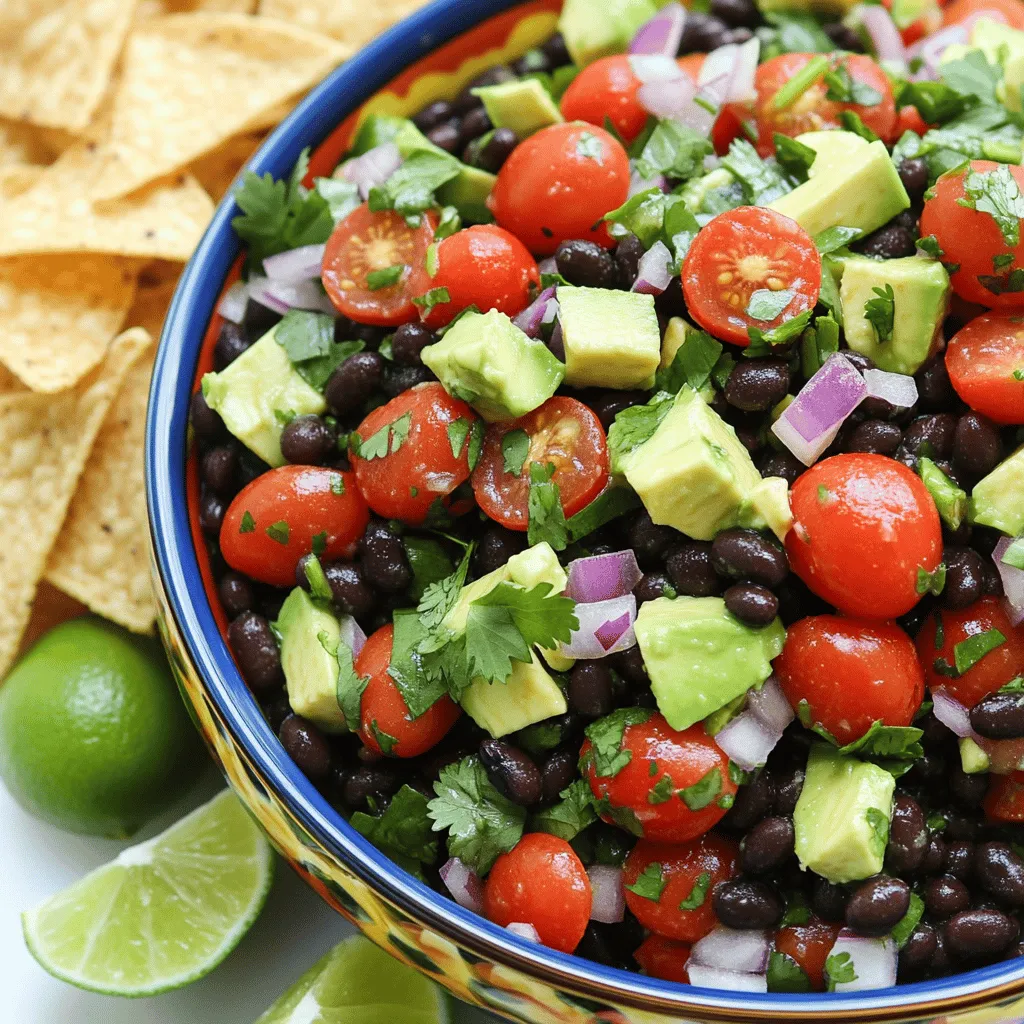
Looking for a tasty snack that packs a flavor punch? You’ve found it! This Avocado Black Bean Salsa is not

To make these yummy lemon blueberry crumb bars, you will need: - 1 ½ cups all-purpose flour - ½ cup rolled oats - ½ cup packed brown sugar - ½ teaspoon baking powder - ½ teaspoon salt - ½ cup unsalted butter, melted and slightly cooled - 1 cup fresh blueberries, rinsed and drained - 2 tablespoons cornstarch - 1 cup granulated sugar - 2 large eggs, at room temperature - ¼ cup fresh lemon juice (about 2 lemons) - Zest of 1 lemon, finely grated - ½ teaspoon pure vanilla extract If you don’t have a few items handy, here are some easy swaps: - All-purpose flour: Use whole wheat flour for a healthier option. - Rolled oats: Quick oats work well in a pinch, but the texture will change. - Brown sugar: You can use white sugar with a bit of molasses for a similar taste. - Unsalted butter: Use coconut oil for a dairy-free version. - Fresh blueberries: Frozen blueberries can be used; just let them thaw first. Here’s what you will need to make these bars: - 8x8-inch baking dish - Mixing bowls - Whisk - Rubber spatula - Measuring cups and spoons - Parchment paper (optional, for easy removal) - Oven preheated to 350°F (175°C) Gather these items before you start. It makes cooking much smoother! Start by preheating your oven to 350°F (175°C). This step warms the oven for even baking. Next, grease an 8x8-inch baking dish. You can also line it with parchment paper. Leave some paper hanging over the sides. This helps you lift the bars out later. In a large mixing bowl, whisk together: - 1 ½ cups all-purpose flour - ½ cup rolled oats - ½ cup packed brown sugar - ½ teaspoon baking powder - ½ teaspoon salt Mix until everything is combined. Slowly pour in ½ cup melted butter. Stir the mixture until it looks like wet sand. Set aside one cup of this mixture for the crumb topping. While the crust bakes, prepare your blueberry filling. In a medium bowl, add 1 cup fresh blueberries. Sprinkle with 2 tablespoons cornstarch. Gently toss the blueberries to coat them with cornstarch. This step helps thicken the filling. In another bowl, whisk together: - 1 cup granulated sugar - 2 large eggs - ¼ cup fresh lemon juice - Zest of 1 lemon - ½ teaspoon pure vanilla extract Mix until smooth. Carefully fold the blueberry mixture into the lemon mixture. Be gentle so you don’t mash the blueberries. Once the crust is baked, pour the blueberry-lemon filling over it. Spread it evenly across the crust. Next, take the reserved crumb mixture and crumble it over the filling. This creates a nice topping for the bars. Return the pan to the oven. Bake for 25-30 minutes. You want the filling to set and the topping to turn golden brown. After baking, take the dish out of the oven. Let it cool for at least 30 minutes in the pan. Use the parchment paper edges to lift the bars out. Cut them into squares to serve. To get a great crust, use cold butter. Cold butter helps create a flakier texture. When mixing, stir until the crumbs look like wet sand. This ensures a solid base. Press the mixture firmly into the pan. A compact crust holds the filling well. Bake until it's lightly golden. This gives it a nice flavor. When mixing blueberries with the lemon filling, be gentle. Use a spatula to fold the ingredients. This helps keep the blueberries intact. If you mash them, the filling will turn purple. You want to see those lovely blue berries in your bars. Mixing slowly ensures even distribution without breaking the fruit. For the best taste, serve these bars chilled. The flavors pop when cool. Dust with powdered sugar right before serving. This adds a sweet touch. Garnish with fresh mint for a splash of color. Plating on a bright dish makes the bars stand out. You can also pair them with whipped cream for a creamy contrast. Enjoy the vibrant mix of lemon and blueberry! {{image_4}} You can swap out blueberries for other fruits. Raspberries, strawberries, or blackberries work great. Just make sure to adjust the sugar, as some fruits are sweeter. For a peach filling, slice fresh peaches and toss them with cornstarch. This makes a yummy change to the classic flavor. To make these crumb bars gluten-free, use almond flour or gluten-free all-purpose flour. Check your oats too; some brands offer gluten-free rolled oats. These swaps keep the texture nice but change the flavor a bit. The bars will still taste delicious and be safe for those avoiding gluten. Mix things up with fun flavor combos! Try raspberry with lemon for a tart treat. You could also use mango puree with lime for a tropical twist. Don't be afraid to experiment with different citrus fruits. Each change offers a new spin on this classic dish. Your taste buds will thank you! To keep your lemon blueberry crumb bars fresh, store them in an airtight container. This helps prevent them from drying out. You can also place a piece of parchment paper between layers to avoid sticking. If you have leftovers, store them at room temperature for short-term use. For longer storage, refrigeration is best. You can freeze these bars for later enjoyment. First, let them cool completely. Then, slice them into squares. Wrap each square tightly in plastic wrap. Place the wrapped bars in a freezer-safe container. They will stay fresh for up to three months. When you’re ready to eat, just thaw them in the fridge overnight. In the fridge, these lemon blueberry crumb bars last up to one week. Keep them covered to maintain freshness. If you notice any changes in texture or smell, it’s best to discard them. Enjoy them cold, or warm them up slightly for a cozy treat! Yes, you can use frozen blueberries. They work well in this recipe. Just remember to thaw them first. Pat them dry with a paper towel. This helps avoid extra juice in your bars. This will keep your filling from being too runny. The bars are done when the filling is set. Look for a slight jiggle in the center. The crumb topping should also be golden brown. You can test this by inserting a toothpick into the filling. If it comes out clean, they are ready! Yes, you can make these bars ahead of time. They taste great after a day in the fridge. Just cover them well to keep them fresh. You can also freeze them for later. They will last up to three months in the freezer. You now have all the steps to make delicious Lemon Blueberry Crumb Bars. We covered the key ingredients, gave tips for the crust, and explored fun variations. These bars are not just tasty; they can fit many diets and preferences. Remember to store them well for lasting freshness. Baking can be simple and rewarding. Enjoy this treat any time. Happy baking!

Lemon Blueberry Crumb Bars Tasty and Simple Dessert

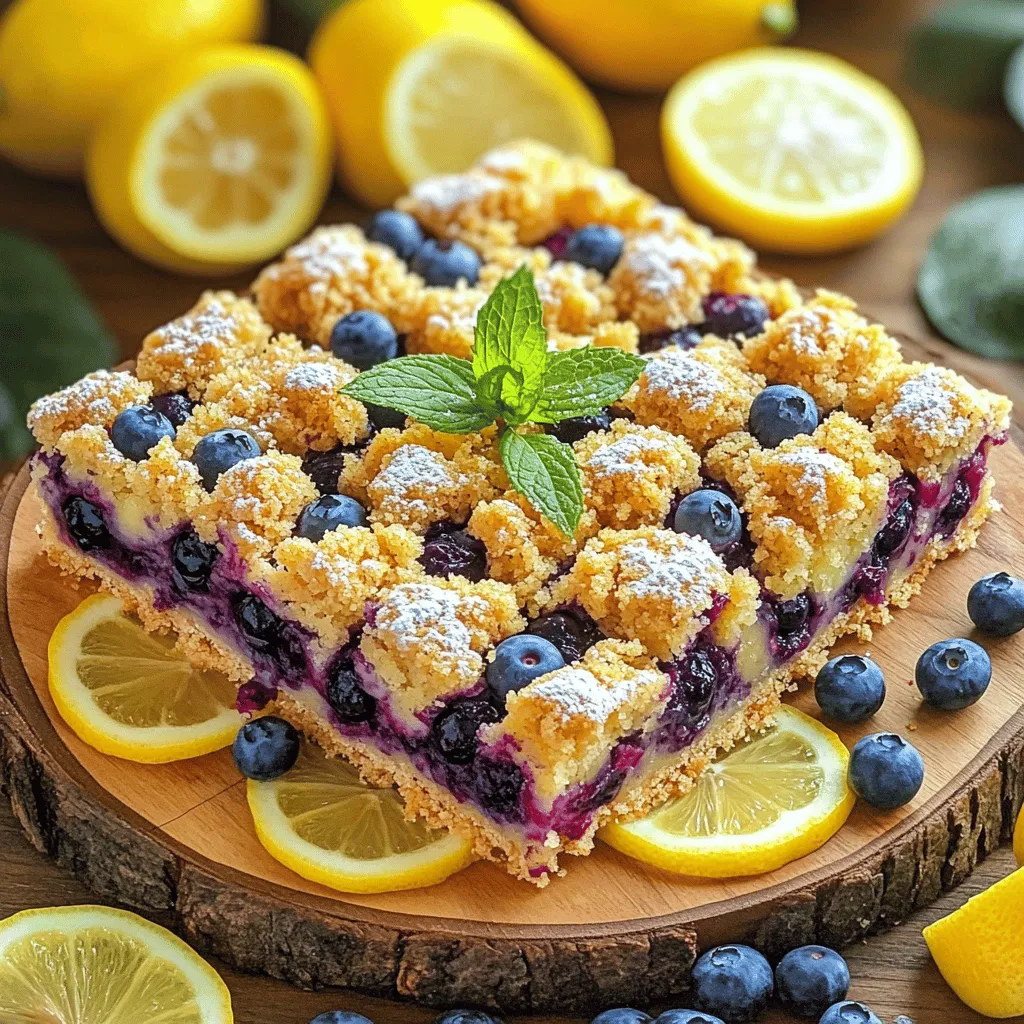
If you’re craving a sweet treat that’s both refreshing and easy to make, you’ll love these Lemon Blueberry Crumb Bars!

- 1 lb boneless, skinless chicken breast - 3 tablespoons honey - 2 tablespoons freshly squeezed lime juice - 1 tablespoon soy sauce - 2 cloves garlic, finely minced - 1 teaspoon ground cumin - 1 teaspoon paprika - Salt and pepper, to taste - Skewers (wooden or metal) - Fresh cilantro, chopped (for garnish) Gathering the right ingredients makes a big difference. For this dish, I start with fresh chicken. I cut the chicken breast into 1-inch cubes. This size cooks evenly and stays juicy. Next, I mix the marinade. I whisk together honey, lime juice, and soy sauce. The honey gives a sweet touch, while lime adds zest. Then, I add minced garlic, cumin, paprika, salt, and pepper. Each spice brings its own flavor, enhancing the chicken. When it comes to skewering, I suggest using either wooden or metal skewers. If you choose wooden skewers, soak them in water first. This step prevents them from catching fire on the grill. Finally, don't forget the cilantro. It adds a fresh pop of color and taste at the end! To start, blend the marinade ingredients. You will need honey, lime juice, soy sauce, minced garlic, ground cumin, paprika, salt, and pepper. Mix these in a large bowl. Whisk until the mixture is smooth. Next, coat the chicken pieces thoroughly in the marinade. Make sure every piece gets a good layer. Then, cover the bowl tightly with plastic wrap. Place it in the refrigerator for 30 minutes to 2 hours. The longer you marinate, the more flavor the chicken absorbs. If you use wooden skewers, soak them in cold water for at least 30 minutes. This prevents them from burning on the grill. While the skewers soak, preheat your grill to medium-high heat. This step is important for even cooking. Now it’s time to thread the chicken onto the skewers. Remove the marinated chicken from the bowl and discard any leftover marinade. Thread the chicken pieces onto the skewers, leaving small gaps between each piece. This helps them cook evenly. Place the skewers on the preheated grill. Grill the chicken for 10-12 minutes, turning occasionally. Make sure to check the internal temperature, aiming for 165°F (75°C). This ensures the chicken is safe to eat and juicy. For the best flavor, marinate the chicken for at least 30 minutes. If you have more time, let it sit for up to 2 hours. This longer time helps the chicken soak up all the tasty marinade. You can switch things up by adding fresh herbs like thyme or basil. You could also try a splash of orange juice for a sweet twist! To get those perfect grill marks, make sure your grill is hot. Place the skewers at a 45-degree angle when you start grilling. This helps create those nice lines. Turn the skewers every three to four minutes. This way, the chicken cooks evenly. Always check the chicken’s internal temperature. It should reach 165°F (75°C) to be safe to eat. For a pretty plate, lay the skewers on a white platter. The contrast makes the colors pop! You can add lime wedges for a fresh touch. Scatter some chopped cilantro around the plate for extra color. Serve with rice, grilled veggies, or a fresh salad to make a complete meal. Enjoy your delicious Honey Lime Grilled Chicken Skewers! {{image_4}} You can switch chicken for shrimp or tofu. Shrimp cooks quickly and adds a nice taste. Tofu absorbs flavors well and is a great plant-based option. If you prefer chicken, try different cuts. Thighs can add more flavor and moisture compared to breasts. Each protein will change the taste and texture of the dish. You can boost the marinade's taste by adding herbs and spices. Consider fresh cilantro, chili powder, or ginger. Each can change the flavor profile and make it unique. You could also add fruits like pineapple or mango. These fruits bring a sweet touch that pairs nicely with the honey and lime. Grilling vegetables on the skewers can add color and nutrition. Bell peppers, zucchini, and red onions work well. They grill nicely and add a crunch. You can alternate chicken and veggies on the skewers for a fun mix. This not only enhances flavor but also makes the dish more colorful. To keep your grilled chicken skewers fresh, place them in an airtight container. This helps lock in moisture and flavor. You can also wrap them tightly in plastic wrap. Store the skewers in the fridge. They will last for 3 to 4 days this way. When reheating, keep the chicken moist. Use a microwave or a skillet. If using the microwave, cover the skewers with a damp paper towel. This adds steam and keeps the chicken juicy. On the stove, heat with a bit of oil over low heat. This prevents drying out. Pair your reheated chicken with sides like rice or salad. They complement the flavors well. If you want to freeze your skewers, wrap them tightly in foil or freezer bags. This protects them from freezer burn. Make sure to remove as much air as possible. You can freeze them for up to 3 months. When ready to eat, thaw in the fridge overnight. Reheat them gently to keep their taste and texture. To know if chicken skewers are done, check the internal temperature. The safe temperature for cooked chicken is 165°F (75°C). Use a meat thermometer to check this. Insert it into the thickest part of the chicken. This ensures the chicken is safe and juicy. If you don't have a thermometer, look for clear juices and firm texture. Yes, you can use store-bought marinade. They save time and can be very tasty. Look for one with good ingredients. However, they may be high in sodium or preservatives. Homemade marinades let you control the flavor and health aspects. You can adjust the taste to your liking. Many sides go well with honey lime grilled chicken skewers. Here are some great options: - Grilled corn on the cob - Cilantro lime rice - Fresh garden salad - Roasted vegetables - Guacamole with tortilla chips - Coleslaw for crunch These sides enhance the flavors and make the meal complete. Enjoy mixing and matching! Grilling honey lime chicken skewers is simple and rewarding. You start by marinating chicken in a flavorful mix. Then, you skewering and grill it to perfection. Add your favorite veggies for extra taste. Storing any leftovers is easy too. Remember, check the chicken's temperature for safety. Try these tips to enhance your dish each time. Experiment with different proteins and marinades. Enjoy your delicious skewers with perfect sides. This meal will impress your family and friends!

Honey Lime Grilled Chicken Skewers Tasty and Easy Meal

Looking for a quick and tasty meal? Honey Lime Grilled Chicken Skewers are the answer! This simple recipe shines with

- 1 cup rolled oats - 1 cup almond milk (or milk of choice) - 1 tablespoon chia seeds - 1 tablespoon maple syrup (or honey) - 1 teaspoon vanilla extract - 1 shot of strong brewed coffee (cooled) - 2 tablespoons caramel sauce, plus extra for drizzling - Pinch of sea salt - Optional toppings: whipped cream, shaved chocolate, or a sprinkle of cinnamon For my Caramel Macchiato Overnight Oats, I start with rolled oats. They give a great texture. Next, I add almond milk, but you can use any milk you like. Chia seeds come next, adding fiber and a fun texture. For sweetness, I mix in maple syrup or honey. Vanilla extract brings warmth to the mix. Then, I add a shot of strong brewed coffee that has cooled down. This gives the oats a nice kick. I drizzle in caramel sauce and sprinkle in sea salt for balance. Finally, I think about toppings. Whipped cream, shaved chocolate, or cinnamon all work well. Gather these ingredients, and you’re ready to create a delicious breakfast. - In a medium-sized bowl, combine the rolled oats, almond milk, chia seeds, maple syrup, vanilla extract, and a pinch of sea salt. - Stir thoroughly until all ingredients blend well. Ensure the oats are coated with the liquid nicely. - Divide the oat mixture evenly into two mason jars or airtight containers. Each jar should be filled to the same level. - Drizzle 1 tablespoon of caramel sauce over the top of each jar. Use a spoon to gently swirl the caramel into the oats, making a beautiful marbled effect. - Pour the cooled brewed coffee over the oats in each jar, allowing it to soak in. - Gently stir with a spoon to mix the coffee flavor throughout the oats. This step is key for that rich taste. - Seal each jar securely with a lid. - Place the jars in the refrigerator for at least 4 hours or overnight. This time helps the oats soften and flavors meld. - The next morning, take the jars from the fridge and give the oats a good stir. - For added creaminess, splash in some milk, and mix well. - Just before serving, top your oats with whipped cream, shaved chocolate, or a sprinkle of cinnamon. Don’t forget an extra drizzle of caramel sauce for a final touch! - Adjusting sweetness: You can control the sweetness by adding more or less maple syrup. Start with one tablespoon, then taste. If it’s not sweet enough, add a little more. - Coffee strength suggestions: Use a strong brewed coffee for the best flavor. A dark roast works well. If you prefer less coffee taste, try a lighter roast or add less coffee. - Adding more milk: For a creamier texture, add more almond milk. Just a splash can make a difference. Stir it in well before serving. - Using different nut butters: Try adding almond or peanut butter to your oats. This will add creaminess and flavor. Just a tablespoon will do. Mix it in with the other ingredients for an even taste. - Serving suggestions: Serve your oats in clear mason jars. This shows off the layers and colors. You can place them on a nice wooden board for a rustic touch. - Creative garnishing options: Top with whipped cream or shaved chocolate. A sprinkle of cinnamon also adds warmth. Drizzle extra caramel sauce over the top for a sweet finish. {{image_4}} You can easily switch up the base flavor of your overnight oats. Here are two fun ideas: - Mocha Macchiato version: Replace the caramel sauce with chocolate syrup. Add cocoa powder to the oat mixture for a rich mocha flavor. You’ll enjoy a delightful mix of coffee and chocolate that wakes you up in the best way! - Vanilla Latte overnight oats: Swap the coffee for vanilla-flavored milk or brew a light vanilla coffee. Keep the caramel sauce, but add more vanilla extract to enhance that sweet, warm taste. This version is perfect for those who love a classic vanilla flavor. Making dietary changes is simple with this recipe. Here are a few options: - Dairy-free alternatives: Use almond milk, coconut milk, or oat milk instead of regular milk. These choices keep the oats creamy and delicious without the dairy. - Sugar-free options: Skip the caramel sauce or use sugar-free caramel syrup. You can also replace maple syrup with a sugar substitute like stevia or erythritol. This way, you can enjoy the same great taste without the extra sugar. Seasonal flavors can really jazz up your oats. Here are two ideas: - Fall flavors (pumpkin spice): Add pumpkin puree and pumpkin spice to the oat mixture. This gives your oats a cozy, autumn vibe. Top with whipped cream and a sprinkle of cinnamon for a festive touch. - Summer fruits (berries): Mix in fresh or frozen berries like blueberries, strawberries, or raspberries. They add a burst of flavor and color. You might even want to drizzle a bit of honey over the top for extra sweetness. You can use mason jars or airtight containers for your overnight oats. Mason jars are fun and cute. They show off the layers of oats and toppings. Airtight containers keep the oats fresh too. They are great for stacking in the fridge. Both options work well, so pick what you like best. Caramel macchiato overnight oats can last in the fridge for up to five days. This makes them perfect for meal prep. Just keep them sealed tight to ensure they stay fresh. If you see any signs of spoilage, like a strange smell or mold, toss them out. You can freeze overnight oats if you want to save some for later. Start by preparing the oats as usual. After mixing, divide them into portions in freezer-safe containers. Leave some space in the container for expansion. When you’re ready to eat, move the oats to the fridge to thaw overnight. Once thawed, stir well and add your toppings before enjoying. Yes, you can use any milk you prefer. I like almond milk, but other great choices are oat milk, soy milk, or regular dairy milk. Each type will give a different taste. Almond milk adds a nutty flavor. Oat milk makes it creamy, while dairy milk adds richness. Choose what you enjoy most. You should let the oats sit for at least four hours. However, overnight is best. This gives the oats time to absorb the liquid. Longer soaking means a creamier texture. If you are in a hurry, four hours will still work, but the oats may be chewier. Yes! To make this recipe vegan, swap honey for maple syrup. Use almond or oat milk instead of dairy milk. Ensure your caramel sauce is dairy-free as well. These simple changes will keep your dish tasty and vegan-friendly. Absolutely! To make a bigger batch, just multiply the ingredients by the number of servings you want. You can store the oats in multiple jars. Follow the same steps for mixing and layering. This way, you can enjoy a quick breakfast all week long. In this blog post, we explored how to make delightful overnight oats. You learned about the key ingredients, like oats, almond milk, and coffee. I shared step-by-step instructions for preparing, assembling, and refrigerating your oats. You discovered tips for enhancing flavor and making it creamier. We also discussed variations and storage options. Overall, overnight oats are simple, tasty, and perfect for meal prep. Enjoy experimenting to find your favorite flavor!

Caramel Macchiato Overnight Oats Simple and Tasty Recipe

Imagine starting your day with a delicious, easy meal that tastes like your favorite coffee treat! In this post, I’ll

- 1 cup rolled oats - 1 cup creamy peanut butter - ½ cup honey or maple syrup - 1 teaspoon vanilla extract - ½ cup chocolate chips - ¼ cup ground flaxseed (optional) - A pinch of salt Gathering your ingredients is the first step to success. Each item plays a key role in making tasty no-bake peanut butter oat cookie dough bites. Rolled oats add a chewy texture and are the base of our bites. Next, we have creamy peanut butter. It brings rich flavor and helps bind the mixture. You can choose honey or maple syrup for sweetness. Both options work well, so pick what you like best. A splash of vanilla extract adds depth to the flavor. Chocolate chips bring sweetness and a bit of fun. You can use semi-sweet or dark chips based on your taste. If you want to boost nutrition, consider adding ground flaxseed. It’s optional, but it packs in fiber and healthy fats. Finally, a pinch of salt balances the sweetness and enhances all the flavors. As you prepare to mix, make sure you have everything ready. This step makes cooking easy and fun. Enjoy the process of creating these delightful treats! To start, gather your ingredients. You need rolled oats, peanut butter, and honey. If you want, add ground flaxseed for some extra nutrition. For tools, use a large mixing bowl, a smaller bowl, a spatula, and a plate lined with parchment paper. These tools make mixing and shaping easy. In the large bowl, combine rolled oats and ground flaxseed. Stir them well to mix. In the smaller bowl, blend the peanut butter, honey, vanilla, and salt. Whisk until smooth. Pour this mix over the oats. Use a spatula to combine everything. Make sure every oat is coated well. Now, it’s time to shape the bites. Use your clean hands to scoop some of the mixture. Roll it into a small ball or press it into a cookie shape. Firmly press the mixture together so it holds its shape well. Place each bite on the parchment-lined plate. Once you form all the bites, refrigerate them for at least 30 minutes. This helps them firm up, making them easier to handle. To get the perfect texture, start with the right oats. Rolled oats work best. They give the bites a chewy feel. If you want a softer mix, try using quick oats. You can also adjust the peanut butter. More peanut butter will give a creamier texture. If you like it firmer, add more oats or flaxseed. This will change the bite's feel. For a fun presentation, arrange your cookie dough bites on a colorful plate. Garnish them with whole oats and extra chocolate chips for a nice touch. If you want to pair them with a drink, try a glass of cold milk. The creaminess of the milk goes well with the peanut butter flavor. You can also serve them with hot tea for a cozy treat. Adding ground flaxseed boosts nutrition. Flaxseed is full of fiber and omega-3s. You can also try using natural sweeteners like honey or maple syrup. These options are better than refined sugars. If you want a protein boost, add some nuts or seeds. These changes make your bites both tasty and good for you. {{image_4}} You can easily change the flavor of your cookie dough bites. Try adding different nuts, seeds, or dried fruits. Here are some fun ideas: - Chopped walnuts or pecans for crunch - Sunflower seeds for a nut-free option - Dried cranberries or raisins for a sweet twist - A dash of cinnamon for warmth These mix-ins will add texture and taste, making your treats extra special. If you follow a specific diet, you can still enjoy these bites. For a gluten-free version, use gluten-free oats. If you need nut-free options, substitute peanut butter with sun butter or soy nut butter. These choices keep the flavor while fitting your needs. You can easily customize the sweetness in your cookie dough bites. If you prefer less sweetness, cut down on honey or maple syrup. You can also add more chocolate chips for a sweeter bite. Taste the mixture before shaping it, so you can adjust to your liking. To keep your no-bake peanut butter oat cookie dough bites fresh, store them in an airtight container. This helps prevent air from drying them out. You can also layer them between sheets of parchment paper. This keeps them from sticking together. These tasty bites can last up to one week in the fridge. Make sure to check for any signs of spoilage before enjoying. If they look or smell off, it is best to toss them. If you want to store them longer, freezing is best. Place the cookie dough bites in a single layer on a baking sheet. Freeze them for about an hour. Once they are firm, transfer them to a freezer-safe bag or container. They can last for up to three months in the freezer. When you’re ready to enjoy, just thaw them in the fridge overnight. Yes, you can use almond butter. The taste will change, but it will still be yummy. Almond butter has a different flavor and texture. It may make the dough a bit softer. If you choose almond butter, try to pick a creamy one. To make a smaller batch, just cut all the amounts in half. Use: - ½ cup rolled oats - ½ cup creamy peanut butter - ¼ cup honey or maple syrup - ½ teaspoon vanilla extract - ¼ cup chocolate chips - 2 tablespoons ground flaxseed (optional) - A pinch of salt This will give you about 6-8 bites. You can also adjust the amounts based on how many you want. To stop the cookie dough bites from sticking, chill them well. After you shape them, place them on parchment paper. Keep them spaced apart. You can also coat them lightly in cocoa powder or coconut to add flavor and help them not stick. Storing them in a sealed container with parchment paper between layers works well too. These cookie dough bites are easy to make and fun to customize. You learned about the key ingredients and how to prepare them. Following the steps, you mixed everything and shaped the bites. With tips for storage and variations, you can enjoy these treats your way. You can also adjust flavors and sweetness to match your taste. I hope you try making these bites soon! They are a delicious and nutritious snack that you can share with others. Enjoy!

No-Bake Peanut Butter Oat Cookie Dough Treat

Craving a sweet treat that’s quick and easy? My No-Bake Peanut Butter Oat Cookie Dough is your answer! Made with

To make Maple Walnut Granola Clusters, gather these key ingredients: - 2 cups rolled oats - 1 cup walnuts, coarsely chopped - 1/2 cup almond slices - 1/4 cup sunflower seeds - 1/2 cup pure maple syrup - 1/4 cup coconut oil, melted - 1/2 teaspoon vanilla extract - 1/2 teaspoon ground cinnamon - 1/4 teaspoon sea salt These ingredients create a delightful mix of flavors and textures. The oats serve as the base, while the nuts add crunch. Maple syrup provides natural sweetness, and coconut oil helps bind everything together. You can add a few optional ingredients to boost taste: - 1/2 cup dried cranberries Dried cranberries bring a sweet and tangy burst to the clusters. They also add a chewy texture, making your snack even more interesting. Feel free to skip them if you prefer a simpler flavor. Each ingredient in your granola clusters offers great health benefits: - Rolled oats are high in fiber, helping with digestion. - Walnuts are rich in omega-3 fatty acids, great for heart health. - Almond slices provide protein and vitamin E, which is good for skin. - Sunflower seeds are packed with antioxidants and healthy fats. - Maple syrup is a natural sweetener with some minerals. - Coconut oil offers medium-chain triglycerides, which support energy. Together, these ingredients create a snack that is not only tasty but also nutritious. Enjoy these clusters for breakfast or as a pick-me-up during the day! Start by gathering all your ingredients. You will need: - 2 cups rolled oats - 1 cup walnuts, coarsely chopped - 1/2 cup almond slices - 1/4 cup sunflower seeds - 1/2 cup pure maple syrup - 1/4 cup coconut oil, melted - 1/2 teaspoon vanilla extract - 1/2 teaspoon ground cinnamon - 1/4 teaspoon sea salt - 1/2 cup dried cranberries (optional) Next, preheat your oven to 350°F (175°C). This step is key for even baking. Line a baking sheet with parchment paper to avoid sticking and make cleanup easy. In a large bowl, mix the rolled oats, walnuts, almond slices, and sunflower seeds. Stir gently to blend. In another bowl, combine the maple syrup, melted coconut oil, vanilla extract, cinnamon, and sea salt. Whisk these wet ingredients until they blend well. This mixture adds flavor and moisture to the granola. Pour the wet mixture over the dry ingredients. Use a spatula to fold everything together. Make sure each oat and nut gets coated. Spread the mixture on your baking sheet. Press it down gently to form clusters. Bake for 25-30 minutes. Stir halfway through to ensure even baking. Keep an eye on it to avoid burning. You want a nice golden brown color. Once baked, take the granola out of the oven. Let it cool completely on the baking sheet. It will harden as it cools. After cooling, break it into clusters with your hands. If you want, mix in dried cranberries for added sweetness. Store the clusters in an airtight container for up to two weeks. Enjoy them for breakfast or as a snack! To get crunchy granola clusters, press the mixture firmly on the baking sheet. This helps the granola stick together while baking. Use a spatula or your hands to create compact clusters. Stir the granola only halfway through baking. This keeps the clusters intact and crispy. Keep your granola in an airtight container at room temperature. This helps maintain its crunchiness. If stored properly, it stays fresh for up to two weeks. You can also freeze it for longer storage. Just thaw it on the counter before eating. I love serving my granola clusters in a mason jar. This adds a nice touch to your table. You can also top yogurt or smoothie bowls with them. They add a great crunch and flavor. Enjoy them as a quick snack or breakfast on the go! {{image_4}} You can swap out walnuts for other nuts. Try pecans, almonds, or hazelnuts. Each nut gives a unique flavor. You can also change the seeds. Pumpkin seeds or chia seeds work well, too. Mixing different nuts and seeds adds extra crunch and nutrition. While maple syrup is sweet and tasty, you can try other sweeteners. Honey adds a floral note. Agave syrup is another option that is lighter. If you want a sugar-free option, try mashed bananas or applesauce. These alternatives change the taste but keep it sweet. You can enhance your granola with fun add-ins. Dried fruits like raisins or apricots add chewiness. Dark chocolate chips bring a rich taste. For a spicy kick, add a pinch of cayenne or nutmeg. Each mix makes the granola special and unique. To keep your maple walnut granola clusters fresh, use an airtight container. This helps protect them from moisture and air. Store them in a cool, dry place like a pantry. Avoid areas near the stove or oven. For added freshness, you can also layer parchment paper between clusters. This keeps them from sticking together. Homemade granola clusters can last up to two weeks at room temperature. After that, they may lose their crispiness. If you notice any changes in smell or texture, it’s best to toss them. Always check for signs of spoilage before enjoying your snack. If you want to keep your clusters for longer, freezing is a great option. Place them in an airtight freezer bag. Make sure to squeeze out all the air before sealing. They can stay fresh in the freezer for up to three months. When you’re ready to eat, just take out what you need and let them thaw at room temperature. Enjoy your tasty snack anytime! Yes, you can use quick oats or steel-cut oats. Quick oats will cook faster but may not hold clusters as well. Steel-cut oats will give a chewier texture, but they will need longer baking time. To make granola clusters stick, use more wet ingredients like maple syrup or coconut oil. Press the mixture down firmly on the baking sheet. Bake until golden brown, then cool before breaking into clusters. Walnuts are rich in healthy fats, protein, and fiber. They support heart health and brain function. Maple syrup contains antioxidants and minerals like manganese and zinc, providing a natural sweetener option. Absolutely! You can swap walnuts for almonds or pecans. Use honey or agave syrup instead of maple syrup. For nut allergies, replace nuts with seeds like pumpkin or sunflower seeds. Serve granola clusters in a bowl or jar. They make a great snack on their own. You can also enjoy them with yogurt, smoothie bowls, or as a topping for oatmeal. In this post, we explored how to make Maple Walnut Granola Clusters. We covered key ingredients, from essential to optional, and discussed their health benefits. I shared step-by-step instructions to help you create the perfect clusters. We also included tips for storage and ideas for fun variations. In the end, making your own granola is easy and fun. It allows you to enjoy tasty snacks while knowing exactly what’s inside. Try it out and enjoy the benefits of your homemade granola!

Maple Walnut Granola Clusters Tasty and Nutritious Snack

Looking for a tasty and nutritious snack? You’ve found it! Maple Walnut Granola Clusters are easy to make and loaded

To make these delicious Peanut Butter Chocolate Chip Energy Bites, gather these simple ingredients: - 1 cup rolled oats - 1/2 cup natural creamy peanut butter - 1/4 cup honey or maple syrup - 1/2 cup dark chocolate chips - 1/4 cup ground flaxseed - 1/2 teaspoon pure vanilla extract - A small pinch of salt You can easily swap ingredients based on what you have at home. Here are some good options: - Peanut Butter: Use almond butter or sunflower seed butter for nut-free bites. - Honey or Maple Syrup: Agave syrup works well if you want a vegan choice. - Dark Chocolate Chips: Use milk chocolate chips or even carob chips for a different taste. - Rolled Oats: Quick oats can also be used, but they may change the texture slightly. - Ground Flaxseed: Chia seeds are a great substitute for added nutrition and fiber. Understanding the benefits of these ingredients adds to their appeal: - Rolled Oats: They provide fiber, which helps with digestion and keeps you full longer. - Natural Creamy Peanut Butter: Packed with healthy fats and protein, it keeps energy levels stable. - Honey or Maple Syrup: These natural sweeteners offer quick energy without refined sugars. - Dark Chocolate Chips: They contain antioxidants and can boost mood and energy. - Ground Flaxseed: This ingredient is rich in omega-3 fatty acids, supporting heart health. - Pure Vanilla Extract: It adds flavor without extra calories and may help reduce stress. - Salt: A pinch enhances all the flavors and balances sweetness. These ingredients not only taste great but also offer many health benefits, making these energy bites a smart snack choice. Start by gathering your ingredients. You need rolled oats, ground flaxseed, a pinch of salt, creamy peanut butter, honey or maple syrup, dark chocolate chips, and vanilla extract. In a large mixing bowl, add 1 cup of rolled oats, 1/4 cup of ground flaxseed, and a small pinch of salt. Mix these dry ingredients well. This step is key; it helps your energy bites have a good texture. In another bowl, mix together 1/2 cup of peanut butter, 1/4 cup of honey or maple syrup, and 1/2 teaspoon of vanilla extract. Whisk until this mixture is smooth and creamy. This creamy blend will help bind the dry ingredients later. Now, pour this creamy peanut butter mixture into the bowl with the dry ingredients. Stir it well until everything is mixed evenly. Make sure there are no dry oats left. Once your mixture is combined, it’s time to add the fun part: the chocolate chips! Gently fold in 1/2 cup of dark chocolate chips. Do this carefully to keep the chips intact. Now, scoop out the mixture with your hands and shape it into small balls, about 1-inch in size. If the mixture is sticky, wet your hands with a little water. This helps shape the bites easily. Place the formed energy bites on a parchment-lined baking sheet. Make sure they aren’t touching. Chill them in the fridge for about 30 minutes. This helps them firm up. After chilling, store them in an airtight container. Enjoy your tasty energy bites! When making energy bites, there are a few common mistakes you should avoid. First, do not skip the salt. A small pinch enhances the flavors of the other ingredients. Second, make sure to measure the oats and peanut butter correctly. Too much peanut butter can make the mixture too sticky, while too few oats can make them fall apart. Lastly, avoid over-mixing after adding the chocolate chips. This keeps your bites from becoming tough. Want to boost the flavor? Here are some tips. You can add spices like cinnamon or nutmeg for warmth. A dash of sea salt can enhance sweetness. If you like a fruity twist, try adding dried fruits like cranberries or raisins. Using dark chocolate chips adds richness. For a nutty crunch, toss in chopped nuts like almonds or walnuts. Feel free to get creative! If you have dietary needs, you can easily adapt this recipe. For a vegan version, swap honey for maple syrup. Use gluten-free oats if you need a gluten-free option. For nut allergies, try sunflower seed butter. If you want to reduce sugar, use less honey or chocolate. Each change can still give you a tasty energy bite! {{image_4}} You can easily make these energy bites vegan. Instead of honey, use maple syrup for sweetness. It works well and keeps the bites plant-based. Choose vegan chocolate chips too. Many brands offer great options. This way, you can enjoy a tasty snack without any animal products. If you need gluten-free energy bites, it’s simple. Ensure your oats are certified gluten-free. Most rolled oats are safe, but always check the label. The other ingredients, like peanut butter and chocolate chips, are usually gluten-free too. This makes it easy for everyone to enjoy these bites. Want to add some fun flavors? Here are a few ideas: - Dried fruits: Chopped dates, cranberries, or apricots add sweetness and chewiness. - Nuts: Chopped almonds, walnuts, or pecans give a crunchy texture. - Seeds: Pumpkin or sunflower seeds boost nutrition and add crunch. - Spices: Try adding a dash of cinnamon or cocoa powder for extra flavor. Mix and match these additions to create your perfect energy bite! To keep your peanut butter chocolate chip energy bites fresh, place them in an airtight container. You can store them in the fridge for easy access. Make sure to layer parchment paper between each layer if stacking them. This prevents sticking and keeps them intact. These energy bites last up to one week in the refrigerator. After that, they may start to lose their flavor and texture. If you notice any change in smell or appearance, it's best to toss them out. Storing them properly helps maintain taste and quality. You can freeze these energy bites for longer storage. Place them in a single layer on a baking sheet and freeze for about an hour. Once solid, transfer them to a freezer-safe bag. They can last for up to three months in the freezer. To enjoy, simply thaw them in the fridge overnight or at room temperature for a quick snack. Yes, you can use crunchy peanut butter! It adds a fun texture. The bites will have little crunchy bits that make each bite exciting. Just keep the other ingredients the same. If you love more crunch, this is a great option. Absolutely! These energy bites are great for kids. They are easy to eat and packed with healthy ingredients. Kids will enjoy the chocolate chips and the nutty flavor. Plus, they are a perfect snack for after school or sports. To make these energy bites healthier, you can try a few things: - Use less honey or maple syrup to reduce sugar. - Add more ground flaxseed for extra fiber. - Substitute dark chocolate chips with unsweetened cocoa nibs. - Include chopped nuts or seeds for more nutrients. These changes can help you create a snack that fits your diet better. You learned about making energy bites in this blog post. We covered all the key ingredients, how to mix and shape them, and shared tips to avoid mistakes. We also explored variations that fit different diets. Finally, I shared storage info to keep them fresh. These energy bites are easy to make and can comfort you anytime. Enjoy creating your own!

Peanut Butter Chocolate Chip Energy Bites Recipe

Looking for a quick, tasty snack that boosts your energy? You’ve come to the right place! In this Peanut Butter

- 4 medium sweet potatoes, peeled and cut into 1-inch cubes - 4 garlic cloves, finely minced - 3 tablespoons extra virgin olive oil - 1 teaspoon dried thyme - 1 teaspoon dried rosemary - 1 teaspoon smoked paprika - Kosher salt and freshly cracked black pepper to taste - Fresh parsley, finely chopped for garnish - Large mixing bowl - Baking sheet - Parchment paper - Spatula Gather these ingredients before you start cooking. Sweet potatoes are the star, offering a natural sweetness. Garlic adds a robust flavor, while herbs like thyme and rosemary bring warmth. Smoked paprika gives a hint of depth. Olive oil helps everything roast to perfection. You’ll need a large mixing bowl to combine your ingredients. A baking sheet lined with parchment paper makes cleanup easy and allows for even roasting. A spatula helps mix and flip the sweet potatoes for even cooking. These tools and ingredients make cooking fun and simple. Your Garlic Herb Roasted Sweet Potatoes will shine on any table. Start by preheating your oven to 425°F (220°C). This step is key. The right temperature helps the sweet potatoes roast evenly. It ensures they get that nice, crispy outside while staying soft inside. Next, take your sweet potatoes. You will need four medium ones. Peel them and cut them into 1-inch cubes. In a large mixing bowl, add the sweet potatoes. Then, finely mince four garlic cloves and toss them in as well. Drizzle in three tablespoons of extra virgin olive oil. This oil will help the herbs stick to the sweet potatoes. Now, it's time to add flavor. Sprinkle in one teaspoon each of dried thyme, dried rosemary, and smoked paprika. Don’t forget to season with kosher salt and freshly cracked black pepper to taste. Mix it all together well, ensuring every piece gets coated. Prepare your baking sheet by lining it with parchment paper. Spread the seasoned sweet potatoes in a single layer on the sheet. Make sure they are not touching each other. This will help them cook evenly and become nice and crispy. Place the baking sheet in your preheated oven. Roast the sweet potatoes for 25-30 minutes. Be sure to flip them halfway through. This helps them brown on all sides. You want them golden and tender when they are done. Once roasted, take the tray out of the oven. Let the sweet potatoes cool for about five minutes. This enhances their flavor. Transfer them to a serving dish and garnish with finely chopped fresh parsley. This adds a pop of color and freshness to your dish. Enjoy your Garlic Herb Roasted Sweet Potatoes! When choosing sweet potatoes, look for firm ones. They should feel heavy for their size. Check for smooth skin with no cuts or bruises. The color can vary but deep orange is ideal. Fresh sweet potatoes will have a nice shine. Avoid those with soft spots or signs of sprouting. You can boost flavor with more herbs or spices. Consider adding fresh rosemary or basil for a twist. A hint of cumin offers a warm touch. If you like heat, sprinkle in some red pepper flakes. Mixing in a bit of honey can add sweetness. Experiment with flavors you love to make it yours. Cooking time may change based on sweet potato size. Smaller cubes cook faster, about 20-25 minutes. Larger pieces need more time, around 30-35 minutes. Always check for doneness by piercing with a fork. They should be soft inside and crispy outside. Adjust timing as needed for your preferred texture. {{image_4}} You can spice things up by adding red pepper flakes or cayenne pepper. Just sprinkle a pinch into your sweet potato mix. This small change gives your dish an exciting heat. If you like a lot of spice, add more! Remember, start with a little. You can always add more later. Feel free to switch up the herbs for different tastes. Instead of thyme and rosemary, try oregano or basil. Each herb brings a new flavor. You can even mix herbs to create your own blend. Think about what you love and let your taste guide you! For a sweet twist, mix in maple syrup or brown sugar. It adds a touch of sweetness that pairs well with the savory garlic. Drizzle some syrup over the sweet potatoes before roasting. You can also sprinkle brown sugar on top right before serving. These combos will make your dish stand out even more! After enjoying your Garlic Herb Roasted Sweet Potatoes, store any leftovers in an airtight container. Keep them in the fridge for up to four days. This helps maintain their flavor and texture. Before sealing, allow them to cool to room temperature. Avoid hot items in the fridge to prevent spoilage. When you reheating your sweet potatoes, aim to keep them crispy. Use an oven or an air fryer for best results. Preheat the oven to 350°F (175°C). Spread them out on a baking sheet and heat for about 10-15 minutes. This method keeps the outside crispy and the inside soft. You can also use a microwave, but be aware that this may make them a bit soggy. To freeze sweet potatoes, let them cool completely first. Then, spread them on a baking sheet in a single layer. Freeze them for about an hour. Once frozen, transfer them to freezer bags. Make sure to remove as much air as possible before sealing. When you are ready to use them, thaw in the fridge overnight before reheating. This way, you can enjoy your tasty side dish later! Yes, you can! This recipe is versatile. You can use many other vegetables. Here are some great options: - Carrots - Brussels sprouts - Cauliflower - Butternut squash - Zucchini Each of these adds unique flavors and textures. Just make sure to cut them into similar sizes for even cooking. You will know the sweet potatoes are done when they are golden brown. Here are some signs to look for: - They should be soft when pierced with a fork. - They have a lovely caramelized outer layer. - The edges might look crispy. These signs mean they are ready to enjoy! Absolutely! This recipe works great for meal prep. Here are some tips: - Prepare the sweet potatoes ahead of time. Store them in the fridge for up to four days. - Roast a bigger batch for easy meals. - Reheat in the oven or microwave for quick lunch or dinner options. This way, you can have a tasty side dish ready to go anytime! This recipe for roasted sweet potatoes is simple and packed with flavor. You learned how to pick the right sweet potatoes, prepare them, and roast them for the best texture. The tips for adding extra spices and herbs can help you tailor the dish to your taste. Remember, leftovers can be stored and reheated easily. Don't hesitate to experiment with variations. Enjoy delicious sweet potatoes any night of the week!

Garlic Herb Roasted Sweet Potatoes Flavorful Side Dish

Looking for a tasty side dish that brightens up any meal? Garlic Herb Roasted Sweet Potatoes are just what you

Older posts
Newer posts
← Previous Page1 … Page5 Page6 Page7 … Page85 Next →

dsad

© 2026 tastyhatch • Built with GeneratePress

Our Policies

  • Copyright Policy
  • Cookie Policy
  • GDPR Policy
  • Privacy Policy
  • Disclaimer
  • Terms Of Use

More Information

  • Home
  • About
  • Contact
  • Appetizers
  • Dessert
  • Dinner
  • Drinks
©2026, tastyhatch About Back To Top