Skip to content
DisclaimerTerms Of UseGDPR PolicyCookie Policy

tastyhatch

  • Home
  • Drinks
  • Appetizers
  • Dinner
  • Dessert
  • About
  • Contact
  • Privacy Policy
DisclaimerTerms Of UseGDPR PolicyCookie Policy

NO-ING-IMG

To make Air Fryer Cinnamon Pretzel Bites, gather the following items: - 1 cup warm water (about 110°F/45°C) - 2 tablespoons granulated sugar - 1 packet (2 ¼ teaspoons) active dry yeast - 2 ½ cups all-purpose flour - 1 teaspoon salt - 1 teaspoon baking soda - ½ cup unsalted butter, melted - 1 teaspoon ground cinnamon - ¼ cup brown sugar - Coarse sea salt for garnish You can swap some ingredients if needed. Use honey instead of granulated sugar for a natural touch. For the flour, whole wheat flour works well. If you want a dairy-free option, try plant-based butter. You can also use coconut sugar instead of brown sugar for a different flavor. You'll need a few tools to make these pretzel bites: - A medium mixing bowl - A large mixing bowl - A wooden spoon or spatula - Measuring cups and spoons - A floured work surface - A sharp knife or dough cutter - Parchment paper - An air fryer With these ingredients and tools, you are ready to create your tasty Air Fryer Cinnamon Pretzel Bites! Start with warm water, about 110°F or 45°C. In a medium bowl, mix the warm water and sugar. Stir until the sugar dissolves. Next, sprinkle the active dry yeast on top. Let it sit for 5 to 10 minutes. The yeast should become frothy. This means it is activated and ready. In a large bowl, whisk together the all-purpose flour and salt. Once the yeast mixture is frothy, pour it into the flour. Use a wooden spoon or spatula to mix until a shaggy dough forms. Transfer the dough to a floured surface. Knead the dough for about 5 minutes. It should feel smooth and elastic. Shape the dough into a ball. Place it in a greased bowl and cover it with a towel. Let it rise in a warm spot for about 1 hour. It should double in size. After the dough has risen, gently punch it down to release air. Divide the dough into 8 equal pieces. Roll each piece into a log about 8 inches long. Twist each log into a pretzel shape. Make sure the ends are attached well. In a shallow bowl, mix the baking soda with 2 cups of hot water. Dip each twisted pretzel into this solution for 30 seconds. This helps form a nice crust. Place the pretzels on parchment paper to drain. Brush the tops with melted butter. Sprinkle coarse sea salt over them. Preheat your air fryer to 375°F (190°C). Arrange the pretzels in the air fryer basket. Make sure they are not crowded. Air fry at 375°F for 8 to 10 minutes. They should turn golden brown and crispy. In a small bowl, mix ground cinnamon and brown sugar for a sweet topping. Once the pretzels are done, brush each one with more melted butter. Quickly sprinkle the cinnamon-sugar mixture on top while they are warm. This helps it stick. Enjoy your tasty pretzel bites! To get the best dough, start with warm water. Aim for about 110°F. Add sugar and yeast to the water. Let this sit until it gets frothy. This means your yeast is alive! Mix the flour and salt in a bowl. Then, combine the dry mix with the yeast mix. Stir until it forms a shaggy dough. Knead it for about five minutes. The dough should feel smooth and elastic. If it feels too sticky, add a little more flour. To cook your pretzel bites evenly, do not overcrowd the basket. Leave space for hot air to flow around each piece. This helps them cook all the way through. Preheat your air fryer to 375°F. This step is key for getting a nice crust. Flip the pretzels halfway through cooking for extra browning. Check them around the 8-minute mark. They should be golden brown when done. These pretzel bites are best served warm. Put them in a cute basket lined with parchment. For a fun twist, pair them with cream cheese frosting or a sweet dip. You can even sprinkle some extra cinnamon on top. Serve them at parties or family movie nights. Everyone will love these tasty bites! {{image_4}} You can add even more fun to your pretzel bites with sweet toppings. One of my favorites is a chocolate drizzle. After air frying, melt some chocolate chips in the microwave. Drizzle the warm chocolate over the pretzel bites. This sweet twist pairs well with the cinnamon sugar topping. You can also add sprinkles for a pop of color. If you prefer savory bites, cheese-stuffed pretzel bites are amazing. Before shaping the dough, cut small pieces of cheese. Place these in the center of each dough piece, then shape them into pretzels. The melted cheese inside adds a delightful surprise. You can use cheddar, mozzarella, or your favorite cheese for this tasty treat. For those needing gluten-free treats, you can swap regular flour for a gluten-free blend. Make sure your yeast is gluten-free as well. Follow the same steps for mixing and shaping the dough. Keep an eye on the texture, as gluten-free dough can behave differently. The result will be soft, chewy pretzel bites that everyone can enjoy. To keep your pretzel bites fresh, store them in an airtight container. They will stay good for about 2 days at room temperature. If you want to keep them longer, refrigerate them for up to a week. Just make sure they are cool before sealing them up. When you want to enjoy your leftover pretzel bites, reheating is easy. Preheat your air fryer to 350°F (175°C). Place the bites in the basket and heat for 3 to 5 minutes. This will help them regain their crispiness. You can also use a microwave, but the bites may not stay as crunchy. If you want to freeze your pretzel bites, first let them cool completely. Arrange them in a single layer on a baking sheet and freeze for about an hour. Once frozen, transfer them to a freezer bag. They can be stored for up to 3 months. When you're ready to eat, just reheat them in the air fryer. Enjoy the fresh taste again! Yes, you can use instant yeast. It works well in this recipe. You can skip the step of letting it foam in water. Just mix it with the flour and salt. This saves a bit of time. You can dip them in many delicious things! Here are some great ideas: - Cream cheese frosting - Warm chocolate sauce - Honey mustard sauce - Cheese dip These dips add a fun twist to your pretzel bites. The dough has risen enough when it doubles in size. You can check by pressing it lightly. If it springs back slowly, it is ready. This usually takes about one hour in a warm spot. Cleaning your air fryer is simple! Here’s how: - Let it cool down first. - Remove the basket and pan. - Wash them in warm, soapy water. - Wipe the inside with a damp cloth. Make sure everything is dry before using it again. Yes, you can bake them in the oven. Preheat your oven to 400°F (200°C). Place the pretzel bites on a baking sheet. Bake for about 12-15 minutes until golden brown. Enjoy them fresh from the oven! We covered all the steps to make pretzel bites, from ingredients to storage. You learned how to activate yeast, prepare dough, and shape your bites. I shared tips for perfect texture and suggested yummy variations, too. With clear instructions, you can try these at home. Enjoy your tasty pretzel bites, and don’t forget to share them!

Air Fryer Cinnamon Pretzel Bites Tasty and Simple Treat

Craving a fun and tasty treat? Look no further than air fryer cinnamon pretzel bites! These easy-to-make bites will have

- 1 pound potato gnocchi - 2 cups fresh spinach, roughly chopped - 1 cup heavy cream - 1/2 cup basil pesto - 1/2 cup freshly grated Parmesan cheese - 2 tablespoons extra virgin olive oil - 2 cloves garlic, finely minced - Salt and black pepper, to taste - Optional: Toasted pine nuts for garnish To make Creamy Pesto Gnocchi with Spinach, gather these simple and fresh ingredients. Start with one pound of potato gnocchi. You can find this at most grocery stores. Use two cups of fresh spinach, which adds color and nutrition. Heavy cream creates the creamy texture, so use one cup. For flavor, add half a cup of basil pesto. This can be store-bought or homemade, depending on your time. Don’t forget the cheese! Freshly grated Parmesan cheese enhances the dish. Use half a cup to get that rich taste. For cooking, you need two tablespoons of extra virgin olive oil. This will help sauté the garlic. Speaking of garlic, two cloves, finely minced, give great flavor. Lastly, season with salt and black pepper to taste. If you want a crunchy touch, consider adding toasted pine nuts as a garnish. With these ingredients, you can create a delightful dinner that everyone will love. - Fill a large pot with salted water. - Bring to a rolling boil and add potato gnocchi. - Cook until they rise to the surface, about 2-3 minutes. Cooking gnocchi is simple. I always use plenty of salt. This adds great flavor. Once the water boils, drop in the gnocchi. Watch for them to float; that means they are done. Drain them well and put them aside. - Sauté minced garlic in olive oil. - Gradually pour in heavy cream and bring to a simmer. - Stir in basil pesto and grated Parmesan cheese. For the sauce, heat olive oil in a non-stick skillet. Add minced garlic and cook for about one minute. You want it fragrant but not burnt. Then, slowly pour in heavy cream. Let it simmer gently. Next, mix in basil pesto and Parmesan cheese. Stir well until the sauce is creamy and smooth. - Add chopped spinach and cook until wilted. - Fold in the drained gnocchi. - Season with salt and black pepper. Now, add the chopped spinach to the skillet. Cook it for about two minutes until it wilts. Gently fold in the gnocchi, coating each piece in the creamy sauce. Finally, season with salt and black pepper. Taste and adjust if needed. This step brings everything together in a lovely way. - Ensure the water is well-salted for flavor. Salt brings out the best taste in gnocchi. - Use a non-stick skillet to prevent sticking. This helps keep the gnocchi intact and makes cleanup easier. - Do not overcook the gnocchi to maintain texture. Cook them just until they float to the top. Overcooking makes them mushy. - Watch the garlic closely to avoid burning. Garlic can go from golden to burnt in seconds. Stir it often to keep it safe. - Serve in shallow bowls for presentation. This makes the dish look more inviting and allows for easier eating. - Garnish with toasted pine nuts and basil. The nuts add crunch, while basil gives a fresh touch. {{image_4}} You can easily adapt this recipe to fit your needs. If you want a gluten-free version, use gluten-free gnocchi. This option still gives you that soft and chewy texture. For a dairy-free choice, simply swap the heavy cream with a plant-based alternative like coconut cream or cashew cream. This keeps the dish rich and creamy without the dairy. Want to add more flavor? Try adding sun-dried tomatoes or roasted vegetables. These ingredients bring a sweet and savory taste that pairs well with the creamy pesto. If you need extra protein, grilled chicken or shrimp works great too. Just toss them in right before you serve your dish. You can switch up the sauce to keep things exciting. For a different flavor, replace the basil pesto with sun-dried tomato pesto. This gives a tangy and rich twist. If you want something even creamier, try a creamy Alfredo sauce base instead. Both options will keep your meal exciting and delicious. To keep your creamy pesto gnocchi fresh, store it in an airtight container. This method helps retain flavor. You can keep the dish in the fridge for up to 3 days. Make sure to let it cool before sealing. When it's time to enjoy your leftovers, reheat them in a skillet. Use medium heat and add a splash of cream. This keeps the sauce creamy and prevents it from drying out. I recommend avoiding the microwave. It can change the texture of the gnocchi. Freezing this dish is not a good idea. The texture of the gnocchi will change when frozen. Instead, enjoy it fresh. If you have leftovers, refrigerate them as described above. I love serving Creamy Pesto Gnocchi with a fresh side salad. A simple green salad with cherry tomatoes and a light vinaigrette pairs well. You can also serve garlic bread to soak up the creamy sauce. Roasted vegetables, like zucchini or bell peppers, add a nice touch. For a heartier meal, grilled chicken or shrimp complements the dish perfectly. Yes, making homemade gnocchi is fun and easy! You need just a few ingredients: potatoes, flour, and egg. Start by boiling the potatoes until soft. Then, mash them and mix with flour and an egg to form a dough. Roll the dough into small pieces and shape them into little dumplings. Boil them in salted water until they float, just like store-bought gnocchi! Absolutely! Creamy Pesto Gnocchi works great for meal prep. You can make it and store it in the fridge for up to three days. Just keep it in an airtight container. When you're ready to eat, reheat it gently in a skillet. Add a splash of cream to keep it creamy and delicious. This blog post covered how to make creamy pesto gnocchi. We explored key ingredients like potato gnocchi, fresh spinach, and pesto. You learned step-by-step instructions to cook this meal. The tips helped ensure perfect texture and flavor. Remember, you can modify it to fit dietary needs or flavor preferences. Don't hesitate to experiment with different ingredients. Enjoy every comforting bite of this simple yet delicious dish!

Creamy Pesto Gnocchi Spinach Delightful Dinner Idea

Looking for a quick and tasty dinner idea? Try my Creamy Pesto Gnocchi Spinach! This dish combines soft gnocchi, fresh

To make garlic herb roasted carrots, you need these key ingredients: - 1 pound baby carrots (or regular carrots, peeled and sliced into sticks) - 4 cloves of garlic, finely minced - 3 tablespoons extra virgin olive oil - 1 teaspoon dried thyme - 1 teaspoon dried rosemary - 1 teaspoon sweet paprika - Salt and freshly cracked black pepper, to taste - Fresh parsley, finely chopped, for garnish - Zest of 1 large lemon These ingredients create a great balance of flavors. The garlic brings a strong taste, while the herbs add a nice touch. You can add more depth to your dish with these optional ingredients: - A pinch of red pepper flakes for heat - Honey or maple syrup for sweetness - A splash of balsamic vinegar for tang These extras let you customize the dish. They can enhance the taste and make your roasted carrots even better. If you want to switch things up, you can replace carrots with these options: - Sweet potatoes for a sweet twist - Parsnips for a unique flavor - Zucchini for a lighter dish Feel free to mix and match. Each substitute offers a new taste and texture, making the meal fun and fresh. {{ingredient_image_2}} Start by washing your carrots well. If you use baby carrots, you can keep them whole. If you choose regular carrots, peel them and slice them into sticks. Make sure they are similar in size. This helps them cook evenly. Once prepped, set them aside. In a large bowl, pour in three tablespoons of extra virgin olive oil. Add four cloves of minced garlic, one teaspoon of dried thyme, one teaspoon of dried rosemary, and one teaspoon of sweet paprika. Don’t forget a good pinch of salt and black pepper! Whisk the mixture until it blends well. This mix is packed with flavor and will coat your carrots beautifully. Preheat your oven to 400°F (200°C). This temperature is key for great roasting. Line a baking sheet with parchment paper for easy cleanup. Add your carrots to the bowl and toss them in the garlic herb mixture until they are fully coated. Spread them out on the baking sheet in a single layer. Roast for 25 to 30 minutes, stirring halfway through. You’ll know they are done when they are tender and have a nice golden color. Once out of the oven, sprinkle with lemon zest and fresh parsley for a burst of flavor and color. Enjoy! To get perfect garlic herb roasted carrots, set your oven to 400°F (200°C). This temperature helps caramelize the sugars in the carrots. It gives the outside a nice golden color. If your oven runs cool, you may need to cook them longer. Use an oven thermometer to check the heat if you're unsure. This ensures even cooking and great flavor. To keep your carrots crisp, do not overcrowd the baking sheet. Space them out so hot air can circulate. If they touch, they will steam instead of roast. Another tip is to dry the carrots well before you coat them. This removes extra moisture and helps them crisp up nicely. Toss halfway through cooking to get even browning. A beautiful dish is all about presentation. After roasting, sprinkle fresh parsley and lemon zest on top. This adds color and freshness. Use a rustic platter to serve your carrots. Drizzle any leftover garlic herb oil from the baking sheet over the top. This adds both flavor and a touch of elegance. Remember, we eat with our eyes first! Pro Tips Choose the Right Carrots: Opt for fresh, vibrant baby carrots for a sweeter flavor. If using regular carrots, ensure they are peeled and cut into uniform sticks for even roasting. Enhance the Garlic Flavor: For a deeper garlic flavor, consider roasting the minced garlic briefly in the olive oil before adding it to the carrots. Check for Doneness: Carrots should be tender with a slight caramelization. Test them with a fork; they should slide in easily without falling apart. Perfectly Zest the Lemon: Use a microplane to zest the lemon, ensuring you only take the yellow part of the skin, avoiding the bitter white pith. {{image_4}} You can boost the flavor by adding herbs and spices. Try fresh basil or oregano for a twist. You can also use spices like cumin or coriander for warmth. Mix and match to find your favorite blend. Each herb brings a unique taste to your dish. This makes it fun to experiment in the kitchen. Baby carrots are sweet and tender. They roast quickly and look great on a plate. Regular carrots, when sliced into sticks, offer a crunchy texture. Both types work well in this recipe. Choose based on your preference or what you have on hand. If you use regular carrots, cut them into even pieces for consistent cooking. Adding a splash of lemon juice brightens the dish. Honey can bring a sweet touch, perfect for kids. A drizzle of balsamic glaze adds a tangy depth. These infusions make the carrots even more exciting. You can mix these flavors at the end or during cooking. Each option gives you a new way to enjoy roasted carrots. To keep your leftover roasted carrots fresh, place them in an airtight container. Let the carrots cool down first. Once cool, seal the container tightly. Store it in the fridge for up to four days. This way, you can enjoy them later without losing flavor. When you’re ready to eat your leftover carrots, use the oven for the best taste. Preheat your oven to 350°F (175°C). Spread the carrots out on a baking sheet. Heat them for about 10-15 minutes. This helps them stay crisp and flavorful. You can also use the microwave, but they may lose some crunch. If you want to save roasted carrots for later, freezing is a great option. First, let them cool completely. Then, spread them on a baking sheet in a single layer. Freeze them for 1-2 hours until firm. After that, transfer them to a freezer bag. Be sure to remove as much air as possible. They can last up to three months in the freezer. When you’re ready to eat, thaw them in the fridge before reheating. Yes, you can use frozen carrots. However, fresh carrots give a better taste. Frozen carrots might not get as crisp. If you use frozen, roast them for a bit longer. Make sure to thaw them first. Pat them dry to remove excess water. This way, they roast better. You can roast many vegetables with this method! Try these options: - Baby potatoes - Bell peppers - Zucchini - Asparagus - Brussels sprouts These vegetables work well with the garlic herb mix. Just adjust the roasting time based on their size. Smaller pieces cook faster. The carrots are done when they are tender and golden. Use a fork or knife to check their softness. They should be easy to pierce but not mushy. Look for a nice caramelized color on the outside. Roasting for 25-30 minutes usually does the trick, but keep an eye on them! In this blog post, we explored how to make garlic herb roasted carrots. We covered the essential and optional ingredients, including tips for substitutions. I shared simple steps for prepping and roasting the carrots to get them tender and tasty. You learned tricks to avoid sogginess and how to garnish for a great look. Experimenting with herbs and spices can add flair to your dish. Storing and reheating leftovers keeps the flavor alive. Enjoy your roasted carrots—simple yet full of flavor!

Garlic Herb Roasted Carrots Simple and Tasty Side

Are you looking for a simple, tasty side dish that will wow your dinner guests? Garlic Herb Roasted Carrots are

For this Sheet Pan Mediterranean Chicken Veggies, you will need: - 4 boneless, skinless chicken thighs - 1 cup cherry tomatoes, halved - 1 red bell pepper, sliced into thin strips - 1 yellow bell pepper, sliced into thin strips - 1 medium red onion, cut into wedges - 1 medium zucchini, sliced into half-moons - 3 cloves garlic, minced finely - ¼ cup extra-virgin olive oil To bring out the Mediterranean flavors, use: - 1 teaspoon dried oregano - 1 teaspoon dried thyme - 1 teaspoon smoked paprika - ½ teaspoon crushed red pepper flakes (optional) - Salt and freshly cracked pepper to taste You can enhance your dish with: - Fresh parsley, chopped (for garnish) - Lemon wedges (for serving) These ingredients create a colorful and tasty meal. The chicken thighs stay juicy, while the veggies roast to perfection. The spices add depth and warmth, making every bite a delight. Enjoy the mix of fresh, vibrant flavors that make this dish a true Mediterranean experience. Start by preheating your oven to 425°F (220°C). In a big bowl, add 4 boneless, skinless chicken thighs. Pour in ¼ cup of extra-virgin olive oil and add 3 minced garlic cloves. Then, sprinkle in 1 teaspoon each of dried oregano, dried thyme, and smoked paprika. If you like heat, add ½ teaspoon of crushed red pepper flakes. Season with salt and pepper. Mix well until the chicken is fully coated in that tasty marinade. Next, grab a large sheet pan. Place the seasoned chicken thighs in the center. Around the chicken, arrange 1 cup of halved cherry tomatoes, sliced red bell pepper, sliced yellow bell pepper, onion wedges, and zucchini slices. This colorful mix makes the dish look amazing! Drizzle a bit more olive oil over the veggies. Season them lightly with salt, pepper, and a pinch of dried oregano. Use your hands to toss the veggies, ensuring they are well-coated. Now, it’s time to roast! Place the sheet pan in your preheated oven. Roast for 25 to 30 minutes. Check that the chicken reaches 165°F (75°C) for safety. The veggies should be tender and slightly caramelized. Once done, take the pan out and let it rest for a few minutes. To serve, garnish with chopped parsley and add lemon wedges for a fresh twist. Enjoy your easy Mediterranean meal! To keep your chicken juicy, start with good-quality thighs. Thighs hold moisture better than breasts. Marinate the chicken in olive oil, garlic, and spices. Let it soak for at least 15 minutes. If you have time, marinate it longer for richer flavor. Roast it at high heat to seal in juices. Check the temperature with a meat thermometer; it should reach 165°F (75°C). This ensures it cooks through without drying out. Cut your vegetables into even sizes for even cooking. Use fresh veggies like bell peppers, zucchini, and cherry tomatoes. Toss them in olive oil and seasonings before roasting. This adds flavor and helps them brown nicely. Spread the vegetables out on the sheet pan, avoiding overcrowding. This allows them to roast instead of steam. Roast them alongside the chicken for a colorful, tasty side. Serve the chicken and veggies right from the sheet pan for a casual vibe. Garnish with fresh parsley for a pop of color. Offer lemon wedges on the side to brighten the dish. The juice adds a fresh zing. For a heartier meal, serve it over rice or couscous. Enjoy the flavors and simplicity of this one-pan dish! {{image_4}} You can easily change the protein in this dish. Instead of chicken thighs, use chicken breasts. They cook well and stay moist. You can also try turkey thighs for a leaner option. If you want red meat, use beef or lamb. Cut them into bite-sized pieces to match the cooking time. For seafood lovers, shrimp works great too. Just make sure to reduce the cooking time to about 10-15 minutes. If you want a meatless meal, this dish can still shine. Replace the chicken with hearty veggies. Use chickpeas or cannellini beans for protein. They add texture and flavor. You can also add more vegetables like eggplant or mushrooms. Just make sure to roast them until tender. This way, you keep all the delicious flavors and colors. To make this meal even better, try adding more spices. A pinch of cumin or coriander gives a warm taste. You can also mix in some fresh herbs like basil or mint. A splash of balsamic vinegar brightens the flavors. For a zesty kick, add lemon zest or capers. These small changes can make a big difference. Feel free to experiment and find your perfect blend! After enjoying your meal, let the leftovers cool. Place them in an airtight container. This keeps the chicken and veggies fresh. Store them in the fridge for up to three days. For best taste, use them within this time. If you have a lot left, consider freezing some. To reheat, take the chicken and veggies out of the fridge. You can use a microwave or oven. If using a microwave, place them on a plate and cover with a damp paper towel. Heat in short bursts, about 1-2 minutes, checking often. If using an oven, preheat it to 350°F (175°C). Place them in an oven-safe dish and heat for about 10-15 minutes. This helps keep the chicken juicy. If you plan to freeze your leftovers, do it right away. Place the chicken and veggies in a freezer-safe bag. Squeeze out as much air as possible. Label the bag with the date. You can freeze the meal for up to three months. To thaw, move it to the fridge overnight. This helps preserve the flavors and texture. Yes, you can use bone-in chicken. It may take longer to cook. Aim for an internal temperature of 165°F. Check the chicken with a meat thermometer. Bone-in chicken adds flavor, but ensure it cooks well. Cut your veggies into uniform pieces. Aim for 1-inch chunks. This helps them cook evenly. For softer veggies, like zucchini, slices work well. For firmer ones, like onions, wedges are great. This way, all veggies roast perfectly. To adjust spice, add more or less crushed red pepper flakes. For a milder dish, skip the flakes. For more heat, increase the amount. You can also add chili powder or cayenne pepper for a kick. Taste as you go! This blog post provided a clear guide to making a tasty dish. We explored the main ingredients, arranged the vegetables, and learned the best roasting methods. Tips ensured your chicken stays juicy while the veggies cook just right. You got ideas for swaps and enhancements, plus storage options. Final thoughts: Enjoy experimenting with flavors and make this dish your own. Happy cooking!

Sheet Pan Mediterranean Chicken Veggies Simple Meal

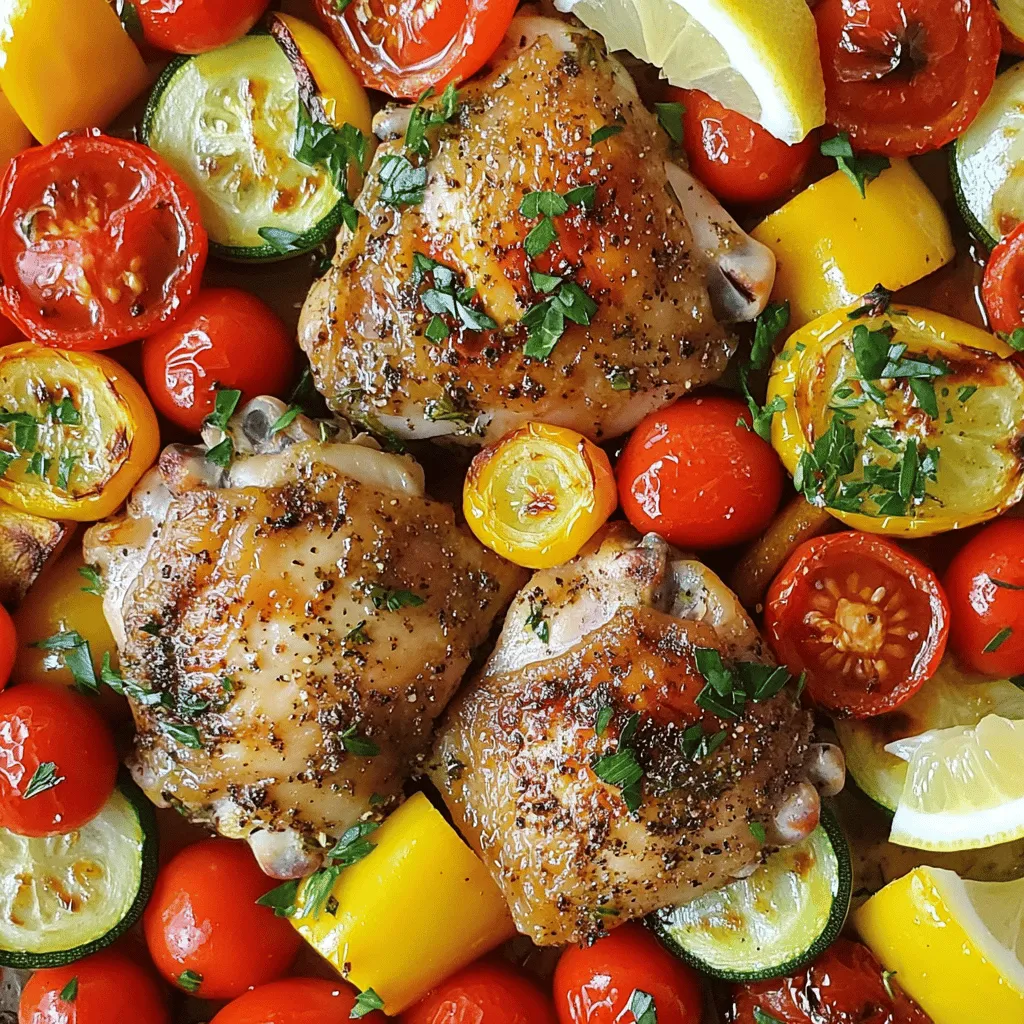
Are you looking for a simple, tasty meal? My Sheet Pan Mediterranean Chicken Veggies recipe is just what you need!

- 1 cup fresh strawberries, hulled and sliced - 1 cup juicy blueberries - 1 cup ripe kiwi, peeled and diced - 1 cup sweet pineapple, cubed - 1 cup succulent mango, diced - 2 tablespoons pure honey - 2 tablespoons freshly squeezed lime juice - 1 tablespoon fresh mint leaves, finely chopped - Suggestions for other fruits I love how fresh fruits make this salad a joy to eat. You can use any mix of fruits you like. Strawberries are sweet and bright. Blueberries burst with flavor. Kiwi adds a fun tartness. Pineapple gives it a tropical touch. Mango brings a creamy feel. For the honey lime dressing, you need just two simple things: honey and lime juice. Honey adds sweetness, while lime juice gives a zing. You can adjust the honey to suit your taste. If you want a hint of freshness, sprinkle in some mint leaves. Feel free to swap fruits! Bananas, oranges, or even grapes work well. Just pick what you enjoy the most. This salad is all about fun flavors and colors. Enjoy mixing and matching! - Rinse the strawberries, blueberries, kiwi, pineapple, and mango in cold water. - Remove the green tops from the strawberries, then hull and slice them. - Peel the kiwi and cut it into small pieces. - Chop the pineapple and mango into bite-sized cubes. - Combine all the fruit in a large mixing bowl. - Gently toss the fruit using a large spoon or spatula. This avoids squashing the pieces. - In a small bowl, whisk together honey and lime juice. - Keep whisking until the honey dissolves fully in the lime juice. - Drizzle the honey-lime dressing over the mixed fruit. - Gently toss the fruits and dressing together until all pieces are coated. - Allow the salad to sit for about 10 minutes. - This helps the flavors blend and the fruit soak in the dressing. Serve your honey lime fruit salad in a clear glass bowl. This choice shows off the bright colors of your fruits. The vibrant look makes it tempting for everyone. You can also use mint leaves to add a touch of green. A fresh sprig on top gives a nice pop and adds a lovely fragrance. To balance the sweetness, try adding a pinch of salt. This little trick makes the flavors stand out more. You can also adjust the honey to fit your taste. If you like it sweeter, add more honey. If you prefer less sweetness, use less honey. Choosing ripe fruit is key to great taste. Look for fruits that feel firm but yield slightly when pressed. Prepare your fruits just before serving. This keeps them fresh and bright. The longer they sit, the soggier they can get. Enjoy your salad at its best! {{image_4}} You can add a fun twist to your Honey Lime Fruit Salad. Try adding coconuts or papaya for a tropical vibe. The sweet coconut adds richness, while papaya brings a soft texture. You can also swap lime juice for mango juice. This change gives the salad a sweet and fruity taste. For a berry-filled salad, mix in fresh raspberries or blackberries. These berries add color and a tart flavor. You may also enjoy a yogurt dressing. Simply mix yogurt with honey and a bit of lime for a creamy touch. This version is both tasty and refreshing. Using seasonal fruits can keep your salad exciting all year. In summer, use berries, peaches, or nectarines. In winter, try apples, pears, or citrus fruits. Adjusting your fruit based on the season keeps each salad unique and fresh. It’s a simple way to enjoy new flavors! Store your Honey Lime Fruit Salad in the fridge. Use an airtight container to keep it fresh. This helps prevent the fruits from getting mushy or losing their taste. Make sure to seal it tightly. Enjoy your fruit salad within three days for the best taste. After that, it may not taste fresh. Look for signs that the salad has spoiled, like a sour smell or slimy texture. If you see these signs, it’s time to toss it out. If you have extra salad, don’t worry! You can use it in many ways. Blend it into a smoothie for a fruity drink. You can also add it to yogurt for a tasty snack. Another fun idea is to layer it in desserts, like parfaits, for a colorful treat. Using canned fruit can be quick and easy. However, fresh fruit always tastes better. Canned fruit may have added sugar or preservatives. This can change the flavor and texture. Here are some pros and cons to consider: - Pros: - Convenient and ready to use - Longer shelf life - Can save time in prep - Cons: - Often less flavor than fresh - May be mushy - Can contain added sugar If you choose canned fruit, avoid fruit in syrup. Instead, look for fruit packed in juice or water. It is usually healthier and tastier. Yes, but honey is not vegan. You can swap honey for agave syrup or maple syrup. Both options keep the sweet flavor. Here are some fully vegan ideas: - Use agave syrup or maple syrup instead of honey - Add a splash of coconut or almond milk for creaminess - Use other sweet fruits to enhance flavor These swaps keep the fruit salad tasty and vegan-friendly. Fruit is naturally gluten-free. So, you can use any fresh fruit without worry. Make sure the dressing is gluten-free too. Use pure honey and fresh lime juice. Here are some tips to ensure safety: - Check labels on any added ingredients - Avoid gluten-containing dressings or toppings - Always use fresh, unprocessed fruits This way, you can enjoy a safe and delicious fruit salad. This fruit salad combines fresh, vibrant ingredients and a sweet honey lime dressing. You learned how to prepare ripe fruits, mix them, and enhance their flavors. I shared tips for perfect presentation and offered variations to keep it exciting. Remember, freshness is key, so prepare the salad just before serving. Enjoy this healthy treat as a snack or dessert. With the right storage, your leftovers can last and still taste great. Dive into your creativity and enjoy customizing this fruit salad to match your taste!

Honey Lime Fruit Salad Fresh and Flavorful Delight

Are you ready to taste the perfect blend of sweet and tangy? This Honey Lime Fruit Salad is your ticket

To make spicy honey garlic Brussels sprouts, you need a few simple items. Here’s what you will need: - 1 pound fresh Brussels sprouts, trimmed and halved - 3 tablespoons extra virgin olive oil - 4 cloves garlic, minced for a robust flavor - 1 tablespoon honey, preferably local for depth - 1 tablespoon sriracha, adjust according to your heat preference - 1 tablespoon soy sauce, for a savory umami touch - Sea salt and freshly ground black pepper, to taste - 1 teaspoon toasted sesame seeds, for a crunchy garnish - Chopped green onions, for a fresh finish These ingredients blend together to create a dish that is sweet, spicy, and full of flavor. Fresh Brussels sprouts make the base, while garlic adds a kick. Honey and sriracha bring balance, with soy sauce adding depth. The sesame seeds and green onions give a nice finish. This dish is not only delicious but also easy to prepare! Start by preheating your oven to 400°F (200°C). This step is crucial for crisping the Brussels sprouts. I recommend lining a large baking sheet with parchment paper. This makes cleanup easy and helps to prevent sticking. Take one pound of fresh Brussels sprouts. Trim the ends and cut them in half. Place the halved sprouts in a large mixing bowl. Drizzle three tablespoons of extra virgin olive oil over them. Toss gently until every sprout is coated. Next, season with sea salt and freshly ground black pepper. Use enough salt to enhance their natural flavor. In a small mixing bowl, add four cloves of minced garlic. Then, add one tablespoon of honey, one tablespoon of sriracha, and one tablespoon of soy sauce. Whisk these ingredients together until they form a smooth sauce. This mixture will bring a sweet and spicy kick to your dish. Now, pour the flavorful sauce over the Brussels sprouts. Toss everything thoroughly, making sure each piece is evenly coated. This step is key to getting that delicious flavor in every bite. Transfer the coated Brussels sprouts to the lined baking sheet. Spread them out in a single layer. This helps them roast evenly. Bake for 20-25 minutes, stirring halfway through. You want them to be crispy and caramelized, which adds great texture. Once your Brussels sprouts are roasted, take them out of the oven. Sprinkle with one teaspoon of toasted sesame seeds. Add chopped green onions for a fresh finish. These garnishes not only add flavor but also make the dish look beautiful. Your spicy honey garlic Brussels sprouts are ready! Enjoy them as a vibrant side dish or a tasty snack. The mix of sweet, spicy, and savory flavors will surely impress your family and friends. When picking Brussels sprouts, look for tight, bright green buds. They should feel firm and heavy in your hand. Avoid any that are yellow or have blemishes. Fresh Brussels sprouts taste better and have a nice crunch. To change the heat, simply alter the amount of sriracha. Start with a small amount if you're unsure. You can always add more later for spiciness. If you want a milder dish, replace sriracha with a sweet chili sauce. This keeps the flavor while reducing the heat. To roast Brussels sprouts evenly, spread them out on the baking sheet. Make sure they are not crowded. Stir them halfway through cooking. This helps each side get that lovely crispy texture. Store leftover Brussels sprouts in an airtight container. Keep them in the fridge for up to three days. If you want to freeze them, blanch them first. This keeps their color and taste better when you reheat them. {{image_4}} You can easily make this dish vegan. Just swap honey with maple syrup. Maple adds a nice sweet touch. It pairs well with the spicy and savory flavors. Use the same amount of maple syrup as honey. This change keeps the taste delicious without losing any charm. If you want more heat, try different sauces. You can use sambal oelek or chili garlic sauce. Both options give a nice kick. Adjust the amount based on your heat level. Start with one teaspoon, then taste and add more if desired. Your sprouts will still taste great! Brussels sprouts love company! You can mix in other veggies. Try adding sliced carrots or bell peppers. They cook nicely and add color. Broccoli florets also work well. Just chop them into small pieces. Toss them together with Brussels before roasting. This adds more flavor and nutrients to your dish. After cooking, let your spicy honey garlic Brussels sprouts cool. Place them in an airtight container and store them in the fridge. They will stay fresh for up to four days. To keep the sprouts crispy, avoid stacking them too high in the container. This way, they won’t get soggy. You can freeze leftover Brussels sprouts if you want to save them for later. First, let them cool completely. Then, spread them out on a baking sheet. Freeze them for about two hours until solid. After that, transfer them to a freezer-safe bag. They can last up to three months in the freezer. However, the texture may change once thawed. To reheat, preheat your oven to 350°F (175°C). Spread the Brussels sprouts on a baking sheet. Bake for about 10-15 minutes until heated through. This helps restore some crispiness. You can also microwave them, but they might lose their crunch. Avoid overcooking to keep them tasty! To tone down the heat, reduce the sriracha amount. You can start with a teaspoon. Try adding more honey to balance the spice. Another option is to add a splash of lemon juice. This adds freshness and brightens the dish. You can also mix in some roasted carrots or sweet potatoes for extra sweetness. Yes, you can use frozen Brussels sprouts. However, thaw them first. Pat them dry to remove excess moisture. This helps them roast better. Frozen sprouts may not get as crispy as fresh ones. If you choose frozen, bake them a bit longer. Keep an eye on them to ensure they cook through. Spicy honey garlic Brussels sprouts pair well with many dishes. They enhance roasted chicken or pork nicely. You can serve them with quinoa or rice for a healthy meal. They also complement grilled steak or fish. Try them with a creamy pasta dish for a nice contrast. You can store leftovers in an airtight container. They last up to three days in the fridge. When reheating, use the oven for best results. This helps keep them crispy. You can also microwave them, but they might get a bit soggy. Yes, you can prepare Brussels sprouts in advance. Trim and halve them a day before. Store them in the fridge in an airtight container. You can also make the sauce a day ahead. Just mix it and keep it stored separately. Combine them right before you bake for fresh flavor. This blog post showed you how to make tasty Spicy Honey Garlic Brussels Sprouts. We went over the simple ingredients and clear steps to prepare and roast them. I shared tips for selecting fresh sprouts and adjusting heat levels, plus variations you can try. Remember, these sprouts are great for meals and match well with many dishes. Enjoy experimenting with this recipe and make it your own. Happy cooking!

Spicy Honey Garlic Brussels Sprouts Delicious Side Dish

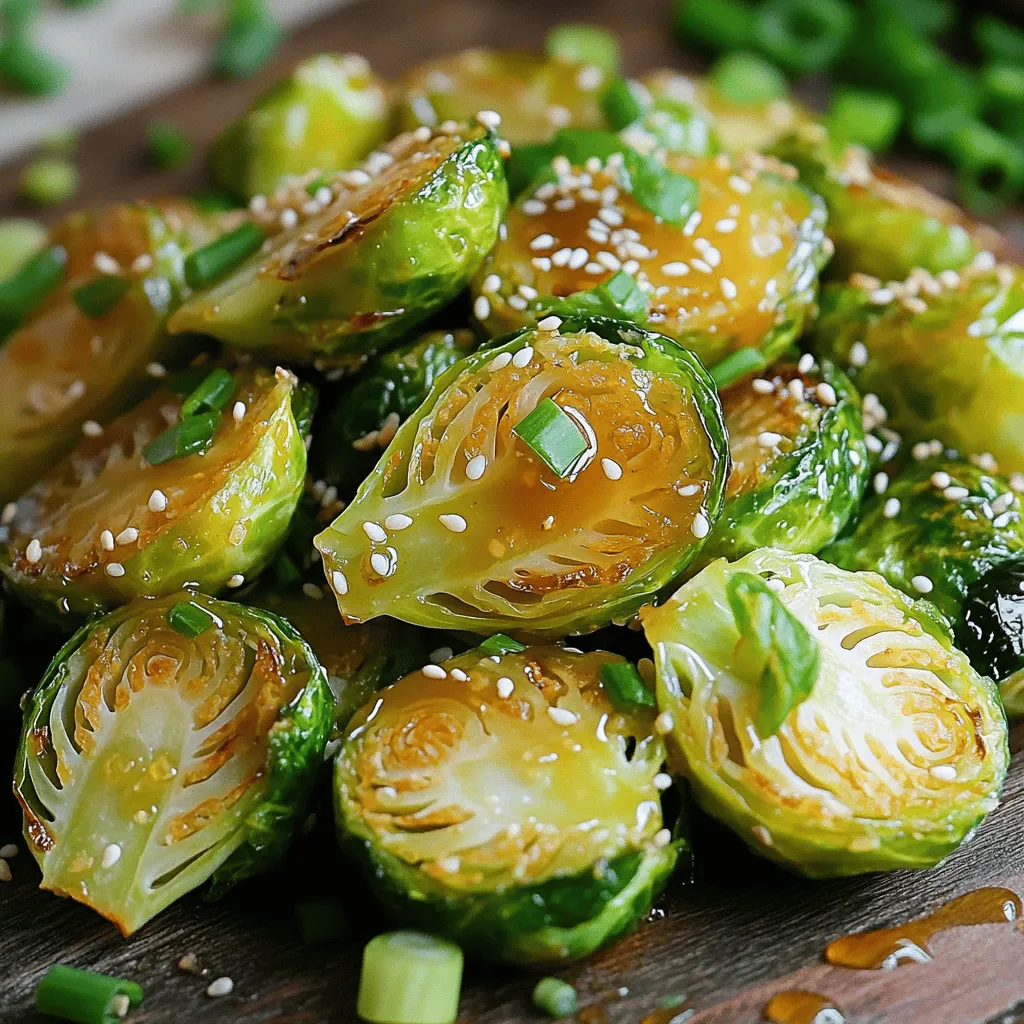
If you think Brussels sprouts are boring, think again! These Spicy Honey Garlic Brussels Sprouts will change your mind. The

- 14 oz firm tofu, well-drained and pressed - 3 tablespoons cornstarch - 1 tablespoon garlic powder - 1 tablespoon onion powder - 1 teaspoon smoked paprika - 1 teaspoon sea salt - 1/2 teaspoon freshly ground black pepper - 2 tablespoons soy sauce - 2 tablespoons sesame oil - Fresh parsley, finely chopped - Dipping sauces like sweet chili sauce or soy sauce These ingredients come together to create a delightful dish. Firm tofu is the star here, providing the base for amazing flavor. The cornstarch makes each bite super crispy. Garlic powder and onion powder add depth, while smoked paprika brings a hint of warmth. Season your tofu with sea salt and black pepper for a balanced taste. Soy sauce adds umami, while sesame oil gives it a nice nutty finish. For garnishing, fresh parsley adds a pop of color and freshness. Pair your crispy bites with sweet chili sauce or soy sauce for a delicious dip. This simple mix of ingredients helps you create a great snack or meal in no time. To start, I press the tofu to remove excess moisture. This step is key for crispiness. Use a clean towel or paper towels to wrap the tofu. Place a heavy object on top for about 15 minutes. After pressing, cut the tofu into bite-sized cubes, around 1 inch. Place the cubes in a mixing bowl. Next, I prepare the dry seasoning mix. In a small bowl, blend together: - 3 tablespoons cornstarch - 1 tablespoon garlic powder - 1 tablespoon onion powder - 1 teaspoon smoked paprika - 1 teaspoon sea salt - 1/2 teaspoon freshly ground black pepper Mix these well to ensure even flavor. Then, drizzle 2 tablespoons soy sauce and 2 tablespoons sesame oil over the tofu. Toss the tofu gently, coating each cube with the sauce. This adds great flavor. Now, sprinkle the dry seasoning mix over the tofu. Toss again until all cubes are covered. This step creates a delicious crust when cooked. Before cooking, I preheat the air fryer to 380°F (193°C) for about 5 minutes. This ensures even cooking. Arrange the tofu in a single layer in the air fryer basket. Do not let them overlap; this keeps them crispy. I cook the tofu for 15-20 minutes. Halfway through, I shake the basket to promote even crisping. The tofu is done when it turns golden brown and feels crisp. Once cooked, I carefully transfer the tofu bites to a serving plate. I love adding fresh parsley on top for a nice touch. Serve these crispy bites hot with a side of sweet chili sauce or soy sauce for dipping. Enjoy! To get that ideal crunch, make sure you space the tofu cubes in the air fryer. If they sit too close, they will steam instead of crisp. Arrange them in a single layer. This allows hot air to circulate around each piece. I recommend setting the air fryer to 380°F (193°C). This temperature cooks the tofu just right, giving it a golden brown finish. For deeper flavor, marinate your tofu before cooking. Let the tofu sit in soy sauce and sesame oil for at least 15 minutes. This helps the flavors soak in. You can also add a touch of lemon juice for a zesty kick. After cooking, use fresh herbs like parsley for garnish. This not only adds color but also a fresh taste. After frying tofu, clean the air fryer to keep it in good shape. Let it cool, then wipe down the basket with a damp cloth. You can also soak it in warm, soapy water. To prevent sticking, spray the basket lightly with cooking oil before adding the tofu. This simple step keeps the tofu from sticking and makes cleanup easier. {{image_4}} You can easily change the taste of your crispy garlic tofu bites. Adding spices like chili powder or cumin gives your bites a warm kick. If you like sweet flavors, try teriyaki or hoisin sauce. These sauces can transform the dish into something new and exciting. For a gluten-free version, use tamari instead of soy sauce. This swap keeps the flavor while meeting dietary needs. If you're looking for vegan options, choose plant-based seasonings. They add flavor and keep your dish healthy without any animal products. Pair your tofu bites with rice or a fresh salad. This combo makes for a balanced meal. You can also create a crispy tofu salad bowl. Just toss the bites with greens, veggies, and your favorite dressing. This adds color and nutrition to your plate. To store your crispy garlic tofu bites, let them cool completely. This step helps keep them fresh. Place the cooled tofu in an airtight container. Glass or plastic containers work well for storage. Make sure to keep them in the fridge. They will last for about 3 to 5 days. To reheat your crispy tofu, use an air fryer if you can. Preheat the air fryer to 350°F (175°C). Place the tofu bites in a single layer. Heat them for about 5 to 7 minutes. This method keeps the tofu crispy. You can also use a skillet. Add a tiny bit of oil and heat on medium. This will also help regain some crunch. You can freeze cooked tofu bites for later use. Allow them to cool completely before freezing. Place them in a freezer-safe bag or container. Remove as much air as possible to avoid freezer burn. They can last up to 3 months in the freezer. When ready to eat, thaw them in the fridge overnight. Reheat in the air fryer or skillet as mentioned above. You can still enjoy crispy tofu using an oven or stovetop. For the oven, preheat it to 400°F (200°C). Cut the tofu into cubes and coat them with cornstarch and your favorite seasonings. Spread the cubes on a baking sheet lined with parchment paper. Bake for about 25-30 minutes, flipping halfway through for even browning. For the stovetop, heat a skillet over medium heat. Add oil and wait until it shimmers. Add the tofu cubes and cook for about 10 minutes. Turn them often until all sides are golden brown and crispy. Yes, you can use extra-firm tofu. It has less moisture, so it makes for crispier bites. Just remember to adjust the cooking time slightly. Extra-firm tofu may need a few more minutes to reach the same golden color. Popular dipping sauces include: - Sweet chili sauce - Soy sauce - Teriyaki sauce You can also try making your own sauce. Mix soy sauce with honey and a splash of lime juice for a tasty blend. Another option is a simple garlic aioli. Just mix mayonnaise, minced garlic, and a squeeze of lemon juice. This adds a creamy touch to your crispy tofu bites. We explored how to make crispy garlic tofu bites step by step. You learned about key ingredients, preparation, cooking tips, and flavor variations. Remember, pressing tofu and proper marinating are crucial for taste. Experiment with spices and pair it with your favorite sides. With these tips, you can create delicious tofu that satisfies any craving. Enjoy your cooking adventure, and make it your own!

Crispy Garlic Tofu Bites Air Fryer Recipe Delight

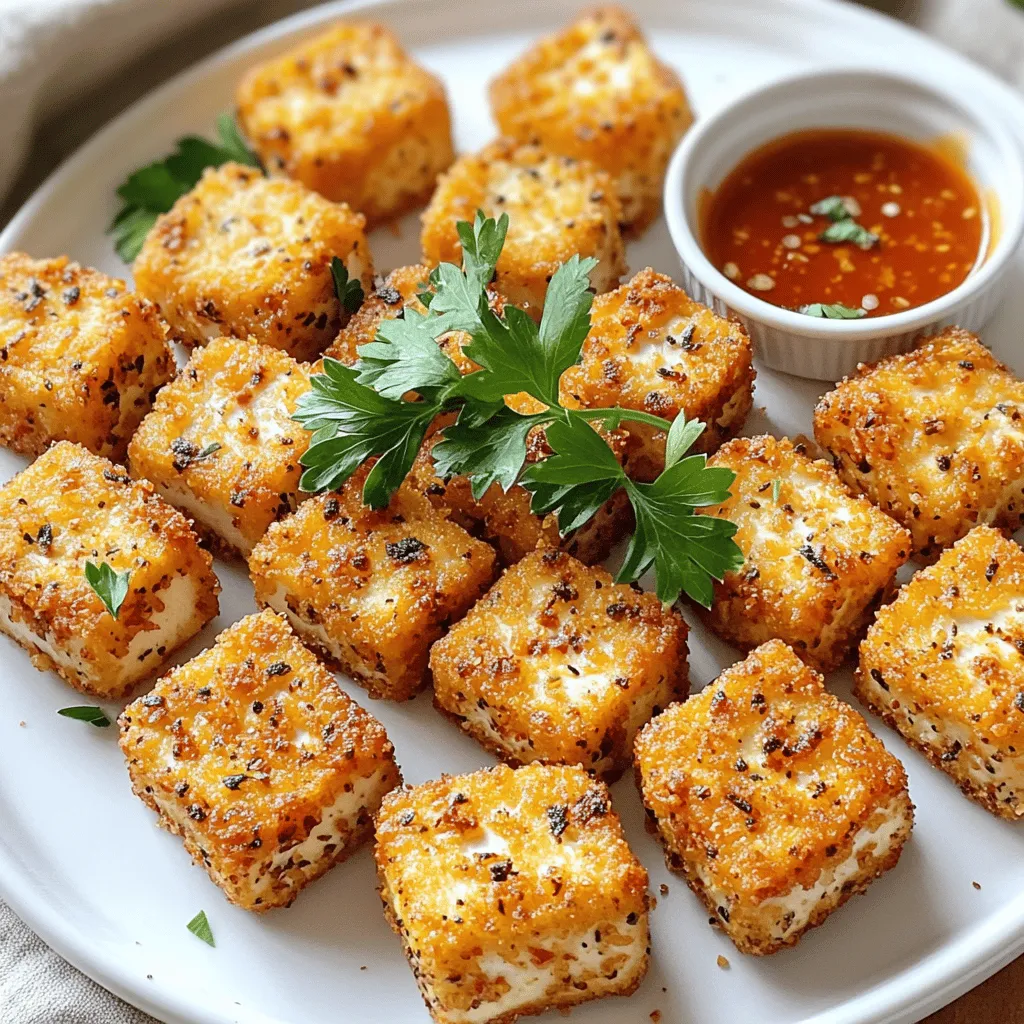
Are you ready to discover a quick and tasty snack that packs a punch? This Crispy Garlic Tofu Bites Air

- 1 lb ground turkey - 1 can (15 oz) black beans, drained and rinsed - 1 can (15 oz) kidney beans, drained and rinsed - 1 can (28 oz) crushed tomatoes - 1 cup corn kernels (fresh, frozen, or canned) - 1 medium onion, finely chopped - 3 cloves garlic, minced (about 1 tablespoon) - 1 bell pepper (any color), chopped into bite-sized pieces - 2 tablespoons chili powder - 1 tablespoon ground cumin - 1 teaspoon smoked paprika - 1 teaspoon cayenne pepper (adjust according to heat preference) - Salt and pepper to taste - 2 tablespoons olive oil - 1 cup chicken broth (or vegetable broth for a lighter version) To make my Instant Pot spicy turkey chili, I start with ground turkey. It is lean and cooks well in the pot. Next, I add beans and crushed tomatoes for texture and flavor. I like using black and kidney beans, but you can pick your favorites. I also include corn for sweetness and bell peppers for crunch. Aromatics like onion and garlic build a strong base. I use chili powder, cumin, smoked paprika, and cayenne pepper for that spicy kick. Don’t forget to season it with salt and pepper; it makes a big difference! - Fresh cilantro - Avocado - Lime wedges For toppings, I love fresh cilantro for a burst of flavor. Sliced avocado adds creaminess, making each bite delightful. Lime wedges give a zesty touch. You can mix and match these toppings to suit your taste! Start by chopping the onion and garlic. Use a sharp knife for clean cuts. Finely chop one medium onion. Then, mince three cloves of garlic. This step adds great flavor to the chili. Next, rinse the beans and corn. Open the cans of black and kidney beans. Pour them into a colander and rinse well under cold water. This helps remove extra salt. If you use frozen corn, run it under warm water to thaw. Canned corn can be rinsed too. This keeps the chili fresh and clean. Now, it's time to cook! First, set the Instant Pot to sauté mode. Add two tablespoons of olive oil to the pot. Once it’s hot, toss in the chopped onion and minced garlic. Sauté for about 3-4 minutes, stirring often. You want the onions to be soft and smell great. Next, brown the ground turkey. Increase the heat slightly and add one pound of ground turkey. Use a wooden spoon to break it apart as it cooks. Stir until it's brown and no longer pink. This should take about 5-7 minutes. Now, add the spices and remaining ingredients. Sprinkle in two tablespoons of chili powder, one tablespoon of ground cumin, one teaspoon of smoked paprika, and one teaspoon of cayenne pepper. Stir well to coat the turkey and onions. Then, pour in the rinsed beans, one can of crushed tomatoes, one cup of corn, and one cup of chicken broth. Don’t forget to add one chopped bell pepper. Mix everything together until well combined. Secure the lid on the Instant Pot. Make sure the pressure valve is set to sealing. Select manual high pressure and set the timer for 15 minutes. When the timer goes off, let the pressure release naturally for 10 minutes. Carefully switch the valve to quick release to let out any steam. Once it's safe to open the lid, stir the chili well. Taste it and adjust the seasoning as needed. Add more salt, pepper, or cayenne pepper for extra heat if you like. Serve the chili hot. Ladle it into bowls and garnish with fresh cilantro. Add slices of avocado on top for a creamy touch. Enjoy this warm and spicy meal! How can I adjust spice levels? To control the heat, use cayenne pepper wisely. Start with one teaspoon. Taste your chili after cooking. If you want more heat, add a bit more cayenne. You can also add hot sauce at the end for extra spice. What beans should I choose? Black beans and kidney beans work great in this recipe. They add texture and protein. You can mix and match beans to suit your taste. For a creamier chili, try using pinto beans instead. How can I prep ingredients in advance? Chop your onion and garlic the night before. Store them in an airtight container in the fridge. Rinse and drain the beans ahead of time too. This saves time on chili day. What are the best practices for Instant Pot usage? Always make sure the sealing ring is in place. It helps the pot build pressure. When sautéing, keep an eye on the heat. If it gets too hot, reduce it to avoid burning. What side dishes pair well with chili? Cornbread is a classic choice. You can also serve tortilla chips for crunch. A fresh salad or guacamole adds balance to the meal. How should I choose bowls for presentation? Use colorful bowls to make your chili pop. A white bowl can showcase the vibrant colors too. Adding a wedge of lime on the side makes it look fresh and inviting. {{image_4}} You can change the ground turkey to other meats. Ground chicken or beef works well. For a twist, try ground pork for a richer flavor. If you prefer a meat-free option, use plant-based meat substitutes. Products made from soy or pea protein can be great. You can also use lentils or mushrooms for a hearty texture. Adding different vegetables can change your chili’s taste. Try diced zucchini or carrots for extra nutrition. Bell peppers can also bring a sweet touch. Incorporating unique spices gives your chili a special kick. Consider adding oregano for a herbaceous note. A dash of cinnamon can add warmth and depth. You can also try adding chipotle powder for smoky heat. After enjoying your Instant Pot spicy turkey chili, store any leftovers properly. Let the chili cool to room temperature. Then, transfer it to airtight containers. This keeps it fresh for up to four days in the fridge. Use clear containers so you can see the chili inside. Label each container with the date to track freshness easily. Freezing chili is a great way to save it for later. To freeze, allow the chili to cool first. Then, portion it into freezer-safe bags or containers. Remove as much air as possible to avoid freezer burn. You can freeze it for up to three months. To thaw, place the chili in the fridge overnight. If you're in a hurry, you can run the sealed bag under cold water. Reheat the chili in a pot over medium heat or in the microwave. Stir it often to ensure it heats evenly. Enjoy your delicious chili again with no loss of flavor! To lower the heat, try these tips: - Use less cayenne pepper. Start with half a teaspoon. - Add a bit of sugar. This can balance the heat. - Mix in more beans or corn. This will dilute the spiciness. - Serve with sour cream or yogurt. Creamy toppings cool the spice. If you want milder chili, adjust the spices. Taste as you go. Make it your own! Yes, canned tomatoes work great. They offer convenience and flavor. Here’s how they compare: - Canned tomatoes are often cooked before canning. This means they can be sweeter and richer. - Fresh tomatoes have a brighter taste. They may add more texture. - Canned tomatoes save prep time. You don’t need to chop or peel. For this recipe, crushed canned tomatoes blend well. They add depth and help thicken the chili. Chili pairs well with many sides: - Cornbread is a classic choice. It’s sweet and soft. - Rice makes a filling side. It soaks up the chili nicely. - A fresh salad adds crunch. Use romaine, tomatoes, and cucumbers. - Tortilla chips are fun for dipping. They add a nice crunch. You can also serve toppings like cheese, sour cream, or jalapeños. Get creative and enjoy your meal! This blog post covered how to make Instant Pot Spicy Turkey Chili. We discussed the key ingredients, like ground turkey, beans, and tomatoes. I shared step-by-step instructions for cooking and finishing the dish. You learned tips for flavor, cooking efficiency, and serving ideas. In the end, this chili is easy and customizable. You can make it your own with toppings or ingredient swaps. Enjoy your cooking and make a delicious meal that everyone will love!

Instant Pot Spicy Turkey Chili Flavorful Comfort Meal

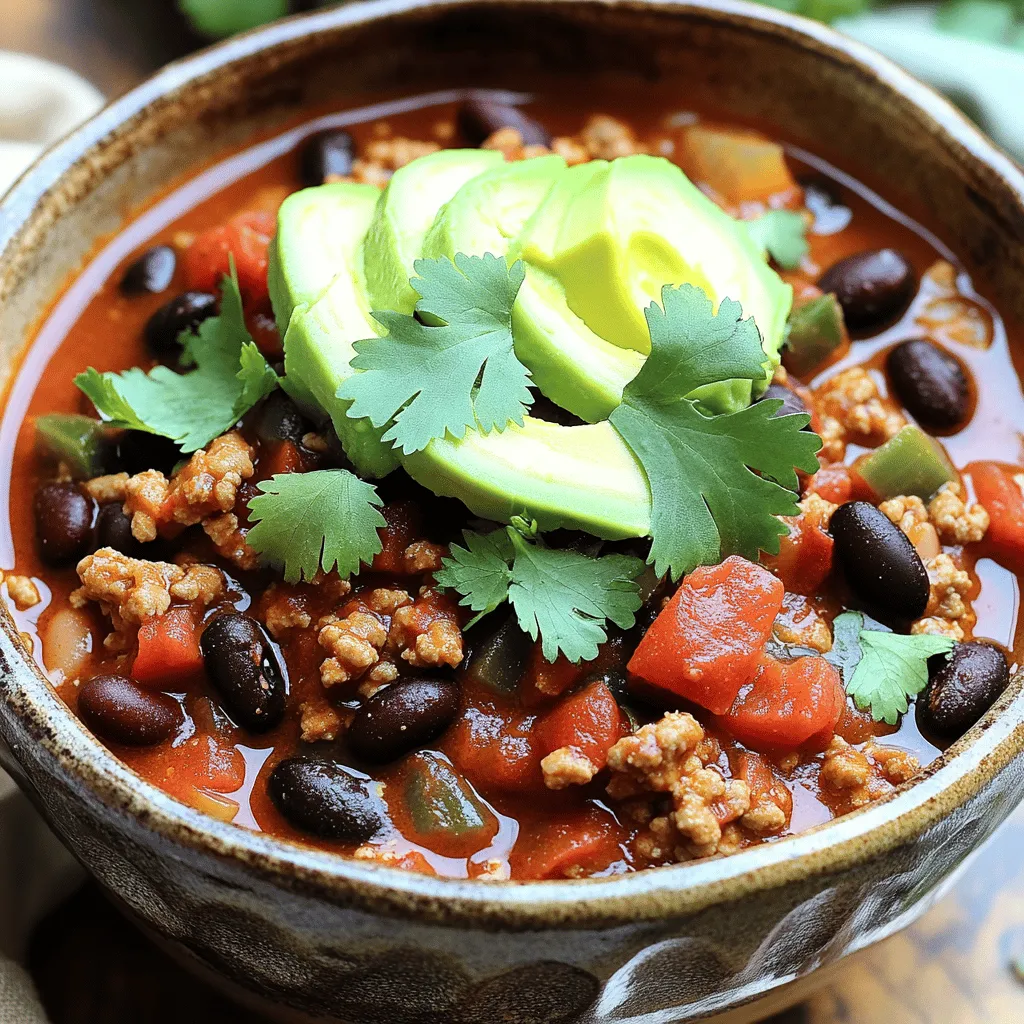
Are you ready to spice up your dinner routine? This Instant Pot Spicy Turkey Chili is not just a meal;

- Large shrimp: Use 1 pound, peeled and deveined. This gives a tender bite. - Bell peppers and red onion: Choose 1 red and 1 yellow pepper. Slice them into thin strips. The colors make the dish look vibrant. For the onion, slice 1 medium red onion into wedges. This adds sweetness. - Marinade components: Combine 3 tablespoons honey, 3 tablespoons low-sodium soy sauce, 2 tablespoons olive oil, and 2 minced garlic cloves. These will give the shrimp a sweet and savory taste. - Ground spices: Use 1 teaspoon ground cumin, 1 teaspoon smoked paprika, and 1/2 teaspoon chili powder. These spices add depth to the flavor. - Fresh herbs and serving suggestions: Add chopped cilantro for freshness. Serve with lime wedges to give a zesty kick. This adds brightness to each bite. 1. Preheat the oven: Set your oven to 400°F (200°C). This heat helps cook the shrimp and veggies evenly. 2. Prepare the marinade: In a medium bowl, mix together the honey, soy sauce, olive oil, minced garlic, cumin, smoked paprika, chili powder, salt, and black pepper. Use a whisk until the mix is smooth and well combined. 1. Combining shrimp and vegetables: In a large bowl, add the peeled and deveined shrimp, sliced bell peppers, and onion. Pour the marinade over the shrimp and veggies. Gently toss everything together until all ingredients are coated well. 2. Baking instructions: Spread the shrimp and vegetable mix on a large baking sheet lined with parchment paper. Make sure they are in a single layer. This helps them cook without steaming. Bake in the preheated oven for 12-15 minutes. The shrimp should turn pink and opaque, while the veggies should be tender and slightly caramelized. To make your sheet pan honey garlic shrimp fajitas pop, consider these tips: - Extra spices: Add a pinch of cayenne pepper for heat. You can also use chili flakes for a kick. If you want a touch of sweetness, sprinkle in some brown sugar. - Presentation tips: Arrange the shrimp and veggies in a colorful pattern. Drizzle a bit of extra honey on top for shine. A sprinkle of fresh cilantro adds a nice green touch. Serve with lime wedges for a zesty finish. To get the best shrimp and veggies, follow these tips: - Avoiding overcooked shrimp: Look for shrimp that turn pink and opaque. They should curl slightly but not be tight. This shows they are cooked but not overdone. - Ensuring veggies are tender yet crisp: Roast the veggies until they are slightly caramelized. They should be tender but still have a bit of crunch. Check them at the 10-minute mark; you can give them a stir if needed. These tips will help you create an amazing dish that is both tasty and visually appealing! {{image_4}} You can switch proteins for a new twist. Chicken works well instead of shrimp. Just cut it into bite-sized pieces and cook it the same way. Tofu is a great vegetarian option too. Press it first to remove extra water. For veggies, feel free to mix it up. You can use green or orange bell peppers for different colors. Add corn for a sweet crunch. This adds texture and flavor to your dish. You can adjust spice levels to fit your taste. For a milder dish, reduce the chili powder or skip it. You can add more honey for sweetness, too. Want it spicier? Add more chili powder or some diced jalapeños. They bring a great kick! You can also try different marinades. A lime and cilantro marinade gives a fresh taste. Alternatively, use a spicy barbecue sauce for a smoky flavor. Be creative and have fun with these changes! To keep your shrimp and veggies fresh, store them in an airtight container. Let the dish cool first, then cover it tightly. This helps keep out air and moisture, which can spoil your meal. You can store the leftovers in the fridge for up to three days. When it's time to enjoy your leftovers, reheat them gently. You can use a skillet over medium heat. Warm the mixture for about five minutes, stirring often. This method keeps the shrimp juicy and the veggies crisp. You can also use the microwave. Heat in short bursts of 30 seconds, stirring in between. Yes, you can freeze cooked fajitas! To do this, let them cool completely first. Then, pack them in a freezer-safe bag or container. Try to remove as much air as possible to prevent freezer burn. Your fajitas can last in the freezer for up to three months. When you're ready to enjoy them again, thaw the fajitas safely. The best way is to place them in the fridge overnight. If you're in a hurry, you can use the microwave for quick thawing. Set it to the defrost setting and check every minute until they are soft. This way, your meal stays tasty and safe to eat. How do I know when the shrimp is cooked? You will know the shrimp is cooked when it turns pink and opaque. This usually takes about 12 to 15 minutes in the oven. Make sure to check the shrimp to avoid overcooking. Overcooked shrimp can become rubbery, which is not tasty. Can I use frozen shrimp for this recipe? Yes, you can use frozen shrimp. Just make sure to thaw them first. You can do this by placing them in cold water for about 15-20 minutes. Pat them dry before adding them to the marinade. Thawing helps the shrimp absorb the flavors well. Is this recipe gluten-free? This recipe is not gluten-free due to the soy sauce. However, you can easily make it gluten-free by using a gluten-free soy sauce or tamari. This swap keeps all the yummy flavors while making it safe for those with gluten allergies. What can I substitute for soy sauce to make it soy-free? You can use coconut aminos as a soy-free substitute. It has a similar taste and works well in this recipe. You can also try using homemade sauces made from broth and spices for a different flavor. This blog post covered delicious shrimp fajitas. We discussed key ingredients like large shrimp, colorful bell peppers, and a great marinade. I shared step-by-step instructions for prep and cooking, plus tips to enhance flavor and presentation. We also explored variations, storage methods, and answered common questions. In the end, these shrimp fajitas are easy to make and fun to enjoy. You can customize them to your taste and diet. Happy cooking!

Sheet Pan Honey Garlic Shrimp Fajitas Delight

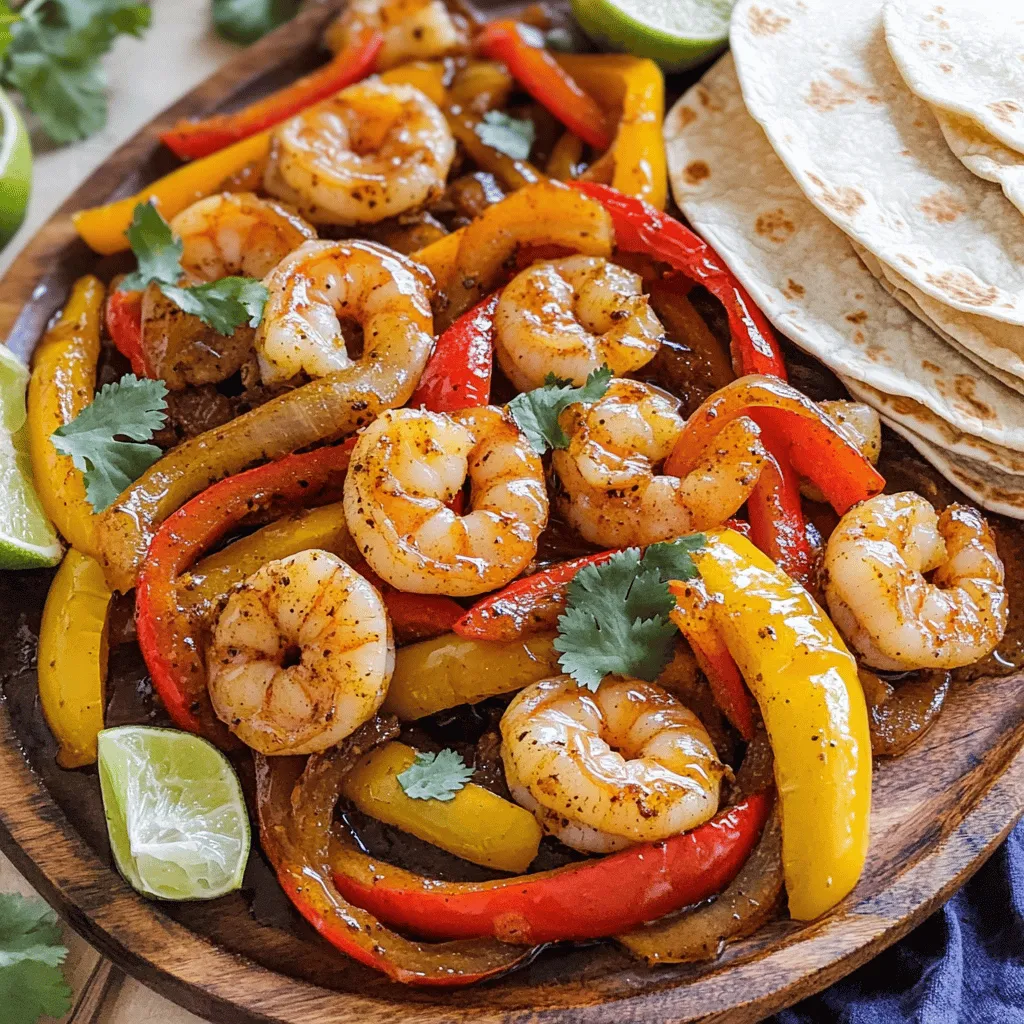
Looking for a quick and tasty meal? You’re in the right place! My Sheet Pan Honey Garlic Shrimp Fajitas are

To make honey lime chicken skewers, gather these main ingredients: - 1 lb boneless chicken breasts, cut into 1-inch cubes - 1 red bell pepper, diced into 1-inch squares - 1 green bell pepper, diced into 1-inch squares - 1 medium red onion, cut into wedges These ingredients create a colorful and tasty dish that everyone will enjoy. The marinade gives the chicken its great flavor. You will need: - 1/4 cup honey - 1/4 cup fresh lime juice - 2 tablespoons olive oil - 2 cloves garlic, minced - 1 teaspoon ground cumin - 1 teaspoon paprika - Salt and pepper to taste Mix these together to coat your chicken. The honey adds sweetness, while lime juice brings freshness. For extra flavor and texture, consider adding: - Fresh cilantro, chopped (for garnish) Adding cilantro brightens the dish and makes it even more appealing. Feel free to get creative with your skewers! {{ingredient_image_2}} First, you need to mix the marinade. In a bowl, whisk together honey, lime juice, olive oil, minced garlic, cumin, paprika, salt, and pepper. This mix adds a sweet and tangy flavor to the chicken. Cut the chicken breasts into 1-inch cubes. Add the chicken to the bowl and stir until each piece is well coated. Cover the bowl with plastic wrap and refrigerate for at least 30 minutes. If you have time, let it marinate for up to 2 hours for even richer taste. While the chicken marinates, prepare your skewers. If you use wooden skewers, soak them in water for at least 20 minutes. This step is key to stop them from burning on the grill. If you have metal skewers, you can skip this step. You will also want to cut your vegetables. Dice the red and green bell peppers into 1-inch squares. Cut the red onion into wedges. This adds color and crunch to your skewers. When the chicken is ready, it’s time to grill. Preheat your grill to medium-high heat. If using a grill pan, heat it on medium and add a little oil to prevent sticking. Take the soaked skewers and start threading them. Alternate pieces of chicken with the bell peppers and onion. This makes the skewers look bright and tasty. Place the skewers on the grill and cook for about 10 to 12 minutes. Turn them every few minutes to ensure even cooking and nice grill marks. Once the skewers are done, remove them from the grill. They should be cooked through with a nice char. Arrange them on a serving platter. Sprinkle with freshly chopped cilantro for color and flavor. Serve warm for the best taste. You can also add extra lime wedges on the side for those who love a zesty kick. Enjoy your delicious honey lime chicken skewers! To get the best flavor, marinate your chicken for at least 30 minutes. If you have time, marinate it for up to 2 hours. The longer time helps the chicken soak in the honey and lime goodness. Make sure to coat every piece of chicken well with the marinade. Use a bowl with a lid or cover it tightly with plastic wrap. This keeps the chicken fresh while it marinates. Use soaked wooden skewers or metal skewers for grilling. Soak wooden skewers for at least 20 minutes. This step stops them from catching fire. When skewering, alternate chicken pieces with colorful veggies like bell peppers and onions. This adds flavor and looks great on the plate. Each skewer should have enough pieces to be filling but not too crowded, allowing for even cooking. Preheat your grill to medium-high heat before placing the skewers on it. This step is key for nice grill marks. Place the skewers on the grill, but do not move them right away. Let them cook for about 3-4 minutes before turning. This allows the grill to create those lovely char marks. Continue grilling for a total of 10-12 minutes, turning them occasionally. Keep an eye on the skewers, ensuring the chicken is cooked through and the veggies are tender. Pro Tips Marinate Longer for Flavor: For even more depth of flavor, marinate the chicken for up to 2 hours. The longer it sits, the more the honey and lime will penetrate the meat. Use Fresh Ingredients: Fresh lime juice and garlic will enhance the taste significantly compared to bottled alternatives. Always opt for fresh when possible. Alternate Skewering: When assembling the skewers, alternate chicken with vegetables. This not only looks appealing but ensures even cooking of both the meat and veggies. Check Doneness with a Thermometer: To ensure the chicken is safely cooked, use a meat thermometer. The internal temperature should reach 165°F (75°C) for safe consumption. {{image_4}} You can swap out chicken for other proteins. Try shrimp, beef, or tofu. Each protein brings a new taste. For veggies, use zucchini, mushrooms, or cherry tomatoes. These options add color and flavor. They also change the texture. Keep the same marinade for great results. Want some heat? Add red pepper flakes or chopped jalapeños to the marinade. This will give your skewers a spicy kick. You can also use spicy sauces like sriracha. Adjust the spice to match your taste. Serve with cooling yogurt or avocado to balance the heat. For a fun twist, add fruits like pineapple or mango. These fruits work well with the honey lime flavor. Alternate the chicken with fruit on the skewers. Grill them for a sweet and savory taste. This variation is perfect for summer parties. The fruit caramelizes and adds a lovely sweetness. After enjoying your honey lime chicken skewers, store any leftovers in the fridge. Place them in an airtight container. They will stay fresh for about 3 to 4 days. To keep the flavors intact, let them cool before sealing. This helps avoid sogginess. If you want to save skewers for later, freezing is a great option. Wrap each skewer tightly in plastic wrap. Then, place them in a freezer bag or container. They can last for up to 3 months in the freezer. When you’re ready to eat, let them thaw in the fridge overnight. To reheat, use the grill or oven for the best results. Preheat your grill to medium-low heat. Place the skewers on and heat them for about 5 minutes, turning occasionally. For the oven, set it to 350°F (175°C). Place the skewers on a baking sheet and warm for about 10-15 minutes. Always check that the chicken is hot all the way through before serving. Yes, you can use chicken thighs. Thighs have more fat, making them juicy. They also add a rich flavor. Cut them into 1-inch pieces like the breasts. The cooking time may be similar, but check for doneness. To prevent burning, soak wooden skewers in water for at least 20 minutes. This helps keep them from catching fire on the grill. You can also use metal skewers. They do not need soaking and are reusable. Pair these skewers with fresh salads, rice, or grilled veggies. A corn salad or quinoa dish works well too. You can also serve them with a tangy dipping sauce for extra flavor. Yes, you can make these skewers in the oven or air fryer. For the oven, set it to 400°F. Place the skewers on a baking sheet. Bake for about 15-20 minutes. For the air fryer, cook at 375°F for 10-12 minutes. Always check for doneness. In this blog post, we explored honey lime chicken skewers, from essential ingredients to grilling steps. You learned how to marinate the chicken and prepare tasty skewers. We also shared tips for perfect grilling and ways to add twists to the recipe. Remember, you can store leftovers easily or even freeze them for later. Enjoy these flavors in different ways and impress your family. Cooking can be fun, and these skewers are a great way to start!

Honey Lime Chicken Skewers Easy Flavorful Dish

Looking for a dish that bursts with flavor and is easy to make? Honey Lime Chicken Skewers are your answer!

Older posts
Newer posts
← Previous Page1 … Page6 Page7 Page8 … Page85 Next →

dsad

© 2026 tastyhatch • Built with GeneratePress

Our Policies

  • Copyright Policy
  • Cookie Policy
  • GDPR Policy
  • Privacy Policy
  • Disclaimer
  • Terms Of Use

More Information

  • Home
  • About
  • Contact
  • Appetizers
  • Dessert
  • Dinner
  • Drinks
©2026, tastyhatch About Back To Top