Skip to content
DisclaimerTerms Of UseGDPR PolicyCookie Policy

tastyhatch

  • Home
  • Drinks
  • Appetizers
  • Dinner
  • Dessert
  • About
  • Contact
  • Privacy Policy
DisclaimerTerms Of UseGDPR PolicyCookie Policy

NO-ING-IMG

- 1 pound ground beef (or ground turkey) - 1 can (15 oz) black beans, drained and rinsed - 1 can (15 oz) kidney beans, drained and rinsed - 1 can (15 oz) diced tomatoes with green chilies - 1 can (15 oz) sweet corn, drained - 1 small yellow onion, finely diced - 2 cloves garlic, minced - 1 packet taco seasoning mix - 2 cups beef broth (or vegetable broth) - 1 tablespoon olive oil - Salt and black pepper to taste - Optional toppings: sour cream, shredded cheese, avocado, and cilantro For this soup, I recommend using standard measuring cups and spoons. This helps ensure you get the right amounts. Ground beef should be about a pound. Use one can for each bean type. For liquids, two cups of broth provide a nice base. The onion should be small but diced finely to mix well. Optional toppings give your soup a personal touch. Here are some great choices: - Sour cream adds creaminess and balances spice. - Shredded cheese brings richness and melts nicely into the soup. - Avocado gives a fresh taste and healthy fats. - Cilantro adds a burst of flavor and color. Try different combinations for fun flavors! Gather all your ingredients first. This makes cooking easier and faster. You will need: - 1 pound ground beef (or ground turkey) - 1 can (15 oz) black beans, drained and rinsed - 1 can (15 oz) kidney beans, drained and rinsed - 1 can (15 oz) diced tomatoes with green chilies - 1 can (15 oz) sweet corn, drained - 1 small yellow onion, diced - 2 cloves garlic, minced - 1 packet taco seasoning mix - 2 cups beef broth (or vegetable broth) - 1 tablespoon olive oil - Salt and black pepper to taste Chop the onion and mince the garlic. This helps release their flavors when cooked. Start by heating the olive oil in a large pot over medium heat. Add the diced onion and cook for 3-4 minutes. The onion should look soft and clear. Next, add the minced garlic and stir for 30 seconds. You want to smell the garlic, not burn it. Now, raise the heat to medium-high. Carefully add your ground beef to the pot. Cook it for 5-7 minutes. Break it up with a spoon until it’s brown. Drain any fat if needed. Once the meat is ready, sprinkle in the taco seasoning mix. Stir it well to coat the meat. Let it cook for about a minute to bring out the flavor. Next, pour in your black beans, kidney beans, diced tomatoes (with juices), corn, and beef broth. Stir everything to mix well. Bring your soup to a boil, then reduce heat to low. Let it simmer for 15-20 minutes, stirring now and then. Taste and add salt and black pepper as needed. When your soup is ready, ladle it into bowls. This is the fun part! Top each bowl with your favorite garnishes. You can add a dollop of sour cream, some shredded cheese, avocado slices, or fresh cilantro. Each topping adds a unique flavor. Serve the soup hot and enjoy your flavorful comfort bowl! For a complete recipe, check out the Full Recipe. To make your taco soup burst with flavor, try these tips: - Fresh herbs: Add fresh cilantro or parsley just before serving. This fresh touch brightens the soup. - Citrus zest: A little lime or lemon zest adds a tangy kick. It wakes up the flavors. - Extra spices: Sprinkle in some cumin or chili powder. These spices deepen the flavor and give a warm touch. Cooking this soup fast is easy with the right tricks: - Prep first: Chop all your veggies and measure your ingredients before cooking. This saves time and keeps things organized. - One-pot meal: Use just one pot for cooking. It speeds up the process and makes clean-up simple. - Boost heat: If you like heat, add diced jalapeños or hot sauce when cooking. Just a little can really spice things up. Meal prepping makes life easier. Here’s how to do it right: - Double the batch: Make a big pot and store half for later. This way, you have a quick meal ready to go. - Cool first: Let the soup cool before storing. This helps avoid condensation in your container. - Label and date: Use clear containers and label them with the date. This keeps your meals organized and fresh. For the full recipe, check out the details above. Enjoy your flavorful comfort bowl of taco soup! {{image_4}} You can easily make this taco soup vegetarian. Swap the ground beef for a mix of beans. Use an extra can of black beans or chickpeas. You can also add lentils for more texture. For broth, choose vegetable broth instead of beef broth. This gives you a tasty, hearty soup without meat. Want to kick up the heat? Add fresh jalapeños or diced green chilies. You can stir in hot sauce or chili powder for more flavor. Consider using spicy taco seasoning for an extra punch. A dash of cayenne pepper can also make your soup really spicy. Just adjust the heat to your taste! If you want something different, try ground turkey or chicken. These options work great and are leaner. For a fun twist, use shredded pork or beef. You can even add cooked sausage for a smoky flavor. Each protein brings its own taste and makes the soup unique. For all these variations, you can still follow the Full Recipe to guide your cooking. After enjoying your taco soup, store leftovers in an airtight container. Make sure the soup cools down to room temperature first. Proper storage helps keep it fresh for up to three days in the fridge. If you plan to eat it later, this method works best. To reheat your taco soup, pour it into a pot over medium heat. Stir it gently to warm it evenly. You can also use a microwave. Place the soup in a microwave-safe bowl and cover it loosely. Heat in short bursts, stirring in between, until hot. Always check the temperature before serving. You can freeze taco soup for later enjoyment. Transfer the cooled soup into freezer-safe bags or containers. Leave some space at the top for expansion. Label each container with the date. This soup can last up to three months in the freezer. When ready to eat, thaw it overnight in the fridge before reheating. This method preserves the flavors well. For the full recipe, check the original recipe link. Yes, you can make this soup ahead of time. It tastes even better the next day! Just cool it down and store it in the fridge. It will stay fresh for about 3-4 days. You can also freeze it for up to three months. When ready to eat, reheat it on the stove or in the microwave. To make the soup less spicy, you can use mild taco seasoning. Look for blends labeled as mild. Another option is to add more beans or corn. This will balance the heat. You can also serve it with sour cream or yogurt. These toppings will help cool down the spice. If you want to substitute ground beef, try ground turkey or chicken. These options are leaner and lighter. You can also use lentils or quinoa for a vegetarian choice. Both add protein and texture. For a fun twist, use diced mushrooms. They add a great umami flavor. Check out the Full Recipe for more ideas! This blog post covered all the key steps to make a great soup. We discussed the ingredients, how to prepare them, and the cooking process. I shared tips to boost flavors and offered variations to suit different tastes. Lastly, we went over how to store and reheat leftovers. Remember, cooking should be fun and easy. Use these tips to make your soup a hit!

Quick & Easy Taco Soup Flavorful Comfort Bowl

Looking for a cozy meal that’s quick and easy? My Quick & Easy Taco Soup is just what you need!

To make delicious spinach artichoke dip bites, you need fresh, quality ingredients. Here’s what you’ll need: - 1 cup fresh spinach, finely chopped - 1 cup canned artichoke hearts, drained and finely chopped - 1 clove garlic, finely minced These fresh ingredients bring bright flavors and great texture to your bites. Along with fresh items, you’ll need some pantry staples. Gather these essential ingredients: - 1/2 cup cream cheese, softened to room temperature - 1/2 cup sour cream - 1/2 cup grated Parmesan cheese - 1/2 cup shredded mozzarella cheese - Salt and black pepper, to taste - 1 package of puff pastry (about 1 lb), thawed - 1 egg, beaten (for egg wash) These staples help create a creamy and cheesy filling that everyone will love. To add a special touch, consider these garnishes and sides: - Extra Parmesan cheese for sprinkling - Fresh spinach leaves for decoration - A side of marinara sauce for dipping These options can enhance the look and taste of your spinach artichoke dip bites. For the full recipe, check the recipe section. Start by gathering all your ingredients. You will need fresh spinach, artichoke hearts, cream cheese, sour cream, Parmesan cheese, mozzarella cheese, garlic, salt, and black pepper. Chop the spinach and artichoke hearts finely. This helps blend the flavors well. In a large bowl, mix the chopped spinach, artichoke hearts, cream cheese, sour cream, Parmesan, mozzarella, and minced garlic. Season with salt and pepper. Stir until the mixture is smooth and creamy. This step is key to a tasty filling. Now, let's work with puff pastry. Roll out the thawed pastry on a floured surface until it's about 1/8 inch thick. Cut it into 3x3 inch squares. Each square will make a cup. Place each square into a mini muffin tin. Press it gently to form a cup. Spoon a generous tablespoon of your spinach-artichoke filling into each cup. Be sure not to overfill them. This way, they will bake nicely without spilling over. Preheat your oven to 375°F (190°C). This temperature is perfect for puff pastry. Brush the edges of each pastry cup with beaten egg. This will give them a nice golden color when baked. Place the muffin tin in the oven. Bake for 20-25 minutes, until the pastry is puffed and golden brown. Once they are done, let them cool for a few minutes. The filling will be very hot! Serve them warm, and enjoy your delicious Spinach Artichoke Dip Bites. For the full recipe, check the section above. When making spinach artichoke dip bites, avoid overfilling the pastry cups. If you fill them too much, they can overflow while baking. Use just enough mixture to fill them to the top. Another mistake is not thawing the puff pastry fully. If it is still cold, it will not puff up correctly. Always allow it to thaw at room temperature before use. Lastly, be sure to season your filling well. A pinch of salt and pepper can enhance the flavors greatly. Serve these bites warm for the best taste. Place them on a nice platter to impress your guests. You can add a sprinkle of extra Parmesan cheese on top for a rich finish. A few fresh spinach leaves can also add color and freshness. Pair them with a tangy dipping sauce like ranch or a zesty marinara for extra flavor. These bites make a great snack for parties or game days. To elevate the taste of your spinach artichoke dip bites, consider adding cooked bacon or diced sun-dried tomatoes. Both ingredients bring a savory touch that balances nicely with the creamy filling. You might also try different cheeses, like goat cheese or feta, for a unique flavor twist. If you enjoy spice, add a dash of red pepper flakes to your filling. This little kick can bring your bites to life. For the full recipe, check out the detailed instructions above. {{image_4}} If you want a gluten-free option, use rice flour or almond flour dough. These options work well and still give you a great base. You can also find pre-made gluten-free puff pastry at many grocery stores. Just check the labels to be sure they fit your needs. Feel free to get creative with your fillings. You can add cooked chicken, bacon, or sun-dried tomatoes for extra flavor. Try adding herbs like dill or basil for a fresh taste. You can also swap in different cheeses, like feta or goat cheese, to change the dip's profile. To make vegan spinach artichoke dip bites, replace cream cheese with cashew cream or vegan cream cheese. Use coconut yogurt instead of sour cream. Nutritional yeast can replace Parmesan cheese. This gives you that cheesy flavor while keeping it plant-based. Enjoy the same great taste without dairy! For the full recipe, check the Spinach Artichoke Dip Bites section. To keep leftover spinach artichoke dip bites fresh, place them in a shallow airtight container. Make sure they cool completely before sealing. This keeps moisture out and preserves their taste. Store them in the fridge for up to three days. If you need to stack them, place parchment paper between layers to prevent sticking. If you want to save these bites for later, freezing is a great option. First, let the bites cool fully. Next, place them on a baking sheet lined with parchment paper. Freeze them for about two hours until firm. Then, transfer the bites to a freezer bag. Remove excess air and seal tightly. They can last for up to three months in the freezer. When you're ready to enjoy them, simply thaw in the fridge overnight. To reheat your spinach artichoke dip bites, preheat your oven to 350°F (175°C). Place the bites on a baking sheet and bake for about 10-15 minutes, or until warm. This helps restore their crispy texture. If you are in a hurry, you can use the microwave, but they may lose some crispiness. Heat on medium power for about 30 seconds to 1 minute. Enjoy them warm for the best taste! Spinach Artichoke Dip Bites stay fresh for about 3 days in the fridge. Store them in an airtight container to keep them moist. If they get too dry, a quick reheating can help restore some softness. Yes, you can prep these bites a day ahead. Make the filling and fill the pastry cups. Then, cover them with plastic wrap and keep them in the fridge. Bake them just before serving for the best taste and texture. These bites are tasty on their own, but you can pair them with a few things: - Fresh veggie sticks like carrots and celery - A light salad for a refreshing touch - A tangy dip, like ranch or tzatziki - Toasted bread or crackers for extra crunch This makes for a fun and filling snack platter. For the full recipe, check out the Spinach Artichoke Dip Bites section. These Spinach Artichoke Dip Bites are easy and fun to make. We covered fresh and pantry ingredients, plus optional garnishes. I shared helpful steps for prepping, assembling, and baking. Avoid common mistakes to ensure great taste and explore fun variations. You can make them gluten-free or vegan too! Storing and reheating leftovers is simple. Enjoying these bites cold or warm makes them great for any occasion. Try serving them with your favorite dip or snack. Each bite is sure to please your taste buds!

Savory Spinach Artichoke Dip Bites Delightful Snack

If you crave a tasty and easy snack, you’ll love these Savory Spinach Artichoke Dip Bites. They blend creamy spinach

To make Zucchini Noodle Alfredo, you need these main ingredients: - 4 medium zucchinis, spiralized into noodles - 1 tablespoon extra virgin olive oil - 3 cloves garlic, finely minced - 1 cup cauliflower florets, steamed until tender - 1 cup unsweetened almond milk (or any preferred plant-based milk) - 1/4 cup nutritional yeast for cheesy flavor - 2 tablespoons tahini for creaminess - 1 teaspoon fresh lemon juice - Salt and freshly ground black pepper, to taste - Fresh parsley, chopped, for a garnish You can add a few optional ingredients to boost the taste: - A pinch of freshly grated nutmeg - A sprinkle of red pepper flakes for heat - A handful of spinach for extra greens You can switch some ingredients based on your needs: - Use coconut milk instead of almond milk for a richer flavor. - Swap cauliflower with silken tofu for a different texture. - Try using regular pasta if you prefer traditional noodles. - Add cooked chicken or shrimp for protein. For the complete experience, check the Full Recipe. To make zucchini noodles, start with fresh zucchinis. Grab four medium zucchinis. I like to spiralize them for a fun shape. You can find spiralizers easily. If you do not have one, a julienne peeler works too. Once your zucchinis are spiralized, heat 1 tablespoon of extra virgin olive oil in a large skillet over medium heat. Add 3 cloves of minced garlic and let it cook for about a minute. The garlic should smell great but not burn. Next, toss in the zucchini noodles. Cook them for 2 to 3 minutes. Stir gently to avoid breaking them. You want them to soften a bit while keeping their shape. After that, set the zucchini noodles aside. Now, it’s time to make the creamy sauce. In a high-speed blender, combine 1 cup of steamed cauliflower florets, 1 cup of unsweetened almond milk, and 1/4 cup of nutritional yeast. Add 2 tablespoons of tahini for creaminess. Do not forget 1 teaspoon of fresh lemon juice. Season with salt and black pepper to taste. If you like, add a pinch of nutmeg for an extra kick. Blend the mixture on high for 1 to 2 minutes. You want it to become smooth and creamy. This sauce is not only tasty but also healthy. Pour the creamy sauce over the zucchini noodles in the skillet. Toss everything gently over low heat. You want the noodles to get coated evenly with the sauce. Warm them through for about 1 to 2 minutes. Once everything is ready, taste it! Adjust the flavor with more salt, pepper, or lemon juice if needed. To serve, place the Zucchini Noodle Alfredo Delight in bowls. Garnish with fresh chopped parsley for color. Enjoy this creamy and comforting meal! For the complete recipe, check out the Full Recipe. To make great zucchini noodles, select firm zucchinis. Look for ones that feel heavy and have smooth skin. Spiralize them just before cooking for the best texture. If they sit too long, they can get watery. When cooking, don't overdo it. Sauté for just 2-3 minutes. This keeps them slightly crisp, which adds a nice bite to your dish. The secret to a creamy Alfredo sauce lies in the blend. Use steamed cauliflower, almond milk, and tahini. Blend them until smooth. Nutritional yeast adds a cheesy flavor without dairy. For even creamier sauce, add a bit more tahini or almond milk. If you like a tangy note, a splash of lemon juice works wonders. Serve the dish hot for the best taste. A sprinkle of fresh parsley on top adds color and flavor. For an extra pop, add a pinch of nutmeg. Pair your Zucchini Noodle Alfredo with a side salad for a fresh touch. If you want protein, grilled chicken or chickpeas make great additions. Check out the Full Recipe for Zucchini Noodle Alfredo Delight for more details! {{image_4}} You can boost the protein in Zucchini Noodle Alfredo easily. Try adding grilled chicken or shrimp. For a plant-based option, consider chickpeas or lentils. Tofu is another great choice. Cook your protein separately, then mix it in with the noodles and sauce for a complete meal. This makes your dish filling and satisfying. While the creamy sauce is amazing, you can switch things up! Try adding basil pesto for a fresh twist. A splash of coconut milk can add sweetness and depth. You can also mix in a bit of sun-dried tomato paste for a rich flavor. Experiment with spices like smoked paprika or crushed red pepper to give your dish a kick. Zucchini noodles are just the start! Add bell peppers, spinach, or mushrooms for added nutrition. You can sauté these veggies with the garlic before adding the noodles. Carrots or broccoli can also work well. This way, you create a colorful dish full of flavor and good-for-you ingredients. The more, the merrier in this comforting meal! For the full recipe, check out the Zucchini Noodle Alfredo Delight 🥒. To keep your Zucchini Noodle Alfredo fresh, place leftovers in an airtight container. Make sure to let the dish cool down before sealing to prevent moisture build-up. Store it in the fridge for up to three days. If you want to enjoy it later, proper storage is key. When reheating, I suggest using the stovetop. Place the noodles in a skillet over low heat. Add a splash of almond milk to keep it creamy. Stir gently until warmed through. Avoid high heat, as it may make the noodles soggy. This way, you keep the taste and texture just right. If you want to freeze Zucchini Noodle Alfredo, follow these steps. First, cool the dish completely. Then, transfer it into freezer-safe bags or containers. This meal can last up to three months in the freezer. When ready to eat, thaw it overnight in the fridge. Reheat gently on the stovetop for the best results. Yes, Zucchini Noodle Alfredo is healthy. Zucchini is low in calories and high in fiber. It adds nutrients without extra carbs. The creamy sauce uses cauliflower and almond milk, which are lighter than traditional cream. This dish is a great way to enjoy comfort food while staying healthy. You can use regular pasta if you prefer. However, zucchini noodles add freshness and fewer carbs. Plus, they soak up the sauce well. If you want a lighter meal, zucchini noodles are a great choice. This recipe is already vegan-friendly! It uses almond milk and nutritional yeast for creaminess and flavor. Just ensure the tahini you use is pure and not mixed with non-vegan ingredients. You can enjoy this dish without any animal products. You can serve this dish with a simple salad for a fresh touch. Garlic bread or crusty rolls also pair well. For added protein, consider grilled chicken or shrimp on the side. They complement the rich flavors of the Alfredo sauce nicely. For the full recipe, check out Zucchini Noodle Alfredo Delight. It includes all the steps to create this creamy dish with ease. Enjoy cooking! Zucchini Noodle Alfredo is a tasty dish that packs flavor and nutrition. We explored the key ingredients, easy steps, and helpful tips for success. From adding protein to making it vegan, you can customize this meal to fit your needs. Store leftovers correctly to enjoy them later. With this knowledge, you can create your own healthy version of Alfredo any time. Enjoy your cooking journey!

Zucchini Noodle Alfredo Creamy and Comforting Meal

Are you craving a creamy and comforting meal? Zucchini Noodle Alfredo is just the answer! This dish swaps heavy pasta

- 1 cup Arborio rice - 4 cups vegetable broth - 8 oz cremini mushrooms, sliced - 1 small onion, finely chopped - 2 cloves garlic, minced - 1 cup fresh spinach, roughly chopped - ½ cup Parmesan cheese, grated - 2 tablespoons olive oil - 2 tablespoons unsalted butter - Salt and pepper to taste - Fresh thyme leaves, for garnish (optional) To make creamy mushroom risotto, you need simple ingredients. Arborio rice is key. It gives the risotto its creamy texture. The vegetable broth adds flavor. For depth, cremini mushrooms work best. They are rich and earthy. Use a small onion for sweetness. Garlic adds a nice punch. Fresh spinach adds color and nutrition. Parmesan cheese makes it creamy and savory. Olive oil and butter create a rich base. Season with salt and pepper to balance flavors. Fresh thyme adds a nice touch, but it's optional. These ingredients combine to create a delicious meal. Each one plays a role in building flavor. You may also find the [Full Recipe] helpful for cooking. 1. Warm the Broth: Start by pouring the vegetable broth into a medium saucepan. Heat it over low heat. Keeping the broth warm helps the rice cook evenly. 2. Sauté the Aromatics: In a large skillet, add the olive oil and 1 tablespoon of butter. Heat this over medium. Once the butter melts, add the finely chopped onion. Cook for 2-3 minutes until it is soft and fragrant. 3. Cook the Mushrooms: Next, add minced garlic and sliced mushrooms to the skillet. Stir and cook for about 5-7 minutes. You want the mushrooms to be tender and golden brown. 1. Toast the Rice: Now, add Arborio rice to the skillet. Stir well to coat each grain. Cook for about 2 minutes. The edges of the rice should look slightly clear. 2. Incorporate the Broth: Begin adding the warm vegetable broth. Use a ladle to add one portion at a time. Stir often until the broth is mostly absorbed before adding more. Keep this up for 18-20 minutes until the rice is creamy and cooked al dente. 3. Add Spinach: When the risotto is nearly done, fold in the roughly chopped fresh spinach. Stir until the spinach wilts and mixes well. 1. Finish with Cheese and Butter: Remove the skillet from heat. Add the last tablespoon of butter and grated Parmesan cheese. Stir until everything is creamy and the cheese melts. 2. Season to Taste: Taste your risotto. Adjust with salt and pepper as needed. 3. Serve: Scoop the creamy mushroom risotto into bowls right away. Garnish with fresh thyme leaves if you like. Enjoy this satisfying dish! For the full recipe, you can refer to the provided details. - Stirring Techniques: Stir the risotto often. This helps release the starch from the rice. More starch means creamier risotto. Use a wooden spoon for best results. - Importance of Warm Broth: Always keep your broth warm. Cold broth will slow down cooking. This makes it hard for the rice to absorb flavors. - Achieving Creamy Consistency: To get that creamy texture, add broth slowly. Let the rice soak up the liquid before adding more. This process takes about 18-20 minutes. - Overcooking Rice: Watch the rice closely. If it cooks too long, it becomes mushy. You want it to be al dente—firm but not hard. - Not Using Enough Broth: Make sure to use enough broth. If you skimp, the rice won't cook properly. The right amount is four cups for one cup of rice. - Skipping Aromatics: Don’t skip the onion and garlic. They build a flavorful base for your risotto. Sauté them until soft and fragrant for the best taste. For the complete recipe, refer to the [Full Recipe]. {{image_4}} You can change your creamy mushroom risotto by adding different elements. Try using different mushrooms. Shiitake and portobello mushrooms add depth and flavor. They bring unique tastes to your dish. Adding proteins can also enhance your risotto. You can mix in cooked chicken or shrimp for a hearty meal. If you're plant-based, tofu works well too. It absorbs flavors and adds a nice texture. Herbs and spices can transform your risotto. Fresh herbs like basil and parsley bring brightness. You can add them right before serving for a fresh touch. Spices can give your dish extra warmth. A pinch of nutmeg adds a cozy feel. Black pepper can elevate the taste and add a slight kick. Cheese is key to a creamy risotto. While Parmesan is classic, you can explore other cheeses too. Goat cheese adds tanginess, while feta offers a crumbly texture. If you want a vegetarian option, try cashew cheese or nutritional yeast. These options keep the creaminess while being dairy-free. For more details on making this dish, check the Full Recipe. For storing leftover creamy mushroom risotto, follow these best practices: - Cool Down: Let the risotto cool to room temperature before storing. - Containers: Use airtight containers to keep air out. Glass or plastic containers work well. - Temperature: Store in the fridge for up to 3 days. Make sure your fridge is at 40°F (4°C) or lower. When you want to enjoy the risotto again, here are methods for reheating: - Stovetop: Place the risotto in a pan. Add a splash of broth or water. Heat on low, stirring often. - Microwave: Put the risotto in a microwave-safe bowl. Add a little broth or water. Heat in short bursts, stirring in between. To maintain creaminess, remember these tips: - Add Liquid: Always add a bit of broth or water while reheating. This helps keep it moist. - Stir Often: Stir the risotto regularly. This keeps it from sticking and helps it heat evenly. For the full recipe, check out the details above! How do you know when risotto is done? You know risotto is done when it is creamy and slightly firm. The rice should be al dente, which means it has a slight bite. Taste a few grains to ensure they are cooked but not mushy. Can I make risotto in advance? Yes, you can make risotto in advance. Cook it fully, then cool it quickly. Store it in the fridge for up to three days. When you reheat, add a little broth to bring back creaminess. What can I serve with creamy mushroom risotto? Creamy mushroom risotto pairs well with grilled chicken or fish. A fresh salad or roasted vegetables make a great side too. You can also enjoy it on its own as a main dish. Is risotto gluten-free? Yes, risotto is gluten-free. The main ingredient, Arborio rice, is naturally gluten-free. Always check your broth and any added ingredients to ensure they are also gluten-free. How to fix overcooked risotto? If risotto is overcooked, you can try adding more broth. This can help to loosen the texture. Stir in a little butter or cheese for added creaminess. Can I freeze creamy mushroom risotto? Freezing creamy mushroom risotto is not ideal. The texture can change when thawed. If you must freeze it, store in an airtight container for up to a month. What type of rice is best for risotto? Arborio rice is the best choice for risotto. It has a high starch content, which gives risotto its creamy texture. You can also use Carnaroli or Vialone Nano rice. How long does risotto last in the fridge? Risotto lasts about three days in the fridge. Store it in a sealed container. Make sure to reheat it properly to enjoy its creamy goodness again. For a detailed guide on making this dish, check out the Full Recipe! This blog post covered how to make creamy mushroom risotto. We looked at essential ingredients and step-by-step cooking methods. I shared tips for perfect risotto and common mistakes to avoid. We also explored fun variations, storage info, and answered frequent questions. In closing, making risotto is easier than you think. With practice, you’ll impress everyone with your delicious meals. Enjoy crafting your own unique version!

Creamy Mushroom Risotto Flavorful and Simple Recipe

If you’re craving a warm, comforting dish, my Creamy Mushroom Risotto is the answer. This simple recipe uses Arborio rice,

To make a great homemade spaghetti sauce, you need some key ingredients. Here’s what you should have: - 1 tablespoon olive oil - 1 medium onion, finely chopped - 3 cloves garlic, minced - 1 can (28 oz) crushed tomatoes - 1/2 cup sun-dried tomatoes, chopped (in oil, drained) - 1 teaspoon dried oregano - 1 teaspoon dried basil - 1/2 teaspoon red pepper flakes (optional, for a spicy kick) - Salt and freshly ground black pepper, to taste - Fresh basil leaves, for garnish - Grated Parmesan cheese, for serving These ingredients work together to create a rich, savory base. The olive oil adds smoothness, while the onion and garlic bring depth to the sauce. You can easily tweak this recipe to fit your taste. Here are some optional ingredients to consider: - Fresh herbs like parsley or thyme - A splash of red wine for depth - Ground meat, like beef or turkey, for heartiness - Other vegetables, like bell peppers or mushrooms Feel free to experiment! Adding or swapping ingredients can create a unique flavor profile. Understanding the nutrition of your ingredients is important. Here are some key points about the main ingredients: - Olive oil: Contains healthy fats and antioxidants. - Tomatoes: High in vitamins C and K, plus they provide lycopene, which is good for heart health. - Garlic: Known for its immune-boosting properties. - Onions: Full of vitamins and may help lower blood sugar levels. - Parmesan cheese: Adds calcium and protein, but watch the serving size due to sodium. Using these ingredients means you get not only great flavor but also some health benefits. For the full recipe, check out the complete guide. Making this sauce is easy and fun! You start by gathering your ingredients. Here’s what you need: - 1 tablespoon olive oil - 1 medium onion, finely chopped - 3 cloves garlic, minced - 1 can (28 oz) crushed tomatoes - 1/2 cup sun-dried tomatoes, chopped - 1 teaspoon dried oregano - 1 teaspoon dried basil - 1/2 teaspoon red pepper flakes (optional) - Salt and freshly ground black pepper, to taste - Fresh basil leaves, for garnish - Grated Parmesan cheese, for serving Now, let’s cook! 1. In a large saucepan, heat the olive oil over medium heat. 2. Once hot, add the finely chopped onion. Cook for about 5-7 minutes. The onion should be soft and clear. 3. Add the minced garlic and stir for 1-2 minutes. You want it fragrant, not brown. 4. Pour in the crushed tomatoes. Mix with the onion and garlic. 5. Add the chopped sun-dried tomatoes, oregano, basil, and red pepper flakes if you like spice. Stir well. 6. Bring the sauce to a gentle boil. Once it bubbles, turn the heat to low. Cook uncovered for 25-30 minutes. Stir often so it doesn’t stick. 7. Taste the sauce. Add salt and pepper to your liking. 8. When it thickens and the flavors blend, take it off the heat. This method is quick and gives great flavor. You can follow the steps above for the stovetop. Just keep an eye on the heat. It’s best to simmer slowly. This lets the flavors mix well. Want an easier way? Use a slow cooker! Here’s how: 1. Sauté the onion and garlic in olive oil first. 2. Then, add the rest of the ingredients to the slow cooker. 3. Cook on low for 4-6 hours or high for 2-3 hours. No need to stir! This method is great for busy days. You’ll have tasty sauce waiting for you! For the full recipe, check out the details above. Enjoy your cooking! To make your sauce taste great, use fresh ingredients. Start with good olive oil. This adds depth to the flavor. Fresh garlic and onions also make a big difference. Always sauté them well to bring out their taste. For herbs, dried oregano and basil work well. You can add fresh basil at the end for more flavor. Taste your sauce as it cooks. Adjust the salt and pepper to suit your taste. If you like heat, add red pepper flakes. One common mistake is cooking the sauce too quickly. Let it simmer slowly for at least 25 minutes. This helps the flavors blend well. Another mistake is not tasting your sauce. Always adjust the seasoning. If your sauce is too acidic, add a pinch of sugar to balance it. Avoid overcooking the garlic, as it can turn bitter. Lastly, don’t skip the fresh basil or Parmesan cheese. They add freshness and richness. For a thick sauce, let it simmer longer. Stir it often to prevent sticking. If the sauce is too thick, add a splash of water or broth. For a thinner sauce, increase the cooking time and add liquids gradually. You want a sauce that clings to the pasta without being watery. Remember, it will thicken as it cools, so keep that in mind while cooking. Enjoy making your sauce delicious and just right! {{image_4}} You can change the taste of your sauce by adding herbs and spices. Try fresh parsley for a bright flavor. Rosemary adds a woodsy touch. If you like a bit of heat, add more red pepper flakes. A bay leaf during cooking gives a deep, rich note. Experiment with your favorites to find your best mix. Adding meat or protein can make your sauce heartier. Ground beef or turkey is a classic choice. You can also use Italian sausage for a spicy kick. If you prefer plant-based options, try lentils or chickpeas. They add protein without meat. Just brown the meat first before adding it to the sauce. For a vegan sauce, skip the meat and cheese. Use vegetable broth instead of water for extra flavor. You can also add pureed vegetables like carrots or mushrooms. They enhance texture and taste. For a creamy twist, stir in cashew cream or coconut milk. It gives a nice richness while keeping it plant-based. You can find the full recipe for a delicious homemade sauce that includes many options for customization. To keep your homemade spaghetti sauce fresh, store it in a clean glass jar. Make sure the jar is dry before adding the sauce. Let the sauce cool down before sealing the jar. This helps prevent moisture build-up inside. Always label the jar with the date. Store it in the fridge for up to five days. Freezing your sauce is easy and smart. First, let the sauce cool completely. Next, pour it into a freezer-safe container. Leave some space at the top for expansion. Seal the container tightly. You can freeze it for up to three months. When you're ready to use it, just thaw it in the fridge overnight. To reheat your sauce, pour it into a saucepan. Heat it on low to medium heat. Stir often to avoid sticking. If it seems thick, add a splash of water or broth. You can also use a microwave. Just place the sauce in a microwave-safe bowl, cover it, and heat in short bursts. Stir in between to ensure even heating. Enjoy your delicious sauce! Yes, you can use fresh tomatoes! Use about 2-3 pounds of ripe tomatoes. First, blanch them in boiling water for one minute. Then, cool them in ice water. Peel off the skins, chop, and add them to your sauce. Fresh tomatoes bring a bright flavor to your dish. However, canned tomatoes are easier and save time. Homemade spaghetti sauce lasts about 4-5 days in the fridge. Keep it in an airtight container for best results. If you want it to last longer, consider freezing it. Frozen sauce can stay fresh for up to 3 months. Just thaw it in the fridge before reheating. This sauce is great with many pasta dishes. You can serve it over classic spaghetti, penne, or even zoodles (zucchini noodles). It also works well in lasagna or baked pasta dishes. Feel free to get creative with your favorite pasta shapes. Spaghetti sauce has roots in Italian cuisine. The first tomato-based sauces appeared in Italy in the 18th century. They became popular in the late 19th century. Italian immigrants brought the sauce to America. Today, it’s a beloved dish worldwide. Each region in Italy has its own unique take on this classic sauce. Homemade spaghetti sauce is simple and fun to make. We explored key ingredients, with essential options and fun add-ins to customize your sauce. You learned cooking methods, from stovetop to slow cooker, plus tips to perfect your flavor and avoid common mistakes. We shared great variations, storage tips, and answered your most common questions. Now, get creative in your kitchen and enjoy each delicious bite!

Homemade Spaghetti Sauce Flavorful and Simple Recipe

Are you ready to elevate your pasta nights? My Homemade Spaghetti Sauce recipe offers rich flavor with just a few

- Preheat the oven to 400°F (200°C). - Season the chicken thighs with salt, black pepper, oregano, and thyme. Starting with the oven hot helps the chicken cook evenly. I like to use bone-in, skin-on thighs for extra flavor and moisture. The seasoning is key. Use a good amount of salt and pepper to bring out the taste. Oregano and thyme add depth and aroma. - Heat olive oil in a skillet over medium-high heat. - Sear chicken thighs skin-side down for 5-7 minutes until golden brown. Heat the olive oil until it shimmers. This ensures a great sear. Place the chicken skin-side down without moving it for the best browning. The skin turns crispy and golden, giving you a flavorful crust. - Flip the chicken, add garlic, then drizzle lemon juice and zest. - Add cherry tomatoes and spinach, then transfer skillet to the oven. - Roast for 25-30 minutes until internal temperature reaches 165°F (75°C). After searing, flip the chicken and add minced garlic. Garlic cooks fast, so stir it for just a minute. Next, drizzle fresh lemon juice and sprinkle lemon zest over the chicken for brightness. Scatter halved cherry tomatoes and fresh spinach around the chicken for color and nutrition. Transfer your skillet to the hot oven. Roast for 25-30 minutes until the chicken reaches 165°F (75°C). This ensures it’s safe and juicy. For the full recipe, check the [Full Recipe]. - Use freshly squeezed lemon juice for better taste. - Let chicken rest before serving for moistness. Fresh lemon juice adds a bright flavor. It brings out the zest in the chicken. When you squeeze the lemon, you get the best taste. I always recommend this simple step. Letting the chicken rest makes it juicy. It allows the juices to settle back into the meat. - Ensure the skillet is hot enough for a good sear, preventing sticking. - Control the heat to avoid burning garlic. A hot skillet is key for a nice sear. It locks in the juices and helps the skin crisp. If the skillet is not hot, the chicken may stick. Be mindful of the heat. Garlic burns quickly and can ruin the dish. I suggest adding garlic only after flipping the chicken. - Artfully arrange the chicken on a platter with tomatoes and spinach. - Drizzle pan juices over the dish for added flavor. When serving, arrange the chicken nicely. Place the tomatoes and spinach around it. This not only looks good but also tastes great. The pan juices add a lovely shine and flavor. You want your meal to be as pleasing to the eyes as it is to the taste buds. {{image_4}} You can easily switch ingredients in this dish. If you want a leaner meal, substitute chicken thighs with chicken breasts. They will cook faster, so keep an eye on them. You can also use other vegetables. Try adding zucchini or bell peppers for a fresh twist. Both add color and nutrients. To change the flavor, you can add red pepper flakes. This will give your dish a spicy kick that many enjoy. If you like fresh herbs, add basil or rosemary. These herbs change the taste and smell of the dish, making it unique. You can mix and match these changes to find your favorite version. For the full recipe, check the detailed instructions to get started on your delicious journey! Store your leftovers in an airtight container. This keeps the chicken fresh for up to 3 days. If you plan to eat it later, check for any signs of spoilage before you dig in. You can freeze the cooked chicken. Use a freezer-safe container and place it in the freezer. This method keeps your chicken good for up to 2 months. When you’re ready to eat, just take it out! To reheat your chicken, use the oven or a skillet. This helps keep the chicken's texture nice and moist. Try to avoid the microwave, as it can make the chicken rubbery. Enjoy the great taste of your One-Pan Lemon Garlic Chicken again! Approximately 25-30 minutes in the oven after searing. This timing allows the chicken to cook through and develop great flavor. The key is to make sure the internal temperature reaches 165°F (75°C). This ensures it's safe to eat and juicy, not dry. Yes, but adjust cooking time to ensure they're fully cooked. Boneless thighs cook faster than bone-in ones. Start checking for doneness after 20 minutes in the oven. This way, you’ll get perfectly cooked chicken without overcooking it. Serve with rice, quinoa, or a fresh salad for a complete meal. These sides balance the flavors and add texture. Rice or quinoa soak up the tasty juices, while a salad adds crunch and freshness. Enjoy your meal with these tasty options! This article covered all you need to know for making One-Pan Lemon Garlic Chicken. We explored key ingredients, step-by-step cooking methods, and helpful tips. Remember to season well and use fresh ingredients for the best taste. This dish is easy to adapt, so feel free to swap ingredients or add your favorite flavors. With proper storage, leftovers can last for days. Enjoy your cooking adventure!

One-Pan Lemon Garlic Chicken Flavorful Weeknight Meal

Looking for a quick and tasty weeknight dinner? Try my One-Pan Lemon Garlic Chicken! This simple dish combines juicy chicken

- Fresh broccoli florets - Red and yellow bell peppers - Carrots and zucchini - Snap peas I love using fresh vegetables for a quick stir-fry. Fresh broccoli florets add crunch. The red and yellow bell peppers bring color and sweetness. Carrots and zucchini give a nice texture. Snap peas add a delightful snap to every bite. - Minced garlic and grated ginger - Soy sauce and honey/maple syrup - Sesame oil Aromatics make your dish pop. Minced garlic and grated ginger give a fragrant base. Soy sauce adds saltiness and depth. Honey or maple syrup sweetens the mix, balancing flavors. Sesame oil adds a rich, nutty taste. - Cornstarch and water mixture - Salt and black pepper to taste If you like a thicker sauce, use a cornstarch and water mix. It helps bind the flavors together. Don't forget to season with salt and black pepper to taste. This step can elevate your dish, making it even tastier. You can find the Full Recipe for this easy veggie stir fry, which will guide you through the steps to create this delicious meal. Start by heating a large skillet or wok over medium-high heat. You want it hot for the best stir-fry. After a minute, pour in the sesame oil. Let it warm for a few seconds to get that delicious flavor. Now, add the minced garlic and grated ginger to the pan. Stir-fry these aromatics for about 30 seconds. You want them to smell great, but watch closely so they don’t burn. This step adds a lovely depth of flavor. Next, add the broccoli florets and julienned carrots. Stir-fry these veggies for 2-3 minutes. They should become tender but still crisp. After that, toss in the sliced red and yellow bell peppers and zucchini. Keep stirring for another 2-3 minutes until they look bright and slightly soft. Add the snap peas to the mix. Then drizzle the soy sauce and honey (or maple syrup) over the veggies. Toss everything to coat them well in the sauce. If you want a thicker sauce, mix cornstarch with water and add it now. Cook for another 1-2 minutes until the sauce thickens. Season with salt and black pepper to taste. Now you can remove the skillet from the heat. For the full recipe, check out the details above. Enjoy your vibrant veggie stir-fry hot with a sprinkle of toasted sesame seeds and chopped green onions! For a great stir-fry, high heat is key. It helps cook the veggies fast. Use a large skillet or wok to let everything move freely. Stir often to cook all the pieces evenly. This keeps them crisp and colorful. To make your stir-fry pop, add extra spices. Try red pepper flakes for heat. You can also mix in some ground coriander or cumin for depth. Fresh herbs like basil and cilantro brighten up the dish. Sprinkle them on right before serving for a fresh taste. For a beautiful presentation, serve your stir-fry over rice or quinoa. The grains soak up the sauce well. Choose colorful plates to show off the vibrant veggies. You can even add a lemon wedge on the side. This gives a nice burst of flavor and looks great! You can find the Full Recipe to create your own tasty version. {{image_4}} You can add protein to your stir-fry for more flavor and nutrition. Try using tofu, chicken, or shrimp. For tofu, cut it into cubes and fry until golden. If you choose chicken, slice it thinly and cook it before adding veggies. Shrimp cooks fast, so add it last. This way, it stays tender and juicy. Using seasonal veggies can make your stir-fry even better. In spring, try asparagus and snap peas. Summer is great for bell peppers and zucchini. In fall, use squash and carrots. Winter is perfect for broccoli and kale. Choose what’s fresh at your store. This helps you save money and get the best taste. Soy sauce is a classic choice, but you have options. Try teriyaki sauce for a sweet twist. You can also use coconut aminos for a soy-free option. For spice lovers, add sriracha or chili paste. Mix flavors to find what you love. Each sauce gives your stir-fry a unique taste. To keep your veggie stir fry fresh, store leftovers in airtight containers. Glass or plastic containers with tight lids work well. Make sure to let the stir fry cool down before sealing. This helps prevent condensation and keeps the veggies crisp. You can store your stir fry in the fridge for up to three days. When it’s time to reheat, use a skillet or a wok. Heat it over medium heat and add a splash of water or oil. This keeps the veggies moist. Stir often to heat evenly. Avoid using the microwave, as it can make the veggies soggy. If you do use the microwave, heat it in short bursts and stir in between. Enjoy your stir fry warm and fresh again! Yes, you can easily make this dish gluten-free. Simply use tamari instead of soy sauce. Tamari tastes similar but is made without wheat. It gives your stir fry the same great flavor without gluten. This recipe is quick! It takes about 10 minutes to prep and 10 minutes to cook. In just 20 minutes, you can have a tasty meal ready. Pair this stir fry with fluffy rice or quinoa for a filling meal. You can also serve it with a light salad or steamed dumplings. These sides complement the stir fry well. Yes! Frozen veggies can work great in this stir fry. Just make sure to thaw them first. Drain excess water before adding them to the pan. This way, your stir fry won't get soggy. Absolutely! This stir fry is perfect for meal prep. You can cook a big batch and store it in the fridge. It stays fresh for up to three days. Just reheat it before serving. If you have leftovers, get creative! You can mix them into a wrap or toss them with pasta. They also work well in a soup. The options are endless for using up that tasty stir fry. For the full recipe, check out the detailed instructions above. This blog post shared a simple and tasty vegetable stir-fry recipe. We covered fresh veggies, seasonings, and cooking tips. You learned how to prep the dish step-by-step, with options for proteins and sauces. In the end, stir-frying offers endless choices. Feel free to change ingredients and make it your way. Enjoy the fun of cooking!

– Easy Veggie Stir Fry Flavorful and Quick Recipe

Are you looking for a quick and tasty meal? This Easy Veggie Stir Fry recipe packs vibrant flavors and fresh

- 1 cup Nutella - 2 large eggs - 1/4 cup all-purpose flour - 2 tablespoons unsalted butter, melted - Powdered sugar, for dusting Precise measurements are key for this recipe. They ensure your lava cake has the right texture and taste. I recommend using a kitchen scale for accuracy. If you don’t have one, measuring cups and spoons work fine too. For the Nutella, use a dry measuring cup. Make sure to pack it in tightly. For the flour, spoon it into the cup and level it with a knife. This way, you won’t add too much and affect the cake's texture. If you need substitutes, you can use dark chocolate instead of Nutella. Just melt it with the butter. For a gluten-free option, almond flour works well in place of all-purpose flour. Consider your preferences and have fun with it! For added ease, you can even use pre-measured ingredients from your local grocery store, which can save time and effort. For the full recipe, check out the detailed instructions. First, you need to preheat your oven to 350°F (175°C). This temperature helps the cake cook just right. While the oven heats, grab four ramekins and grease them with melted butter. Use a brush or a paper towel to spread the butter evenly. This step makes sure your cake comes out easily later. In a medium bowl, add 1 cup of Nutella and 2 tablespoons of melted butter. Use a whisk or spatula to blend them together. Mix until the two ingredients are smooth and well combined. This creates a rich base for your cake that is both sweet and creamy. Now, crack 2 large eggs directly into the Nutella mix. Whisk them in well until the mixture looks smooth and creamy. Next, you will fold in 1/4 cup of all-purpose flour. Sift the flour into the bowl. Use a spatula to gently fold it in. Be careful not to overmix; a few lumps are okay. This keeps the cake light and airy. Once your batter is ready, evenly pour it into the greased ramekins. Fill each one about three-quarters full. Place the ramekins on a baking sheet and put them in the oven. Bake for 10-12 minutes. The edges should be firm, but the center should still look soft. To check for doneness, gently shake a ramekin; it should wobble slightly in the center. After baking, let the cakes cool for 2 minutes before serving. This helps them set and makes them easier to flip out. For the full recipe, you can refer to the provided details. Enjoy making your delicious lava cake! To get that gooey lava center, watch for a few signs. You want the edges to be set while the center remains soft. This means perfect timing is key. Bake for 10-12 minutes. If your oven runs hot, reduce the time. Always check your oven's calibration. A well-calibrated oven ensures your cakes bake just right. This dessert shines when paired with ice cream or fresh fruit. Vanilla ice cream contrasts well with the rich Nutella. You can also add berries for a fresh touch. When serving, dust the top with powdered sugar. This adds a sweet finish. Arrange your lava cake on a plate with a scoop of ice cream for a picture-perfect look. Some common mistakes can ruin your lava cake. First, don't overmix the batter. This can lead to a tough texture. Mix until just combined. Next, be careful with baking time. Underbaking means a runny center, while overbaking results in a dry cake. Stick to the time guidelines and check often. Following these tips will lead you to the perfect 5-Ingredient Nutella Lava Cake! {{image_4}} You can add more fun flavors to your lava cake. Try mixing in chocolate chips. They melt nicely and add a delightful texture. You can also add crushed nuts like walnuts or hazelnuts for a crunchy twist. If you want to switch things up, use other spreads like peanut butter or almond butter instead of Nutella. Each option brings its unique taste and charm. If you need gluten-free options, swap all-purpose flour with almond flour or a gluten-free blend. This keeps the texture light and fluffy. For a vegan version, replace eggs with a mix of flaxseed and water. Use two tablespoons of ground flaxseed mixed with six tablespoons of water. Let it sit for a few minutes to thicken. This works well to bind your ingredients without eggs. Transforming your lava cake into cupcakes is simple. Pour the batter into cupcake liners and adjust baking time to about 10 minutes. You can also layer the cake with ice cream or whipped cream. It adds a tasty contrast and makes your dessert even more decadent. To store your leftovers, place the lava cakes in an airtight container. They will stay fresh in the fridge for a few days. If you want to freeze them, wrap each cake in plastic wrap, then place them in a freezer bag. You can freeze them for up to three months. When reheating, the best way is to use the oven. Preheat your oven to 350°F (175°C). Place the lava cake on a baking sheet and warm it for about 10 minutes. This method helps keep the center gooey and delicious. You can also use the microwave if you're short on time. Heat the cake for 20-30 seconds, but watch closely to avoid overcooking. In the fridge, your lava cake will last for about 3-4 days. After this time, the texture and taste may change. Look for signs of spoilage. If the cake smells sour or has an unusual color, it's best to throw it away. A dry texture can also indicate that it's past its prime. Always trust your senses! Yes, you can prepare the batter ahead of time. Mix all your ingredients and pour them into the greased ramekins. Cover them with plastic wrap and place them in the fridge for up to 24 hours. When you’re ready to bake, just pull them out and bake as directed. This way, you can enjoy fresh lava cakes without much fuss. Absolutely! If you prefer dark chocolate, feel free to swap Nutella for dark chocolate. You can also try milk chocolate or even white chocolate for a unique twist. Just remember to adjust the sugar based on the sweetness of your chocolate choice. If your lava cake does not melt in the center, it may be due to baking time. Ensure you bake it for only 10-12 minutes. If it still doesn’t work, check your oven temperature. An oven thermometer can help you confirm it’s accurate. Yes, you can double this recipe without any trouble. Just multiply each ingredient by two. Use larger ramekins or bake in batches if you have only a few. Make sure to check the baking time, as it may vary with larger portions. This blog post offers a simple guide to making a delicious Nutella lava cake. We covered the needed ingredients, measuring tips, and step-by-step baking instructions. We also included valuable tips to avoid common mistakes and ideas for variations. Remember, careful measuring and monitoring baking time are keys to success. Explore different flavors and serving styles to make this dessert your own. Enjoy your baking journey and share your creations with friends!

5-Ingredient Nutella Lava Cake Irresistible Dessert

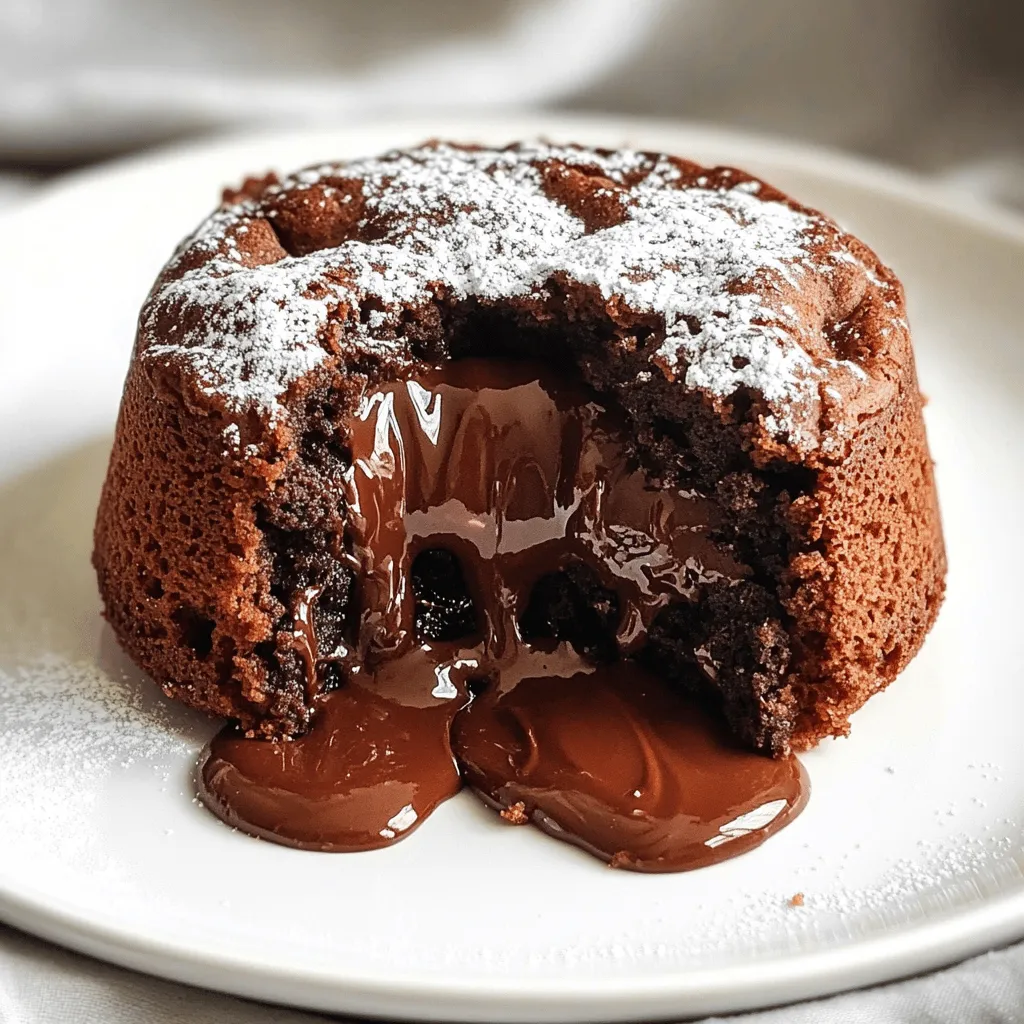
Are you craving a sweet treat that is simple yet spectacular? Look no further! This 5-Ingredient Nutella Lava Cake is

To make Instant Pot Creamy Chicken and Rice, you will need fresh and simple ingredients. Here’s the list: - 1 pound boneless, skinless chicken thighs - 1 cup jasmine rice, rinsed - 1 medium onion, diced - 3 cloves garlic, minced - 2 cups chicken broth - 1 cup heavy cream - 1 cup frozen peas and carrots mix - 1 teaspoon dried thyme - 1 teaspoon smoked paprika - Salt and pepper to taste - 2 tablespoons olive oil - Fresh parsley, chopped (for garnish) Each ingredient plays a key role in creating a rich and creamy dish. The chicken thighs provide a juicy base. Jasmine rice adds a nice texture. The onion and garlic bring depth of flavor, while chicken broth keeps everything moist. Heavy cream makes the dish creamy and luxurious. The frozen peas and carrots mix offers color and nutrition. Finally, thyme and smoked paprika add warmth and earthiness. This balance of flavors makes this meal a true flavor explosion. For the complete recipe, check out the Full Recipe. To start, set your Instant Pot to the sauté function. Add 2 tablespoons of olive oil. Let the oil heat until it shimmers. Then, toss in 1 medium diced onion. Sauté for about 2-3 minutes. You want the onion soft and clear. Next, add 3 cloves of minced garlic. Cook for 1 more minute. The garlic should smell great and be lightly golden. Now, it’s time to add the chicken. Place 1 pound of boneless, skinless chicken thighs into the pot. Season them with salt, pepper, 1 teaspoon of dried thyme, and 1 teaspoon of smoked paprika. Cook the chicken for about 5 minutes. Turn the pieces often for even browning. Don’t worry about cooking them all the way through; they will finish cooking later. After browning the chicken, pour in 1 cup of rinsed jasmine rice and 2 cups of chicken broth. Gently stir to mix. Make sure the rice is fully under the liquid. This step is key for even cooking. Secure the lid on the Instant Pot. Ensure the valve is set to “sealing.” Select the “Manual” or “Pressure Cook” function. Set the timer for 10 minutes. Once the cooking time ends, allow the Instant Pot to naturally release pressure for about 5 minutes. Then, carefully switch the valve to “venting” to release any leftover pressure. After opening the lid, add 1 cup of heavy cream and 1 cup of frozen peas and carrots. Stir well to combine. Let it sit for a few minutes to warm the veggies. Taste your creamy chicken and rice, and adjust the seasoning if needed. For the best presentation, serve in shallow bowls. Top with fresh chopped parsley for a pop of color. Enjoy the rich flavors of this dish! For the full recipe, check the previous section. To get that perfect creaminess, you want to use heavy cream. This adds rich flavor and smooth texture. Make sure to stir in the cream after cooking. This keeps it silky. If you want it even creamier, add a bit more cream. You can also mix in some cream cheese for a twist. Want to boost the flavor? Consider adding more spices. Try a pinch of garlic powder or onion powder. Fresh herbs like thyme or parsley can brighten the dish. You can also toss in some lemon zest for a fresh zing. If you like heat, add a bit of cayenne pepper. Using the Instant Pot is easy, but a few tips help. Always make sure the sealing ring is in place. This allows for proper pressure cooking. When you sauté, keep an eye on the chicken. You want it browned but not cooked all the way. For even cooking, stir the rice well with the broth. Lastly, let the pressure release naturally for the best texture. For the Full Recipe, be sure to follow each step carefully for the best results. {{image_4}} If you want to mix things up, try different proteins. You can use turkey or pork instead of chicken. For a plant-based option, tofu or chickpeas work well too. You can also swap the jasmine rice for brown rice. Keep in mind that brown rice takes longer to cook. If you like more veggies, add bell peppers or spinach. They add color and nutrition. For a gluten-free version, check your broth label to ensure it's gluten-free. Use a gluten-free cream or cashew cream for a dairy-free option. Almond milk is another great choice. If you have nut allergies, coconut milk gives a nice creaminess without nuts. This way, everyone can enjoy the dish. Want to change the flavor? Think about adding fresh herbs like basil or cilantro. A squeeze of lemon can brighten the dish too. If you love heat, sprinkle in some red pepper flakes. For a smoky taste, a bit more smoked paprika does wonders. Experimenting with flavors keeps meals exciting and fresh! For the full recipe, you can refer to the Instant Pot Creamy Chicken and Rice 🥣 section above. After you enjoy your meal, store the leftovers in an airtight container. Place the chicken and rice mixture in the fridge. It will stay fresh for up to three days. Make sure to let it cool down before sealing it. This helps keep the flavor intact. To reheat your creamy chicken and rice, use the stovetop or the microwave. If using the stovetop, add a splash of chicken broth to a pan. Heat it gently over low heat. Stir often until it's warmed through. In the microwave, place it in a microwave-safe bowl. Heat it on medium power for one to two minutes, stirring halfway. This helps it heat evenly. If you want to save some for later, freezing is a great option. Divide the chicken and rice into single portions. Use freezer-safe containers or bags. Remove as much air as you can to prevent freezer burn. You can freeze it for up to three months. For bulk storing, place everything in one large container. Just remember, single portions thaw and reheat faster. Making this dish takes about 30 minutes. You spend 10 minutes prepping the ingredients. Then, the Instant Pot cooks everything in just 10 minutes. After cooking, let it sit for 5 minutes to release pressure. This quick cooking time makes it perfect for busy nights! Yes, you can use brown rice! But you need to change the cooking time. Brown rice takes longer to cook, so set the Instant Pot for 22 minutes instead of 10. Also, add more chicken broth—use 2.5 cups for better results. This will help the rice cook fully and stay tender. This creamy chicken and rice dish pairs well with many sides. Try a simple green salad with a light vinaigrette. You can also serve it with crusty bread to soak up the sauce. Another great option is steamed broccoli or green beans for a healthy crunch. Want some heat? Add red pepper flakes or hot sauce to the pot. Start with a teaspoon and taste as you go. You can also add diced jalapeños when cooking. If you like smoky flavors, try using chipotle powder instead of smoked paprika. Each option gives a unique twist! In this blog post, we explored the easy recipe for Instant Pot Creamy Chicken and Rice. We covered the key ingredients, cooking steps, and helpful tips to get the best results. You can customize this dish with your favorite proteins and veggies, or even make it gluten-free. Remember, practice makes perfect. With these steps, you can enjoy a creamy, flavorful meal with minimal effort. Happy cooking!

Instant Pot Creamy Chicken and Rice Flavor Explosion

Craving a dish that warms your soul and excites your taste buds? In just one pot, you can make Instant

- 12 oz pappardelle pasta - 1 teaspoon Calabrian chili paste - 1 cup heavy cream - ½ cup cherry tomatoes, halved - 1 cup fresh spinach leaves - Fresh basil for garnish - Large pot - Skillet - Whisk To make Creamy Calabrian Chili Pappardelle, you need a few key ingredients. Pappardelle pasta gives a great base. This wide pasta holds the sauce well. The Calabrian chili paste adds a nice kick. You can adjust this based on your spice level. Heavy cream makes the sauce rich and smooth. Optional ingredients can enhance your dish. Cherry tomatoes add sweetness and color. Fresh spinach leaves bring a nice pop of green. Basil adds freshness when you garnish your pasta. You will also need some tools. A large pot helps boil the pasta. A skillet cooks your sauce. A whisk combines everything well. For the full recipe, check out the instructions to bring all these elements together! First, fill a large pot with salted water. Bring it to a rolling boil. Add the pappardelle pasta. Cook it for about 7-9 minutes until al dente, which means it's firm yet tender. Be sure to reserve 1 cup of starchy pasta water before you drain the rest. This water helps the sauce stick to the pasta. Next, heat a large skillet over medium heat. Pour in 2 tablespoons of extra virgin olive oil. Once the oil is hot, add 3 cloves of finely minced garlic. Sauté the garlic for about 1 minute. You want it to smell nice but not brown. Burnt garlic can taste bitter and ruin your dish. Now, slowly pour in 1 cup of heavy cream while stirring. Keep stirring to mix everything well. Let the sauce simmer on low heat. After about 3-4 minutes, it should thicken a little. Stir it often to keep it from sticking to the pan. Once your sauce is ready, it’s time to combine. Add the drained pappardelle to the skillet. Gently toss the pasta to coat it evenly in the creamy sauce. Season with kosher salt and black pepper to taste. Adjust to your liking. Enjoy the beautiful blend of flavors in each bite. For the full recipe, refer to the instructions provided at the start. To change the heat in your Creamy Calabrian Chili Pappardelle, start with the chili paste. Use less for a milder dish. If you love heat, add more chili paste. You can also balance the spice by adding a touch of sugar or honey. Mixing in other spices, like smoked paprika or black pepper, can help create a rich flavor. For a perfect creamy sauce, watch your heavy cream closely. Pour it in slowly and stir well. This helps it blend nicely with the chili paste. Using freshly grated cheese makes a big difference. Pre-grated cheese may not melt as well. If the sauce gets too thick, add some reserved pasta water. This keeps it smooth and creamy. Pair your pappardelle with a fresh side salad. A simple arugula salad with lemon dressing works great. For wine, try a light white like Pinot Grigio. It matches well with the creamy sauce and chili heat. You can even serve it with crusty bread to soak up all that goodness. For the complete recipe, check out the Full Recipe link. {{image_4}} You can make this dish vegetarian by swapping some ingredients. Instead of chicken or sausage, use veggies like mushrooms or zucchini. These add great flavor and texture. You can also boost the dish with more veggies like bell peppers or kale. They add color and nutrients without losing the creamy vibe. Want to add protein? You can easily include chicken, shrimp, or sausage. For chicken, grill or sauté it first, then add it to the sauce. If you're using shrimp, cook them until they turn pink before tossing them in. Sausage needs to be browned before you mix it in. Adjust cooking times for each protein to ensure everything is perfectly cooked. If you need a gluten-free option, pick gluten-free pasta. Many brands offer great choices that taste good. Just make sure to follow the package directions for cooking times. Gluten-free pasta can cook faster or slower than regular pasta, so keep an eye on it to avoid mushiness. Check the [Full Recipe] for all the details needed to create this delicious meal! To store leftovers, let the creamy Calabrian chili pappardelle cool to room temperature. Place it in an airtight container. This keeps the dish fresh and tasty. You can expect it to last up to 3 days in the fridge. After this time, the flavors may fade and the cream can separate. To reheat, use low heat on the stove. Add a splash of reserved pasta water to keep it creamy. Stir often to ensure even warmth. Avoid the microwave if possible, as it can change the texture. Microwaving may cause the sauce to break and lose its silkiness. Yes, you can freeze this dish! To freeze, let it cool completely. Use a freezer-safe container and leave some space for expansion. This dish can stay good for about 2 months in the freezer. When ready to eat, thaw it overnight in the fridge. Reheat gently on the stove, adding cream or pasta water if needed for creaminess. Calabrian chili is a small, red pepper from Italy. - Flavor profile: It has a smoky and fruity taste. The heat level is medium to hot, which adds depth to dishes. - Common uses in cooking: You can use Calabrian chili in pastas, sauces, and marinades. It adds a burst of flavor, making your meals more exciting. Yes, you can prepare this dish in advance. - Tips for meal prep: Cook the pasta and sauce separately. Store them in airtight containers. When ready to serve, reheat each part and combine them. This keeps the pasta from getting mushy. Yes, it can be spicy. - How to control heat levels: Adjust the amount of Calabrian chili paste to your liking. Start with a small amount and taste as you go. - Serving recommendations for spice averse diners: Serve the dish with extra cheese or a splash of cream on top. This can help balance the heat. You can use other ingredients to create a creamy texture. - Alternative ingredients: Try using cashew cream, coconut milk, or a blend of silken tofu and vegetable broth. - Recipe adjustments needed: If using these alternatives, you may need to adjust the cooking time and add different spices for flavor. This blog post shared a tasty recipe that highlights key ingredients like pappardelle pasta, Calabrian chili paste, and heavy cream. We explored steps from boiling pasta to creating a rich sauce. You learned tips for spice levels and variations to fit different diets. Finally, I covered how to store leftovers and answered common questions. Enjoy making this dish your own. The flavors are worth the effort!

Creamy Calabrian Chili Pappardelle Delight

Craving a pasta dish that bursts with flavor? Look no further than my Creamy Calabrian Chili Pappardelle Delight. This recipe

Older posts
Newer posts
← Previous Page1 … Page79 Page80 Page81 … Page85 Next →

dsad

© 2026 tastyhatch • Built with GeneratePress

Our Policies

  • Copyright Policy
  • Cookie Policy
  • GDPR Policy
  • Privacy Policy
  • Disclaimer
  • Terms Of Use

More Information

  • Home
  • About
  • Contact
  • Appetizers
  • Dessert
  • Dinner
  • Drinks
©2026, tastyhatch About Back To Top