Go Back
To make hot chocolate bombs, you need a few key items: - 1 cup milk chocolate chips - 1 cup white chocolate chips - 1/2 cup cocoa powder - 1/2 cup mini marshmallows - 1/4 cup sprinkles (optional) - 1/2 teaspoon vanilla extract These ingredients create a rich and creamy drink. The milk chocolate and white chocolate give great flavor and texture. There are many ways to add unique flavors to your bombs. Consider these options: - Peppermint extract for a minty twist - Caramel sauce for a sweet touch - Cinnamon for a warm spice - Nutmeg for a cozy flavor Each addition can change the taste. So, feel free to mix and match! To create your hot chocolate bombs, gather these tools: - Microwave-safe bowl for melting chocolate - Silicone sphere mold for shaping - Spoon for spreading chocolate - Refrigerator for setting the shells - Heat-safe plate to smooth edges Having the right tools makes the process easier. It helps you create perfect bombs every time! {{ingredient_image_2}} To start, grab a microwave-safe bowl and add one cup of milk chocolate chips. Heat them in the microwave. Set the timer for 30 seconds. After the time is up, stir the chocolate. Repeat this until it is smooth and fully melted. Be careful! If you heat it too long, the chocolate can burn. Next, take a silicone sphere mold. Pour about one tablespoon of the melted chocolate into each half of the mold. Use the back of a spoon to coat the sides evenly. Make sure every part is covered. Once done, place the molds in the fridge for 10 to 15 minutes. This will help the chocolate set. After the first layer is hard, you may need to melt more chocolate. Pour another layer into each mold. Again, use a spoon to spread it evenly. Return the molds to the fridge for another 10 to 15 minutes. This makes a strong chocolate shell. Now it’s time to fill the bombs! Take half of the chocolate shells out of the molds. Add cocoa powder to each shell, followed by mini marshmallows. If you like, sprinkle some colorful sprinkles on top. Drizzle a little melted white chocolate over this mix. This will help hold the top shell in place. Take the other half of the chocolate shells and press them onto the filled ones. Make sure they fit well together. Use the remaining melted white chocolate as glue to seal the bombs. Hold them for a moment until the chocolate starts to set. Now you’re ready to enjoy the magic of hot chocolate bombs! To get smooth chocolate, start with good quality chips. I prefer milk chocolate for flavor. Microwave the chips slowly, in 30-second bursts. Stir after each round until the chocolate melts. This keeps it from burning. If it looks thick or grainy, add a teaspoon of vegetable oil. This helps it shine and flow better. A secure seal keeps the filling inside. Use melted white chocolate as glue. After filling one half, gently press the top half on. Make sure they align well. You can hold them for a few seconds to let them stick. If you find gaps, add more melted chocolate to seal them up. Presentation is key to wow your guests. I love to drizzle more melted white chocolate on top. Add colorful sprinkles for fun. You can even use edible glitter for a festive touch. Serve in clear mugs to show off the magic inside. When you pour hot milk over the bomb, watch it melt and reveal the treats. It’s a delightful show for everyone! Pro Tips Use High-Quality Chocolate: Opt for high-quality chocolate chips for a richer flavor and smoother texture in your hot chocolate bombs. Chill Between Layers: Make sure to chill the chocolate layers thoroughly between applications to ensure a sturdy shell that won't break easily. Customize Fillings: Feel free to experiment with different fillings such as crushed cookies, flavored marshmallows, or even small candies for a unique twist. Presentation Matters: For a stunning presentation, use colorful sprinkles and drizzle additional melted chocolate on top before serving. {{image_4}} You can make hot chocolate bombs in many flavors. Mint is a popular choice. Just add mint extract to the melted chocolate. For a caramel twist, use caramel sauce inside the bombs. You can also try other flavors like orange, mocha, or raspberry. Each flavor brings its own fun taste. Mixing flavors can make it even more exciting! Decorating hot chocolate bombs adds fun. For holidays, use colored sprinkles that match the theme. You can drizzle colored chocolate over the bombs for more flair. If it’s a birthday, add edible glitter for sparkle! You can even use themed molds, like hearts for Valentine’s Day. Each decoration can make your hot chocolate bombs unique and special. You can switch up the fillings to surprise everyone. Peanut butter adds a creamy, nutty taste. Just spoon a little into the bomb before sealing. Hazelnut spread is another great choice. You can also use crushed cookies or toffee bits for crunch. Be creative with your fillings to find your favorite mix! Store your hot chocolate bombs in an airtight container. This keeps them fresh and safe. A cool, dry place works best. Avoid places with high heat or humidity. Too much moisture can cause the chocolate to bloom. Blooming makes the chocolate look dull and less tasty. Hot chocolate bombs can last up to two weeks when stored properly. If you keep them in the fridge, they may last a bit longer. Always check for any signs of spoilage before use. If they look or smell off, it’s best to throw them away. You can freeze hot chocolate bombs to enjoy later. Wrap each bomb in plastic wrap. Then, place them in a freezer-safe bag. They can last for up to three months in the freezer. When ready to use, let them sit at room temperature for about 30 minutes before serving. This helps them warm up and makes for a great treat. To make hot chocolate bombs, gather your ingredients: - 1 cup milk chocolate chips - 1 cup white chocolate chips - 1/2 cup cocoa powder - 1/2 cup mini marshmallows - 1/4 cup sprinkles (optional) - 1/2 teaspoon vanilla extract Start by melting the milk chocolate chips in the microwave. Use short bursts of 30 seconds. Stir after each burst until smooth. Be careful not to burn the chocolate. Pour the melted chocolate into a silicone sphere mold. Cover the inside with a spoon. Chill in the fridge for 10-15 minutes until hard. Repeat for a second layer. Next, fill half of the chocolate shells with cocoa powder, mini marshmallows, and sprinkles. Drizzle melted white chocolate on top. Press the other half of the shells onto the filled ones. Use the white chocolate to seal them well. Chill again if needed. Finally, decorate with more white chocolate and sprinkles. Yes, you can use different types of chocolate. Dark chocolate, milk chocolate, or even white chocolate works well. Each type gives a unique taste. Mixing chocolates can add depth to your hot chocolate bombs. Try flavored chocolates like caramel or mint for fun twists. You can find pre-made hot chocolate bombs at local stores or online. Many bakeries sell them during winter. Check out specialty shops or online marketplaces like Etsy. You can also find them on sites like Amazon. Look for brands that focus on quality ingredients for the best taste. Making hot chocolate bombs is simple and fun. We covered essential ingredients and optional flavors. You learned how to melt chocolate, mold shells, and securely seal the bombs. Tips helped you achieve smooth chocolate and present your treats nicely. We've explored tasty variations and how to store your bombs for freshness. Use this guide to impress your friends and enjoy delicious drinks. You now have the tools to make your hot chocolate bombs unique and tasty! Enjoy your sweet adventures!

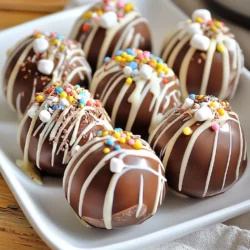
Decadent Hot Chocolate Bombs

Delicious chocolate spheres filled with cocoa, marshmallows, and sprinkles that melt into a rich hot chocolate.
Prep Time 20 minutes
Cook Time 40 minutes
Total Time 1 hour
Course Dessert
Cuisine American
Servings 6
Calories 200 kcal

Ingredients
  

  • 1 cup milk chocolate chips
  • 1 cup white chocolate chips
  • 1/2 cup cocoa powder
  • 1/2 cup mini marshmallows
  • 1/4 cup sprinkles (optional)
  • 1/2 teaspoon vanilla extract

Instructions
 

  • In a microwave-safe bowl, add the milk chocolate chips. Microwave in 30-second intervals, stirring after each interval until the chocolate is completely melted and smooth. Take care not to overheat to prevent burning the chocolate.
  • Using a silicone sphere mold, pour approximately one tablespoon of the melted milk chocolate into each half of the mold. Use the back of a spoon to evenly cover the inner sides with chocolate. Repeat this process for all molds, then transfer them to the refrigerator for about 10-15 minutes until set.
  • Once the first layer is solidified, re-melt any remaining milk chocolate if necessary and pour another layer into the molds. Use a spoon to spread it evenly, then return the molds to the refrigerator for another 10-15 minutes to create a sturdy chocolate shell.
  • Carefully remove the chocolate shells from the molds by gently pressing from the bottom. If any edges are jagged or rough, you can smooth them by briefly running the edges along a heated plate to temper the chocolate.
  • For half of the chocolate spheres, add a layer of cocoa powder, followed by a few mini marshmallows, and sprinkles if desired. Drizzle a small amount of the melted white chocolate over the filled mixture to help adhere the top shell.
  • Take the remaining chocolate shell halves and carefully press them onto the filled ones, aligning well. Use the remaining melted white chocolate as a glue to seal the halves together securely. If necessary, hold them briefly until the chocolate begins to set.
  • For an extra touch, drizzle some melted white chocolate decoratively over the top of the assembled hot chocolate bombs, and finish with a sprinkle of additional sprinkles for a festive presentation.
  • To enjoy your hot chocolate bomb, place one in a mug and pour hot milk over it. As it melts, watch the magic unfold with marshmallows and chocolate releasing into the milk! Stir well with a spoon to combine all the delicious flavors.

Notes

For a festive touch, add more sprinkles on top.
Keyword chocolate bombs, dessert, hot chocolate